Nikon COOLPIX S1200pj User manual

Nikon
DIGITAL CAMERA
COOLPIfl_ S1200pj
Reference Manual

The following shooting functions can be set by pressing the multi selector • (_),
• (_), _ (_), ori_"([]).
(flash mode) _.
_,A(macro mode) _-_1
!
[] (exposure compensation)
Functions Available for Each Shooting Mode
Tile functions that carl be set vary depending on tile shooting mode, as shown
below.
• See "Default Settings" ([_ 59) for more information.
Functions auto mode
Flash mode ([[Z_ 54)
Self-timer ([_] 56)
Macro ([_Q 57)
Exposure compensation
(CZ] 58) V' V' V' V'
Special Smart I_1 AUtO o
Scene effects portrait mode _"
V' V '2 V'
V' V '2 V'
1 Available function depends on scene mode.
2 Available function depends on smart portrait menu settings.
53

Features That Can Be Set Using the Multi Selector
Using the Flash (Flash Modes)
The flash mode carl be set to match the shooting conditions.
1Press the multi selector • (_ flash mode). A
8
2Press the multi selector • or • to choose the
desired flash mode and press the _]_ button.
• See"Available Flash Modes" ([]_] 55) for more
information.
• If a setting is not applied by pressing the _ button
within a few seconds, the selection will be canceled.
• When _IAIITD(auto) isapplied, _4'_ is only displayed for
a few seconds, regardless of Photo info settings
(_-_ 64).
3Frame the subject and take a
picture.
• The flash lamp indicates flash status when
the shutter-release button is pressed
halfway.
On: The flash will fire when you press
the shutter-release button all the way down.
Blinks: Flash charging. Wait a few seconds and try again.
Off: Flash will not fire when picture is taken.
• If the battery is low, the monitor will turn off, and remain off, while the flash charges.
[] Effective Range of the Flash
When ISOsensitivity is setto Auto, the flash has a range of 03 45 m (1 ft 14 fOat the maximum
wide angle zoom position and a range of 0,5 3& m 11ft 8 in, 11fOat the maximum telephoto
54 zoom position,

FeaturesThatCanBeSetUsingtheMultiSelector
Available Flash Modes
tAUTO Auto
Flash fires automatically when lighting is dim.
_ Auto with red-eye reduction
Suited to pictures of people. This option reduces tile "red eye" phenomenon that
caused by the use of flash.
@off
Flash will not fire even when lighting is dim.
We recommend using a tripod to stabilize the camera when shooting in dim
lighting.
Fill flash
Flash fires whenever a picture is taken. Use to "fill in" (illuminate) shadows and
backlit subjects.
_l_ Slow Sync
Auto flash mode is combined with slow shutter speed.
Suited to evening and night portraits that include background scenery.
Flash illuminates main subject; slow shutter speeds are used to capture
background at night or under dim lighting.
[] The Flash Mode Setting
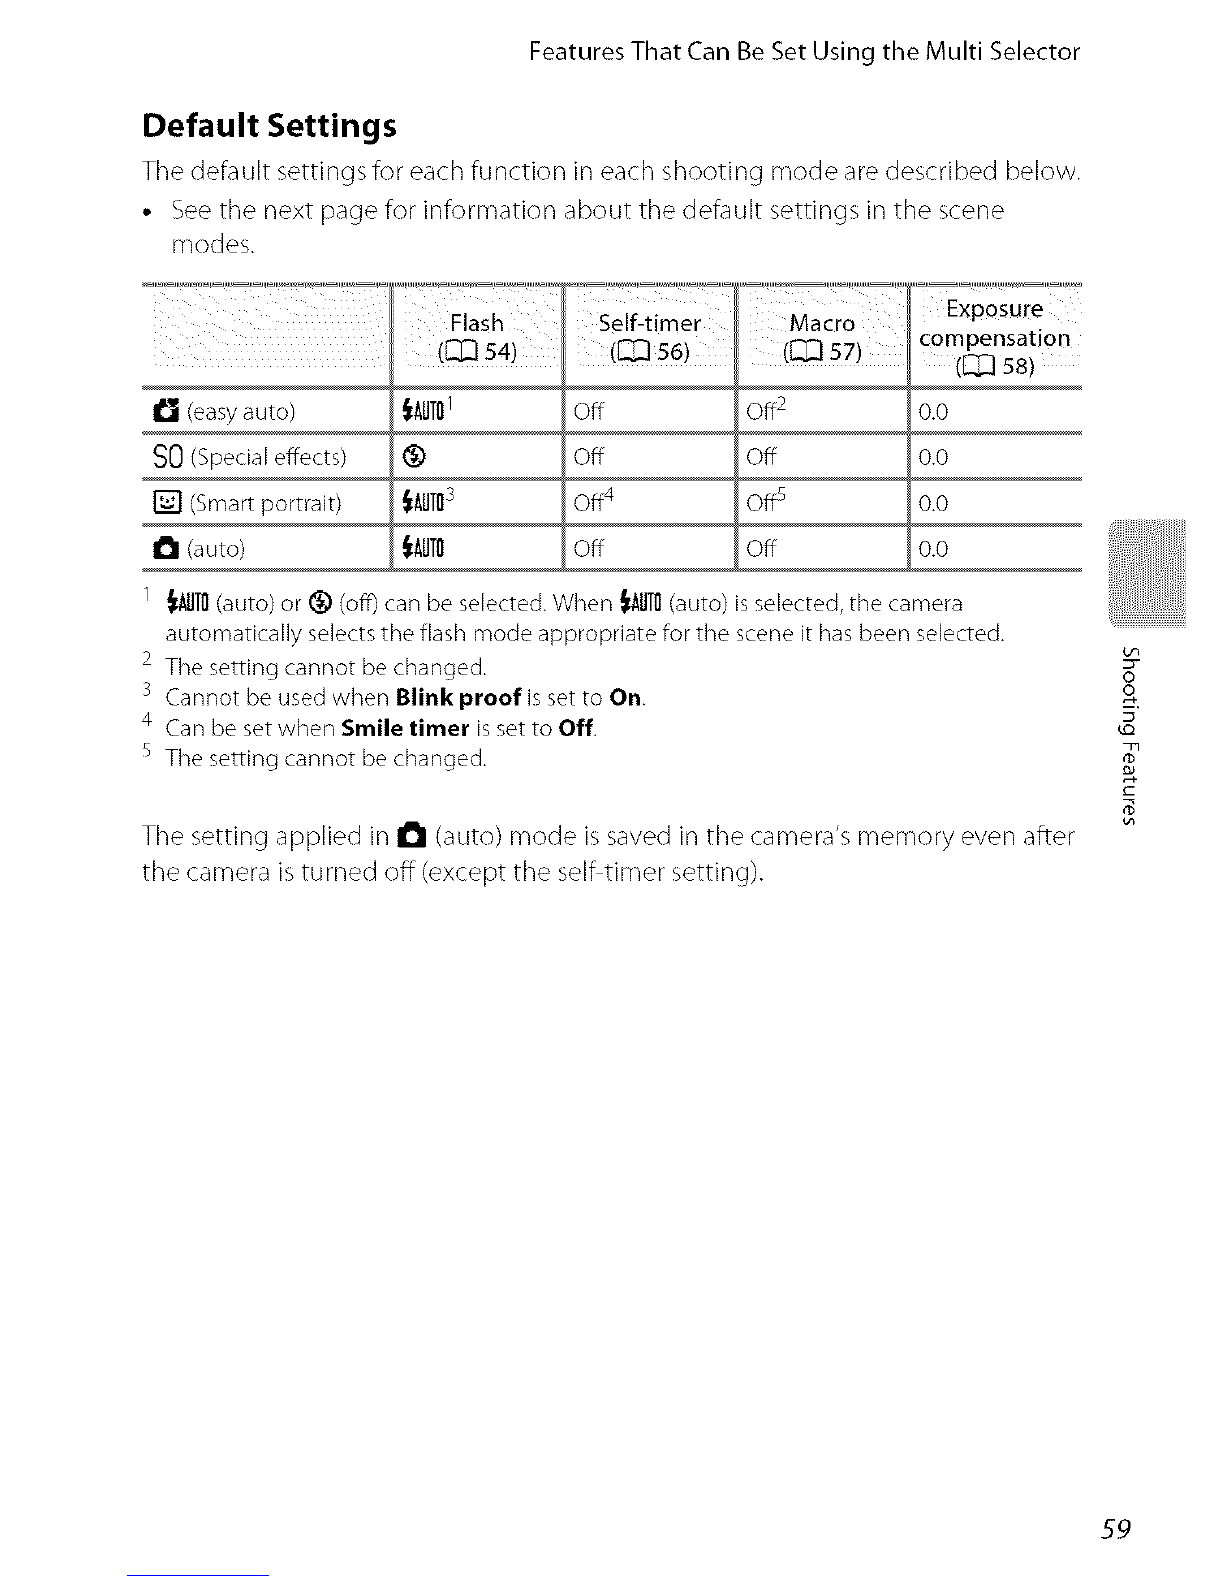
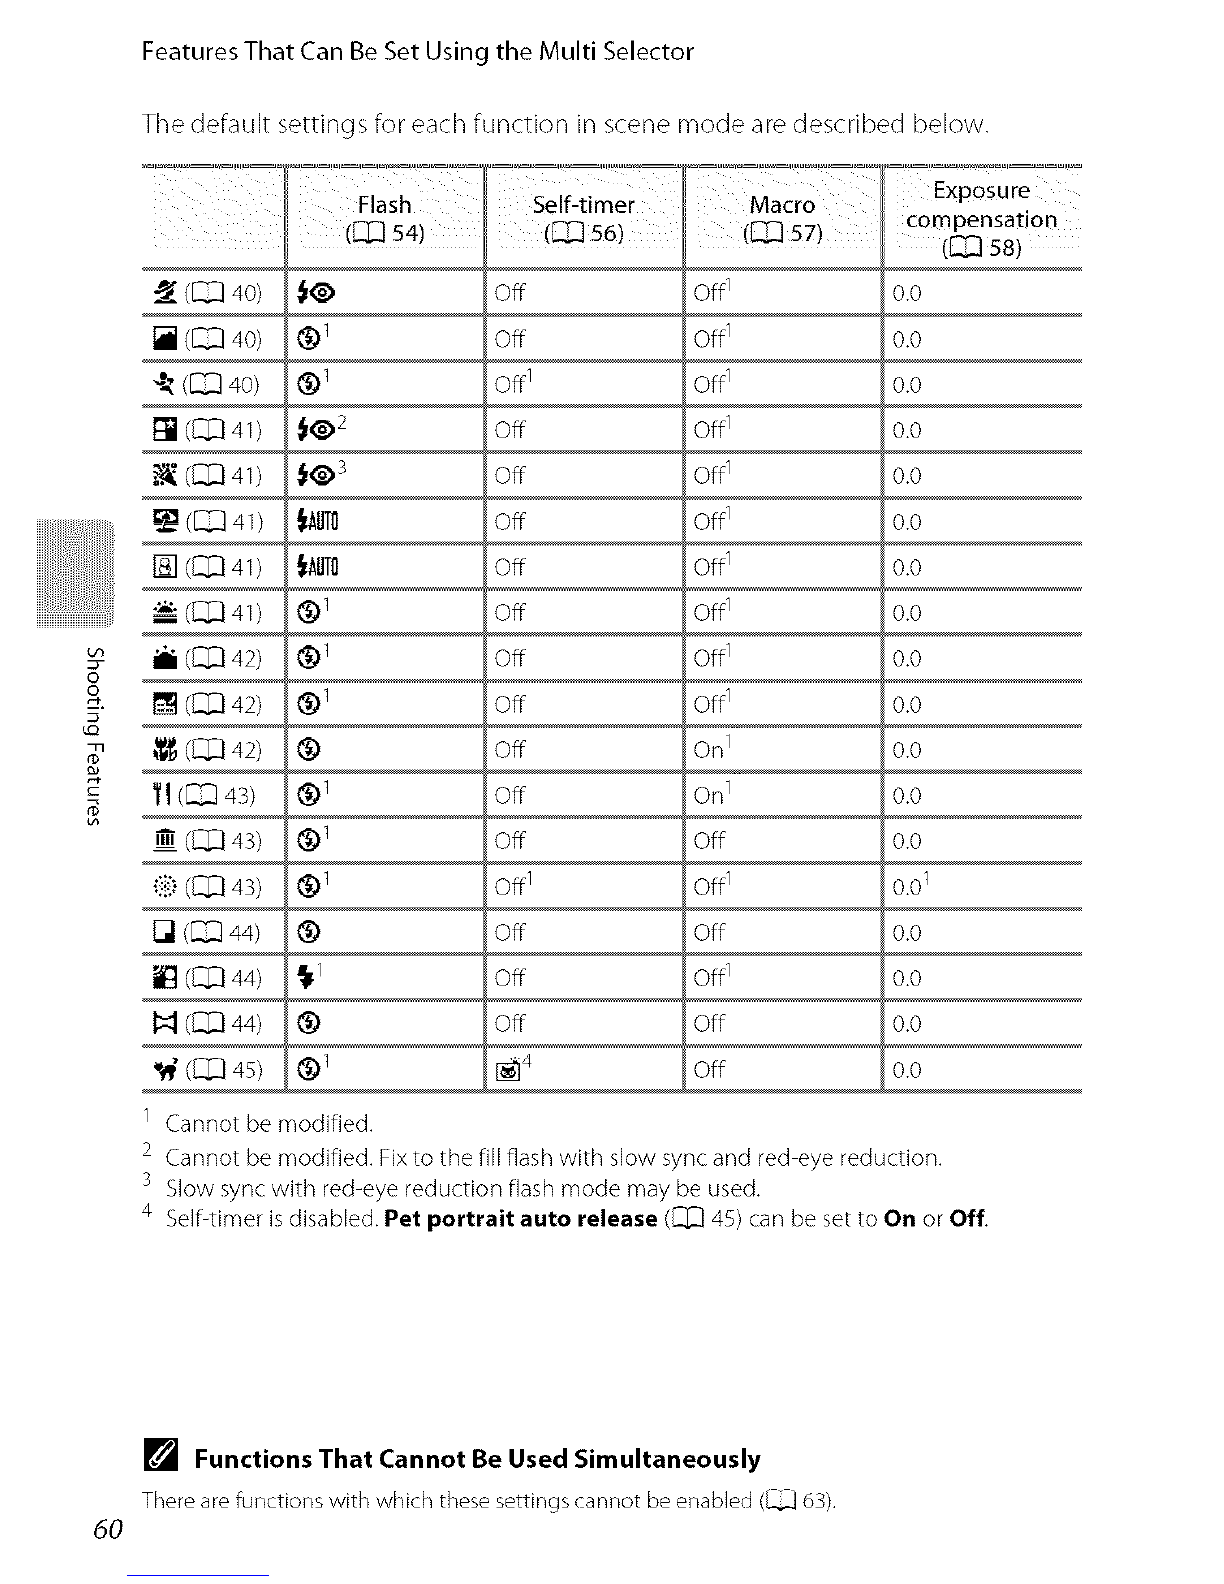
• The default flash mode setting varies with shooting mode,
See "Default Settings" (_ 59),
"Features That Can Be Set Using the Multi Selector" (_ 53).
• Some flash settings cannot be used with other functions. See "Features That Cannot Be Applied
Simultaneously" (_ 63) for more information.
• The flash mode setting applied in I_1 (auto) mode is stored in the camera's memory even after the
camera is turned off.
[] Red-eye Reduction
This camera uses advanced red eye reduction ("in Camera Red Eye Fix"),
To reduce red eye, a series of low intensity pre flashes fire before the main flash. In addition, if the
camera detects red eye when a picture is taken, the affected area is processed to reduce red eye
before the picture is saved,
Note the following when shooting:
• Due to the pre flashes, there is a longer than usual interval between the time the shutter release
button is pressed and the time the shutter is released,
• More time than usual is required to record pictures,
• Red eye reduction may not produce the desired results in some situations,
• in extremely rare instances, areas not subject to red eye may be affected by red eye reduction
processing; in these cases, choose another flash mode and try again,
oo
55

Features That Can Be Set Using the Multi Selector
oo
s
56
Using the Self-timer
Tile camera is equipped with a ten second and two second timer for selhportraits.
This feature is useful for reducing tile effects of camera shake that occurs when
pressing tile shutter release button. When using tile selhtimer, use of a tripod is
recommended. Set Vibration reduction to Off from tile setup menu ([_[_ 98)
when using a tripod to stabilize tile camera.
1 Press the multi selector _ (_Q) self-timer). 4
2Press the multi selector A or V to choose c_:
lOs or 2s and press the _ button.
•lOs (ten seconds): Use on important occasions, such as
weddings
•2s (two seconds): Use to prevent camera shake
• The mode selected for self-timer is displayed.
• If a setting is not applied by pressing the _) button
within a few seconds, the selection will be canceled.
• When the shooting mode is set to Pet portrait scene mode, I_i (Pet portrait auto
release) is displayed (_ 45). The self-timer settings lOs and 2s cannot be used.
3Frame the picture and press the _ [I
shutter-release button halfway. _ ®,,<_
• Focus and exposure will be set. ,¢"
4Press the shutter-release button the
rest of the way down.
• The self-timer starts, and the number of
seconds remaining before the shutter is
released is displayed in the monitor.The sell:
timer lamp blinks while the timer is counting
down. About one second before the shutter
is released, the lamp stops blinking and glows
steadily.
• When the shutter is released, the self timer
will be set to OFF.
• To stop the timer before a picture is taken,
press the shutter-release button again.

FeaturesThatCanBeSetUsingtheMultiSelector
Using Macro Mode
VVhen using macro mode, tile camera carl focus on objects as close as 3cm (1.2
in.) from the front of the lens. This feature is useful when taking close up pictures
of flowers and other small subjects.
1Press the multi selector • (_ macro mode).
Y
2Pressthe multi selector A or • to choose ON _, ,_1
and press the _ button. I
• The macro rnode icon (@) is displayed. I
• If the setting is not applied by pressing the 0 button I
within a few seconds, the selection will be canceled.
3o
o
Rotate the zoom control to set the zoom ratio 5
to aposition where _ and the zoom indicator _-_
glow green.
•mhec,osestposs,b,eshootingd,stan e
occordingtothezoomos,t,on
• The camera can focus at distance of g cm (3.5 in.) at the
zoom position at which _ and the zoom indicator
glow green. When the zoom indicator is positioned to the left (wider angJe) of _, the
camera can focus on subjects as dose as 3 cm ( 1.2 in.) from the lens
_1_ Note on Using the Flash
The flash may be unable to light the entire subject at distances of less than 50 cm (1 ft 8 in.).
[] Note on Autofocus
When using macro mode in the I_1 (auto) mode, you can _cus without pressing the shutter release
button halfway by setting Autofocus mode (_ 52) in the shooting menu (_ 51) to Full-time
AF, When using other shooting modes, Full-time AF is turned on automatically when macro mode
is turned on. You may hear the sound of the camera focusing,
[] The Macro Mode Setting
• Macro mode cannot be used when using certain shooting modes. See "Features That Can Be Set
Using the Multi Selector" (_ 53) for more information,
• The macro mode setting applied in I_1 (auto) mode is stored in the camera's memory even after
the camera is turned off. $7

Features That Can Be Set Using the Multi Selector
oo
g_
Adjusting Brightness (Exposure Compensation)
Exposure compensation is used to alter exposure from the value suggested by the
camera to make pictures brighter or darker.
1Press the multi selector i_ (r_ exposure
compensation). _
2Press the multi selector • or • to select a Exposure
compensation value, compensation guide
• To make the picture brighter, apply positive (+)
exposure compensation.
• To make the picture darker, apply negative ( )
exposure compensation.
• A specific exposure compensation value isapplied
when selected.
Exposure compensation
value
3Press the _) button.
• When an exposure compensation value other than 0,0 is applied, the value is
displayed with the I_)indicator in the monitor.
4Press the shutter-release button to take a I_ _1
picture. (_ii
•To exit without altering exposure, return to step 1, I "_'I
change the value to 0.0 and press the _) button. I _]_1
38
[] Exposure Compensation Value
The exposure compensation value applied in I_1 (auto) mode is stored in the camera's memory even
after the camera is turned off,

Features That Can Be Set Using the Multi Selector
Default Settings
The default settings for each function in each shooting mode are described below.
• See the next page for information about the default settings in the scene
modes.
-Io-I_,OOOT!_,,=.... _,_ '°,_'_?_"_' _,_,_ ,_w_,,_,,,._ ._-,,,w ...... _,_
Flash Self-timer Macro Exposure
compensation
,, ([Z3 54) ,, dZZ] 56) ([Z3 57) (ZZ] 58)
I_ (easy auto) _IAIITO1 Off Off2 O.O
SO (Special effects) (_ off off 0.0
[] (Smart portrait) _IAIITO3 Off4 Off5 0.0
i_ (auto) _AII_ Off Off 0.0
1 _AII1_(auto) or (_) (off) can be selected. When _AII1_(auto) is selected, the camera
automatically selects the flash mode appropriate for the scene it has been selected.
2 The setting cannot be changed.
3 Cannot be used when Blink proof is set to On
4 Can be set when Smile timer is set to Off,
5 The setting cannot be changed.
The setting applied in I_1 (auto) mode issaved in the camera's memory even after
the camera is turned off (except the self timer setting).
oo
59

2
s
Features That Can Be Set Using the Multi Selector
The default settings for each function in scene mode are described below.
............ --_ °=_"_'_'='°'--_:_!__---"_""_'°_' _'_'_"!T_
FlaSh Self-t,mer Macro
,,, ,,, ,,,icss
(_ 40) off off _
[] (_ 40) off off _
-_ (_ 40) off _ off _
[] (QQ 41) off off _
(Q_] 41) Off Off 1
-_ (_ 41) Off Off _
[] (_3 41) Off Off _
(I_ 41) Off Off _
i ([_ 42) Off Off 1
[] ([_']] 42) Off Off 1
_ ([_']] 42) Off On 1
_1 (_ 43) Off On 1
,1_(1:_ 43) off off
"iii" (1_ 4s) off _ off _
FJ (_ 44) Off Off
(_ 44) Off Off 1
(_ 44) Off Off
"# (1:_ 49 _i 4 Off
@1
@1
i@ 2
i@3
iAu_
iAu_
@1
@1
@1
@
@1
@
@
1 Cannot be modified.
ExPOsure
compensation
(Z_ 58)
0.0
0.0
0.0
0.0
0.0
0.0
0.0
0.0
0.0
0.0
0.0
0.0
0.0
0.01
0.0
0.0
0.0
0.0
2 Cannot be modified. Fix to the fill flash with slow sync and red eye reduction.
Slow sync with red-eye reduction flash mode may be used.
4 Self4imer isdisabled. Pet portrait auto release ([_']] 45) can be set to On or Off.
[] Functions That Cannot Be Used Simultaneously
There are functions with which these settings cannot be enabled (_ 63),
60

In the shooting screen _ MENUbutton _ Shooting menu _ Image mode
You can use the Image mode setting in the shooting
menu to select the combination of image size and
compression rate that is used when saving pictures.
Choose the image mode best suited to the manner in
which pictures will be used and the capacity of the
internal memory or memory card. The higher the
image mode setting, the larger the size at which it can
be printed, but limiting the number of pictures that can be recorded.
Image Mode Settings (Image Size and Quality)
Option* '°'_Size(pixels) Description
Higher quality than [_, suitable for enlargements or
i_ 4320x3240"_ 4320 x 3240 high-quality prints. The compression ratio is
approximately 1:4.
[] 4320x3240
(default setting) 4320 x 3240
............................................................................................Best choice in most situations. The compression ratio
[] 3264X2448 3264 x 2448 isapproximately 1:8.
"_ 2592x1944 2592)<1944
Smaller size than [], _"_,or _ allows more pictures to
[] 2048xiS36 2048 x 1536 be stored.The compression ratio is approximately 1:8.
Suited to display on a computer monitor. The
_'_ 1024x768 1024 x 768 compression ratio is approximately 1:8.
Suited to full-screen display on a television with an
_ 640x480 640 x 480 aspect ratio of 4:3, or distribution by e-maik The
compression ratio is approximately 1:8.
4224x2376 4224 x 2376 Pictures with an aspect ratio of 16:9are recorded. The
compression ratio is approximately 1:8.
The total number of pixels recorded, and the number of pixels recorded horizontally and
vertically.
Example: [] 432Ox3240 = Approx. 14 megapixels,4320 x 3240 pixels
oo
The icon for the current setting is displayed in the monitor in shooting and
playback modes (l_ 8, 9).
61

Changing the Image Size (Image Mode)
[] Image Mode
• Change made to this setting applies to all shooting modes.
• There are functions with which this setting cannot be enabled. See "Features That Cannot Be
Applied Simultaneously" (_ 63) for more information,
[] Number of Exposures Remaining
The _llowing table lists the approximate number of pictures that can be stored in internal memory
and on a 4 GB memory card, Note that the number of pictures that can be stored will differ
depending on the composition of the picture (due to JPEG compression), In addition, this number
may vary depending on the make of memory card, even when the memory cards have the same
specified capacity,
Memory card! °_!!_ii'_°_i'!_
Image mode (approx. 94 MB) (4GB) Print Size2 (cmiin')
J_ 4320x3240"_t_
[] 4320x3240
_- [] 3264x2448
8
_. [] 2592x 1944
_'_ 2048x 1536
[] 1024x768
14
27
48
74
116
378
550 Approx. 36 x 27/14 x 10.5
1100 Approx. 36 x 27/14 x 10.5
1910 Approx. 28 x 21/11 x8
2940 Approx. 22 x 16/8.5 x 6.5
4640 Approx. 17 × 13/7× 5
15000 Approx. 9 x 7/3.5 x 2.5
640x480 673 24100 Approx. 5 × 4/2 x 1.5
4224x2376 38 1290 Approx. 35 x 20/14 x 8
1 If the number of exposures remaining is 10,000 or more, the number of exposures
remaining display shows "9999".
2 Print size at an output resolution of 300 dpi. Print sizes are calculated by dividing the
number of pixds by printer resolution (dpi) and multiplying by 2.54 cm (1 in.). However, at
the same image size, pictures printed at higher resolutions will print smaller than the size
indicated, and those printed at lower resolutions will print larger than the size indicated.
62

Some shooting settings cannot be used with other functions.
_o_ _,_o_ _ ..........
Restricted Setting Descriptions
function
Continuous When Continuous, BSS,or Multi-shot 16 is
([]]_ 51) selected, flash is disabled.
Flash mode "B"[i"rl"k""p'_'o"o_...................................................When On is selected for Blink proof, flash is
([_ 49) disabled.
Smile timer
Se!f-timer ([]_] 49)
AF area mode
(_3 52)
Continuous
(_::]sl)
When Smile timer is selected, self-timer is
disabled.
When Subject tracking isselected, serf timer is
disabled.
When Subject tracking isselected, macro
mode is disabled.
When Multi-shot 16 is selected, the Image
mode setting is fixed at """_(image size: 2560 ×
1920 pixels).
!:::;!? :........................................................................................................................When3200or6400isselectedfor,SO
sensitivity, the image mode setting of only _'_
Image mode ISOsensitivity
(_::] 51)
Continuous Self-timer ([]]_ 56)
Continuous
ISO sensitivity (_51)
_o,_!_,_÷_,,,o_ ........................................................................................................................
Continuous
(_3 51)
Print date Blink proof
(_::] 49)
2048x1536, [] I024x768, or _ 640x480 can
be selected. If any image mode setting other
than above is selected, the image mode setting is
automatically changed to [] 2048x1536 when
ISO sensitivity is set to 3200 or 6400.
When using the self-timer, the continuous
setting is fixed to Single.
When Multi-shot 16 is selected, the ISO
sensitivity setting is automatically specified
according to the brightness.
When Continuous or BSS is selected, shooting
date cannot be imprinted on the picture.
When On is selected, Print date is disabled.
oo
T
E
63

Features That Cannot Be Applied Simultaneously
function Setting
_I!_'_':'!:T_ Continuous
(_::]sl)
Motion detection j lSOsensitivity
j(_ Sl)
-_w_ .... _ Continuous
Blink warning (QQ 51)
_"_I_TT°'_ Continuous
(Q_ Sl)
Digital zoom AF area mode
(_3 S2)
When Multi-shot 16 is selected, Motion
detection is not enabled.
When a setting other than Auto is selected for
ISO sensitivity, Motion detection is disabled.
When Continuous, BSS,or Multi-shot 16 is
selected, Blink warning is disabled.
When Multi-shot 16 is selected, digital zoom is
not available.
When Subject tracking is selected, digital zoom
is disabled.
oo
64
Notes on Digital Zoom
•Digital zoom cannot be used with some settings and shooting modes (_ 69).
• When digital zoom is in effect, the camera focuses at the center of the frame,

When the camera is pointed at a human face in the
shooting modes listed below, the camera
automatically detects the face and focuses on it. When
the camera detects more than one face, the double
border (focus area) isdisplayed around the face that is
focused on, and single borders around the others.
Shooting mode
I_ ceasy auto} mode ([_ 38)
Portrait (_ 40) or Night portrait
([_ 41) in scene mode ([_ 39)
When AF area mode (_) 52) is set to
Face priority (_ 42) in I_1 (auto)
mode.
Smart portrait mode (_) 47)
Number offacesthat
can be detected
Upto 12
Up to 3
(double border)
The face closest to the
camera
The face closest to the
center of the frame
• In I_ (easy auto) mode, the camera changes focus areas depending on the
scene that it automatically selects.
• If no faces are detected when the shutter release button is pressed halfway in
Portrait or Night portrait scene mode or smart portrait mode, the camera will
focus on the subject at the center of the frame.
• In Face priority, if you press the shutter release button halfway while no faces
are detected, the camera selects the focus area (up to nine areas) containing the
subject closest to the camera.
oo
65

i!!!!!
oo
Face Detection
L_ Notes on Face Detection Function
• The ca mera's ability to detect faces depends on a variety of factors, including whether or not the
subject is facing the camera. The camera may be unable to detect faces in the following situations:
When faces are partially hidden by sunglasses or otherwise obstructed
When faces take up too much or too little of the frame
• When the frame includes more than one face, the faces detected by the camera and the face on
which the camera focuses depend upon a variety of factors, including the direction in which the
faces are looking.
• In some rare cases, the subject may not be in focus despite the fact that the double border glows
green (_ 31), Should this occur, switch to I_1 (auto) mode and set AF area mode to Manual or
Center, Try refocusing on another subject positioned at the same distance from the camera as the
actual portrait subject (_ 68).
Viewing Pictures That Were Taken Using Face Detection
• When pictures in which a face was detected during shooting are played back, the pictures will be
automatically rotated for playback display according to the orientation of the face detected
except pictures taken using Continuous, BSS, or Multi-shot 16 (_ 51, _'_ 39),
• In full frame playback mode, the picture will be enlarged with the face detected during shooting
(_ 33) at the center of the monitor when the zoom control is rotated to i(% except pictu res
that were taken using Continuous, BSS, and Multi-shot 16 (_ S1, _ 39).
66

In the shooting modes listed below, the camera detects up to three human faces
when the shutter is released, and processes the picture to soften facial skin tones
before saving tile picture.
• _ (easyauto) mode
•Portrait ([_[_ 40) or Night portrait ([_[_ 41) scene mode
• Smart portrait mode
Editing functions such as Skin softening can be applied to saved pictures by
using Glamour retouch ([_ 71).
oo
Notes on the Skin Softening Function
•More time than usual may be required to save a picture when shooting with skin softening
function,
• In some shooting conditions, facial skin tones may not be smoothed or parts other than faces may
be modified, if the desired results are not produced, switch the camera to other shooting mode or
set Skin softening to Off in smart portrait mode, and shoot again.
• The skin softening level cannot be adjusted when the portrait or night portrait is selected in the
scene mode, or when the camera switches to portrait or night portrait in I_ (easy auto) mode. 67

Use focus lock to focus on off center subjects when center is selected for AF area
mode. To focus on off center subjects when Center is selected for AF area mode
in the shooting menu (_ 51) in I_1 (auto) mode, use focus Iockas described
below.
1 Position the subject in the center of the frame.
i!!!!!
oo
_'L*
g_
eJ
2Press the shutter-release button _=
halfway.
•Thecamerafocuseson the subjectandthe
focusareaglowsgreen.
• Focusandexposurearelocked.
3Continue holding down the shutter-release
button halfway and recompose the picture.
• Besurethatthe distancebetween the cameraandthe
subjectdoesnot change.
4Press the shutter-release button the rest of
the way down to take the picture.
68

Playback Features
This chapter describes how to select certain types of pictures for playback as well
as some of the features available when playing back )ictures.
g-
69

Youcanchangetheplaybackmodeaccordingtothetypeofpicturesyouwantto
view.
Available Playback Modes
[] Play [_[_]32
All pictures are played back. When you switch from shooting mode to playback
mode, this mode is selected.
Favorite pictures _ 4
Only pictures added to albums are played back. Pictures should be added to albums
before selecting this mode (_[_ 7).
Auto sort
Pictures are automatically sorted in to categories, such as portraits, landscapes, and
movies. You can play back pictures in a specific category only.
List by date _9
Only pictures captured on the same date are played back.
Switching Between Playback Modes
IPress the_ button in full-frame or
_ thumbnail playback mode.
• The screen used to select a playback
E_ mode (the playback mode selection
menu) is displayed.
70
2 Use the multi selector A or V to select a
playback mode and press the _) button.
• If you select Play, tile playback screen is displayed.
• When an option other than Play is selected, the album,
category or shooting date selection screen is displayed.
• To return to the current playback mode without
switching playback modes, press the [] button.
Select an album, category or shooting date
and press the _) button.
• I_ "Favorite Pictures Mode" (_'_ 4)
• _ "Auto Sort Mode" (_ 7)
• l_l "List by Date Mode" (_ 9)
• Repeat the procedure from step I to select an album,
category or shooting date again. Favorite pictures

fin the -_ MENUbutton -_ [] tab, I_ tab, _ tab, 1_1tab
playback screen or
When viewing pictures in full frame playback mode or thumbnail playback mode,
you can configure the following functions by pressing the MENUbutton to display
the men u, and then selecting the [] ta b, _1 ta b, _ ta b, or _ tab ([_ 12).
Item Description [_
r_,, Quick retouch 1 Easily create retouched copies in which contrast and _ 12
saturation have been enhanced.
_E_D-Lighting 1 Enhances brightness and contrast in dark portions of _ 13
_ictures.
Glamour Make facial skin tone softer and make faces look smaller
retouch 1 with larger eyes.
Apply a variety of effects using digital filter.
Filter effects 1 The available effects are Color options, Soft, Selective _ 16
color, Cross screen, Fisheye, and Miniature effect.
When using a printer to print pictures saved on tile
_, Print order 2' 3 memory card, you can use the Print order function to _ 46
select which pictures are printed, and how many copies of
each picture are printed.
Slide show 2'3 View pictures stored in the internal memory or on a _ 50
memory card in an automatic slide show.
O11Protect 2,3 Protect selected pictures from accidental deletion. _ 52
Specifies the orientation in which saved pictures are _ 54
_c_Rotate image 3 displayed with playback.
Create a small copy of the current picture. This feature is
[] Small picture 1 useful for creating copies for display on Web pages or _ 18
e-mail attachments.
Record voice memos using the camera's built in
Voice memo microphone and attach them to pictures. Voice memo _ 55
can also be played backand deleted.
E_ Copy 4 Copy files between memory card and internal memory. _ 57
1 The selected picture is edited, and the copy is saved with a different file name. Pictures taken, or
movies at an image mode setting of _ 4224x2376 (_ 10) cannot be edited. Once an picture
has been edited, some editing functions may become unavailable (_ 11).
2 When using list by date mode, press the MENUbutton from the list of dates screen (_ 9) to apply
the same function to all pictures captured on the selected date.
s This function is available when the projector is in operation (_ 88).
4 This function is not available when using favorite pictures mode, auto sort mode, or list by date
mode.
R-
E
71
Other manuals for COOLPIX S1200pj
3
Table of contents
Other Nikon Digital Camera manuals

Nikon
Nikon CoolPix P7100 User manual

Nikon
Nikon COOLPIX S7000 User manual

Nikon
Nikon 1 AW1 User manual

Nikon
Nikon COOLPIX 8800 User manual

Nikon
Nikon COOLPIX P310 User manual

Nikon
Nikon D300S User manual

Nikon
Nikon FM2 User manual

Nikon
Nikon 1 v2 User manual

Nikon
Nikon Z 8 User manual

Nikon
Nikon F 100 User manual

Nikon
Nikon Z1 Quick start guide

Nikon
Nikon 1J4 User manual

Nikon
Nikon Z 5 User manual

Nikon
Nikon COOLPIX S02 User manual

Nikon
Nikon COOLPIX A Use and care manual

Nikon
Nikon Coolpix S6100 User manual

Nikon
Nikon D2XS User manual

Nikon
Nikon CoolPix S9700 User manual

Nikon
Nikon COOLPIX 900 User manual

Nikon
Nikon CoolPix S9300 User manual