Nikota 01244 User manual

Item No.01244
Owner's Manual
Rotary
Tool W!Flex.
Shaft
Dutil
Rotatif
W/
Arbre
Flexible
Herramienta
Rotatoria
W/Eje Flexible

Points for Safe Attention
Caution: When the machine
is
operated, the following basic safety measures should
be observed to prevent from electric shock, damage and fire.
Children beyond Multifunctional Tool
Do not let the persons, especially for children, reach the tool or electric wire and far
away from the operation site.
Protection from
Electric
Shock
Avoid contacting with grounding parts, such as pipe, electric warmer, electric stove,
refrigerator.
Attention to
Environment
Do not let the tool
be
rained.
Don't
use the tool under the condition
of
humidity.
It
is necessary for operation site to have the adequate light.
Don't
operate the tool
near the place storing the flammable liquid and combustible gas, or the place
storing the explosive materials, for example, near the garage.
PUtting
on
Jumper
Do not carry far clothes or decoration. They can be tangled
by
mobile parts. If
working in the open air, the rubber gloves and skid-proof footwear are
recommendable. Bind your plait shed together or carry a hair net.
Putting
on Glass
and
Face Shield
It is necessary for you to put on the glass and the face shield
in
the dust
environment.
Putting
on
Ear
Shield
If
you work in the heavy noise, it is necessary to put on the ear shield to protect
your
ear.
Keeping Your Body in Stability
Stand on steadily and keep your body
in
balance in any time. Don't climb the
ladder not fastened against the wall. Don't work standing on the chair or similar
matter.
Keeping Site Clean
The disordering working site has the potential
of
hidden danger.
Marking
Location
of
Hidden
Pipe
and
Wire
The electric wire, water pipeline and gas pipe are mounted inside
of
wall. At first,
the location
of
them should be marked.
Using
Correct
Tools
Do not use the improper tools for operation.
Avoid Unintentional
Starting
the Machine
Do not carry tools with the finger at the switch, attached
to
electricity mains. Make
sure that the switch
is
switched
off
to electricity mains with the connection.
Pull the
Power
Supply Plug from the Plug Socket
Pull the power supply plug with non-usage, before the cleaning or maintenance and
before a tool change,
for
example, replacing driller or sharpening grounding rod.
Preventing
Power
Wire
from Damage
When you carry the machine, do not pull the connecting cable and
do
not pull out
the plug from socket. Prevent the power from heating, oiling or contacting with
sharp edges.
Extension
Cable
Line
The extension cable line with the qualified and undamaged indication can
be
used
When you purchase the extension cable line, it
is
necessary to consult with the
related attentions.
You
Are Always Attentive
Observe its work. Advance rationally.
Do
not use the tool ifyou are unknown
for
the work.
Do not let other persons operate the machine or connect line, hold it
of
the field
of
work away.
Ensure
Workpiece in Stability
Use chip devices or a screw cane in order
to
hold the workpiece
Little
Pressure
You
do
not use
in
the use
of
the multifunctional tools to high pressure; bit
it
and
disks ability broken. Use only clean and sharp accessories parts.
No
Overload for Tool
They work better and more certainly
in
the indicated achievement area.
Maintain its Tools with
Care
Hold its tools sharply and cleanly
in
order to work well and certainly. Follow the
maintenance directions and the references for tool change.
Store its Tool Certainly
Store unused tools in a dry room. They must be inaccessible for children.
Control its Device on Damages
Control your the device before each utilize on damages. Device or connection
line damages should show, the device may
be
used no longer until these were
removed regular. All parts correctly must be mounted in order to guarantee the
flawless business
of
the device.
III
Repairs
Only for
an
Electric Specialist
Do not take apart the device. Through improper repairs, considerable dangers can
emerge for the user. Repair work and restoration work may be carried out only
by
authorized specialist staff.
We
recommend you
to
address ourselves as required
to
l.
our service center.
~
t1
Caution!
The use
of
other as the accessories part recommended
in
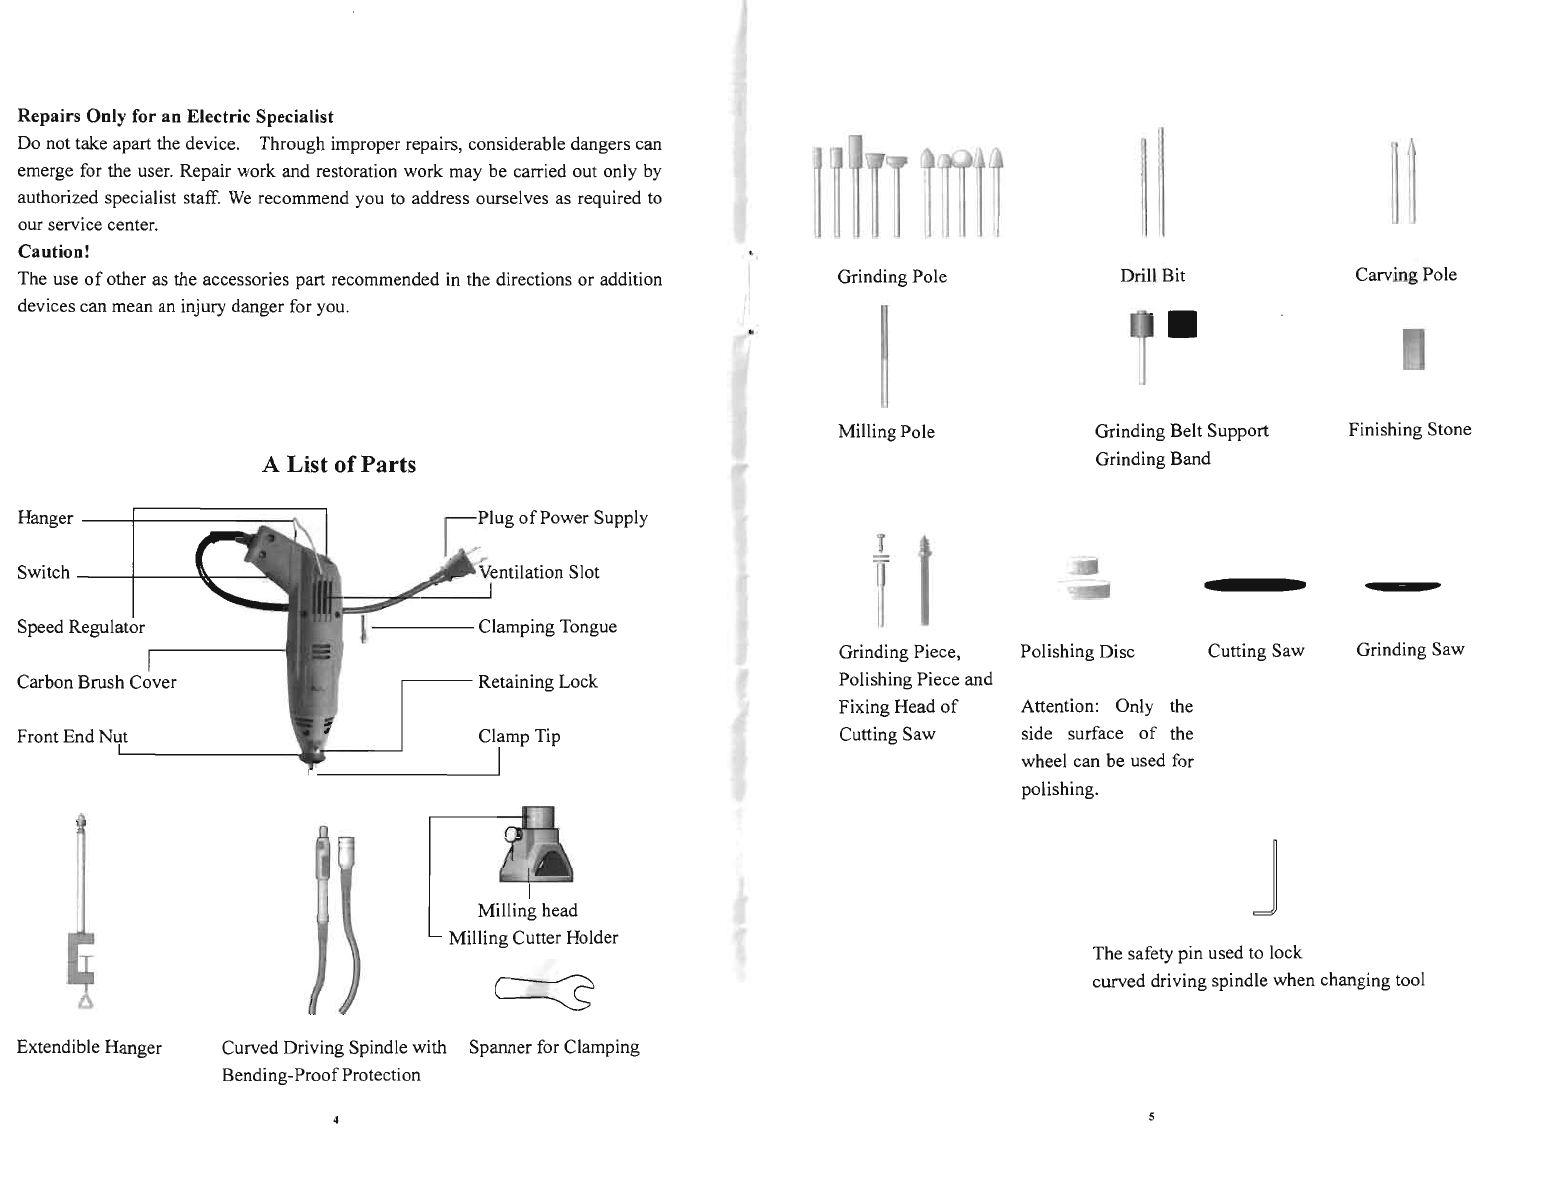
the directions or addition Grinding Pole Drill Bit Carving Pole
devices can mean an injury danger for you. •
Milling Pole Grinding Belt Support Finishing Stone
Grinding Band
A List of
Parts
Hanger
I\.
1
...
. : lug
of
Power Supply i
v
Switch
'k
Speed Regulator
-----
Clamping Tongue Grinding Piece, Polishing Disc Cutting Saw Grinding Saw
Carbon Brush Cover
r----
Retaining Lock Polishing Piece and
Fixing Head
of
Attention: Only the
Front End N Clamp Tip Cutting Saw side surface
of
the
I wheel can be used for
polishing. J
Milling head
Milling Cutter Holder The safety pin used to lock
curved driving spindle when changing tool
c==::s
Extendible Hanger Curved Driving Spindle with Spanner for Clamping
Bending-ProofProtection
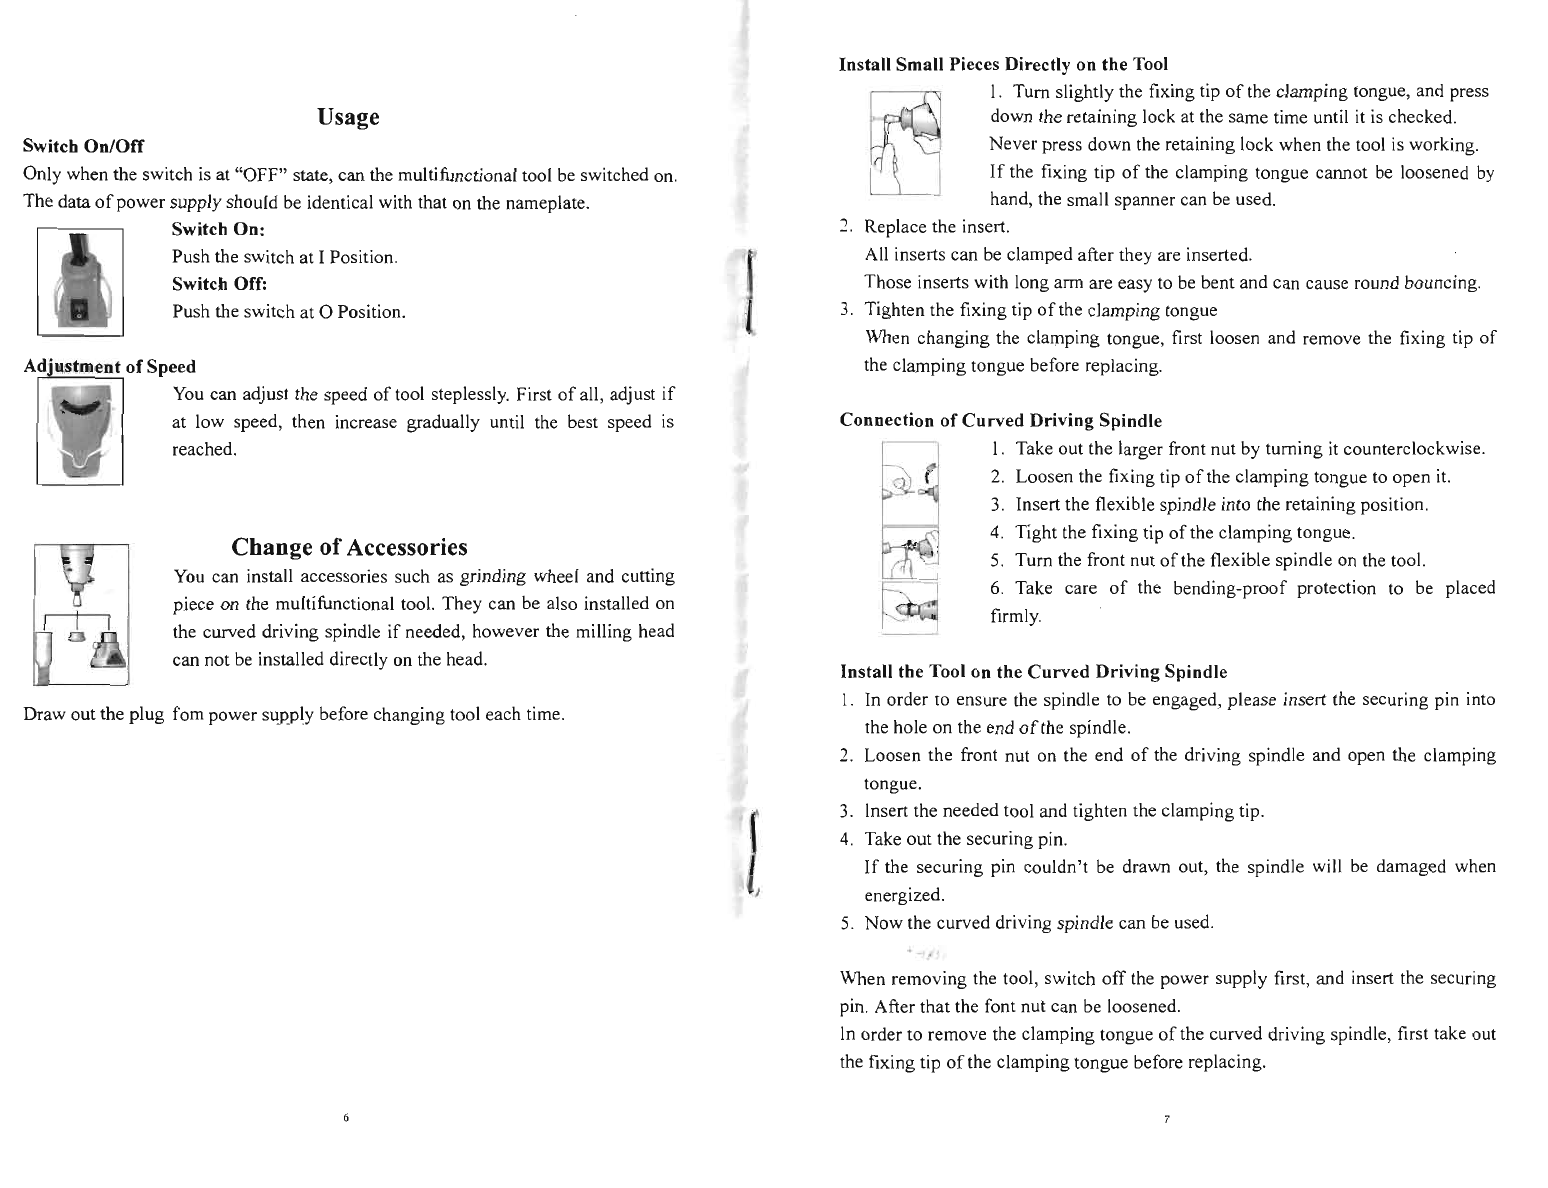
Usage
Switch
On/Off
Only when the switch is at "OFF" state, can the multifunctional tool be switched on.
The data
of
power supply should be identical with that on the nameplate.
i Switch
On:
Push the switch at I Position.
Switch Off:
Push the switch at 0 Position.
Adjustment
of
Speed
0.
You
can adjust the speed
of
tool steplessly. First
of
all, adjust
if
} at low speed, then increase gradually until the best speed
is
, I
~
reached.
Change
of
Accessories
You
can install accessories such as grinding wheel and cutting
piece on the multifunctional tool. They can be also installed on
the curved driving spindle
if
needed, however the milling head
can not
be
installed directly on the head.
Draw out the plug fom power supply before changing tool each time.
Install Small Pieces Directly on the Tool
I. Turn slightly the fixing tip
of
the clamping tongue, and press
down the retaining lock at the same time until
it
is
checked.
Never press down the retaining lock when the tool is working.
If
the fixing tip
of
the clamping tongue calIDot be loosened
by
hand, the small spanner can be used.
..,
Replace the insert.
All inserts can be clamped after they are
in
serted.
Those inserts with long arm are easy to
be
bent and can cause round bouncing.
3.
Tighten the fixing tip
of
the clamping tongue
When changing the clamping tongue, first loosen and remove the fixing tip
of
the clamping tongue before replacing.
Connection
of
Curved
Driving Spindle
I. Take out the larger front nut by turning
it
counterclockwise.
2.
Loosen the fixing tip
of
the clamping tongue to open
it.
3.
Insert the flexible spindle into the retaining position.
4.
Tight the fixing tip
of
the clamping tongue.
5. Turn the front nut
of
the flexible spindle on the tool.
6.
Take care
of
the bending-proof protection to be placed
~
firmly.
Install the Tool on the
Curved
Driving Spindle
1. In order
to
ensure the spindle to be engaged, please insert the securing pin into
the hole on the end
of
the spindle.
2. Loosen the front nut on the end
of
the driving spindle and open the clamping
tongue.
3.
Insert the needed tool and tighten the clamping tip.
I
4.
Take out the securing pin.
If
the securing pin couldn't be drawn out, the spindle will be damaged when
energized.
5.
Now
the curved driving spindle can be used.
When removing the tool, switch
off
the power supply first, and insert the securing
pin. After that the font nut can be loosened.
In
order to remove the clamping tongue
of
the curved driving spindle, first take out
the fixing tip
of
the clamping tongue before replacing.

Connection
of
the Milling
Cutter
Holder
I. Tum the front nut counterclockwise and take it out.
2.
Loosen the fixing tip
of
the clamping tongue to open
it.
3.
Replace with needed tool and all tools should
be
clamped.
4.
Tighten the fixing tip
of
the clamping tongue.
5.
Insert the milling cutter into the fixing holder and tighten
it.
6.
Tighten screws at both sides on the tool.
Operation
Points for Attention in
Operation
Do not process working pieces with asbestos to avoid harm upon bodies.
Always take care
of
good ventilation and the density
of
dust
in
air, interrupt process
if
needed.
Please wear goggles, dust mask and body cover.
If
there are electrical wires and pipes
of
water and gas
in
wall, first find them by
pipe/wire finder and mark the positions
of
wires and pipes.
Please check plugs and connecting wires regularly,
if
damage
is
found, please make
renewal via our after-sale service center.
Please check extended cables (socket panel), and make replacement
if
damaged.
Your
hand holding the tool should
be
dry without oil and grease.
Curved
Driving Spindle
The curved driving spindle
is
specially suitable for the part
of
working piece where
is
hardly accessible, and the precision operation for sensitive materials.
If
possible, hang the curved driving spindle on the extendible fixing hanger.
Attention: In order to avoid damage
of
the spindle,
do
not over
.
..
..
i
10
I bend the driving spindle.
/
·n·
"---/
Extendible Fixed
Hanger
If
connecting the multifunctional tool with the curved driving
spindle, you can hang the tool on the extendible fixed hanger,
thus the working range can
be
freer and vibration could not
be
transmitted from the tool to the working table.
• The multifunctional tool can
be
fixed and hanged.
The adjustable height from 200
mm
to 500 mm.
• The maximum thickness
of
the fixed working table 60 mm.
•
• The hanger can rotate
in
3600
By fixing screws at downside, you can
fix
the extendible fixed hanger on the edge
of
the working table. In order to ensure firm connection between the tool and the
hanger, take care
of
its fixation.
Tum the extendible pole clockwise you can lock the height. Tum
it
counterclockwise, the extendible pole can
be
loosened.
Points for Attention in Processing
•
If
working speed
is
higher and the pressure exerted on the accessories
of
the tool
is
larger, the accessories will
be
broken.
So
exert less pressure when processing
to
save your mighty and to protect the tool and the accessories.
• Please adopt good and clean accessory.
• Following points should
be
taken care when working:
The speed used to process metal should
be
lower than that used for hard timber.
The low speed should
be
adopted to process plastics to avoid damage upon
it.
Rise up the speed
if
vibration occurs.
• The low speed should be adopted when the polishing accessory and the grinding
wheel are used.
• The high speed should
be
adopted when the wire or bristle brush
is
used.
• Hold the tool firmly
by
both hands as can as possible.
•
If
speed lowers much when processing, it means the pressure you exert
is
too
larger.
• Dirt or blunt accessories can reduce efficiency.
If
you feel you larger pressure
should be exerted,
it
means the accessories should be cleaned or replaced.
Milling Device
Adopting the milling device, you can process holes on ceramics, porcelain tile or
porcelain wares easily.
\
...
I I The depth
of
milling can
be
adjusted
by
loosening screws first
and tightening them at the required depth. Here the graduation
is
only used for positioning.
Of
course you can install other tool such
as
the drill bit on the
milling device to drill the hole with certain depth.

Grinding
Pole The field to
be
used: sharpening, deburring, rust-removing and
shaping.
Points for attention: clean and finish the shape
of
the grinding
Hnmn
pole
by
finishing stone.
Carving
Pole
The field to
be
used: make fine carving on different materials.
Points for attention:
o The speed used to process metal should be lower than that
[[J used for hard timber.
o The lowest speed should
be
adopted to process plastics to
avoid damage upon
it.
o Adopt higher speed can avoid vibration.
OJ
Milling
Cutter
The field to be used: open groove or hole on smooth surface.
-I
Cutting
Round
Saw
The field to be used: open groove or cut on pin, screw, lamina
or sheet
of
timber or plastics.
The diameter
of
the saw
is
less than 50
mm.
Grinding
Band
/
Grinding
Saw
I
~
Th'
fi'ld to
b,
""d,
odnd'no, ,mooth'no
",d
,hap'no
of
timber and glass fiber.
Points
for
attention: adopt grinding band/grinding saw with
rougher sizes at the beginning and that with finest sizes at the
end.
Finishing Stone
rn
The field to
be
used: cleaning and shaping
of
grinding
saw.
Polishing Disc The field to be used: polishing
of
metal and plastics.
Points for attention: when polishing, only the side surface
of
the disc can
be
used, otherwise the working piece could be
Ir
;!.
1
10
damaged
by
screws.
Maintenance
Please keep smooth and clean
of
the ventilation slot
of
the tool. When cleaning, use
soft brush and wet cloth, and corrosive liquid could not
be
used.
Never immerse the tool into water and liquid.
Replacement
of
Carbon
Brush
The tool has installed two carbon brushes.
If
the creep occurs
on
the motor or the motor does not turn,
it
means the carbon
brushes are ineffective. Please replace both two carbon brushes.
Open the round cover by a small screwdriver.
Replace the old carbon brushes with new ones.
Retighten the cover.
You
can obtain new carbon brushes from
NIKOT
A
service center and you can find its address and telephone
number
in
my
warranty card.
Technical
Data
Voltage: 120V
-60Hz
Power Consumption: I30W
Speed Range: 8,000/min -30,000/min
Average Noise: LP =82.8 db(A)
Noise Intensity:
LW
= 95.8 db(A)
Vibration Speed: 2.1m/s2 under the load
of
6.9 m/s2•
We
reserve right
to
make technical alteration during the period
of
improvement
of
product.
1/

Any
implied
warranty,
including
the
implied
warranties
of
"merchantability"
and
"fitness
for
a specific
purpose"
,will last only
one
year
from
the
date
of
purchase.
Under
no
circumstances
shall
Nikota
Tools
be
liable
for
any
indirect,
incidental
or
consequential
damages
from
the
sale
or
use
of
the
product.
Some states do not allow the exclusion
or limilation
of
incidental
or
consequential damages, so the above limitation
or
exclusion may not
apply to you. Some states do not allow limitation on how long an implied warranty lasts, so the above
limitation may not apply
to
you.
This warranty gives you specific legal rights and you may also have other rights which
van
from
slate
10
state.
Electric
Tool
90-Day
limited warranty for
commercial
and renlal purpose.
For more information,please call toll free number: 1·87(-4-NIKOTA.
IMPORTANT:please
request
RGA
number
before
you return the defective. Au
non-NIKOTA
products are
nOI
warranted.
PLACE
STAMP
HERE
NIKOTA
TOOLS
Product
Registration Dept.
P.O.Box 7340
~
Alhambra,
CA 91802-7340 \'Sf
U.S.A

No.
Important! please fill out
and
return within the
next7
days to
facilitate warranty claims.
0 _________________________________
NAME
:
LAST
FIRST
MIDDLE
ADDRESS
•
COUNTRY
MODEL
NO.
SERIAL
NO.
DAY
OF
PURCHASE: MID/Y
NAME
OF
RETAILER
ADDRESS
OF
RETAILER
.Which
factor(s) most inOuenced your decision to purchase
this Nikota Tool? (check up to 3)
I.
0 Nikota reputation
8.
0 Appearance/Design
2.
0 Unique features
9·0
Price
3. 0
friend's
recommendation
10.
0 Received as a
gUt
4.
0 Warranty
II.
0 Salesperson's recommendation
5.0
Quality
12.0
Previous usage
6.
0 Durability
7.0
Other
e Where will this Nikota tools be primarily used?
o
At
home
by
a hobbist
o
At
home
by
a do-it-yourselfer
o Professional
.Which
of
the following A)
Nikota
brand tools
do
you
own,
H)
other
brand
tools
do
you
own,
and
C)
tools
do
you
plan
to
buy
in the
next
12
Months?
(check
all that
apply)
A)Nikota
B)ather
brand C)plan
to
Purchase
I.
Circular
saw
I.
0
I.
0
I.
0
2.
Corded
drill
2.0 2.0
2.0
3.
Cordless
drill
3.0
3. 0
3·0
4.
Cordless
Circular
saw
4·0
4·0
4·0
5.
Rotary
tool
5.0
5·0
5·0
6.
Rotary
hammer
6.0 6.0
6·0
7.
Heat
gun
7·0 7.0 7.0
8.
Polisher
8·0
8·0
8.0
9.
Angle
grinder
9·0
9.0
9.0
10.
Jig
saw
10.0
10. 0
10.0
I I.
Orbital
sander
11. 0 11. 0
II.
0
12.
Hammer
drill
12·0
12·0 12·0
13.
Reciprocating
saw
13.0
13. 0 13. 0
14.
Other
14·0 14.0 14.0
15.
None
of
the
above
15
. 0
15.0 15·0
Thank
you
for
taking
the
time
to
fill
out
this
warranty
card.
Please
affix
sufficient
postage
and
return this
card
10 us.
NIKOTA
TOOLS
LIMITED
ONE
YEAR
WARRANTY
Nikota Tools warrants its Power Tools to
be
free
of
defects from workmanship
and materials for a period of one year from the date
of
original purchase.
We
will repair or replace at ouroption, any product covered under this warranly
which, after inspection, shows to be defective
in
workmanship or ma,pr:al
during the
~
warranty period. For repair or replacement. rCI"rn the
complete tool with warranty card
or
purchase receipt. freight prepaid, 10
Nikota Tools. This warranty does not apply where:
• the tool has been misused,abused or improperly maintained
• repairs are required due to normal wear and tear
• repairs have been attempted
or
made by
others
• alterations have been made 10 the 1001
• commerical and rental application
to be continued
~
Table of contents
Other Nikota Power Tools manuals


