primatech P260 User manual

Revision 12/10 Printed inCanada
PNEUMATICFLOORINGSTAPLER
P260
OPERATINGINSTRUCTIONS
WARNING
Read theseinstructionsthoroughlybeforeusingthistooland keep it
handyforreference.

PNEUMATICSTAPLERP260
isaheavydutyprecision toolspeciallydeveloped forthe
installation ofhardwood flooring. Weighting only11
pounds(5kg),thisergonomicallydesigned toolmakes
the installation ofhardwood floorveryeasy,allowing the
operatorto set and nail the boardsinthe standing
position. It usesstandard½"crownflooring staples
availableinlengthsof 1½"(38mm),1¾"(44mm)or2"
(50mm).Forbestresult, onlyPrimatechstaplesshould
be used. Formaximumperformance, the manufacturer
guidelinesshouldbe followed. Read carefullythese
instructionsbeforeoperating thistool.It isimportant to
understand warnings/cautionsand the safetymeasures
to ensure safe use ofthistool.
Additionalinformation isavailabledirectlyfromthe
manufacturer:
1135 Jeremy-Fortin, Québec, QC
Canada, G1J1R8
Phone:1 (800)363-1962, 1 (418)522-7744
Fax:1 (418)522-7466
email: support@primatech.ca
web: www.primatech.ca/support
SAFETYMEASURES
Theseimportant guidelinesshouldalwaysbe followed
to worksafelywith the PRIMATECH pneumaticstapler
modelP260:
1.Read theseinstructionsthoroughlybeforeusing this
tooland keep it handyforreference ifnecessary.
2.Alwayskeep hands,feet orotherbodypartsaway
fromthe staple ejection area.
3.Neveraimthe toolinanydirection otherthan the
working area.
4.Alwayscarryormanipulate the toolbyitshandle
while the airsupplyhose isconnected.
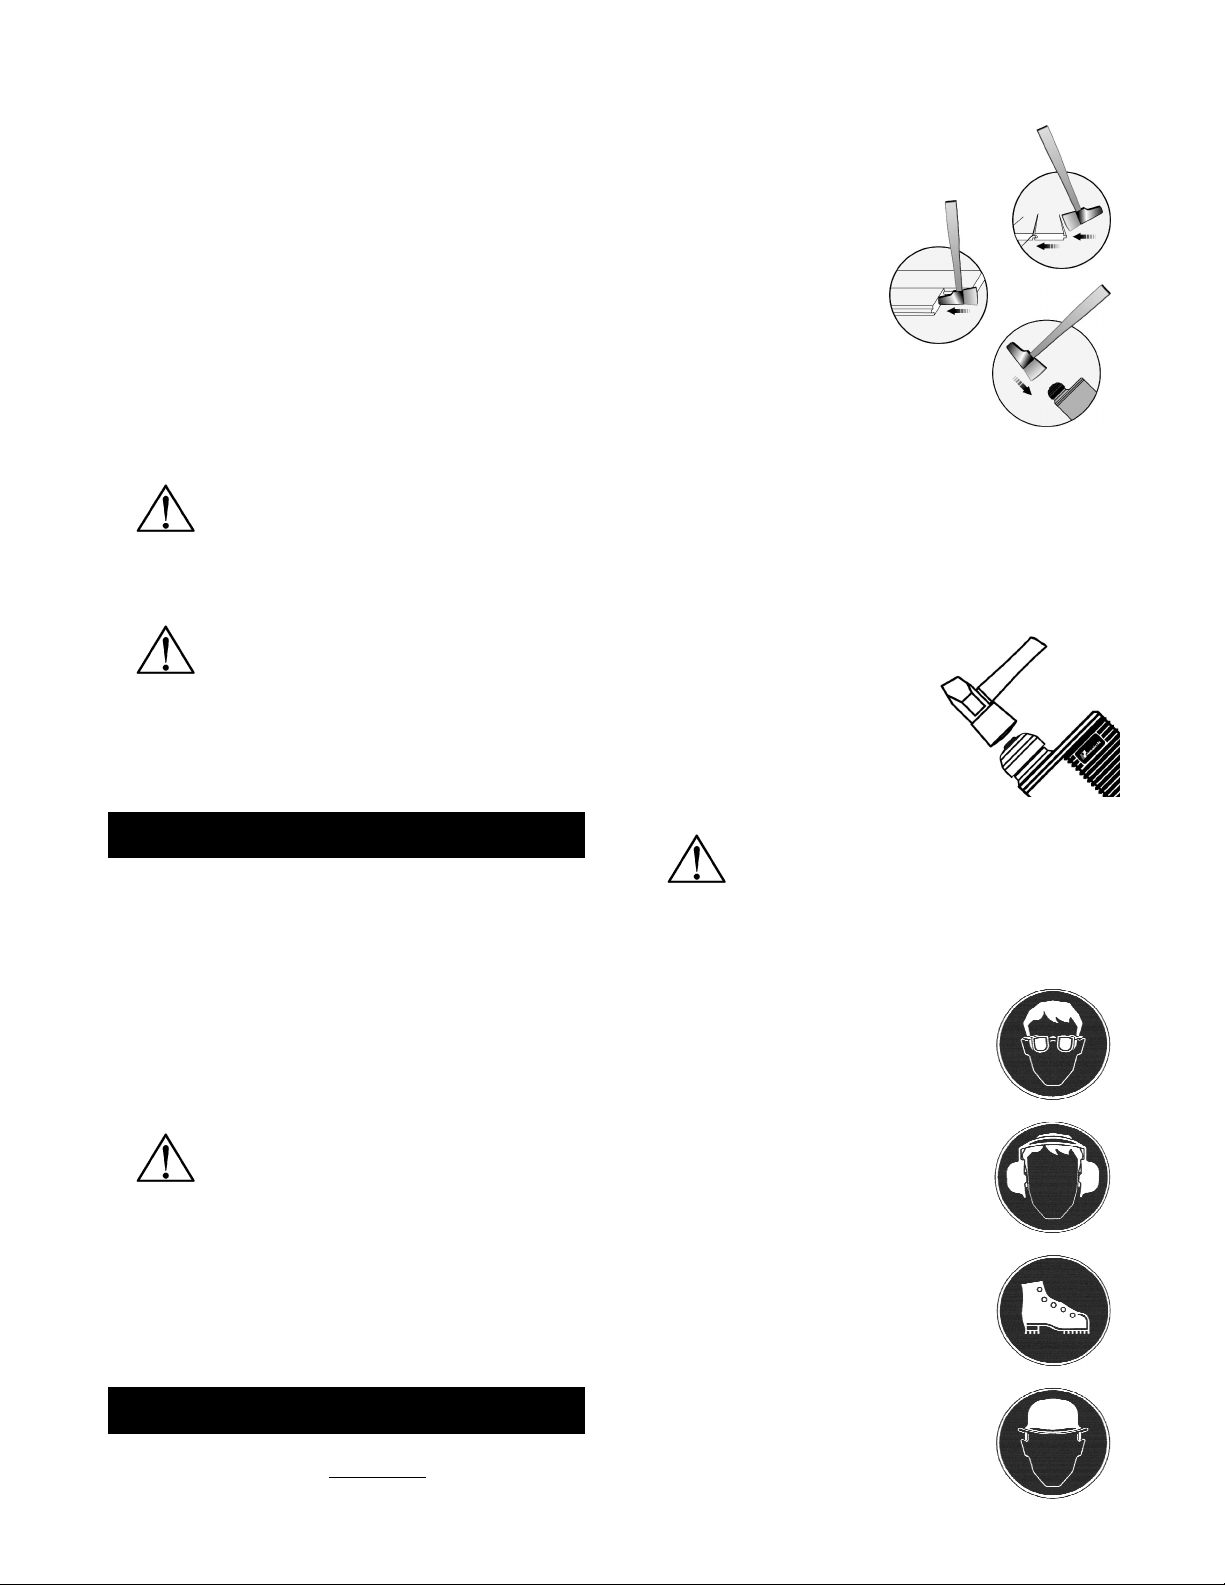
5.Neverhitthe head cap ofthe actuatorifthe plastic
baseisnot sitting perfectlyon the working surface.
6.Neverleavethe toollayingdownon itsside while
the airsupplyhoseisconnected; the toolshould
alwaysbe lefton the floor,standing on itsplastic
base.
7.Do not alterorremove safety.
8.Alwaysdisconnectthe airsupplyhosewhen the tool
isnot in use orwhen move to anotherworkarea.
9.Neverserviceorrepairthe tool,clearobstructions
ormakeadjustmentswhilethe airsupplyhoseis
connected.
10.Onlycompressed airshould be used to powerthis
tool(100 psi, 6.9 barmaximum).
11.Neveruseoxygen oranyothercompressed gasas
a powersource forthistool.
12.AlwayswearOSHA-required Z-87 safetyglasses
with side shields.
13.Alwayswearproperearand feet protection while
the airsupplyhose isconnected.
14.Alwaysremovecleatsfromthe feederchannel
before servicing the tool.
DO NOT REMOVE ORALTERSAFETY.
NEVERDEPRESS THESAFETYCONTACT
WITHYOUR HANDSWHENTOOL IS
CONNECTEDTO AIRSUPPLY.EXTREME
CAUTIONISADVISEDWHENUSING THIS
TOOL.
CONNECTION&AIRSUPPLYSYSTEM
Toensuremaximumperformanceand efficiency,and
alsoaminimumofcare, the PRIMATECH pneumatic
staplerrequiresclean, dryair.It isnecessaryto usea
filterand a pressure regulator.
Thistoolneedsadetachablemalecouplerwith 3/8"
NPTmaletreads.Usea3/8"(1cm)minimumdiameter
airsupplyhose. Asmallerhoseorahoselongerthan
50' (15 m)couldcauseapressuredrop when the toolis
activated repeatedly.
ALWAYSUSE AFREE-FLOWCONNECTION
FORTHECOMPRESSEDAIRSUPPLYTO
PREVENT THAT THETOOL STAYSCHARGED
AFTERDISCONNECTING THEAIRSUPPLY
HOSE.
UNLOADTOOL BEFORECONNECTING AIR
TO PREVENT ACCIDENTAL DISCHARGE.
AFTERMOVING TOOL TO ADIFFERENT
WORK AREA,ORAFTERANYMAINTENANCE
TO THETOOL,ALWAYSENSUREPROPER
OPERATIONBYACTUATING TOOL SEVERAL
TIMES WITHOUT STAPLES OVERTHE
SUBFLOORING .
Dirt, dust, and otherparticlesinthe airsupplycan cause
sluggishoperation orprematurewearofmany
componentsofthe tool.Drainwaterfromthe
compressortankregularly.The compressorstart-stop
limitsshouldbe set to deliveran airpressureofat least
100 psi (7bar) at all time. Consultthe compressor
manualordealerforinstructionson howto makethis
adjustment.
At80 psi(5.5 bar) and100 hitsperminute, the tool
consumesapproximately4.5cu.ft(125 )ofairper
minute at 70°F(21°C).Higherairpressurewill increase
the consumption ofcompressed air.
The toolisdesigned to be operated with acompressed
airpressureof80 psi(5.5 bar).Occasionally,ahigher

pressurecouldbe necessary,forexampleto usethe
toolwith different speciesofharderwood. In thesemore
difficultcases,the compressed airpressurecan be
increased up to 100 psi(6.9 bar).It isveryimportant not
to exceed thismaximumpressureto prevent leaksand
riskofdamage to the tool.
The toolmaybe fitted with the optionalP-055 pressure
releasevalve. thisvalvewill producealoud noiseifthe
maximumairpressure isexceeded.
Checkthe compressed airsupplyhosebefore
connecting to ensurethat theyarefree fromdirtor
particlesthat can alterthe performanceofthe tool.Pay
specialattention to anyairleaks.Afterassembly,check
all the connectionsto prevent the leaksand to have
maximumefficiency.
DO NOT USE ACOMPRESSEDAIR
PRESSUREHIGHERTHAN 100 PSI
(6.9 BAR). HIGHERPRESSURECANCAUSE
PREMATUREWEARORDAMAGETO
CERTAINCOMPONENTS.
TO PREVENT ACCIDENTAL DAMAGETO THE
FINISHEDSURFACEOF THEINSTALLED
FLOOR,REST THETOOL ONTO THE
SUBFLOORING WHENCONNECTING AIR,
LOADING TOOL ORPERFORMING ANY
MAINTENANCETO THETOOL.
LOADING THE TOOL
Pull backthe pushercompletelyinthe rearposition and
applydownwardpressureto engage itinto the locking
position. Drop stripsofstaplesthrough the slot intop of
magazine. Whilepulling backand applying upward
pressure, releasethe pusherfrom itslocking position.
Then, gentlyallowitto moveforwardto engage the
staplesinto the magazine. The slide must be released
slowlyto prevent damage. Formaximumperformance,
alwaysuse Primatech staples.
USE ONLY 15½GA 1/2"-CROWN
FLOORING STAPLES.THEUSE OF ANY
OTHERTYPE OF FASTENERSWILL DAMAGE
THETOOL.FORMAXIMUMPERFORMANCE,
ALWAYSUSE PRIMATECH STAPLES.
Alwaysoperate the toolwith staplesinfeederchannel.
Damage mayoccurifthe toolis operated without
staples.
OPERATION
Placethe toolonto the subflooring, unload tooland
connectthe hose. Afterloading the toolwith PRIMATECH
staples,thePNEUMATICSTAPLER modelP260 isreadyfor
use.
A2.5 lbs(1.1 kg)hammerissupplied with
the tool.Usethe rubberfaceto help
position the boards.Usethe
steelwith caution to prevent
damage to the boards.
Press the flooring firmlyin
place. The lipofthe plastic
baseP-433 shouldrest
snuglyagainstthe tongue of
the flooring. Downwardpressureshould
be applied to ensureproperseating of
the staple. Toactivate the tool,strike
lightlythe head cap P-601 with the RUBBERFACE ofthe
2.5 lbs(1.1 kg)hammersupplied with the tool. Never
strike thetoolwith the metal end of the hammer. If
wood isslightlytwisted, hitting the toolwith more force
will assistinpulling the boardup snugly. NEVER strike
the head cap when the toolisnot sitting on the working
surface.
USE ONLYTHE RUBBER FACE OF
THEHAMMER.USINGTHESTEELEND
WILL DAMAGETHETOOL AND VOID
THEWARRANTY.
AVOIDOPERATING THETOOL WHENTHE
SAFETYCONTACT ISNOT FULLY
DEPRESSED.THISWILL CAUSE
PREMATUREWEARORDAMAGETO THE
DRIVING BLADE,PISTONAND CYLINDER.
Eyeprotection isrecommended and
shouldbe wornbythe operatorand
otherinworking area. Accidental
ejection ofstaplesorwood debris
could cause severe eye injury.
In some environments, earprotec-
tion might be required, asworking
condition mayinclude exposure to
high noise levelswhich lead to
hearing damage.
Wearing safetybootsand safetyhat
isalso highlyrecommended.
NOTE:All the personalprotection
equipmentsmustmeet national
standards.

ADJUSTING FORHARDWOOD
THICKNESS
Tofasten 3/4"or25/32"
flooring, no adjustment
to the toolisrequired.
Usethe standardP-433
plasticbasesupplied
with the tool.
Tofasten 1/2"flooring,
install optionaladapter
kitP-188. Ifnecessary,
useone ortwoshims
(supplied)to insurethat
thegate/foot do not sit
onthe tongue. Insert
shimsbetween main
bodyand plasticbaseas
shown.
Tofasten 33/32"flooring,
removeplasticbaseas
shown. Youmayapply
the optionalself-
adhesivebaseP-986 to
protectthe finished
surface ofthe flooring.
BEFORESTARTING ANINSTALLATION,
STAPLEDOWNASAMPLEOF FLOORING TO
ASCERTAINTHAT YOUAREUSING THE
RIGHT TOOL AND FASTENER.
PREVENTIVE MAINTENANCE
Thistoolrequiresminimallubrication. Use
onlydetergent-free oilsuchasPrimatech
P-090. Othertypesoflubricant may
degrade the seals.Twodropsofoil weekly,
directlyin the airinlet, issufficient.
Checkperiodicallyto makesurethat allscrewsare
tight. Payparticularattention to the twoscrewsholding
the feederchannelaswell asthe screwsand nutson
the feederchannelassemblywho might loosen up over
time. Becarefulnot to stripthe threadswhen tightening.
The useofan mediumstrength adhesivesealant such
asthe Loctite 242 isrecommended forthosescrews
and nuts.
MAINTENANCE &REPAIR
Disassemblyofthe toolmustbe done inaclean
environment. Somepartscan be easilydamaged if
disassembled with impropertoolsorbyinadequate
methods.Maintenanceshouldonlybe performed by
trained personnel.Useonlygenuine PRIMATECH
replacement parts.
TO PREVENT INJURY,ALWAYS DISCON-
NECT THEAIRSUPPLYHOSE WHENSER-
VICING ORDISASSEMBLING THETOOL.
When assembling thetool,makesurethat all hexcap
screwsP-005 holding the casing on the basearetight.
Inspectthesescrewsregularly.Do not useany
substitute to gasket P-107.
When servicing the tool,do not twistorforceanyparts.
Damagemayresultfromsuchabuse. Ifpartsdo not
comelooseeasily,contactyourPRIMATECH distributor
formore information.
When opening the toolformaintenance, alwaysclean
all componentsofdirt, grit, orparticles.Inspectthe tool
carefullyforbroken partsorexcessivewear,and
replaceifnecessary.When ordering parts,be sureto
specifythe right partnumber,and alsothe toolserial
number.
AFTERANYMAINTENANCETO THETOOL,
REMOVE ALL STAPLES BEFORE
CONNECTING AIRAND ACTUATETHETOOL
REPEATEDLYOVERAPIECEOF WOODOR
SUBFLOORING TO INSUREPROPER
OPERATION.
CLEANING THE VALVE
Dirt, dustorotherparticles,oreven waterinthe tool
mayimpede the cycling ofthe valveassembly.Toclean
the head and valveassembly,removethe six(6)screws
P-015 and takethe head assemblyoff the tool.Pull out
the main valve assemblyP-543.
Totakethe actuatorP-642 and itscap P-644 apart, rest
the assemblyonto aflat surface, insertthe long armof
an Allen wrenchthrough the top holeofthe actuatorand
gentlytap on it to unclickboth parts.
It isgenerallynot necessaryto removethe head cap
P-601. Checkall sealsand replaceifnecessary.Clean
the interiorand lightlylubricate with non-detergent oil
P-090. Othertypesoflubricant maydegrade the seals.
Ifcareistaken,the gasket P-107 shouldrequireonly
infrequent replacement.

ASSEMBLING THE VALVE
Thistoolfeaturesaredesigned valveassembly.All its
componentscan be assembled togetherwithout the
need ofascreworanytool;simplywith asnap-in
action. The wholeassemblycan nowbe simply
pulled-out ofthe head, making maintenance easier.
1.0First, makesurethat all componentshaveall their
sealsinstalled.
2.Insertthe actuatorP-642 iinto the mainvalveP-543
and snap the actuatorcap P-644 into the actuator.
The actuatorassemblyshould slide smoothly.
3. Make surethe head P-506 isclean and lightlylubricated
and insert the valve assemblyintoit.
4.Ensurethat the diskP-601Aiscompletelysnapped
into the head cap P-601. Snap head cap onto the
head P-506. It isusuallynot necessaryto remove
head cap formaintenance.
AFTERREASSEMBLY,ALWAYSACTUATE
THETOOL AFEWTIMES WITHOUT
STAPLES AGAINST APIECEOF WOODTO
INSUREPROPEROPERATION.
REPLACING THE DRIVING BLADE
1.Checkto partlistto orderthe right replacement
driving blade.
2.Removethe sixP-015 screwsand takeoff the head
assemblyP-506. It isusuallyeasierto replacethe
driving blade byopening the toolfromthe top;
although insomecasesitmaybe necessaryto
access the componentsbyremoving the base
assemblyP-235.
3.Ifthe piston hasfewthreadson itstop face, use
one ofthe P-015 screwsto pull itout thepiston.
You mayalso insert the replacement driving blade
into the gate/foot guide at the bottomof the toolto
push the piston out.
4.Removeanydebrisand disposeofthe broken
driving blade and screw.Atthistimeassess
condition ofcylinderP-518. Ifscratched, usearat-
tail fileto smooth out walls.The piston mustbe
allowed to move without restriction.
5.Lockthe piston inavise, using arag to prevent
scoring. Followthe instructionssupplied with the
replacement driving blade.
6.Reverse the orderofinstructionsto reassemble.
TROUBLESHOOTING
Thissection will helpto diagnoseproblemsthat might
alterthe qualityofwork done bythe operator,orthe
tool,and will givesuggestionson howto solvethem.
Followthe orderofthese instructions.
TO PREVENT INJURY,ALWAYS
DISCONNECT THE AIR SUPPLY
HOSE WHENADJUSTING,SERVICING OR
DISASSEMBLING THETOOL.
FIRST:CHECKTHE COMPRESSEDAIRSUPPLY
Manyofproblemscomefromafaultyorinadequate
compressed airsupplysystem.Beforeattempting
to repairthe tool,thefollowing pointsshouldbe
checked:
a)checkthe pressureat the output ofthe
compressor;adjustto 80-100 psi(5.5-6.9 bar) as
required
b)checkthe tankpressureofthe compressor&
adjust the start/stop limits
c)checkthe airdeliverysystem,useahoseofat
least 3/8"
d)usefewertoolssimultaneously;do not exceed
the capacityofthe compressororofthe delivery
system
e)drain waterfromthe compressor
SECOND:CHECKFORAIRLEAKS
Atrest, thistoolshouldnot haveanyairleak.
Beforeattempting to repairthe tooland replace
parts, checkthe following:
a)Tighten screwsP-015 orreplace gasket P-107
b)CheckrectangularringsP-009 &P-543A;
replace ifnecessary
c)Checkall sealson valveP-543 replaceif
necessary
d)Checkthe top edge ofmaincylinderP-518; it
should be free ofdents.
e)ChecksealP-516B
f)Clean &lubricate the head assembly;
re-assemble the head assemblycarefully
g)Checkinteriorofhead P-506 forscratches
h)Checktop ring P-014; replace ifnecessary
TOOLDOES NOT DRIVE STAPLES
a)Checkthat therearestaplesinthe feeder
channel
b)Makesurethe feederclipisengaged behind the
staples
c)Checkthe front end ofthe feederchannelfor
burrs ordamages
d)Checkthe safetyelement
e)Checkifthe driverisstuckindownposition (see
6 below)
f)Checkforobstruction inthe stapleejection area

STAPLES ARENOT SET COMPLETELY
a)First, verifyairsupply(see 1 above)
b)Clean tooland lubricate tool;particularlythe
head assembly
c)Increaseairpressurewhen working with harder
woods; neverexceed 100 psi(6.9 bar)
d)Checkthe driving blade forbroken end
e)Ensurethe tooliswell seated on the floorwhile
ejecting
TOOLDOES NOT ACTIVATE
a)Checkthe airsupply
b)Inspectthe head assemblyand checkall seals;
reassemble carefully
DRIVING BLADEDOES NOT RETURN
a)Checkforjammed staple orobstruction
b)Checkgate/foot and end offeederchannelfor
damagesorburrs.
c)Checkforbroken orbent driving blade
d)Checkthe band P-518B
e)Inspect the head assemblyand checkall seals;
clean &lubricate
f)Checkfordamaged ormissing bottomO-ring
P-014
g)Tighten reinforcement plate
h)Checkthat the bumperisin place
BROKENORWORN DRIVING BLADE
Replacethe driving blade.Failureto followthe
instructionscarefullywill resultinrepeated
breakage ofthe driving blade.
POORFEEDORTOOLJAMMING
a)Makesurethe feederclipengagesbehind the
staples
b)Checkthe gate and foot fordebris,damagesor
wear
c)Checkthe front end ofthe feederchannelfor
burrs ordamages
OTHERPROBLEMS
Contact Primatech:
byphone1 (800)363-1962
1 (418)522-7744
byemail support@primatech.ca
consult ouron-line TechnicalSupport site at
http://www.primatech.ca/support
TOOLS WARRANTY&LIMITATIONS
Primatechwarrantsthat newlypurchased fastening
tools,partsand accessorieswill be free fromdefectsin
materialand workmanship(excluding wearparts) for
the period shownbelow,afterthe date ofpurchaseby
the originaluserasevidenced byavaluablepurchase
invoice.
ONE-YEARLIMITEDWARRANTYwill applyto all
parts, except those subjected to normalwear
SEVEN-YEAREXTENDEDLIMITEDWARRANTY
covers toolcasing.
WARRANTYSTATEMENT
Primatech‘ssoleliabilityhereunderwill be to replace
anypartoraccessorywhichprovesto be defective
withinthe specifictimeperiod. Anyreplacement partor
accessoriesprovided inaccordancewith thiswarranty
will carryawarrantyforthe balanceofthe period of
warrantyapplicableto the partitreplaces.When repair
orreplacement ofpartortoolisrequired, the complete
toolorpart(s) mustbe returned to Primatechorat such
authorized warrantyservicepoint ofPrimatech,
transportation prepaid, with acopyofproofofpurchase
evidencing that the partortooliswithinthe warranty
period.
Thiswarrantyisvoidasto anytoolwhichhasbeen
subjected to misuse, abuse, accidentalorintentional
damage, used with fasteners not meeting Primatech
specifications,sizeorquality,improperlymaintained,
repaired with otherthan genuine Primatechreplacement
parts,damaged intransitorhandling, orwhich, in
Primatech‘ssoleopinion, hasbeen altered, modified or
repaired inawaythat affectsordetractsfromthe
performance ofthe tool.
PRIMATECH MAKES NOWARRANTY,EXPRESSED
ORIMPLIED,RELATINGTOMERCHANTABILITY,
FITNESS,OROTHERWISE,EXCEPTAS STATED
ABOVE,and Primatech‘sliabilityAS STATED ABOVE
AND AS ASSUMEDABOVE isinlieu ofall other
warrantiesarising out of,orinconnection with, the use
and performanceofthe tool,except to the extent
otherwise provided forbyapplicable law.
PRIMATECH SHALL IN NOEVENTBE LIABLEFOR
ANYDIRECT,INDIRECT,ORCONSEQUENTIAL
DAMAGES WHICH MAY ARISE FROMLOSS OF
ANTICIPATEDPROFITSORPRODUCTION,
SPOILAGEOF MATERIALS,INCREASEDCOSTOF
OPERATION, OROTHERWISE.Anyliability,ifany,
connected with the useofthe toolshall terminate upon
the expiration ofthe warrantyperiod specified above.
Table of contents
Other primatech Power Tools manuals
Popular Power Tools manuals by other brands

Black & Decker
Black & Decker RS1050E Original instructions

RotoZip
RotoZip RotoZip DR1 Operating/safety instructions

Hitachi
Hitachi CJ 110M Handling instructions

Blaupunkt
Blaupunkt GSSA 750101 manual

TrakPower
TrakPower TK-950 manual

Strautmann
Strautmann PP 1207 Translation of the original operating instructions