NINCOAIR NH92017 RTF User manual

NINCOAIR is brand of NINCO DESARROLLOS S.L.
Ctra. de l’Hospitalet 32
08940 Cornella Barcelona Spain
CIF B-60307725 · www.nincoair.com
1
NH92017
RTF - GLIDER PRO
2
,
4GHZ
Material necesario: Destornillador de estrella y 8 baterías AA para la emisora. ESPAÑOL
ATENCIÓN:
Los modelos de radio control no son juguetes y pueden lesionar seriamente a personas o dañar
propiedades si no son usados de manera responsable.
No está recomendado para niños menores de 14 años y siempre debe ser utilizado por usuarios
experimentados, así como en lugares dedicados al vuelo de modelos de radio control.
Lea atentamente las instrucciones antes de montar y volar el modelo. Busque ayuda si tiene alguna
duda. El uso de este modelo es responsabilidad suya.
CONTENIDO:
Fuselaje – Varilla de refuerzo ala principal – Ala izquierda – Ala derecha – Estabilizador horizontal –
Timón – Set hélice – Emisora – Cargador – Batería – Variador – Cola en V.
1. FUNCIONAMIENTO DE LA EMISORA Y COMANDOS DE VUELO.
La emisora requiere 8 baterías alcalinas tamaño AA (no incluidas). Colóquelas en
el compartimiento trasero de la emisora. Preste atención a su correcta colocación
según la polaridad.
Comandos de vuelo en MODO 2:
1. Control timón 5. Palanca trim profundidad
9. Inversor sevos
2. Control acelerador 6. Control alabeo 10. Botón ON/OFF
3. Palanca trim timón 7. Control profundidad 11. Indicador batería
4. Palanca trim acelerador 8. Palanca trim alabeo 12. Indicador encendido

NINCOAIR is brand of NINCO DESARROLLOS S.L.
Ctra. de l’Hospitalet 32
08940 Cornella Barcelona Spain
CIF B-60307725 · www.nincoair.com
2
NH92017
RTF - GLIDER PRO
2
,
4GHZ
Antes de encender la emisora, comprobar que la palanca del acelerador
está completamente en el mínimo. Encienda la emisora. Los LED rojo y
verde se iluminan. CUANDO SE ILUMINA SOLO EL LED ROJO HAY QUE
CAMBIAR LAS BATERÍAS INMEDIATAMENTE. ¡NO VUELE SI SÓLO SE
ILUMINA EL LED ROJO!
2. CARGAR LA BATERÍA
No cargue la batería durante más de 120 minutos.
Antes del primer vuelo, la batería debe cargarse/descargarse 3-4 veces para ‘despertarla’ y conseguir
las mejores prestaciones de uso. Por favor, siga las instrucciones de carga indicadas a continuación:
Paso a paso.
1. Usar sólo el cargador Li-po incluido. Conectar el cargador al adaptador de pared (12v DC) y a la
batería como se muestra en la imagen. También puede cargarse desde la batería del coche (12v DC),
las pinzas roja (+) y negra (-) deben conectarse a los polos correctos de la batería del coche.
2. Al conectar correctamente la fuente de alimentación de 12v el LED verde indicador de carga se
ilumina.
3. Conectar la batería del avión al cargador. El LED rojo indicador de carga parpadeará, lo que indica
que se está cargando la batería. Si el LED deja de parpadear y permanece en verde indica ‘carga
completa’.
4. Para cargar una batería totalmente descargada necesitará 60 minutos. Cuando la batería está
cargada el LED cambiará de rojo a verde. Desconectar la fuente de alimentación y la batería del
cargador.
5. Al finalizar la carga, el voltaje de cada elemento de la batería debe ser 4,2v +/-0.1v. Por tanto el
pack de la batería debe tener un voltaje de 8,3v.
6. No dejar desatendido el cargador durante el proceso de carga Dejar enfriar la batería antes de una
nueva carga.
7. No almacenar o cargar la batería al sol.
8. No cargar la batería mientras esté todavía en el avión.
Modelo equipado con batería de li-po recargable. Preste atención a las siguientes normas de seguridad de uso:
1. No arroje las baterías al fuego u otra fuente de calor.
2. No use ni deje las baterías cerca de una fuente de calor como un fuego o un calentador.
3. No arroje las baterías contra una superficie dura.
4. No sumerja las baterías en agua, manténgalas en un ambiente seco y fresco.
5. Recargar las baterías con el cargador de batería indicado específicamente para este propósito.
6. No sobre-descargue las baterías.
7. No conecte las baterías a un dispositivo eléctrico.
8. No suelde las baterías ni las rasque o perfore con uñas u otros objetos cortantes.
9. No transporte ni almacene las baterías junto con objetos metálicos.
10. Cargue las baterías cada 6 meses
11. Apague el equipo después de usarlo
12. Para el reciclaje de las pilas, tape primero los polos con celo o introdúzcalo en una bolsa de plástico.
Conectar la batería
Indicador de carga
Alimentación 12v DC
Carga con cargador de pared
Carga con batería de coche

NINCOAIR is brand of NINCO DESARROLLOS S.L.
Ctra. de l’Hospitalet 32
08940 Cornella Barcelona Spain
CIF B-60307725 · www.nincoair.com
3
NH92017
RTF - GLIDER PRO
2
,
4GHZ
3. HERRAMIENTAS NECESARIAS
-Tijeras
-Pegamento
-Alicates
-Destornillador estrella
-Llave allen 3mm
4. INSTALACIÓN DEL SET DE COLA
1. Retirar la protección de la cinta adhesiva de doble cara.
2. Colocar el estabilizador horizontal. Presentar la colocación del timón, colocar la solapa del timón en
el fuselaje y fijar todo con pegamento.
3. Comprobar el balance correcto de los estabilizadores, perfectamente horizontal, y la colocación del
timón completamente vertical.
4. Usar pegamento adecuado para reforzar las uniones.
5. Conectar el acelerador, en el fuselaje, a los servos del timón y estabilizador horizontal. Fijar con la
llave allen.
4.1 INSTALACIÓN ALTERNATIVA COLA EN V

NINCOAIR is brand of NINCO DESARROLLOS S.L.
Ctra. de l’Hospitalet 32
08940 Cornella Barcelona Spain
CIF B-60307725 · www.nincoair.com
4
NH92017
RTF - GLIDER PRO
2
,
4GHZ
5. INSTALACIÓN ALA PRINCIPAL
1. Insertar la varilla de refuerzo en un ala.
2. Colocar el conector a través del fuselaje y presentar la otra media ala. Antes de insertar totalmente
las dos alas al fuselaje conectar el servo del timón de profundidad (bajo ala principal) y el fuselaje
(donde se unen las alas).
3. Conectar los terminales de los servos en el alojamiento central y presionar para colocar las alas.
6. INSTALACIÓN HÉLICE
1. Colocar la hélice sobre el eje del motor,
asegurar con la tuerca como se indica en la
imagen.
2. Fijar el cono con tornillos 2.6mm.
7. VERIFICACIONES PARA EL VUELO
Al conectar la emisora, comprobar que el
acelerador está el mínimo. El resto de controles
y trim deben estar centrados. Sólo entonces
conectar la emisora.
Antes de despegar, comprobar el timón de
profundidad y el ala principal; el acelerador y la
estabilizadora y el timón de cola están
correctamente posicionados.
8. ANTES DEL VUELO
Volar el avión cuando no haya viento o sea muy ligero. Elegir una zona abierta, sin edificios, carreteras
o árboles altos. El viento no sólo dificulta el control del avión sino que puede provocar accidentes.

NINCOAIR is brand of NINCO DESARROLLOS S.L.
Ctra. de l’Hospitalet 32
08940 Cornella Barcelona Spain
CIF B-60307725 · www.nincoair.com
5
NH92017
RTF - GLIDER PRO
2
,
4GHZ
Cargar la batería al máximo. Si no va a usarse durante una semana, cargar o descargar la batería
hasta que quede aproximadamente a media carga. No almacenar una batería totalmente descargada o
totalmente cargada por un periodo largo.
9. CONTROL EMISORA
Antena totalmente extendida para volar
MODO 2
+/- 60min. Con la batería totalmente cargada.
Con la batería sin carga suficiente.
Palanca elevador
(ascenso/descenso)
Avión desciende
Avión asciende
Palanca timón
(derecha/izquierda)
Avión gira a izquierda Avión gira a derecha
Palanca acelerador
(control velocidad)
Vuelo veloz
Vuelo lento o
motor parado
Palanca alabeo
(derecha/izquierda)
Desplazamiento lateral a izquierda y
derecha

NINCOAIR is brand of NINCO DESARROLLOS S.L.
Ctra. de l’Hospitalet 32
08940 Cornella Barcelona Spain
CIF B-60307725 · www.nincoair.com
6
NH92017
RTF - GLIDER PRO
2
,
4GHZ
10. INICIAR EL VUELO
1. Despegue.
Este avión necesita realizar el despegue lanzado a mano. Mover la palanca del acelerador hacia delante
poco a poco, el motor comenzará a girar hasta llegar a su máxima velocidad. Pedir a otra persona que
lance el avión contra el viento y en un ángulo de unos 15º. Hay que mover un poco los elevadores para
alcanzar una altura de seguridad (más de 30m). A continuación, intentar mover el timón para girar el
avión. Hasta que estar familiarizado con los movimientos, realizar pruebas a poca velocidad.
2. Vuelo.
Los debutantes en el vuelo deberían comenzar sus prácticas en un día sin viento. Practicar el control de
la elevación y los giros una vez el avión esté entre 30 y 100m de altura. Una vez supere los 100m será
posible intentar los loopings, invertidos y planeos. Parar de practicar por debajo de 30m.
La palanca del elevador sirve para controlar la altura del avión. Mover la palanca hacia delante, el flap
del avión se mueve hacia abajo y el avión desciende. Mover la palanca hacía atrás, el flap se mueve
hacia arriba y el avión se eleva. Llevar en exceso hacia adelante la palanca causará la caída en picado
del avión, por ello, se recomienda hacer controles lentos para evitar accidentes. Cuando se dominen
las elevaciones y los giros se podrán practicar los vuelos básicos y avanzados en forma de 8,
invertidos...
El tiempo de uso ininterrumpido es de 6 minutos. Aterrizar el avión si se eleva muy lentamente o baja
cuando se mueve la palanca totalmente hacia adelante. La hélice puede ir más lenta o pararse si no
tiene suficiente batería. El sistema reservará energía para activar los servos y poder aterrizar.
VIENTO

NINCOAIR is brand of NINCO DESARROLLOS S.L.
Ctra. de l’Hospitalet 32
08940 Cornella Barcelona Spain
CIF B-60307725 · www.nincoair.com
7
NH92017
RTF - GLIDER PRO
2
,
4GHZ
3. Aterrizaje.
Cuando el avión está a unos 30m del suelo, volar con el viento, planear. Cuando el avión está a unos
20m encararlo a la dirección del viento y aterrizar.
11. FUNCIONAMIENTO
El funcionamiento ininterrumpido dura unos 6 minutos. Aterrizar antes de completar este tiempo o lo
antes posible si el motor llega a pararse.
Si se tiene preparadas baterías de repuesto, se podrá volver a volar más tiempo sin esperas.
Comprobar a menudo el LED indicador de carga durante el vuelo. Cuando sólo esté encendido el LED
rojo aterrizar el avión y cambiar las baterías inmediatamente. Si no, el avión puede quedar fuera de
control.
12. CONCEPTOS DEL VUELO
El avión debería volar en un área cónica de unos 100º por encima y frente al piloto. Volar más lejos o
más bajo hará que sea más difícil controlarlo y aterrizarlo.
Ángulo de elevación y velocidad del viento.
Si el avión permanece con el morro elevado es que éste pesa poco. Trimar el avión con el elevador. Por
otro lado, si el avión tiende a caer de morro, es que éste pesa demasiado, actuar a la inversa.
COLA PESADA
(Tiende a arriba)
NORMAL
MORRO PESADO
(Tiende a abajo)

NINCOAIR is brand of NINCO DESARROLLOS S.L.
Ctra. de l’Hospitalet 32
08940 Cornella Barcelona Spain
CIF B-60307725 · www.nincoair.com
8
NH92017
RTF - GLIDER PRO
2
,
4GHZ
Evitar las interferencias de la misma frecuencia.
Debería evitarse volar el avión cuando estén volando otros aviones con la misa frecuencia en el mismo
lugar, sino los aviones con esta frecuencia estarán fuera de control.
Corrientes de aire.
Existen corrientes de aire especiales en el rebufo de edificios altos
o laderas pronunciadas. Evitar el vuelo en estas zonas porque es
peligroso.

NINCOAIR is brand of NINCO DESARROLLOS S.L.
Ctra. de l’Hospitalet 32
08940 Cornella Barcelona Spain
CIF B-60307725 · www.nincoair.com
9
NH92017
RTF - GLIDER PRO
2
,
4GHZ
Items required: Philips head screwdriver and AA size batteries for transmitter x 8pcs. ENGLISH
WARNINGS:
Radio control models are not toys. Serious injury to people or damage to property can result if not
used in a responsible manner.
It is not recommended for children under 14 years old and should only be flown by experienced radio
control pilots. It is recommended that this model only be flown at dedicated radio control flying sites.
Read all instructions carefully prior to assembling and before flying this model. Seek advice should any
information be unclear. You assume all risk and responsibility when using this model.
CONTENT:
Fuselage – Main wing reinforce stick – Left wing – Right wing – Horizontal stabilizer – Rudder – Folding
propeller set – Transmitter – Charger – Battery – ESC – V tail.
1. TRANSMITTER OPERATION AND FLIGHT CONTROLS.
The transmitter requires 8 AA size alkaline batteries (not included). Fit them into
the battery compartment at the rear of the transmitter paying careful attention in
order to observe correct polarity.
Transmitter control layout for MODE 2 radio:
1. Rudder control 5. Elevator trim lever
9. Servo reverse switches
2. Throttle control 6. Aileron control 10. On/Off power switch
3. Rudder trim lever 7. Elevator control 11. Battery indicator
4. Throttle trim lever 8. Aileron trim lever 12. Power indicator

NINCOAIR is brand of NINCO DESARROLLOS S.L.
Ctra. de l’Hospitalet 32
08940 Cornella Barcelona Spain
CIF B-60307725 · www.nincoair.com
10
NH92017
RTF - GLIDER PRO
2
,
4GHZ
Before turning on the transmitter, make sure the throttle stick is pulled all
the way back. Switch on the transmitter. The green and red LED should
be iluminated. WHEN THE RED LED ONLY IS ILUMINATED, THE
BATTERIES MUST BE REPLACED IMMEDIATELY. DO NOT FLY WITH ONLY
THE RED LIGHT ILUMINATED.
2. CHARGING THE BATTERY
Do not charge the battery more than 120 minutes.
Before the first flight, the battery should be circled 3-4 times to ‘wake’ it up for its best flight
performance. Please, follow the charge instruction that follow in order to charge the flight battery:
Charging steps.
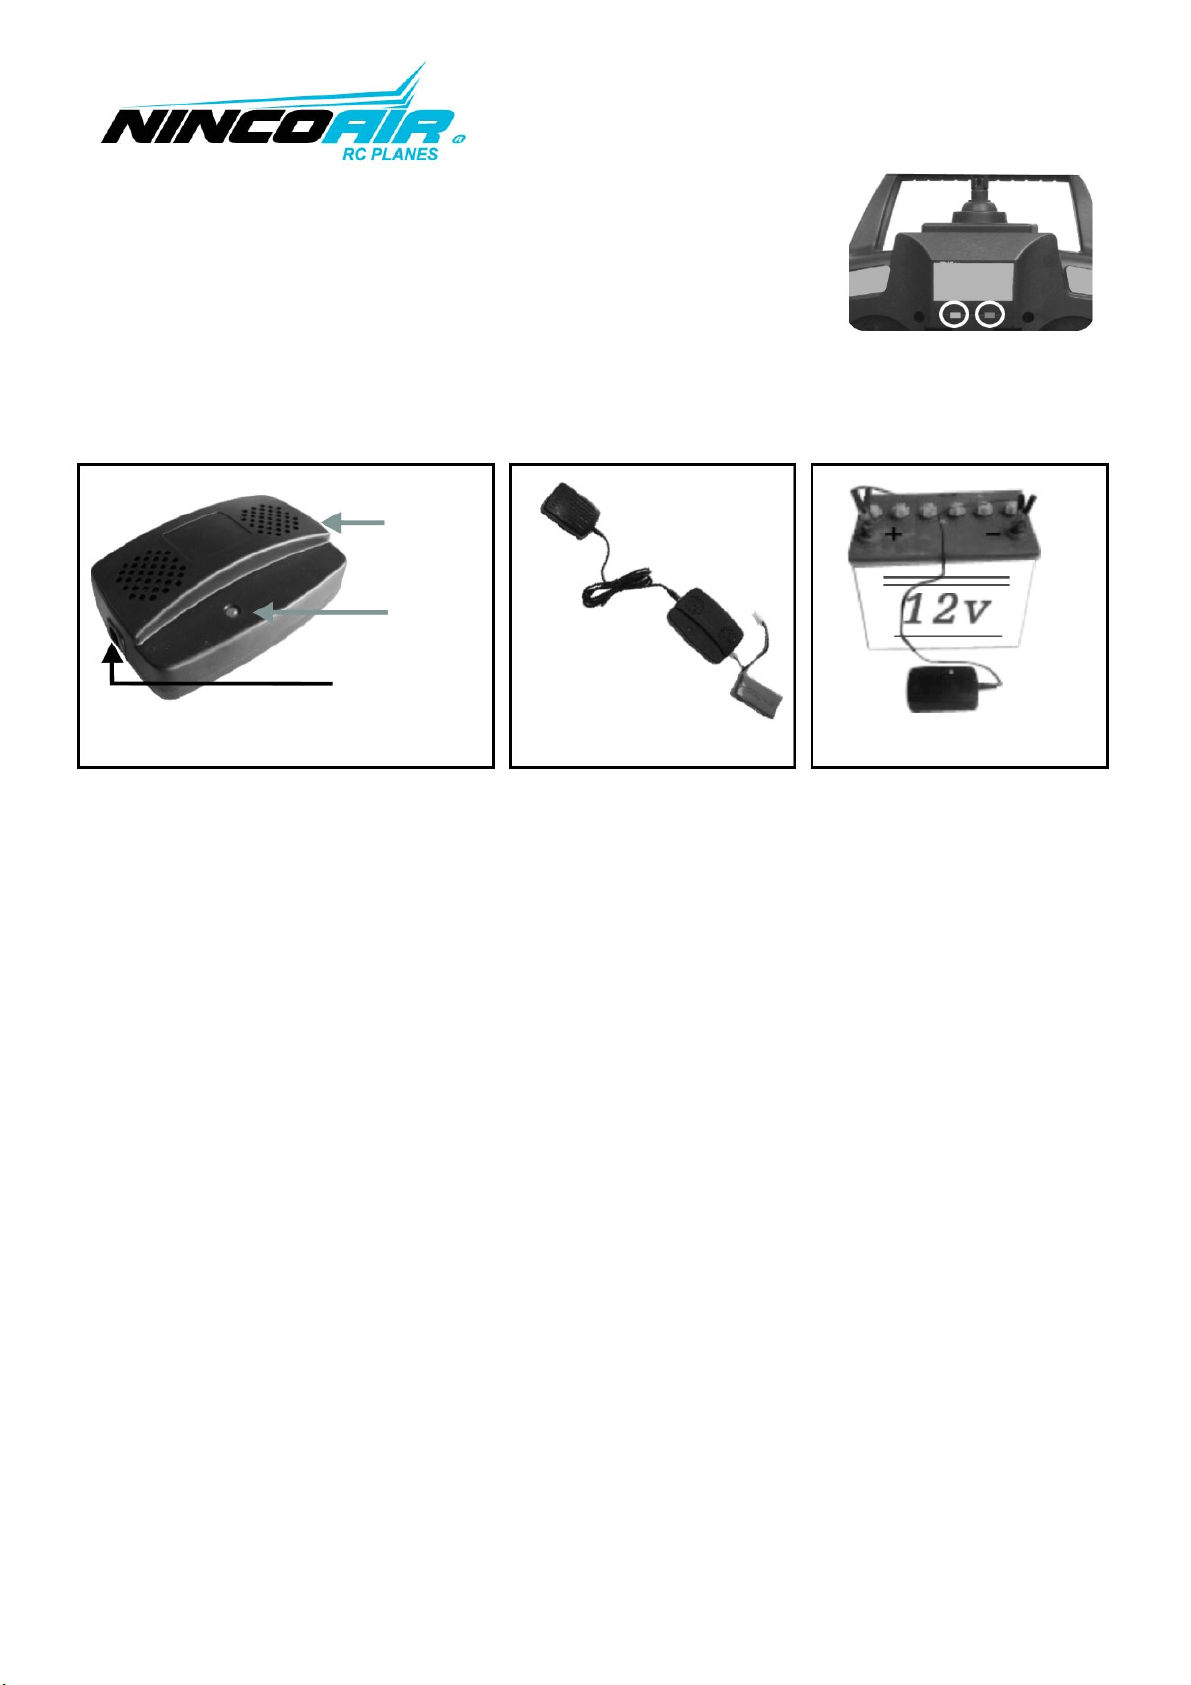
1. Use only included ‘Li-po’ charger against the warranty may cause danger. Connect the charger to DC
12V wall adapter and the battery as shown. You can charge from your car as a DC 12v power source-
Note: the red (+) and black (-) clips must be connected to the correct car battery poles.
2. After connecting the 12v power source properly, the charging LED indicator will turn green.
3. Connect the flight battery to the charging jack on the charger. The LED indicator will blink red,
which indicates the battery is being charged. If the LED stops blinking and remains in green it means
the flight battery pack is fully charged.
4. To charge a fully discharged battery will take about 60 minutes. When the battery is fully charged,
the LED will turn from Red to Green. Disconnect the power source and battery from the charger.
5. After fully charged, the voltage of each single cell of the battery pack should be 4,2 +/- 0.1v.
Therefore the whole battery pack voltage should be 8.3v.
6. Do not leave charger unattended while charging. Allow battery to cool down before charging again.
7. Do not store and charge the battery directly under sunlight.
8. Do not charge the battery while the battery is still in the airplane.
Model featured with li-po battery rechargeable, please read carefully these security guidelines:
1. Do not dispose of the battery into fire or heat.
2. Do not use or leave the battery near a heat source, such as fire or a heater.
3. Do not strike the battery or throw it against a hard surface.
4. Do not immerse the battery into water. Keep the battery cool and dry.
5. When recharging the battery, use only the charger designed for that purpose.
6. Do not over-discharge the battery.
7. Do not connect the battery to an electrical outlet.
8. Do not directly solder the battery or pierce it with a nail or other sharp object.
9. Do not transport or store the battery together with metal objects such as necklaces, hairpins, etc.
10. Charge the battery every six months.
11. Turn off your equipment power switch after use.
12. Recycle used batteries after covering the battery terminals with insulation tape or inserting the battery into an individual
polybag.
Connect to flight
battery
Charging indicator
DC12v power source
Charge with wall adapter
Charge with car battery

NINCOAIR is brand of NINCO DESARROLLOS S.L.
Ctra. de l’Hospitalet 32
08940 Cornella Barcelona Spain
CIF B-60307725 · www.nincoair.com
11
NH92017
RTF - GLIDER PRO
2
,
4GHZ
3. TOOLS REQUIRED
-Scissors
-Glue
-Pliers
-Crosshead screwdriver
-Allen wrench 3mm
4. INSTALLATION OF TAIL WING SET
1. Tear off double sided tape.
2. Hold horizontal stabilizer, pin the bulge into the concave. See attachment for rudder installation.
Insert the rudder from blade into the fuselage, secure both with glue.
3. Be sure to keep horizontal stabilizer balance at both side and the rudder should be vertical with
horizontal stabilizer.
4. Using foam glue or other suitable glue to reinforce.
5. Connect the throttle on the fuselage to horizontal stabilizer and rudder driver arms, secure with
allen wrench.
4.1 INSTALLATION ALTERNATIVE V TAIL.

NINCOAIR is brand of NINCO DESARROLLOS S.L.
Ctra. de l’Hospitalet 32
08940 Cornella Barcelona Spain
CIF B-60307725 · www.nincoair.com
12
NH92017
RTF - GLIDER PRO
2
,
4GHZ
5. INSTALLATION OF MAIN WING SET
1. Insert main wing reinforce stick into one half wing.
2. Put stick through fuselage and connect another half wing, before the two half wings fully connected
together with fuselage, aileron servo (under main wing), and fuselage (the part on fuselage where two
half wings join) should be connected first.
3. Connect one end of aileron throttle to the servo arm (outmost hole), and connect another end to
aileron control arm, secure with wrench.
6. PROPELLER INSTALLATION
1. Install propeller on to motor shaft, secure
with nut, see attached picture.
2. Secure the spinner onto propeller adapter
with 2mm x 6 mm screws.
7. FLYING CHECKING
Switch on the transmitter, make sure throttle is
pulled all the way back, other control and trim
part should be place in the middle, plane power
should be the last to switch on.
Before taking off, check to make sure aileron
and main wing, elevator and horizontal
stabilizer, fin and rudder to be paralleled, if not,
please adjust connect hole of throttle and arm or by releasing or tightening throttle.
8. BEFORE YOUR FLIGHT
Fly the model when the wind is calm. Pick an open area away from buildings, road or tall trees. Gusty
winds not only make it hard to control your plane but also may cause crash, loss or accident.

NINCOAIR is brand of NINCO DESARROLLOS S.L.
Ctra. de l’Hospitalet 32
08940 Cornella Barcelona Spain
CIF B-60307725 · www.nincoair.com
13
NH92017
RTF - GLIDER PRO
2
,
4GHZ
Charge a battery pack fully. Before storing the battery pack for longer than a week, charge or
discharge a li-po battery till about half-full. Do not store a fully-discharged or fully-charged li-po
battery pack for a long time.
9. TRANSMITTER CONTROL
Fully extend the antenna for flight
MODE 2
+/- 60min. With a battery fully charged
With a battery not charged enough
Elevator stick
(up/down control)
Air
p
lane descends
Air
p
lane climbs
Rudder stick
(ri
g
ht
/
left control)
Airplane turns left Airplane turns right
Throttle stick
(speed control)
Fast flight
Slow flight or
motor stop
Aileron stick
(ri
g
ht
/
left control)
Right and left movement

NINCOAIR is brand of NINCO DESARROLLOS S.L.
Ctra. de l’Hospitalet 32
08940 Cornella Barcelona Spain
CIF B-60307725 · www.nincoair.com
14
NH92017
RTF - GLIDER PRO
2
,
4GHZ
10. FLYING INSTRUCTION
1. Take off.
This plane needs to be taken off by hand-launch. Move the throttle stick fully forward slowly, the motor
will be started slowly till turning at the maximum speed; ask a friend launches the plane against wind
at an elevation angle of 15º for you. You may add a little gentle up the elevator trim till it gets a safe
height (more than 30m). Then you could try to move the rudder stick to turn the airplane. But you
must be aware of moving all control inputs slowly and gently.
2. Flying.
Beginners should practice flying on a calm day. Practice the control of elevation and turning after
gaining the height of 30-100m. Once it climbs up to 100m high, you will get enough safe altitude for
trying the loop, invert and glide the plane. Stop the practice when it is below 30m.
The elevator control stick is for controlling elevation of the plane. Move the stick forward, the elevator
on the plane will move downward and the plane will descend. Move the control stick upward, the
elevator will move upward and the plane will climb up, too much up control will cause the airplane
‘stall’ and drop from the sky, therefore always move the control stick gently to avoid the accident.
After becoming proficient in controlling the elevator and ailerons, you can try to practise the basic and
advance flight as cuba-8, loop, invert…
The continuous power time is about 6 minutes. Land the plane if it climbs up slowly or descends when
you move the throttle stick fully forward. The propeller may slow down or stop if the power of the
battery is not enough. The power system will remain rest power is for the servos to land the model.
WIND

NINCOAIR is brand of NINCO DESARROLLOS S.L.
Ctra. de l’Hospitalet 32
08940 Cornella Barcelona Spain
CIF B-60307725 · www.nincoair.com
15
NH92017
RTF - GLIDER PRO
2
,
4GHZ
3. Landing.
When the plane is about 30m high from the ground, fly with the wind. When the plane is about 20m
turn into the wind and land.
11. POWER SYSTEM
Continuous power running time is about 6 minutes. Land the plane before the time is up or as soon as
possible when the motor stops turning.
Bring extra batteries with you for longer flight time.
Check the transmitter power LED indicator often during flight. When only the red LED is lit land the
plane at once and replace the battery immediately. Otherwise, the plane will soon be out of control.
12. FLYING CONCEPTS
The airplane should fly in a cone area within 100º above and in front the operator. To fly too far o too
low will make it be out of control and difficult to land.
Elevation angle and wind speed
It the airplane, keeps pitching up, it shows the nose is light. Trim the airplane downward by the
elevator till it flies level. On the other side, if the plane keeps pitching down, it shows the nose is
heavy. Do the opposite in this condition.
TAIL HEAVY
(pitch up)
NORMAL
NOSE HEAVY
(Pitch down)

NINCOAIR is brand of NINCO DESARROLLOS S.L.
Ctra. de l’Hospitalet 32
08940 Cornella Barcelona Spain
CIF B-60307725 · www.nincoair.com
16
NH92017
RTF - GLIDER PRO
2
,
4GHZ
Avoid the same frequency interference.
You should avoid controlling your plane when any model with the same frequency in the same area or
all the models with the same frequency will be out of control.
Special draught.
There exists vortex in the leeward of tall building or steep
slope. Avoid flying in this area because it is dangerous.

NINCOAIR is brand of NINCO DESARROLLOS S.L.
Ctra. de l’Hospitalet 32
08940 Cornella Barcelona Spain
CIF B-60307725 · www.nincoair.com
17
NH92017
RTF - GLIDER PRO
2
,
4GHZ
Noch benötigt: Kreuzschraubendreher und 8 Stück AA Batterien für den Sender. DEUTSCH
Noch benötigt: Kreuzschraubendreher und 8 Stück AA Batterien für den Sender.
WARNUNG:
Ferngesteuerte Modelle sind kein Spielzeug! Bei nicht sachgemäßer Verwendung kann es zu Schäden
an Personen oder Gegenständen kommen.
Das Modell ist nicht geeignet für Kinder unter 14 Jahren und sollte nur von einem erfahrenen Piloten
geflogen werden. Es wird empfohlen das Modell nur an den dafür vorgesehenen Modellflugplätzen zu
benutzen.
Lesen Sie die Bedienungsanleitung sorgfältig bevor Sie das Modell fliegen. Fragen Sie nach wenn
Informationen unklar sind. Sie sind für alle Risiken und Schäden verantwortlich wenn Sie das Modell
benutzen.
INHALT:
Rumpf, Verstärkungsrohr für den Hauptflügel, rechter Flügel, linker Flügel, Höhenleitwerk, Ruder,
Propeller Set, Sender, Ladegerät, Akku, Flugregler für den Motor, V heckleitwerks.
1. SENDER BENUTZUNG UND STEUERUNG
Der Sender benötigt 8x AA Batterien (nicht enthalten). Legen Sie diese auf der
Rückseite des Senders in die dafür vorgesehene Halterung ein. Achten Sie dabei
auf die richtige Polarität.
Senderbelegung für Steuerung Mode 2 (Gas links)
1. Ruder 5. Höhenleitwerk Trimmung
9. Servo Umkehr Schalter
2. Gas 6. Querruder 10. An/Aus Schalter
3. Ruder Trimmung 7. Höhenleitwerk 11. Batterie Status Anzeige
4. Gas Trimmung 8. Querruder Trimmung 12. Sender Status Anzeige

NINCOAIR is brand of NINCO DESARROLLOS S.L.
Ctra. de l’Hospitalet 32
08940 Cornella Barcelona Spain
CIF B-60307725 · www.nincoair.com
18
NH92017
RTF - GLIDER PRO
2
,
4GHZ
Bevor Sie den Sender einschalten, stellen Sie sicher das der Gashebel sich
auf der untersten Position befindet. Schalten Sie den Sender ein. Die rote
und die grüne Kontroll LEDs sollten nun leuchten. WENN NUR DIE ROTE
LED LEUCHTET, MÜSSEN DIE BATTERIEN UMGEHEND AUSGETAUSCHT
WERDEN. FLIEGEN SIE NICHT WENN NUR DIE ROTE LED LEUCHTET.
2. AUFLADEN DES AKKUS
Laden Sie den Akku nicht länger als 120min.
Vor dem ersten Flug sollte der Akku 3-4 geladen werden um seine volle Leistung entfalten zu können.
Bitte beachten Sie die Ladeanweisungen um den Akku korrekt zu laden:
Ladehinweise.
1. Verwenden Sie nur das beiliegende Ladegerät um Gefahren auszuschliessen. Verbinden Sie das
Ladegerät mit dem Steckernetzteil und dem Akku wie gezeigt. Sie können den Akku mit dem Ladegrät
auch an der Autobatterie aufladen. Bitte beachten Sie die richtige Polarität rot (plus) und schwarz
(minus).
2. Nach dem Verbinden mit der 12V Stromquelle leuchtet die Kontroll LED am Ladegerät grün auf.
3. Verbinden Sie den Akku mit der Buchse des Ladegeräts. Die Kontroll LED blinkt rot während des
Ladevorgangs. Wenn die LED aufhört zu blinken und permanent grün leuchtet, ist der Ladevorgang
abgeschlossen und der Akku voll geladen.
4. Um den Akku vollständig zu laden, dauert der Ladevorgang etwa 60min. Wenn der Akku vollständig
geladen ist, ändert sich die Status LED von rot zu grün. Trennen Sie nach der Ladung alle
Verbindungen vom Ladegerät, Akku und Netzteil.
5. Nach der vollständigen Ladung, sollte die Spannung jeder einzelnen Zelle bei 4,2V +/- 0,1V liegen.
Der komplette Akku hat dann eine Spannung von etwa 8,3V-8,4V.
6. Lassen Sie das Ladegerät während des Betriebs nicht unbeaufsichtigt. Lassen Sie den Akku abkühlen
bevor Sie Ihn erneut laden.
7. Lagern und Laden Sie den Akku nicht in direktem Sonnenlicht.
8. Laden Sie den Akku nicht wenn er sich noch im Flugzeug befindet.
Das vorliegende Modell ist mit einem aufladbarem Lipo Akku ausgerüstet. Bitte lesen Sie sorgfältig nachfolgende
Sicherheitshinweise
1. Werfen Sie den Akku nicht ins Feuer oder setzen diesen extremer Hitze aus.
2. Lagern oder verwenden Sie den Akku nicht in der Nähe einer Heizung oder Feuer.
3. Schlagen oder werfen Sie den Akku nicht gegen Wände oder harte Untergründe.
4. Lassen Sie den Akku nicht mit Wasser in Berührung kommen. Halten Sie den Akku kühl und trocken.
5. Wenn Sie den Akku laden, benutzen Sie ausschliesslich das dafür vorgesehene Ladegerät.
6. Endladen Sie den Akku nicht zu tief.
7. Schliessen Sie den Akku nicht direkt an eine Steckdose an.
8. Löten Sie nicht direkt am Akku und beschädigen Sie Ihn nicht mit einem Nagel oder anderen scharfen Gegenstand.
9. Transportieren oder lagern Sie den Akku niemals zusammen mit metallischen Gegenständen wie Halsketten oder Haarnadeln
10. Laden Sie den Akku alle 6 Monate.
11. Schalten Sie alle Geräte nach Gebrauch aus.
12. Gebrauchte Akkus müssen an den Kontakten isoliert werden um recycelt werden zu können. Geben Sie diese dann an die
dafür vorgesehenen Sammelstellen ab. Der Akku gehört nicht in den Hausmüll!
Verbinden mit
Flugakku
Ladekontrolleuchte
DC12 Volt Eingang
Ladung mit Steckernetzteil
Ladung mit Autobatterie

NINCOAIR is brand of NINCO DESARROLLOS S.L.
Ctra. de l’Hospitalet 32
08940 Cornella Barcelona Spain
CIF B-60307725 · www.nincoair.com
19
NH92017
RTF - GLIDER PRO
2
,
4GHZ
3. BENÖTIGTES WERKZEUG
-Schere
-Kleber
-Zange
-Kreuzschlitz Schrauberdreher
-Steckinbus 3mm
4. MONTAGE DES HECKLEITWERKS
1. Entfernen Sie die Schutzfolie des doppelseitigen Klebebandes.
2. Halten Sie das Höhenleitwerk und stecken Sie die Pins in die dafür vorgesehenen Einbuchtungen.
Siehe Anhang für Ruderinstallation. Legen Sie das Höhenruder an den Rumpf an und befestigen dieses
mit Klebstoff.
3. Stellen Sie sicher, das das Höhenruder waagerecht und das Seitenleitwerk senkrecht im 90° Winkel
montiert sind.
4. Benutzen Sie Schaumstoffkleber oder einen anderen geeigneten Kleber um die Klebestellen zu
verstärken
5. Verbinden Sie das Höhen- und Seitenleitwerk mit den Anlenkstangen. Sichern Sie die Schrauben mit
einer 3mm Madenschraube.
4. MONTAGE DES V HECKLEITWERKS

NINCOAIR is brand of NINCO DESARROLLOS S.L.
Ctra. de l’Hospitalet 32
08940 Cornella Barcelona Spain
CIF B-60307725 · www.nincoair.com
20
NH92017
RTF - GLIDER PRO
2
,
4GHZ
5. MONTAGE DES HAUPTFLÜGELS
1. Führen Sie das Verstärkungsrohr in eine Hälfte des Flügels ein.
2. Führen Sie das Rohr durch den Rumpf und stecken es in den zweiten Flügel. Bevor Sie den Flügel
komplett am Rumpf einstecken, verbinden Sie die Querruderservokabel.
3. Verbinden Sie die Anlenkung der Querruder mit den äußeren Enden der Servohörner und sichern
diese mit einer Madenschraube.
6. PROPELLER INSTALLATION
1. Installieren Sie den Propeller auf der
Motorwelle und sichern diesen mit einer
Schraube, siehe Bild.
2. Sichern Sie den Spinner mit einer 2x6mm
Schraube direkt am Propelleradapter
7. FLUGVORBEREITUNGEN
Schalten Sie den Sender ein und stellen Sie
sicher das der Gashebel auf der untersten
Position ist, und alle anderen Hebel sich in der
Mittelstellung befinden.
Bevor Sie das Modell abheben lassen,
kontrollieren Sie die Querruder und Hauptflügel,
Höhen- und Seitenleitwerk und stellen Sie
sicher das diese Paralell zu einander stehen. Wenn dies nicht der Fall ist, korrigieren Sie die
Anlenkungen.
8. VOR DEM FLUG
Fliegen Sie das Modell nur bei wenig Wind. Wählen Sie eine weite, offene Fläche weit weg von
Gebäuden, Strassen oder hohen Bäumen. Stärkere Winde machen es nicht nur schwierig das Modell zu
kontrollieren, sondern es kann auch abstürzen, abtreiben und Unfälle verursachen.
Table of contents
Languages:
Other NINCOAIR Remote Control manuals
Popular Remote Control manuals by other brands

Kenwood
Kenwood KNA-RCDV331 instruction manual

Universal Remote Control
Universal Remote Control CLIKR-5 UR5U-8780L operating instructions

Samsung
Samsung MWR-WG00JN Service manual

APART
APART PM1122-INT user manual

Complete Control
Complete Control MX-980i operating instructions

FUTABA
FUTABA GV T2PG instruction manual

HygroMatik
HygroMatik Spa Touch Control manual

Niles
Niles RCA-HT installation guide

Heat Controller
Heat Controller Room Air Remote Controller Owner's instruction manual

Sony
Sony RM-AX4000A - Universal Remote Control operating instructions

Jula
Jula Hard Head 018984 operating instructions

Midea
Midea RG70E2(2)/BGEFU1 manual