12 13
SG www.ninjakitchen.sg MY www.ninjakitchen.my SG +65 800 120 5111 MY +60 1800 803 915
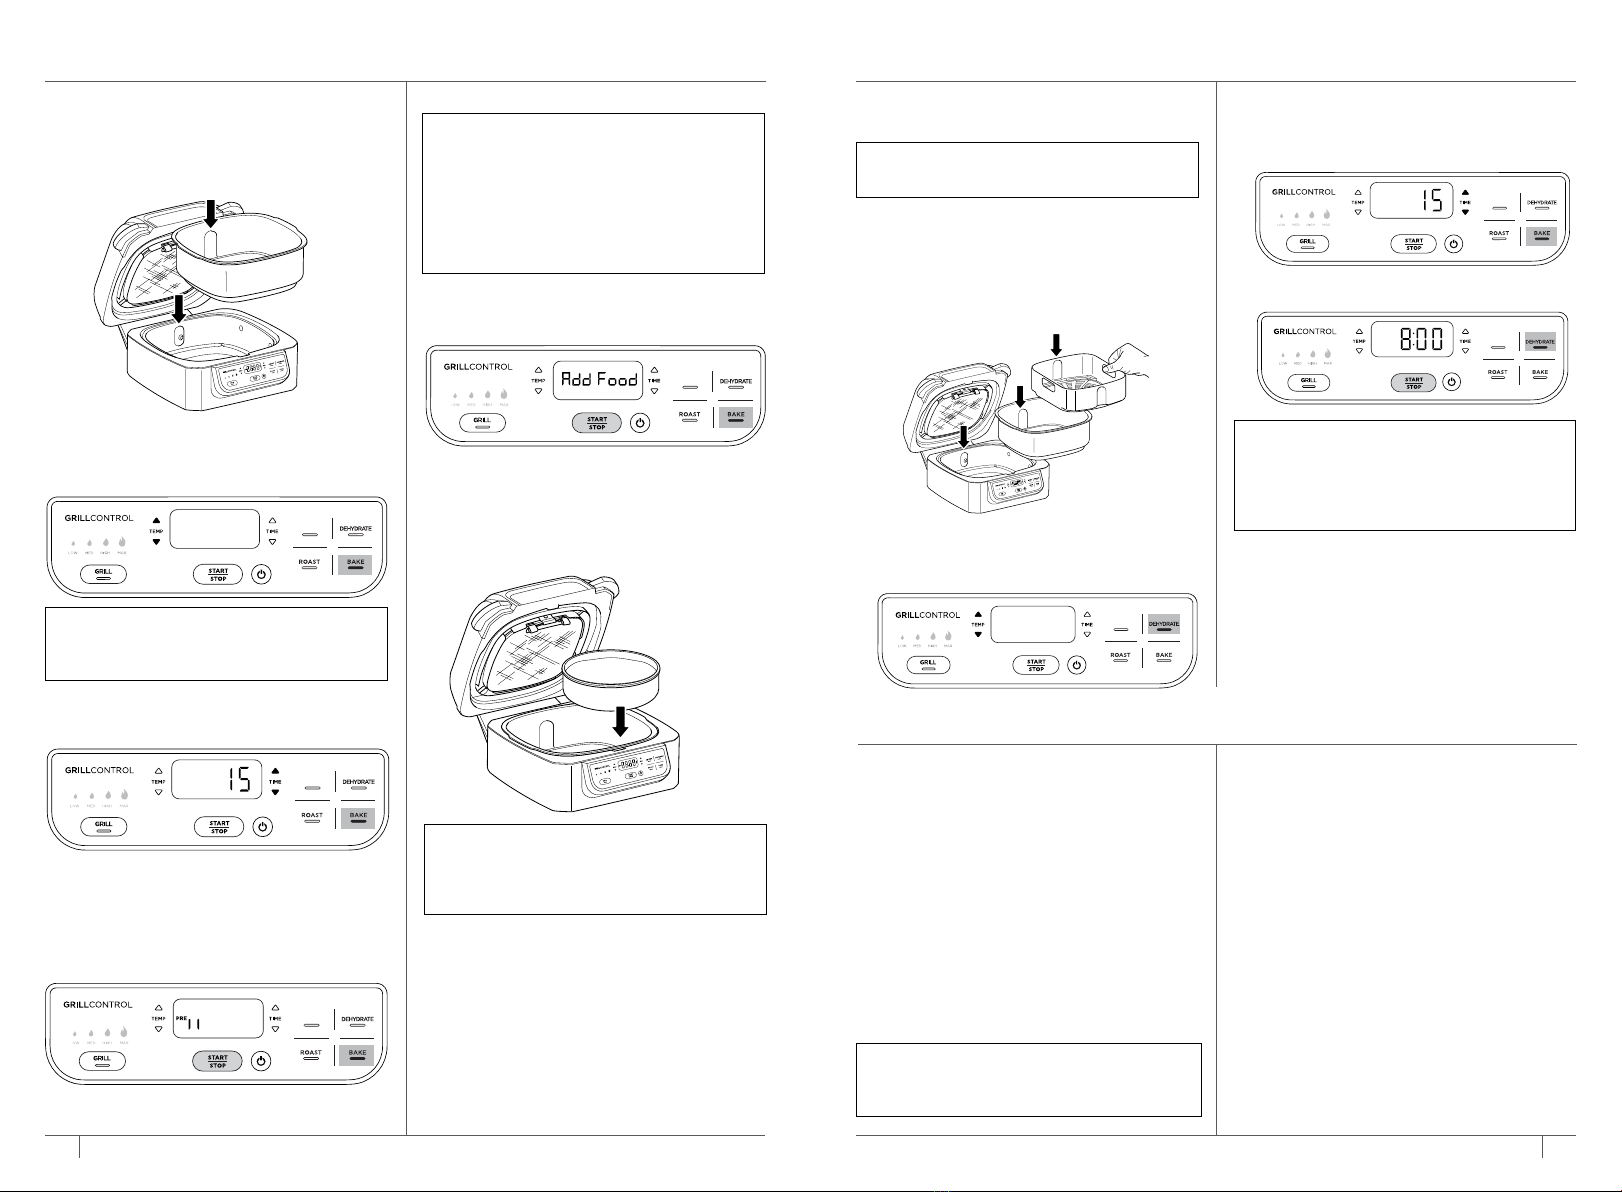
Dehydrate
1Place cooking pot in the unit with the
indent on the pot aligned with the bump
on the main unit, then add a single layer
of ingredients to the bottom of the pot.
Place the crisper basket in the pot and
add a layer of ingredients to the bottom
of the basket. Close the hood.
2Press the DEHYDRATE button. The
default temperature setting will display.
Use the up and down TEMP arrows to
set your desired temperature.
CLEANING YOUR FOODITM GRILL
The unit should be cleaned thoroughly
after every use. Always let the appliance
cool before cleaning.
• Unplug the unit from the wall outlet
before cleaning. Keep the hood open
after removing your food so the unit
will cool down more quickly.
• To clean the main unit, and control
panel, wipe them with a damp cloth.
• The cooking pot, grill plate, crisper
basket, splatter shield, cleaning brush,
and any other included Ninja Foodi Grill
accessories are dishwasher safe.
• If hand-washing, use the included
cleaning brush (the opposite end is a
scraper for releasing baked-on residue).
Air-dry or towel-dry all parts after
hand-washing.
• If food residue or grease are stuck on the
grill plate, splatter shield, or any other
removable part, place them in a sink or
stack them in the pot and fill with warm,
soapy water and allow to soak for a
couple hours or overnight. After soaking,
use the brush to clean the parts.
• Over time, the splatter shield front tabs
and frame may accumulate grease
buildup. To deep clean the splatter
shield, place it in a pot of water and boil
for 10 minutes. Then, rinse with room
temperature water and allow to dry
completely before reinstalling.
3Use the up and down TIME arrows to
set the dehydration time, in 15-minute
increments, up to 12 hours.
4Press the START/STOP button to begin.
The unit does not need to preheat.
5When dehydration time is complete, the
unit will beep and END will appear on
the display screen. Remove your food
and close the hood.
USING YOUR FOODITM GRILL – CONT.
5When preheating is complete, the unit
will beep and “Add Food” will flash
across on the display screen.
6Open the hood and add ingredients to
the pot or set your bake pan* directly
in the bottom of the pot, and close the
hood to start cooking. Once the hood is
closed, cooking will begin and the timer
will start counting down.
7When cook time is complete, the unit
will beep and END will appear on the
display screen. Keep the hood open after
removing your food so the unit will cool
down more quickly. The stainless steel
wrap on the exterior of the unit will be
hot after cooking. If you need to cook
your food longer, simply press the TIME
up arrow to add more time, then press
the START/STOP button.
Bake
1Place cooking pot in the unit so the
indent on the pot aligned with the bump
on the main unit, then close the hood.
2Press the BAKE button. The default
temperature setting will display. Use
the up and down TEMP arrows to adjust
the temperature.
3Use the up and down TIME arrows to set
the cook time, in 15-minute increments,
up to 4 hours.
4Press the START/STOP button to begin
preheating. PRE will appear on the
display screen, and the progress bar
will begin. It can take up to 3 minutes
to preheat, depending on the selected
temperature setting.
NOTE: During cooking, you can open the
hood
to check on your food. The timer will
pause when the
hood
is opened and then
automatically resume after it is closed.
AIR FRY
AIR FRY
AIR FRY
NOTE: NEVER use abrasive tools or
cleaners. NEVER immerse the main unit
in water or any other liquid.
NOTE: During dehydration, you can
open the hood to check on your food.
The timer will pause when the hood is
opened and then automatically resume
after it is closed.
150C AIR FRY
AIR FRY
AIR FRY
60C AIR FRY
NOTE: The Dehydrate function is not
included on all models.
NOTE: While preheating is strongly
recommended for best results, you can
skip it by pressing the BAKE button again.
“Add Food” will flash across the screen.
Open the hood and place ingredients
in the crisper basket. Once the hood is
closed cooking will begin and the timer
will start counting down.
NOTE: To convert conventional oven recipes,
reduce the temperature by 25°C. Check food
frequently to avoid overcooking. *Bake pan is
not included