Nippon DENON D-C1 User manual

DENO-00342
l)
F
N
O
N
Hi-Fi
Micro
Component
System
OPERATING
INSTRUCTIONS
MODEL
D-C1
MICRO
COMPONENT
SYSTEM
EUROPE,
U.K.,
AUSTRALIA
&
ASIA
models
U.S.A.
model
CAUTION
DANGER
invisible
laser
radiation
when
open
and
interlocks
failed
or
defeated.
AVOID
DIRECT
EXPOSURE
TO
BEAM.
CONTENTS
SPECIFICATIONS:
«.).
5.
wesce
cn
aies
OPERATING
INSTRUCTIONS
..........
NIPPON
COLUMBIA
CO.
LTD.
Printed
by:
Schaltungsdienst
Lange,
Berlin
(GERMANY)
ma
D-C1
¢
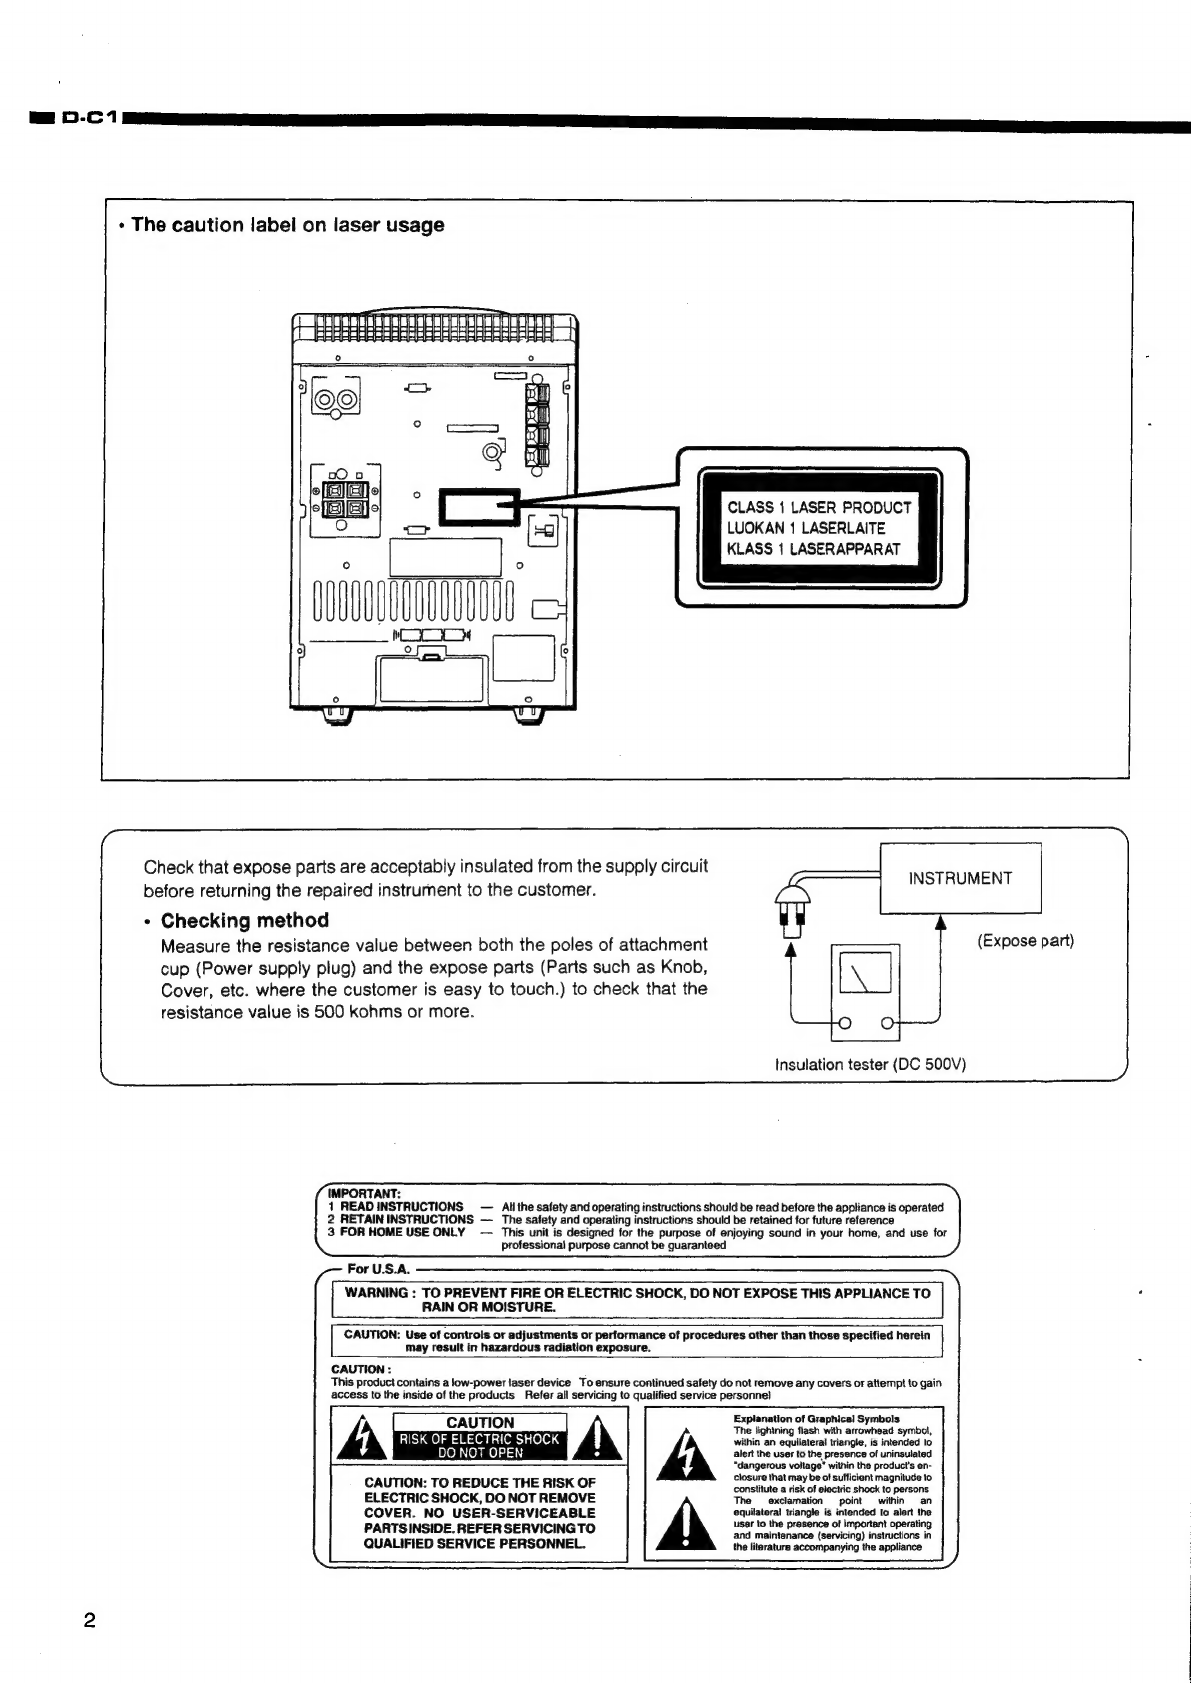
The
caution
label
on
laser
usage
CLASS
1
LASER
PRODUCT
LUOKAN
1
LASERLAITE
KLASS
1
LASERAPPARAT
Check
that
expose
parts
are
acceptably
insulated
from
the
supply
circuit
; ;
F
3
INSTRUMENT
before
returning
the
repaired
instrument
to
the
customer.
*
Checking
method
Measure
the
resistance
value
between
both
the
poles
of
attachment
(Expose
part)
cup
(Power
supply
plug)
and
the
expose
parts
(Parts
such
as
Knob,
Cover,
etc.
where
the
customer
is
easy
to
touch.)
to
check
that
the
resistance
value
is
500
kohms
or
more.
insulation
tester
(DC
500V)
IMPORTANT:
1
READINSTRUCTIONS
—
Ali
the
safety
and
operating
instructions
should
be
read
before
the
appliance
is
operated
2
RETAIN
INSTRUCTIONS
—
The
safety
and
operating
instructions
should
be
retained
for
future
reference
3
FOR
HOME
USE
ONLY
—
This
unit
is
designed
for
the
purpose
of
enjoying
sound
in
your
home,
and
use
for
professional
purpose
cannot
be
guaranteed
For
U.S.A.
WARNING
:
TO
PREVENT
FIRE
OR
ELECTRIC
SHOCK,
DO
NOT
EXPOSE
THIS
APPLIANCE
TO
RAIN
OR
MOISTURE.
CAUTION:
Use
of
controls
or
adjustments
or
performance
of
procedures
other
than
those
specified
herein
may
result
in
hazardous
radiation
exposure.
CAUTION
:
This
product
contains
a
low-power
laser
device
To
ensure
continued
safety
do
not
remove
any
covers
or
attempt
to
gain
access
to
the
inside
of
the
products
Refer
all
servicing
to
qualified
service
personne)
CAUTION
Explanation
of
Graphical
Symbols
[
CAUTION
The
lightning
flash
with
arrowhead
symbol,
RISK
OF
ELECTRIC
SHOCK
within
an
equilateral
triangle,
is
intended
to
DO
NOT
OPEN
alert
the
user
to
the
presence
of
uninsulated
“dangerous
voltage”
within
the
product's
en-
closure
that
may
be
of
sufficient
magnitude
to
CAUTION:
TO
REDUCE
THE
RISK
OF
constitute
a
risk
of
electric
shock
to
persons
ELECTRIC
SHOCK,
DO
NOT
REMOVE
The
exclamation
point
within
an
COVER.
NO
USER-SERVICEABLE
equilateral
triangle
is
intended
to
alert
the
PARTSINSIDE.
REFER
SERVICING
TO
ee
pronenice
of
npodenl
coer
and
maintenance
(servicing)
instructions
in
QUALIFIED
SERVICE
PERSONNEL.
the
literature
accompanying
the
appliance

a
a
ee
ES
a
ene
C-
1
aa
SAFETY
PRECAUTIONS
The
following
precautions
should
be
observed
when
servicing.
1
Since
many
parts
in
the
unit
have
special
safety-related
characteristics,
always
use
genuine
Denon’s
replacement
parts.
Especially
critical
parts
in
the
power
circuit
block
should
not
be
replaced
with
other
makers.
Critical
parts
are
marked
with
in
the
circuit
diagram
and
printed
wiring
board.
2.
Before
returning
a
repaired
unit
to
the
customer,
the
service
technician
must
thoroughly
test
the
unit
to
ascertain
that
it
is
completely
safe
to
operate
without
danger
of
electrical
shock
SPECIFICATIONS
@
TUNER
SECTION
©
TIMER
SECTION
Circuit
system:
[FOR
EUROPE,
U
K.]}
System:
Digital
quartz
clock
FM/MW/LW
3
bands
Display
format:
[FOR
EUROPE,
U.K.]
[FOR
AUSTRALIA,
ASIA}
24-hour
cycle
FM/SW/MW
3
bands
[FOR
AUSTRALIA,
ASIA,
US
A]
[FOR
U.S
A]
12-hour
cycle
FM/AM
2
bands
Timer
accuracy:
Within
60
seconds
at
monthly
rate
Tuning
range:
IEC
Sensitivity:
(S/N
26
dB)
[FOR
EUROPE,
U.K.]
FM:
87
5
-
108
MHz
(50
kHz
step)
MW:522
-
1,611
kHz
(9
kHz
step)
LW:
153
-
281
kHz
(1
kHz
step)
@
CD
PLAYER
SECTION
Number
of
channels:
2
Frequency
Response:
20
-
20,000
Hz
[FOR
AUSTRALIA,
ASIA]
desi
see
FM:
87
5
-
108
MHz
(50
kHz
step)
woe
ces
EInSemn
SW
Se
ISO
Mag
kee)
Properties:
Wave
length:
785
nm
MW:
522
-
1,611
kHz
(9
kHz
step)
MW:
530
-
1,710
kHz
(10
kHz
step)
[FOR
U.S
A_]
FM:
87.9
-
107
9
MHz
(100
kHz
step)
AM:
530
-
1,710
MHz
(10
kHz
step)
FM:
1
5
»V/75
ohms
{FOR
EUROPE,
U.K
}
MW:
1,500
pV/m
(loop
antenna)
LW:
3,500
p1V/m
(loop
antenna)
[FOR
AUSTRALIA
ASIA]
MW:
1,200
uV/m
(loop
antenna)
SW
400
pV
[FOR
U.S.A
]
AM:
1,400
LV/M
(loop
antenna)
Laser
output:
Less
than
175
pW
(IEC
Pub
825)
Less
than
485
pW
(FDA
CFR
21)
@
GENERAL
SPECIFICATION
Power
supply:
Power
consumption:
AC
230
V,
50
Hz
[FOR
EUROPE,
U
K
}
AC
110
V-
120
V,
220
V
-
240V
50/60
Hz
[FOR
AUSTRALIA,
ASIA]
AC
120
V,
60
Hz[FORU
SA]
Battery:
4
5
v
[8x
JIS
R6P
(JIS
SUM-3)
OR
"AA"
Cell
or
IEC
R6]
(Optional)
50
W
®
TAPE
DECK
SECTION
Dimensions:
180
(W)
x
265
(H)
x
255
(D)
mm
ight:
i
teri
Track
system:
4
track,
2
channels
worane
S/GRG
WAthUOBHerles)
Recording
system:
AC
bias
e
SPEAKER
SECTION
Erasing
system:
AC
erase
Tape:
id
Recording/Playback
System:
2-way
bass
reflex
speaker
system
Normal/C-O2/Metal
(Playback
only)
Speakers:
12cmx1,5cmx
1
Tape
speed:
4.75
cm/s
Impedance:
6
ohms
Frequency
response
Normal
50
-
15,000
Hz
Maximum
input
C,O2
50
-
16,000
Hz
Power:
25
W
(musical
peak
signa!)
Dimensions:
150
(W)
x
260
(H)
x
200
(D}mm
Weight:
19kg
@
AMPLIFIER
SECTION
Input
sensitivity/
Impedance:
Output
impedance:
Audio
output:
MIC:
4
mV
(10
kohms)
AUX:
800
mV
(47
kohms)
(US
pin
sockets)
External
speaker
terminals
Suitable
impedance:
6
-
16
ohms
Headphones
Suitable
impedance:
8
-
100
ohms
15W+15W
(6
ohms,
THD
10%)
*
Specifications
are
subject
to
change
withoutnotice
for
performance
improvement

IMPORTANT
SAFEGUARDS
SAFETY
POINTS
YOU
SHOULD
KNOW
ABOUT
YOUR
AUDIO
EQUIPMENT.
CAUTION:
6A.
10.
1.
12.
13.
14,
Read
all
of
these
instructions.
Save
these
instructions
for
{ater
use.
(For
U.S.A.)
Follow
all
warnings
and
instructions
marked
on
the
audio
equipment.
Read
Instructions
-
Ail
the
safety
and
operating
Instructions
should
be
read
before
the
appliance
is
operated.
Retain
Instructions
-
The
safety
and
operating
instructions
should
be
retained
for
future
reference.
Heed
Warnings
-
All
warnings
on
the
appliance
and
in
the
operating
instructions
should
be
adhered
to.
Follow
Instructions
-
All
operating
and
use
instructions
should
be
followed.
Water
and
Moisture
-
The
appliance
should
not
be
used
near
water
-
for
example,
near
a
bathtub,
washbowl,
kitchen
sink,
laundry
tub,
ina
wet
basement,
of
near
a
swimming
pool,
etc.
Carts
and
Stands
-
The
appliance
should
be
used
only
with a
cart
or
stand
that
1s
recommended
by
the
manufacturer.
An
appliance
and
cart
combination
should
be
moved
with
care.
Quick
stops,
excessive
force,
and
uneven
surfaces
may
cause
the
appliance
and
cart
combination
to
overturn.
Wall
or
Ceiling
Mounting
-
The
appliance
should
be
mounted
to
a
wall
or
ceiling
only
as
recommended
by
the
manufacturer.
Ventilation
-
The
appliance
should
be
situated
so
that
its
location
or
position
does
not
interfere
with
its
proper
ventilation.
For
example,
the
appliance
should
not
be
situated
on
a
bed,
sofa,
rug,
or
similar
surface
that
may
block
the
ventilation
openings;
or,
placed
in
a
built-in
installation,
such
as
a
bookcase
or
cabinet
that
may
impede
the
flow
of
atr
through
the
ventilation
openings.
Heat
-
The
appliance
should
be
situated
away
from
heat
sources
such
as
radiators,
heat
registers,
stoves,
or
other
appliances
(including
amplifiers)
that
produce
heat.
Power
Sources
-
The
appliance
should
be
connected
ta
a
power
supply
only
of
the
type
described
in
the
operating
instructions
or
as
marked
on
the
appliance.
Grounding
or
Polarization
-
The
precautions
that
should
be
taken
so
that
the
grounding
or
polanzation
means
of
an
appliance
ts
not
defeated.
Power-Cord
Protection
-
Power-supply
cords
should
be
routed
so
that
they
are
not
likely
to
be
walked
on
or
pinched
by
items
placed
upon
or
against
them,
paying
particular
attention
to
cords
at
plugs,
conventence
receptacles,
and
the
point
where
they
exit
from
the
appliance.
Cleaning
-
The
appliance
should
be
cleaned
only
as
recommended
by
the
manufacturer.
Power
Lines
-
An
outdoor
antenna
should
be
located
away
from
power
lines.
15.
Outdoor
Antenna
Grounding
-
If
an
outside
antenna
is
connected
to
the
recerver,
be
sure
the
antenna
system
is
grounded
so as
to
provide
some
protection:
against
voltage
surges
and
built
up
static
charges.
Section
810
of
the
National
Electrical
Code,
ANSI/NFPA
No.
70
-
1990,
provides
information
with
respect
to
proper
grounding
of
the
mast
and
supporting
structure,
grounding
of
the
lead-
in
wire
to
an
antenna
discharge
unit,
connection
to
grounding
electrodes,
and
requirements
for
the
grounding
electrodes.
See
Figure
below.
EXAMPLE
OF
ANTENNA
GROUNDING
AS
PER
NATIONAL
ELECTRICAL
CODE
ANTENNA
LEAD
IN
GROUND
CLAMP
ANTENNA
DISCHARGE
UNIT
(NEC
SECTION
810-20)
GROUNDING
CONDUC’
(NEC
SECTION
810-21)
ELECTRIC
SERVICE
EQUIPMENT
(HEC
ART
250,
PART
Hy)
NEC
~
NATIONAL
ELECTRICAL
CODE
16.
Nonuse
Periods
-
The
power
cord
of
the
appliance
should
be
unplugged
from
the
outlet
when
left
unused
for
a
long
period
of
time.
17.
Object
and
Liquid
Entry
-
Care
should
be
taken
so
that
objects
do
not
falt
and
liquids
are
not
spitled
into
the
enclosure
through
openings.
18.
Damage
Requiring
Service
-
The
appliance
should
be
serviced
by
qualified
service
personnel
when:
A.
The
power-supply
cord
or
the
plughas
been
damaged;
or
B.
Objects
have
fallen,
or
liquid
has
spilled
into
the
appliance;
or
C.
The
appliance
has
been
exposed
to
rain;
or
D.
The
appliance
does
not
appear
to
operate
normally
or
exhibits
a
marked
change
in
performance;
or
E.
The
appliance
has
been
dropped,
or
the
enclosure
damaged.
19.
Servicing
-
The
user
should
not
attempt
to
service
the
appliance
Osyond
that
described
in
the
operating
instructions.
All
other
servicing
should
be
referred
to
qualified
service
personnel.
For
CANADA
:
CAUTION
TO
PREVENT
ELECTRIC
SHOCK
DO
NOT
USE
THIS
(POLARIZED)
PLUG
WITH
AN
EXTENSION
CORD,
RECEPTACLE
OR
OTHER
OUTLET
UNLESS
THE
BLADES
CAN
BE
FULLY
INSERTED
TO
PREVENT
BLADE
EXPOSURE.
For
U.S.A.
INFORMATION
This
equipment
has
been
tested
and
found
to
comply
with
the
limits
for
a
Class
B
digital
device,
pursuant
to
Part
15
of
the
FCC
Rules.
These
limits
are
designed
to
provide
reasonable
protection
against
harmful
interference
in
a
residential
instaflation.
This
equipment
generates,
uses,
and
can
radiate
radio
frequency
energy
and
,
if
not
installed
and
used
in
accordance
with
the
instructions,
may
cause
harmful
interference
to
radio
communications.
However,
there
1s
no
guarantee
that
interference
will
not
occur
in
a
particular
installation.
lf
this
equipment
does
cause
harmful
interference
to
radio
or
television
reception,
which
can
be
determined
by
turning
the
equipment
off
and
on,
the
user
is
encouraged
to
try
to
correct
the
interference
by
one
or
more
of
the
following
measures:
—
Reorient
or
relocate
the
recerving
antenna.
—
Increase
the
separation
between
the
equipment
and
receiver.
~-
Connect
the
equipment
into
an
outlet
on
a
circuit
different
from
that
to
which
the
recerver
ts
connected.
~
Consult
the
dealer
or
an
expenenced
radio/TV
technician
for
help.
POWER
CAUTION:
This
unit
ts
operated
on
120
volts,
60
Hz
(normal
household
current)
and
is
provided
with a
polarized
AC
plug.
One
blade
of
the
plug
is
wider
than
the
other,
which
means
that
the
plug
can
be
inserted
in
the
wall
outlet
in
one
way
only.
For
the
sake
of
safety,
do
not
damage
the
plug.
In
case
of
using
an
extension
cord,
make
sure
to
use
a
cord
provided
with
a
polanzed
plug.
When
inserting
the
AC
plug
in
the
wail
outlet,
make
sure
to
hold
the
plug
itself.
In
order
to
avoid
electric
shocks
and
breaking
of
the
cord,
do
not
pull
on
the
cord.
INSTALLATION:
*
Do
not
place
the
unit
where
it
is
subjected
to
direct
sunlight.
*
Do
not
place
the
unit
on
or
close
to
heat-radiating
devices.
*
Do
not
place
the
unit
where
it
is
subjected
to
dust.
For
U.S.A.
Note
to
CATV
system
installer
:
This
reminder
ts
provided
ta
call
the
CATV
system
tnstaller's
attention
to
Article
820-22
of
the
NEC
that
provides
guidelines
for
proper
and,
tn
particutar,
specifies
that
the
cable
ground
shail
be
connected
to
the
grounding
system
of
the
building,
as
close
to
the
point
of
cable
entry
as
practical.
NOTICE
.
The
POWER
button
on
the
front
panel
and
remote
control
switches
the
unit
from
ON
to
STANDBY
but
does
not
isolate
the
unit
from
the
mains
supply.
If
the
unit
is
to
be
left
unattended
for
aiong
period,
itis
recommended
that
the
unit
is
switched
to
standby
and
the
mains
plug
ts
removed
from
the
socket.
Pour
le
Canada
ATTENTION
POUR
PREVENIR
LES
CHOCS
ELECTRIQUES,
NE
PAS
UTILISER
CETTE
FICHE
POLARISEE
AVEC
UN
PROLONGATEUR,
UNE
PRISE
DE
COURANT
OU
UNE
AUTRE
SORTIE
DE
COURANT,
SAUF
SI
LES
LAMES
PEUVENT
ETRE
INSEREES
A
FOND
IMPORTANT
1.
Lire
le
mode
d'emploi
-
Avant
d'utiliser
l'appareil,
lire
toutes
les
instructions
de
securité
et
de
fonctionnement.
.
Conserver
le
mode
d'emploi
-
Conserver
les
instructions
de
securité
et
de
fonctionnement
a
titre
de
référence
future.
.
Pour
une
utilisation
ala
maison
uniquement
-
Cet
appareit
est
congu
pour
apprecier
la
musique
a
la
maison.
L'utilisation
pour
un
but
professionnel
ne
peut
pas
étre
garanti.
PRECAUTION
EN CE
QUI
CONCERNE
L'ALIMENTATION
Cet
appareil
fonctionne
sur
te
secteur
de
120
volts,
60
herts
(courant
pour
habitation
normal}
et
est
fournt
avec
une
fiche
secteur
polansee.
Une
des
lames
de
la
fiche
est
plus
large
que
l'autre.
Ainsi,
la
fiche
ne
peut
étre
inseree
dans
ta
prise
secteur
que
dans
un
sens.
Pour
la
securite,
ne
pas
endommager
la
fiche.
Dans
fe
cas
de
[utilisation
d'une
rallonge
électnque,
s‘assurer
d'en
utiliser
une
avec
des
fiches
poiarisees.
Lors
du
branchement
de
Ia
fiche
secteur
dans
la
prise,
bien
mamipuler
per
la
fiche
ells
méme.
Pour
eviter
tout
choc
électrique
et
cassure
de
la
ralionge,
ne
pas
tirer
sur
cette
derniére.
INSTALLATION:
*
Ne
pas
mettre
l'appareil
1a
ou
il
est
sujet
a
lumiére
directe
du
soleil.
*
Ne
pas
mettre
l'appareil
sur
ou
pres
d'un
appareil
de
chauffage.
*
Ne
pas
mettre
l'appareil
la
ou
il
est
sujet
ala
poussiére.
AVIS
.
Le
bouton
POWER
du
panneau
avant
et
de
la
télécommande
commute
l'appareil
de
sous
tension
ON
a
attente
STANDBY
mais
niisole
pas
l'appareil
de
lalimentation
secteur.
Si
l'appareil
n'est
pas
utilise
pendant
une
longue
periode,
i!
est
recommandé
de
!e
reglersurattente
et
de
débrancherla
fiche
d'alimentation
de
la
prise
électrique.
Rae
a
aa
a
a
OI
OLE
OL
EG
ee
re
|,
°C)
bay
ee
exe
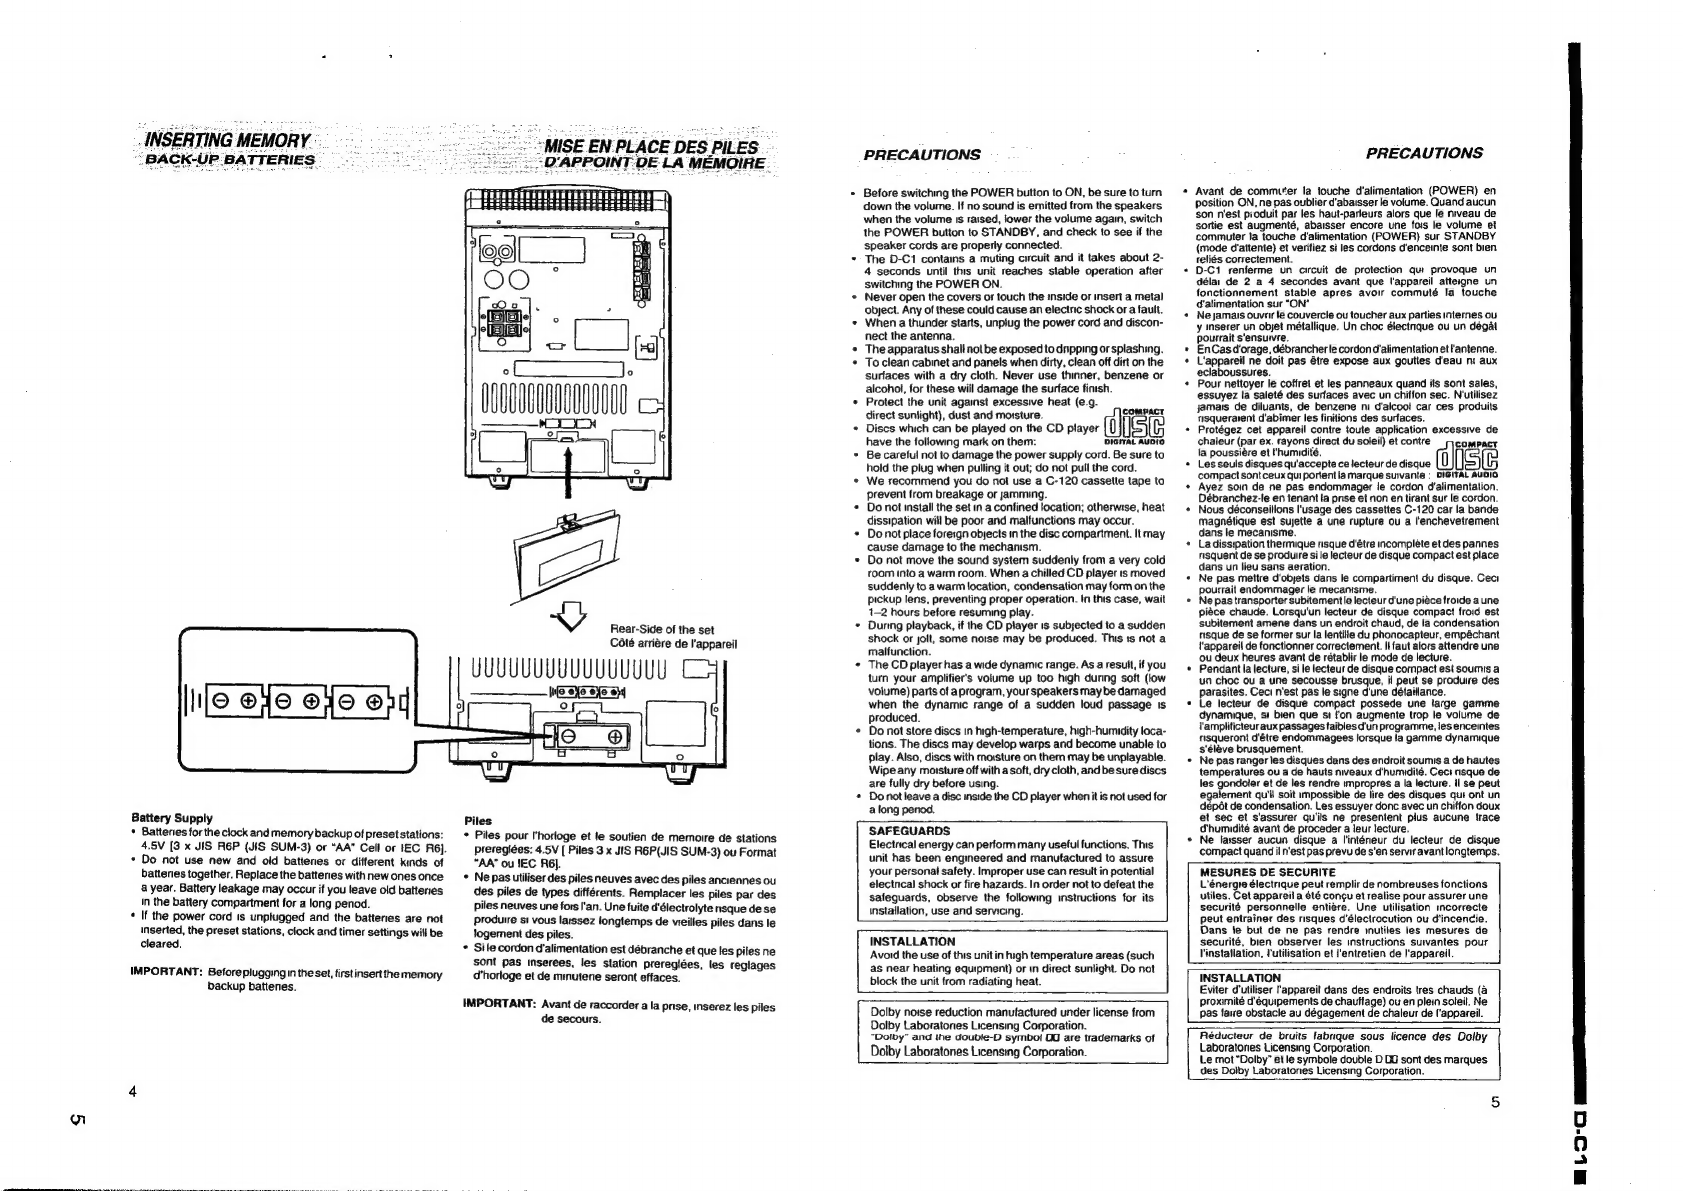
Battery
Supply
*
Batteries
for
the
clock
and
memory
backup
of
preset
stations:
4.5V
[3
x
JIS
R6P
(JIS
SUM-3)
or
“AA”
Cell
or
IEC
R6].
*
Do
not
use
new
and
old
batteries
or
different
kinds
of
batteries
together.
Replace
the
batteries
with
new
ones
once
a
year.
Battery
leakage
may
occur
if
you
teave
old
battenes
in
the
battery
compartment
for
a
long
period.
*
If
the
power
cord
is
unplugged
and
the
batteries
are
not
inserted,
the
preset
stations,
clock
and
timer
settings
will
be
cleared.
IMPORTANT:
Before
pluggingin
the
set,
firstinsert
the
memory
backup
battenes.
O:APPOINT
DE
LA
MEMOIRE
z
\)
Rear-Side
of
the
set
Cété
arriére
de
l'appareil
UUUUUUUUUUUUUUUU
C4
We-sie
sis
$4
Piles
*
Piles
pour
I’horloge
et
le
soutien
de
memorre
de
stations
prereglées:
4.5V
[
Piles
3
x
JIS
R6P(JIS
SUM-3)
ou
Format
“AA”
ou
IEC
R6].
*
Ne
pas
utiliser
des
piles
neuves
avec
des
piles
anciennes
ou
des
piles
de
types
différents.
Remplacer
les
piles
par
des
piles
neuves
une
fors
|'an.
Une
fuite
d'électrolyte
nsque
de
se
produrre
si
vous
latssez
iongtemps
de
vieilies
piles
dans
le
logement
des
piles.
*
Sile
cordon
d'alimentation
est
débranche
et
que
les
piles
ne
sont
pas
inserees,
les
station
preregiées,
les
reglages
d'hortoge
et
de
minuterte
seront
effaces.
IMPORTANT:
Avant
de
raccorder
a
la
prise,
inserez
les
piles
de
secours.
MISE
EN
PLACE
DES
PILES
-
PRECAUTIONS
+
Before
switching
the
POWER
button
to
ON,
be
sure
to
turn
down
the
volume.
If
no
sound
is
emitted
from
the
speakers
when
the
volume
ts
raised,
jower
the
volume
again,
switch
the
POWER
button
to
STANDBY,
and
check
to
see
if
the
speaker
cords
are
properly
connected.
*-
The
D-C1
contains
a
muting
circuit
and
it
takes
about
2-
4
seconds
until
this unit
reaches
stable
operation
after
switching
the
POWER
ON.
*
Never
open
the
covers
or
touch
the
inside
or
insert
a
metal
object.
Any
of
these
could
cause
an
electric
shock
or
a
fault.
*
When
a
thunder
starts,
unpiug
the
power
cord
and
discon-
nect
the
antenna.
«
The
apparatus
shalt
not
be
exposed
to
dipping
or
splashing.
¢
Toclean
cabinet
and
panels
when
dirty,
clean
off
dirt
on
the
surfaces
with
a
dry
cloth.
Never
use
thinner,
benzene
or
alcohol,
for
these
will
damage
the
surface
finish.
*
Protect
the
unit
against
excessive
heat
(e.g.
direct
sunlight),
dust
and
moisture.
COMPACT
*
Discs
which
can
be
played
on
the
CD
player
have
the
following
mark
on
them:
DIGITAL
AUDIO
*
Becarefui
not
to
damage
the
power
supply
cord.
Be
sure
to
hold
the
plug
when
pulling
it
out;
do
not
pull
the
cord.
«
We
recommend
you
do
not
use
a
C-120
cassette
tape
to
prevent
from
breakage
or
jamming.
«
Do
not
install
the
set
in
a
confined
tocation;
otherwise,
heat
dissipation
will
be
poor
and
malfunctions
may
occur.
+
Donotplace
foreign
objects
in
the
disc
compartment.
It
may
cause
damage
to
the
mechanism.
*
Do
not
move
the
sound
system
suddenly
from
a
very
cold
room
into
a
warm
room.
When
a
chilled
CD
player
is
moved
suddenly
to
a
warm
location,
condensation
may
form
on
the
pickup
lens,
preventing
proper
operation.
tn
this
case,
wait
1-2
hours
before
resuming
play.
*
During
playback,
if
the
CD
player
is
subjected
to
a
sudden
shock
or
jolt,
some
noise
may
be
produced.
This
ts
not
a
malfunction.
«
The
CD
player
has
a
wide
dynamic
range.
As
a
result,
if
you
turn
your
amplifiers
volume
up
too
high
during
soft
(low
volume)
parts
of
a
program,
your
speakers
may
be
damaged
when
the
dynamic
range
of
a
sudden
loud
passage
is
produced.
¢
Do
not
store
discs
in
high-temperature,
high-humidity
loca-
tions.
The
discs
may
develop
warps
and
become
unable
to
play.
Also,
discs
with
moisture
on
them
may
be
unplayable.
Wipe
any
moisture
off
with
a
soft,
dry
cloth,
and
be
sure
discs
are
fully
dry
before
using.
*
Donotleave
a
disc
inside
the
CD
player
when
it
is
not
used
for
a
long
penod.
SAFEGUARDS
Electrical
energy
can
perform
many
useful
functions.
This
unit
has
been
engineered
and
manutactured
to
assure
your
personal
safety.
Improper
use can
result
in
potential
electrical
shock
or
fire
hazards.
In
order
not
to
defeat
the
safeguards,
observe
the
following
instructions
for
its
Installation,
use
and
servicing.
INSTALLATION
Avoid
the
use
of
this
unit
in
high
temperature
areas
(such
as
near
heating
equipment)
or
tn
direct
sunlight.
Do
not
block
the
unit
from
radiating
heat.
Dolby
noise
reduction
manufactured
under
license
from
Dolby
Laboratories
Licensing
Corporation.
“Dolby”
and
the
doubie-D
symboi
OG
are
trademarks
of
Dolby
Laboratones
Licensing
Corporation.
PRECAUTIONS
Avant
de
commuter
la
touche
d’alimentation
(POWER)
en
position
ON,
ne
pas
oublier
d'abaisser
le
volume.
Quand
aucun
son
n'est
produit
par
les
haut-parleurs
alors
que
le
niveau
de
sortie
est
augmenté,
abaisser
encore
une
fois
le
volume
et
commuter
la
touche
d'alimentation
(POWER)
sur
STANDBY
(mode
d'attente)
et
verifiez
si
les
cordons
d’enceinte
sont
bien
reliés
correctement.
«
D-C1
renferme
un
circuit
de
protection
qui
provoque
un
délai
de
2
a
4
secondes
avant
que
l'appareil
atteigne
un
fonctionnement
stable
apres
avoir
commuté
la
touche
d'alimentation
sur
“ON"
*
Nejamais
ouvir
le
couvercie
ou
toucher
aux
parties
internes
ou
y
inserer
un
objet
métallique.
Un
choc
électnque
ou
un
dégal
pourrait
s‘ensuvre.
EnCasd'orage,
débrancher
te
cordon
d'alimentation
et'antenne.
L'appareil
ne
doit
pas
étre
expose
aux
gouttes
d'eau
ni
aux
eclaboussures.
¢
Pour
nettoyer
le
coffret
et
les
panneaux
quand
its
sont
sales,
essuyez
la
saleté
des
surfaces
avec
un
chiffon
sec.
N'utilisez
jamats
de
diluants,
de
benzene
ni
d'alcoo!
car
ces
produits
risqueratent
d'abimer
les
finitions
des
surfaces.
«
Protégez
cet
appareil
contre
toute
application
excessive
de
chaleur
(par
ex.
rayons
direct
du
soleil)
et
contre
oe
la
poussiére
et
t'humidité.
*
Lesseuls
disques
qu'accepte
ce
lecteur
de
disque
compact
sont
ceux
qui
portent
ia
marque
suivante
;
DIGITAL
AUDIO
*
Ayez
soin
de
ne
pas
endommager
le
cordon
d'alimentation.
Débranchez-le
en
tenant
la
pnse
et
non
en
tirant
sur
le
cordon.
+
Nous
déconseillons
l'usage
des
cassettes
C-120
car
la
bande
magnétique
est
sujette
a
une
rupture
ou
a
l'enchevetrement
dans
le
mecanisme.
«
La
dissipation
thermique
risque
d'étre
incomplete
et
des
pannes
nsquent
de
se
produrre
si
le
lecteur
de
disque
compact
est
place
dans
un
lieu
sans
aeration.
¢
Ne
pas
mettre
d'objets
dans
le
compartiment
du
disque.
Ceci
pourrait
endommager
le
mecanisme.
+
Nepas
transporter
subitement
le
lecteur
d'une
piéce
froide
a
une
piéce
chaude.
Lorsqu'un
lecteur
de
disque
compact
froid
est
subitement
amene
dans
un
endroit
chaud,
de
la
condensation
risque
de
se
former
sur
la
lentille
du
phonocapteur,
empéchant
'appareil
de
fonctionner
correctement.
It
faut
alors
attendre
une
ou
deux
heures
avant
de
rétablir
le
mode
de
lecture.
*
Pendantla
lecture,
sile
lecteur
de
disque
compact
est
soumis
a
un
choc
ou
a
une
secousse
brusque,
il
peut
se
produie
des
parasites.
Ceci
n'est
pas
le
signe
d'une
défaillance.
«
Le
lecteur
de
disque
compact
possede
une
large
gamme
dynamique,
si
bien
que
st
fon
augmente
trop
le
volume
de
'ampliticteur
aux
passages
taibles
d'un
programme,
les
enceintes
risqueront
d'étre
endommagees
lorsque
la
gamme
dynamique
s'éléve
brusquement.
*
Ne
pas
ranger
les
disques
dans
des
endroit
sours
a
de
hautes
temperatures
ou
a
de
hauts
niveaux
d’hunudité.
Ceci
nsque
de
les
gondoler
et
de
les
rendre
impropres
a
la
lecture.
il
se
peut
egalement
qu'il
soit
impossible
de
lire
des
disques
qut
ont
un
depét
de
condensation.
Les
essuyer
donc
avec
un
chiffon
doux
et
sec
et
s'assurer
quiils
ne
presentent
plus
aucune
trace
d'humidité
avant
de
proceder
a
leur
lecture.
°
Ne
lassser
aucun
disque
a
I'intérieur
du
lecteur
de
disque
compact
quand
ii
n‘est
pas
prevu
de
s‘en
servir
avant
longtemps.
MESURES
DE
SECURITE
L’énergre
électrique
peut
remplir
de
nombreuses
fonctions
utiles.
Cet
appareil
a
été
concu
et
realise
pour
assurer
une
securité
personnelle
entiére.
Une
utilisation
incorrecte
peut
entrainer
des
risques
d’électrocution
ou
d'incencie.
|
a
fe
but
de
ne
pas
rendre
inutiles
les
mesures
de
securité,
bien
observer
les
instructions
sutvantes
pour
linstallation,
lutilisation
et
{'entretien
de
l'appareil.
_|
INSTALLATION
Eviter
d’utiliser
'appareit
dans
des
endroits
tres
chauds
(a
proximité
d'équipements
de
chautfage)
ou
en
plein
soleil.
Ne
pas
faire
obstacle
au
dégagement
de
chaleur
de
l'appareil.
|
Réducteur
de
bruits
fabrique
sous
licence
des
Dalby
Laboratories
Licensing
Corporation.
Le
mot
“Dolby”
et
le
symbole
double
D
00
sont
des
marques
des
Dolby
Laboratones
Licensing
Corporation.
i
ia
de
a
ha
ea
BS
ANN
2
I
te

FEATURES
Sound
Controls
*
S-mode
preset
Graphic
equalizer
You
can
select
the
best
sound
setting
among
FLAT,HEAVY,
MILD,
CLEAR
and
VOCAL,
with
easy
operation,
matching
to
sound
sources
and
your
sound
preference.
*
Super
Wide-eftect
Lets
you
enjoy
stereo-sound
effect
of
a
concert
hall.
*
Dynamic
Bass
Enjoy
the
rich
bass
sound.
Tuner
+
DIGITAL
SYNTHESIZER
TUNER
with
20
PRESET
STATIONS:
Allows
you
to
memonze
10
stations
for
FM
and
10
stations
for
AM.
COD
Player
with
6-Disc
changer
+
Front
Loading
CD
Piayer
*
CD
SYNCHRONIZED
RECORDING
function
You
can
start
recording
from
a
CD
by
Pressing
one
operation
button.
And
the
auto
spacing
function
automatically
inserts
a
4-
second
unrecorded
interval
between
songs.
¢
AUTO
EDIT
function
This
function
automatically
arranges
CD
tracks
to
be
recorded
matching
to
your
tape
length.
You
do
not
have
to
worry
about
the
playing
time
when
recording
from
a
CD.
*
CONTINUOUS
EDIT
function
Use
this
function
when
you
want
to
record
[rom
more
than
one
disc
onto
one
tape.
Cassette
Deck
*
FULL
LOGIC
AUTO
REVERSE
DECK
*
AUTO
TAPE
SELECTOR
Automatically
detects
your
tape-type
and
selects
the
best
position
for
playback
or
recording.
*
DOLBY
B
Notse
Reduction
Programmable
Timer
and
Clock
*
Timer-Play/Timer-Recording
*
Sleep
Timer:
You
can
tum
off
the
set
automatically,
Speaker
System
+
2-Way
BASS
REFLEX
Speaker
System
Computer
Play:
Enables
you
an
easy
and
quick
operation.
Simply
press
your
desired
Play
button
(Namely,
the
CD
Play
button,
the
Tape
Play
button,
or
a
Tuner/Band
button).
Then
the
sound
system
ts
auto-
matically
turned
on,
a
sound
source
1s
chosen,
and
play
begins.
Multi
Function
Display
with
Backlight
Full
Operation
Remote
Control
FEATURES
....
CONNECTIONS
CONTROLS...
REMOTE
CONTROL
SOUND
CONTROLS
SETTING
THE
CLOCK
LISTENING
TO
THE
RADIO
Basic
Operation
PRESETTING
RADIO
STATIONS
INTO
THE
MEMORY
LOADING
DISCS
.
LISTENING
TO
DISCS.
2
play
modes
are
avail
Basic
Operation
LISTENING
TO
THE
DESIRED
TRACKS
IN
THE
DESIRED
ORDER
....
Programmed
Play
USEFUL
FUNCTIONS
IN
CD
PLAY..........
Random
Play
Listening
Repeatedly
LISTENING
TO
A
TAPE
Basic
Operation
RECORDING
A
TAPE......
Basic
Operation
AUTO
EDIT
RECORDING
FROM
CDs...
Continuous
Edit
Recording
PROGRAMMABLE
TIMER
..
TIMER-PLAY
TIMER-RECORDING
SLEEP
TIMER............
MIXING
MICROPHONE
LISTENING
TO
AN
EXTERNAL
SOUND
UNIT
TROUBLESHOOTING
.
SPECIFICATIONS
wus
MAINTENANCE
....
RECORDING
PROTECTION
6
CARACTERISTIQUES
Commandes
de
Son
+
Egaliseur
graphique
a
5
courbes
prerégiées
Choisir
!e
son
idéal
parm
les
courbes
FLAT,
HEAVY,
MILD,
CLEAR
et
VOCAL
pour
I'harmoniser
avec
les
sources
sonores
et
les
préférences
personnelles.
*
Effect
SUPER
WiDE
Effet
de
son
en
stéreo
et
d'espace
comme
dans
une
salle
de
concert.
*
Graves
Dynamiques
Pour
benéticier
de
graves
riches.
Tuner
*
Tuner
synthétiseur
numerique
avec
20
stations
preregiées:
Il
permet
de
memonser
10
stations
en
FM
et
10
stations
en
AM.
Lecteur
CD
avec
changeur
de
6
disques
+
Lecteur
CD
a
chargement
frontat
*
Enregistrement
synchronisé
de
disque
compact
Vous
pouvez
commencer
un
enregistrement
de
CD
en
appuyant
simplement
sur
une
touche
de
fonctionnement.
ta
fonction
espacement
automatique
permet
d'inserer
un
intervalle
de
4
scondes
entre
les
morceaux.
*
Fonction
de
montage
automatique
Grace
a
cette
fonction
les
plages
d'un
disque
sont
automatiquement
arrangees
selon
la
longueur
de
la
bande.
Vous
n'avez
pas
besoin
de
vous
soucier
de
la
duree
de
lecture
lorsque
vous
enregistrez
unCD.
*
Fonction
de
montage
ininterrompu
Utilisez
cette
fonction
torsque
vous
enregistrez
plus
d'un
disque
sur
une
cassette.
Platine
Cassette
*
Platine
cassette
auto-reverse
entierement
logique
*
Sélection
automatique
de
bande
Le
type
de
fa
bande
est
automatiquement
détecté
et
la
meilleure
position
pour
la
tecture
ou
lenregistrement
est
choisie.
*
Réduction
de
bruit
DOLBY
B
Horloge
et
Minuterre
Programmable
*
Lecture
programmable
par
minutene/enregistrement
program-
mabie
par
minuterie
*
Minutene
de
sommeil:
L'appareil
peut
s'éteindre
automatiquement.
Systeme
d’enceintes
+
Systéme
d'enceintes
BASS
REFLEX
2
voles
Lecture
par
ordinateur:
Elle
vous
permet
une
utilisation
facile
et
rapide.
Appuyez
simplement
sur
la
touche
de
lecture
désiree
(c'est-a-dire
la
touche
“CD
Play”,
la
touche
“Tape
Play"
ou
une
touche
“Tuner/Band”).
La
chaine
se
met
automatiquement
sous
tension,
une
source
sonore
est
choisie
et
la
lecture
commence.
Aftichage
fonctions
multiptes
avec
eclairage
arriére
Télécommande
tntegrale
CARACTERISTIQUES
.
CONNEXIONS
FRREGLAGE
D'HORLOGE
.
ECOUTE
DE
LA
RADIO
..
Fonctionnement
de
base
PREREGLAGE
DE
STATIONS
DE
RADIO
DANS
LA
MEMOIRE
MISE
EN
PLACE
DES
DISQUES
ECOUTE
DE
DISQUES....
2
modes
de
lecture
sont
disponibles
Fonctionnement
de
base
ECOUTE
OES
PLAGES
DESIREES
DANS
L'ORORE
...
Lecture
programmee
FONCTION
UTILE
EN
LECTURE
DE
DISQUE
COMPACT
Lecture
aléatoire
Ecoute
repétitive
ECOUTE
D'UNE
CASSETTE......
Fonctionnement
de
base
ENREGISTREMENT
D'UNE
BANDE
Fonctionnement
de
base
ENREGISTREMENT
A
MONTAGE
AUTOMATIQUE
A
PARTIR
DE
CD...
sant
in
sastsed
sented
atarossictan
Enregrstrement
edité
en
continu
MINUTERIE
PROGRAMMABLE
|...
ccoessenss
LECTURE
PROGRAMMEE
PAR
MINUTERIE
ENREGISTREMENT
PROGRAMMEE
PAR
MINUTERIE
MINUTERIE
DE
SOMMEIL
On
DEPISTAGE
DES
PANNES
FICHE
TECHNIQUE
ENTRETIEN
....
PROTECTION
CONTRE
EFFACEMENT
ACCIDENTEL
.
CONNECTIONS
CONNEXIONS
2.
[ANTENNA
Speaker
box
Boitier
de
haut-parleur
NOTES:
¢
Make
sure
that
the
core
part
of
wire
ts
locked
by
the
terminal
after
each
connection.
*
Set
the
AM
loop
antenna
away
from
the
sound
system
and
speaker
wire.
Speaker
Connections
Be
sure
to
connect
the
red
wire
to
@
and
the
black
wire
to
©.
Also
be
sure
to
connect
the
right
speaker
to
[A]
and
the
left
speaker
to
NOTE:
These
terminals
are
only
used
to
connect
the
speaker
box
wires.
Do
not
connect
other
wires
to
these
terminals,
Antenna
Connections
@
AMloopantenna
(attached):
Be
sure
to
connect
this
antenna.
@
FM
indoor
antenna
(attached):
Be
sure
to
connect
this
antenna.
@
FM
outdoor
antenna
(optional):
Use
this
antenna
when
the
reception
1s
not
good
enough.
In
that
case,
disconnect
the
indoor
antenna.
AUX
Connections
Use
these
terminals
when
you
want
to
connect
an
extra
sound
unit.
Power
Requirement
To
AC
120
V,
60
Hz.
CAUTION:
Plug
in
the
set
only
after
all
the
connections
have
been
completed.
Speaker
box
Boitier
de
haut-pareur
Speaker
box
Boitier
de
haut-parieur
FREMARQUES:
«
Vérifier
que
le
conducteur
du
fil
est
bien
insere
dans
la
borne
apres
chaque
branchement.
*
Ecartez!'anntenne-cadre
AM
dela
chaine
et
des
fils
d'enceintes.
1.
Branchement
des
Haut-Parleurs
Veiller
a
brancher
le
cordon
rouge
sur
®
et
le
cordon
noir
sur©.
De
méme,
veiller
a
brancher
l'enceinte
droite
sur
[R]
et
I'enceinte
gauche
sur
[i].
REMARQUE:
Ces
bornes
servent
uniquement
pour
brancher
les
fits
de
boftier
de
haut-parleur.
On
n'y
branchera
aucun
autre
fil.
2.
Branchement
d'Antenne
@
Antenne
cadre
AM
(fournte):
Raccorder
cette
antenne.
@
Antenne
FM
intéreure
(fournie):
Raccorder
cette
antenne.
@
Antenne
FM
extéreure
(en
option):
Utiliser
cette
antenne
si
la
reception
laisse
a
désirer.
Dans
ce
cas,
débrancher
t'antenne
inténeure.
3.
Branchement
AUX
Se
servir
de
ces
bomes
pour
brancher
un
appareil
audio
supplémentaire.
4.
Alimentation
Brancher
sur
secteur
de
120
V,
60
Hz.
ATTENTION:
Brancher
ie
cordon
d’alimentation
sur
une
prise
secteur
apres
avoir
acheve
toutes
les
connextons.
7
LoO-c
™@

CONTROLS
REAR
PANEL
@
RIF
Selector
(A,
B)
FRONT
PANEL
CD
Player/Tuner
Disc
indicator
Disc
Direct
Selection
Buttons
{
DISC
}
CD
Tray
Open/Close
Buttons
|
#
]
Skip-Manual
Search/Tuning
Down
Button
[
DOWN/KK
<0]
Stop/Clear
Button
[0
}
Skip-Manual
Search/Tuning
Up
Button
[D>
DDI/
UP]
Play/Pause
Button
[>
/
10]
Long
Play
Indicator
[
LONG
PLAY
]
CD
Tray
Volume
Control
{
VOLUME
]
Headphones
Socket
[
PHONES
}
Mixing
Microphone
Socket
{
MIC
}
Mixing
Microphone
Level
Control
[
MIC
LEVEL
]
Timer
Button
|
TIMER
}
Remote
Control
Sensor
Tuner/Band
Selection
Button
[|
TUNER/BAND
}
Dynamic
Bass
On/Off
Button
[
DYNAMIC
BASS
a
ON/
i
OFF
]
Function
Button
[
FUNCTION
]
DOLBY
NR
On/Off
Button
[
DOLBY
NR
»=
ON/
m@
OFF
J]
Power
On/Standby
Button
([
POWER
ON/STANDBY
]
POWER
ON/STANDBY
Indicator
ssette
Deck
Record/Pause
Button
[
REC/PAUSE
}
Rewind/Skip
Search
Button
[
<1
}
Reverse
Play
Button
[
<I
}
Stop
Button
[0
]
Forward
Play
Button
[
>
}
Fast
Forward/Skip
Search
Button
[D>
}
Cassette
Lid
Open/Close
Position
[
Push
EJECT
}
REMOTE
CONTROL
(RC-193)
@
Power
Button
[
POWER
}
@
Sleep
Button
[
SLEEP
}
@
Time
Set
Button
{
TIME
SET
]
Programme
Button
[
PROG
}
@
Number
Buttons
Cassette
Deck
Reverse
Mode
Button
[
REV
MODE
]}
Forward
Play
Button
[
>
]
Stop
Button
[
H
}
Reverse
Play
Button
[
<4]
Record/Pause
Button
(
@
/
1]
Fast
Forward/Skip
Search
Button
[
>
J
Rewind/Skip
Search
Button
(
<4<¢
]
Auto
Edit/Tuner
Mode
Button
[
A.EDIT/T.MODE
}
@
Tuner/Band
Selection
Button
|
TUNER/BAND
]}
CD
Player
Disc
Selection
Button
[
DISC
}
Skip-Manual
Search/Tuning
Up
Button
[
1
/
TUNE
4
}
Skip-Manua!
Search/Tuning
Down
Button
[4
/
TUNE
VJ
Repeat
Play
Button
[@
]
Random
Play
Button
[
RANDOM
}
Piay
Mode
Button
[
P.MODE
J
Stop
Button
[
MJ
CD
Play/Pause
Button
[
CD
>/
11}
Volume
Control
Button
{
¥
VOLUME
A
}
Super
Wide
Button
[
S.WIDE
}
Graphic
Equalizer
Pattern
Selection
Button[
EQPATTERN
}
QOQHHOHE
QOQHS
OOPOHHHHO
SOO
CO
OOOO
®
®
688988
OO®
DESO
O8®
PANNEAU
ARRIERE
@
Sélecteur
d'interference
radio
(A,
B)
PANNEAU
AVANT
Lecteur
CD/Tuner
Indicateur
Disc
Touches
de
sélection
directe
de
disque
[
DISC
]
Touche
d’ouverture/fermeture
de
tiroir
de
disque
|
&
}
Touche
de
recherche
manuelle
par
saut/syntonisation
Bas
{
DOWN/KkKI
<kJj
Touche
d'arrévetfacement
[0
j
Touche
de
recherche
manuelle
par
saut/syntonisation
Haut
[D>
DD1/
UP
]
Touche
de
lecture/pause
[[>/
ll
]
Indicateur
lecture
longue
duree
[
LONG
PLAY
}
Tirow
de
disque
Commande
de
Volume
[
VOLUME
}
Prise
casque
[
PHONES
}
Pnse
de
microphone
de
mixage
[
MIC
]
Commande
du
niveau
du
microphone
de
mixage
[MIC
LEVEL
|
Touche
de
minuteria
[
TIMER
}
Capteur
de
télécommande
Touche
tuner/gamme
[
TUNER/BAND
]
Interrupteur
de
graves
dynamiques
{
DYNAMIC
BASS
»=
ON/
BLOFF
|
Touche
selecteur
de
source
[
FUNCTION
}
interrupteur
de
circuit
de
reduction
de
bruit
{
DOLBY
NR
»
ON/
MLOFF
}
Touche
d’alimentation
activé/en
attente
{
POWER
ON/STANDBY
}
Indicateur
alimentation
activé/en
attente
latine
Cassette
Touche
d’enregistrement/pause
{
REC/PAUSE
]
Touches
de
rembobinage/de
recherche
par
saut
[<I]
}
Touche
de
tecture
en
sens
inverse
{
<1]
Touche
d'arrét
[0]
Touche
de
lecture
normale
[
[>
]
Touche
d'avance
rapide/de
techerche
par
saut
[>
]
Position
d’ouverturefermeture
de
la
trappe
a
cassette
{
&
Push
EJECT]
TELECOMMANDE
(RC-193)
Interrupteur
d’alimentation
[POWER
}
Touche
de
temponsateur
[
SLEEP
]
@
Touche
de
regiage
horaire
[
TIME
SET
)
@
Touche
de
programme
[
PROG
}
@
Touches
numeriques
2
®
®
BO
OOOO
GGOS
GOO
GO
OOOO
G®O8OOD
Platine
Cassette
Touche
de
mode
inverse
[REV
MODE
}
Touche
de
lecture
normale
[
®
}
Touche
d'arrét
[i
]
Touche
de
lecture
en
sens
inverse
[
<4
}
Touche
d’enregistrement/pause
|
@/
II
}
Touche
d'avance
rapide/de
techerche
par
saut
[
>
|
-
Touches
de
rembobinage/de
recherche
par
saut
|
<4
}
Touche
d'arrét
automatique/mode
tuner[
A.EDIT/T.MODE
]}
Touche
tuner/gamme
[
TUNER/BAND
J
§
©
©68898e8
ecteur
CD
Touche
de
sélection
de
disque
[
DISC
]
Touche
de
recherche
manuelle
par
saut/syntonisation
Haut
[>P1/
TUNE
4}
Touche
de
recherche
manuelle
par
saut/syntonisation
Bas
[Hed
/
TUNE
¥]
Touche
de
iecture
repétitive
[@
}
Touche
de
lecture
aléatoire
[
RANDOM
]
Touche
de
mode
de
lecture
[
P.MODE
}
Touche
d'arrét
[
@
|
Touche
de
lecture/pause
de
CD
[CD
>/H}
Commande
de
volume
[¥
VOLUME
&
J
Interrupteur
deffet
Super
Wide
[
S.WIDE
]
Touche
de
sélection
de
courbe
d'égalisation
[EQ
PATTERN
]
@O8
@GOOO
©
O®
Se
aaa
a
a
a

"REMOTE
CONTROL
cs
1.SV
x
2
[IEC
R6,
“AA”,
JIS
ABP(JIS SUM-3))
Q
©
_.
10
REMOTE
CO
1.
Point
the
remote
control
at
the
remote
sensor
(@)
when
operating.
2.
The
remote
control
may
not
be
effective
in
the
strong
day
fight.
3.
Never
get
the
remote
contro!
wet.
4.
Replace
the
batteries
when
the
performance
of
the
remote
control
becomes
unstable.
NOTES:
*
Do
not
use
new
and
old
batteries
or
different
kinds
of
batteries
together.
*
Dunng
radio
tistentng
(AM),
if
you
operate
the
remote
control
extremely
close
to
the
sound
system,
some
noise
may
be
produced.
VOLUME
CONTROL
1,
Press
[¥
VOLUME
4
]
on
the
remote
control
to
adjust
the
sound
level.
You
can
also
adjust
it
manually
by
turning
the
volume
control
[VOLUME]
on
the
front
panel.
GRAPHIC
EQUALIZER
PATTERN
CONTROL
You
can
select
the
best
sound
setting
among
FLAT,
HEAVY,
MILD,
CLEAR
and
VOCAL,
with
easy
operation,
matching
to
sound
sources
and
your
sound
preference.
2.
Repeatedly
press
[EQ
PATTERN]
on
the
remote
control
to
select
the
desired
graphic
equalizer
pattern.
The
selected
graphic
equalizer
patternis
indicated
with
the
square
bracket
on
the
display
(@).
DYNAMIC
BASS
effect
3.
Set([DYNAMIC
BASS]
on
the
front
panel
to
=
ON
to
get
the
rich
bass
sound.
Toturn
itl
OFF,
press
[DYNAMIC
BASS]
again.
SUPER
WIDE
effect
4.
You
can
emphasize
the
stereo
sound
effect
with
this
function.
Press
[S.
WIDE]
on
the
remote
control
to
tum
it
on,
then
the
indicator
appears
on
the
display
(@).
To
turn
it
off,
press
the
same
button
again.
LEVEL
INDICATOR
Onginai
sound
jevel
is
indicated
on
the
display
(@).
NOTE:
The
level
indicator
ts
not
affected
by
any
sound
con-
trols
such
as
the
graphic
equalizer,
dynamic
bass
controt
and
main
volume
control.
Listening
with
Headphones.
insert
your
headphones
plug
into
the
headphones
socket
(@)
to
enjoy
private
listening.
Once
you
pug
in
your-headphones,
the
sound
from
the
speakers
will
be
muted.
TELECOMMANDE
1.
Dinger
fa
télecommande
vers
fe
capteur
de
télécommande
(@)
pour
transmettre
les
instructions.
2.
La
télécommande
nsque
de
ne
pas
fonctionner
dans
une
forte
lumiére
solatre.
3.
Ne
jamais
mouiller
la
teiécommande.
4.
Rempltacer
les
piles
lorsque
la
télécommande
fonctionne
irreguliérement.
REMARQUES:
¢
Nepas
utiliser
des
piles
neuves
avec
des
piles
anciennes
ou
des
piles
de
types
différents.
¢
Pendant|'écoute
de
la
radio
(AM),
sila
télécommande
est
utilisee
trop
pres
de
la
chaine,
des
bruits
rsquent
de
se
produtre.
COMMANDE
DU
VOLUME
1.
Appuyez
sur
[¥
VOLUME
4
]
de
la
télécommande
pour
ajuster
le
niveau
sonore.
Un
reglage
manual
est
egalement
possible
en
tournant
la
commande
du
volume
{
VOLUME
]
sur
fe
panneau
avant.
EGALISEUR
GRAPHIQUE
A
5
COURBES
PREREGLEES
Choisir
le
son
idéal
parme
les
courbes
FLAT,
HEAVY,
MILD,
CLEAR
et
VOCAL
pour
I'harmoiser
avec
les
sources
sonores.
2.
Appuyez
de
fagon
repétée
sur
[EQ
PATTERN]
de
la
télécommande
afin
de
choisir
la
courbe
d'égalisation
graphique
souhaitée.
Celle
qui
est
choisre
est
indiquee
par
les
parentheses
carrees
sur
t'affichage
().
Effet
GRAVES
DYNAMIQUES
3.
Réglez|'interrupteur{
DYNAMIC
BASS
|du
panneau
avant
sur
a.
ON
pour
obtentr
des
sons
graves
plus
riches.
Pour
tamener
linterrupteur
4.
OFF,
appuyez
une
nouvelle
fois
sut
[DYNAMIC
BASS
].
Effet
SUPER
LARGE
4.
Cette
fonction
vous
permet
d'accentuer
l'effet
stéreo.
Appuyez
sur
la
touche
[
S.WIDE
}de
la
télécommande
pour
mettre
cette
fonction
en
service,
ce
qui
fait
apparaitre
le
voyant
sur
l'affichage
(@).
Pour
mettre
la
fonction
hors
service,
appuyez
une
nouvelle
fois
sur
la
méme
touche.
INDICATEUR
DE
NIVEAU
Le
niveau
du
son
onginal
est
indique
sur
tatfichage
(@).
REMARQUE:
L
‘indicateur
de
niveau
nest
pas
affecté
par
les
commandes
de
son
comme
l’égaliseur
grahphique,
la
commande
dynamique
des
graves
et la
commande
de
volume
principale.
Ecoute
au
Casque
Raccorder
le
casque
d'écoute
sur
la
prise
de
casque
(@)
pour
ecouter
en
s'isolant.
Le
fait
de
brancher
le
casque
d'écoute
a
pour
effet
de
rendre
inaudible
le
son
des
haut-parleurs.
11
EEE
a
RA
Na
a
OR
Sa
a
a
Se
BL,
~<a

(Example
of
setting
it
at
PM
10:25)
Plug
in
1.
Insert
the
power
plug
into
mamns
outlet.
And
“—
—
—"
will
appear
in
the
display.
Turning
the
set
on
2.
Press
[
POWER
]on
the
remote
contro!
or
[
POWER
ON/
STANDBY
J}
on
the
front
panel
and
“HELLO
—
-—
"will
appear
in
the
display.
To
set
the
current
hour
3.
Press
[
TIME
SET
]
twice
on
the
remote
control.
“AM
12:00
”
appears
in
the
display
and
“AM”
will
blink.
4.
Select
“PM"
indication
by
pressing
{2/PM
]
onthe
remote
control.
When
you
want
to
select
“AM”
indication,
press
{
1/AM
]
on
the
remote
control.
NOTE:
The
clock
adopts
12-hour
indication.
“AM
12:00”
stands
for
12
o'clock
in
the
midnight
and
“PM
12:00”
for
12
o'clock
in
the
noon.
5.
Press
[
PROG
]
on
the
remote
control.
6.
Enter
the
current
hour
by
pressing
the
number
button(s)
on
the
remote
control.
(For
example,
press
[
10+/10
]=
[
©}
for
entenng
10.)
7.
Press
[
PROG
]
on
the
remote
control.
To
set
the
current
minutes
8.
Enter
the
current
minutes
by
pressing
the
number
button(s)
on
the
remote
control.
(For
exampie,
press
[
10+/10
]
=
[
10+/10
]
=
[5]
for
entering
25.)
9.
Press
[
PROG
J
on
the
remote
control.
To
activate
the
clock
10.
Press
[
TIME
SET
]
on
the
remote
control
by
a
time
signal.
NOTES:
*
Clock
setting
mode
will
be
cancelled
unless
you
press
number
buttons
or
{
PROG
]
within
30
seconds.
In
that
case,
repeat
the
operation
steps
3.
~
9.
*
The
clock
is
powered
by
the
batteries
for
memory
backup.
«
When
you
turn
the
power
off,
the
“BYE
—
——"
mes-
sage
will
display
about
2
seconds.
Thereaiter
the
backlight
will
go
off
and
the
current
time
will
be
displayed.
To
call
the
clock
in
the
display
11.
Press
{
TIME
SET
]
on
the
remote
control,
and
the
current
time
will
appear
for
5
seconds.
To
reset
the
clock
Follow
the
operation
steps
2.
~
10.
of
the
SETTING
THE
CLOCK.
(Exemple
de
réglage
d’hortoge
4
10:25)
Branchement
1.
Inserer
la
fiche
d'alimentation
dans
la
prise
secteur.
Et
“———
apparait
sur
l'affichage.
Mise
sous
tension
de
I’appareit
2.
Appuyer
sur
la
touche
[
POWER
]
de
ja
télécommande
ou
sur
ja
touche
{
POWER
ON/STANDBY
}
du
panneau
avant.
“HELLO—
——"
apparait
sur
l'affichage.
Réglage
de
l'heure
actuelle
3.
Appuyer
deux
fois
sur
la
touche
[
TIME
SET]
de
la
télécommande.
“AM
12:00”
apparait
sur
l'affichage
et
“AM”
clignote.
4.
Sélectioner
“PM”
en
appuyant
sur
la
touche
[2/PM]
de
le
télecommande.
Quand
vous
voulez
sélectioner
Vindication
de
“AM”,
appuyer
sur
ja
touche
[1/PM]
de
le
télecommande.
REMARQUE:
L’horloge
adopte
indication
de
12-heure.
“AM
12:00”
represente
12
heure
de
minuit,
et
“PM
12:00”
represente
12
heure
de
midi.
5.
Appuyer
sur
la
touche
[
PROG
]
de
la
télécommande.
6.
Entrer
heure
actuelle
en
appuyant
sur
la
(les)
touche(s)
numenque(s)
de
la
télécommande.
(Par
exemple,
appuyer
sur
la
touche
[
10+/10
]
>
[0
}
pour
entrer
10.)
7.
Appuyer
sur
la
touche
{
PROG
]
de
!a
télécommande.
Reglage
des
minutes
actuelles
8.
Entrer
les
minutes
actuelles
en
appuyant
sur
la
(les)
touche(s)
numenque(s)
de
la
télécommande.
(Par
exemple,
appuyersurla
touche[
10+/10
}>[
104/10
Jo
(5
]
pour
entrer
25.)
9.
Appuyer
sur
la
touche
[
PROG
]}
de
la
télecommande.
Activation
de
horloge
10.
Appuyersurla
touche
[
TIME
SET
}
dela
télécommande
au
top
d’un
signal
horaire.
REMARQUES:
«
Le
mode
de
reglage
d'horloge
est
annulé
sauf
si
les
touches
numerques
ou
la
touche
[PROG]
est
enfoncee
dans
les
30
secondes.
Dans
ce
cas,
répéter
les
operations
des
étapes
3.
~
9.
*
L'horloge
est
alimentée
par
des
piles
pour
un
soutien
de
memonre.
«
Alamuse
hors
tension,
le
message
“BYE
~
~
-"
est
affiché
pendant
2
secondes
environ.
Ensuite,
l'éclawage
arriére
s'éteint
et
I'heure
actuelle
est
affichée.
Appel
d’horloge
sur
I’affichage
11.
Appuyer
sur
la
touche
[
TIME
SET
]de
la
télécommande
et
I'heure
actuelie
apparait
pendant
5
secondes.
Remise
a
zéro
de
I'horloge
Suivre
l'operation
des
étapes
2.
~
10.
de
REGLAGE
D'HORLOGE.
13
a
8
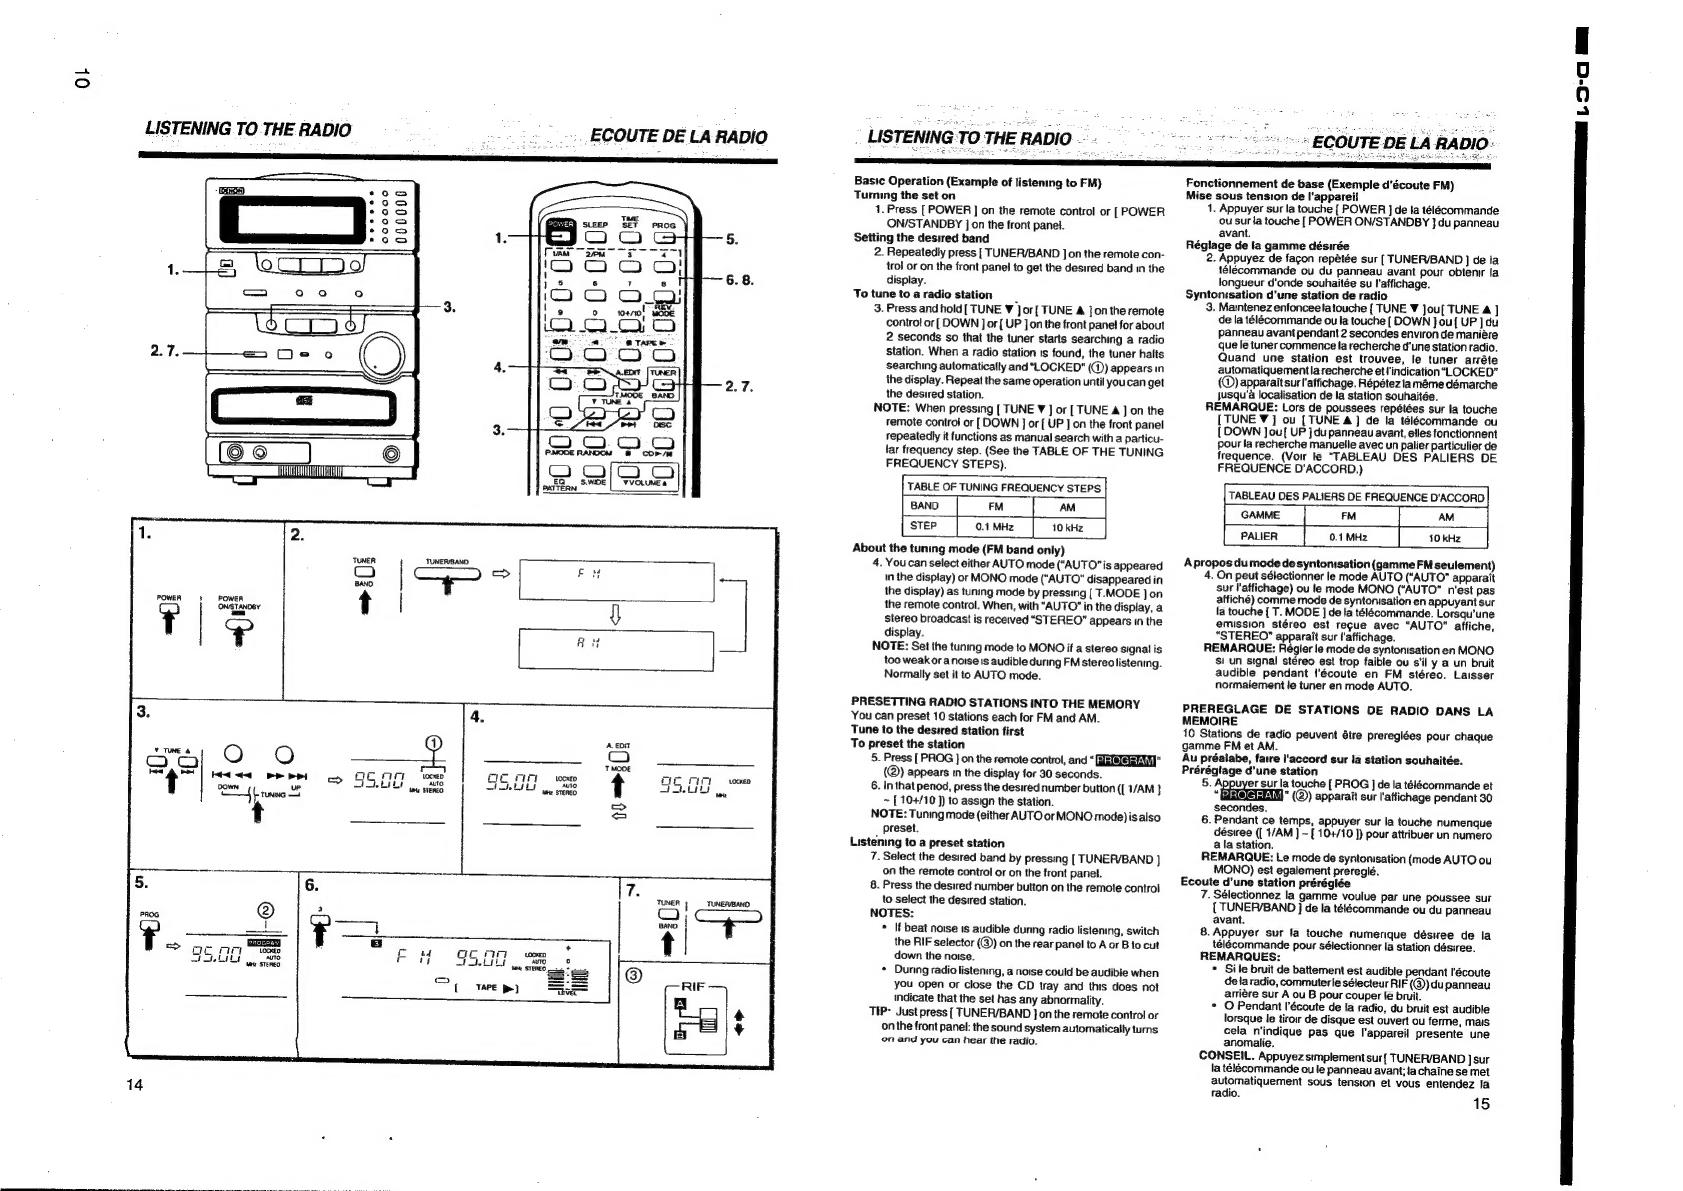
OL
LISTENING
TO
THE
RADIO
eo0000
|
=>
ECOUTE
DE
LA
RADIO
LISTENING
TO
THE
RADIO.
~
SECOUTE
DE
LA
RADIO:
Basic
Operation
(Example
of
listening
to
FM)
Turning
the
set
on
1.
Press
[
POWER
]
on
the
remote
control
or
[
POWER
ON/STANDBY
]
on
the
front
panel.
Setting
the
desired
band
2.
Repeatedly
press
[
TUNER/BAND
J
on
the
remote
con-
trol
or
on
the
front
panel
to
get
the
desired
band
in
the
display.
To
tune
toa
radio
station
3.
Press
and
hold[
TUNE
¥
Jor{
TUNE
&
Jon
the
remote
control
or
[
DOWN
]
or
{
UP
]
on
the
front
pane!
for
about
2
seconds
so
that
the
tuner
starts
searching
a
radio
station.
When
a
radio
station
1s
found,
the
tuner
halts
searching
automatically
and
"LOCKED"
(@))
appears
in
the
display.
Repeat
the
same
operation
until
you
can
get
the
desired
station.
NOTE:
When
pressing
[
TUNE
¥
]
or
[
TUNE
4]
on
the
remote
control
or
[
DOWN
J
or
[
UP
]
on
the
front
panel
repeatedly
it
functions
as
manual
search
with
a
particu-
tar
frequency
step.
(See
the
TABLE
OF
THE
TUNING
FREQUENCY
STEPS).
TABLE
OF
TUNING
FREQUENCY
STEPS.
|
BAND
FM
“|
AM
0.1
MHz
10
kHz
About
the
tuning
mode
(FM
band
only)
4.
You
can
select
either
AUTO
mode
(“AUTO”
is
appeared
in
the
display)
or
MONO
mode
(“AUTO"
disappeared
in
the
display)
as
tuning
mode
by
pressing
[
T.MODE
Jon
the
remote
control.
When,
with
“AUTO”
in
the
display,
a
stereo
broadcast
is
received
“STEREO”
appears
in
the
display.
NOTE:
Set
the
tuning
mode
to
MONO
if
a
stereo
signal
is
too
weak
or
a
noises
audible
during
FM
stereo
listening.
Normally
set
it
to
AUTO
mode.
PRESETTING
RADIO
STATIONS
INTO
THE
MEMORY
You
can
preset
10
stations
each
for
FM
and
AM.
Tune
to
the
desired
station
first
To
preset
the
station
5.
Press
[
PROG
]
on
the
remote
control,
and
“
gieleran"
(®)
appears
in
the
display
for
30
seconds.
6.
In
that
penod,
press
the
desired
number
button
([
/AM
}
~
[
104/10
])
to
assign
the
station.
NOTE:
Tuning
mode
(either
AUTO
or
MONO
mode)
is
also
preset.
Listening
to
a
preset
station
7.
Select
the
desired
band
by
pressing
[
TUNEPVBAND
]
on
the
remote
control
or
on
the
front
panel.
8.
Press
the
desired
number
button
on
the
remote
control
to
select
the
desired
station.
NOTES:
*
If
beat
noise
ts
audible
during
radio
listening,
switch
the
RIF
selector
(@)
on
the
rear
panel
to
Aor
Btocut
down
the
noise.
*
Dunng
radio
listening,
a
noise
could
be
audible
when
you
open
or
close
the
CD
tray
and
this
does
not
indicate
that
the
set
has
any
abnormality.
TIP: Just
press
[
TUNER/BAND
jon
the
remote
control
or
on
the
front
panel:
the
sound
system
automatically
turns
en
and
you
can
hear
the
radio.
Fonctionnement
de
base
(Exemple
d’écoute
FM)
Mise
sous
tension
de
l'appareil
1.
Appuyer
sur
la
touche
{
POWER
]
de
la
télécommande
ou
sur
ia
touche
[
POWER
ON/STANDBY
}
du
panneau
avant.
Réglage
de
la
gamme
désirée
2.
Appuyez
de
fagon
repétée
sur
[
TUNER/BAND
]
de
ta
télécommande
ou
du
panneau
avant
pour
obtenur
[a
longueur
d'onde
souhaitée
su
l'affichage.
Syntonisation
d'une
station
de
radio
3,
Maintenez
enfonceetatouche
{
TUNE
¥
Jou[
TUNE
A
]
de
la
télécommande
ou
la
touche
[
DOWN
J
ou
{
UP
]
du
panneau
avant
pendant
2
secondes
environ
de
maniére
que
le
tuner
commence
la
recherche
d'une
station
radio.
Quand
une
station
est
trouvee,
le
tuner
arréte
automatiquementla
recherche
et!'indication
“LOCKED”
(®)
apparait
surl'affichage.
Répétezlaméme
démarche
jusqu’a
localisation
de
la
station
souhaitée.
REMARQUE:
Lors
de
poussees
repétées
sur
la
touche
[TUNE
¥
]
ou
[TUNE
4}
de
la
télécommande
ou
[
DOWN
Jou[
UP
}du
panneau
avant,
elles
fonctionnent
pour
la
recherche
manuelle
avec
un
palier
particulier
de
frequence.
(Voir
fe
“TABLEAU
DES
PALIERS
DE
FREQUENCE
D‘ACCORD.)
TABLEAU
DES
PALIERS
DE
FREQUENCE
D'ACCORD
GAMME
PALIER
Apropos
du
mode
de
syntonisation
(gamme
FM
seulement)
4.
On
peut
sélectionner
le
mode
AUTO
(“AUTO”
apparait
sur
l'affichage)
ou
le
mode
MONO
(“AUTO”
n'est
pas
affiché)
comme
mode
de
syntonisation
en
appuyant
sur
la
touche
[
T.
MODE
]
de
la
télécommande.
Lorsqu’une
emission
stéreo
est
regue
avec
“AUTO"
affiche,
“STEREO”
apparait
sur
taffichage.
REMARQUE:
Regier
le
mode
de
syntonisation
en
MONO
Si
un
signal
stereo
est
trop
faible
ou
s'il
y
a
un
bruit
audible
pendant
{'écoute
en
FM
stéreo.
Laisser
normaiement
le
tuner
en
mode
AUTO.
PREREGLAGE
DE
STATIONS
DE
RADIO
DANS
LA
MEMOIRE
10
Stations
de
radio
peuvent
étre
prereglées
pour
chaque
gamme
FM
et
AM.
Au
préatabe,
faire
l'accord
sur
la
station
souhaitée.
Prérégtage
d’une
station
5.
Appuyer
sur
la
touche
[
PROG
]
de
la
télécommande
et
SSROGRANE
(®)
apparait
sur
l'affichage
pendant
30
secondes,
6.
Pendant
ce
temps,
appuyer
sur
la
touche
numenque
désiree
([
1/AM
]
~
[
10+/10
])
pour
attribuer
un
numero
a
la
station.
REMARQUE:
Le
mode
de
syntonisation
(mode
AUTO
ou
MONO)
est
egalement
prereglé.
Ecoute
d’une
station
préréglée
7.
Sélectionnez
la
gamme
voulue
par
une
poussee
sur
(
TUNER/BAND
J
de
Ia
téléecommande
ou
du
panneau
avant.
8.
Appuyer
sur
la
touche
numerique
désiee
de
la
télécommande
pour
sélectionner
la
station
désiree.
REMARQUES:
*
Sile
bruit
de
battement
est
audible
pendant
I'écoute
dela
radio,
commuter
te
sélecteur
RIF
(@)du
panneau
arriére
sur
A
ou
B
pour
couper
le
bruit.
*
O
Pendant
I’écoute
de
la
radio,
du
bruit
est
audible
lorsque
le
tiroi
de
disque
est
ouvert
ou
ferme,
mais
cela
n’indique
pas
que
l'appareil
presente
une
anomalie.
CONSEIL.
Appuyez
stmplement
sur{
TUNER/BAND
J
sur
la
télécommande
ou
le
panneau
avant;
la
chaine
se
met
automatiquement
sous
tenston
et
vous
entendez
la
radio.
15
LoO-c
@&

_
—_
LOADING
DISCS.
~~
MISE
EN
PLACE
DES
DISQUES
000000
3
8 6
0-0-0
3
<
0}
=
es
oO
as)
a
12
cm
disc
Disque
de
12
cm
=
Be
sure
to
place
the
disc
inside
the
hontas
reohek
ees
~
groove
for
12
cm
disc.
be
;
Ongranoey
J
Groove
for
12
cm
disc
Veillez
a
placer
le
disque
dans
le
e
gee
ee
P
«©.
%
<p
|
RainurepourlesCD
de
12cm
_
sillon
pour
disque
de
12
cm.
.
—y
}
1°)
as
r
8
cm
disc
ee
epee
Disque
de
8
cm
6.
@:
Disc
CHECK
=
Be
sure
to
place
the
disc
inside
the
groove
for
8
cm
disc.
@O1SC
CHec
Veillez
a
placer
fe
disque
dans
le
t
sillon
pour
disque
de
8
cm.
Groove
for
8
cm
disc
Rainure
pour
les
CD
de
8
cm
About
the
“Err”
Error
Message
Sur
le
message
d’erreur
“err”
When
an
error
in
operations
occurs,
“Er”
appears
in
the
Lorsqu'une
erreur
se
produit
dans
les
operations,
“Err”
display
and
the
CD
tray
opens.
A
list
of
appropriate
apparaat
sur
l'afficheur
et
te
tirow
a
CD
s'ouvre.
La
liste
des
recovesy
nee
Herta
scmd
mesures
appropriées
a
prendre
est
la
survante.
*
iyou
plug
in
the
set
with
an
8
cm
disc
already
loaded
in
*
Si
l'appareil
a
été
branche
alors
qu’un
disque
the
CD
tray.
+
Remove
the
8
cm
disc
and
then
close
the
E
pena
The
disc-changer
mecfianism
allows
you
to
load
up
to
six
12
cm
discs,
and
you
can
select
your
desired
disc
to
play
by
pressing
one
button.
{NOTE:
Only
one
8
cm
(3
inches)
disc
1s
loadable
temporarily
to
play.)
Turning
the
set
on
1,
Press
[
POWER
]
on
the
remote
control,
or
press
|
POWER
ON/STANDBY
J
on
the
front
panel.
Loading
discs
2.
Open
the
CD
tray
by
pressing
the
open/close
button
[
#
]
of
the
desired
DISC
number
on
the
front
panel.
For
example,
press
[
#
J]
of
DISC
number
1
if
you
want
to
set
a
disc
in
the
DISC
number
1.
Then
the
DISC
indicator
on
the
front
pane!
starts
blinking
faster
and
the
tray-open
message
(the
disc
number
and
“OPEN”)
also
blinks
in
the
display.
The
CD
tray
will
open
in
a
few
seconds.
NOTE:
Only
one
8
cm
disc
1s
loadable
temporarily
to
play,
however,
the
CD
player
cannot
keep
any
8
cm
disc
in
the
disc-storage
which
enables
to
change
discs
inside
the
CD
player.
Load
an
8
cm
disc
after
having
loaded
12
cm
discs.
If
you
try
to
load
or
operate
other
12
cm
discs
with
the
8
cm
disc
loaded
in
the
CD
tray,
the
CD
ptayer
will
give
you
the
error
message
“Err”
in
the
display
and
eject
the
8
cm
disc.
In
that
case,
first
remove
the
8
cm
disc
from
the
CD
tray
and
do
the
operation
again.
3.
Place
a
disc,
with
its
labelled
side
up,
in
the
disc
tray.
CAUTION:
*
Be
sure
to
place
the
disc
in
the
centre
of
the
CD
tray.
An
improper
placement
of
the
disc
may
cause
scratch
marks
and
malfunction.
*
This
set
can
play
an
8
cm
(3
inches)
disc
without
any
adaptor.
Remove
an
adaptor
if
it
is
attached
to
your
disc.
NOTES:
*
Hold
the
disc
by
the
edge
and
do
not
touch
its
surface
(especially
its
unlabelled
side
which
has
the
recording
data.)
*
Do
not
place
more
than
1
disc
at
one
time.
+
Do
not
interrupt
open-close
movement
of
the
CD
tray.
4.
Close
the
CD
tray
by
pressing
the
same
opervclose
button
{
2
]
whose
indicator
ts
blinking.
TIP:
Ifyou
press
[
#
]
of
the
desired
DISC
number
you
want
to
open,
the
CD
tray
closes
and
ther’
opens
for
the
desired
DISC
number.
For
example,
pressing
{
#
Jof
DISC
2
closes
the
CD
tray
for
DISC
1
and
then
opens
the
CD
tray
for
DISC
2.
5.
Follow
the
operation
steps
2
-
4
to
load
discs.
Each
time
you
load
a
disc,
the
DISC
indicator
lights
up,
telling
you
that
a
disc
ts
in
that
DISC
number.
About
the
DISC
indicator
When
the
indicator
ts
blinking:
It
indicates
that
the
DISC
number
ts
selected
to
operate.
When
the
indicator
ts
lit
up:
It
indicates
that
a
disc
is
contained
in
the
DISC
number.
When
the
indicator
is
gone
off:
it
indicates
that
no
disc
ts
contained
in
the
DISC
number.
{MPORTANT:
When
you
plug
in
the
set
for
the
first
time,
all
the
DISC
indicators
light
up
with
no
discs
loaded.
Also
alt
the
indicators
light
up
with
or
without
discs
loaded
when
you
Le
mecantsme
de
changeur
de
disque
permet
de
charger,
jusqu’a
stx
disques
de
12
cm
et
le
disque
désire
a
reproduire
peut
atre
séjectionne
en
appuyant
sur
une
touche.
(REMARQUE:
Un
seul
disque
de
8
cm
(3
pouces)
peut
atre
chargé
temporairement
pour
la
lecture).
Mise
sous
tension
de
l'appareil
1.
Appuyer
sur
la
touche
[
POWER
]
de
la
tétecommande
ou.
{[
POWER
ON/STANDBY
]
du
panneau
avant.
Chargement
des
disques
2.
Ouvnr
le
tiror
a
CD
en
appuyant
sur
la
touche
d’ouverture/
fermeture
[
#
]du
numero
DISC
désire
sur
le
panneau
avant.
Par
exemple,
appuyer
sur
[#
]dunumero
DISC
1
pour
placer
un
disque
dans
le
numero
DISC
1.
Puts
l'indicateur
DISC
du
panneau
avant
commence
a
clignoter
plus
vite
et le
message
d'ouverture
du
tirorr
(le
numero
du
disque
et
“OPEN”)
clignote
aussi
sur
I'afficheur.
Le
tiror
a
CD
s’ouvre
en
quelques
secondes.
REMARQUE:
Un
seui
disque
de
8
cm
peut
atre
charge
temporairement
pour
la
lecture.
Le
lecteur
CD
ne
peut
cependant
pas
conserver
un
disque
de
8
cm
dans
le
chargeur
de
disque
qui
permet
de
changer
les
disques
a
(inténeur
du
lecteur
CD.
Charger
un
disque
de
8
cm
apras
avoir
chargé
les
disques
de
12
cm.
Si
vous
essayez
de
charger
ou
d'utiliser
d'autres
disques
de
12
cm
avec
le
disque
de
8
cm
charge
dans
le
tiroir
a
CD,
le
lecteur
CD
affiche
le
message
d’erreur
“Err
et
éjecte
le
disque
de
8
cm.
Dans
ce
cas,
retirer
tout
d'abord
le
disque
de
8
cm
du
tirow
a
CD,
puis
recommencer
V'operation.
3.
Placer
un
disque
dans
le
tiroir
de
disque
avec
la
face
portant
l'étiquette
onentée
vers
le
haut.
ATTENTION:
*
Placezle
disque
au
centre
du
plateau,
pour
eviter
de
griffer
je
disque
ou
de
provoquer
un
mauvais
fonctionnement.
*
Cet
appareil
peut
lire
des
disques
de
8
cm
{3
pouces)
sans
adapteur.
Retirer
I'adaptateur
s'il
est
fixe
au
disque.
REMARQUES:
*
Tenuir
le
disque
par
son
bord
et
ne
pas
toucher
sa
surface
(en
particulier
la
face
ne
portant
pas
d'étiquette
quicontient
les
donnees
enregistrees).
*
Ne
pas
placer
plus
de
1
disque
a
{a
fots.
°
Ne
pas
pas
interrompre
‘ouverture
ou
la
fermeture
du
tiroir
acob.
4.
Refermer
le
plateau
en
appuyant
sur
la
touche
d’ouverture/
fermeture
[
&
]
dont
le
témoin
clignote.
CONSEIL:
Sila
touche
[#
]
dunumero
DISC
désire
a
ouvnr
est
enfoncee,
te
tiroira
CD
se
ferme,
puis
s'ouvre
pour
le
numero
DISC
désire.
Par
exemple,
une
pression
sur
[
&
]
de
DISC
2
ferme
ie
tirowa
CD
pourle
DISC
1
puis
ouvrele
tirotra
CD
pour
fe
DISC
2.
5.
Elfectuer
les
operations
2
-
4
pour
charger
des
disques.
Chaque
fois
qu'un
disque
est
charge,
l'indicateur
DISC
s‘allume,
indiquant
qu'un
disque
se
trouve
dans.ce
numerode
DISC.
:
Sur
lindicateur
DISC
Lorsque
l'indicateur
clignote:
II
indique
que
le
numero
DISC
est
séiectionne
pour
l'utilisation.
Lorsque
l'indicateur
est
allumé:
Il
indique
qu'un
disque
est
contenu
dans
fe
numero
DISC.
Lorsque
l'indicateur
est
éternt:
{1
indique
qu'aucun
disque
n’est
contenu
dans
le
numero
DISC.
IMPORTANT:
Lorsque
l'appareil
est
branche
pour
la
premiare
fois,
tous
les
indicateurs
DISC
s'alftument
sans
qu'aucun
disque
ne
soit
charge.
Tous
les
indicateurs
s'allument
ausst
que
des
disques
sorent
charges
ou
non
lorsque
la
fiche
d'alimentation
est
inseree
dans
une
pnise
électrique
apras
un
16
CD
tray.
*
Ifyou
perform
the
disc
check
function
with
an
8
cm
disc
in
the
CD
tray.
(See
“How
to
check
all
the
discs
inside
the
CD
player”
on
page
17.)-+
Remove
the
8
cm
disc
and
then
close
the
CD
tray.
*
If
you
place
two
12
cm
discs
on
the
same
CD
tray
and
then
tned
to
play
a
disc.
+
Remove
one
of
the
discs
and
then
close
the
CD
tray.
*
Ifyou
load
a
12
cm
disc
on
top
of
an
8
cm
disc
in
the
CD
tray.
Remove
one
of
the
discs
and
then
close
the
CD
>
iffeu
SElGCL
het
Cisc
With
an
8
cm
disc
already
loaded
in
the
CD
tray.
Remove
the
8
cm
disc
and
then
close
the
CD
tray.
était
deja
charge
dans
le
tiroir
+
Retirer
le
disque
de
8
cm,
puis
fermer
le
tiror
a
CD.
¢
Sila
fonction
de
verification
de
disque
a
été
activee
avec
un
disque
de
8
cm
dans
ie
tiroir
a
CD.
{Vor
“Comment
verifier
tous
les
disques
dans
le
lecteur
CD"
page
17.)—+
Retirer
le
disque
de
8
cm,
puis
fermer
le
tirorr
a
cD.
.
Si
deux
disques
de
12
cm
ont
été
places
dans
le
mame
tirorra
CD
et
que
lalecture
a
été
activee.
+
Retirerundes
disques,
puts
fermer
le
tiro
a
CD.
*
Siun
disque
de
12
cma
été
charge
sur
un
disque
de
8
cm
dans
Ie
tiror
a
CD.
+
Retirer
un
des
disques.
puis
rommerc
te
trow
a
GO.
*
Siun
autre
disque
a
été
sélectionne
avec
un
disque
de
8
cm
déja
charge
dans
le
tiror
a
CD.
~
Retirer
le
disque
de
8
cm,
puts
fermer
le
tiroir
a.
CD.
insert
the
power
plug
into
a
power
point
after
unplugging.
In
these
cases,
the
CD
tray
indicators
will
indicate
correctly
after
you
open
and
close
each
CD
tray,
or
after
you
try
to
play
each
disc.
How
to
check
all
the
discs
inside
the
CD
player
{
@:
DISC
CHECK]
6.
First
turn
off
the
set
by
pressing
{
POWER
]
on
the
remote
control
or
{
POWER
ON/STANDBY
@
J
on
the
front
panel.
White
you
press
and
hoid
[
TIMER
@
:
DISC
CHECK
}
on
the
front
panel,
tum
on
the
set
by
pressing
[
POWER
ON/
STANDBY
@
]
on
the
front
panel.
The
CD
player
repeats
open-close
movement
showing
you
the
disc
contained
in
the
each
DISC
number
from
1
to 6.
CAUTION:
Do
not
use
this
function
for
replacing
discs.
If
you
do
so,
it
may
cause
malfunction
or
scratch
marks
on
your
discs.
débranchement.
Dans
ces
cas,
les
indicateurs
du
tiror
a
CD
fonctionneront
correctement
apras
avoir
ouvert
et
ferme
tous
les
tiroirs
a
CD
ou
apras
avoir
essaye
de
reproduire
tous
les
disques.
Comment
verifier
tous
les
disques
dans
le
tecteur
CD
{
@:
DISC
CHECK
]
6.
Mettre
tout
d'abord
l'appareil
hors
circuit
en
appuyant
sur
[
POWER
}
de
ia
télécommande
ou
sur
[POWER
ON/
STANDBY
@
]
du
panneau
avant.
Tout
en
maintenant
[TIMER
@
:
DISC
CHECK
|
sur
ie
panneau
avant
enfonce,
mettre
l'appareit
sous
tension
en
appuyant
sur]
POWER
ON/
STANDBY
@
|
du
panneau
avait.
Le
lecteur
CD
repate
ie
mouvement
d’ouverture-fermeture,
montrantle
disque
contenu
dans
chaque
numero
DISC
de
1
a
6.
ATTENTION:
Ne
pas
utiliser
cette
fonction
pour
remplacer
des
disques.
Cela
pourrait
provoquer
un
fonctionnement
défectueux
ou
rayer
les
disques.
17
fe

ck
LISTENING
TO
DISCS
18
5.6.
9.
9.
10.
ECOUTE
DE
DISQUES
4.11.
2.
5.6.9.
OOOO
3
_
LISTENING
TO
DIS
2
play
modes
are
available.
One-disc
play:
You
can
play
one
particular
disc.
Long
play:
Youcan
play
upto
6
discs
continuously.(12cm
disc
onty)
Basic
operation
Turning
the
set
on
1.
Press
{
POWER
]
on
the
remote
control
or
[
POWER
ON/
STANDBY
J
on
the
front
panel.
Selecting
the
CD
mode
2.
Repeatedly
press
[
FUNCTION
}
on
the
front
panel
so
that
“Cd”
appears
in
the
display.
NOTE:
You
can
select
the
CD
mode
by
pressing
[
CD
>/
Il]
on
the
remote
control
or
{
[>/
00
]
on
the
front
panel.
In
that
case,
the
CD
player
starts
play
immediately.
Setting
the
play
mode
3.
For
Long
play,
press
[
P.
MODE
]
on
the
remote
control
so
that
the
LONG
PLAY
indicator
on
the
front
panel
lights
up.
For
One-disc
play,
press
[
P.
MODE
Jon
the
remote
control
sothat
the
LONG
PLAY
indicator
on
the
front
panel
goes
off.
Selecting
the
desired
disc
to
piay
4.
Repeatedfy
press
[
DISC
]
on
the
remote
control
so
that
the
desired
DISC
indicator
blinks
on
the
front
panel.
You
can
also
select
the
desired
disc
by
pressing
[
DISC
}
of
the
desired
disc
number
on
the
front
panel.
in
this
case,
the
CD
player
starts
play
immediately
from
the
first
track
of
the
disc.
NOTES:
*
Whenyou
set
the
play
mode
to
the
one-disc
play,
the
CD
player
plays
the
disc
you
selected
and
stops
after
ail
the
tracks
of
the
disc
has
been
played.
*
When
you
set
the
play
mode
to
the
long
play,
the
CD
playerstarts
play
from
the
disc
youselected
to
the
lastdisc
inthe
CD
tray
continuously.
For
example,
if
you
select
the
disc
number
2,
the
CD
player
plays
from
the
disc
number
2
to
the
disc
number
6
continuously.
To
start
play from
the
first track
to
the
last
5.
Press
{
CD
B/I1]
on
the
remote
control
or
{>/
00}
on
the
front
panel.
To
halt
play
temporarily
6.
Press
[
CD
B/I8
}
on
the
remote
control
or
{C>/
0
]
on
the
front
panel.
To
resume
play,
press
the
same
button
again.
To
stop
play
7.
Press
(i
CD
]
on
the
remote
control
or
[1]
on
the
front
panel.
Then
the
disc
number
(@),
the
total
number
of
tracks
(®)
and
the
total
playing
time
(@))
of
the
disc
are
indicated
inthe
display.
The
music
table
(@))
also
indicates
each
track
number.
“
OVER
"(®)
appears
when
a
disc
has
more
than
16
tracks.
To
play
a
particular
track
8,
Press
the
particular
track
number
on
the
remote
control.
Then
the
CD
player
starts
play.
The
CD
payer
stops
when
the
track
has
been
played.
To
play
from
the
desired
track
to
the
fast
track
of
disc
9.
Select
the
desired
track
by
repeatedly
pressing
[<4
]
or
[
1
Jon the
remote
control
or
[
KK
<i
Jor[
b>
Ot]
on
the
front
panel,
and
press
[
CD
®/11}
on
the
remote
control
or
(C>/
Df
]
on
the
front
panel.
To
get
a
particular
part
of
a
track
10.
Press
and
hold
[
<4
]
or
[
>B1
}
on
the
remote
control
or
{KX
<3)
of
[>>
D4]
on
the
front
pane!
dunng
play,
and
the
CD
player
will
start
search.
The
player
will
start
play
when
you
release
the
button.
To
change
discs
to
play
11.
Dunng
play,
select
the
desired
disc
by
repeatedly
pressing
[
DISC
]on
the
remote
control
oron
the
front
panel.
Then
the
cb
ete
Starts
play
from
the
first
track
of
the
disc
you
TIP:
Just
press{
CD
/
Il
Jon
the
remote
control
or[f>/
fl
Jon
the
front
panel,
and
the
sound
system
1s
automatically
tumed
on,
and
the
CD
player
starts
play
if
a
disc
has
been
loaded.
_ECOUTE
DE
DISQUES
2
modes
de
lecture
sont
disponibles.
Lecture
un
disque:
Un
disque
particulier
peut
atre
reproduit.
Lecture
longue
durée:
6
disques
peuvent
atre
reproduits
les
uns
apras
les
autres.
(Disque
de
12
cm
seulement)
Fonctionnement
de
base
Mise
sous
tension
de
l'appareil
1.
Appuyer
sur
la
touche
{
POWER
]
de
Ia
télécommande
ou
sur
ja
touche
[
POWER
ON/STANDBY
}
du
panneau
avant
Sélection
du
mode
CD
2.
Appuyer
plusieurs
fois
sur[
FUNCTION
J
dupanneau
avant
de
sorte
que
“Cd”
apparaisse
sur
l'afficheur.
REMARQUE:
Le
mode
CD
peut
atre
sélectionne
en
appuyant
sur
[CD
b/I8)
de
la
telécommande
ou
sur
[C>/00)
du
panneau
avant.
Dans
ce
cas,
le
lecteur
CD
commence
immediatement
la
lecture.
Réglage
du
mode
de
lecture
3.
Pour
la
lecture
longue
duree,
appuyer
sur
[
P.MODE
)
de
la
télécommande
de
sorte
que
!'indicateur
LONG
PLAY
du
panneau
avant
s’allume.
Pour
la
lecture
un
disque,
appuyer
sur[
P.MODE
}dela
télécommande
de
sorte
quel'indicateur
LONG
PLAY
du
panneau
avant
s'éteigne.
Sélection
du
disque
&
reproduire
4.
Appuyer
plusieurs
fors
sur
{
DISC
}
de
la
téléecommande
de
sorte
que
l’indicateur
DISC
désire
clignote
sur
le
panneau
avant.
Le
disque
désue
peut
aussi
atre
séiectionne
en
appuyant
sur
{
DISC
]
du
numero
de
disque
désire
sur
le
panneau
avant.
Dans
ce
cas,
le
ecteur
CD
commence
immediatementia
lecture
depuis
a
premiare
plage
du
disque.
REMARQUES:
*
Lorsque
le
mode
de
lecture
un
disque
est
regié,
le
lecteur
CD
reproduit
le
disque
sélectionne
et
s'arrate
apras
que
toutes
les
plages
du
disque
ont
été
reproduites.
*
Lorsque
te
mode
de
lecture
longue
duree
est
reglé,
le
lecteur
CD
commence
!a
lecture
continue
a
partir
du
disque
sélectionne
jusqu'au
dernier
disque
dans
le
tiroir
a
CD.
Par
exemple,
si
le
numero
de
disque
2
est
sélectionne,
le
lecteur
CD
reproduit
en
continu
du
numero
de
disque
2
jusqu’au
numero
de
disque
6.
Démarrage
de
lecture
de
la
premiére
a
la
derniére
plage
5.
Appuyer
sur
la
touche
[
CD
B>/
If}
de
la
télécommande
ou
sur
fa
touche
[[>/00
]
du
panneau
avant.
Arrét
de
lecture
momentane
6.
Appuyer
sur
la
touche
[
CD
P>/
tI
]
de
la
tééecommande
ou
sur
la
touche
[
&>/l]
du
panneau
avant.
Pour
reprendre
la
lecture,
appuyer
de
nouveau
sur
la
mame
touche.
Arrét
de
lecture
7.
Appuyer
sur
la
touche
[
@
CD
}
de
la
télécommande
ou
sur
la
touche
[0
]
du
panneau
avant.
Puls
le
numero
de
disque
(®),
le
nombre
total
de
plages
(@)
et
le
temps
total
de
lecture
(@)
du
disque
sont
indiques
sur
lafficheur.
Le
tableau
de
musique
(@)
indique
aussi
chaque
numero
de
plage.
“OVER”
(depassement)
(©)
apparaitiorsqu'un
disque
a
plus
de
16
plages.
Lecture
d’une
plage
particuliére
8.
Appuyer
sur
la
touche
de
numero
de
plage
particuliére
de
la
télécommande.
Puts
le
tecteur
de
CD
commence
la
lecture.
Le
lecteur
de
CD
s'arrate
lorsque
la
plage
a
été
reproduite.
Lecture
de
la
plage
désiree
yusqu’a
1a
derniére
plage
sur
le
disque
9.
Sélectionner
ta
plage
désiree
en
appuyant
repétitivement
sur
la
touche
[
<4
|]
ou
{
1
}
de
la
téleécommande
ou
sur
la
touche
[kK
<K)
Jou[
OP
CI
]
du
panneau
avant,
et
appuyer
sur
la
touche
[
CD
b/
Il)
de
la
téléecommande
ou
sur
la
touche
[C/1§
}
du
panneau
avant.
Repérage
d'une
section
particuliére
d'une
plage
10.
Appuyer
suriatouche/|
<4
]
ou[
+t
]delatélécommande
ou
sur
la
touche
[KJ
<4
Jou
{b>
C1)
du
panneau
avant
et
la
maintenir
enfoncee
pendant
fa
lecture
et
je
lecteur
CD
commence
la
recherche.
Le
lecteur
commence
la
lecture
lorsque
la
touche
est
relEchee.
Pour
changer
de
disque
pendant
la
lecture
11.
Pendantia
lecture,
selectionner
le
disque
désire
en
appuyant
plusteurs
fors
sur[
DISC
}de
la
télecommande
ou du
panneau
avant.
Le
tecteur
CD
commence
ators
la
lecture
a
partir
de
la
premiare
plage
du
disque
sélectionne.
CONSEIL.
Appuyez
simpiement
sur
(CO
P/N}
sur
la
télécommande
ou
[[>/
OD
]
sur
le
panneau
avant,
la
chaine
se
met
automatiquement
sous
tension
et le
lecteur
de
disque
compact
commence
{a
lecture
si
un
disque
compact
a
été
charge.
19
SR
Ae
a
a
A
ee
ere)
|.
"Cl
gaz

—
ie)
LISTENING
TO
THE
DESIRED
TRACKS
IN
THE
DESIRED.ORDER
ECOUTE
DES
PLAGES
_DESIREES
DANS
L’ORDRE
Programmed
Play:
You
can
programme
up
to
20
tracks
selecting
from
up
to
6
discs
and
play
them
in
the
desired
order.
1.
With
the
CD
player
in
stop
made,
press
[
PROG
]
on
the
remote
control,
and
“{g6IeEFAM)”
will
appear
in
the
display.
To
sefect
the
desired
disc
2.
Repeatedly
press
[
DISC
}
on
the
remote
control
so
that
the
DISC
indicator
of
the
desired
disc
blinks
on
the
front
panel.
The
selected
disc
number
also
appears
in
the
display.
You
can
also
select
the
desired
disc
by
pressing{
DISC
|
of
the
desired
disc
number
on
the
front
panel.
To
select
the
desired
tracks
3.
Press
the
desired
track
number
on
the
remote
control.
For
example,
if
you
want
to
program
the
track
number
5,
12
and
20,
press
[5],
{
10+/10}
[2/PM],
{
10+/10]
[
10+/10}[
0}.
NOTE:
To
cancel
programme
mode,
press
[Ml
CD
J
onthe
remote
control
or
[0
J
on
the
front
panel.
4.
Follow
the
same
operation
step
2
-
3
for
further
program-
ming
up
to
20
tracks,
To
start
play
5,
Press
[CD
®/
18]
on
the
remote
control
or
[>/
[0]
on
the
front
panel.
To
stop
play
6.
Press
{
M
CD
jon
the
remote
control
or
[0
]
on
the
front
panel
once.
NOTE:
Programme
steps
will
be
cleared
if
you
press
[
al
CD
}
or
[Q
]
more
than
one
time.
To
review
the
programme
7.
Repeatedly
press
{
PROG
J
onthe
remote
control.
Each
time
you
press
[
PROG
],
the
disc
number
(),
the
track
number
(@)
and
its
programme
step
(@)
are
indicated
In
the
display.
To
clear
the
programme
8.
With
the
CD
player
in
stop
mode,
repeatedly
or
continu-
ously
press
{
CD
]
onthe
remote
control
or[C
Jon
the
front
panel.
NOTE:
Turning
off
the
set
also
clears
the
programme.
NOTE
about
8
cm
disc
in
programmed
play:
Programmed
play
within
an
8
cm
disc
can
be
played.
But
programmed
play
between
an
8
cm
disc
and
other
discs
cannot
be
played.
In
that
case,
the
Error
message
appears
in
the
display
and
the
CD
tray
opens
for
you
to
remove
the
8
cm
disc.
‘ECOUTE
DES
PLAGES
ESIREES
DANS
L'ORDRE
Lecture
programmée:
Jusqu’a
20
plages
sélectionnees
sur
jusqu’a
6
disques
peuventatre
programmees
et
reproduites
dans
ordre
déstre.
1.
Le
lecteur
CD
étant
en
mode
d’arrét,
appuyer
sur
la
touche
[PROG]
de
la
télécommande
et
“
GRI@IEGEN”
apparait
sur
l'affichage.
Pour
sélectionner
le
disque
désiré
2.
Appuyer
plusieurs
fots
sur
[
DISC
}
de
la
télécommande
de
sorte
que
|'indicateur
DISC
du
disque
déstre
clignote
sur
le
panneau
avant.
Le
numero
du
disque
désire
apparaat
aussi
sur
l'afficheur.
Le
disque
désire
peut
aussi
atre
sélectionne
en
appuyant
sur
[
DISC
}
du
numero
de
disque
désire
sur
le
panneau
avant.
Pour
sélectionner
les
plages
désirées
3.
Appuyer
sur
la
touche
correspondant
au
numero
de
plage
désiree
de
la
télécommande.
Par
exemple,
si
on
veut
programmer
le
numero
de
piage
5,
12
et
20,
appuyer
sur
la
touche
[ 5
J,
[
10+/10
][
2/PM
J,
{
10+/10]
{
10+/10]
{0}.
REMARQUE:
Pour
annuler
le
mode
de
programmation,
appuyer
sur
la
touche
{
i
CD
J
de
la
télécommande
ou
sur
la
touche
[0
]
du
panneau
avant.
4.
Effectuer
de
nouveau
les
operations
2
-
3
pour
program-
mer
jusqu’a
20
plages.
Démarrage
de
lecture
5.
Appuyer
sur
la
touche
[
CD
P>/
It]
de
ta
telécommande
ou
sur
la
touche
[C>/
10
]
du
panneau
avant.
Arrét
de
lecture
6.
Appuyer
sur
la
touche
[I
CD
]
de
la
télécommande
ou
appuyer
une
fois
sur
la
touche
{
D
}
du
panneau
avant.
REMARQUE:
Les
étapes
de
programmation
sont
effacees
st
la
touche
[i
CD}
ou
la
touche
[0]
est
enfoncee
plusieurs
fois.
Révision
de
programme
7.
Appuyer
plusieurs
fois
sur[
PROG
]delatétécommande.
Chaque
fois
que
[
PROG }
est
enfonce,
le
numero
de
disque
(@),
le
numero
de
plage
(@)
et
son
pas
de
programmation
(@)
sont
indiques
sur
I'afficheur.
Effacement
de
programme
8.
Le
lecteur
CD
étant
en
mode
d'arrat,
appuyer
plusieurs
fors
sur
ou
maintenur
enfoncé
[
fil
CD
|
delatélécommande
ou
[0]
du
panneau
avant.
REMARQUE:
La
mise
hors
circuit
de
l'appareil
efface
aussi
le
programme.
REMARQUE
sur
les
disques
de
8
cm
en
lecture
programmée:
La
lecture
progammee
sur
disques
de
8
cm
est
possible,
mais
la
lecture
programmee
entre
un
disque
de
8
cm
et
d'autres
disques
ne
!'est
pas.
Dans
le
cas
d'une
telle
lecture,
le
message
Error
apparait
sur
l'affichage
et
le
plateau
de
disque
s'ouvre
pour
permettre
fe
retrait
du
disque
8
cm.
21
BI
en
a
NR
a
Ras
a
RR
a
a
|

vk
FONCTION
UTILE
EN
LECTURE
USEFUL
FUNCTIONS
INCD
PLAY
DE
DISQUE
COMPACT
7
i)
f
q
&
3
8
Oooo
Goo
O00
oss
“a
etapa!
CO
©
a)
1
)
ia
Random
Ptay:
You
can
make
the
player
select tracks
to
play
in
random
order.
About
play
mode
in
random
play
*
Random
play
in
long
play
mode:
All
the
tracks
of
each
disc
will
be
played
in
random
order,
starting
from
the
disc
you
selected
to
the
fast
disc.
*
Random
play
in
one-disc
play
mode:
All
the
tracks
of
the
disc
you
selected
will
be
played
in
random
order.
To
select
play
mode
®
For
long
play
mode,
press
[
P.MODE
]
on
the
remote
contro!
so
that
the
LONG
PLAY
indicator
lights
up.
For
one-disc
play
mode,
press
P.MODE
]
on
the
remote
control
so
that
the
LONG
PLAY
indicator
goes
off.
To
start
random
play
@®
With
the
set
in
CD
mode,
press
[
RANDOM
}
on
the
remote
control.
Then
“
"
appears
tn
the
display.
To
cancel
random
play
@®
Press
[@
CD
}
on
the
remote
control
or
{0
]
on
the
front
panel.
“ ”
disappears
in
the
display.
NOTE:
When
you
wantto
halt
random
play
without
cancel-
ling
the
play,
press
[
CD
/
It}
on
the
remote
control
or
{
&/10]
on
the
front
panel.
TIPS:
*
Pressing
[
PP
}
or
[
>>
D1]
makes
the
random
play
take
a
step
forward.
*
Pressing
[
RANDOM
]
renews
the
random
play.
Listening
Repeatedly
About
play
mode
in
repeat
play
*
Repeat
play
inlong
play
mode:
All
the
discs
are
played
repeatedly.
*
Repeat
play
in
one-disc
play
mode:
The
disc
you
selected
is
played
repeatedly.
NOTE:
The
CD
player
will
automatically
stop
repeat
play
when
24
hours
pass.
To
select
play
mode
1.
For
long
play
mode,
press
[
P.MODE
]
on
the
remote
control
so
that
the
LONG
PLAY
indicator
lights
up.
For
one-disc
play
mode,
press
[
P.MODE
}
on
the
remote
control
so
that
the
LONG
PLAY
indicator
goes
off.
To
set
repeat
play
2.
With
the
set
in
CD
mode,
press
[
@
}
on
the
remote
control,
and
“
Ge
”
will
appear
in
the
display.
TIP:
You
can
repeat
the
desired
tracks
of
the
desired
discs
in
combination
with
programmed
play
(see
page
20).
To
start
repeat
play
3.
Press
[
CD
>/#]
on
the
remote
controt
or
{
&>/1i0
Jon
the
front
panel.
To
cancel
the
repeat
play
4.
Press
[
@
]
on
the
remote
contro!
so
that
"@
*
will
disappear
in
the
display.
NOTE:
Repeat
play
ts
also
cancelled
by
pressing
[MCD]
on
the
remote
control
or
[C1]
on
the
front
panel.
"<=
FONCTION
UTILE
EN
LECTURE
~
DE
DISQUE
COMPAC
Lecture
aléatoire:
Le
jecteur
peut
sélectionner
des
plages
pour
la
lecture
aléatoire.
Sur
le
mode
de
lecture
en
tecture
aléatoire
*
Lecture
aléatoire
en
mode
longue
durée:
Toutes
les
plages
de
tous
les
disques
sont
reproduites
dans
un
ordre
aléatotre,
en
commenaant
a
partir
du
disque
sélectionné
jusqu'au
demier
disque.
+
Lecture
aléatoire
dans
le
mode
lecture
un
disque:
Toutes
les
plages
du
disque
sélectionne
sont
reproduites
dans
un
ordre
aléatore.
Pour
sélectionner
te
mode
de
lecture
@
Pour
te
mode
de
lecture
longue
duree,
appuyer
sur
[P.MODE
j
de
la.
télécommande
de
sorte
que
lindicateur
LONG
PLAY
s'altume.
Pour
le
mode
de
lecture
un
disque,
appuyer
sur
[P.MODE
j
de
la
télécommande
de
sorte
que
!’indicateur
LONG
PLAY
s'éteigne.
Démarrage
de
lecture
aléatoire
@
Le
tecteur
étant
en
mode
CD,
appuyer
sur
fa
touche
[RANDOM]
de
la
télecommande.
Ensuite,
“A
”
apparait
sur
l'affichage.
Annulation
de
lecture
aléatoire
@
Appuyersurlatouche|i™
CD
]de
la
télécommande
ou
sur
la
touche
([)]
du
panneau
avant.
“[RANDOM]”
disparait
de
I'affichage.
REMARQUE:
Lorsqu’on
veut
arréter
fa
lecture
aléatoire
sans
annulerla
lecture,
appuyer
surla
touche
[
CD
>/
Il]
de
la
télécommande
ou
sur
la
touche
[C>/0]]
du
panneau
avant.
CONSEILS:
*
Le
fait
d'appuyer
sur
la
touche
[P41]
ou
sur
[DI>
D>
]faitavancer
la
lecture
aléatoire
d'unpas
en
avant.
*
Le
fait
d'appuyer
sur
la
touche
[
RANDOM
]
repéte
la
lecture
aléatorre.
Ecoute
répétitive
Sur
le
mode
de
lecture
en
lecture
répétitive
*
Lecture
répétitive
en
mode
longue
durée:
Tous
les
disques
sont
reproduits
de
maniare
repétée.
°
Lecture
répétitive
dans
le
mode
lecture
un
disque:
Le
disque
sélectionné
est
reproduit
de
maniare
repétée.
REMARQUE:
Le
lecteur
CD
arrate
automatiquement
la
tecture
repétitive
au
bout
de
24
heures.
Pour
sélectionner
le
mode
de
lecture
1.
Pour
le
mode
de
lecture
longue
duree,
appuyer
sur
[
P.MODE
]
dela
télécommande
de
sorte
que
l'indicateur
LONG
PLAY
s’allume.
Pour
le
mode
de
lecture
un
disque,
appuyer
sur[{
P.MODE
]
deta
télécommande
de
sorte
que
lindicateur
LONG
PLAY
s’éteigne.
Pour
régler
fa
lecture
répétitive
2,
L'appareil
étant
en
mode
CD,
appuyer
sur
[@
]
de
ta
télécommande
et
“G&
”
apparaat
sur
I'afficheur.
CONSEIL.
Les
plages
désirees
sur
les
disques
désires
peuvent
atre
repétées
en
combinaison
avec
fa
lecture
programmée
(voir
page
20).
Démarrage
de
lecture
répétitive
3.
Appuyer
sur
fa
touche
[
CD
®/
If
|
de
la
télécommande
ou
sur
fa
touche
[C/00
}
du
panneau
avant.
Annuiation
de
lecture
répétitive
4.
Appuyer
sur
[CG
]
de
la
télécommande
de
sorte
que
“G
”
disparatsse
de
l'afficheur.
REMARQUE:
La
lecture
repétitive
est
aussi
annulée
en
appuyant
sur
(i
CD
}
de
fa
télécommande
ou
sur
(0)
du
panneau
avant.
23
Lo-O
ma

Sl
5-a.
7.
8.9.
The
tape
side
played
in
forward
play.
Face
de
la
cassette
lue
en
marche
avant.
@
Push
EJECT
The
tape
side
played
in
reverse
play.
Face
de
la
cassette
lue
en
sens
inverse.
‘ECOUTE
D’UNE
CASSETTE
>
on
_
TAPE
Be)
~
CHE
Ce
ae
TAPE
b>)
:
TAPE.
py
6.
17.8.9.
ene
RT
ne
(A
EEMES
>
Basic
Operation
Turning
the
set
on
1.
Press
[|
POWER
]
on
the
remote
contro!
or
press
[
POWER
ON/STANDBY
jon
the
front
panel.
Loading
a
tape
2.
Press
[&
Push
EJECT
J
on
the
top
panel
to
open
the
cassette
holder.
insert
a
tape
and
close
the
cassette
holder.
TIP-
The
Auto
Tape
Type
Selector
automatically
detects
your
tape-type
(Normal
or
CrOz)
and
selects
the
best
position
for
Playback
and
recording.
Metal
tapes
are
usable
only
for
ck.
Setting
the
Dolby
Noise
Reduction
selector
3.
Set[
DOLBY
NR
Jto
=
ON
or
31
OFF
matching
to
the
tape;
if
the
tape
has
been
recorded
with
the
Dolby
NR,
set
[
DOLBY
NR
}
to
=
ON.
Selecting
a
tape
running
mode
4.
Each
time
you
press
[
REV
MODE
J
on
the
remote
control,
“="
(One
way
mode)
or
“«=>"
(Endless
mode)
appears
by
tums
in
the
display.
About
tape
running
mode
One
way
mode
[
=]:
Either
side
of
the
tapes
played.
The
play
will
stop
automatically
at
the
end
of
the
tape.
Endiess
mode
[:=>
}:
Both
sides
of
the
tape
are
played
endlessly.
(The
tape
deck
stops
automatically
after
having
played
16
times
both
Side
A
and
B)
NOTES:
*
Ifthe
switch
at
the
power
pomt
is
set
to
off
while
a
tape
is
running,
it
may
be
impossible
to
remove
the
cassette.
If
this
happens,
set
the
switch
back
to
on
before
attempting
to
remove
the
cassette.
*
The
cassette
deck does
not
start
play
in
the
case
of
no
tape
inserted
in
the
cassette
deck
you
operate.
To
start
play
in
forward
direction
5-a.
Press
[TAPE
P
]
on
the
remote
control
or
[>]
on
the
front
panel.
Then
“>
“
blinks
in
the
display.
To
start
play
in
reverse
direction
5-b.
Press[
<4
]on
the
remote
control
or{
<J
Jon
the
front
panel.
Then
“
<4”
blinks
in
the
display.
To
stop
play
6.
Press
[lM
TAPE
Jon
the
remote
controf
or
[1
J
on
the
front
panel.
To
rapidly
advance
or
rewind
the
tape
7.
With
the
cassette
deck
in
stop
mode,
press[
PP
Jor[
<4
]
on
the
remote
contro!
or
[
>>
Jor[
<i
Jon
the
front
panel.
NOTE:
If
you
press
[
B®
]
or
[
«#4
}
on
the
remote
control
or
[D>
]
or
[<1]
on
the
front
panel
dunng
play
it
functions
as
Skip
Search.
To
get
the
beginning
of
the
song
(Skip
Search)
8.
Press[
<4
Jor{
<<
]dunng
forward
play
(press
[
>
Jor
[6
]
dunng
reverse
play),
and
the
cassette
deck
will
start
search
with
“>
"(“@"
in
reverse
play)
blinking
at
faster
rate.
When
the
beginning
of
the
song's
found,
the
cassette
deck
starts
play.
To
get
the
beginning
of
the
next
song
(Skip
Search)
9.
Press[
>
Jor[
D>
}dunng
forward
play
(press
[
<4
Jor
[<<]
dunng
reverse
play),
and
the
cassette
deck
will
start
search
with"
>
"(“"inreverse
play)
blinkingat
faster
rate.
When
the
beginning
of
the
next
song
is
found,
the
cassette
deck
starts
play.
NOTES:
The
skip
search
function
works
by
detecting
an
unrecorded
interval
for
more
than
4
seconds
between
songs.
It
may
not
function
properly
in
the
following
cases:
The
unrecorded
interval
is
less
than
4
seconds.
The
songs
have
quiet
or
no
sound
parts.
The
recorded
tape
has
a
conversation.
The
unrecorded
interval
has
a
hum
noise.
The
recording
level
of
a
tape
ts
too
low.
When
you
operate
this
function
while
a
TV
is
on.
In
this
case,
tum
off the
TV
or
move
the
unit
away
from
the
TV.
TIP:
Just
press
[
P
]/[~@]
on
the
remote
control
or
{>
]/
{
<
jonthe
front
panel,
andthesoundsystem
automatically
tumed
on,
and
the
cassette
deck
starts
play
if
a
tape
has
been
loaded.
Fonctionnement
de
base
Mise
sous
tension
de
l'appareil
1,
Appuyer
sur
la
touche
{
POWER
]
de
la
télécommande
ou
sur
la
touche
{
POWER
ON/STANDBY
]
du
panneau
avant.
Chargement
d’une
cassette
2.
Appuyer
sur
la
touche
[
&
Push
EJECT
}
du
panneau
avant
pour
ouvnr
le
receptacle
a
cassette.
Inserer
une
bande
et
tefermer
le
réceptacie
a
cassette.
CONSEIL:
Sélector
automatique
de
type
de
bande
(Normal/CrOz)
ce
sélector
détecte
auto-matiquement
le
type
de
bande
et
sélectionne
la
meilieure
position
pourlalecture
etl'enregistrement.
Des
bandes
métallique
ne
sont
utilisables
que
pour
la
reproduc-
tion.
Réglage
du
commutateur
de
reduction
de
bruit
Dolby
3.
Régler
le
commutateur
{
DOLBY
NR
}
sur
a=
ON
ou
J
OFF
selon
la
bande.
Si
la
bande
a
6té
enregistree
avec
le
systeme
Dolby
NA,
regler
[
DOLBY
NR
}
sur
a=.
ON.
Sélection
du
mode
de
défitement
de
bande
4.
Chaque
fors
que
la
touche
[
REV
MODE
]
de
{a
télécommande
est
enfoncee,
“="
(mode
une
voie)
ou
“=>”
(mode
continu)
apparait
successivement
sur
I'affichage.
A
propos
du
mode
de
défilement
de
bande
Mode
une
vote
[
=
}:
Chaque
face
de
la
bande
est
Iue.
La
lecture
S'arréte
automatiquement
a
la
fin
de
la
bande.
Mode
continu
[
=
]:
Les
deux
faces
de
la
bande
sont
Iues
en
continu.
(La
platine
cassette
s'arréte
automatiquement
apres
16
lectures
des
Faces
A
et
B.)
REMARQUES:
*
Si
le
commuteur
calimentation
est
regle
sur
arrét
(OFF)
pendant
qu'une
bande
défile,
il
peut
étre
impossible
de
retirer
lacassetie.
Sicela
se
produit,
reglerde
nouveaule
commutateur
sur
marche
(ON)
avant
d'essayer
de
retirer
la
cassette.
°
Lalecture
ne
se
déclenche
pas
s'il
n'y
a
pas
de
cassette
dans
fa
platine
choisie.
Démarrage
de
lecture
en
sens
normal
§-a.
Appuyer
sur
la
touche
[
TAPE
®
|
de
la
télécommande
ou
sur
la
touche
[>
]
du
panneau
avant.
Ensuite
“P"
clignote
sur
'affichage.
Démarrage
de
lecture
en
sens
inverse
5-b.
Appuyer
sur
la
touche[
<4
dela
tétécommande
ou
sur
la
touche
[<0
}
du
panneau
avant.
Ensuite
“<4
"
clignote
sur
atfichage.
Arrét
de
lecture
6.
Appuyer
sur
la
touche
{
Il
TAPE
]
de
la
télécommande
ou
surla
touche
[C)
]
du
panneau
avant.
Avance
ou
rembobinage
rapide
de
la
bande
7.
Laplatine
cassette
étant
en
mode
d'arrét,
appuyer
sur
la
touche
[>
]
ou
sur
fa
touche
[
<4
|
de
la
télécommande
ou
sur
la
touche
[>C>
]
ou
sur
ta
touche
[
<1
|
du
panneau
avant.
REMARQUE:
Sila
touche
{
P
]
ou
(
<4
]
de
la
télécommande
ousurlatouche
[Ot
Jou[
<j
|dupanneauavantestenioncee
Pendant
la
lecture,
elle
fonctionne
comme
touche
de
recherche
Par
saut.
Repérage
du
début
d'une
chanson
(Recherche
par
saut)
8.
Appuyer
sur
la
touche
[
<4
]
ou
surla
touche
[
<I<]
|
pendant
la
fecture
normale
(appuyer
sur
la
touche
[
®
}
ou
sur
la
touche
[>>
}
pendant
ia
lecture
en
sens
inverse)
et
la
platine
cassette
commence
la
recherche
et
“>
”
("
<4"
pour
la
lecture
en
sens
inverse)
clignote
plus
rapidement.
Lorsque
le
débutdela
chanson
est
repere,
la
platine
cassette
commence
ia
lecture.
Repérage
du
début
de
la
chanson
suivante
(Recherche
par
saut)
9.
Appuyer
sur
la
touche
[
P
Jou
surla
touche
[>>
}pendantla
lecture
normale
(appuyer
sur
la
touche
{
<<}
ou
sur
la
touche
[
<0
]
pendant
la
lecture
en
sens
inverse)
et
la
platine
cassette
commence
la
recherche
et
“>
"
(“
<4”
pour
la
lecture
en
sens
inverse)
clignote
plus
rapidement.
Lorsque
le
début
de
lachanson
suivante
est
repere,
la
platine
cassette
commence
fa
lecture.
REMARQUES:
Les
fonctions
de
recherche
par
saut
fonctionnent
en
détectant
un
espace
blanc
de
4
secondes
entre
les
chansons.
Elle
nsque
de
ne
pas
fonctionner
correctement
dans
les
cas
suivants:
*
L'espace
blanc
est
inféneur
a
4
secondes.
*
Les
chansons
ont des
morceaux
silencieux
ou
des
morceaux
sans
son.
La
bande
enregistree
contient
une
conversation.
L’espace
blanc
contient
un
bruit
de
ronflement.
Le
niveau
d’enregistrement
de
la
bande
est
trop
faible.
Lorsque
cette
fonction
estutilisee
pendant
qu'un
téléviseurest
allume.
Danscecas,
éteindrele téléviseur
ouéloignert'appareil
du
téléviseur.
CONSEIL:
Appuyez
simplementsur[
B>
}
/{ <4
Jsurlatélécommande
ou
sur
[>
}/{<]
le
panneau
avant,
la
chaine
se
met
automatiquement
sous
tension
et
fa
platine
cassette
commence
la
lecture
si
une
bande
a
été
chargee.
25
eeee

9}
RECORDING
A
TAPE
ENREGISTREMENT
D'UNE
BANDE
1.
3-a.
3-b.
CO
27M
3
5. 6. 8.
4.
3-b.
es
To
record
onto
Side
A
Pour
enregistrer
sur
la
Face
A
t
“
To
record
onto
Side
B
on
REC/PAUSE
on
REC/PAUSE
OOLBY
NA
>
=
ON
ry
Pour
enregistrer
sur
la
Face
B
26
Basic
Operation
Turning
the
set
on
1.
Press
{
POWER]
on
the
remote
control
or
[|
POWER
ON/
STANDBY
J
on
the
front
panel.
Selecting
a
tape
running
mode
2.
Each
time
you
press
[
REV
MODE
]
on
the
remote
control,“
="
(One
way
mode)
or“
«=>
"(Both
way
mode)
appears
by
tums
in
the
display.
One
way
mode
{
=}:
Either
side
of
the
tape
is
recorded.
Both
way
mode
[
‘=>
]:
Both
sides
of
the
tape
are
recorded
automatically.
Loading
a
tape
3-a.
For
recording
onto
both
sides
of
a
tape:
Press[
TAPE
B
Jon
the
remote
control
or
[
>
]
on
the
front
panel
to
select
forward
play.
Then
insert
a
cassette
tape
so
that
the
Side
A
faces
toward
you.
3-b.
For
recording
onto
either
side
of
a
tape:
To
record
onto
the
Side
A
of
a
tape:
Set
the
tape
running
direction
to
forward
play
by
pressing
[
TAPE
P
]
on
the
remote
control
or
[>
]
on
the
front
panel.
Then
insert
a
cassette
tape
so
that
the
Side
A
faces
toward
you.
To
record
onto
the
Side
B
of
a
tape:
Set
the
tape
running
direction
to
reverse
play
by
pressing
[
<4
]on
the
remote
control
or
[<1]
on
the
front
panel.
Then
insert
a
cassette
tape
so
that
the
Side
A
faces
toward
you.
NOTE:
The
recording
tevel
ts
automatically
set
and
the
volume
control
and
graphic
equalizer
ts
not
effective.
TIP:
The
Auto
Tape
Selector
automatically
detects
your
tape-type
(Normal
or
CrOz)
and
selects
the
best
position
for
playback
and
recording.
Setting
the
Dolby
Noise
Reduction
selector
4.
Set[
DOLBY
NR]
to
m=
ON
orm
OFF
matching
toyour
preference.
Recording
radio
broadcasts
5.
With
the
set
in
radio
mode,
press
[
@/II
]
on
the
remote
control
or
[
REC/PAUSE
Jon
the
front
panel
to
stand
by
recording.
Then
the
recording
indicator
“
"
blinks
in
the
display.
Press
the
same
button
again
to
start
recording.
NOTES:
*
Ifbeatnorse
is
audible
before
recording,
switch
the
RiF
selector
on
the
rear
panel
to
A
or
B
to
cut
down
the
notse.
*
Tohalt
the
recording
temporarily,
press
{
@/1
]
on
the
remote
control
or
{
REC/PAUSE
]
on
the
front
panel.
Press
the
same
button
again
to
resume
recording.
To
cancel
the
recording,
Press
the
tape
stop
button.
Recording
from
a
CD
(Synchronized
recording)
6.
With
the
set
in
CD
stop
mode,
press
[
@/I1]
on
the
remote
control
or
[
REC/PAUSE
]
on
the
front
panel
to
stand
by
recording.
Then
the
recording
indicator
“ "
blinks
in
the
display.
Press
the
same
button
again
to
start
recording.
Then
the
CD
player
and
the
cassette
deck
starts
synchronously,
and
“ "
appears
in
the
display.
NOTES:
*
At
the
end
of
each
CD
track,
4-second
unrecorded
interval
is
inserted
on
the
tape.
*
During
Synchronized
recording,
you
cannot
change
function
mode
by
pressing
the
function
button
and
other
function
related
buttons.
*
For
ordinary
recording
from
a
CD,
press
twice
[
@/H
}
on
the
remote
control
or
[|
REC/PAUSE
J
on
the
front
panef
after
you
Start
the
CD
player.
In
this
case,
“
”
does
not
appear
in
the
display.
To
stop
synchronized
recording
7.
Press
the
tape
stop
button
|
™@
TAPE
Jon
the
remote
contro!
or
[OJ
on
the
front
panel.
NOTE:
When
you
press
the
CD
stop
button
[
i
CD
]
on
the
remote
control
or
[0
}
on
the
front
panel
during
synchronized
recording,
the
CD
player
stops
immediately
and
the
tape
deck
becomes
recording
stand-by
status
after
having
inserted
4-second
unre-
corded
interval.
To
cancel
the
recording
stand-by
status,
press
the
tape
stop
button
[
ill
TAPE
]
on
the
remote
control
or
{
0
]
on
the
front
panel.
How
to
erase
a
tape
NOTES:
*
Select
a
tape
running
mode
and
direction
by
following
the
operation
steps
2.-
3,
*
Unptug
the
mixing
microphone
before
starting
erasing.
6.
win
the
set
in
TAPE
mode,
press
twice
{
@/
Hf]
on
the
remote
Control
or
[
REC/PAUSE
}
on
the
front
panel
to
start
erasing.
9.
To
stop
erasing,
press
{
Ml
TAPE
]
on
the
remote
control
or
{
0]
on
the
front
panel.
__
J
ENREGISTREMENT
D'UNE
BANDE:
Fonctionnement
de
base
Mise
sous
tension
de
l'appareil
1.
Appuyer
sur
la
touche
[
POWER
]
de
la
télécommande
ou
sur
la
touche
{
POWER
ON/STANDBY
]
du
panneau
avant.
Sélection
du
mode
de
défilement
de
bande
2.
Chaque
fois
que
la
touche
[
REV
MODE
}
de
la
télécommande
est
enfoncee,
"="
{mode
une
voie)
ou“
<=?
“(mode
deux
voies)
apparait
successivement
sur
I'af
i
Mode
une
vore
{
=
]:
face
de
la
bande
est
lue.
La
lecture
s'arréte
automati
ta
fa
fin
de
ta
bande.
Mode
deux
vores
[
«=>
}:
Les
deux
faces
de
la
bande
sont
iues
automatiquement.
Chargement
d’une
cassette
3-a.
Pour
enregistrer
sur
les
deux
faces
de
la
cassette:
Appuyer
sur
[
TAPE
>
}de
la
télécommande
ou
sur
{
[>
]
du
panneau
avant
pour
chorsir
la
tecture
en
avant.
Ensuite,
mstaller
une
cassette
en
dirigeant
la
Face
A
vers
sor.
3b.
Pour
enregistrer
sur
une
des
faces
d'une
cassette:
Pour
enregistrer
sur
ta
Face
A
de
la
cassette:
Réglez
la
direction
de
défilement
vers
j;'avant
en
appuyant
sur
{TAPE
>
}
de
la
télécommande
ou
sur
[>
}
du
panneau
avant.
installez
ensuite
la
cassetie
de
maniére
que
la
Face
A
soit
tournee
vers
vous.
Pour
enregistrer
sur
i
Face
B
de
la
cassette:
Réglez
la
direction
de
défilement
vers
lariére
en
appuyant
sur
[
<8
)de
la
télecommande
ousur[
<]
}du
panneau
avant.
Installez
ensuite
la
cassette
de
maniére
que
la
Face
A
soit
touree
vers
vous.
REMARQUE:
Le
niveau
d'enregistrement
est
défi
automatiquementet
le
reglage
du
volume
ams:
que
l'égaliseur
graphique
sont
inoperants.
CONCEIL:
Le
type
de
fa
bande
(Normal
ou
CrO:)
est
automatiquement
détecté
et
la
meilleure
position
pour
la
lecture
ou
'enregistrement
est
choise
par
fa
fonction
de
sélection
automatique
de
bande.
Réglage
du
commutateur
de
reduction
de
bruit
Dolby
4.
Régler
|
DOLBY
NR
]
sur
a
ON
ou
Mt
OFF
selon
les
préférences.
Enregistrement
d’émissions
de
radio
5.
L'appareil
étanten
mode
radio,
appuyer
sur[
@/
II
}de
ta
télécommande
ou
sur
[
REC/PAUSE
}
du
panneau
avant
pour
entrer
en
mode
dattente
d'enregistrement.
Ensuite
findicateur
d’enregistrement
“GIE@l”
clignote
sur
laffichage.
Appuyer
a
nouveau
sur
la
méme
touche
pour
commencer
I'enregstrement.
REMARQUES:
*
Siun
bruit
de
battement
est
audible
avant
d'enregistrer,
regier
le
sélecteur
RIF
du
panneau
ariére
a
Aou
B
pour
reduire
ce
bruit,
+
Pour
interrompre
temporairement
l'enregistrement,
appuyer
sur
{
@/I1
}
de
la
télécommande
ou
sur
[
RECPAUSE
]
du
panneau
avant.
Appuyer
a
nouveau
sur
la
méme
touche
pour
reprendre
lenregistrement.
Pour
annuler
l'enregistrement,
appuyer
sur
ta
touche
d'arrét
de
bande.
Enregistrement
a
partir
d'un
disque
compact
(Enregistrement
synchronisé)
:
6.
Le
lecteur
CD
étant
en
mode
d'arét,
appuyer
sur
[@/I0}
de
la
télécommande
ou
sur
|
REC/PAUSE
}
du
panneau
avant
pour
entrer
en
mode
d’attente
d'enregistrement.
Ensuite
findicateur
d'enregistrement
“
BEE"
clignote
surl'affichage.
Appuyer
a
nouveau
sur
fa
méme
touche
pour
commencer
l'enregistrement.
Ensuite
fe
lecteur
CD
et
la
platine
cassette
commencent
|'enregistrement
‘synchronise.
Puis
le
fecteur
de
disque
compact
et
la
platine
cassette
s@
mettent
synchromquement
en
marche
et
“|
"
apparait
sur
laffichage.
REMARQUES:
°
Ala
fin
de
chaque
plage
de
disque
compact,
un
espace
blanc
de
4
secondes
est
insere
sur
la
bande.
*
Pendant
un
,
VOUS
NE
pouvez
pas
rent
synchronise,
>
changer
le
mode
de
fonction
en
appuyant
sur
ia
touche
de
fonction
‘ou
sur
d'autres
touches
relatives
a
la
fonction.
*
Pour
un
enregistrement
normal
a
partir
d'un
disque
compact,
appuyez
deux
fors
sur
[
@/
11
]
de ta
télécommande
ou
sur
[|
REC/
PAUSE
}
du
panneau
avant
apres
avo
démaré
le
lecteur
de
CD.
Dans
ce
cas,
“{S]§E}"
n'apparait
pas
sur
l'atfichage.
Arrét
d’enregistrement
synchronise
7.
Appuyer
sur
la
touche
d’arét
[lJ
TAPE
}
de
la
télécommande
ou
sur
la
touche
[
0
]
du
panneau
avant.
REMARQUE:
Lorsque
la
touche
d’arrét
de
CD
[ICD]
de
la
télécommande
ou
fa
touche
[1]
du
panneau
avant
est
enfoncee
pendant
l'enregistrement
synchronise,
le
lecteur
CD
s‘arréte
immediatement
et
la
platine
cassette
entve
en
mode
d'atlente
d'enregistement
apres
insertion
d'un
espace
blanc
de
4
secondes.
Pour
annuler
le
mode
d'attente
d'enregistrement,
appuyer
sur
la
touche
d'arrét|
i
TAPE
]dela
télécommande
ousurla
touche
(O
]du
Panneau
avant.
Effacement
d’une
bande
REMARQUES:
+
Sélectionner
le
mode
de
défilernent
de
bande
et
la
direction
en
survant
les
étapes
2.
-
3.
survantes.
*
Débrancher
le
microphone
de
mixage
avant
de
commencer
effacement.
8.
Lappared
étant
en
mode
TAPE,
appuyer
deux
fois
sur
{
@/
11}
de
la
télécommande
ou
sur
|
REC/PAUSE
]
du
panneau
avant
pour
com-
mencer
leffacement.
9.
Pour
aréter
effacement,
appuyer
sur
la
touche
{ME
TAPE}
de
la
télécommande
ou
sur
la
touche
[
D
]
du
panneau
avant.
27
LO-o

+
NI
AUTO
EDIT
RECORDING
FROMCDs
1a.
1-b.
5.
105/10
-
ENREGISTREMENT
A
MONTAGE
“AUTOMATIQUE
A
PARTIR
DE
CD
t
I
5
=
za
(<4
TAPE
This
function
automatically
arranges
CD
tracks
to
be
recorded
matching
to
your
tape
length.
You
do
not
have
to
worry
about
the
playing
time
when
recording
from
CDs.
Selecting
the
both
way
mode
@
Press
[
REV
MODE
]
on
the
remote
control
to
select
the
both
way
mode
(
«=>
).
Selecting
the
tape
running
direction
@
Press
[
TAPE
®
Jon
the
remote
control
or[C
Jon
the
front
panet
to
select
the
forward
play.
Loading
a
tape
@
Insert
a
tape
with
the
Side
A
facing
toward
you.
Selecting
the
CD
mode
@
Press|
FUNCTION
Jon
thefrontpanelor{
CD>/Il
Jonthe
remote
contro!
to
select
the
CD
mode.
Selecting
the
desired
disc
©
Repeatedly
press
{
DISC
]
on
the
remote
control.
Selecting
the
playing
time
of
your
tape
1-a.
With
the
set
in
CD
stop
mode,
repeatedly
press
[
A.
EDIT
}
on
the
remote
control
to
get
the
playing
time
of
your
tape
in
the
display.
For
example,
if
you
use
a
60-minute
tape,
select
C-60.
4-b.When
using
a
tape
other
than
C-46,
C-60
or
C-90
(for
example
C-54),
get
“C---”
in
the
display
first
and
enter
its
playing
time
“54”
by
pressing
the
number
buttons
of
the
remote
control.
2.
Then
the
unit
will
show
you
the
track
numbers
to
be
recorded
and
a
remainder
time
of
the
tape
(@)
as
“A
FILE”
(for
the
Side
A
of
the
tape),
then
“b
FILE”
(for
the
Side
B
of
the
tape).
Lastly,
the
unit
will
indicate
the
last
track
number
(@)
and
the
total
number
of
tracks
to
be
recorded
(@).
NOTE:
To
cancel
the
Auto
Edit
recording,
press
the
CD
stop
button
{
if
CD
]
on
the
remote
control
or
{O]
on
the
front
panet.
To
start
recording
3.
Press
twice{
@/I1
Jon
the
remote
control
or
[
REC/PAUSE
]
on
the
front
panel.
Then
the
tape
deck
will
start
recording
after
automatically
rewinding
the
tape
to
its
beginning
and/
or
skipping
its
leader
tape.
NOTE:
The
tape
deck
will
erase
the
tape
remainder
of
Side
A
before
starting
to
record
“b
FILE”
onto
the
Side
B
of
the
tape.
Continuous
Edit
Recording
You
can
record
from
more
than
one
disc
onto
one
tape.
4.
When
the
last
track
of
the
disc
has
been
recordedin
the
Auto
Edit
recording,
both
the
CD
player
and
tape
deck
stop
and
the
Continuous
Edit
indicator“
"(®)
appears
in
the
display.
Replace
the
disc
with
another
one.
Then
the
unit
arranges
tracks
to
be
recorded
onto
the
remainder
of
the
tape.
5.
Repeatedly
press
[
DISC
}
on
the
remote
control,
or
press
{
DtSC
]
of
the
desired
number
on
the
front
panel.
Then
press
[
A.EDIT
}
on
the
remote
control
to
arrange
tracks
to
be
recorded
onto
the
remainder
of
the
tape.
NOTE:
You
can
replace
discs
with
new
ones
by
pressing
the
open/close
[
#
]
button.
in
this
case,
the
unit
automatically
starts
arranging
tracks
when
the
CD
tray
ts
closed.
6-a.
Press
[CD
/I§]
on
the
remote
contro!
or
[
>/00
]
on
the
front
panel
to
start
Continuous
Edit
recording.
NOTE:
Pressing
[
@/
1]
or
[
REC/PAUSE
]
cannot
start
Con-
tinuous
Recording.
6-b.
When
the
tape
remainder
is
not
enough
for
recording
any
track
of
the
disc,
“no
FILE"
appears
in
the
display.
In
this
case,
try
a
different
disc,
or
press
the
tape
stop
button
[
@
TAPE
J
on
the
remote
control
or
[7]
on
the
front
panet
to
cancel
the
Continuous
Edit
recording.
To
stop
Auto
Edit
recording
7.
Press
{
TAPE
]
on
the
remote
control
or
[
D
}
on
the
front
panel.
NOTE:
When
you
press
the
CD
stop
button
{
lf
CD]
on
the
remote
control
or
[1
}
on
the
front
panel,
the
Auto
Edit
recording
ts
cancelled,
but
the
tape
deck
becomes
record-
ing
stand-by
status
after
having
inserted
4-second
unre-
corded
interval.
Press
the
tape
stop
bution
|
Ml
TAPE
]
on
the
remote
controt
or
[0
j
on
the
front
panel
if
you
want
to
cancel
the
recording
stand-by
status.
NOTE
ABOUT
AUTO
EDIT
RECORDING:
The
Auto
Edit
recording
function
records
up
to
20
tracks,
selecting
from
the
first
rack
to
the
23
rd
track
within
a
disc.
If
a
disc
has
more
than
23
tracks,
the
rest
of
the
tracks
are
ignored.
Cette
fonction
assemble
automatiquement
les
plages
du
discque
com-
pact
a
enregistrer
en
fonction
de
la
longueur
de
fa
bande.
Inutile
de
se
soucier
du
temps
de
lecture
pour
enregistrer
des
disques
compacts.
Sélection
du
mode
Deux
Sens
@
Appuyez
sur
[
REV
MODE
]
de
la
telécommande
pour
choisir
le
mode
Deux
Sens
(=).
Sélection
du
sens
de
défilement
de
la
bande
Appuyez
sur
[TAPE
B
J
de
la
télécommande
ou
sur
[
(>
]
du
panneau
avant
pour
chorsir
la
lecture
en
avant.
Mise
en
place
d'une
cassette
@
Inserez
ta
cassette
en
dirigeant
ia
Face
A
vers
vous.
Sélection
du
mode
CD
@
Appuyez
sur
{
FUNCTION
j
du
panneau
avant
ou
sur
[
CD
®/
11]
de
la
télécommande
pour
choisir
le
mode
CD.
Sélection
du
disque
désir
©
Appuyer
plusieurs
fors
sur
{
DISC
}
de
la
télécommande.
Sélection
du
temps
de
lecture
de
la
bande
1-a.
L'appareil
étant
en
mode
d’arrét
CD,
appuyer
repétitivement
sur
latouche{
A.
EDIT
jde
ia
téiécomande
pour
afficher
le
temps
de
tecture
de
la
bande.
Par
exemple,
si
une
cassette
de
60
minutes
est
utilisee,
sélectionner
C-60.
1-b.
Lors
de
l'utilisation
de
cassettes
autres
que
C-46,
C-60
ou
C-90
(par
exemple
C-54),
afficher
d'abord
*C---”
sur
l'affichage
et
entrer
ensuite
le
temps
de
lecture
“54"
en
appuyant
sur
les
touches
numenques
de
la
télécommande.
2.
Ensuite
!'appareil
indique
les
numeros
de
plages
a
enregistrer
et
un
temps
restant
de
la
bande
(@)
“A
FILE”
(pour
la
Face
A
de
la
bande),
ensuite
“b
FILE”
(pour
la
Face
B
de
ta
bande).
Finalement,
l'appareil
indique
te
dermer
numero
de
plage
(@))
et
le
nombre
total
de
plages
a
enregistrer
(@).
REMARQUE:
Pour
annuler
!'enregistrement
avec
edition
automatique,
appuyer
sur
la
touche
d'arrét
de
CO
[
@
CD
|
dela
télécommande
ou
appuyer
sur
la
touche
[0
]}dupanneau
avant.
Pour
commencer
I'enreistrement
3.
Appuyer
deux
fois
sur
(@/11]
de
fa
télécommande
ou
sur
{
REC/PAUSE
]
du
panneau
avant.
La
platine
cassette
com-
mence
l'enreistrement
apres
le
rembobinage
automatique
de
la
bande
vers
le
début
ev/ou
le
saut
de
sa
guide-bande.
REMARQUE:
La
platine
cassette
efface
le
reste
de
la
bande
de
la
Face
A
avant
de
commencer
t'enregistrement
de
"b
FILE"
surla
Face
B
de
Ia
bande.
Enregistrement
édité
en
continu
Des
enregtstrements
sur
une
bande
peuvet
étre
effectues
a
partir
de
plusieurs
disques
4.
Lorsque
la
derniére
plage
du
disque
a
été
enregistree
en
mode
d'enregistrement
avec
edition
automatique,
le
lecteur
CD
et
la
piatine
cassette
s'arrétent
et
l'indicateur
d'edition
continue
“(CONT)”
(@)}
s'allume
sur
laffichage.
Remplacer
te
disque
par
un
autre
disque.
Ensuite,
l'appareil
assemble
les
plages
a
enregistrer
sur
la
bande
restante.
5.
Appuyer
plusieurs
fois
sur
{
DISC
]
de
la
télécommande
ou
appuyer
sur
{
DISC
]
du
numero
désire
sur
fe
panneau
avant.
Pus
appuyer
sur
[
A.EDIT
|
de
la
télécommande
pour
arranger
les
plages
a
enregistrer
sur
le
reste
de
la
bande.
REMARQUE:
Les
disques
peuvent
atre
remplaces
en
appuyant
sur
la
touche
d'ouverture/termeture
[
4
].
Dans
cecas,
l'appareil
commence
automatiquement
a
arranger
les
plages
lorsque
le
tirow
a
CD
est
ferme.
6-a.
Appuyer
sur
la
touche
{CD
®/It]
de
la
télécommande
ou
appuyer
sur
la
touche
[[>/0l}
du
panneau
avant
pour
com-
mencer
l'enregistrement
edité
continu.
REMARQUE:
Le
fait
d'appuyer
sur
fa
touche
[@/11}
de
ia
télécommande
ou
dappuyer
sur
Ja
touche
[
REC/PAUSE
}
ne
perment
pas
le
démarrage
de
l'eregistrement
continu.
6-b.
Lorsquela
bande
restante
n’estpas
assez
longue
pour
enregistrer
les
piages
du
disque,
"no
FILE“
apparit
sur
l'affichage.
Sicela
se
produit,
essayer
un
autre
disque
ou
appuyer
surla
touche
d'arrét
de
bande
{
™@
TAPE
]
de
la
télécommande
ou
appuyer
sur
la
fouche
|}
du
panneay
avant
pour
annuler
l'enregistrement
edité
continu.
Pour
arréter
l'enregitrement
avec
édition
automatique
7.
Appuyer
sur
la
touche
{li
TAPE}
de
la
télécommande
ou
appuyer
sur
la
touche
{Cj
]
du
panneau
avant.
REMARQUE:
Lorsque
la
touche
[
J
CD
}
de
ia
télécommande
ou
ta
touche
[0]
du
panneau
avant
est
enfoncee,
le
mode
d'enregistrement
avec
edition
automatique
est
anuté,
mais
la
piatine
cassette
entre
en
mode
d'attente
d'enregistrement
apres
finsertion
d'un
intervatle
de
4
secondes.
Appuyer
sur
la
touche
(I
TAPE
]
de
la
télécommande
ou
appuyer
sur
la
touche
(0
|
du
panneayu
avant,
st
on
veut
annuler
le
mode
d'attente
dienregistrement,
REMARQUE
A
PROPOS
DE
L'ENREGISTREMENT
AVEC
EDITION
AUTOMATIQUE:
Lafouction
d’enregistrement
Audio
Edit
permet
d’enregistrerjusqu'a
20
plages,
sélectionnant
entre
ta
premere
et
la
23e
plage
d'un
disque.
Si
un
disque
comporte
plus
de 23
plages,
les
derniéres
sont
ignorees.
29
SS
a
ae
a
a
PD,
GN
a
ee
EEE
Oe
C—O

8k
PROGRAMMABLE
TIMER
MINUTERIE
PROGRAMMABLE
3.
12.
2.
10.
13.
Tune
to
your
desired
broadcast.
Syntoniser
la
station
désiree.
106/10
er
or
aug
Turn
the
power
|
10.
off.
TIMER
>
Mettez
hors
|
tenston.
10410
106/10
The
programmable
timer
turns
on
and
off
your
desired
sound
source
at
your
desired
time.
ft
can
also
start
recording
from
a
radio
broadcast
at
your
desired
time.
NOTE:
Set
the
clock
first
referring
to
SETTING
THE
CLOCK
(on
page
12).
The
timer
does
not
function
uniess
the
clock
1s
set.
TIMER-PLAY
Selecting
the
desired
sound
source
(CD,
TAPE
or
RADIO)
1.
Radio-play:
Prepare
the
radio
listening
(see
LISTENING
TO
THE
RADIO
on
page
14).
CD-play:
Prepare
CD
listening
(see
LISTENING
TO
DISCS
on
page
18).
Tape-play:
Prepare
Tape
listening
(see
LISTENING
TO
A
TAPE
on
page
24).
Selecting
the
Timer-Play
mode
2.
Press
[
TIMER]
on
the
front
panel.
Then“
@
"
appears
for
5
secands
tn
the
display.
Setting
the
time
to
turn
on
3. In
that
penod,
press
[
TIME
SET
}
twice
on
the
remote
control.
4.
Select
either
“AM”
(by
pressing
[
1/AM]
on
the
remote
control)
or
“PM"
(by
pressing
{
2/PM
]
on
the
remote
con-
trol).
Then
press
{
PROG
}
on
the
remote
control.
5.
Enter
the
desired
hour
by
pressing
the
number
buttons
on
the
remote
control.
For
example,
press
[
7
]
for
setting
7:00.
Then
press
[
PROG
]
on
the
remote
control.
6.
Enter
the
desired
minutes
by
pressing
the
number
buttons.
For
example,
press
[
10+/10
]<>
[5]
for
setting
7:15.
Press
[
PROG
]
on
the
remote
control.
NOTES:
*
Set
the
volume
contro!
to
the
desired
level.
*
The
tape
deck
always
starts
in
the
Forward
Play
under
timer-play.
*
Radio
will
be
selected
as
the
sound
source
of
timer-play
if
no
disc
(under
CD-play)
or
no
tape
(under
Tape-play)
ts
loaded.
*
Once
you
have
set
the
timer,
it
functions
everyday
at
the
same
time.
Set
the
timer
off
when
the
timer
function
is
not
necessary.
Setting
the
time
to
turn
off
7.
Select
either
“AM*
(by
pressing
[
1/AM]
on
the
remote
contro!)
or
“PM"
{by
pressing
[
2/PM
]
on
the
remote
con-
trol).
Then
press
[
PROG
).
8.
Enter
the
desired
hour
by
pressing
the
number
buttons.
For
example,
press
[
8
]
for
setting
8:00.
Then
press
[
PROG
].
9.
Enter
the
desired
minutes
by
pressing
the
number
buttons.
For
example,
press
[
10+/10
Jo
[
104/10
]
>
[0]
for
setting
8:20.
Then
press
[
PROG
]
and
turn
off
the
set
to
standby
the
timer-play.
TIMER-RECORDING
NOTES:
*
Tune
to
the
desired
radio
station.
*
Recording
always
starts
in
the
Forward
direction
under
timer-recording.
IMPORTANT:
Once
you
have
set
the
timer-recording,
it
func-
tions
everyday
at
the
same
time.
Set
the
timer
off
when
the
timer-recording
ts
not
necessary.
10.
Press
[
TIMER
}
twice
on
the
front
panel.
Then
“@-
Hae”
appears
in
the
display
for
4
seconds.
11,
Follow
the
same
operation
steps
3.
—
9.
To
review
the
timer
settings
12.
Press
{
TIME
SET
]
once
on
the
remote
contro/.
Then
ON-
time
and
OF
F-time
appear
respectively
for
3
seconds
in
the
display.
To
cancel
the
Timer
mode
13.
Repeatedly
press
[
TIMER
]
so
that
“
@
”
or
“o-
faa”
disappears
in
the
display.
NOTES:
*
To
cancel
the
Timer
mode
dunng
the
setts
on
with
the
timer
mode,
turn
off
the
set
and
turn
it
on
again,
then
follow
the
operation
step
13.
*
The
timer-play/-recording
can
activate
only
when
the set
4s
in
power
standby.
«
When
you
enter
the
same
settings
of
time
both
for
turning
on
and
off,
the
timer
function
1s
also
cancelled.
La
minutene
programmable
enclenche
et
arréte
ta
source sonore
désiree
a
l'heure
specifiée.
Ele
peut
également
commencer
tenregistrement
d'emmissions
de
radio
a
l'heure
désirée.
REMARQUE:
Régler
d'abord
I'horloge
en se
reportant
a
fa
section
REGLAGE
D'HORLOGE
(a
1a
page
12).
La
minutene
ne
fonctionne
pas
sauf
si
'horloge
est
LECTURE
PROGRAMME
PAR
MINUTERIE
Sélection
de
fa
source sonore
désirée
(CD,
TAPE
ou
RADIO)
1.
Ecoute
de
ta
radio:
Preparer
fécoute
de
la
radio
(voir
la
section
ECOUTE
DE
LA
RADIO
a
la
page
14).
Lecture
de
CD:Preparer!'écoute
de
CD
(voirlasection
ECOUTE
DE
DISQUES
a
fa
page
18).
Lecture
de
cassette:
Preparer
I'écoute
d'une
cassette
(voir
la
section
ECOUTE
D'UNE
CASSETTE
ala
page
24).
Sélection
de
mode
de
lecture
programmée
par
minutene
2.
Appuyersurlatouche[
TIMER
|
du
parneau
avant.
Ensuite,“
@
apparait
pendant
5
secondes
sur
l'affichage.
seecton
de
I'heure
de
démarrage
3.
Pendant
ce
temps,
appuyer
deux
fois
sur
la
touche
[
TIME
SET
]
de
fa
téKécommande.
4.
Sélectionner
“AM”
(en
appuyant
sur
la
touche
[
1/AM
]
de
la
tél&commande)
ou
bien
“PM”
(en
appuyant
sur
la
touche
[
2/PM
J
de
fa
télécommande).
Ensuite,
appuyer
sur
la
touche
[
PROG
}
de
la
télécommande.
5.
Entrer
'heure
désiree
en
appuyant
sur
les
touches
numenques.
de
la
télécommande.
Par
exemple,
appuyer
sur
ta
touche
{
7]
pour
regter
a
7:00
le
matin.
Appuyer
sur
la
touche
[
PROG
}de
la
télécommande.
6.
Entrer
les
minutes
désirees
en
appuyant
sur
les
touches
numenques.
Parexemple,
appuyer
surlatouche[
104/10
J
[5]
pour
entrer
7:15.
Appuyer
sur
la
touche
[PROG]
de
la
télécommande.
REMARQUES:
+
Régler
la
commande
de
volume
au
niveau
désire.
*
La
platine
cassette
commence
toujours
la
lecture
normale
pendant
{a
lecture
programmee
par
minutene.
*
La
radio
est
sélectionnee
comme
source
sonore
pour
la
lecture
programee
par
minutene
si
aucun
disque
n'est
charge
(pendant
la
lecture
d'un
CO)
ou
si
aucune
cassette
n'est
chargee
(pendant
la
lecture
de
cassette).
*
Dés
que
la
minutene
est
regiée,
elle
fonctionne
tous
les
jours
a
la
méme
heure.
Arréter
la
minutene
lorsque
la
fonction
de
minutene
n'est
pas
necessaire.
Réglage
de
I'heure
d‘arrét
7.
Sélectionner
“AM”
(en
appuyant
sur
ta
touche
[
1/AM]
de
la
télécommande)
ou
bien “PM”
(en
appuyant
sur
la
touche
[
2/PM
]
de
la
télécommande).
Ensuite,
appuyer
sur
la
touche
[
PROG
].
8.
Entrer
l'heure
désiree
en
appuyant
sur
les
touches
numenques.
Parexemple,
appuyer
surla
touche{
8
}pourentrer8:00le
matin.
Appuyer
sur
la
touche
{
PROG
].
9.
Entrer
les
minutes
désirees
en
appuyant
sur
les
touches
Numenques.
Par
exemple,
appuyer
sur
la
touche
[
10+/10
]>
{
103/10
]
=
[
0
)pour
entrer8:20.
Appuyersurlatouche[
PROG
}.
Ensuite,
étiendre
fappane!
pour
entrer
en
mode
diattente
de
lecture
par
minutene.
ENREGISTREMENT
PROGRAMME
PAR
MINUTERIE
REMARQUES:
*
Syntoniser
la
station
désiree.
¢
Lenregistrement
commence
dans
fe
sens
norma!
pendant
fenregustrement
programme
par
minutene.
IMPORTANT:
Dés
que
l'enregistrement
programme
par
mmutene
est
regi,
il
fonctionne
tous
les
jours
a
la
méme
heure.
Arréter
sa
minutene
lorsque
l'enregistrement
programme
par
minutene
n'est
pas
necessarre.
10.
Appuyer
deux
fois
sur
la
touche
[
TIMER
}
du
panneau
avant.
Ensuite,
“o-|
“
apparait
sur
l'affichage
pendant
3
secondes.
11.
Survre
les
mémes
operations
aux
points
3.
—-
9.
Pour
reviser
les
réglages
de
minutene
12.
Appuyersurlatouche[
TIME
SET
|delatéléicommande.
L’heure
denclenchement
(ON-time)
et
l'heure
d'arrét
(OFF-time)
apparaissent
respectivement
pendant3
secondes
sur''affichage.
Pour
annuler
le
mode
programmation
par
minutene
ivernent
sur
fa
touche
[
TIMER
}
jusqu'a
ce
que
"
disparaisse
de
I'affichage.
REMARQUES:
*
Pour
annuler
le
mode
mmutene
pendant
que
l'appareil
est
allume
et
le
mode
minutene
est
enclenche,
éteindre
l'appareil
et
fe
rallurer,
ensuite
survre
foperation
d’crite
au
point
13.
*
Lenregistrementfecture
programme
par
minutene
peut
seulment
étre
activé
lorsque
l'appareil
est
en
mode
d'attente.
*
Lorsque
tes
mémes
reglages
d'heures
sont
entres
pour
les
heures
d'enclenchement
et
d'arrét,
la
fonction
de
minutene
est
annulée.
31
a
a
a
a
I
ea
ID
A
LEI
PE
ee
B,
-C}
RERB

clignote
sur
affichage.
2.
Press
[
SLEEP
]
once.
Pour
revérifier
le
temps
restant
avant
d'éteindre
l'appareil
To
reset
the
sleep
timer
2.
Appuyer
une
fois
sur
la
touch
[
SLEEP
].
3.
Repeat
the
procedure
1.
Pour
remettre
la
minuterie
de
sommeil
a
zéro
To
cancel
the
sleep
timer
3.
Réperter
fa
procedure
1.
4.
Repeatedly
press
{SLEEP
]
until
you
get
“0:00"
Then
—_
Pour
annuler
la
minuterie
de
sommeil
the
indicator
*
”
will
disappear
in
5
seconds.
4.
Appuyer
repétitivement
sur
la
touche
[
SLEEP
}
jusqu'a
NOTE:
The
sleep
timers
not
available
during
Timer-play/
ce
que
“0:00”.
Ensuite,
l'indicateur
“
"
disparait
Timer-recording.
en
5
secondes.
REMARQUE:
La
minutene
de
sommeil
ne
fonctionne
pas
pendant
fa
lecture/enregistrement
programme
par
minutene.
Mixing
Play
Lecture
avec
mixage
1.
Insert
the
Microphone
plug
into
the
MIC
socket
on
the
1.
Inserer
la
fiche
de
microphone
dans
la
prise
MIC
du
front
panel.
panneau
avant.
2.
Adjust
the
MIC
LEVEL
controt.
2.
Ajustez
le
reglage
MIC
LEVEL.
3.
Prepare
the
desired
sound
source
to
mix
(TUNER,
3.
Preparer
la
source
sonore
désiree
pour
fe
mixage
TAPE,
CD
or
AUX).
(TUNER,
TAPE
(cassette),CD
ou
AUX).
NOTE:
Howling
occurs
when
the
microphone
is
brought
REMARQUE:
Un
hurlement
se
produit
lorsque
le
micro-
too
near
to
the
speaker.
Move
the
microphone
away
phone
est
trop
rapproche
du
haut-parieur.
Eloigner
le
from
the
speaker
or
turn
down
the
VOLUME
control
or
microphone
du
haut-parleur
ou
tourner
la
commande
de
MIC
LEVEL
control
if
howling
occurs.
VOLUME
ou
reglage
MIC
LEVEL
pour
redurre
le
niveau
Mixing
Recording
de
volume
st
un
hurlement
se
produit.
4.
Prepare
the
desired
sound
source
to
mix
(TUNER,
CD
_
Enregitstrement
avec
mixage
(optional)
°
or
AUX).
4.
Preparer
la
source
sonore
désiree
pour
le
mixage
(En
option)
S
5.
To
start
mixing
recording,
press
twice
[
@/II]
on
the
(TUNER,
CD
ou
AUX).
‘.
remote
control
or
[
REC/PAUSE
]
on
the
front
panel.
5.
Commencer
l'enregistrement
avec
mixage,
appuyer
(Refer
to
RECORDING
A
TAPE
on
page
26
for
record-
duex
fois
sur
la
touche
[
@/
II}
de
la
télécommande
ou
ing
operation.)
sur
la
touche
[
REC/PAUSE
}
du
panneau
avant.
(Se
reporter
a
fa
section
ENREGISTREMENT
D'UNE
BANDE
ala
page
26
pour|'opération
d’enregistrement.)
Hii
POUR
ECOUTER
UN
IL
AUDIO
EXTERNE
Listening
to
an
external
sound
unit
Pour
écouter
un
appareil
audio
externe
1.
Connect
the
output
terminals
of
additional
equipment
1.
Branchement
d’équipements
supplementaires
(DAT,
e.g.
DAT,
VCR
to
the
“AUX”
jack.
If
it
is
desired
to
VCR)
sur
les
prises
“AUX”.
Sil’on
désire
connecter
une
connect
a
turntable,
note
that
only
those
equipped
with
platine-disques
aux
prises
“AUX’,
il
faut
que
celle-ci
soir
an
equalizer
amplifier
can
be
connected
to
the
“AUX”
equipee
d'un
amplificateur-egaliseur.
Les
platines
non
jack.
Turntables
without
pre-amplification
will
not
work
pourvues
de
pre-amplificateur
ne
pourront
etre
utilisees
with
this
unit.
avec
ce
modeie.
2.
Select
the
AUX
as
the
sound
source
by
pressing
2.
Sélectionnez
AUX
comme
source
sonore
en
appuyant
(
FUNGTION
j
on
the
front
panel.
sur
[FUNCTION
]
sur
le
panneau
avant.
33
6L
4
-
"
You
can
tum
off
the
set
automatically.
L'appareil
peut
étre
étemnt
automatiquement
avec
fa
minutene
de
sommeil.
——
Setting
the
desired
time
to
turn
off
is
.
gies
a
- .
.
,
1.
Press
repeatedly
[SLEEP
]
on
the
remote
control
until
Réglage
de
l'heure
d’enclenchment
et
d'arrét
,
,
i
:
you
get
the
desired
time
to
turn
off.
Then
the
sleep
timer
1.
pare
repeuivernent
Sur
bith
[
Senet)
de
la
"
4
aren
A
‘élécommande
jusqu’a
ce
que
I'heure
désiree
s'éteigne.
:
,
To
Werte
et
eee
off
Ensuit,
l'indicateur
de
minutene
de
someit
~(SLEEP)"
5
=

02
TROUBLESHOOTING
°
Operations
|
Problems
Tape
Deck
CD
piayer
are
pressed.
*
Tuner
Section
Circuit
system
:
Tuning
range
:
IEC
sensitivity
-
{S/N
26
dB)
*
Tape
Deck
Section
Track
system
:
Recording
system
:
Erasing
system
:
Tape
Tape
speed
:
Frequency
response
.
*
Amplifier
Section
(Input
sensitivity
/
Impedance
:
Output
Impedance
.
Audio
output
:
*
Timer
Section
System
:
Display
format
:
Timer
accuracy
-
No
AC
power.
Cassette
cannot
be
inserted.
No
recording.
Disc
is
not
played.
The
set
functions
incorrectly
even
though
you
pressed
the
proper
operational
buttons.
The
display
has
irregular
indications
about
which
the
operating
guide
does
not
expiain.
Deteriorated
sound
or
irregular
tape
speed.
Player
does
not
operate
correctly;
soundis
Interrupted,
noise
occurs
and
tracks
cannot
be
selected.
Player
does
not
operate
normally
when
control
buttons
FM/AM
2
bands
FM
:
87.9
to
107.9
MHz
(100
kHz
step)
AM
:
530
to
1,710
kHz
(10
KHz
step)
FM
1.5
V/75
ohms
AM
=
1,400
pV/m
(loop
antenna)
4
tracks,
2
channels
AC
bias
AC
erase
Recording/Playback
Normal
/CrO2/
Metal
(Playback
only)
4.75
cm/s
Normal:
50
to
15,000
Hz
CrOz
:
50
to
16,000
Hz
MIC
-
4
mV
(10
kohms)
AUX
:
800
mV
(47
kohms)
{US
pin
sockets)
External
speaker
terminals
Suitable
impedance
:
6
to
16
ohms
Headphones
Suitable
tmpedance
:
8
to
100
ohms
12W+12W(6
ohms,
1
KHz,
T.H.D,
3%)
8W+8W(6ohms,
60~16kHz,
T.H.D.
1%)
Digital
quartz
clock
12-hour
cycle
Within
60
seconds
at
monthly
rate
the
cassette
holder.
stick.
*
Is
disc
soiled?
again.
¢
CD
Player
Section
Number
of
channels
:
Frequency
response
.
Disc
:
Pickup
-
*
General
Specifications
Power
supply
-
Power
consumption
:
Dimensions
:
Weight
:
*
Speaker
Section
System
:
Speakers
:
Impedance
:
Maximum
Input
Power
-
Dimensions
:
Weight
:
*
Accessories
AM
loop
antenna
.
FM
indoor
antenna
.
Remote
control
(RC-193)
:
Size
“AA”
(IEC
R6)
Dry
Cell
Battenes:
Instruction
Manual:
Warranty
Card:
*
Unplug
the
power
cord
and
remove
all
the
batteries
first.
Then
plug
the
power
cord
and
reinsert
alt
the
battenes
after
the
display
have
been
cleared.
And
then
retry
the
same
operation.
(In
this
case,
the
clock
settings
and
the
Preset
station
memones
are
cleared.
Resetthem
again.)
*
Make
sure
that
the
cassette
tape
is
inserted
Properly
in
*
Are
the
accidental-erasure
prevention
tabs
punched
out?
If
so,
cover
the
holes
with
plastic
tape.
*
Clean
head
with
a
cleaning
stick.
*
Clean
head,
capstan
and
pressure
roller
witha
cleaning
*
Is
disc
loaded
upside
down?
*
Is
disc
scratched
or
warped?
*
Is
disc
scratched
or
otherwise
flawed?
*
First
press
the
Stop/Clear
button
then
perform
play
disc
Check
Points
(Cause)
*
Is
the
power
cord
connected
properly?
2
20
to
20,000
Hz
12
cnv8
cm
Semiconductor
Laser
AC
120
V,
60
Hz
Battery:
4.5
V
[3
x
JIS
R6P
(JIS
SUM-
3)
or
“AA”
Cell
or
IEC
R6)
50W
180
(W)
x
265
(H)
x
255
(D)
mm
5.6
kg
(with
battenes)
2-way
bass
reflex
speaker
system
Bass
reflex:
12cm
x
1;5emx1
6
ohms
25
W
(musical
peak
signal)
150
(W)
x
260
(H)
x
200
(D)
mm
1.9
kg
wa
aa0
Changes
in
specifications
are
for
better
performance
and
may
be
brought
about
without
our
giving
prior
notice.
[
Measured
pursuant
to
the
Feferal
Trade
Commission’s
Trade
Regulation
Rule
on
Power
Claims
for
Amplifiers.
}
NOTICE:
THIS
DIGITAL
APPARATUS
DOES
NOT
EXCEED
CLASS
B
LIMITS
FOR
RADIO
NOISE
EMISSION
FOR
A
DIGITAL
ACPAATUS
AD
SCT
OUT
IN
THE
RADIO
INTERFERENCE
REGULATIONS
OF
THE
CANADIAN
DEPARTMENT
OF
COMMUNICATIONS.
34
Points
de
vérification
(Cause)
“DEPISTAGE
DES
ANNES...
Pas
d'alimentation
courant
secteur.
Le
cable
est-il
bren
branché?
Problems
d’alimentation
Uappareil
fonctionne
incorrectement
méme
siles
touches
de
fonctionnement
appropriées
sont
enfoncees.
Uaffichage
indique
des
messages
errones
qui
ne
sont
pas
expliques
dans
le
mode
d'empio:.
La
cassette
ne
peut
pas
étre
inseree.
*
Débrancherle
cordon
d'alimentation
et
retirer
d'asbordles
piles.
Ensuite,
brancher
le
cordon
d'ajimentation
et
réinserer
toutes
les
piles
apes
tetfacement
de
I'affichage.
Mamtenant
reessayer
ta
méme
operation.
(Dans
ce
cas,
les
reglages
d'horloge
et
les
memowes
de
station
sont
elfaces.
Les
regler
a
nouveau.)
Opérations
générales
S‘assurer
que
la
cassette
est
correctement
inseree
dans
le
receptacle
a
cassette.
*
Les
segments
de
prevention
contre
{'effacement
accidentel
sont
peut
étre
bnses.
Dans
ce
cas,
recouvnr
les
orifices
d'un
morceau
de
ruban
adhesit.
*
Nettoyer
les
tétes
avec
un
coton-tige.
*
Nettoyer
tes
tates,
le
cabestan
et
le
rouleau
presseur
avec
un
coton-tige.
Pas
d'enregistrement.
Platine
cassette
Le
son
est
déforme
ou
la
vitesse
de
bande
est
irreguliére.
Le
disque
compact
en
place
n'est
pas
lu.
Le
tecteur
ne
fonctionne
pas
correctement;
le
son
est
délivre
par
saccades,
le
bruit
est
éleve
etlasélectionde
piste
estimpossible
a
effectuer.
Lelecteurne
fonctionne
pas
correctement
quand
les
touches
de
commande
sont
actionnees.
Le
disque
compact
est-it
place
a
|;envers?
Le
disque
compact
en
place
est-il
déforme
ou
rayé?
Le
disque
compact
en
place
est-il
déforme
ou
rayé?
Le
disque
compact
en
place
est-il
sale?
Lecteur
CD
Appuyer
d'abord
sur
la
touche
d'arrét/d'effacement
et
commander
une
nouvelle
fois
la
lecture
du
disque
compact.
*
Section
tuner
*
Section
lecteur
CD
Systeme
du
circuit
:
2
gammes
FM/AM
Nombre
de
canaux
:
2
Plage
d'accord
:
FM
:
87,9.
107,9
MHz
(palier
100
kHz)
Résponse
de
frequence
;
20
a
20.000
Hz
AM
:
§30
a
1.710
kHz
(palier
10
kHz)
Disque
12
ou
8
cm
de
diamétre
Sensibilité
[EC
FM
:
1,5
pV/75
ohms
Capteur
*
Laser
semiconducteur
(S/N
26
dB)
AM
:
1.400
yV/m
(antenne
cadre)
*
Données
générales
*
Section
platine-cassette
Alimentation
:
Secteur
120
V,
60
Hz
Systeme
de
piste
.
4
pistes,
2
canaux
Piles:
4.5
V
[Piles
3
x
JIS
REP
(JIS
Systeme
SUM-3)
ou
Format
“AA*
ou
IEC
R6]
d'enregistrement
:
Polansation
secteur
Consommation
.
50
W
Systéme
d'effacement:
Effacement
secteur
Dimensions
:
180
(L)
x
265
(H)
x
255
(P)
mm
Bande
Enregistrement/Lecture
Pords
:
5,6
kg
(avec
les
pites)
Cassette
ee
*
Section
haut-parleurs
{lecture
uniquement}
ame:
g
1
ft
Vitesse
de
bande
.
4.75
cm/sec.
Systéme
:
Systéme
d'enceintes
bass
réfiex
2
voles
Haut-parleurs:
Bass
réfiex:
12
cmx1;5¢emx1
Impedance
:
6
ohms
Résponse
de
frequence
-
Bande
normale:
50
a
15.000
Hz
CrOz:
50
a
16.000
Hz
*
Section
amplificateur
Purssance
d'entree
max.
:
25
W
(signal
de
créte
musicale)
Sensibilite/
MIC:
4
mV
(10
kohms)
Dimensions
:
150
(L)
x
260
(H)
x
200
(P}
mm
Impedance
d'entree
:
AUX
800
mV
(47
kohms)
Pords:
1,9
kg
(prises
a
broches
US)
oA
s
Impedance
de
sortie
:
Bomes
de
haut-parleurs
externes
Ratna
endte
AM:
1
Impedance
adéquate
«
6
a
16
ohms
Antenne
FM
inténeure:
1
Casque
:
Télécommande
(RC-193):
1
.
Impedance
adéquate
:
8
a
100
ohms
Piles
“AA”
(IEC
R6)
a
Sortie
audio
12W+12W(6ohms,
1kHz,T.H.D.3%)
iment
seches:
5
BW+8W(Gohms,
60-16
kHz,
T-H.0.1%)
Mode
d’emplor
1
*
Section
minuterie
Carte
de
garantie:
1
Systeme
-
Horloge
numerique
a
quartz
Format
daffichage
.
Cycle
de
12
heures
Les
specifications
sont
swettes
a
modifications
sans
preavis
Precision
.
Décalage
inféneur
a
60
secondes
pour
des
raisons
d'amélioration.
par
mois
[
Measure
conforement
aux
reglements
commerciaux
de
la
Commission
Commerciale
Fédérale
au
suet
de
l'alimentation
des
ampliticateurs.
"|
me
CET
APPAREIL
NUMERIQUE
N’EXCEDE
PAS
LIMITES
DE
CLASSE
“B”
SUR
LES
BRUITS
RADIOELECTRIQUES
PROVENANT
DES
APPAREILS
NUMERIQUES
TEL
QUE
STIPULE
DANS
LE
REGLEMENT
SUR
LE
BROUILLAGE
RADIOELECTRIQUE
EMIS
PAR
LE
MINISTERE
DES
COMMUNICATIONS
CANADIENNE.
35
Lro-o
Table of contents
Other Nippon Stereo System manuals


