Nissindo KP-600 User manual

b1b2
bb 3
4# 1 # 2 # 3 # 4
DIGITAL KEY CONTROL
CH1
SIGNAL -12dB 0dB +12dB
CH1 AUDIO LEVEL
CH2 AUDIO LEVEL
SIGNAL
CH2
ECHO EFFECT
EFFECTREPEATDELAY
MIC INPUT
KE Y
2 3
1
MUSIC TONE
BASSBALANCE TREBLE
MUSIC VOLMIC MASTER VOLECHO VOL
MIC VOL
MIC 2MIC 1 MIC 3
MIC TONE
TREBLEBASS
KEY CONTROL MULTIPLEX
MIC.
ENHANCE
MUSIC
LOUDNESS
POWER
MODEL KP-600
DIGITAL KEY CONTROL KARAOKE MIXER
MIN MAX MIN MAX MIN MAX
AUTO INPUT SELECTOR AUX 1 A UX 2 BGM LOU DNESS ENH ANCE
Professional Karaoke Mixer
KP-600
Operating Instructions
b1b2
bb 3
4# 1 # 2 # 3 # 4
DIGITAL KEY CONTROL
CH1
SIGNAL -12dB 0dB +12dB
CH1 AUDIO LEVEL
CH2 AUDIO LEVEL
SIGNAL
CH2
ECHO EFFECT
EFFECTREPEATDELAY
MIC INPUT
KE Y
2 3
1
MUSIC TONE
BASSBALANCE TREBLE
MUSIC VOLMIC MASTER VOLECHO VOL
MIC VOL
MIC 2MIC 1 MIC 3
MIC TONE
TREBLEBASS
KEY CONTROL MULTIPLEX
MIC.
ENHANCE
MUSIC
LOUDNESS
POWER
MODEL KP-600
DIGITAL KEY CONTROL KARAOKE MIXER
MIN MAX MIN MAX MIN MAX
AUTO INPUT SELECTOR AUX 1 A UX 2 BGM LOU DNESS ENH ANCE

SAFETY INSTRUCTIONS
1. Read Instructions: All the safety and operation
instructions should be read before this Nissindo
product is operated.
2. Retain Instructions: The safety and operating
instructions should be kept for future reference.
3. Warnings: All warnings on this Nissindo product in
these operating instructions should be followed.
4. Follow Instructions: All operating and other
instructions should be followed carefully.
5. Water and Moisture: This Nissindo product should
not be used near water, for example, near a bathtub,
washbowl, kitchen sink, laundry tub, in a wet
basement, near a swimming pool, swamp or salivating
St. Bernard dog, etc.
6. Cleaning: Clean only with a dry cloth.
7. Ventilation: This Nissindo product should be
situated so that its location or position does not
interfere with its proper ventilation. For example, the
Component should not be situated on a bed, sofa,
rug, or similar surface that may block any ventilation
openings, or placed in a built-in installation such as a
bookcase or cabinet that may impede the flow of air
through ventilation openings.
8. Heat: This Nissindo product should be stayed away
from heat sources such as radiators, or other devices
producing heat.
9. Power Sources: This Nissindo product should be
connected to a power supply only of the type
described in these operation instructions or as marked
on this Nissindo product.
10. Power Cord Protection: Power supply cords
should be routed so that they are not likely to be
walked upon or pinched by items placed upon or
against them. Please pay particular attention to cords
plugs, convenience receptacles, and the point where
they exit this Nissindo product.
11. Object and Liquid Entry: Care should be taken so
that objects do not fall on, or liquids are not spilled
into this Nissindo product.
12. Damage Requiring Service: This Nissindo product
should be serviced only by qualified service personnel
when:
A. The power-supply cord or the plug has been
damaged; or
B. Objects have fallen, or liquid has spilled into
this Nissindo product; or
C. This Nissindo product has been exposed to
rain; or
D. This Nissindo product does not appear to
operate normally or exhibits a marked change in
performance; or
E. This Nissindo product has been dropped, or its
chassis damaged.
13. Servicing: The user should not attempt to service
this Nissindo product beyond those means described
in this operating manual. All other servicing should be
referred to the Nissindo Service Department.
14. To prevent electric shock, do not use this
polarized plug with an extension cord, receptacle or
other outlet unless the blades can be fully inserted to
prevent blade exposure.
15. Grounding or Polarization: Precautions should be
taken so that the grounding or polarization means of
this Nissindo product is not defeated.
16. Power Precaution: Unplug this Nissindo product
during lightning storms or when unused for long
periods of time. Note that this Nissindo product is not
completely disconnected from the AC mains service
when the power switch is in the OFF position.
17. This apparatus does not exceed the Class
A/Class B (whichever is applicable) limits for radio
noise emissions from digital apparatus as set out in the
radio interference regulations of the US Department of
Communications.
18. Exposure to extremely high noise levels may cause
permanent hearing loss. Individuals vary considerably
in susceptibility to noise-induced hearing loss, but
nearly everyone will loss some
hearing if exposed to sufficiently intense noise for a
period of time. The U.S. Government's Occupational
Safety and Health Administration (OSHA) have
specified the permissible noise level exposures shown
in the following chart.
According to OSHA, any exposure in excess of
these permissible limits could result in some hearing
loss. To ensure against potentially dangerous exposure
to high sound pressure levels, it is recommended that
all persons exposed to equipment capable of
producing high sound pressure levels use hearing
protectors while the equipment is in operation. Ear
plugs or protectors in the ear canals or over the ears
must be worn when operating the equipment in order
to prevent a permanent hearing loss if exposure is in
excess of the limits set forth here.
AC-Power Sources
This set should be operated only from the type of
power source indicated on the marking label. If you
are not sure of the type of electrical power supplied to
your home, consult your dealer or local power
company. For those sets designed to operate from
battery power, or other sources, refer to the operating
instructions.
Overloading
Do not overload wall outlets, extension cords or
convenience receptacles beyond their capacity, since
this can result in fire or electric shock.
An appliance and cart combination
should be moved with care. Quick
stops, excessive force and uneven
surfaces may cause the appliance
and cart combination to overturn.
Accessories
Do not place the set on an unstable cart, stand, tripod,
bracket, or table. The set may fall, causing serious
injury to a child or an adult, and serious damage to
the set. Use only a cart stand tripod, bracket, or table
recommended by the manufacturer.
For the set with a three-wire grounding type ac plug:
This plug will only fit into a grounding-type power
outlet. This is a safety feature. If you are unable to
insert the plug into the outlet, contact your electrician to
have a suitable outlet installed. Do not defeat the
safety purpose of the grounding plug.
CONTENTS
Features of the amplifier.................................... 4
Specifications................................................. 4
Name and functions of front panel components..... 5
Name and functions of front panel components..... 6
Connector information...................................... 7
Troubleshooting............................................... 8
RISK OF ELECTRIC SHOCK
DO NOT OPEN
CAUTION: TO REDUCE THE RISK OF ELECTRIC SHOCK
DO NOT REMOVE COVER (OR BACK) NO
USER-SERVICEABLE PARTS INSIDE REFER SERVICING
TO QUALIFIED PERSONNEL
2 3
WARNING- To reduce the risk of fire or electric shock, do not expose
this appliance to rain or moisture.
Duration Per Day
In Hours
8
6
4
3
2
1.5
1
0.5
0.25 or less
Sound Level dBA,
Slow Response
90
92
95
97
100
102
105
110
115
Typical
Example
Duo in small club
Subway Train
Very loud classical music
Patrice screaming at Ron about deadlines
Loudest parts at a rock concert
110V AC-POWER
110V AC-POWER
AC-POWER CORD INCLUDED
LD DVD VCD AUX AID
MPX
AUTOINPUT SELECTOR
b1b2
bb 3
4#1 #2 #3 #4
DIGITALKEY CONTROL
CH1
SIGNAL -12dB 0dB +12dB
CH1AUDIOLEVEL
CH2AUDIOLEVEL
SIGNAL
CH2
EXPERT DESIGN
NATURAL SOUND
ECHO EFFECT
REPEATEFFECTDELAY
MIC INPUT
KEY
2 3
1
MUSI C TONE
BASSBALANCE TREBLE
MUSI C VOLMIC MASTERVOLECHO VOL
MIC VO L
MIC 2MIC 1 MIC3
MIC TONE
TREBLEBASS
KEY CONTROL MULTIPLEX
VOCALAID ONETOUCH
KARAOKE
POWER
ON
OFF
MODEL KP-600
DIGITAL KEY CONTROL KARAOKE MIXER MIN MAX MIN MAX MIN MAX
LD DVD VCD AU X AID
MPX
AUTOINPUT SELECTOR
b1b2
bb 3
4#1 # 2 # 3 #4
DIGITALKEY CONTROL
CH1
SIGNAL -12dB 0dB +12dB
CH1AUDIOLEVEL
CH2AUDIOLEVEL
SIGNAL
CH2
EXPERTDESIGN
NATURALSOUND
ECHO EFFECT
REPEATEFFECTDELAY
MIC INPUT
KEY
2 3
1
MUSI C TONE
BASSBALANCE TREBLE
MUSI C VOLMIC MA STER VO LECHO V OL
MIC VO L
MIC 2MIC 1 MIC 3
MIC TONE
TREBLEBASS
KEY CONTROL MULTIPLEX
VOCALAID ONETOUCH
KARAOKE
POWER
ON
OFF
MODEL KP-600
DIGITAL KEY CONTROL KARAOKE MIXER MIN MAX MIN MAX MIN MAX

ECHO EFFECT
EFFECTREPEATDELAY
MIC INPUT
KEY
2 3
1
MUSIC TONE
BASSBALANCE TREBLE
MUSIC VOL
MIN MAX
MIC MASTER VOL
MIN MAX
ECHO VOL
MIN MAX
MIC VOL
MIC 2MIC 1 MIC 3
MIC TONE
TREBLEBASS
KEY CONTROL MULTIPLEX
AUX 1 AUX 2 BGM LOU DNESS E NHANC E
AUTO INPUT SELECTOR
b1b2
bb 3
4# 1 # 2 # 3 # 4
DIGITAL KEY CONTROL
CH1
SIGNAL -12dB 0dB +12dB
CH1 AUDIO LEVEL
CH2 AUDIO LEVEL
SIGNAL
CH2
POWER
MODEL KP-600
PROFESSIONAL KARAOKE MIXER MIC.
ENHANCE
MUSIC
LOUDNESS
4 5
Nissindo KP-600 has many distinguished features as follows:
Three audio and Three video inputs (AUX 1, AUX 2, BGM) let you connect various audio and video
components.
ECHO control lets you add and echo effect to the voices coming through the microphones.
DIGITAL KEY CONTROL lets you select the musical pitch you desire (+/-4 notes in 9 positions).
You can record karaoke performances on a cassette deck and/or VCR connected to this unit.
Vocal enhanceer with high/low, frequency and process controls for an optimized natural vocal image and rich
and vibrant sound.
Three microphone inputs with volume controls.
Full-function remote control for ease of operation.
Two XLR (rear panel) balance microphone inputs, three 1/4 inches (front panel) microphone inputs
(cord/wireless microphone).
Input level sensitivity controller for each audio input.
Audio ouput from BGM, AUX 1, AUX 2 are selectable sensitivity in Low, Mid, High position.
Reproducing Karaoke Sources with This Unit
Sound Multiplex tapes or discs designed for karaoke use (i.e., laser karaoke), generally have background music and
original vocals on the right channel, but only background music on the left channel. When these sources are played back
in Multiplex mode (refer to the manual supplied with your playback source for details), you can select the background
music, or you can adjust the volume of the original vocals against that of the background music by rotating MPX BAL.
Note:
There are some types of karaoke sources, with which the this unit's sound adjustments may not properly function.
Please confirm the type of karaoke source you have purchased before attempting to reproducing it with this unit.
FEATURES
SPECIFICATIONS
NAMES AND FUNCTIONS OF FRONT PANEL COMPONENTS
10 13 15 16
1 2 3 4 5 6 7 8 9
17 18 19 20 21 22 23 24 25 2611 12 14
LED: Display audio inputs, audio output meters,
digital key controller
Key Control Down Button: Press to lower key
Key Control Natural Button: Press to reset
Key Control Up Button: Press to higher key
Music Loudness: Press to enhance the music
Microphone Enhance: Press to enhance vocal
ECHO Volume: Turn to increase/decrease echo
Microphone Master Volume: Turn to
increase/decrease mic. volume
Music Volume: Turn to increase/decrease music
volume
Power Switch: Press to turn On/Off
Microphone 1 Input: 1/4” mic. input
Remote Microphone 1 Key Control: 1/8”
mini-jack remote key control via mic.
Microphone 2 Input: 1/4” mic. input
Remote Microphone 2 Key Control: 1/8”
mini-jack remote key control via mic.
Microphone 3 Input: 1/4” mic. input
Microphone 1 Volume Control: Turn to
increase/decrease mic. volume
Microphone 2 Volume Control: Turn to
increase/decrease mic. volume
Microphone 3 Volume Control: Turn to
increase/decrease mic. volume
Microphone Tone Bass Adjustment: Turn to
increase/decrease mic. low frequency
Microphone Tone Treble Adjustment: Turn to
increase/decrease mic. high frequency
ECHO Effect Delay Adjustment: Turn to
increase/decrease length of echo
ECHO Effect Repeat Adjustment: Turn to
increase/decrease mic. interval repetition time of echo
ECHO Effect Adjustment: Turn to
increase/decrease process of effect
Music Tone Balance Adjustment: Turn to
increase/decrease music volume
Music Tone Bass Adjustment: Turn to
increase/decrease music low frequency
Music Tone Treble Adjustment: Turn to
increase/decrease music high frequency
Digital Key Control (+4 = -4) Step Key
Digital Echo: Repeat/ Delay/ Effect
2 Key Control Input Jacks (35 mm) In Front Panel
Auto Multiple Selection/ Manual Selection
Input: AUX 1, AUX 2, BGM (3 Audio and Video Inputs)
Microphone Input: 3 Front 1/4” and 2 Rear XLR (5 MIC.
Inputs)
Full Function Remote Control
Multiplex: Vocal Aid/ One Touch Karaoke
Audio Out: 2 RCA Jacks (Pre-Out/ Record-Out)
Video Out: 3 RCA Jacks
Frequency Response: 20~20,000 Hz +/- 3k dB
Music Master Control
Microphone Master Control
Echo Control
AC-Power: 110V~120V 60 Hz
Optional AC Input: Unswitch 2 (American Type 2 Pins)
Dimination (WxDxH): 17x8x3 (inches)
Net Weight: 8 LBs
1
2
3
4
5
6
7
8
9
10
11
12
13
14
15
16
17
18
19
20
21
22
23
24
25
26
SAFETY
MARK
USA 020898-11
020898-11
ITEM NO. D040224
02005-80428-8 6
MODEL NO. KP-600
DIGITAL STEREO MIXER
AC-POWER: 110V 60Hz
CLASS 1 U.S.A.
MIXER PRODUCT TO IEC 825
NISSINDO
CALIFORNIA, UNITED STATES OF AMERICA
WWW.NISSINDOUSA.COM
NISSINDO TRADEMARK ALL RIGHTS RESERVED
ENGINEERED AND DESIGN IN U.S.A.
SAME AS LINE VOLTAGE
RISK OF ELECTRIC SHOCK DO NOT OPEN
Taking apart or modifying the receiver may lead to electric shock,
fire, or damage to the receiver and will void your warranty.
NISSINDO CALIFORNIA USA
110V 60Hz
FUSE
AC-POWER
AC.OUTLETS
UNSWITCHED
300W MAX. TOTAL
CAUTION
L
R
OUT 1
DVD CDG BGM
VIDEO OUTPUT
VIDEO INPUT PRE OUTPUT
OUT 2
OUT 1 OUT 2
L
R
OUTBGM
INPUT
LEVEL
INPUT
LEVEL
INPUT
LEVEL
EFFECTOR
IN
OUT IN
L
R
L
R
AUX 2AUX 1REMOTEMIC 5 321
SENSITIVITY
AUX 1
DVD AUDIO INPUT
AUX 2
CDG AUDIO INPUT
BGM
AUDIO INPUT
LMH
SENSITIVITY
LMH
MIC 4
#4
#3
MUTE
LOUD
#2
#1
ENH
4
3
2
1
MIC
VOLUME
ECHO
VOLUME
MUSIC
VOLUME
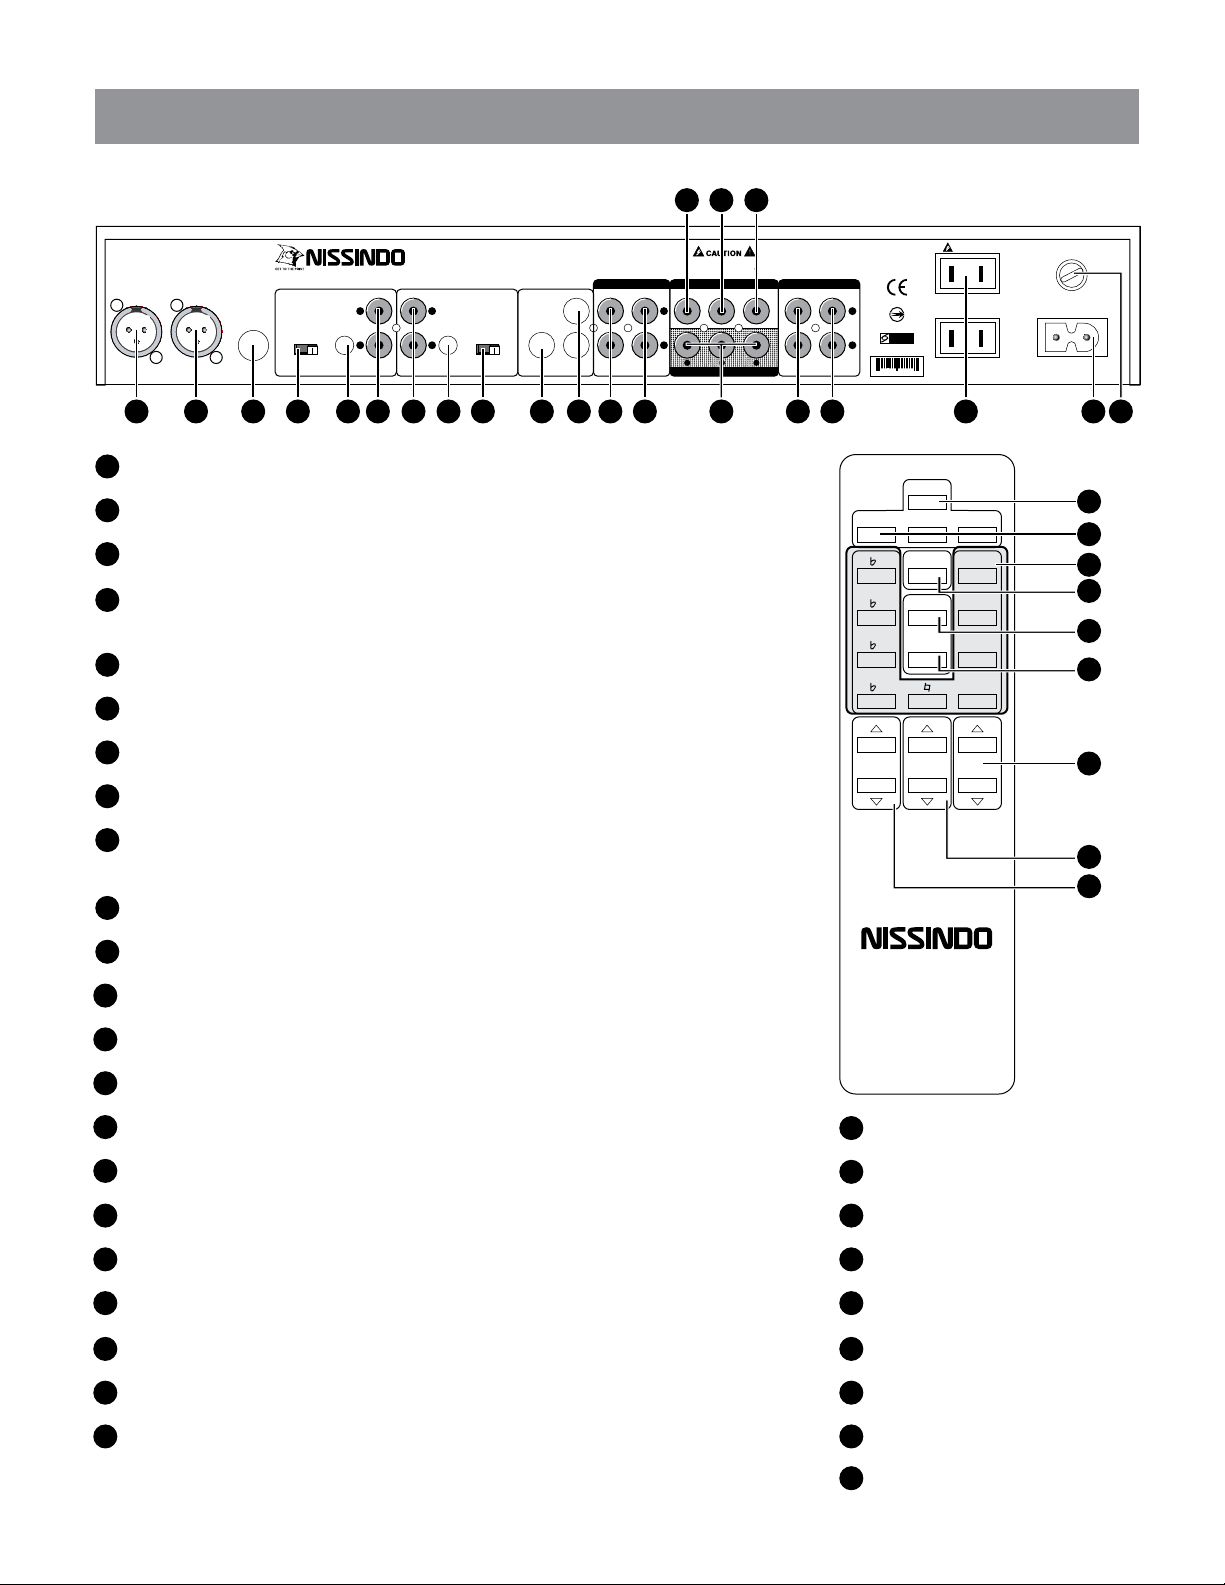
REMOTE CONTROL UNIT
KARAOKE MIXER
MODELNO. KP-600
AUX3
AUTO
AUX2AUX1
6 7
NAMES AND FUNCTIONS OF REAR PANEL COMPONENTS CONNECTIONS
27 28 31 3432 33 38 39 40
41 42 43
44 45 46 484729 30 35 36 37
Microphone 4 with Balance Input: XLR balance input for better sound quality
Microphone 5 with Balance Input: XLR balance input for better sound quality
Remote Control: Option to control PC
Low, Middle and High Sensitivity Adjustment: Switch to
increase/decrease sensitivity
AUX 1 Audio Level Adjustment: Turn to increase/decrease audio input level
AUX 1 Audio Input: Aux 1 RCA input jack
AUX 2 Audio Input: Aux 2 RCA input jack
AUX 2 Audio Level Adjustment: Turn to increase/decrease audio input level
Low, Middle and High Sensitivity Adjustment: Switch to
increase/decrease sensitivity
BGM Audio Level Adjustment: Turn to increase/decrease audio input level
BGM Audio Input: BGM RCA input jack
Effector Audio Out: Out to equalizer
Effector Audio In: In from equalizer
Video Monitor Output with Three Terminals: Video RCA outputs
AUX 1 Video Input: RCA video input
AUX 2 Video Input: RCA video input
BGM Video Input: RCA video input
Audio Pre Out 1: This jack is designed for connection to power amplifier
Audio Pre Out 2: This jack is designed for connection to power amplifier
110V AC-Power Outlets
110V AC-Power Connector
Fuse
27
28
29
30
31
32
33
34
35
36
37
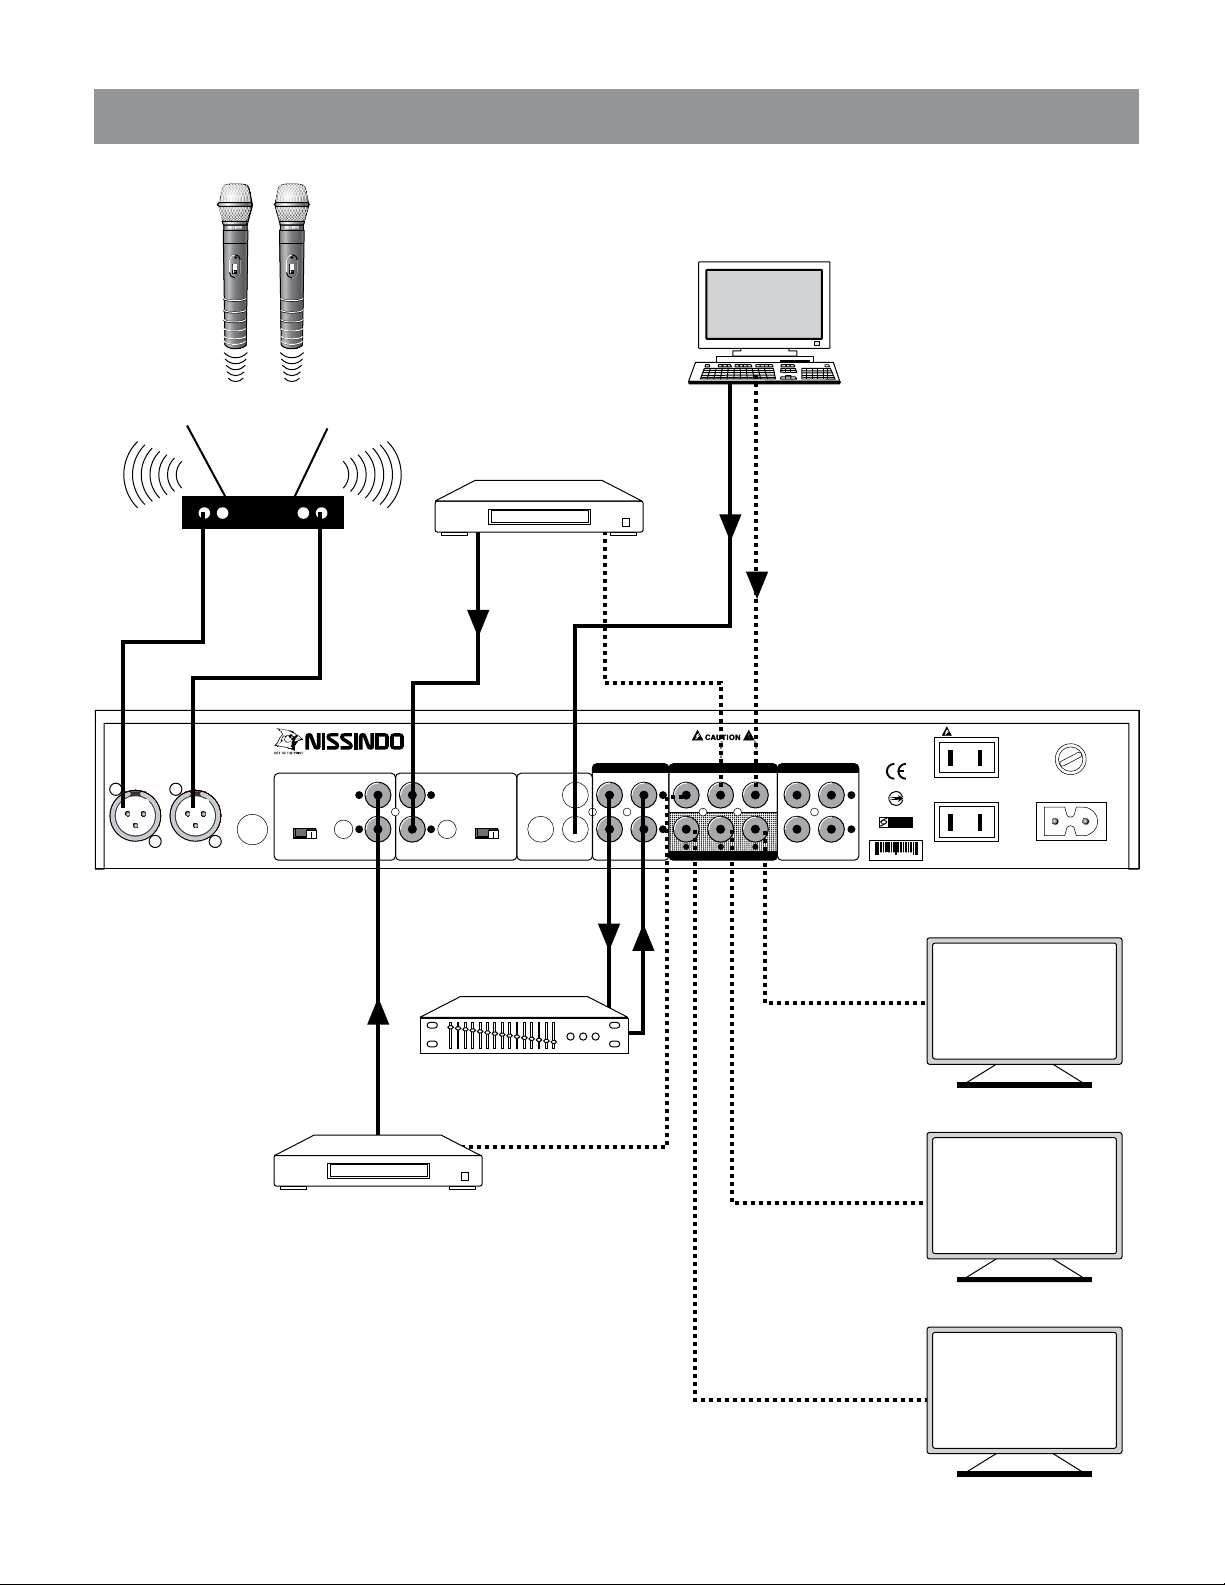
WIRELESS MICROPHONE RECEIVER
BATT LOW
ON
OFF
BATT LOW
ON
OFF
VIDEO MONITOR
TV 3
VIDEO MONITOR
TV 2
VIDEO MONITOR
TV 1
connect to
MIC. receiver
(REAR MIC. 4)
connect to
MIC. receiver
(REAR MIC. 5)
DVD PLAYER
POWER
DVD
CDG PLAYER
POWER
CDG
EQ
PC Source
Audio
Audio
Audio
Video
Video
BGM (BackGround Music)
Video
Video
Video
Video
Connect the power cords last.
Be sure to disconnect the power cords of all audio and
video componets from their AC outlets before making
connections.
When making connections between this unit and other
components, make sure that all connections are correct
and you have connected L (left) to L and R (right) to R.
38
39
40
41
42
43
44
45
46
47
48
Auto Selector
Manual Selectors
Key Control Function
Mute Control Function
Loud Control Function
Mic. Enhance Control Function
Music Volume Control
Microphone Volume Control
ECHO Volume Control
49
50
51
52
53
54
55
56
57
55
56
57
49
50
51
52
53
54
SAFETY
MARK
USA 020898-11
020898-11
ITEM NO. D040224
02005-80428-8 6
MODEL NO. KP-600
DIGITAL STEREO MIXER
AC-POWER: 110V 60Hz
CLASS 1 U.S.A.
MIXER PRODUCT TO IEC 825
NISSINDO
CALIFORNIA, UNITED STATES OF AMERICA
WWW.NISSINDOUSA.COM
NISSINDO TRADEMARK ALL RIGHTS RESERVED
ENGINEERED AND DESIGN IN U.S.A.
SAME AS LINE VOLTAGE
RISK OF ELECTRIC SHOCK DO NOT OPEN
Taking apart or modifying the receiver may lead to electric shock,
fire, or damage to the receiver and will void your warranty.
NISSINDO CALIFORNIA USA
110V 60Hz
FUSE
AC-POWER
AC.OUTLETS
UNSWITCHED
300W MAX. TOTAL
CAUTION
L
R
OUT 1
DVD CDG BGM
VIDEO OUTPUT
VIDEO INPUT PRE OUTPUT
OUT 2
OUT 1 OUT 2
L
R
OUTBGM
INPUT
LEVEL
INPUT
LEVEL
INPUT
LEVEL
EFFECTOR
IN
OUT IN
L
R
L
R
AUX 2AUX 1REMOTEMIC 5 321
SENSITIVITY
AUX 1
DVD AUDIO INPUT
AUX 2
CDG AUDIO INPUT
BGM
AUDIO INPUT
LMH
SENSITIVITY
LMH
MIC 4
#4
#3
MUTE
LOUD
#2
#1
ENH
4
3
2
1
MIC
VOLUME
ECHO
VOLUME
MUSIC
VOLUME
REMOTE CONTROL UNIT
KARAOKE MIXER
MODELNO. KP-600
AUX3
AUTO
AUX2AUX1
6 7
NAMES AND FUNCTIONS OF REAR PANEL COMPONENTS CONNECTIONS
27 28 31 3432 33 38 39 40
41 42 43
44 45 46 484729 30 35 36 37
Microphone 4 with Balance Input: XLR balance input for better sound quality
Microphone 5 with Balance Input: XLR balance input for better sound quality
Remote Control: Option to control PC
Low, Middle and High Sensitivity Adjustment: Switch to
increase/decrease sensitivity
AUX 1 Audio Level Adjustment: Turn to increase/decrease audio input level
AUX 1 Audio Input: Aux 1 RCA input jack
AUX 2 Audio Input: Aux 2 RCA input jack
AUX 2 Audio Level Adjustment: Turn to increase/decrease audio input level
Low, Middle and High Sensitivity Adjustment: Switch to
increase/decrease sensitivity
BGM Audio Level Adjustment: Turn to increase/decrease audio input level
BGM Audio Input: BGM RCA input jack
Effector Audio Out: Out to equalizer
Effector Audio In: In from equalizer
Video Monitor Output with Three Terminals: Video RCA outputs
AUX 1 Video Input: RCA video input
AUX 2 Video Input: RCA video input
BGM Video Input: RCA video input
Audio Pre Out 1: This jack is designed for connection to power amplifier
Audio Pre Out 2: This jack is designed for connection to power amplifier
110V AC-Power Outlets
110V AC-Power Connector
Fuse
27
28
29
30
31
32
33
34
35
36
37
WIRELESS MICROPHONE RECEIVER
BATT LOW
ON
OFF
BATT LOW
ON
OFF
VIDEO MONITOR
TV 3
VIDEO MONITOR
TV 2
VIDEO MONITOR
TV 1
connect to
MIC. receiver
(REAR MIC. 4)
connect to
MIC. receiver
(REAR MIC. 5)
DVD PLAYER
POWER
DVD
CDG PLAYER
POWER
CDG
EQ
PC Source
Audio
Audio
Audio
Video
Video
BGM (BackGround Music)
Video
Video
Video
Video
Connect the power cords last.
Be sure to disconnect the power cords of all audio and
video componets from their AC outlets before making
connections.
When making connections between this unit and other
components, make sure that all connections are correct
and you have connected L (left) to L and R (right) to R.
38
39
40
41
42
43
44
45
46
47
48
Auto Selector
Manual Selectors
Key Control Function
Mute Control Function
Loud Control Function
Mic. Enhance Control Function
Music Volume Control
Microphone Volume Control
ECHO Volume Control
49
50
51
52
53
54
55
56
57
55
56
57
49
50
51
52
53
54

8
If this unit fails to operate normally, check the following table. It lists the common operating errors and simple
measures which can correct them. If a problem cannot not be corrected, or the symptom is not listed,
disconnect the unit's power cord and contact your authorized Nissindo dealers or service centers for help.
Sometimes a failure (e.g. when buttons do not function) may be remedied by disconnecting the AC power
cord from the wall outlet and connecting it again, since this resets the unit's microcomputer.
SYMPTOM
Your voice is not heard
through the microphone.
The volume of the original
vocals cannot be reduced
even when the MPX BAL
control is turned to the
MUSIC side.
Your voice does not
replace the original vocals
when the VOCAL AID
button is pressed.
Sound from the playback
source cannot be heard.
The echo effect does not
work.
POSSIBLE CAUSE
Microphone plug is not firmly
inserted into the jack.
Microphone is turned off.
The MPX/STEREO button is not
set properly.
The volume level of the
microphone is low.
The singing voice is not loud
enough.
The INPUT selector is not set
properly.
MAGIC VOCAL is set to ON.
REMEDY
Insert firmly.
Turn on the power of the microphone.
With sound multiplex sources, set the
MPX/STEREO button to MPX. (The MPX indicator
lights)
With general stereo sources, set the
MPX/STEREO button to STEREO (the MPX
indicator goes off) and press the ONE TOUCH
KARAKE button. The MPX BAL control does not
function with these sources.
Turn up the volume of the microphone with the MIC
LEVEL control.
Sing louder.
Set it to the source to be played.
Turn off MAGIC VOCAL by pressing the MAGIC
VOCAL button.
TROUBLESHOOTING
NOTE
1
AA
AA
ALKALINE
BATTERY
ALKALINE
BATTERY
2
3
OPEN BATTERY COVER
Open the battery compartment cover on the back of the remote control unit.
The cover should be opened easily if you press on in with your thumb while
sliding it in the direction of the arrow.
INSERTING BATTERIES
Insert two size AA (R6) alkaline batteries (supplied) by matching the
+ and _on the batteries to the diagram inside the battery
compartment.
CLOSE BATTERY COVER
Close the cover of the battery case.
BATTERY INSTALLATION
1
2
3
Remove the batteries to avoid damage from possible
battery leakage whenever you anticipate that the remote
control will not be used for an extended period.
9
MAINTENANCE

Printed on 100% Recycled Paper
Comments to
PO BOX 880023
San Francisco, CA 94188-0023
E-Mail: [email protected]
Nissindo Trademark All Rights Reserved.
Design and Engineered in U.S.A. Code No. D050926
Thank you for purchasing this unit. To
make full and effective use of this unit,
please read this Owner's Manual
carefully before operating it.
After reading, retain this booklet
together with the Warranty Card for
future use in case of defections or
other troubles.
Other manuals for KP-600
1
Table of contents
Other Nissindo Karaoke System manuals


