Naxa NKM-100 User manual

Karaoke Party System with Bluetooth®
NKM-100
Instruction Manual
Please read carefully before use and keep for future reference.

Page 2 Naxa Electronics
Table of Contents
Thank You ..................................................................... 3
In the Box ...................................................................... 3
At a Glance .................................................................... 4
Connecting Power.......................................................................... 8
Connecting the Microphones....................................................... 8
Connecting to a TV......................................................................... 8
CD/CD+G Mode .............................................................10
About Compact Discs.................................................................. 10
Loading a Disc............................................................................... 10
Playing a Disc................................................................................. 11
Selecting a Desired Track/Passage............................................ 11
Programming Tracks ................................................................... 11
Repeat Play Modes ....................................................................... 11
Bluetooth®Mode.........................................................12
Pairing/Connecting a Bluetooth Device....................................12
Playing Audio Wirelessly From a Bluetooth Device ................13
Warnings and Precautions..........................................14
Troubleshooting ..........................................................18
Specications ..............................................................19
Support ....................................................................... 20

www.naxa.com Page 3
Thank You
We know you have many choices when it comes to
technology; thank you for choosing us here at Naxa
Electronics. Established in 2001 in Los Angeles, Califor-
nia, we are dedicated to delivering products that en-
tertain and delight.
We trust that you will be happy with your purchase.
Please read this manual carefully and save it for refer-
ence. You may also nd the latest FAQ, documentation,
and other product material at our website. Come visit
us on the web at www.naxa.com and see all that we
have to offer!
In the Box
Please take a moment to make sure that you have ev-
erything in the list below. Although we make every ef-
fort to ensure that each Naxa device is securely packed
and sealed, we know a lot can happen in between us
and you. If anything is missing, check back with your
local retailer to get immediate assistance. If they can-
not help you, please contact our Naxa Support team at
www.naxa.com/naxa_support.
•Two (2) microphones
•Two (2) 1/4” to XLR microphone cables
•A/V cable
•AC power cord
•Instruction Manual
•Warranty Card

Page 4 Naxa Electronics
At a Glance
1Power Press to turn the unit on or off.
2 Lights
On/Off
Press to turn the multicolor LED lights on or
off.
3 MIC 2
input
Input connection (6.35 mm) for Microphone 2
4 MIC 2
Volume
Turn to adjust the volume level of the micro-
phone connected to MIC 2.
5 Echo Turn to adjust the reverb level applied to
both MIC 1 and MIC 2.
6 Master
Volume
Turn to adjust the volume of the entire
system.
7AVC Automatic Voice Control. Turn to adjust the
AVC level applied to both MIC 1 and MIC 2.
AVC attempts to adjust the volume to
balance the varying input levels to the
microphone.
8 MIC 1
Volume
Turn to adjust the volume level of the micro-
phone connected to MIC 1.
9 MIC 1
input
Input connection (6.35 mm) for Microphone 1.
10 Speaker Dynamic full-range speaker

www.naxa.com Page 5
11 Display Shows player status information.
12 CD indicator Lights red when the CD source mode is
active.
13 Bluetooth
indicator
Lights a steady blue when Bluetooth
source mode is active and connected to
a device.
Flashes blue slowly when not connect-
ed to a device.
Flashes blue rapidly when pairing mode
is active and ready to connect to a new
device.
14 CD/Bluetooth Press to change the source mode be-
tween the CD player and Bluetooth®.
15 Program/Pair CD mode: Press to start programming a
custom playlist.
Bluetooth mode: Press to place the unit
in pairing mode.

Page 6 Naxa Electronics
16 CD
compartment
Load CD, CD-R/RW, and CD+G discs here
for playback.
17 CD door Covers and protects the CD
compartment.
18 Press to start, pause, or resume
playback.
19 REP (Repeat) CD mode: press to change the repeat
play mode.
20 Press to skip to the next track. Press and
hold to scan quickly forward through the
track.
21 Press to stop playback.
22 Press to skip to the previous track.
Press and hold to scan quickly in reverse
through the track.

www.naxa.com Page 7
23 Microphone
holster
Flip down and out to store the included
microphone.
24 White: audio
out (left)
A/V out. Use with the provided RCA A/V
cable to connect to a TV when playing
CD+G discs.
25 Red: audio out
(right)
A/V out. Use with the provided RCA A/V
cable to connect to a TV when playing
CD+G discs.
26 Yellow: com-
posite video
out
A/V out. Use with the provided RCA A/V
cable to connect to a TV when playing
CD+G discs.
27 USB charge
port
Connect and charge your USB device.
This port is designed for charging only
(DC 5 V, 1 A output). Use the cable pro-
vided by the device manufacturer.
28 Power in Power connector (AC 120 V, 60 Hz).

Page 8 Naxa Electronics
Connecting Power
This unit can operate on AC 120 V, 60 Hz power.
With the included AC power cable, connect the AC
Power in socket [28] found on the rear of the unit to a
wall power outlet that provides AC power.
⚠⚠This unit supports AC 120 V power only.
Do not connect the unit to a power source
other than that which is indicated here and
on the label as this may result in the risk of
re or electric shock.
Do not handle the power plug with wet
hands. Doing so may cause electric shock.
Connecting the Microphones
To start using the microphones, use the included cables
to connect then to the system.
1. Align the 3 pins found on the bottom of the mi-
crophone with the XLR end of the cable. Insert the
cable and push until it clicks.
2. Connect the 6.35 mm plug of the cable to the MIC 1
or MIC 2 input connectors found on the front of the
system [9, 3].
3. When you are ready to use the microphones, set
the switch on them to the ON position.
⚠L Microphone holsters can be found on
either side of the system. Flip them down
to reveal a convenient place to hold the
microphones when they are not in use.
Connecting to a TV
This unit can play CD+G karaoke discs. Karaoke CD+G
discs typically contain both CD-audio tracks and syn-
chronized song lyrics. You will need to connect the ka-
raoke system to a TV in order to view the song lyrics.
The composite video connection is capable of sending a
standard-denition video signal to a TV.
1. Make the composite video connection with the yel-
low plug of the supplied A/V cable [26].

www.naxa.com Page 9
2. Make the L/R audio connection with the white and
red plugs of the supplied A/V cable [24, 25].
3. Load a compatible CD+G karaoke disc in the CD
compartment.
4. Turn on the karaoke system and press CD/Blue-
tooth to set the active source mode to CD (the CD
indicator will light red).
5. Turn on the TV. Set the active TV input mode to
match the name of the composite video connection
used (some typical names are AV1, AV2, Composite
1, CVBS 1, etc.) Please refer to the documentation
included with your TV to learn more about how to
identify and change the TV input mode.
When the TV input mode is set correctly, you will see
CD+G programming on your screen
⚠⚠Disconnect power before making this and
any other connection.
⚠L The Red/White audio connectors may be
used independently of the composite video.
For example, you may connect them to a
receiver or amplier to play the audio from
the karaoke system without the video.

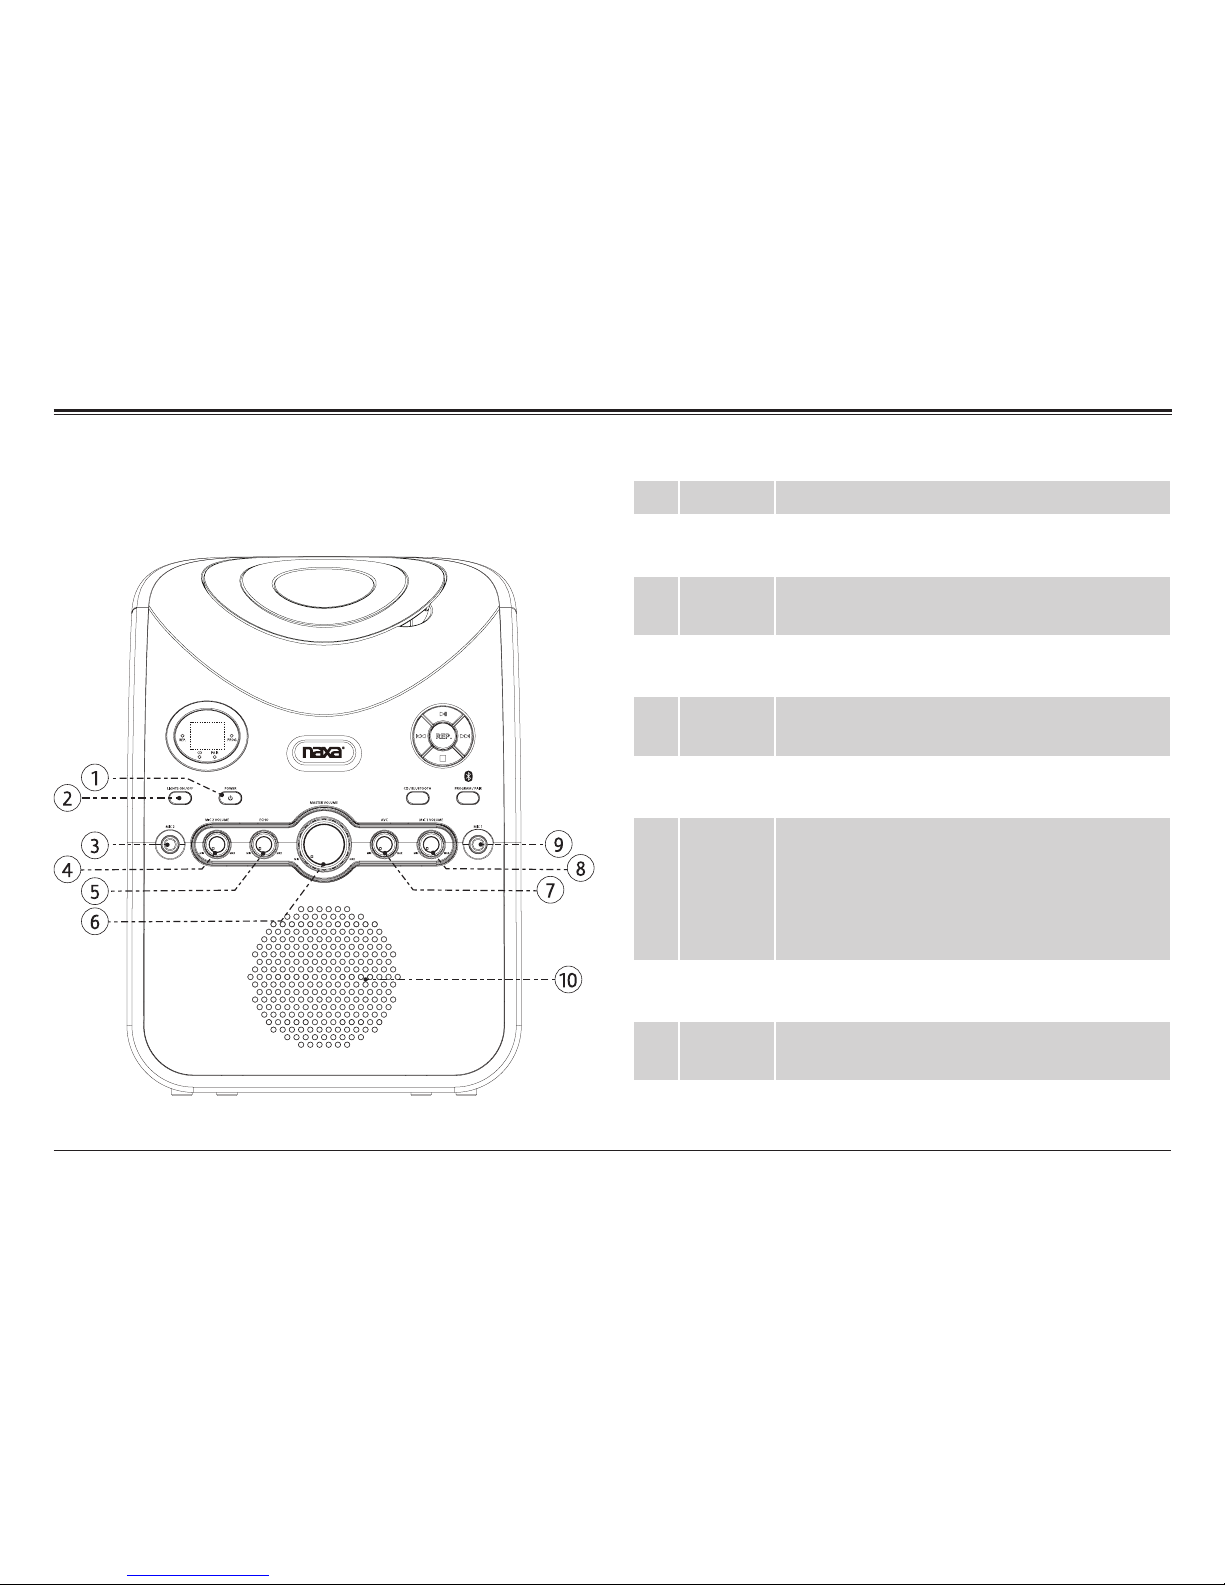
Page 10 Naxa Electronics
CD/CD+G Mode
Press the CD/Bluetooth button [14] to select CD mode.
The CD indicator will light red [12].
About Compact Discs
This player is compatible with all digital audio CDs,
digital audio CD-Recordable discs (CD-R) and CD-Re-
writable discs (CD-RW) that have been nalized, and
CD-DA format digital audio CDs.
This player is not compatible with MP3-CDs. This
player will not recognize and play compact discs that
contain MP3 audio les on them.
This player can play CD+G discs. CD+G discs contain CD-
audio as well as graphics. Karaoke CD+G discs typically
display lyrics synchronized to the CD audio.
⚠L Only handle a CD by its edge. Avoid touch-
ing the label or the playable side with your
hands or any other object.
Loading a Disc
1. Gently lift the CD door to open it [17].
2. Place a CD into the compartment [16] with the la-
bel side facing up (the reective side should face
down). The hole in the center of the CD should align
and sit securely on the spindle.
3. Gently lower the CD door to close it. Playback will
start from the rst track.
4. To remove a disc, press [21] to stop playback.
Make sure the disc stops spinning completely, then
gently lift the CD door to open it. Grasp the disc by
its edges and take it out carefully.
⚠L Make sure the disc has stopped spinning
completely before opening the CD DOOR
To ensure good performance, wait until the
system has completely read the disc before
proceeding with other functions.
The display will show “NO” if no disc is
loaded or if the disc is unreadable.

www.naxa.com Page 11
Playing a Disc
•To start, pause, or resume playback, press [18].
•To stop playback, press [21].
Selecting a Desired Track/Passage
•To select a desired track, press or [22, 20] un-
til the desired track appears on the display.
•To search for a particular passage during playback,
press and hold or [22, 20] to quickly scan
through the current track. Release the button to
return to playback at normal speed.
Programming Tracks
Programming tracks of disc are possible when play-
back is stopped. Up to 20 tracks can be programmed to
play in any order.
1. While playback is stopped, press PROGRAM/PAIR
[15] to enter program mode. The Program indicator
will light up.
2. While the display is ashing, use the or but-
tons [22, 20] to select a track.
3. Press PROGRAM/PAIR [15] to save the selected
track to the program. The display will ash the
next program track number.
4. Repeat steps 2 & 3 to store other desired tracks
until all desired tracks have been programmed.
5. Press [18] to start playing the custom program;
press [21] to cancel program playback.
To clear the program from memory, press [21] when
the disc is stopped or open the CD door.
Repeat Play Modes
Control the order in which tracks are played by chang-
ing the repeat play mode. Press REP [19] during play-
back in order to cycle through the different modes; the
repeat indicator will light up when a repeat mode is ac-
tive.
To cancel repeat play mode and return to normal play-
back, press REP [19] until the repeat indicator darkens.

Page 12 Naxa Electronics
Bluetooth®Mode
Press the CD/Bluetooth button [14] to select Bluetooth
mode. The Bluetooth indicator will light blue [13].
⚠L Make sure Bluetooth® is enabled on the
target Bluetooth audio device.
Pairing/Connecting a Bluetooth
Device
You will need to pair your device with the karaoke sys-
tem the rst time you use them together. After they
have been paired together, the karaoke system will
automatically detect and connect with your Bluetooth
device when you set it to Bluetooth mode.
To pair your device:
1. Press PROGRAM/PAIR [15] to place the system in
pairing mode. The Bluetooth indicator [13] will ash
blue rapidly.
2. Use your device to scan/search for other Bluetooth
devices.
3. Select “ NKM-100 ” from the scan/search results.
Use the password “0000” if the device asks
for one. The Bluetooth indicator [13] will light a
steady blue when the connection is complete.
4. Use the controls of the device to start playback.
⚠L Bluetooth works best within 10 meters.
If the connection fails, the Bluetooth indi-
cator will keep ashing.
To learn more about how to use the
Bluetooth audio function of your device
(including how to scan/search for other
devices), please refer to the instructions
provided by the device manufacturer.
If your device becomes unpaired with the
system because it was reset or the con-
nection was erased manually, simply press
PROGRAM/PAIR [15] and repeat the proce-
dure above.

www.naxa.com Page 13
Playing Audio Wirelessly From a
Bluetooth Device
Once your device has been paired, you can stream au-
dio wirelessly from it to the Karaoke system.
1. Follow the instructions for Pairing/Connecting a
Bluetooth Device.
2. Set the volume on your device to approximately
80% of its maximum level; then turn the Master
Volume dial [6] to adjust the volume to a comfort-
able level.
3. Use the native controls on the connected device to
control playback (i.e., play/pause, skip, etc.)
4. If your device supports it, you may also be able to
control playback with the buttons on the karaoke
system.

Page 14 Naxa Electronics
Warnings and Precautions
The lightning ash with arrowhead symbol within an equilateral
triangle is intended to alert the user to the presence of unin-
sulated “dangerous voltage” within the product’s enclosure that
may be of signicant magnitude to constitute risk of electric
shock
The exclamation point within an equilateral triangle is intended
to alert the userto the presence of important operation and ser-
vicing instructions in the literature accompanying the appliance.
On Protection Against Laser Energy Exposure
• As the laser beam used in this product is harmful to the eyes, do not
attempt to disassemble the casing.
• Stop operation immediately if any liquid or solid object should fall
into the cabinet.
• Do not put anything in the safety slot. If you do, the laser diode will
be ON when the disc compartment door is still open.
• If the unit is not to be used for a long period of time, make sure that
all power sources are disconnected from the unit. Remove all batter-
ies from the battery compartment, and unplug the AC-DC adapter
from the wall outlet. Make it a practice to remove the AC-DC adapter
by grasping the main body and not by pulling the cord.
• This unit employs a laser. The use of controls or adjustment or per-
formance of procedures other than those specied here may result in
exposure to hazardous radiation.
CAUTION
• Do not block the ventilation openings or holes.
• Do not place any naked ames (such as lighted candles) on the ap-
paratus.
• When discarding batteries, follow all local rules and laws governing the
disposal of batteries. Consider the environmental impact of your actions!
• Invisible laser radiation when open and interlock has failed or been
defeated. Avoid direct exposure to beam.
• To prevent re or shock hazard, do not expose this appliance to rain
or moisture.

www.naxa.com Page 15
Important Safety Information
1. Read Instructions: All the safety and operating instructions should be
read before the product is operated.
2. Retain Instructions: The safety and operating instruction should be
retained for future reference.
3. Heed Warnings: All warnings on the product and in the operating in-
structions should be adhered to.
4. Follow Instructions: All operating and usage instructions should be
followed.
5. Cleaning: Unplug this product from the wall outlet before cleaning.
Do not use liquid cleaners or aerosol cleaners. Use a damp cloth for
cleaning.
6. Attachments: Use only attachments recommended by the manufac-
turer. Use of other attachments may be hazardous.
7. Water and Moisture: Do not use this product near water (e.g., near a
bathtub, washbowl, kitchen sink, laundry tub, in wet basements, or
near a swimming pool and the like).
8. Accessories: Do not place this product on an unstable cart, stand,
tripod, bracket, or table. Use only with carts, stands, tripods, brack-
ets, or tables recommended by the manufacturer or
sold with the product. Any mounting of the product
should follow the manufacturer’s instructions and
should use a mounting accessory recommended
by the manufacturer. A product and cart com-
bination should be moved with care. Quick stops,
excessive force, and uneven surfaces may cause the
product and cart combination to overturn.
9. Ventilation: Slots and openings in the cabinet are provided for ven-
tilation to ensure reliable operation of the product and to protect it
from overheating. These openings should never be blocked by placing
the product on a bed, sofa, rug, or other similar surface. This product
should not be placed in a built-in installation such as a bookcase or
rack unless proper ventilation is provided or the manufacturer in-
structions have been adhered to.
10. Power Sources: This product should be operated only from the type of
power source indicated on the rating label. If you are not sure of the
type of power supply to your home, consult your product dealer or
local power company. For products intended to operate from battery
power or other sources, refer to the operating instructions.
11. Grounding or Polarization: This product may be equipped with a po-
larized alternating-current line plug that has one blade wider than
the other. This plug will only t into the power outlet in one direction.
This is a safety feature. If you are unable to insert the plug fully into
the outlet, try reversing the direction of the plug. If the plug should
still fail to t, contact an electrician to replace the obsolete outlet. Do
not defeat the safety purpose of the polarized plug.
12. Power-Cord Protection: Power supply cords should be routed so that
they are not likely to be walked on or pinched by items placed upon
or against them, paying particular attention to cords at plugs, conve-
nience receptacles, and at the point which they exit from the product.
13. Protective Attachment Plug: The product may be equipped with an at-
tachment plug with overload protection. This is a safety feature. See
the operating instructions for replacement or directions to reset the
protective device. If replacement of the plug is required, be sure the
service technician has used a replacement plug that has the same over-
load protection as the original plug as specied by the manufacturer.
14. Lightning: For added protection for this product, unplug it from the
wall outlet during a lightning storm or when it is left unattended and
unused for long periods oftime. This will prevent damage to the prod-
uct due to lightning or power-line surges.

Page 16 Naxa Electronics
15. Overloading: Do not overload wall outlets, extension cords, or inte-
gral convenience receptacles as this can result in a risk of re or elec-
tric shock.
16. Object and Liquid Entry: Never push objects of any kind into this prod-
uct through openings as they may touch dangerous voltage points or
short-out parts that could result in a re or electric shock. Never spill
liquid of any kind on the product.
17. Servicing: Do not attempt to service this product yourself as open-
ing or removing covers may expose you to dangerous voltage or other
hazards. Refer all servicing to qualied service personnel.
18. Damage Requiring Service: Unplug this product from the wall outlet
and refer servicing to qualied service personnel under the follow-
ing conditions: a) when the power-supply or plug is damaged; b) if
liquid has been spilled or if objects have fallen into the product; c) if
the product has been exposed to rain or water; d) if the product does
not operate normally by following the operating instructions. Adjust
only those controls that are covered by the operating instructions as
improper adjustment of other controls may result in damage and will
often require extensive work by a qualied technician to restore the
product to its normal operation; e) if the product has been dropped or
damaged in any way; f) when the product exhibits a distinct change in
performance—this indicates a need for service.
19. Replacement Parts: When replacement parts are required, be sure
that your service technician has used replacement parts specied
by the manufacturer or have the same characteristics as the original
part. Unauthorized substitutions may result in re, electric shock, or
other hazards.
20. Safety Check: Upon completion of any service or repairs to this
product,ask the service technician to perform safety checks to ensure
that the product is in proper operating condition.
21. Wall or Ceiling Mounting: The product should be mounted to a wall or
ceiling only as recommended by the manufacturer.
22. Heat: The product should be situated away from heat sources such as
radiators,heat registers, stoves, or other products (including ampli-
ers) that produce heat.
FCC NOTICE
This device complies with Part 15 of the FCC Rules. Operation is subject
to the following two conditions: (1) this device may not cause harmful
interference, and (2) this device must accept any interference received,
including interference that may cause undesired operation.
Note: This equipment has been tested and found to comply with the lim-
its for a Class B digital device, pursuant to Part 15 of the FCC Rules. These
limits are designed to provide reasonable protection against harmful in-
terference in a residential installation. This equipment generates, uses
and can radiate radio frequency energy and, if not installed and used in
accordance with the instructions, may cause harmful interference to ra-
dio communications. However, there is no guarantee that interference
will not occur in a particular installation. If this equipment does cause
harmful interference to radio or television reception, which can be de-
termined by turning the equipment off and on, the user is encouraged to
try to correct the interference by one or more of the following measures:
• Reorient or relocate the receiving antenna.
• Increase the separation between the equipment and receiver.
• Connect the equipment into an outlet on a circuit different from that
to which the receiver is connected.
• Consult the dealer or an experienced radio/TV technician for help.

www.naxa.com Page 17
CAUTION ON MODIFICATIONS
Any changes or modications not expressly approved by the grantee of
this device may void the authority granted by the FCC to operate the
equipment.
WARNING
This product contains lead, a chemical known to the State of California to
cause cancer and birth defects or other reproductive harm. Wash hands
after handling.
CAUTION
This product is equipped with a polarized plug (one blade is wider than the
other blade) as a safety feature to reduce the risk of electrical shock. This
plug will t into a polarized outlet only one way. This is a safety feature.
If you are unable to insert the plug into the electrical outlet, try reversing
the plug. If the plug still does not t, contact a qualied electrician. Never
use the plug with an extension cord unless the plug can be fully inserted
into the extension cord. Do not alter the plug. Do not attempt to defeat
the safety purpose of the polarized plug.
NEC NATIONAL ELECTRICAL CODE
Dot not apply oil or petroleum products to this product.
GRAPHIC SYMBOLS WITH SUPPLEMENTARY MARKINGS ARE LOCATED ON
THE BOTTOM OF THE UNIT. USE OF ANY CONTROLS OR ADJUSTMENTS OR
PERFORMANCE OF PROCEDURES OTHER THAN THOSE HEREIN SPECIFIED
MAY RESULT IN HAZARDOUS RADIATION EXPOSURE.

Page 18 Naxa Electronics
Troubleshooting
No power when ON
• Check the power plug is connected to the back of the unit and
then plug into a power outlet.
• Check that the outlet is switched on and working properly.
• Check that the POWER button on the front of the unit has
been pressed.
No sound
• Turn the master volume dial clockwise to raise the volume.
• If playing from an external audio device, ensure the volume is
turned up to at least 80%.
CD Player does not work
• Check that your disc is not scratched or dirty.
• Ensure that the CD lens is clean. If dusty, blow clean air across
the lens to remove the dust. If problems persist, use a CD lens
cleaner to clean the CD compartment.
• Check there is no moisture inside of the unit. Allow to dry
before use.
• Ensure the protective card has been removed from the CD Tray.
• Try a different CD
No sound when connected to a TV
• Ensure component or AV is selected as the source for your TV
audio.
• Ensure the color-coded RCA cables are correctly connected to
their respective jacks.
• Turn up the volume of the TV or home theatre.
Lyrics do not appear on screen
• Ensure the color-coded RCA cables are correctly connected to
their respective jacks.
• Ensure you are playing a CD+G. Audio CDs will not display Lyr-
ics.
• Ensure that the CD+G LED is lit to conrm a CD+G format disc
is playing
No sound from microphone
• Turn up the volume on the MIC 1 and MIC 2 VOLUME and mas-
ter volume dials.
• Ensure the microphone is switched to the ON position on the
microphone handle.
• Ensure you are singing into the microphone and are not more
than 3cm away from the microphone.
• Ensure the microphone jack is securely connected to either
MIC 1 or MIC 2.
• Check the echo dial is not set too low

www.naxa.com Page 19
Music or vocals cut out while playing a CD+G and sing-
ing with the microphone.
• Turn the AVC level dial counter clockwise to its lowest setting.
• Ensure you are playing a CD+G that has a vocal track
Burned CDs will not play
• Ensure the burned CD has been nalized in CD-audio format.
MP3 format CDs are not supported.
What format discs are compatible?
• Formats supported are: CD, CD+G, CD-R (burned as an audio
CD), and CD-RW (burned as an audio CD).
• Note: CD-R and CD-RW burned as MP3 discs are not sup-
ported.
Specications
Media Support CD, CD-R/RW
Playable Media Formats CD-audio, CD+G
Wireless Source Bluetooth® version 2.1
Input MIC 1 (1/4”)
MIC 2 (1/4”)
Output RCA composite video
RCA stereo audio
Level Controls Master volume
MIC 1
MIC 2
Echo (reverb)
Automatic Voice Control (AVC)
Speaker Output Power 3 W
USB Charge Output DC 5 V, 1 A
Power Source AC 120 V, 60 Hz
Note: Product are improved continuously. We reserve the right to modify
the product and specications without prior notice.

Page 20 Naxa Electronics
Support
If you have problems with your device, please consult the instructions in this manual. Please also visit us on the
web at www.naxa.com to get up to the minute news, alerts, and documentation for your device. For additional
assistance, please contact Naxa Technical Support.
NAXA Technical Support
2320 East 49th St.
Vernon, CA 90058
http://www.naxa.com/naxa_support/
Table of contents
Other Naxa Karaoke System manuals
Popular Karaoke System manuals by other brands

TJ Media
TJ Media TKR-355P user manual

Karaoke Night
Karaoke Night KN103 user manual

The Singing Machine
The Singing Machine SML2260 instruction manual

The Singing Machine
The Singing Machine STVG529BK/W instruction manual

SOUNDMASTER
SOUNDMASTER CDG-552E user guide

American Idol
American Idol AI150 Specifications

Goodmans
Goodmans XB13CDG user manual

SINGTRONIC
SINGTRONIC KA-2500DSP User Explanation Book

VocoPro
VocoPro DVD-Duet Digital Key Control DVD/CD/CDC Dual Cassette Karaoke... owner's manual

auna
auna 10032441 manual

WOW! Videoke Premium
WOW! Videoke Premium Mabuhay Plus TKR-301 user manual

Fenton
Fenton FT215LED instruction manual