Nitto Kohki MYG-40 User manual

Professional tool Pneumatic Grinder
Model: MYG-40
The end tool in the drawing is not included with the tool.
[Specifications]
Model
MYG-40
Maximum operating pressure MPa 0.6
Air consumption (No load) m3/min 0.50
Rated speed (No load) min-1 13000
Grinding Wheel outer diameter mm 100
Mass (weight) kg 1.4
Sound pressure level *1 dB (A) 92
Sound power level *1 dB (A) 103
Vibration level *2 m/s24.2
*1 Based on the ISO15744 measurement standard.
*2 Based on the 3 axes combined value measurement standard of the
ISO28927-1 of the hand-held tool frequency correction vibration
acceleration effective value.
Japan Use Only
Please read manual carefully before you attempt to use your tool so that you may use it properly
and safety.
Keep the manual handy - so you can use it whenever necessary.
• Due to continuous product development/improvement, the specifications and configurations in this
document are subject to change without prior notice.
INSTRUCTION
MANUAL
Manufactured by.
NITTO KOHKI CO., LTD. 9-4, Nakaikegami 2-chome, Ohta-ku, Tokyo, 146-8555, Japan
Tel : +81-3-3755-1111 Fax : +81-3-3753-8791
TQ15298-0 05/2017

EN
Contents
Precautions on Use (Make sure to follow the
instructions given)................................................. 1
General Power Tool Safety Warnings ...................1
General Pneumatic Tool Safety Warnings ............4
Product Specific Safety Rules...............................4
1 Application ......................................................... 6
2 Checking Inside the Package............................ 6
3 Part Names........................................................ 6
4 Air Supply .......................................................... 7
5 Preparation........................................................ 8
Replacing the Grinding Wheel ..............................8
Start and stop........................................................9
6 How to Use...................................................... 10
Grinding work......................................................10
7 Maintenance and Inspection............................ 11
Storing the tool....................................................11
Storing the Grinding Wheel.................................11
Maintenance and Inspection...............................12
Disposal ..............................................................13
California Proposition 65
WARNING
Some dust created by power sanding, sawing, grinding, drilling, and other construction activities contains
chemicals known [to the State of California] to cause cancer birth defects or other reproductive harm.
Some examples of these chemicals are:
Lead from lead-based paints,
Crystalline silica from bricks and cement and other masonry products, and
Arsenic and chromium from chemically-treated lumber.
Your risk from these exposures varies, depending on how often you do this type of work. To reduce your exposure
to these chemicals: work in a well ventilated area, and work with approved safety equipment, such as those dust
masks that are specially designed to filter out microscopic particles.
Instructions
Thank you very much for your purchase of this Nitto Kohki product.
Before using your tool, please read this manual carefully so that you may use it properly to get the most out of it.
Please keep the manual handy - so you can use it whenever necessary.
The following Safety notations are used throughout the manual to highlight safety precautions for the user and for the
tool.
WARNING: Indicates a potentially hazardous situation which, if not avoided by following the
instructions given, could result in death or serious injury.
CAUTION: Indicates a potentially hazardous situation which, if not avoided by following the
instructions given, could result in injury or material damage.
* Please note, however, that failure to observe safety precautions under the “ CAUTION” category could result in
a serious occurrence depending on the situation.
Please observe all safety precautions in the manual.
CAUTION: Important precautions for tool setup, operation and maintenance.
About pictograms
WARNING: It might be dangerous to operate the tool if the instructions supplied are not followed.
Using this tool improperly could result in serious injury. Read the instruction manual before
use .

1
EN
Precautions on Use (Make sure to follow the instructions given)
Before using your tool, to avoid personal injury always take the basic precautions explained in later sections.
General Power Tool Safety Warnings
Personal safety
WARNING
Dress properly.
Do not wear loose clothing or jewelry. There is a
danger of being caught in moving parts. Wear a
pair of non-slip shoes. If your hair is long, wear a
protective hair covering to contain your hair.
Always wear eye protection.
Corrective glasses are not considered eye
protection. Always wear appropriate eye
protection.
Wear a dust mask.
When dust is generated in the workplace, wear a
dust mask.
Use a dust collector or dust collection
equipment correctly.
If a dust collector or dust collection equipment
are being used, check that these are connected
and used properly. Use of a dust collector can
reduce risk caused by dust.
When loud noise is generated in the workplace,
wear a hearing protection.
Do not overreach.
Keep proper footing and balance at all times.
Be on your guard when working.
Do not use the tool when you are tired.
When you use the tool, be sure about the handling method, how to work, and pay sufficient attention to the
surrounding environment.
Never touch the tip of moving parts when the tool is running.
Also, do not direct the tip of moving parts toward people or animals.
Be aware of tool vibration and recoil. Some tools can cause a considerable amount of vibration.
Depending on how the product is operated, the type of tool setting, and the length of operation, it could place a
tremendous burden on your hands, arms and body.
The tool could cause a vibration injury or tendonitis. Avoid long-term use and take appropriate breaks.
Consult a doctor if you experience any discomfort or pain while operating the tool.
Protective hair
covering
Dust mask
Work clothes
Safety shoes
Protective
goggles
Earplugs

2
EN
Work area safety
WARNING
Do not use the tool at home.
This is a professional tool (industrial or work tool for business). Do not bring the tool home and use it there.
Keep the work area clean.
Working in a messy work area or work table could cause an accident.
Be cautious about the work area.
Do not expose the tool to rain.
Do not use the tool in a damp or wet place.
Keep the work area well lit.
Do not operate the tool in an explosive atmosphere, such as in the
presence of flammable liquids (thinner, lacquer, gasoline, etc.) or
gas.
Do not let children come close to the work area.
Keep children and bystanders away while operating tool.
Some tools generate loud noise.
Check that the noise regulations of each area are complied with.
When work has to be done in high locations, make sure there is
nobody underneath the work area.
If the tool or material is dropped, it could cause an accident or
injury.
Before starting operation, make sure that there is no conduit,
water pipe or gas pipe by your work area.
If a tool touches a buried object, it could cause electrical shock or leakage, which could cause an accident.
Before starting to work
WARNING
Perform inspection before using the tool.
Before using the tool, check for loose screws on the tool and for damage on the protective cover or other parts,
and make sure that the tool operates normally and demonstrates prescribed functions.
Check the position adjustment and tightening status of moving parts, parts damage, attachment status, and all
other locations for issues that could affect operation.
For parts replacement and repair, follow the instructions indicated in the instruction manual.
If there are no instructions in the instruction manual, contact the retailer where you purchased the tool or the
nearest NITTO service member store.
Do not use the power tool if the switch does not turn it ON and OFF.
Make sure to properly attach the tip tool.
If the tip tool is not attached properly, there is a risk of jumping out or damage, which could result in injury.
After adjustment, be sure to remove tools such as Spanners, wrenches, etc.
Use appropriate tools.
Do not force small tools to do the job of a heavy duty tool. Do not use tools for purposes not intended.
Do not use tools in an unreasonable manner.
When the specifications are followed, tools can be used efficiently and safely.
Secure workpieces.
Where possible use clamps or a vise to hold the work. It is safe to hold the workpieces by hand and both hands
can be used for operation.
Precautions on use

3
EN
Handling tools
WARNING
Storing the tool
When the tool is not used, store the tool in a dry location. Also, store the tool out of the reach of children.
For some tools, the storage temperature and humidity are specified. Store the tool in an appropriate location.
Be cautious about how the tool is carried.
Do not carry the tool with your hand touching the operation switch.
Do not leave the tool while the tool is still running.
Do not leave the work area until you turn off the operating switch, remove the power source and the tool
completely stops.
Do not allow the following chemicals to come into contact with the tool, as parts could deteriorate.
Acetone, benzine, thinner, ketone, ether, trichloroethylene and other similar chemicals
Maintenance and Inspection
WARNING
Do not disassemble or alter the tool.
Using the tool after disassembling or remodeling it could cause an accident or injury.
Inspect tip tools and accessories.
Always inspect tip tools and accessories for damage or deterioration before attaching them to the tool.
If damage or deterioration is found, request repair from the retailer where you purchased the tool or the nearest
NITTO service member store.
Inspect for damaged sections.
Sufficiently check for damage on accessories or other parts, that the tool operates normally, and that work can
be performed appropriately.
If there are accessories or parts that have been damaged or could hinder work, request repair from the retailer
where you purchased the tool or the nearest NITTO service member store.
Request repair from a dedicated store.
For repair or replacement of parts, request service from the retailer where you purchased the tool or the nearest
NITTO service member store.
Repair requires special knowledge and skills. If repair is performed at a place other than a specialty store, the
tool may not demonstrate its full performance or it could lead to an accident or injury.
Request repair with the failed status kept intact. When requesting a repair, do not throw away damaged parts. It
could be important information for investigating the failure cause so do not change the status.
Use genuine parts.
If inappropriate parts are used, it could cause accident or injury.
Genuine parts are listed in the instruction manual or brochure. Inquire at the retailer where you purchased the
tool or the nearest NITTO service member store.
Do not remove the Labels or Plates on the tools.
If Labels or Plates are broken or peeling, for a replacement Label or Plate contact the retailer where you
purchased the tool or the nearest NITTO service member store.

4
EN
General Pneumatic Tool Safety Warnings
WARNING
Use the tool with proper air pressure.
If the air pressure is high, the rotation speed and reciprocation frequency become faster, causing damage such
as damage or accelerated wear. Also, unexpected accidents could occur.
Connect the tool to air piping.
In some factories, other than air piping, there may be other piping such as oxygen, nitrogen, gas, etc. Before
connecting to piping, make sure it is the correct piping.
Do not start the tool carelessly.
Turn off the operation switch, then attach the Connecting Hose to the tool.
When attaching, removing, and maintaining accessories, make sure to detach the Connecting Hose from the
tool.
Be cautious about exhaust.
Pneumatic tool exhaust contains oil and drainage, etc. Be careful about the exhaust direction so that the exhaust
does not directly hit people nearby.
Do not allow sources of electricity to touch the tool.
The pneumatic tool is not insulated against contact by electric sources. Because there is a risk of electric shock,
do not allow sources of electricity to touch the tool.
CAUTION
Handle the tool with care.
Rough handling could cause accidents or malfunctions. Do not exert an impact on the tool by throwing or
dropping it.
Handle the Connecting Hose with care.
Do not carry the tool by holding the Connecting Hose, and do not pull the Connecting Hose to remove it.
Product Specific Safety Rules
WARNING
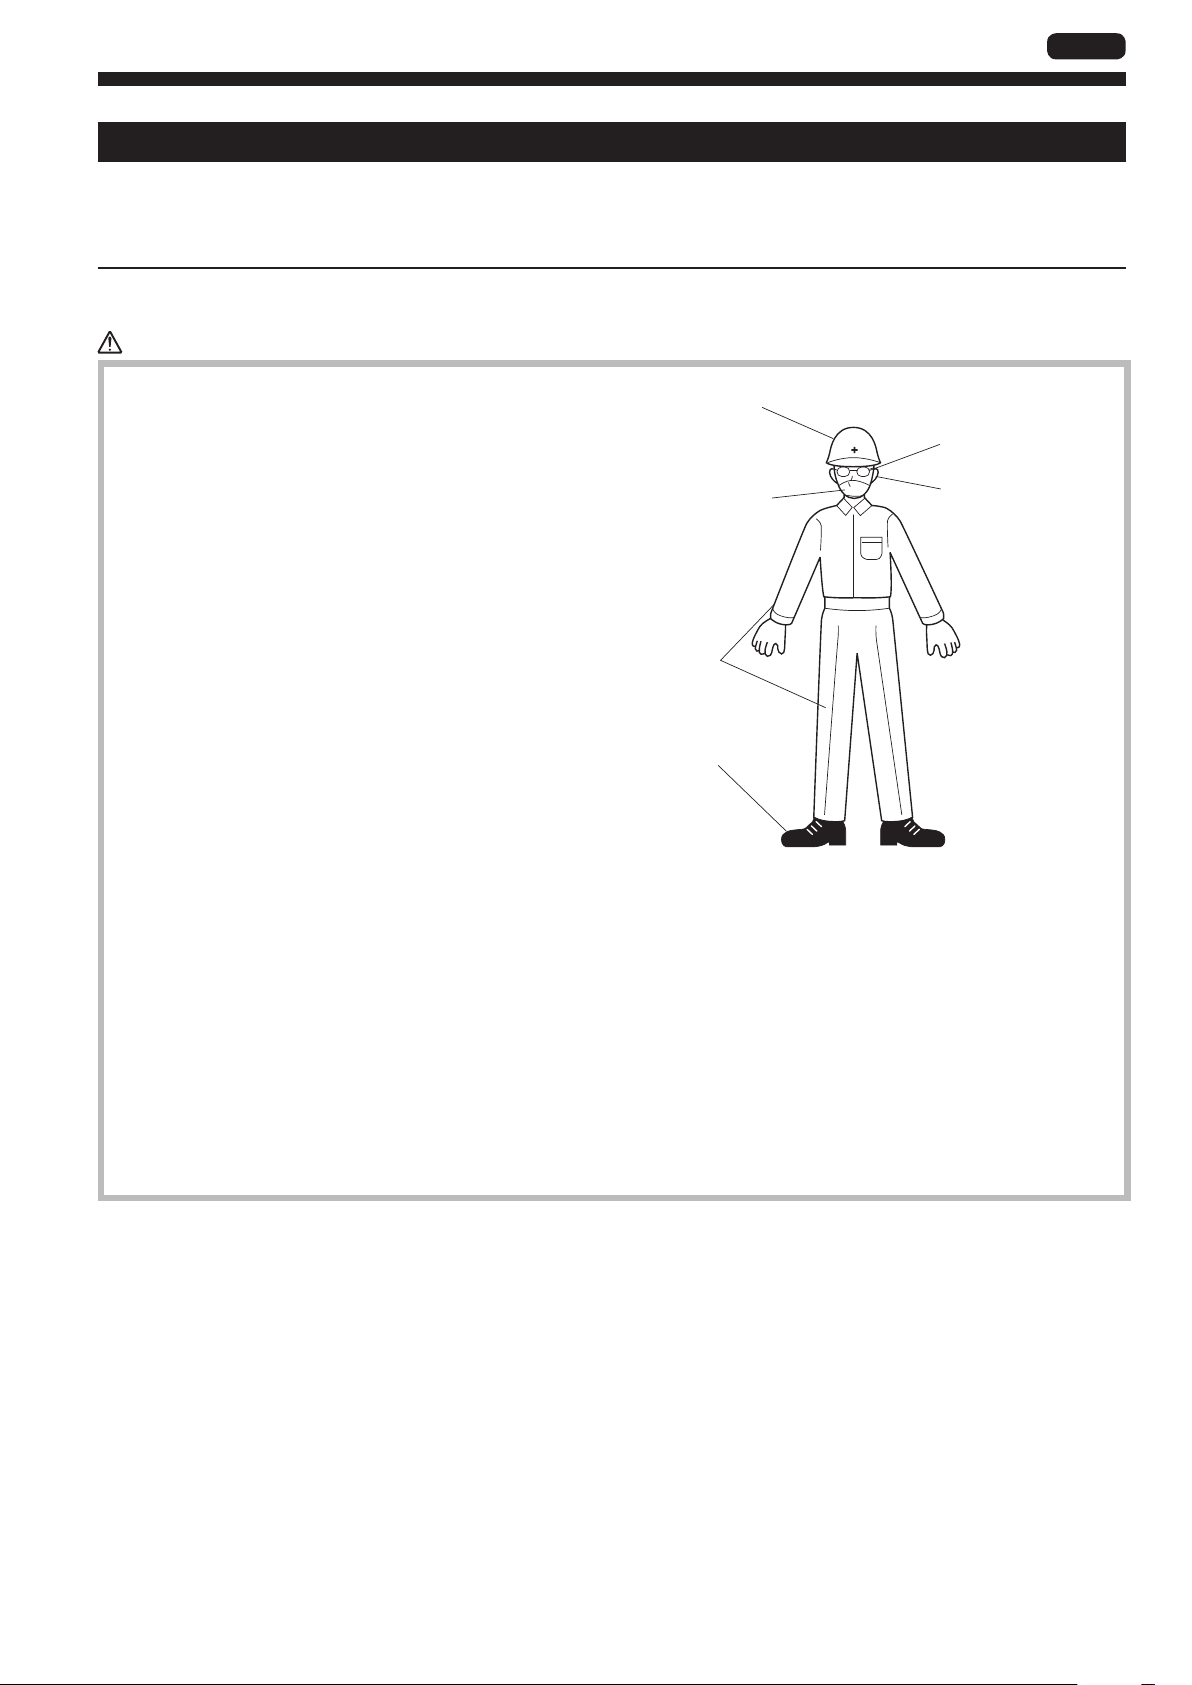
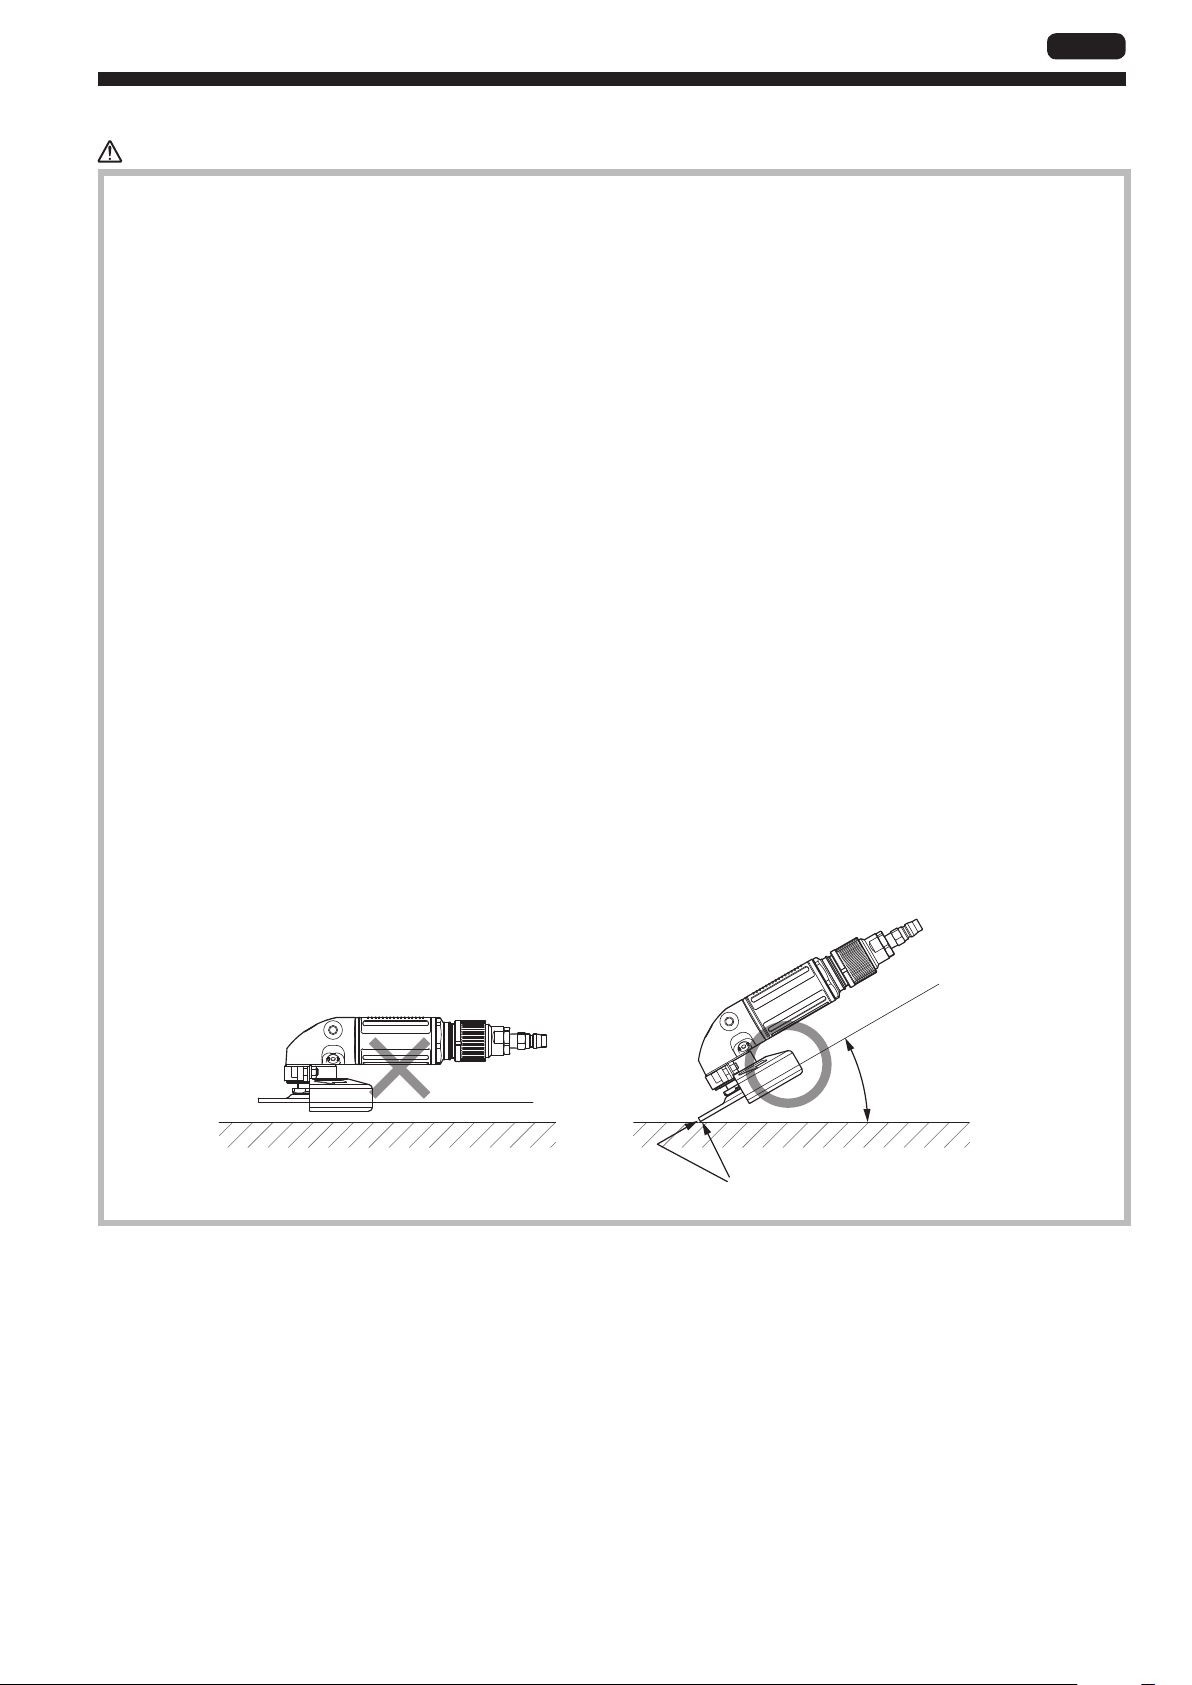
Protect your body from chips.
During grinding, hot chips scatter. Since it could cause blindness, respiratory disorders, burns or hearing
impairment, when working, to protect your body use protective eyewear, a dust mask, earplugs, gloves
(excluding knitted gloves), long-sleeved work clothes, etc. In addition, do not bring your face close to the tool.
Do not use a Grinding Wheel with an allowable rotational speed (indicated on the Grinding Wheel top label)
lower than the actual rotational speed of the machine. Also, please make sure that the specified dimensions of
the Grinding Wheel conform to the specifications of this machine.
(Article 119 of the Ordinance on Industrial Safety and Health)
When attaching the Grinding Wheel, check that there are no abnormalities such as cracking, chipping, or
excessive wear.
Do not use the tool if there is a slight abnormality such as a Grinding Wheel containing moisture, damage, loss,
etc. of the display label.
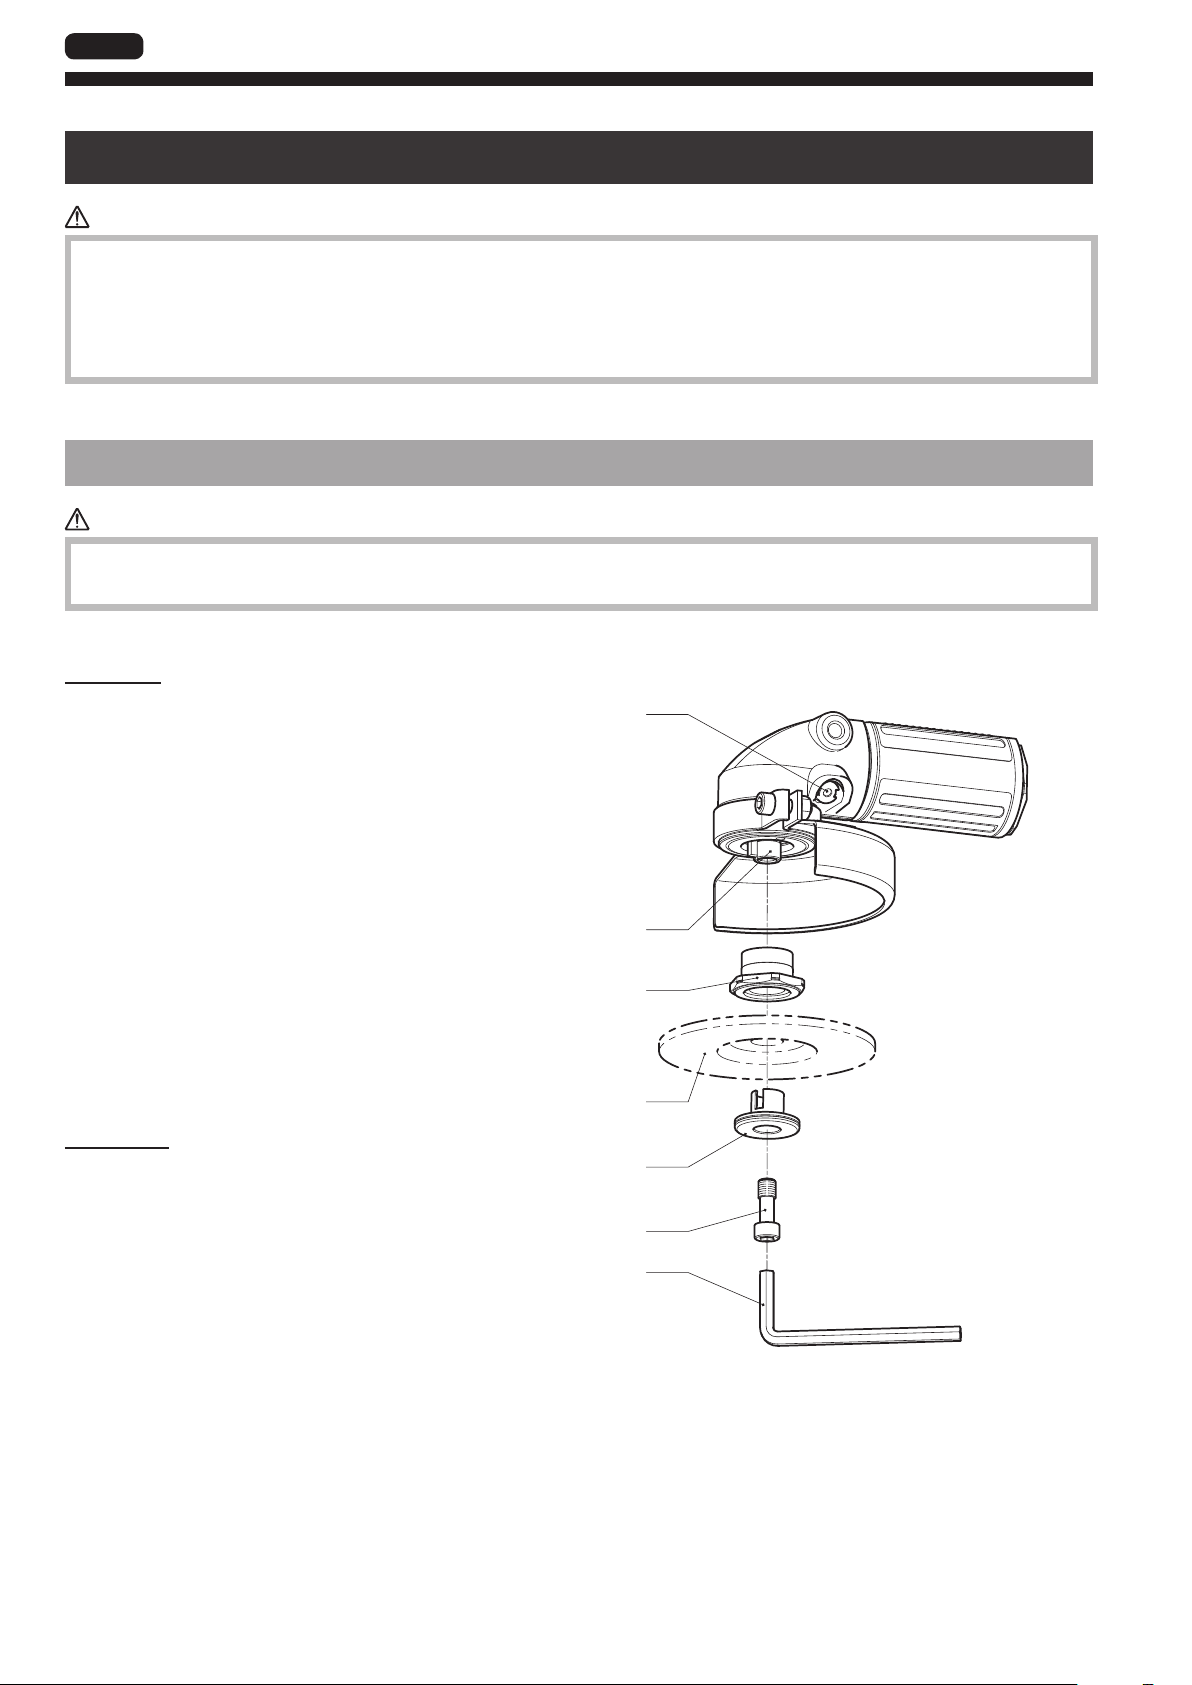
Use our genuine Outer Flange.
Do not use Outer Flanges that are damaged, bent or severely worn out.
Also, do not use a substitute flange or flat washer.
Check that the Grinding Wheel is suitable for the Outer Flange.
Tighten the Grinding Wheel moderately.
When aligning the Grinding Wheel to the Outer Flange do not use a reduced bushing unless the bushing to be
used is supplied from the parts maker or is as specified.
When attaching the Grinding Wheel, make sure that the label on the top of the Grinding Wheel comes into
contact with the mounting surface of the Spindle.
For the label on top of the Grinding Wheel, use one with the same diameter as the outer diameter of the end face
of the Spindle, or larger.
Precautions on use

5
EN
WARNING
Always inspect the Spindle's threaded part and Outer Flange for breakage, deformation and wear.
If an abnormality is found, stop using the tool immediately.
Never use the side other than the usage surface of the Grinding Wheel.
(Article 120 of the Ordinance on Industrial Safety and Health)
Be sure to install a Wheel Guard on the air grinder having a tip Grinding Wheel tool maximum diameter of 50
mm or more.
(Article 117 of the Ordinance on Industrial Safety and Health)
Be sure to use the Wheel Guard provided with this machine.
Use of equipment other than as specified could cause an accident.
Always replace damaged, deformed, or excessively worn Wheel Guards.
Do not use a Wheel Guard that could cause damage to the Grinding Wheel.
The intake air pressure during operation of this tool should not exceed 0.6 MPa.
Do not abruptly operate or stop the tool.
When starting, be sure to open the Throttle Lever or Valve Ring gradually.
When performing any work, before attaching the Grinding Wheel be sure to use a tachometer to check the no-
load rotation speed of the tool.
Make sure the Valve Ring of the main unit is at the maximum rotation position and that the rotation speed at 0.6
MPa does not exceed the rotation speed stated on the Wheel Guard.
Also, when you use this unit after repair, check in the same way.
Attachment, detachment, and trial operation of the Grinding Wheel must be performed by a qualified person
who has received special education prescribed by laws and regulations.
(Article 36 of the Ordinance on Industrial Safety and Health)
(Articles 1 and 2 of Rules on Special Education for Safety and Health)
During trial operation, make sure that there is no one near the rotating Grinding Wheel.
For 1 minute before operation and 3 minutes after replacement of the tip grinding tool, perform trial operation
in a safe place and make sure that there is no abnormality in operation of the tool.
(Article 118 of the Ordinance on Industrial Safety and Health)
At startup, push the Grinding Wheel slowly against the workpiece until the Grinding Wheel gets warm.
Always work at the correct angle of 15 to 30 degrees.
15 to 30°
Use surface

6
EN
1 Application
This tool is a pneumatic hand-held grinder for grinding a workpiece using the Grinding Wheel shown below according
to the shape of the JIS R 6211 27 offset Grinding Wheel.
MYG-40
MYG-40
A Grinding Wheel
diameter 100 mm
B Grinding Wheel
hole diameter 15 mm
C Grinding Wheel
thickness 3 to 6 mm
2 Checking Inside the Package
When you open the package box, check the contents of the package and also check for any damage that may have
occurred during transportation.
If an abnormality is found, request service from the retailer where you purchased the tool or the nearest NITTO service
member store.
Package content and accessories Quantity Check
1MYG-40 (main unit) 1
25 mm Hex. Socket Screw Key 1
36mm Hex. Socket Screw Key 1
4Instruction Manual
(this document) 1
Package content and accessories Quantity Check
5General Catalog 1
6Caution for Use 1
7Questionnaire Postcard 1
123
3 Part Names
1
2
3
4
5
6
7
1Spindle Lock
Button
2Grip Tube
3Valve Ring
4Coupler
5Wheel Guard
6Driving Flange
7Outer Flange
M8
A
C
3 to 6 mm
B

7
EN
4 Air Supply
CAUTION
Remove drainage before stating work.
When drainage enters the tool, the vicinity of the exhaust port freezes, which could cause a loss of power.
1
2
3
4
5
6
7
8
1Compressor
2Air Filter
3Air Regulator
4Lubricator
5Connecting Hose
6Machine Oil
7Coupler
8Tool
Air pressure used
Use the tool with air pressure at 0.6 MPa. If the pressure is too low, the tool cannot demonstrate the required
performance. If it is too high, it could damage parts of the tool. Use an Air Regulator (3) to adjust the pressure to the
appropriate level.
Air line
Use a Connecting Hose (5) with an internal diameter of 9.5 mm (3/8”) between the Compressor (1) and the tool
(8). Compressed air exits the Compressor and cools and moisture condenses. Some moisture could condense
inside the Connecting Hose and get inside the tool, causing a malfunction. Install the Air Filter (2) and Lubricator (4)
between the Compressor and the tool.
Machine oil
Install a Lubricator between the Compressor and the tool, and be sure to use machine oil (ISO VG-10).
Failure to do so could cause damage to the tool. Also, if lubricating oil with high viscosity is used, it could cause
performance degradation.
Refueling
Each day before starting work detach the Connecting Hose and refill a few drops of machine oil (ISO VG-10) (6) from
the Coupler (7) to the tool.
After refueling, connect the Connecting Hose and perform idle operation for a few seconds to allow the oil to blend in
the entire tool.

8
EN
5 Preparation
WARNING
During work, be sure to wear eye protection, earplugs, a dust mask, and gloves (other than knitted gloves).
When replacing or adjusting the Grinding Wheel or parts, be sure to detach the Connecting Hose from the tool.
Never touch moving parts while the tool is running.
After stopping work, the tip of the grinding tool will continue to rotate for a while.
Never touch moving parts until the tool completely stops.
Replacing the Grinding Wheel
WARNING
Before replacing the Grinding Wheel, always turn OFF the Valve Ring and detach the Connecting Hose from the
tool.
Attaching
1 Insert the Outer Flange (5) into the Grinding
Wheel (4)
2 While holding the Spindle Lock Button (1), turn
the Driving Flange (3) by hand, and push the
Button at the position where rotation stops
3 Align the notch of the Outer Flange (5) with
the key and mount it together with the Grinding
Wheel (4)
4 Using a 6 mm Hex Socket Screw Key (7), tighten
the Outer Flange Bolt (6) to the Spindle (2)
When you release your hand from the Spindle Lock
Button (1), the lock is released automatically.
1
2
3
4
5
6
7
Removing
1 While holding the Spindle Lock Button (1), turn
the Grinding Wheel (4) by hand, and push the
Button at the position where rotation stops
2 Using a 6 mm Hex Socket Screw Key (7), loosen
the Outer Flange bolt (6)
The Grinding Wheel now can be removed.
3 Remove the Grinding Wheel

9
EN
Start and stop
Start
1 Make sure that the Valve Ring (1) is in the
position where the green line (2) is visible
When the green line (2) is visible, it indicates that the
Valve Ring is OFF.
1
2
2 Attach the Connecting Hose to the tool, then
turn the Valve Ring counterclockwise (4) while
pushing the Valve Ring in the direction of 3
The tool starts. 3
4
Stop
1 Turn the Valve Ring clockwise
The tool stops.

10
EN
6 How to Use
Grinding work
CAUTION
Do not press the Grinding Wheel strongly against the working surface.
Doing so could damage parts or damage the Grinding Wheel. Strongly pressing the tool against the working
surface does not change work efficiency.
1 Hold the tool with your hand to start
2 Lightly touch the Grinding Wheel at an angle of 15 to 30
degrees against the working surface
15 to 30°

11
EN
7 Maintenance and Inspection
Storing the tool
Store the tool according to the following warnings and cautions.
WARNING
When the tool is not in use, store out of the reach of children.
CAUTION
When the tool is not in use, store in a place with little humidity.
After completing work, lubricate with machine oil (ISO VG-10) from the Coupler of the tool and operate a little
before storing.
If the tool is left as is after use, moisture in the air could remain inside the main unit, likely causing rust to occur.
Storing the Grinding Wheel
Store the Grinding Wheel according to the following warnings.
WARNING
Avoid moisture, and store the Grinding Wheel in a dry place. When storing or handling, observe the following
items.
Do not expose to moisture
Do not drop
Do not expose to impacts
Do not throw
Do not step on
Do not roll

12
EN
Maintenance and Inspection
WARNING
For maintenance and inspection, be sure to detach the Connecting Hose from the tool.
Use genuine parts.
Never touch moving parts while the tool is running.
Replenishing grease
Apply grease (Sumitec 305) as needed to the inside of the main unit about once a month according to the following
procedure.
At that time, use an air blower or the like to remove dirt adhering to the Muffler. Also, depending on dirt conditions,
replace the Muffler as needed. If dirt adheres to the Muffler, it could cause a loss of power.
1 Loosen the + Countersunk Head Screw
(1) of the Exhaust Cover and remove the
Exhaust Cover (2), Spacer (3), Exhaust
Filter (the 41st Filter), Exhaust Plate (5),
and Packing Cover (6)
5
4
3
2
1
6
4
1st Filter
2nd Filter
1+ Countersunk Head Screw 4×14
2Exhaust Cover
3Spacer
4Exhaust Filter
5Exhaust Plate
6Packing Cover
2 Use a grease gun to inject grease (Sumitec
305) into the grease inlet (7)
Use a grease gun nozzle with a tip outer diameter
of less than 3 mm.
The nozzle for a grease nipple cannot be used for
injection.
7
42nd Filter
Maintenance and Inspection

13
EN
3 Perform a trial run and wipe off extra grease that seeps out
Attach a Connecting Hose to the Coupler of the tool and operate the tool.
At that time, grease may scatter from the exhaust part and grease inlet, so use with care.
Stop the tool in a few seconds and always detach the tool from the Connecting Hose, then wipe off any grease
that seeps from the periphery of the Spindle.
4 Assembling the Exhaust Cover
Assemble the Exhaust Cover by performing the disassembly procedure in reverse.
MYG-40 uses two Exhaust Filters (4). Insert the Exhaust Filter (the 42nd Filter) under the Packing Cover so
that there is no clearance in the Housing.
When assembling, use care for the orientation of the Exhaust Cover (2), Exhaust Filters (4), Exhaust Plate
(5), and Packing Cover (6).
Disposal
Separate the tool, accessories, and packing materials for environmentally-friendly recycling.
When disposing of the tool, follow the rules of each municipality.
Table of contents
Other Nitto Kohki Grinder manuals

Nitto Kohki
Nitto Kohki MYTON MYG-50 User manual

Nitto Kohki
Nitto Kohki MYTON MLG-70 User manual

Nitto Kohki
Nitto Kohki DIMMER MONOCANALE MULTIPROTOCOLLO COSTANT... User manual

Nitto Kohki
Nitto Kohki MYTON MYG-70 User manual

Nitto Kohki
Nitto Kohki MLG-40 User manual

Nitto Kohki
Nitto Kohki MLG-25 User manual

Nitto Kohki
Nitto Kohki L-25B User manual

Nitto Kohki
Nitto Kohki L-25B User manual

Nitto Kohki
Nitto Kohki Myton MYG-25 User manual

Nitto Kohki
Nitto Kohki MG-40 User manual