NK SpeedCoach OC 2 User manual
Model 2
Includes Training Pack Upgrade
INSTALLATION
SpeedCoach Heart Rate Monitor*
The heart rate monitor belt connects to your unit via
Bluetooth® Low Energy technology. Attach belt across the
lower portion of your chest, as shown in the gure to the
right and adjust the strap to t your body snugly. To pair
your strap to your unit, please see Setup Menu option.
*Training Pack Features
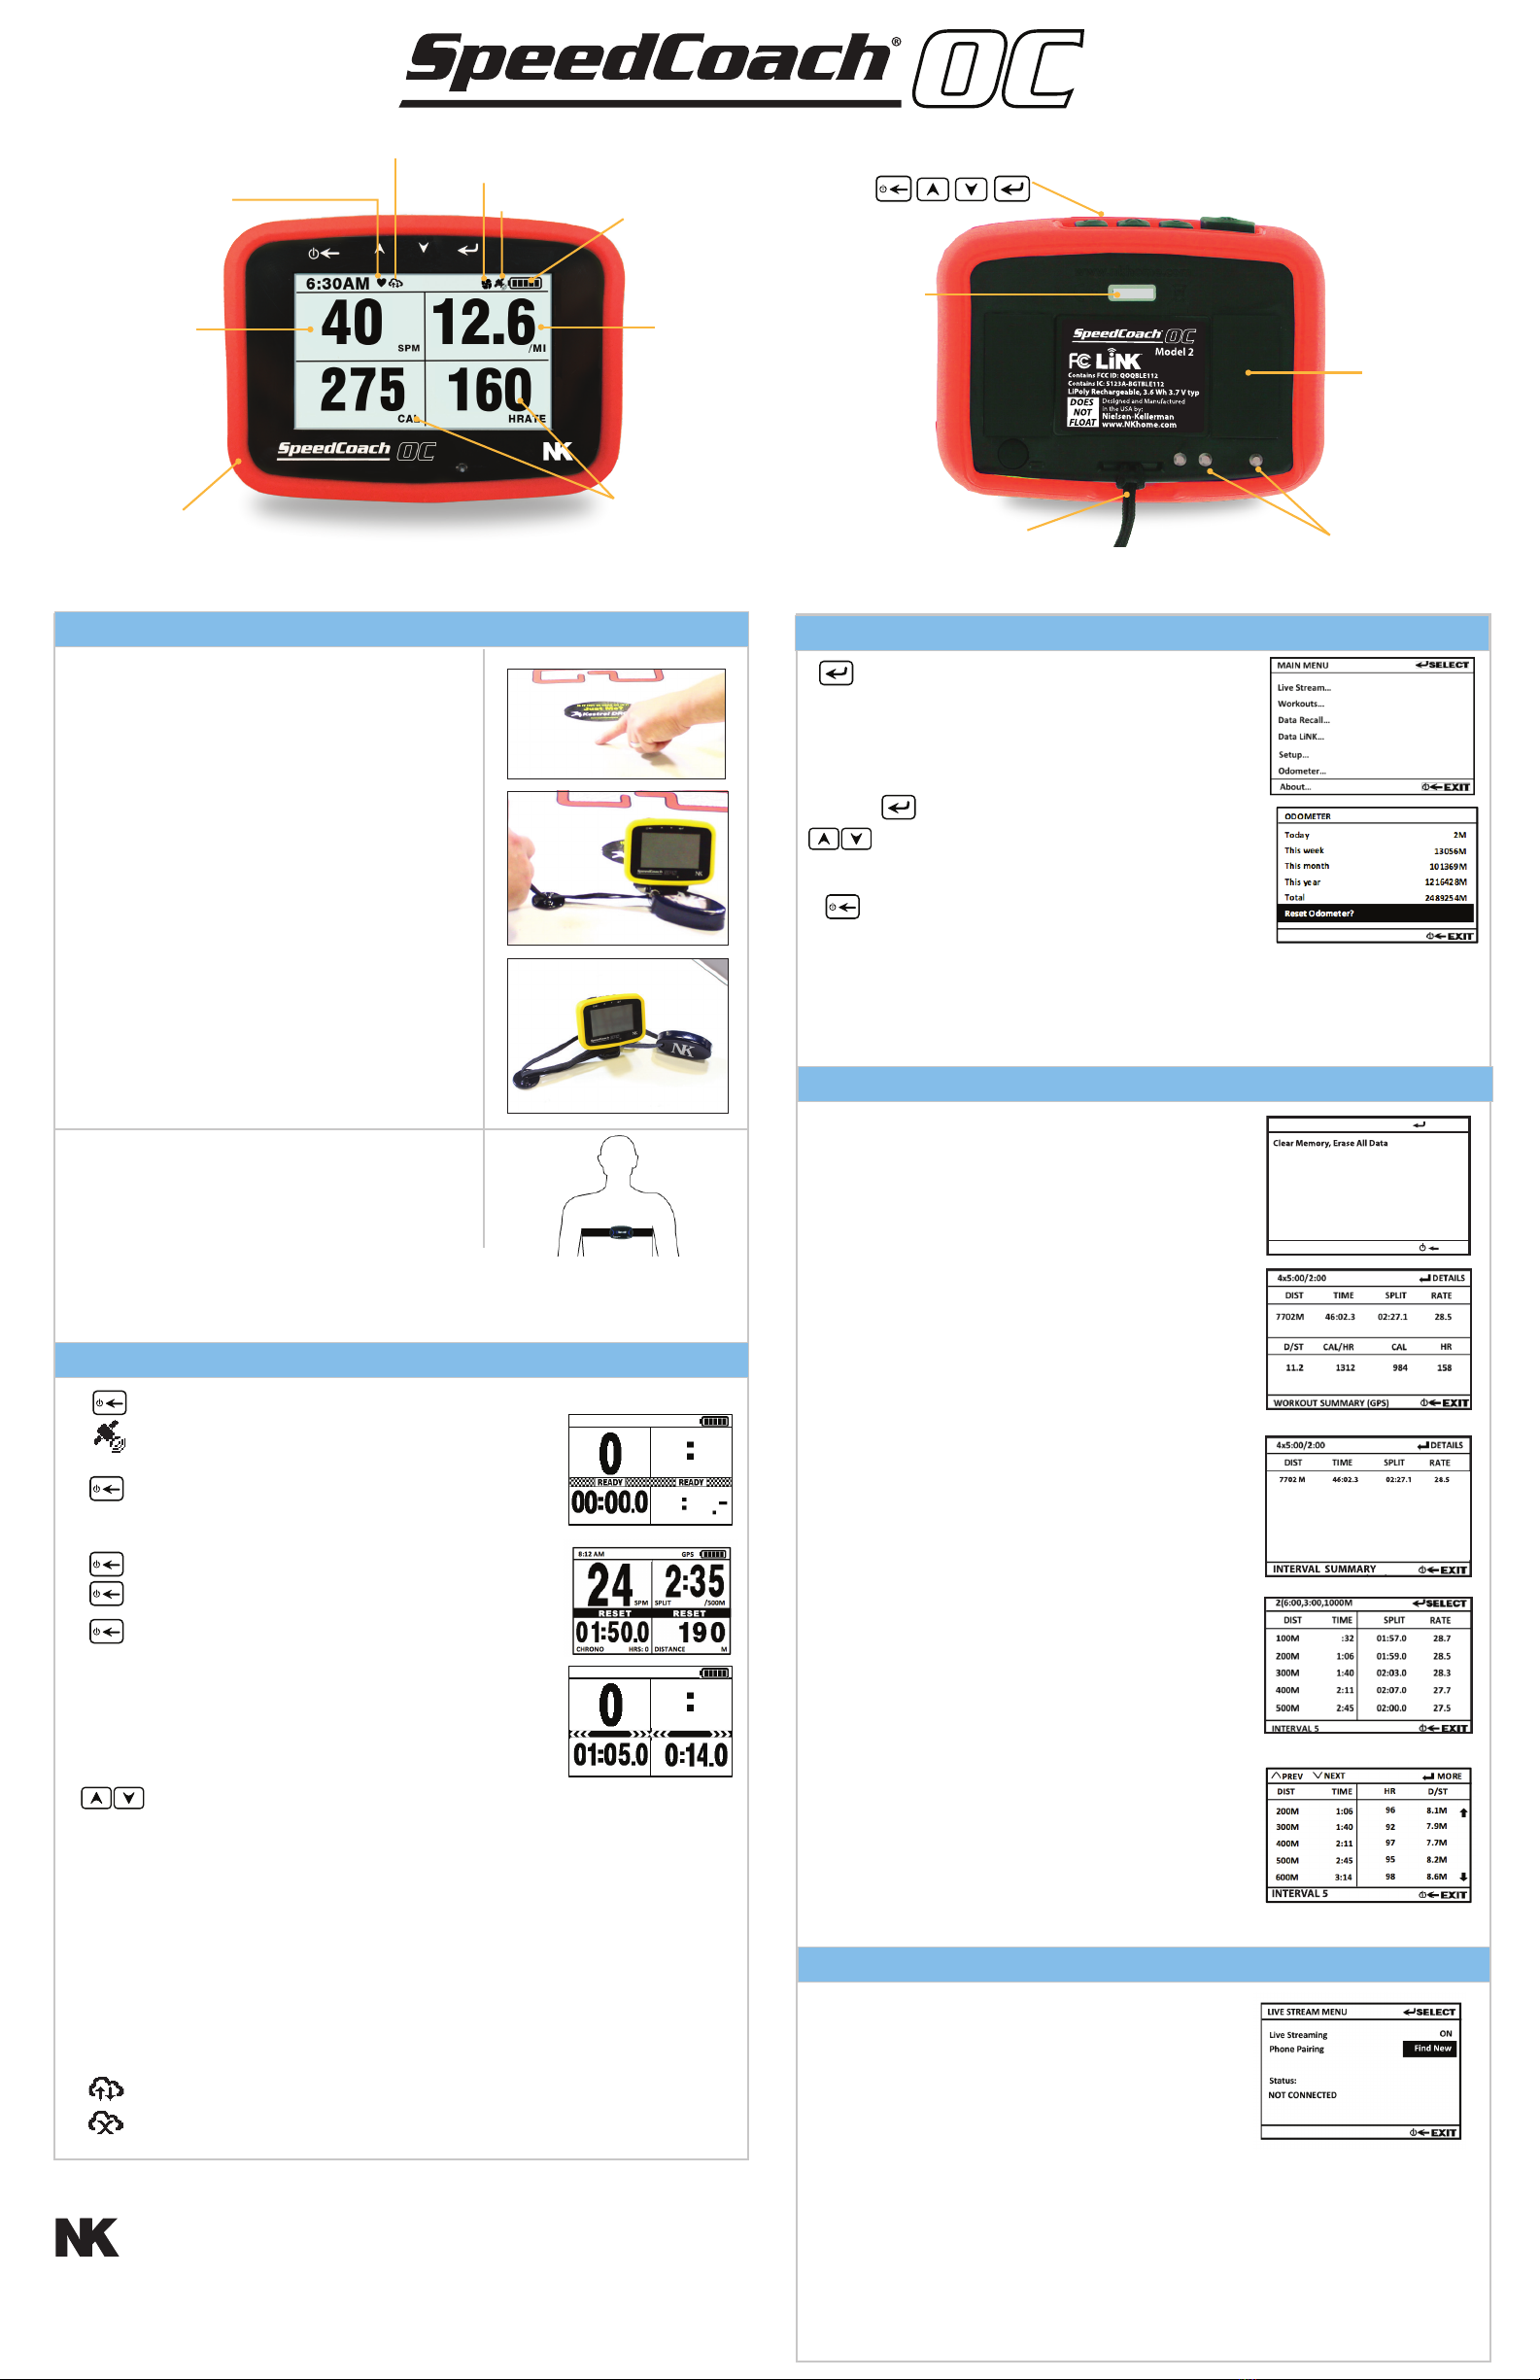
MENU NAVIGATION AND SETTING BUTTON USE
Access Menus/Select
Press once to access the Main Menu.
From there, you can Setup or Run Workouts, View Data
Recall, use the Data LiNK, enter the Setup Menu or
view the About screen for rmware version number and
other information. On any menu, select the highlighted
option to enter the submenu or enter adjustment mode.
also moves to the next menu item adjustment.
Move/Adjust
Use the up and down buttons to navigate within a menu
OR to adjust a selected value.
Go Back/Exit
Press to exit from any screen or menu to the previous
screen.
Odometer
A running total of the distance paddled since last reset. These distances can
be reset at any time by the user. Please note: a“Unit Odometer” is found in
the About menu option. The Unit Odometer shows the lifetime distance of
the unit and cannot be reset by the user.
SPEED/PACE
MOUNTING
DOCK FEET
BATTERY CONTACTS
STROKE RATE
FLEX WINDOW
BATTERY LIFE
INDICATOR
PROTECTIVE
RUBBER BUMPER LANYARD ATTACHMENT
SERIAL NUMBER
BUTTONS:
ON/OFF/BACK UP DOWN SELECT
as seen from front
SpeedCoach OC Mounting Plate
For the best mounting results, you will want to choose a spot
where the mounting plate is ush to the deck. You will also
want to ensure that the SpeedCoach will be clear of your
paddle blade when switching hands and does not force you
to look DOWN and alter your paddling form.
After choosing a mounting location, clean this location with
the provided alcohol swabs to remove all dirt and debris from
the board. Allow a minimum of 5 minutes for the alcohol to
evaporate from the board. Unclip the mounting plate from
the SpeedCoach bracket. Remove the paper liner from the
mounting plate tape. Press down and hold the mounting
plate in the chosen mounting location for at least 30 seconds.
IMPORTANT! Wait at least 12 hours before clipping the
SpeedCoach bracket into the mounting plate or attaching
the SpeedCoach unit.
Wrap the excess lanyard around the base of the mount,
making sure you leave enough slack on the lanyard to attach
it to the leash mount. Mark on one side a point where the
leash mount can be installed. Use alcohol as above to clean
this spot on the board. Press down and hold the leash mount
to install. Pull lanyard through the leash mount opening and
wrap the lanyard loop around the SpeedCoach unit to hold in
place (Fig3).
Memory Storage
When the memory is full, the unit will stop recording data. When
nearing or at full data, delete all session data to continue recording
(see below). The amount of memory used can be found on the
bottom of the Recall Menu. An alert message will appear when
memory log is nearly full.
Data Recall
Select Data Recall from the Main Menu to review stored data.
Recall memory will be formatted in sessions according to date and
time. Just Row sessions will have the JustGo prex whereas a
Workout session will just show the pieces run.
Please note: a session is not complete until: a) In Just Row, you reset
the counter b) In Workout, the workout is completed or cancelled.
Clear Memory, Erase All Data
This selection will delete ALL memory if chosen. Sessions cannot be
deleted individually.
Viewing Sessions
Selecting a session/workout will bring up the Workout Summary
(Figure 1). This overview will provide the overall stats for all
measurements during the entire session. Pressing the Details button
brings up the Interval Summary page (Figure 2). An overview of
the various intervals that were performed during the entire session
will be shown. If you select a specic interval, the Detailed Interval
Review screen (Figure 3) will be shown. This screen shows the
interval breakdown by a specied period (time or distance). Select
MORE to view additional measurement values not currently shown
on the screen.
Data LiNK™
Select this to connect your unit to your PC or MAC for Firmware
updates or uploading data to your computer. Please go to
www.nkhome.com/support/rowing-and-sports-support/manuals-
and-downloads/ to download the LiNK application and follow
instructions.
Please note: Bluegiga Bluetooth Low Energy dongle required
Fig2: Interval Summary
MEMORY
The total memory that the unit can store is approximately 25 hours.
Every stroke is stored in memory and the memory can be reviewed
by 100 meter increments. Stroke by stroke details can be exported*
with the LiNK application.
Fig1: Workout Summary
Fig3: Detailed Interval Review
RECALL MENU SELECT
EXIT
Mar 10 06:15a
Mar 10 06:00a
Mar 09 06:27a
JustGo-3050M
4x5:00/2:00
5x5:00/10:00
Mar 06 03:24a
Mar 01 06:17p
2(6:00,3:00,1000M
8x1000M/3:00
?
NOTE! Your SpeedCoach OC DOES NOT FLOAT! To prevent a loss, keep the NK
“life preserver” foam oat attached to your SpeedCoach at all times. When
paddling, loop the lanyard around the mounting dock. NK is not responsible in
the event your SpeedCoach sinks and is lost.
Fig1
Fig2
Fig3
BASIC OPERATION
Turn On - Hold for 2 seconds.
Satellite Lock Indicator- It is recommended to turn the unit
on when outside and wait for this icon to go from a hollow
satellite icon to a solid satellite icon. A solid (i.e., lled in)
satellite icon indicates that you have adequate GPS satellite
coverage and can begin your row (approx. 1-3 mins).
Start -Press once. A checkered READY bar will appear on the
screen. The READY bar will disappear and the
stroke rate, speed/split, timer and ex windows will all start
to run when the unit detects a stroke.
Stop - Press once.
Reset Timers - Hold for 2 seconds until the RESET bar ap-
pears, then release. Press again to Start.
Turn O - Hold for 3 seconds until TURN OFF bar appears
(after STOP and RESET), then release. Your SpeedCoach OC
will turn o automatically after 8 minutes of not sensing
accelerometer movement.
To preserve your battery, be sure to turn your unit o
before carrying it in your workout bag or car.
Change Flex Field Measurement - Press up to change
the bottom left ex window and press down to change
the lower right ex window.
Note: You can also change the top windows through our Setup->Display Setup option
(rmware 2.12 or higher). Please see the Setup section on how to change these elds.
DISTANCE - Accrued distance since reset in your selected units of measure.
AVERAGE - Average Split or Speed since reset calculated as a function of the distance
traveled over the elapsed time.
COUNT - Count of strokes detected since reset.
DIST/STROKE - Distance per stroke calculated on a stroke-by-stroke basis.
HEART RATE* – Current heart rate in beats per minute (bpm) .
ELAPSED TIME – Amount of time since start of paddle.
CAL/HOUR – Average calorie burn per hour paddled.
CALORIES - Total number of calories burned.
Live LiNK indicator- Indicates mobile device is connected and streaming.
Live LiNK indicator- Indicates mobile device is connected but not streaming.
SPM
CHRONO HRS:0 AVERAGE
GPS
-
/500M
- --
-- --
-
8:12AM
SPM
AVERAGE
GPS
-
/500M
- --
CHRONO HRS:0
OFF
OFF
TURN OFFTURN OFF
8:12AM
IMPELLER INDICATOR
HEART RATE INDICATOR*
(Training pack only)
GPS INDICATOR
LIVE LINK INDICATOR*
LIVE STREAM
Select Live Stream to broadcast your SpeedCoach measurements
to the cloud for public viewing. You will need to pair the Speed-
Coach to a mobile phone and have the phone in range of the
SpeedCoach to broadcast your data live. We recommend keeping
the phone in a waterproof bag.
1. Download NK Live LiNK application to your mobile device.
2. Make sure Bluetooth is turned ON on your mobile device.
3. Open the NK Live LiNK App.
4. Enter a Boat ID in the Live LiNK application.
5. Turn Live Streaming to ON on the SpeedCoach.
6. On SpeedCoach select Phone Pairing->Find New. In the LiNK app, select Pair.
7. Your data will now be broadcast live. Go to the app or link.nksports.com to view live results.
Nielsen-Kellerman
www.NKsports.com

WARNING! LITHIUM-ION POLY BATTERY HAZARDS
Your SpeedCoach OC contains a lithium-ion poly battery pack. Lithium-ion batteries
contain ammable liquid electrolyte that may vent, ignite and produce sparks when
subjected to high temperatures or when damaged or overcharged. If ignited, batteries
may burn rapidly with a are eect and may produce irritating, corrosive and/or toxic
gases, including toxic hydrogen uoride gas, which may cause dizziness or suocation.
Contact with battery electrolyte may be irritating to skin, eyes and mucous membranes.
• Do not ever subject to re or temperatures above 140°F | 60°C. NOTE: A car in hot
sunlight may exceed these temperatures!
• Do not charge, use, transport or store above 115°F | 45°C.
• Do not charge below 32°F| 0°C.
• Do not charge in direct contact with ammable items.
• Do not puncture or open the unit.
• If the unit’s internal battery pack is damaged, avoid contact with battery
electrolyte, which may be irritating to skin, eyes and mucous membranes.
• In case of battery re, evacuate the area to avoid inhalation of fumes. If possible,
cover the battery with sand to extinguish the re or use a dry ABC- type
extinguisher.
• Allow good air circulation around top and sides of unit while charging.
SETUP MENU
From the Main Menu select Setup. From there, use the menu navigation steps described above to
navigate, select, adjust and exit setup options:
BATTERY USE AND CHARGING
A fully charged battery will provide approximately 6-8 hours of operation, depending on backlight
use. Each bar on the battery indicator represents 20% of battery life, or approximately 1.2 to 1.6
hours.
To charge your unit, press it rmly into the charging dock of your SpeedCoach OC charger until
it clicks and you see“Charging ...” on the screen. The battery indicator will ash and the bars will
indicate the charge status achieved. The battery indicator will show full and stop ashing after 90%
charge is achieved, and the display will turn o when the unit is fully charged.
The SpeedCoach OC can only be charged with the supplied charging dock. The SpeedCoach OC is
compatible with any USB charging source, including your computer an automotive USB or a cell-
phone standby power source. A SpeedCoach® XL charger will not charge a SpeedCoach OC.
Your SpeedCoach is equipped with a safety feature that will shut down charging if the
battery is too hot or too cold. Do not charge below 32°F | 0°C or above 115°F | 45°C. If
you receive a battery warning on the screen while the unit is within these temperature
limits, immediately remove the unit from the charging dock and contact NK for
service. Further attempts to charge may result in re or permanent damage.
WORKOUTS (Training Pack Feature)
Run Last Workout: Runs the last workout. This is a quick way to repeat single distance or single time
workouts without setting up intervals.
NOTE : Press to ready the workout. Workout will start when rst stroke is detected. Press
to pause a workout. Hold to cancel a workout.
Single Distance: Select this option to run a single distance-based workout at the distance shown.
Press , followed by and to adjust the distance. Then press 2x to run the workout.
Single Time:Select this option to run a single time-based workout for the time shown. Press ,
followed by and to adjust the time. Then press 2x to run the workout.
Intervals…
Select this option to create a multi-interval based workout (e.g. time,
distance, and/or rest periods). You can select from the pre-loaded
workouts or customize to create your own. Up to 6 custom workouts
can be programmed. The SPC is loaded with 6 default workouts,
which are editable. Please note: Interval workout names are
automatically generated based on the type of intervals performed.
Creating an Interval Workout
First select a pre-existing workout to edit. Use and to
select a eld. Press the , followed by the and to
modify the middle column. Press again, followed by
and to adjust the right column value. Press return to eld
selection. Please note: pressing the will automatically SAVE
and exit the workout when nished.
Countdown: When toggled ON, a countdown timer will start
when the rst stroke is detected. When the countdown reaches
zero, the workout will begin. Tip: The countdown allows the user
to build to“race pace”before starting their workout. If countdown
is toggled OFF, the workout will start immediately when the rst
stroke is detected.
Intervals: Determines the number of intervals in the workout.
If you select Equal, all work intervals will be equal in type and
value and all rest intervals will be equal in type and value.
If you select Variable, you can create a multi-faceted workout
of work and rest intervals that can each vary by type and
duration.
Work: Denes the rst work interval of the workout. Work can
be time based or distance based. If more than one interval is
being performed, a number will be added to this entry (i.e., Work1,
Work2, Work3, etc).
Rest: Denes the amount of rest in between work intervals.
Rest can be time based or distance based. The number shown
to the right is the rest value per the unit shown. Similarly if more
than one rest period is entered in a variable workout, it will be
followed by a number.
Number of Sets: Select the number of sets of the proceeding interval workout to run. For
example if you have a workout with a work and rest interval, setting this to 2 will run this work
and rest interval workout twice.
Rest Between Sets: Only appears if Number of Sets is greater than 1. Denes the rest period
between a repeated group of intervals.
WORKOUTS SELECT
EXIT
Single Distance
Run Last Workout
Single Time
Intervals...
2000M
00:30:00
NEW INTERVAL WORKOUT SELECT
EXIT
Countdown OFF
Run Workout?
Intervals Equal
Work Dist
10S
1
100M
Rest Time
Repeat?
00:02:00
1
Prole
Adjust the units (lbs/in or kg/cm) then set your height, weight and age for accurate calorie burn
information.
Display Setup
Allows you to set the top two windows to display any of the measurements available.
Accessory Setup
Select this option to pair your Heart Rate belt (TP Version only).
HRM Setup*
Selecting this option will automatically attempt to pair the Heart Rate Monitor (HRM) Belt with the
unit. If more than one belt is found, you may need to change locations to isolate belt. The HRM
will automatically turn on when attached to your body. The belt works best with moisture, so if you
are not getting a reading, place some moisture on the rubber contacts of the belt before attaching
to your body. Once the belt has been paired with the unit, you will not need to pair in the future
(unless you select Forget HRM or change belts).
Speed/Distance Setup
Options are Speed mode or Split mode. Speed mode will display your speed in the top left window.
Split mode will display your pace expressed as a time to cover a distance. Units allows you to change
the units shown for speed and distance (options are: M, M/S, /500M, /1000M; KM, KMH, /500M,
/1000M; or MI, MPH, /MI).
Input
The Speed (and distance) Input setting can be set to GPS or Impeller. Please note that you will need a
wiring harness and impeller to use the Impeller mode.
Auto Pause
If toggled ON, the unit will stop the timer if it does not detect a stroke within the last 6 seconds. If
toggled OFF, the unit will not stop the timer even if no strokes are being detected. If you would like to
stop the timer manually, please select the button to start and stop the timer manually. Please
note: the unit will not Auto Pause during the Rest sessions of a Workout.
Auto Shutdown
When Auto Shutdown is set to 10min, the unit will automatically shut o after 10 minutes of not
detecting a stroke rate. If the Auto Shutdown is set to OFF, the unit will only turn o when the user
manually shuts the unit down.
NOTE: Average Speed is always calculated as a function of the distance covered in the elapsed time shown.
Because the timer will continue to run while you are not rowing, turning Auto Pause “OFF” will impact the
calculation of your cumulative average speed.
ADVANCED SETUP MENU
Impeller Calibration
To change your Calibration Value or run the calibration routine (see below).
GPS Spd Smoothing, Strokes
The Speed Smoothing feature will average the last number of strokes selected. If“2”is selected, for
example, the Speed/Split displayed will be an average of the last two strokes, updated every stroke.
Stroke Rate Setup
Options are Timer Start Acceleration, Noise Filtering and Axis.
Timer Start Acceleration
Governs the degree of acceleration that must be detected to start the stroke meter. The default value
is 4. If you increase this value, a more forceful stroke is needed to start the timer. If you decrease this
value, a less forceful stroke is needed to start the timer.
Noise Filtering
Governs the degree to which the accelerometer will register changes in acceleration as a stroke. The
default value is 3. If you increase this value, more acceleration is needed to register a stroke. If you
decrease this value, less acceleration is needed to register a stroke.
Axis
Allows you to select Front-Back (2) or Any (3). Front-Back (2) is generally recommended for rowing
assuming that the unit will be mounted perpendicular to the long axis of the boat. If mounting at a
non-perpendicular axis, the recommendation is to toggle to Any (3).
Time and Date
Used to change the format of the date and time displayed. Please note: only time shows on the display,
date will be shown on data recall screen. Please note in most U.S. locations daylight savings time is ON in
the summer and OFF in the winter.
Diagnostics
The Diagnostics screen provides information about the performance of your unit’s GPS receiver, acceler-
ometer, HRM*, clock, and charging system. This information assists NK tech support in case your unit is
not functioning correctly.
IMPELLER CALIBRATION
Calibration is only relevant if you are using your SpeedCoach OC with a wiring harness and speed
impeller. The Calibration Value is an adjustment factor that compensates for any dierence between your
impeller’s distance measurement and the “standard boat”upon which the SpeedCoach’s calculations
are based. Calibration applies only when in Impeller mode for speed and distance can average out any
impact of current or tide to improve the accuracy of the calibration results.
Entering Impeller Calibration
Select “Impeller Calibration”from the Advanced Setup Menu.
Entering a Calibration Value Manually
If you know your boat’s SpeedCoach Calibration Value from previous calibration (it is the same for any
SpeedCoach), you may enter it manually. From the Calibration Menu, press to select the Calibration
Value, then press to adjust the value, and to accept the value.
Running the Calibration Routine
The SpeedCoach OC does not need a measured course to be calibrated. Because the SpeedCoach
OC knows both the GPS and Impeller distance measured, it can self-calibrate. Calibration simply
involves rowing the selected distance in two directions. Your distance options are 500 to 1000M.
Although a longer distance will somewhat improve the accuracy of your calibration, is important to
choose a calibration distance that you can row in a relatively straight line in both directions. Ideally, it
will also have relatively consistent current throughout. The Calibration Routine requires that you row
your course in both directions so the unit can average out any impact of current and tide to improve
the accuracy of the calibration result through more comparison data.
If you wish to change your calibration distance from 500M, press to move to the distance line,
to select, then to adjust and to accept.
To run the calibration routine, press to highlight Run on the Calibration Menu, then
to select. From the calibration screen, press to start each calibration leg and follow the screen
prompts. On each leg, the land distance and water distance will count up until the selected distance
is reached in the land distance window (bottom left). Note that there will be a three- or four-stroke
delay at the start of each leg while the GPS and impeller readings are synchronized. At the end of the
routine, the newly calculated Calibration Value will be displayed. Press to accept the new value
and exit the routine, or press to exit the routine without changing your Calibration Value.
At any time while running the calibration routine, you can press to exit the routine without
changing your calibration value.
SPECIFICATIONS
WEIGHT Control unit and bumper: 5.2oz.(150 gm)
SIZE Measures 3.6X2.6X1.2 in (92x67x31mm) with bumper.
BUOYANCY Does not oat. Use NK foam oat.
WATER RESISTANT Waterproof (IP-67)
MEMORY 25 hours of memory. Stores every stroke.
BATTERY CAPACITY One rechargeable lithium-poly battery provides up to 8 hours of battery life.
BATTERY LIFE EXPECTANCY After 300 full charge and discharge cycles, expected capacity is 80% of original.
COMPLIANCE The SpeedCoach OC conforms with Council Directive 2004/108/EC (december 15,
2004) on electromagnetic compatibility and is CE-marked accordingly.
ENVIRONMENTAL The SpeedCoach OC is RoHS (reduction of hazardous substances) compliant and
marked in accordance with the WEEE (Waste Electrical And Electronic Equipment)
directive. Please do not dispose of the unit or battery in your household trash.
Return to NK, an NK dealer or a designated recycling center for proper recycling and
disposal.
ACCURACY Speed: +/- 0.1 m/s; Distance: +/- 2.5 m over any distance.
319045_2_180612
© 2018 Nielsen-Kellerman. NK, Nielsen-Kellerman, SpeedCoach and the NK and LiNK logos are trademarks of Nielsen-Kellerman Co.
Table of contents
Other NK Measuring Instrument manuals


Popular Measuring Instrument manuals by other brands

OHAUS
OHAUS CKW Series Installation and operation instructions

Simex
Simex STI-638 user manual

Electro-Metrics
Electro-Metrics PCL-30 instruction manual

greenTEG
greenTEG gO Measurement-System user manual

DAKOTA ULTRASONICS
DAKOTA ULTRASONICS PZX-7 Operation manual

Extech Instruments
Extech Instruments 461920 user guide


