Nobacco APYRON User manual

Οδηγός χρήσης
Product manual
Manual de utilizare
Ръководство за употреба

24
Thank you for selecng NOBACCO ΑΡΥΡΌΝ. Please
read the manual supplied and make sure that you
have fully understood it before using the prod-
uct. If you require any addional informaon about the
product or its use, please consult your local reseller or
visit the NOBACCO’s ocial website at www.nobacco.gr.
NOBACCO DESIGN CENTER, using one of the most ad-
vanced PCB boards created NOBACCO APYRON device.
This sophiscated device uses a high capacity built in
baery and an exquisite Oled screen with plethora of
informaon, augmented contrast and improved visibil-
ity under all lighng condions. Constructed by robust
metal materials, it incorporates a solid steel 510 self ad-
jusng connector that guaranes seamless connecvity
with any atomizer.
With Temperature Control Technology, the most ad-
vanced safety features, 75 was or power and numer-
ous funcons, NOBACCO APYRON will oer you an un-
parallel vaping experience.
PACKAGE CONTENTS*:
1 x NOBACCO APYRON
1 x USB cable
1 x User manual
1 x Authencity card with Scratch&Check security code
Product manual

25
*The company reserves the right to change the contents and
characteriscs of the package or/and the product without any
prior noce.
ΕΝ
Dimensions: 82x42x22 mm
26
DEVICE CHARACTERISTICS:
• Metal Body
• Solid Steel buons
• 510 solid steel connector with spring loaded pin
• Micro USB pass-through charging port
• 2000mAh built in baery
• 0.96’’ OLED screen
• Main Funcon (Fire) Buon
• Up Regulatory buon (+)
• Down Regulatory buon (-)
• Colors: Silver, Black, White
Product manual
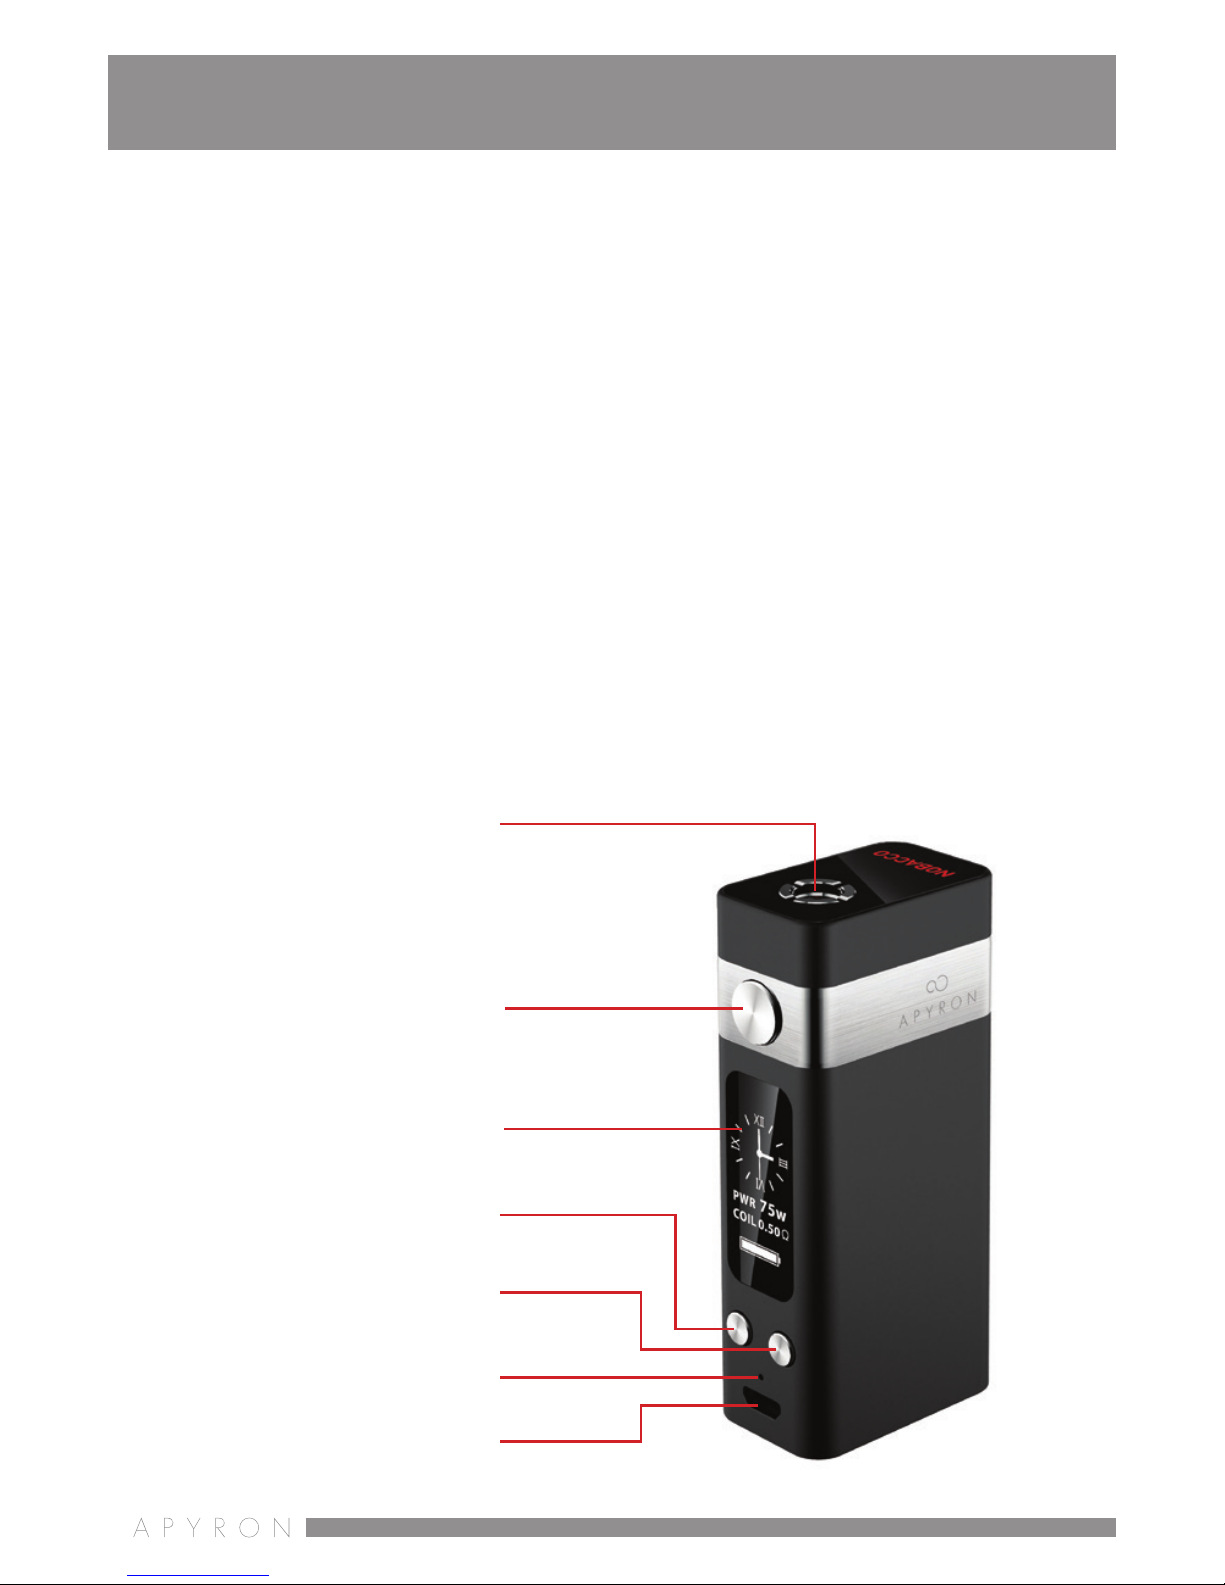
Main function
button
OLED screen
510 connector
Down regulatory
button (-)
Up regulatory button (+)
reset
Micro USB port

27
NOBACCO APYRON FUNCTIONS:
Α) Power Mode: The device can adjust the power out-
put from 1-75 was
B) Bypass Mode: Bypass Mode : In this mode the de-
vice’s electronic board is bypassed and all the available
baery’s voltage and current is provided to the atomizer.
It is recommended that the parcular funcon is only
used by experienced users who are already accustomed
with the use of Mechanical MODS. Addionally, the at-
omizers must be checked and ascertained that they are
not short circuited and are in the range of the recom-
mended resistance values.
Misuse may damage the device and the atomizer. Inap-
propriate use will void the warranty.
C) Clock Mode: The screen shows the selected me and
the power
D) Temp Mode (Ni, Ti, SS316): Temperature Control
Mode
E) TCR Mode (M1, M2, M3): Temperature Control
Mode with T.C.R. (Temperature Coecient of Resis-
tance) adjustment
POWER, TEMPERATURE
AND RESISTANCE RANGE:
Power range:
Power Mode/ Clock Mode/Temp mode/TCR mode
1-75 with 0.1 wa increment.
ΕΝ

28
Temperature Control range:
Temp mode/TCR mode
100°C-315°C with 5°C increment
200°F-600°F with 10°F increment
Resistance Range:
Power Mode/ Clock Mode/ Bypass Mode
0.1-3.5ohm
Temp mode/TCR mode
0.05-1.5ohm
Bypass Mode:
Maximum output voltage is 4.2Volts with a freshly
charged baery. Power (wa) indicaon is relevant to
the atomizer resistance.
Note: 4.2Volts is the theorecal upper limit of the built
in baery. Actual upper limit may be dierent due to
power loss of PCB and wiring
DEVICE USE AND PREPARATION:
In order to acvate the device, press ve (5) consecuve
mes the re buon. The Screen will illuminate and the
NOBACCO APYRON logo will appear. Your device is now
turned on.
Product manual

29
CAUTION:
During the inial acvaon, the device is by default set
to Clock Mode. Please choose the appropriate opera-
on mode according to your atomizer before using the
device.
To deacvate the device press ve (5) consecuve mes
the re buon. On the Screen the message “NOBACCO
APYRON” will appear and the device will turn o.
DEPENDING ON THE TYPE OF THE ATOMIZER’S COIL
HEAD CHOOSE ONE OF THE FOLLOWING MODES (A/B/
C/D/E)
Press the re buon three (3) consecuve mes in or-
der to cycle through the modes. The top indicator of the
screen will blink, indicang you have entered the sys-
tem’s menu. By pressing the (+) buon, you can cycle
through the modes.
Α) Power Mode
This mode allows you to adjust the device’s power out-
put from 1-75 was
Use only atomizers with coil heads that are not compat-
ible with Temp Modes (read the atomizer’s user manual
for more informaon on the type of coil head).
You can adjust the power output by using the +,- buons.
Always start from the lowest power seng, according to
your atomizer specicaons, gradually increasing unl
you nd your preferred seng.
ΕΝ

30
Β) Bypass mode
In this mode the device’s electronic board is bypassed
and all the available baery’s voltage and current is pro-
vided to the atomizer.
It is recommended that the parcular funcon is only
used by experienced users who are already accustomed
with the use of Mechanical MODS. Addionally, the at-
omizers must be checked and ascertained that they are
not short circuited and are in the range of the recom-
mended resistance values.
Use only atomizers with coil heads that are not compat-
ible with Temp Modes (read the atomizer’s user manual
for more informaon on the type of coil head).
CAUTION:
Misuse may damage the device and the atomizer. Inap-
propriate use will void the warranty.
C) Clock Mode:
In This mode, the me and the remaining power of the
device are displayed.
Use only atomizers that the coil heads are not compa-
ble with Temp Modes (Read the atomizer’s user manual
for more informaon on the type of coil head).
You can adjust the power output by using the +,- buons.
Always start from the lowest power seng, according to
your atomizer specicaons, gradually increasing unl
Product manual

31
you nd your preferred seng.
Changing between dial and numerical display:
While in Clock Mode, press the re buon three (3)
consecuve mes. The word “Time” will start blinking.
Press the (-) buon and the date (numerical display) or
the hand set (dial display) will blink. Next press (+) but-
ton to switch between dial/numerical display.
D) Temp mode(Ni, Ti, SS316):
In this mode, you are allowed to adjust the limit of the
coil head temperature in conjuncon with the power
seng of the device.
Three (3) dierent coil head wire types are supported,
each with its own preset mode.
Ni: Coil heads with Νi200 wire
Ti: Coil heads with tanium wire
SS316: Coil heads with solid steel type SS316 wire
ΕΝ

32
If you are unfamiliar with the type of the coil head you
intend to use, please read the manual of the atomizer.
CAUTION:
Using dierent type of coil head from the one supported
on each Temp mode (Ni, Ti, SS316) may cause damage to
the device and atomizer. Warranty is void due to misuse.
The temperature ranges from 100°C-315°C in 5°C incre-
ments or 200°F-600°F in 10°F increments, with scales
changing cyclic.
Temperature value adjustment is made via the +, - buons.
Seng the power while in TEMP modes:
Press the re buon three (3) consequve mes and
the upper indicator will start blinking. Press the (-) but-
ton unl the PWR indicaon blinks. Press the (+) buon
once to enter into the adjustment and then set the de-
sired power by pressing the +, - buons.
Product manual
33
Ε) TCR mode (M1, M2, M3)
This mode allows you to manually change the Tempera-
ture Coecient of Resistance (=T.C.R.) of the coil head
of your atomizer, depending on the type of wire it uses.
If you are not aware of the T.C.R. of the wire you intend
to use, please nd out more informaon about the T.C.R
rst and then proceed to any further acon.
Three (3) dierent memories (M1, M2, M3) are support-
ed, each working independently for T.C.R. adjustment.
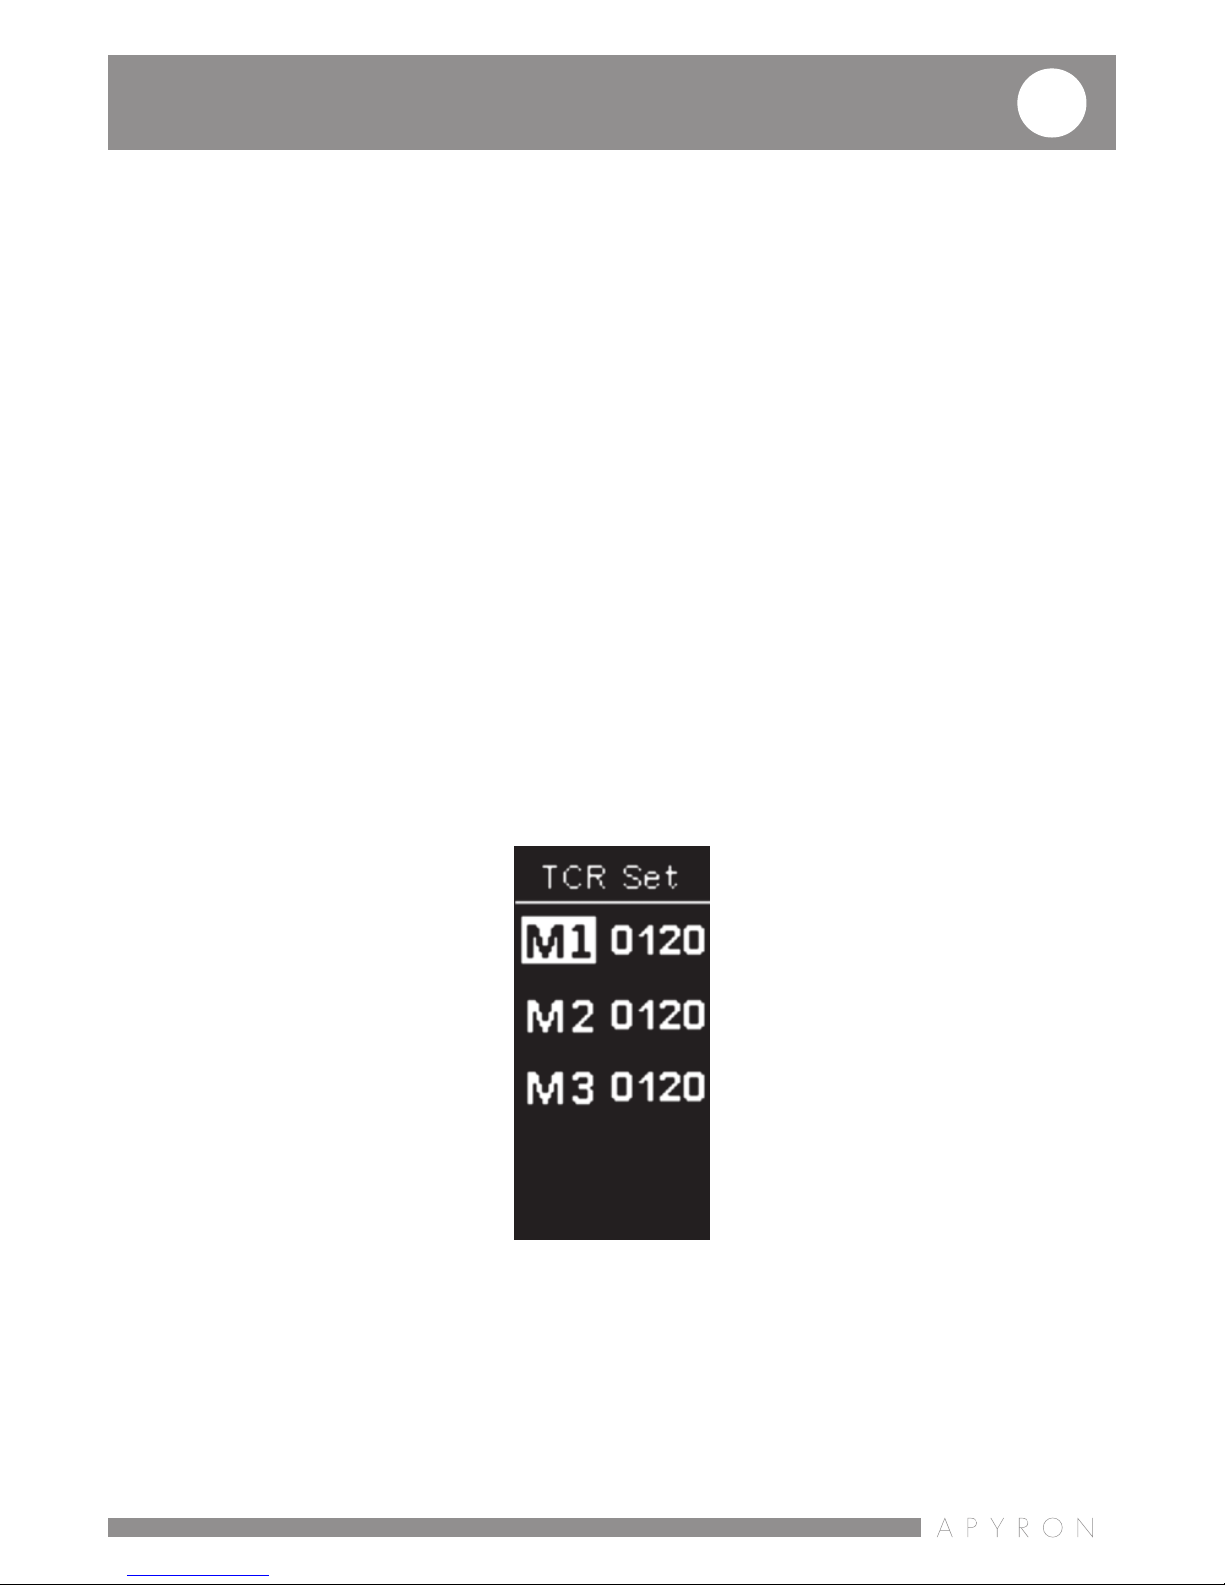
To adjust the T.C.R.:
While the device is powered o, press together the re
and (+) buons for about ve (5) seconds.
The device enters the menu showing the following print
screen:
ΕΝ
By pressing the +,- buons you cycle through M1, M2,
M3 memories and by pressing the re buon you can
enter the value of each memory.

34
Input the correct T.C.R. value using the +,- buons.
The range in each memory is 1-1000.
CAUTION:
Using dierent T.C.R. value than the one of the wire may
result in malfuncon of the device and the atomizer.
Warranty is void due to misuse.
Note: If the device detects atomizer with a resistance
bigger than 1.5 ohms, it automacally turns to POWER
mode for safety reasons.
Atomizer Lock:
While the device is powered on, aach the atomizer. Press
the re buon (3) consecuve mes and then the (-) but-
ton unl the resistance indicaon starts to blink. Press the
(+) buon one me to lock/unlock the resistance value.
Atomizer lock is advised for the correct funcon of the de-
vice in Temp Modes (TEMP Ni-Ti-SS316/TCR Mode).Each
me you use a new atomizer or a new coil head atomizer
lock procedure should be followed for top performance.
Note: Device and atomizer must be in room tempera-
ture in order for the atomizer lock procedure to be done
correctly. In any other case indicaons of temperature
and resistance may dier from the actual resulng in
poor performance.
Product manual

35
Your device can auto detect the value of the atomizer’s re-
sistance. If it detects a dierence greater than 0.05 ohms,
while in Temp Modes, the device prompts you to choose if
there is a new coil aached with following message:
Choose new coil by pressing the (+) buon, if you are
using a dierent coil/atomizer than the one before the
message appeared or same coil by pressing (-) if it is the
same coil/atomizer.
AMP/PUFF/TIME
Your device allows you to have three (3) dierent indica-
ons at the boom line of the screen.
ΑMP: Amperes used while vaping
PUFF*: Pu counter
ΤΙΜΕ*: Device usage in seconds
To choose your preferred reading: Press three (3) con-
secuve mes the re buon and then the (-) buon
ΕΝ
36
unl the last indicator starts to ash. By pressing the (+)
buon you change through the indicaons.
*Note: The manufacturer makes extra quality control tesng
on the device before packing. Potenally other indicaons
than zero, in PUFF/TIME counters, while the inial acvaon
of the device, are a result of the quality control tesng.
USE
Screw the atomizer on the device without using exceed-
ing force and then inhale gently by pressing the re but-
ton of the device.
For peak performance you are advised to start your
draw one (1) second aer you press the re buon and
leave it one (1) second prior to the end of your inhale.
SUPPLEMENTARY FUNCTIONS
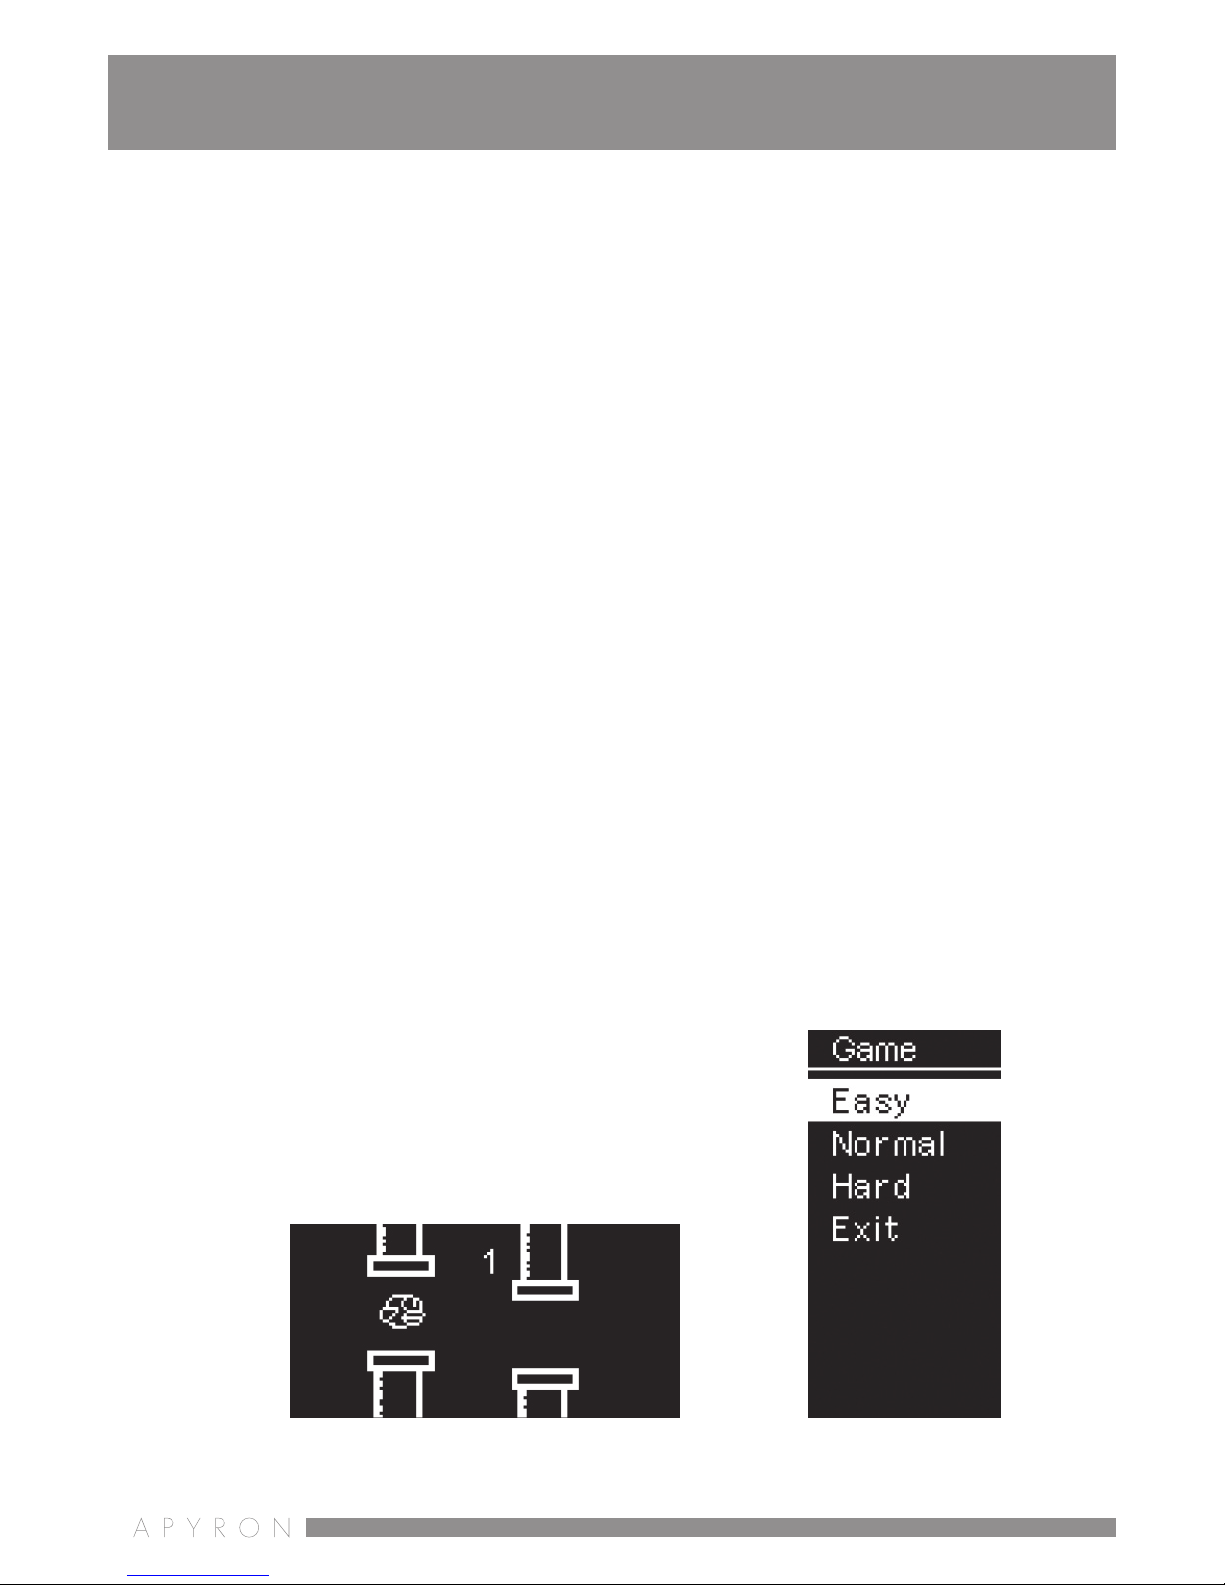
Game mode:
With the device powered on simulta-
neously press the re and (+) buon to
enter SCREEN mode. Press the (+) buon
unl you enter GAME mode. Three (3)
Product manual

37
levels of diculty are available (EASY-NORMAL-HARD) or
you can exit by pressing the EXIT sign.
Note: You cannot vape while in Game Mode.
Logo:
With the device powered on simulta-
neously press the re and (+) buon
to enter SCREEN mode. Press the (+)
buon unl you enter LOGO mode.
Key Lock/Unlock:
With the device powered on press simultaneously the
+,- buons to lock/unlock the adjustmens of power/
temperature.
ΕΝ

38
Note: If you wish to carry the device in a bag/suitcase,
please turn it o for safety reasons. Your device has a
ten (10) seconds cut o system for protecon of the at-
omizer and the baery from prolonged use.
Screen Protecon
With the device powered on, simultaneously press the
re and (+) buon to enter SCREEN mode. With +,- but-
tons you can choose the me of the screen protecon.
Screen orientaon:
With the device powered o, simultaneously press the
+,- buons to change the screen orientaon by 180°.
MALFUNCTION AND PROTECTION
INDICATIONS
Over 10s protecon: Fire buon is pressed over ten
(10) seconds. Device cuts power automacally.
Atomizer Short-circuit Protecon: Atomizer coil head
is short circuited. Replace with a new one or check the
atomizer.
Low power Alert: Baery volts are below 3.3V. Please
charge the device.
Product manual

39
Weak Baery Alert: Baery volts during usage drop
below 2.9V. The device regulates the waage to protect
the baery.
Αtomizer Low Alert: The atomizer has a resistance that is
below the minimum specicaons of the device. Please,
replace with one that is within the specicaon range.
ΕΝ

40
Temperature Protecon: Temp Protecon System is ac-
vated according to your sengs.
Temperature Alert: The internal device temperature is
over 70°C and shuts down for safety reasons. “DEVICE
TOO ΗOT” displayed. Wait for the device to cool down
to room temperature before using again.
Stop using the device if the automac shut down sys-
tem fails.
CHARGING YOUR DEVICE
Connect NOBACCO APYRON with the supplied USB cable
to a USB input or a wall adapter with USB output. Once
your device is charged, the charging indicator ( ) will dis-
appear.
CAUTION:
Do not charge the device unaended.
The wall adaptor must not exceed at its output 1.2A/5V
specicaons. Otherwise there is a possibility to dam-
age the device and void the warranty due to inappro-
priate charging.
MAINTENANCE:
Periodically, use a ssue paper or a cloth to clean the at-
omizer and the device threads to remove any dirt and/
or moisture.
Product manual

41
PRECAUTIONS
• This device is not intended for use by underage per-
sons, non nonsmokers, children, pregnant or breast-
feeding women, persons with or at risk of heart dis-
ease and/or under medicaon for depression.
• This device is not sold or marketed as a smoking ces-
saon device.
• This device may include small parts, so please keep it
away from children and/or pets.
• Please obey the local laws and/or regulaons pertain-
ing to the use of vaping devices.
• Keep the device away from very high or very low tem-
peratures and/or humid environments.
• Do not pierce or in any way damage the device hous-
ing. If the device housing is damaged in any way, di-
rectly contact NOBACCO company.
• If you are not planning to use the device for a long
period of me, fully charge the baery and discon-
nect the atomizer. Repeat charging once every month.
• Keep the device away from children and minors.
ΕΝ

42
WARRANTY
This equipment has been tested and found to be free of
defects in materials and workmanship that result in fail-
ure during normal usage. This warranty is extended to
the original end-user purchaser, beginning at the me
of retail purchase. Under this warranty, we will replace
or repair, free of charge, any defecve materials. This
warranty does not cover misuse, unauthorized modi-
caons and external uses such as acts of nature. This
warranty does not cover normal wear and tear. In such
a case, the service department will inform you of the ex-
act cost pertaining to the repair of your device and will
request your approval before proceeding to any further
acon. For more informaon about the warranty peri-
od, please visit the product’s ocial webpage at www.
nobacco.gr or ask your local reseller.
NOBACCO COMPANY CANNOT BE HELD RESPONSIBLE FOR
DAMAGES THAT MAY OCCUR DUE TO INAPPROPRIATE USE
OF THE DEVICE OR INCORRECT COMPLIANCE WITH THE
PROCEDURES DESCRIBED IN THE USER MANUAL
No part of this guide may be reproduced, translated or
transmied in any form or by any means without the
prior wrien permission of NOBACCO Company.
Product manual
Table of contents
Other Nobacco Vaporizer manuals


