Noirot CNX User manual
IP24
A00

2.

3.
4
12
20
28
FFrançais
GB English
RS Српски
RU Русский

4.
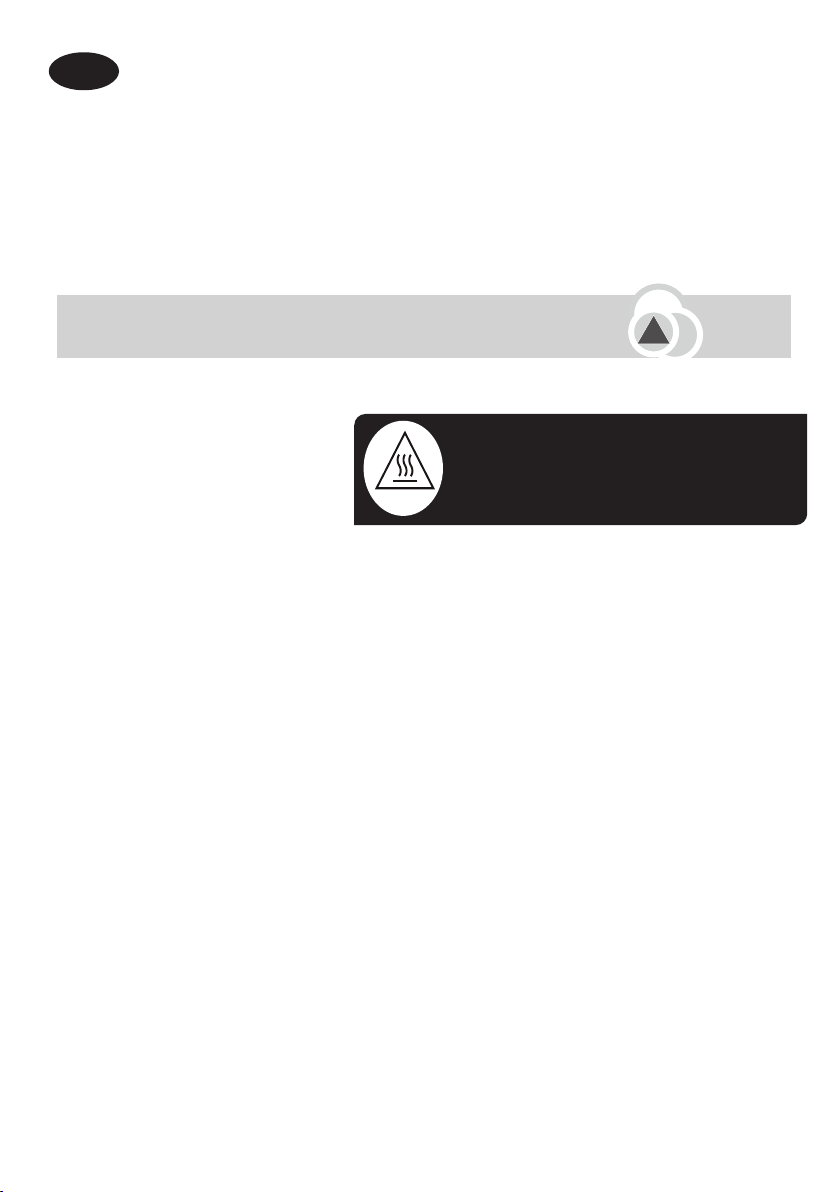
ATTENTION - Certaines
parties de ce produit
peuvent devenir très
chaudes et provoquer
des brûlures. Il faut prê-
ter une attention particulière en présence d’enfants et de per-
sonnes vulnérables.
- Cet appareil peut être utilisé par des enfants âgés d’au moins 8 ans
et par des personnes ayant des capacités physiques, sensorielles
ou mentales réduites ou dénuées d’expérience ou de connaissance,
s’ils (si elles) sont correctement surveillé(e)s ou si des instructions
relatives à l’utilisation de l’appareil en toute sécurité leur ont été don-
nées et si les risques encourus ont été appréhendés. Les enfants
ne doivent pas jouer avec l’appareil. Le nettoyage et l’entretien par
l’usager ne doivent pas être eectués par des enfants sans surveil-
lance.
- Il convient de maintenir à distance les enfants de moins de 3 ans, à
moins qu’ils ne soient sous une surveillance continue.
- Les enfants âgés entre 3 ans et 8 ans doivent uniquement mettre
l’appareil en marche ou à l’arrêt, à condition que ce dernier ait été
placé ou installé dans une position normale prévue et que ces en-
fants disposent d’une surveillance ou aient reçu des instructions
quant à l’utilisation de l’appareil en toute sécurité et en comprennent
bien les dangers potentiels.
Lire attentivement la notice (*) d’installation et
d’utilisation, notamment les consignes ci-dessous. Sécurité
!
Caution, hot surface
Attention surface très chaude.
AVANT PROPOS :
- Vous venez d’acquérir ce convecteur CNX de Noirot et nous vous remercions de ce choix,
témoignant ainsi de votre conance.
- Cet appareil a été étudié, conçu et réalisé avec soin pour vous donner entière satisfaction.
- Il est important de bien lire cette notice en entier avant l’installation et la mise en route de
votre appareil.
- Il est recommandé de conserver cette notice, même après installation de votre appareil.
FFrançais
5.
Sécurité
- Veillez à ne rien introduire dans l’appareil.
- Le raccordement électrique de cet appareil doit impérativement
être eectué hors tension par une personne qualiée.
- Toutes les interventions sur les appareils doivent être eectuées
hors tension et par un personnel qualié.
- L’alimentation électrique de l’appareil doit être réalisée via un dis-
positif de coupure omnipolaire conforme aux règles d’installation.
L’appareil ne doit pas être installé sous une prise de courant.
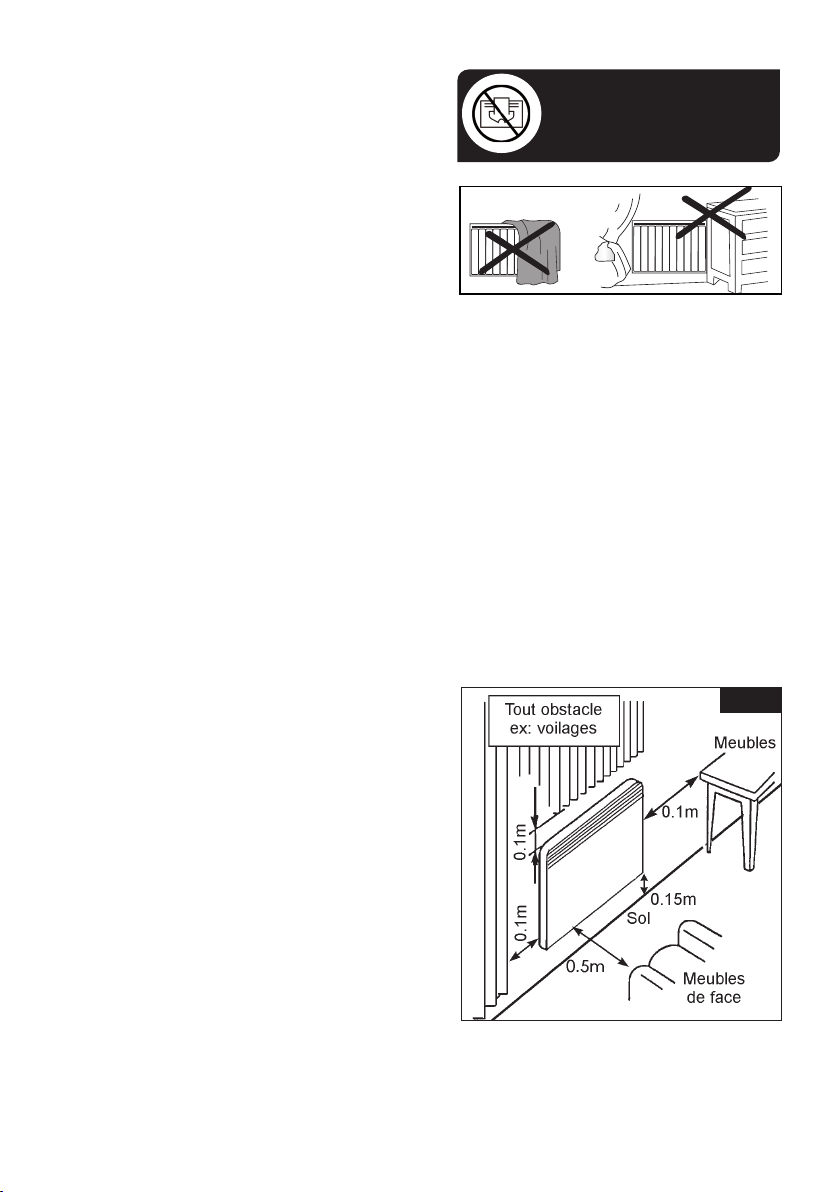
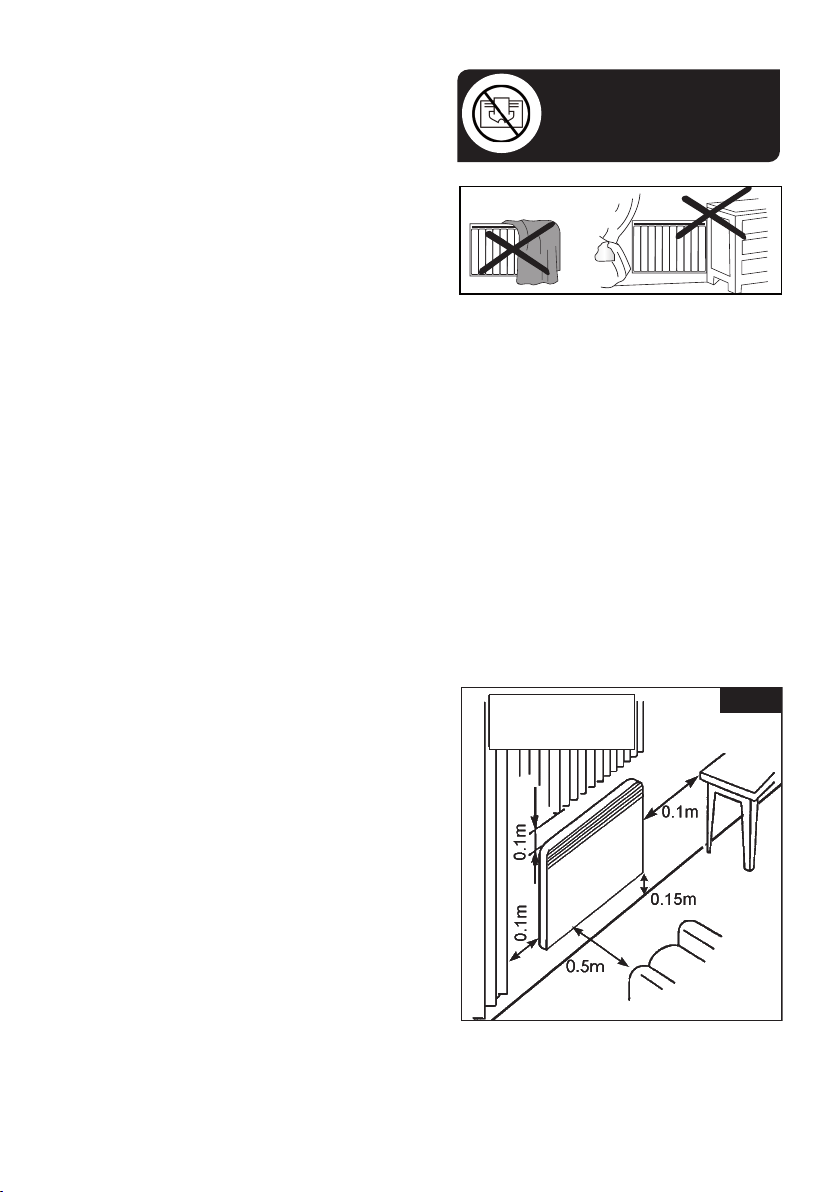
- Respecter les distances minimum
d’installation au sol, aux parois, aux
meubles, etc... (Fig. A).
- L’alimentation électrique doit être
protégée par un dispositif diéren-
tiel résiduel de courant assigné au
plus égal à 30 mA, notamment dans
le cas d’une installation dans un lo-
cal contenant une baignoire ou une
douche.
- Si le câble d’alimentation est en-
dommagé, il doit être remplacé par
le fabricant, son service après-vente ou une personne de qualica-
tion similaire an d’éviter un danger.
Fig. A
MISE EN GARDE :
NE PAS COUVRIR.
- Les enfants âgés entre 3 ans et 8
ans ne doivent ni brancher, ni régler
ni nettoyer l’appareil, et ni réaliser
l’entretien de l’utilisateur.
- Si l’appareil est recouvert, il y a
risque de surchaue. Le logo ci-
contre rappelle ce risque.
- Il est donc formellement interdit
de couvrir ou d’obstruer les entrées ou les sorties d’air au risque
d’incidents ou de dégradations de l’appareil.
6.
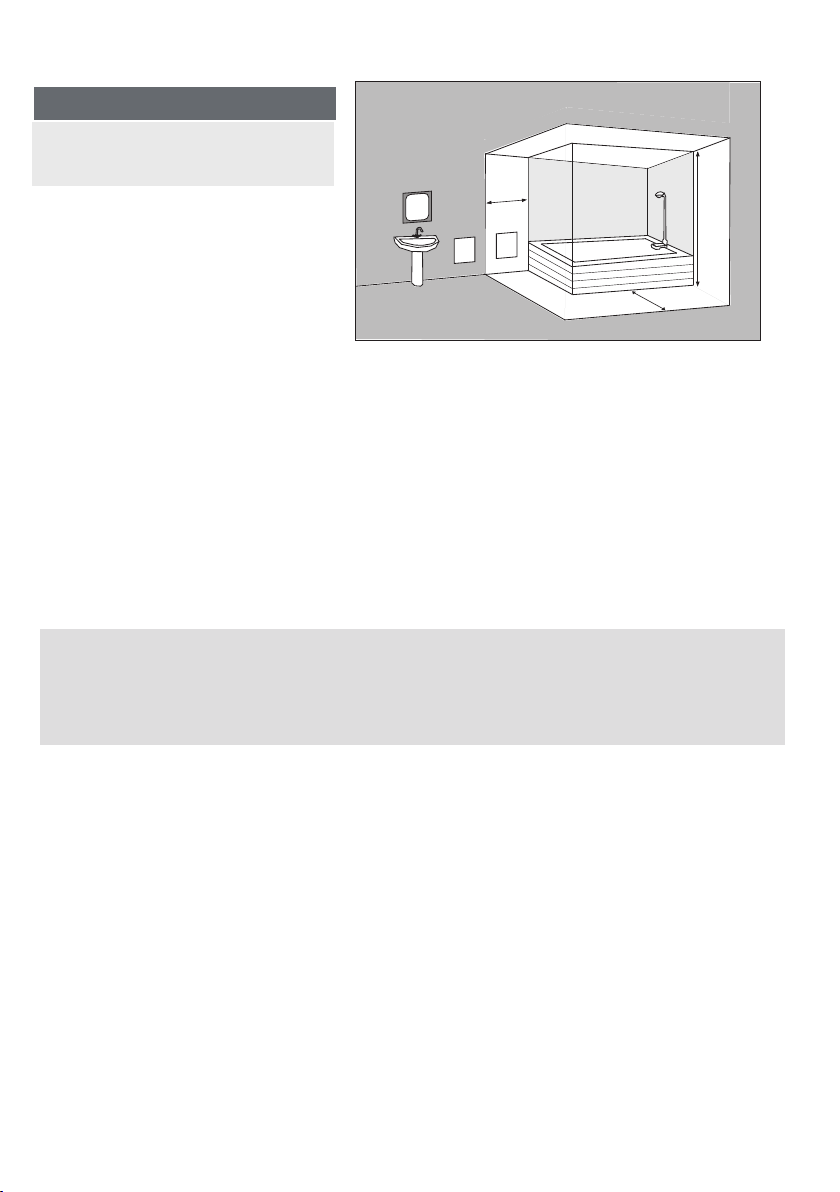
* hauteur à partir du fond de la baignoire
Hors Volume
Volume 0
Volume 2
2,25m*
0,60m
0,60m
Volume 1
Fig. B
(*) La présente notice a été établie au moment de la fabrication de l’appareil et
conformément aux normes en vigueur à cette date.
Le fabricant se réserve le droit de modier à tout moment la notice d’installation et
d’utilisation an de prendre en compte les normes et l’évolution de celles-ci.
Installation des appareils
L’installation doit être conforme aux
normes en vigueur dans le pays d’installa-
tion ( NFC 15-100 pour la France).
- L’appareil peut être installé dans le volume 2 ou hors volume des salles d’eau
(Fig. B).
- éviter d’installer l’appareil dans un courant d’air susceptible de perturber sa
régulation.
- Cet appareil de chauffage électrique direct est destiné à assurer le chauffage
d’ambiance des locaux de type habitat ou assimilables, individuels ou collectifs,
neufs ou existants.

7.
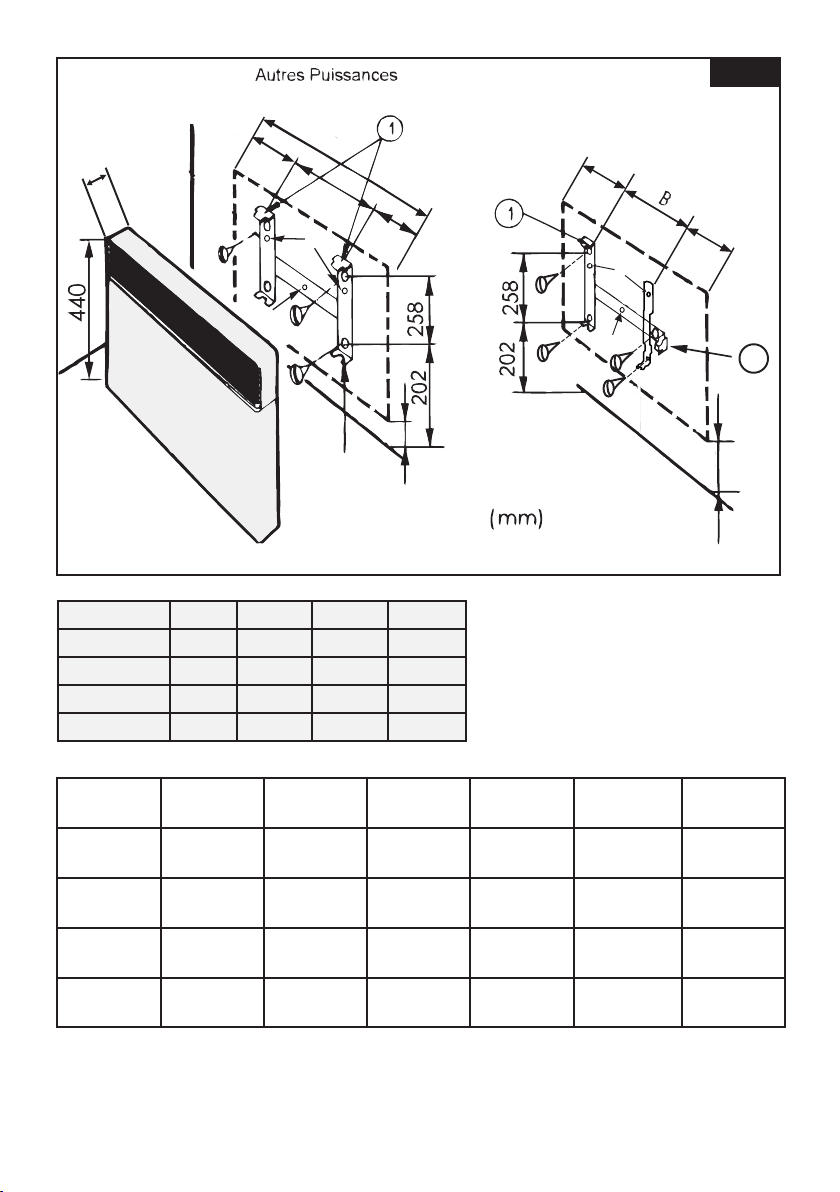
- INSTALLATION ET FIXATION
Pour faciliter la mise en place et respecter la cote minimale de 150 mm du bas de
l’appareil par rapport au sol (Fig.D).
∙ libérer le dosseret en pinçant et en tirant les deux languettes insérables au dos de
l’appareil (Rep. 1 Fig.D).
∙ utiliser le dosseret comme gabarit de marquage en le déposant au sol contre le
mur. Pointer les trous du dosseret (Rep. A Fig. C & D) pour marquer les xations
inférieures.
∙ repositionner le dosseret pour faire correspondre les marques avec les trous des
xations inférieures.
∙ vérier l’horizontalité du dosseret, marquer les 2 trous de xation supérieure, puis
percer et cheviller les 4 trous ainsi repérés.
∙ replacer le dosseret au mur et xer à l’aide de 4 vis diam.5,5mm max.
. accrocher l’appareil sur le dosseret.
28
B
104
258
2
AA
500=>1250W
Fig. C
Nota : Pour centrer latéralement votre appareil,
aidez-vous du trou rep. 2 Fig. C&D.
500 => 1000W
8.
c
c
2
2
500 => 1250W
B
c
150
mini
mini
150
80
1
A
c
A
A
Fig. D
Puissances 500W 1000W 1500W 2000W
Intensité 2,2A 4,3A 6,5A 8,7A
Lg Appareil 340 420 580 740
B128 208 178 320
C106 106 201 210
Puissance
(W)
Tension
(V)
Courant
(A)
Hauteur
(mm)
Largeur
(mm)
Epaisseur*
(mm
Poids**
(kg)
500 220-240 2,2 440 340 80 3
1000 220-240 4,3 440 420 80 3,6
1500 220-240 6,5 440 580 80 4,3
2000 220-240 8,7 440 740 80 5,9
* : sans les dosserets de xation.
** : +/- 10%.
500 => 1000W
9.
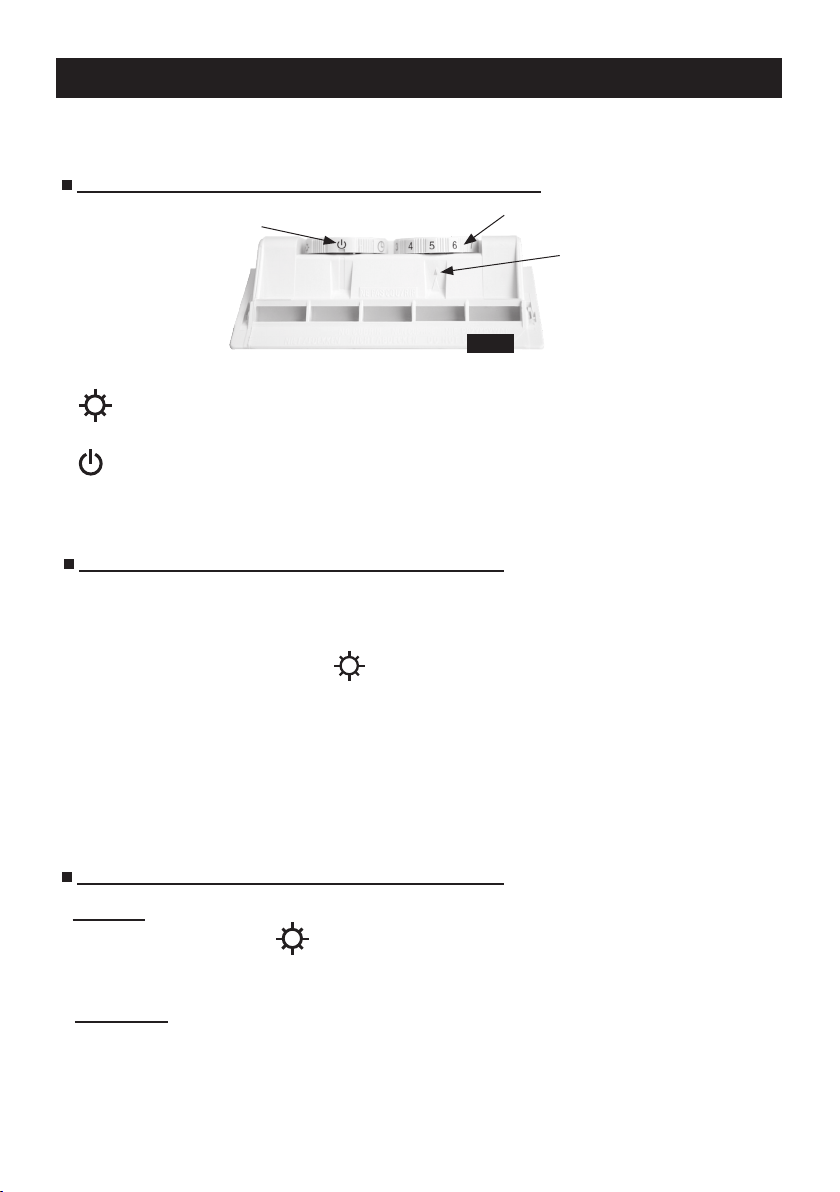
1 - FONCTIONNEMENT
LE BOITIER DE COMMANDE COMPREND (Fig. E) :
Commutateur de mode de fonctionnement (A)
- « » mode confort
- «» mode économique
- « » arrêt de la fonction chauffage de l’appareil
- (B) = réglage de température
- (C) = témoin de chauffe
REGLAGE DE LA TEMPERATURE CONFORT :
AB
C
Fig. E
∙ Le réglage de la température ambiante s’effectue entre les graduations 1 et 9.
∙ Fermer les portes de communication de la pièce, mettre le commutateur de
fonctions (Rep. A Fig. E) sur et mettre le bouton de réglage (Rep. B Fig. E)
sur 5. Le voyant s’allume (Rep. C Fig. E). Attendre quelques heures pour que la
température se soit stabilisée à la valeur souhaitée.
∙ Si la température obtenue ne vous convient pas, augmenter ou diminuer la valeur
de la consigne d’un quart de point avec le bouton de réglage.
∙ Attendre de nouveau quelques heures pour vérier la valeur de la température de
confort.
VOUS ETES DANS LA PIECE. Régler le commutateur sur mode
Confort « ». La température obtenue est celle réglée initialement.
Au besoin, afnez cette température à l’aide d’un thermomètre.
VOUS N’ETES PAS DANS LA PIECE OU LA NUIT. Régler le com-
mutateur sur le mode Economique «». Cette position économique
provoque un abaissement de la température de la pièce de -3,5°C
environ par rapport à la température Confort.
REGLAGE DES FONCTIONS ECONOMIQUES :
∙ 1er Cas :
La régulation électronique de cet appareil a été conçue pour vous donner le
maximum d’économie.
∙ 2ème Cas :

10.
CHOIX D’UNE PLAGE DE TEMPERATURE :
Pour obtenir le point Maxi. d’une plage de température par limitation de la rotation
(exemple : de la position 0 à 7 du bouton de réglage du thermostat), placer l’index
dans le trou face au repère M Fig.F.
Pour obtenir une température xe préalablement réglée (exemple : la position 7 du
bouton de réglage du thermostat), placer l’index dans le trou face au F Fig.F.
Les 2 index (Fig. F) situés sur la manette du thermostat sont des butées que l’on
peut déplacer (après les avoir extraits de leur emplacement d’origine).
Fig. F
2 - DEPANNAGE
SYMPTOME CAUSE DU
DYSFONCTIONNEMENT ETAPES DE DEPANNAGE
L’appareil ne chauffe
pas
1) Connexion non able
cordon d’alimentation.
2) Le convecteur est en mode
veille.
3) La température réelle de la
pièce dépasse le réglage du
thermostat.
1) Etablissez une connexion sécurisée.
2) Mettez le convecteur en mode de fonc-
tionnement.
3) Réglez la température de fonctionne-
ment du convecteur.
L’appareil chauffe tout
le temps
1) Vérier que le réglage de
la température n’a pas été
modié.
2) Vérier que l’appareil n’est
pas situé près d’une porte
ouverte ou/et dans un courant
d’air.
1) Régler de nouveau la température.
2) Fermer la porte ou supprimer le cou-
rant d’air.
Mauvaise odeur lors
de la première mise en
marche
Pas de dysfonctionnement. L’odeur disparaît après quelques minutes
de fonctionnement du convecteur.
11.
3 - ENTRETIEN & CONSEILS
- Pour conserver les performances de l’appareil, il est nécessaire d’effectuer
régulièrement un dépoussiérage de l’intérieur de celui-ci en passant l’aspirateur
sur les entrées et sorties d’air.
- Utilisez de préférence des produits nettoyants universels à base d’agents tensio-
actifs (savon, etc...) et un chiffon type microbres. Pour un simple dépoussiérage,
un chiffon suft.
NE JAMAIS UTILISER DE PRODUITS ABRASIFS OU À BASE D’ACÉTONE
QUI RISQUERAIENT DE DÉTÉRIORER LE REVÊTEMENT DE L’APPAREIL.
Prévu pour être raccordé à un réseau d’alimentation électrique 220 - 240V~ 50Hz.
Recommandations et conseils
TOUTES LES INTERVENTIONS SUR NOS APPAREILS DOIVENT ÊTRE
EFFECTUÉES HORS TENSION ET PAR UN PERSONNEL QUALIFIÉ
IMPORTANT : LES CARACTÉRISTIQUES DE L’APPAREIL SONT INDIQUÉES SUR L’ÉTI-
QUETTE SIGNALÉTIQUE.
Appareil de classe 2 : signie que l’appareil est à double isolation et ne doit
donc pas être raccordé au conducteur de protection (l de terre).
Indice de Protection de l’enveloppe de l’appareil contre la pénétration des
corps solides et liquides
classe II
IP....
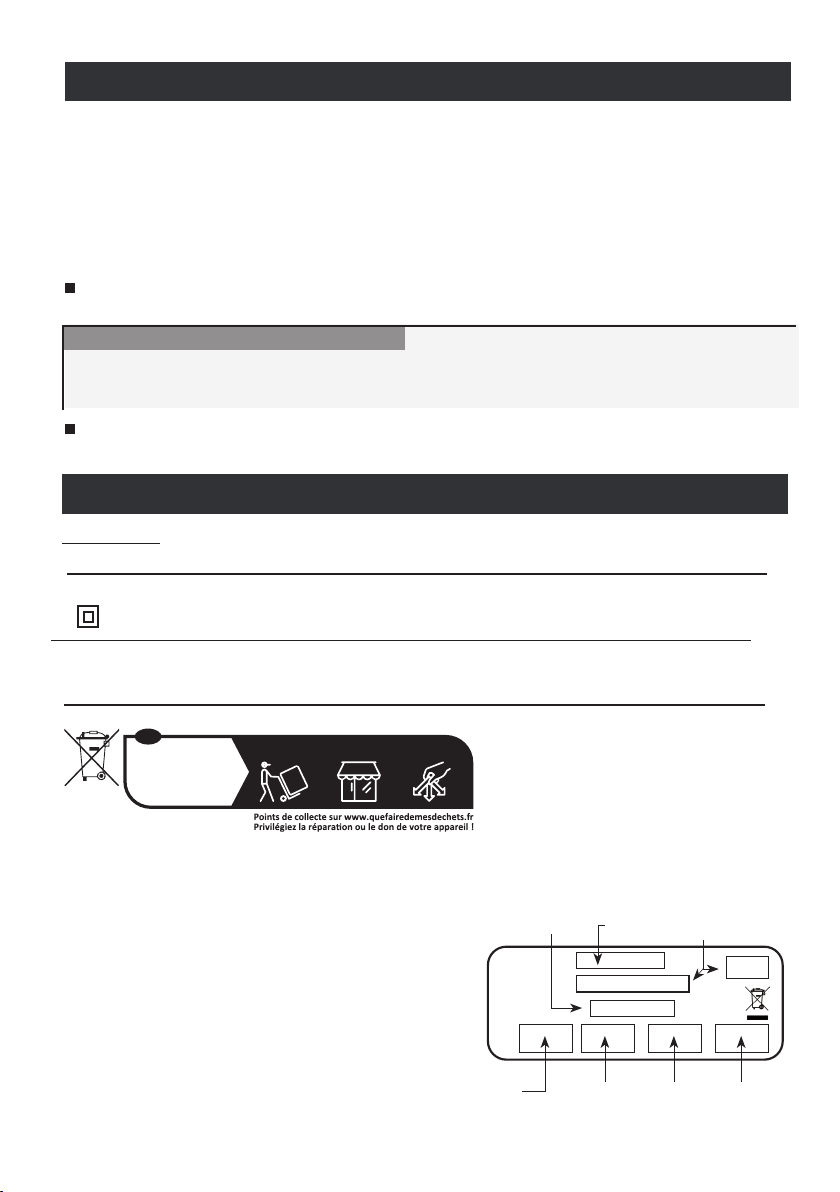
4 - IDENTIFICATION DE VOTRE APPAREIL
REPRISE
À LA LIVRAISON À DÉPOSER
EN MAGASIN À DÉPOSER
EN DÉCHÈTERIE
OU OU
FR
Cet appareil
et ses accessoires
se recyclent
L’étiquette signalétique est placée en bas et à droite (côté commande) de votre appareil,
elle permet de l’identier.
Elle est composée de :
- La référence complète de l’appareil
et son indice de fabrication (rep.A)
à préciser pour le SAV.
- Sa puissance en Watt (rep. B).
- Les certicats de conformités, adresse (rep.
C-D-E-F).
- N° du constructeur (rep X).
MADE IN FRANCE
A
CD E F
BX
12.
CAUTION - Parts of this
product can become
very hot and cause
burns. Take particular
care in the presence of
children and vulnerable people.
- This appliance may be used by children aged at least 8 years and
by persons with reduced physical, sensory or mental capabilities or
lacking experience or knowledge, provided that they are properly
supervised or if they have been given instructions on the safe use of
the appliance and are aware of the risks involved. Children must not
play with the appliance. Please make sure that unsupervised child-
ren do not carry out cleaning and maintenance on the appliance.
- Children under 3 years of age should be kept away from the ap-
pliance unless they are under continuous supervision.
- Children aged between 3 and 8 years should only switch the ap-
pliance on or o if it has been placed or installed in a normal position
as intended and that they are supervised or have been instructed in
the safe use of the appliance and understand its potential hazards.
Read the installation and operating instructions (*)
carefully, especially those set out below. Safety
!
Caution, hot surface
Attention surface très chaude.
FOREWORD:
- Thank you for choosing this CNX convector from Noirot and for your trust.
- This appliance has been carefully conceived, designed and built to give you complete
satisfaction.
- It is important to read these instructions in full before installing and operating your appliance.
- Please keep these instructions even after your appliance has been installed.
GB English
13.
- Please ensure that children between
the ages of 3 and 8 do not connect,
adjust or clean the appliance or carry
out user maintenance.
- If the appliance is covered, there
is a risk of overheating. The logo
opposite is a reminder of this risk.
- It is strictly prohibited to cover or
obstruct the air inlets or outlets as this may result in incidents or
damage to the appliance.
Safety
- Make sure that nothing is introduced into the appliance.
- This appliance must be connected to the power supply by a quali-
ed person when the power is o.
- All work on the appliance must be carried out with the power o
and by qualied personnel.
- Power to the appliance must be supplied via an omnipolar dis-
connecting device in compliance with the installation regulations.
The appliance must not be installed under a power socket.
- When installing the appliance, en-
sure at least the minimum distances
from the oor, walls, furniture, etc.
(Fig. A).
- The power supply must be protec-
ted by a residual current device with
a rated current not exceeding 30
mA, particularly in the case of ins-
tallation in a room containing a bath
or shower.
- If the power cable is damaged, it
must be replaced by the manufac-
turer, its after-sales service department or a similarly qualied party
in order to avoid any hazard.
Fig. A
WARNING:
DO NOT COVER.
Fig. A
Any obstacle
E.g. curtains Furniture
Furniture
in front
of the appliance
Floor

14.
* height from the bottom of the bath
Outside the zone
Zone 0
Zone 2
2,25m*
0,60m
0,60m
Zone 1
Fig. В
(*) These instructions were drawn up at the time of manufacture of the appliance
and in accordance with the standards in force at that time.
The manufacturer reserves the right to modify the instructions for installation and
operation at any time in order to take into account the applicable standards and any
amendments to them.
Installing the appliance
The electrical wiring must comply with the
standards in force in the country of instal-
lation (NFC 15-100 for France).
- The appliance can be installed in zone 2 or outside the zone in wet rooms (Fig. B).
- Avoid installing the unit in a draught that could cause it to be adjusted incorrectly.
- This direct electric heater is designed to provide room heating in new or existing
individual or collective housing or similar premises.

15.
- INSTALLATION AND FIXING
For easy installation and to ensure at least a minimum clearance of 150 mm from the
bottom of the appliance to the oor (Fig.D):
∙ release the backrest by pinching and pulling the two insertable tabs on the back
of the appliance (location 1 Fig.D).
∙ use the backplate as a marking template by placing it on the oor against the wall.
Insert a sharp object through the holes in the backplate (location A Fig. C & D) to
mark the lower xing points.
∙ reposition the backplate to line up the marks with the lower xing holes.
∙ check to ensure that the backplate is horizontal, mark the top 2 xing holes, then
drill and peg the holes at the 4 marked locations.
∙ replace the backplate on the wall and x it with four 5.5 mm max. diameter screws.
∙ hang the appliance on the backplate.
28
B
104
258
2
AA
500=>1250W
Fig. C
Note : To centre your appliance laterally, use the
hole at location 2, Fig. C&D.
500 => 1000W

16.
c
c
2
2
500 => 1250W
B
c
150
mini
mini
150
80
1
A
c
A
A
Fig. D
Power ratings 500W 1000W 1500W 2000W
Current 2.2A 4.3A 6.5A 8.7A
Lg Appliance 340 420 580 740
B128 208 178 320
C106 106 201 210
Power
rating (W)
Voltage
(V)
Current
(A)
Height
(mm)
Width
(mm)
Depth*
(mm)
Weight**
(kg)
500 220-240 2.2 440 340 80 3
1000 220-240 4.3 440 420 80 3.6
1500 220-240 6.5 440 580 80 4.3
2000 220-240 8.7 440 740 80 5.9
* without the backplates.
**: +/- 10%.
500 => 1000W
Other power ratings
minimum
minimum
17.
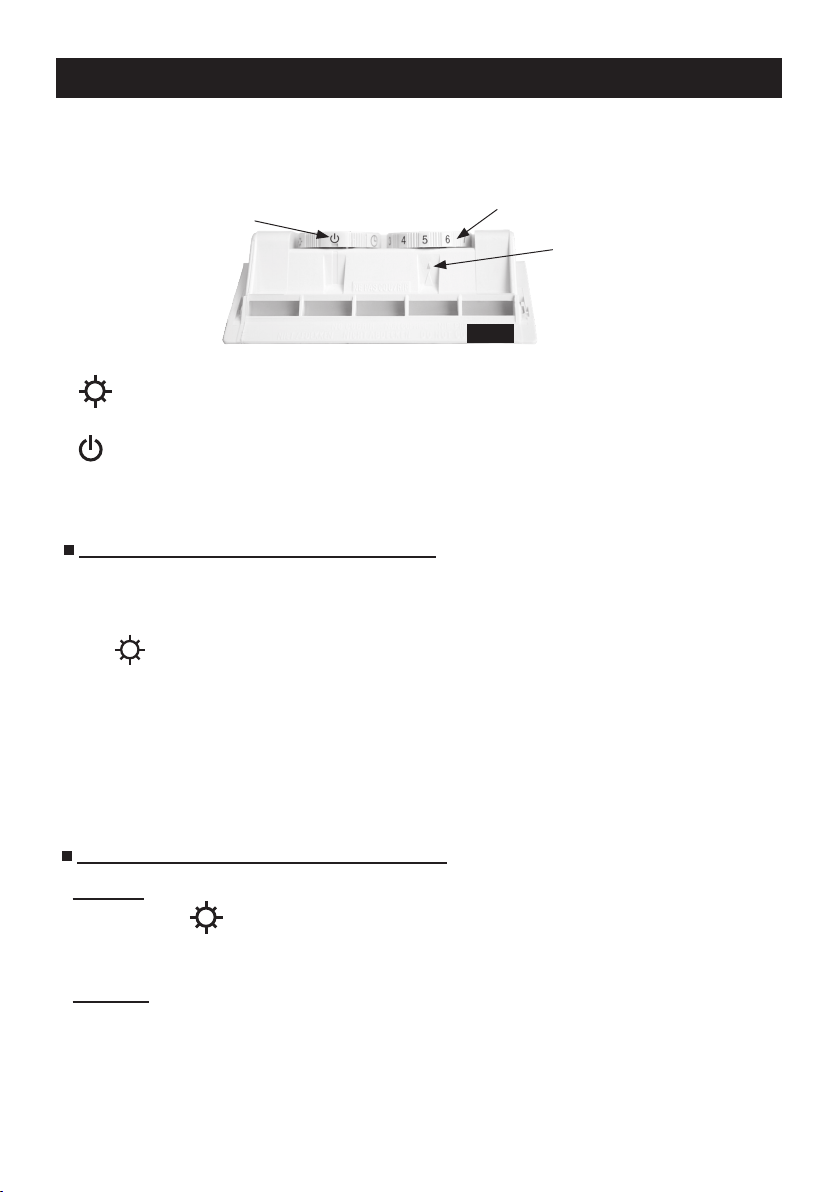
1 - OPERATION
THE CONTROL UNIT INCLUDES (Fig. E):
Operating mode switch (A)
- « » comfort mode
- «» economy mode
- « » appliance heating function off
- (B) = temperature setting
- (C) = heating indicator
COMFORT TEMPERATURE SETTING:
AB
C
Fig. E
∙ The room temperature is set between marks 1 and 9.
∙ Close the connecting doors of the room, set the function switch (location A on Fig.
E) to and turn the adjustment knob (location B on Fig. E) to 5. The indicator
lights up (location C on Fig. E). Wait a few hours until the temperature has stabilised
at the desired value.
∙ If you do not like the temperature obtained, increase or decrease the temperature
setting by a quarter of a point using the adjustment knob.
∙ Wait for a few more hours to check the comfort temperature value.
IF YOU ARE IN THE ROOM. Set the switch to Comfort mode
«». The temperature obtained is the one initially set.
If necessary, nely adjust this temperature using a thermometer.
IF YOU ARE NOT IN THE ROOM OR AT NIGHT. Set the switch
to Economy mode «». This economy position lowers the room
temperature by about -3.5°C from the Comfort temperature.
SETTING THE ECONOMY FUNCTIONS:
∙ Case 1:
∙ Case 2:
The electronic adjustment of this appliance has been designed to ensure maximum
savings.
18.
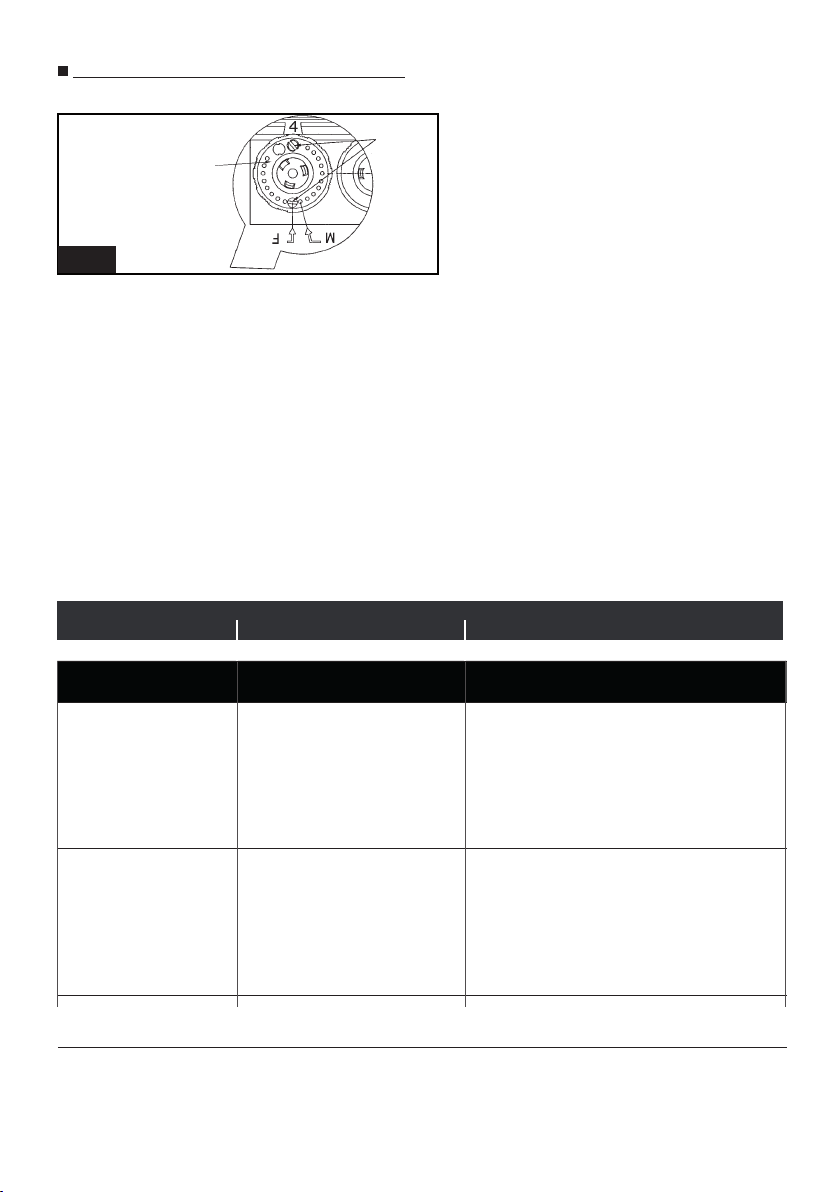
CHOOSING A TEMPERATURE RANGE:
To obtain the maximum point of a temperature range by limiting the rotation (e.g.
from position 0 to 7 of the thermostat adjustment knob), place your index nger in
the hole facing the M mark shown on Fig. F.
To obtain a previously set xed temperature (e.g. position 7 of the thermostat control
knob), place your index nger in the hole facing F as shown on Fig.F.
The 2 markers (Fig. F) located on the thermostat handle are stops that can be
moved (after removing them from their original location).
Fig. F
2 - TROUBLESHOOTING
SYMPTOM CAUSE OF
MALFUNCTION TROUBLESHOOTING STEPS
The appliance does not
heat up
1) Unreliable power cable
connection.
2) The convector is in stand-
by mode.
3) The actual room tempera-
ture exceeds the
thermostat setting.
1) Establish a safe connection.
2) Switch the convector to operating
mode.
3) Set the operating temperature of the
convector.
The appliance heats up
all the time
1) Check that the tempera-
ture setting has not been
changed.
2) Check that the appliance
is not located near an open
door and/or in a
draught.
1) Set the temperature again.
2) Close the door or eliminate the
draught.
Unpleasant odour
when rst switched on No malfunction. The odour disappears after a few minutes
of operation.
Adjustment knob
Marker

19.
3 - MAINTENANCE & ADVICE
- To keep the appliance at optimum performance, regularly remove dust from inside
it by operating a vacuum cleaner at the air inlets and outlets.
- Preferably use surface-active universal cleaning products (soap, etc.) and a
microbre cloth. For simple dusting, a cloth is sufcient.
NEVER USE ABRASIVE OR ACETONE-BASED PRODUCTS THAT COULD
DAMAGE THE COATING OF THE APPLIANCE.
Designed to be connected to a 220 - 240V~ 50Hz power supply.
Recommendations and advice
ALL WORK ON OUR APPLIANCES MUST BE CARRIED OUT WITH THE
POWER OFF AND BY QUALIFIED PERSONNEL
IMPORTANT : THE CHARACTERISTICS OF THE APPLIANCE ARE SHOWN ON THE IN-
FORMATION PLATE.
Class 2 appliance: means that the appliance is double insulated and therefore
must not be connected to the protective conductor (earth wire).
Protection class of the appliance casing against entry of solid objects and
liquids
classe II
IP....
4 - IDENTIFYING YOUR APPLIANCE
The information plate is located at the bottom right (control side) of your appliance
to identify it.
The information plate consists of:
- The full reference of the appliance and its
manufacturer’s index (location A) to be
specied for the purposes of after-sales
service.
- Power rating in Watts (location B).
- Certicates of conformity, address (location
C-D-E-F).
- Manufacturer’s number (see X).
MADE IN FRANCE
A
CD E F
BX

20.
OPREZ – Delovi ovog
proizvoda mogu se jako
zagrejati i izazvati ope-
kotine. Posebnu pažnju
treba obratiti u prisustvu dece i ranjivih osoba.
- Ovaj uređaj mogu koristiti deca od najmanje 8 godina i osobe sa
smanjenim zičkim, čulnim ili mentalnim sposobnostima ili bez is-
kustva ili znanja, ako su pod odgovarajućim nadzorom ili ako su im
data uputstva za potpuno sigurno korišćenje uređaja i ako su pro-
cenjeni uključeni rizici. Ovaj uređaj nije igračka. Čišćenje i održavanje
od strane korisnika ne smeju sprovoditi deca bez nadzora.
- Decu mlađu od 3 godine treba držati podalje, osim ako nisu pod
stalnim nadzorom.
- Deca uzrasta između 3 i 8 godina smeju uključivati ili isključivati
uređaj samo pod uslovom da je uređaj postavljen ili instaliran na
uobičajenom predviđenom mestu i da su ta deca pod nadzorom ili
su dobila uputstva o bezbednoj upotrebi uređaja i u potpunosti razu-
meju potencijalne opasnosti.
Pažljivo pročitajte uputstvo (*) za instalaciju
i upotrebu, posebno uputstvo u nastavku. Sigurnost
!
Oprez, vruća površina
Oprez, vruća površina.
PREDGOVOR:
- Upravo ste kupili ovaj konvektor CNX od Noirota i zahvaljujemo vam na ovom izboru, čime
svedočimo vašem poverenju.
- Ovaj uređaj je pažljivo proučavan, dizajniran i proizveden kako bi vam pružio potpuno
zadovoljstvo.
- Važno je da temeljno pročitate ovaj priručnik pre instaliranja i pokretanja vašeg uređaja.
- Preporučuje se da ovaj priručnik zadržite, čak i nakon što instalirate svoj uređaj.
RS Српски
Table of contents
Languages:
Other Noirot Heater manuals


Popular Heater manuals by other brands

Thermon
Thermon HELLFIRE 400 Installation, operation & maintenance instructions

Black & Decker
Black & Decker BDTH600 Use and care book

EnergoLine
EnergoLine EL200 Mounting and installation

Heatlight
Heatlight HLWA15-LV Series instructions

Arcotherm
Arcotherm SP 110 instruction manual

HSS Hire
HSS Hire 56282 Operating & safety guide

GHP Group
GHP Group Dyna-Glo RMC-FA40 user manual

Tansun Quartzheat
Tansun Quartzheat SOR 210IP Reference manual

Truma
Truma Ultraheat S 3004 Operating instructions & installation instructions

Buderus
Buderus 21 Applications manual

TwinStar
TwinStar 7HM1000 Owner's operating manual

HOMCOM
HOMCOM TSH-RC Assembly & instruction manual


