nologo RX1 User manual

GB
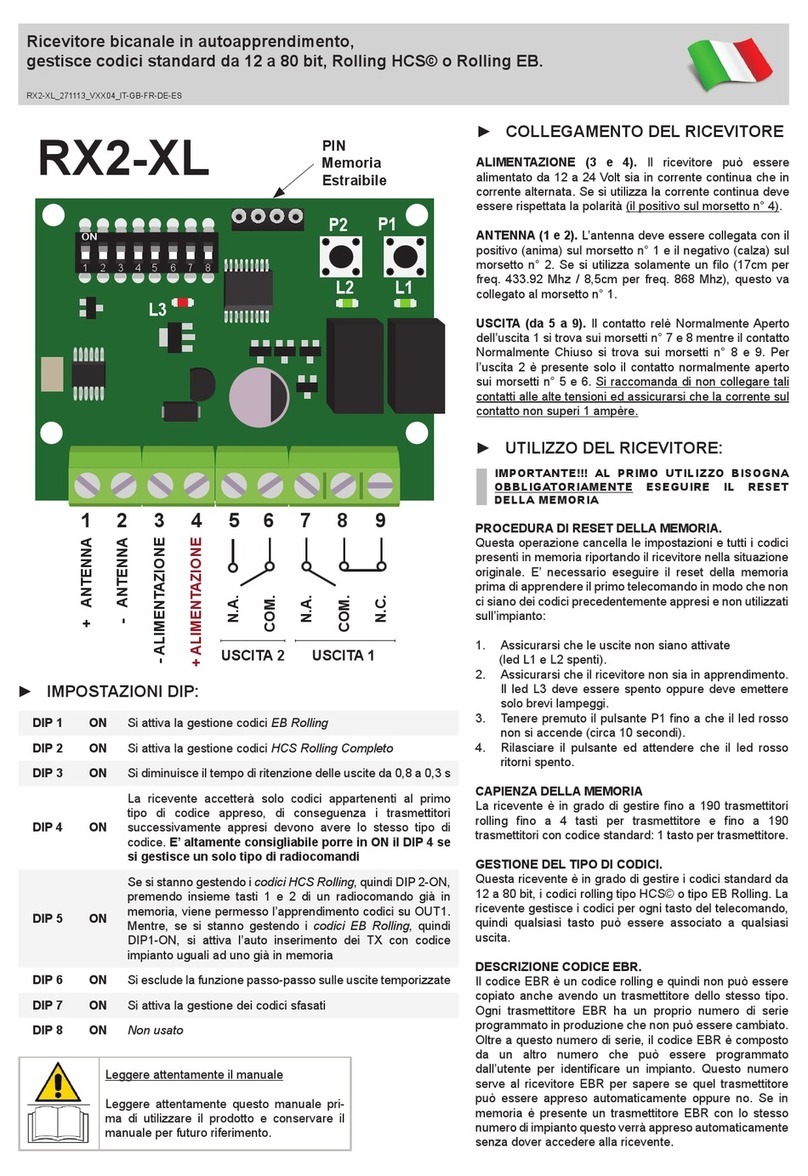
►RECEIVER CONNECTION
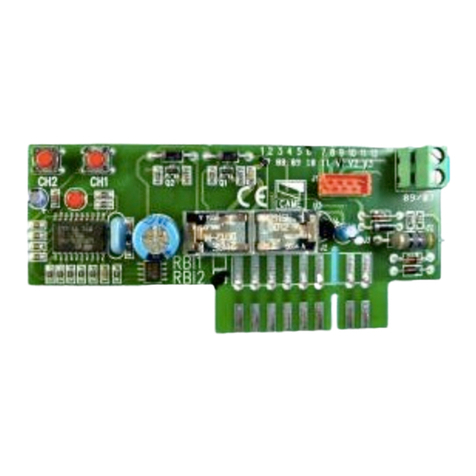
POWER SUPPLY (2 and 3). The receiver can be powered with
12 or 24 Vac/dc. If yu use direct current respect the polarity. (The
positive in the terminal no. 3).
ANTENNA (1 and 2). The antenna should be connected with
positive side in the terminal no.1 and the negative in the terminal
no. 2.
If you use only one cable (17 cm for freq. 433.92 Mhz - 8,5 cm
for freq. 868 Mhz), this has to be connected to the terminal no. 1.
RELAY. The output relay’s contact ( normally opened) is on the
terminal 4 and 5 .
1 AMP MAX LOW VOLTAGE ONLY
►USING OF THE RECEIVER
*** IT IS NECESSARY TO EXECUTE THE MEMORY´S
RESET BEFORE INITIAL PROGRAMMING ***
ATTENTION!! this operation will cancel all the codes in the
memory. It is necessary to cancel the memory before to learn the
first transmitter - how to cancel:
1. Make sure that the relay has not been activated (the
contact of the relay is open).
2. Make sure that the receiver is not learning. The red led
must be switched off or it is fl ashing shortly
3. Press the button till the red led is lit.
4. Wait till the red led is switched off or it is fl ashing.
CODE MANAGING
This receiver can manage standard codes from 12 till 64 bit and
rolling codes HCS©. The fi rst learned transmitter establish the
code’s type that the receiver has to manage, it means that the
transmitter has to have the same code’s type. Concerning the
rolling codes it is possible to activate or desactivate the
key’scontrol and the rolling counter. With this function you can
choose the se-curity level of the receiver.
►ACTIVATION OR REMOVE
ROLLING CODE’S CONTROL
This operation is necessary to activate or remove the key’s control
and the rolling code counter. If you active this control , the receiver
will accept ONLY the rolling code with owner key (producer key)
and will control the rolling counter, in a way that the tranmitter
cannot be copied.
The operation is as follow:
1. Make sure that the receiver ‘s exit are removed and are
not in self-learning
2. Press and eave the button.The red led is lit.
3. Press and leave the button.The red led is fl ashing and
lighting .
4. Press and leave the button. The red led is switched off and
remains switched off if you need the fuction is removed and
light shortly if the funciton is activated.
TRANSMITTER’S LEARNING
To learn a code make as follow:
1. Make sure that the receiver ‘s relay is not active.
2. Push and leave the button The red led is lit
3. Push the transmtter’s button within 5 sec.If the code has
been learnt the red led is fl ashing shortly. If the red led
is fl ashing slowly it means that the memory is full. If the
red led is not fl ashing it means that the transmitter is not
compatible
STEP-BY-STEP FUNCTION
The receiver ‘s exit can be set up for step-by-step function (to be
active or to be removed). If you want to active or remove this
function you have to press the button when the relay is active If
the relay is in the NORMAL FUNCTION, it will be operating the
function step-by-step, but if it was already active, the relay will
working with a normal process.
TRANSMITTER’S CANCELLATION
This operation can cancel one single transmitter.
1. Press and leave the button. The red led is lighting .
2. Press the transmitter’s button. If it is already on the mem-
ory, the red led is fl ashing for 3 sec. and then return to
the normal status. During this time press the button again.
1Channel receiver with self-learning,
it manages standard codes from 12 till 64 and rolling HCS©
+ ANTENNA
- ANTENNA
+ POWER SUPPLY
RELAY CONTACTS
1
2
3
4
5
-
+
LED
BUTTON
it manages standard codes from 12 till 64 and rolling

■ DICHIARAZIONE DI CONFORMITÀ
■ CONFORMITY DECLARATION
■ DÉCLARATION DE CONFORMITÉ
■ KONFORMITÄTSERKLÄRUNG
■ DECLARACIÓN DE CONFORMIDAD
■ NOLOGO S.r.l. dichiara che il seguente apparato RX1
e’ conforme ai requisiti essenziali delle seguenti norme:
■ NOLOGO S.r.l. declares that the following product RX1
is conformed to the following norms:
■ NOLOGO S.r.l. déclare que le produit suivant: RX1 est
conforme aux criteres essentiels des normes suivantes’:
■ NOLOGO S.r.l. bestätigt , dass das folgende Produkt:
RX1 folgende gesetzten entspricht:
■ El producto corresponde a las directivas europeas:
EN 301 489-3 (2000) Classe 1 EN 300 220-1 V2.1.1
EN 60 950 Mod. A1 (1993)-A2 (1993)-A3 (1995)-A4
(1997)
■ Io sottoscritto amministratore Ernestino Bandera dichiaro che
l’apparato sopra defi nito è stato provato nella confi gurazione
tipica di installazione e soddisfa i requisiti essenziali di protezi-
one delle direttive:
■ Me Ernestino Bandera, declares that the above mentioned
product has been tested in a typical installation and fulfi l the
essential requirements of the laws:
■ Je soussigné,Ernestino Bandera, déclare que l’ appareil ci-
dessus a été testé dans la confi guration typique d’installation et
remplit les critères essentiels de protection des directives:
■ Der Unterzeichner ,Ernestino Bandera, bestätigt dass das
o.g. Gerät in einer typische Installation getestet wurde und den
grundlegenden Anforderungen etnspricht:
■ Es conforme con todas las normas técnicas correspondientes
al producto en el campo de aplicación de las Directivas Comu-
nitarias:
99/5/CE
Ernestino Bandera
Busto Arsizio, 17.09.2007
■ Frequenze di trasmissione autorizzate
■ Permitted transmission frequency
■ Fréquence de transmission autorisées
■ Sendefrequenzen autorisiert
■ Frecuencias de emisión
EU 433,92 Mhz ROSSO/RED/ROUGE/ROT/ROJ
868 Mhz BLU/BLUE/BLAU/AZUL
2002/95/EC
NOLOGO S.r.l.
tel. +44 01482 860950
www.remotecontrolgates.co.uk
www.gatestore.co.uk
Other nologo Receiver manuals
