Nomadic NA-A1-13 Original operating instructions

Nomadic Electric Awning
AWNI
NG CO
16680 N 51st Ave Units 4 & 5
Glendale, AZ 85306
(480) 576-2489
www.NomadicAwning.com
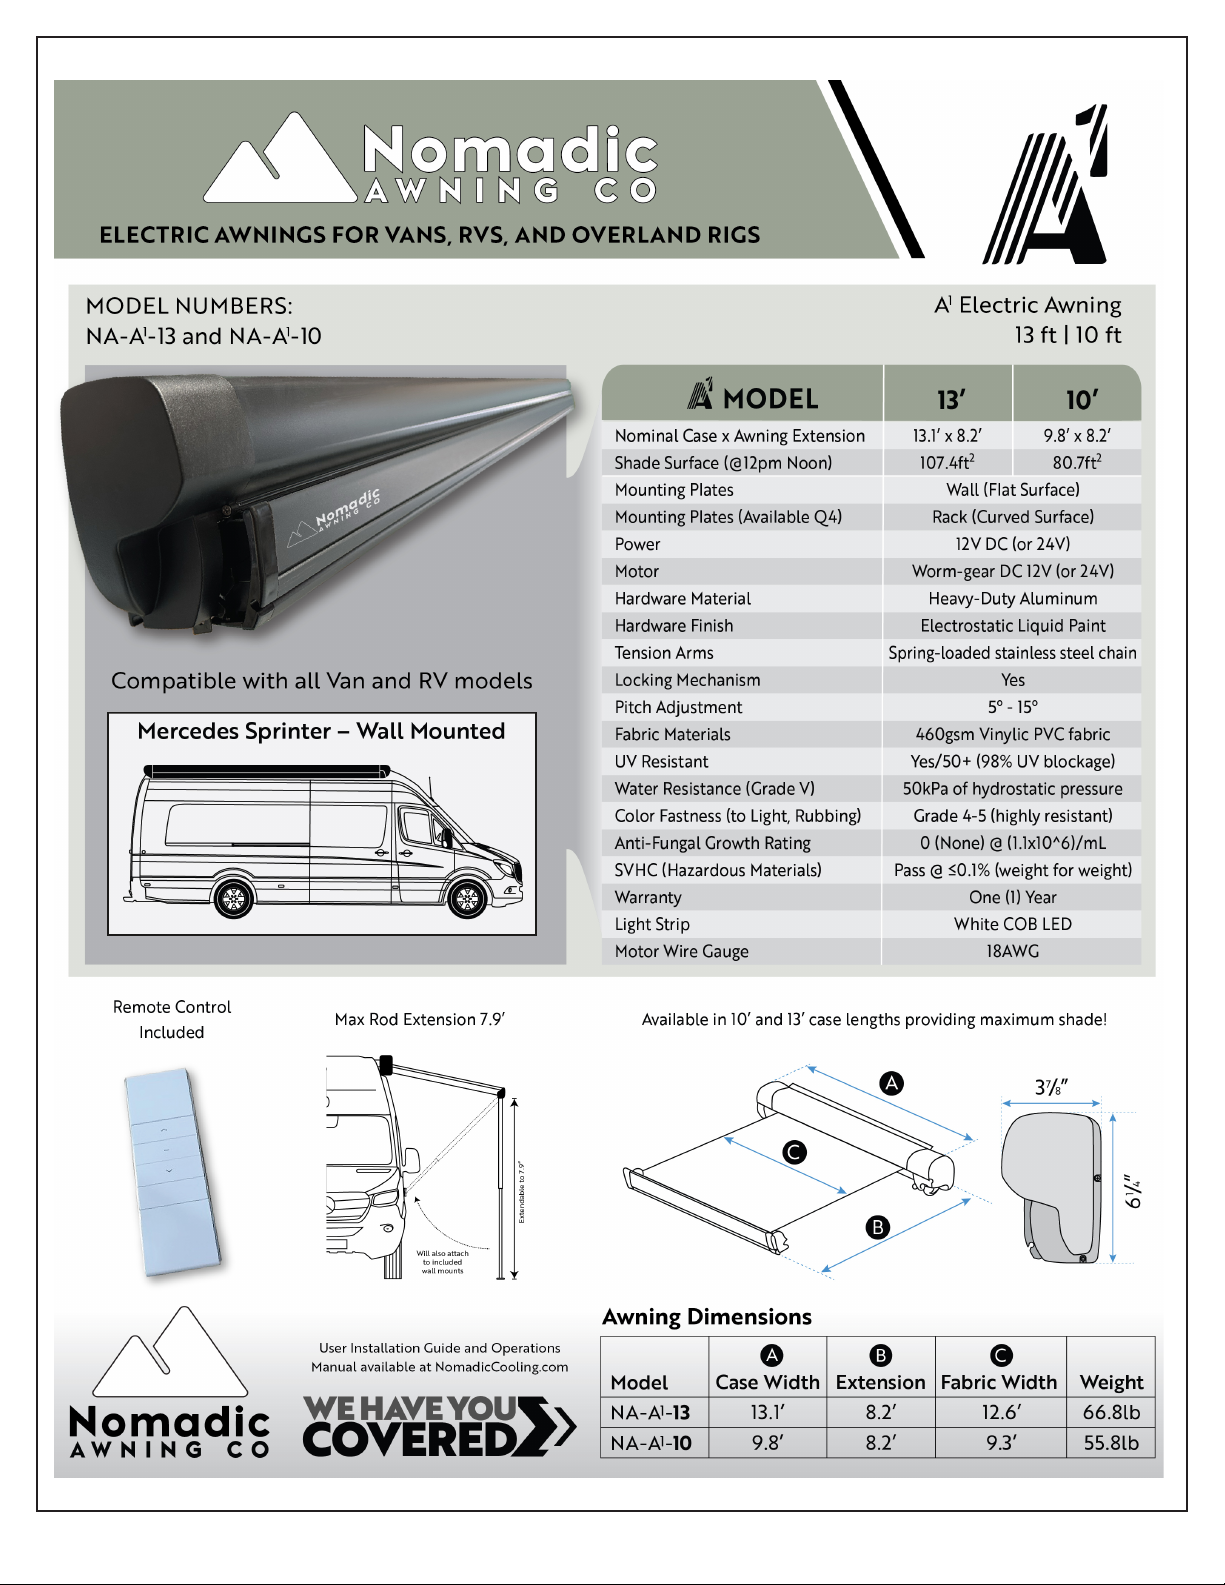
V1.3-092723Item No. NA-A1-13 and NA-A1-10
Instalation & Operation Guide
For 13’ and 10’ Models

A1Electric Awning Guide V1.3-092723 2 Nomadic Awning Co
TABLE OF CONTENTS
Important Safety Instructions ..............3
Itemized Parts List .........................5
Technical Specifications....................6
Instalation Steps ..........................7
Mounting Position ......................7
Support Rod Lengths ...................7
Bracket Mounting Positions .............8
Mount the Awning ......................9
Electronically Open the Awning ........10
Manually Open the Awning ............10
Fix the Support Rods. . . . . . . . . . . . . . . . . . . 11
Mount Rod Feet Brackets ..............11
Usage of the Support Rod Bracket......12
Store the Hand Crank ..................12
Notice.................................12
Awning Maintenance ......................13
Proper Awning Use........................14
Warranty .................................15
Returns, Cancelations and Missing Items ..16
Always bench test electric awning
before installing to ensure the unit
powers up as it should.
INTRODUCTION
The Nomadic Electric Awning is designed and
intended to be installed on fat and curved
surface recreational vehicles. Instalation
should be performed by at least two peo-
ple. At least one person should have simiar
instalation experience. You can also elect to
have it installed by an upfitter, van builder
or instalation specialist.
It is important to read this instalation guide
before starting to ensure that the awning is
installed correctly and works properly.
Due to ongoing improvements, Nomadic
Awning Co. reserves the right to modify
awning appearance and technical specifi-
cations without notice.
Check to ensure all required parts are
included (listed on page 5).
AWNI
NG CO
16680 N 51st Ave Units 4 & 5
Glendale, AZ 85306
(480) 576-2489
www.NomadicAwning.com
Keep a record of the following information:
Model No.
Serial No.
Date Purchased
Installed By
NA-A1-13 NA-A1-10
Nomadic Awning Co 3 A1Electric Awning Guide V1.3-092723
Review the following safety guidelines and
instructions that can aid in reducing or elim-
inating the risk of accidents and injuries.
A. Safety Information Icons
The safety alert symbol is used to warn
about possible risks of physical harm.
To prevent injury or even death, pay
attention to and follow all safety mes-
sages that appear after this symbol.
B. Understanding Signal Words
Signal words identify safety and property
damage messages and indicate the degree
of hazard seriousness.
WARNING is used for hazardous situ-
ations that could result injury (includ-
ing death, severe, moderate or minor
injury if not avoided.
NOTICE is used for situations that
could result in damage to the awning
or vehicle or unnecessary complica-
tions in the instalation process.
HELPFUL TIP is used for useful
information or best practices.
C. Supplemental Directives
Read and comprehend these instructions
before installing, using, servicing, or maintain-
ing the awning.
Poor instalation, operation, servicing, or
maintenance of the awning can result in
severe injury.
Follow all instructions.
The instalation must comply with all appli-
cable local and national codes, including the
atest edition of the following standards:
USA
• ANSI/NFPA70, National Electrical
Code (NEC)
• ANSI/NFPA1192, Recreational
Vehicle Code
CANADA
• CSA C22 1. Parts I & II,
Canadian Electrical Code
• CSA Z240 RV Series,
Recreational Vehicles
D. General Safety Messages
WARNING - Failure to follow the subsequent
warnings could lead to death or serious injury.
• Use a qualified service technician if
you do not have experience installing
simiar products.
• Do NOT modify this product in any
way. Modifications can be extremely
dangerous and void warranties.
• Do NOT add any devices or accessories
to the awning unless specifically
authorized in writing by Nomadic
Awning Co.
IMPORTANT SAFETY INSTRUCTIONS

A1Electric Awning Guide V1.3-092723 4 Nomadic Awning Co
IMPORTANT SAFETY INSTRUCTIONS
WARNINGS
Instalation must be performed with
the awning powered off and away
from the power source during the
instalation process. Removal of the
awning power supply wiring keeps all
awning power off at all times.
Awning instalation should be per-
formed by experienced persons or
specialists with the required skills.
Any problems during instalation may
incur potential hidden dangers, such
as coming detached while driving.
Wear gloves when installing the
awning, or opening and closing it.
When working with a stepadder, be
careful not to drop the awning when
from any height.
Do not use in strong winds or snow.
There is a risk of injury if the awning
colapses due to strong winds or
heavy snow accumuation.
If the weather goes bad (rain, snow,
thunder, etc.) stop using the awning
and close it immediately.
Before driving, ensure the awning is
properly attached, the screws are not
loose, and fabric is stored properly.
NOTICES
Handle with care. This product is
shipped in the best condition.
Do not disassemble or modify. Only
experienced people should make
any adjustments.
Open and close the awning only when
there are no other people around it.
Injury can occur if the awning legs,
handles, or body hit a person during
opening and closing operations.
Check the awning reguarly.
If you have not used the awning for
a while, check and verify that the
awning is properly attached, that no
screws are loose, that the fabric is not
scratched or torn, and that the awning
can be closed and stored properly.
Do not use fire under the awning.
Do not use a BBQ under the awning.
It may cause a fire and is dangerous.
Do not swing the handle.
Use the handle only to open and
close the awning. Do not use it for any
other purpose. Keep the handle out
of the reach of children.
Before driving, making sure the
awning is properly attached, the
screws are not loose, and the fabric
is stored properly.
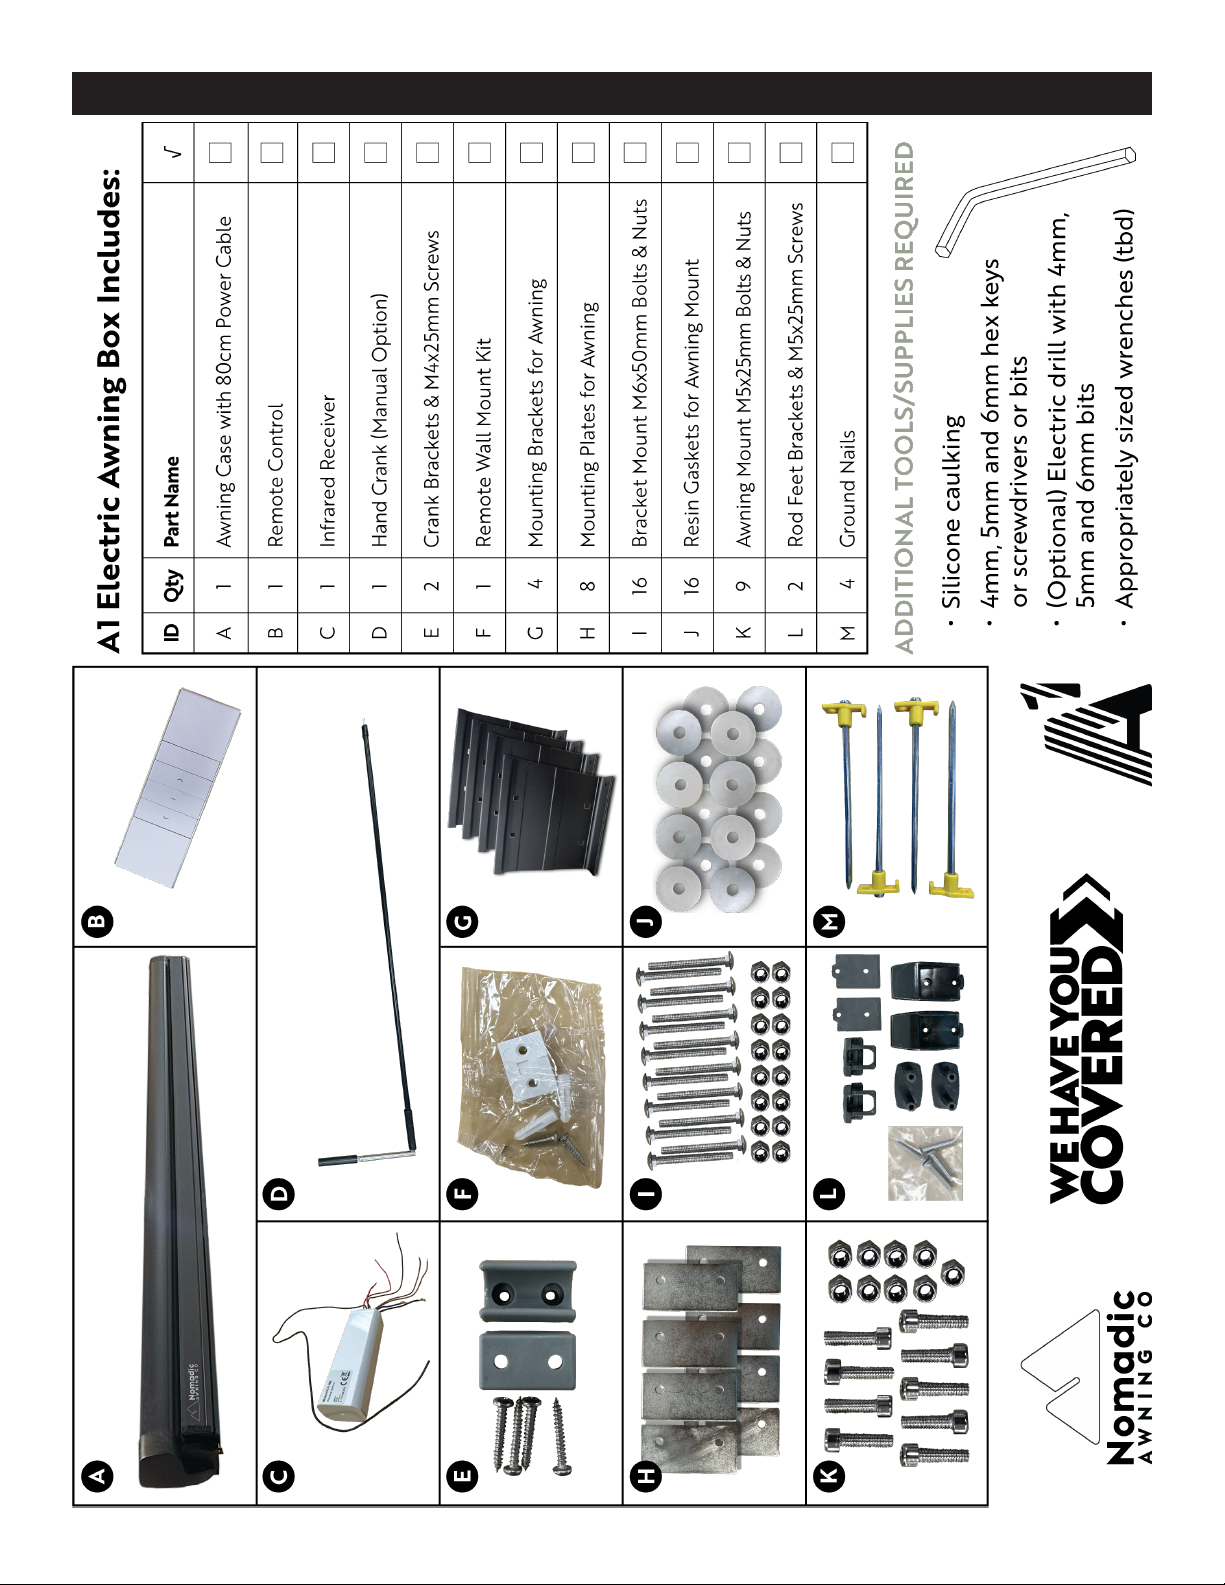
ITEMIZED PARTS LIST
Nomadic Awning Co 5 Electric Awning Instalation and Operation Guide
A1Electric Awning Guide V1.3-092723 6 Nomadic Awning Co

Nomadic Awning Co 7 A1Electric Awning Guide V1.3-092723
INSTALLATION STEPS
Before beginning the instalation, read this
guide and ensure that you have all of the
parts listed on page 3.
Verify that all parts are undamaged. If there
are any parts that are damaged or missing,
please contact your supplier.
Instalation should be performed by at least
two people. In addition, it is recommended
that at least one person has previous
instalation experience, or you may consider
having it installed by a specialty company.
MOUNTING POSITION
Know in advance how to properly
install the electric awning.
If the mounting surface is not vertical to the
ground and all brackets cannot be mounted
horizontally, use a spacer or adapter to
maintain horizontal and vertical support
before mounting the awning.
Vehicles need a vertical and fat mounting
surface to directly install the awning.
Vehicles with a non-fat bracket mounting
surface require adapters or spacers to install
the awning.
Awning body must be installed vertically.
Installing the awning at an angle can
cause improper function.
Do not install in a pace where the mounting
surface is curved.
If the mounting surface is curved, use an
adapter or spacer to make the mounting
surface straight (not included).
Body
Body
Body
Body
Awning
Body
Awning
Body
Awning
Bo
dy
Awning

A1Electric Awning Guide V1.3-092723 8 Nomadic Awning Co
SUPPORT ROD LENGTHS
Awning Width Max Rod Length
13.1’ (4.0m) 7.9’ (~2.4m)
9.8’ (3.0m) 7.9’ (~2.4m)
If the legs do not touch the ground when
mounted at a high pace, use the wall mount
brackets (included) to attach standing pole
legs to the vehicle’s side (instalation on
pages 11-12).
BRACKET MOUNTING POSITIONS
A
B
Each bracket is ~5.9” (15cm) wide. The
brackets are attached to the back of awning.
Determine where to install the bracket on
the vehicle. The set up position spacing has
the same dimensions on the left and right
(“A” and “B” are the same measurements).
If using 4 brackets, the distance should be
equally spaced between each bracket.
Check the measurements of “C” and decide
on the awning mounting location.
Awning Width x Extension “C” width
13.1’ x 8.2’ (4m x 2.5m) 7.874” (20cm)
9.8’ x 8.2’ (3m x 2.5m) 0.394” (1cm)
Apply the kit to the body of the vehicle and
mark the location of the holes in the bracket
on the body.
Drill holes in the marked areas.
Front
Back
AB
CC
Wall Bracket Sets
13’ (4.0m) cases should use
all 4 mounting brackets.
10’ (3.0m) cases can use 3
or 4 mounting brackets.

Nomadic Awning Co 9 A1Electric Awning Guide V1.3-092723
MOUNT THE AWNING
1. Drill marked holes on vehicle’s body.
6.5mm
6.5mm
6.5mm
9.0mm
For motor
power cable
2. Install the brackets on the vehicle. Caulk
the mounting surface and holes of the
bracket using silicone.
Pate
Silicone
caulking
Resin gaskets
M6 x 50mm Screws
M6 Nuts
Vehicle
surface
3. Attach the motor power cable.
4. Attach the awning body to the brackets.
(1) Seat the top of awning body to the
upper part of the brackets and then (2)
pivot the lower side into the brackets.
Bo
dy
2
Awning
1
Awning
5. After installing the awning body, drill a
hole in the awning with a 5.2mm drill to
fit the two bottom holes of the bracket.
M5 x 15mm Bolts
6. Attach the awning to the brackets by
using the allocated M5 bolts and nuts.
M5 x 15mm Bolts
M5 Nut
Awning Casing
Motor
Power
Cable
Wall
Switch Remote
Receiver
12V DC
Power
A1Electric Awning Guide V1.3-092723 10 Nomadic Awning Co
After awning is attached, check to
ensure there are no problems, and
then drive the vehicle for a while, and
check again.
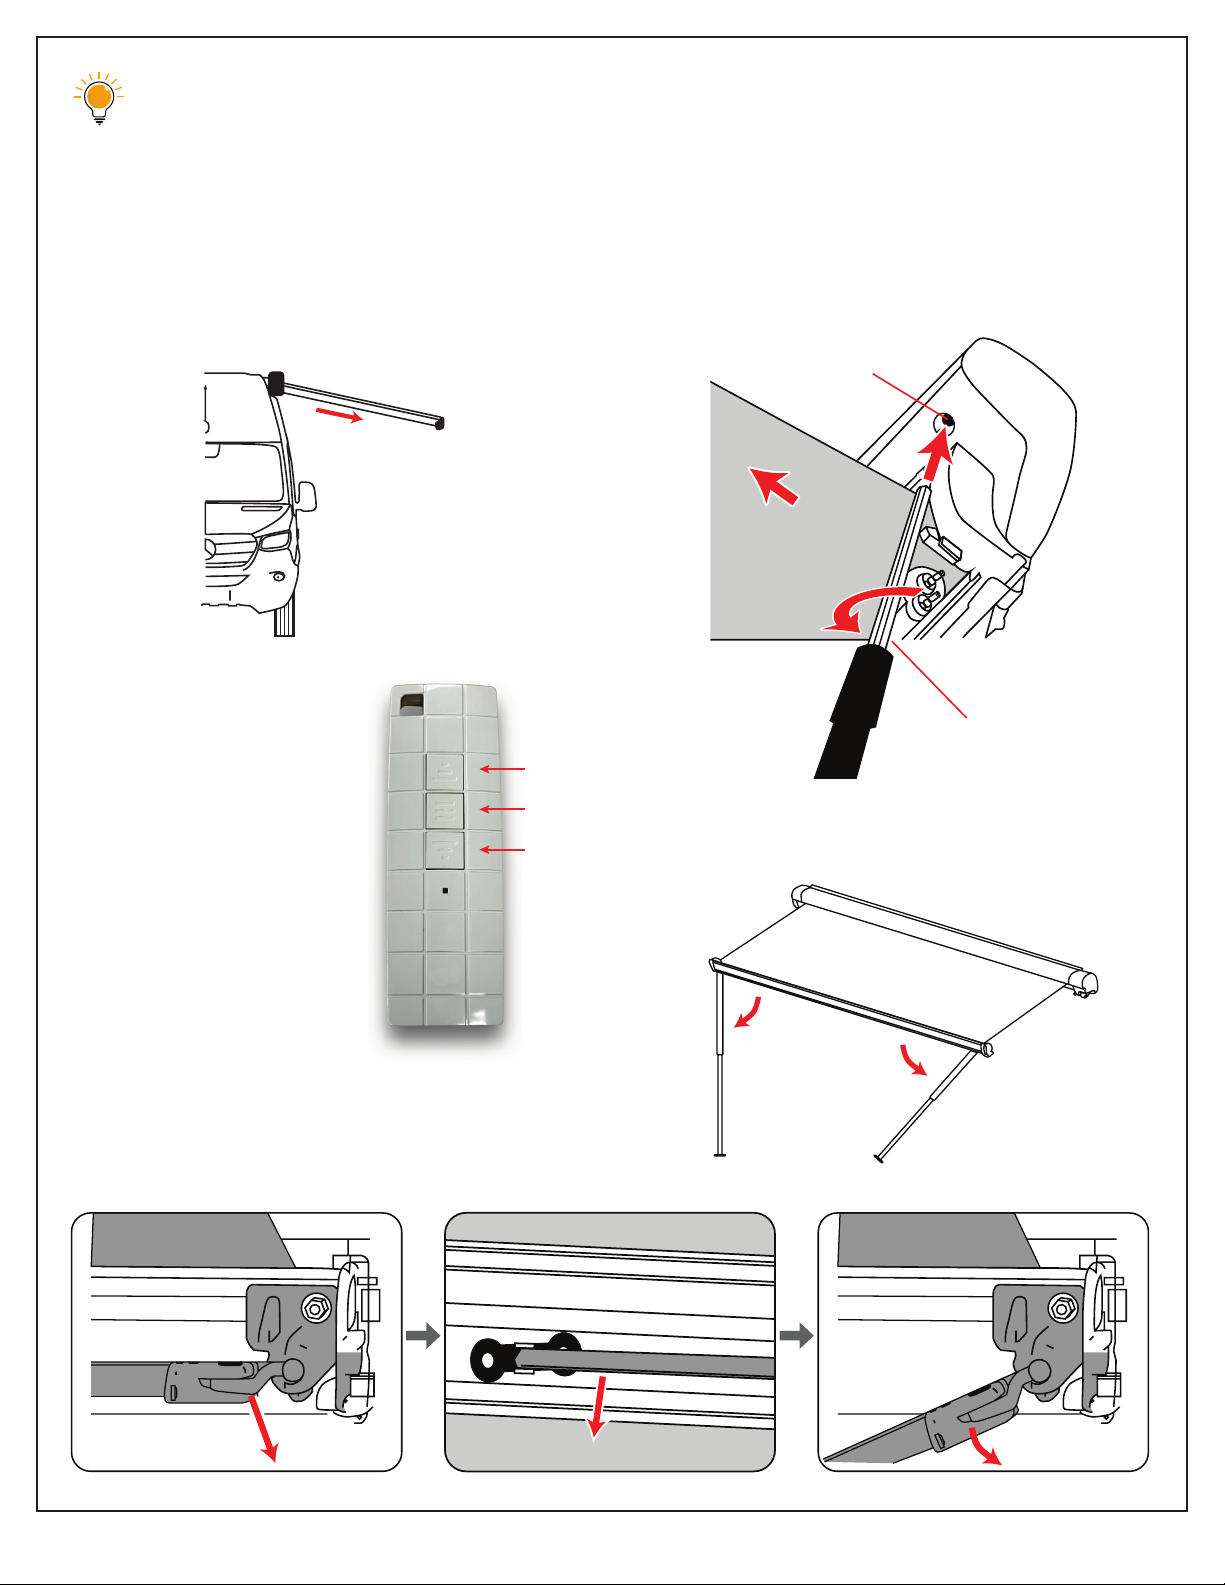
ELECTRONICALLY OPEN THE AWNING
Awning can be opened electronically using
either the remote control.
1. Press ON with
remote to begin
unfolding the
awning till it reaches
the desired position.
Return the switch
back to the MIDDLE
position, or press
OFF on the remote
to stop moving.
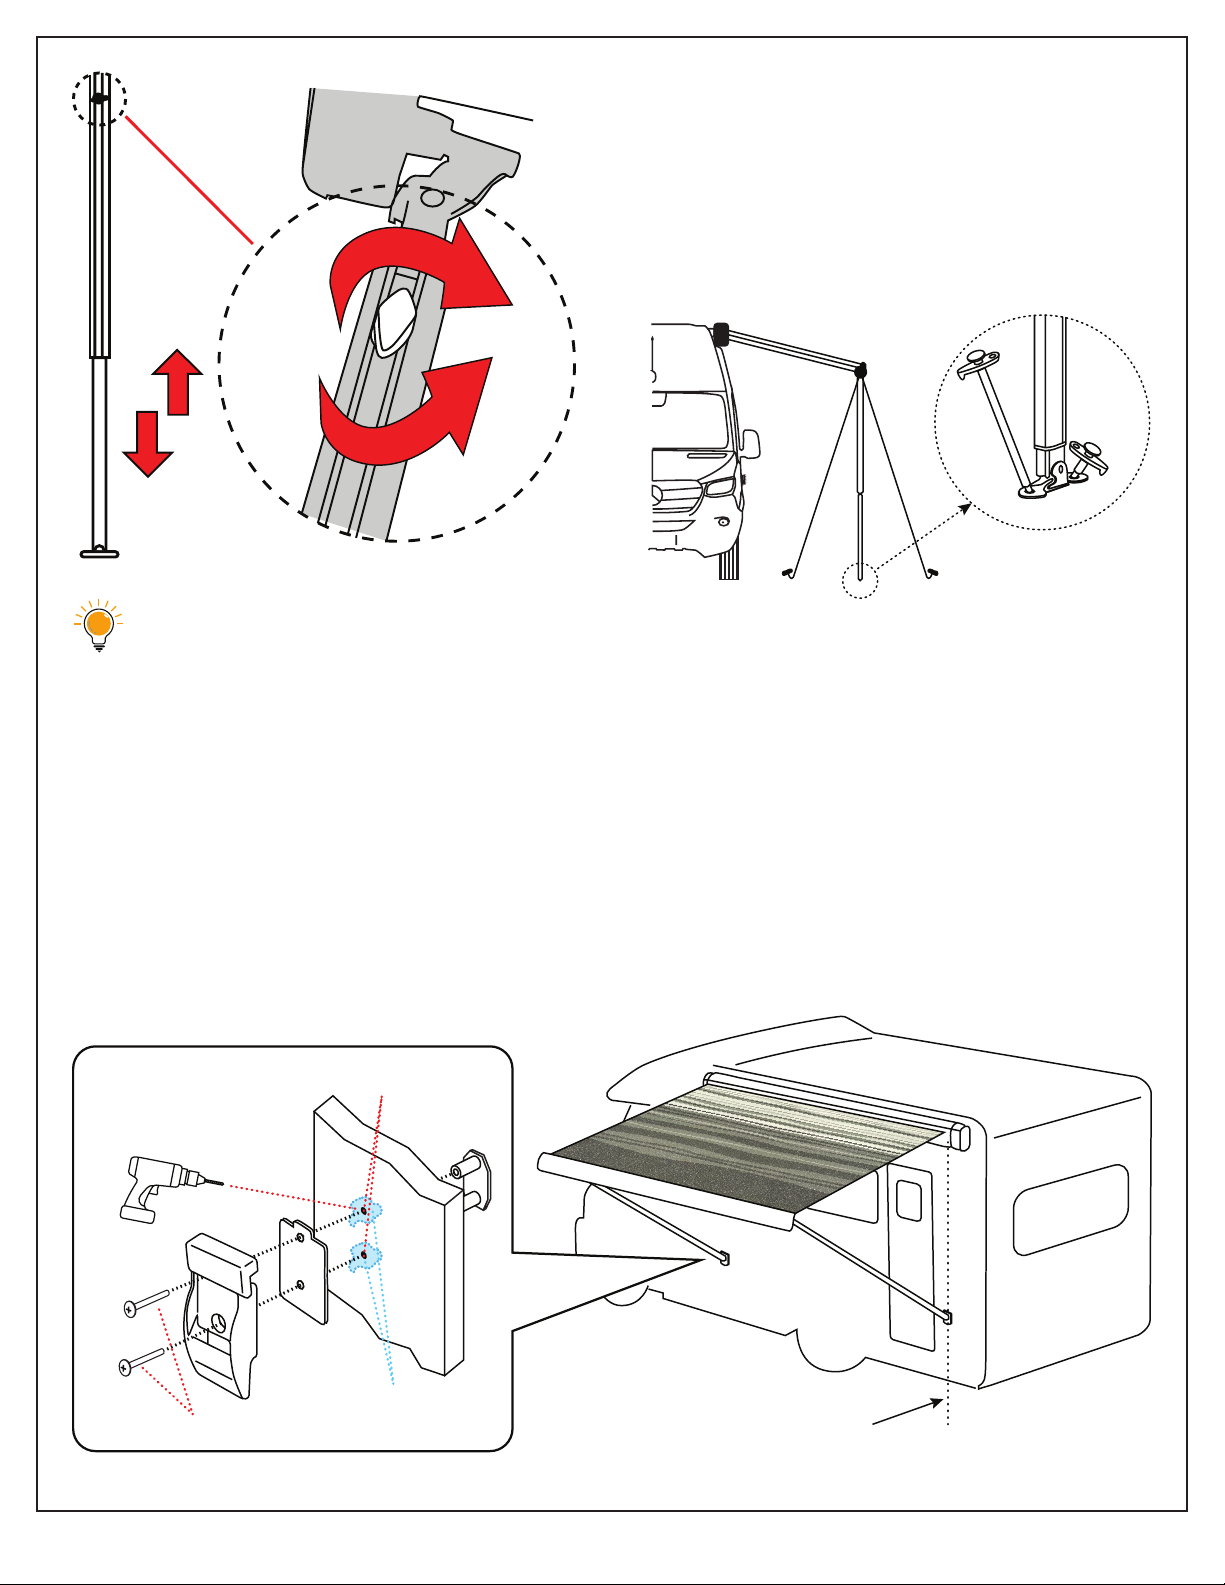
2. Pull out the left and right support rods,
loosen the screw and extend the legs.
MANUALLY OPEN THE AWNING
Awning can be opened manually using the
hand crank.
1. Hook the hand crank on the awning and
turn counterclockwise. Pull out about 3ft.
2. Pull out the left and right support rods,
loosen the screw and extend the legs.
Pull out
awning
3’ (~1m)
Crank
Counterclockwise
Crank hex
fits larger
of 2 holes
On
P
ause
O
Nomadic Awning Co 11 A1Electric Awning Guide V1.3-092723
If manually opening, once the sup-
port rods are extended, turn the hand
crank counterclockwise to extend
the fabric out further. If the fabric
becomes distorted or twisted while
pulling it out, turn the handle crank
slightly in the opposite direction to
eliminate the distortion or twist.
FIX THE SUPPORT RODS
1. Use hammer and provided stakes to fix
the support rods to the ground.
2. By attaching two wind ropes, support
rods are stronger against wind.
MOUNT ROD FEET BRACKETS
1. Support rods can attach to the wall
brackets if they are unable to reach the
ground, or if the ground is uneven.
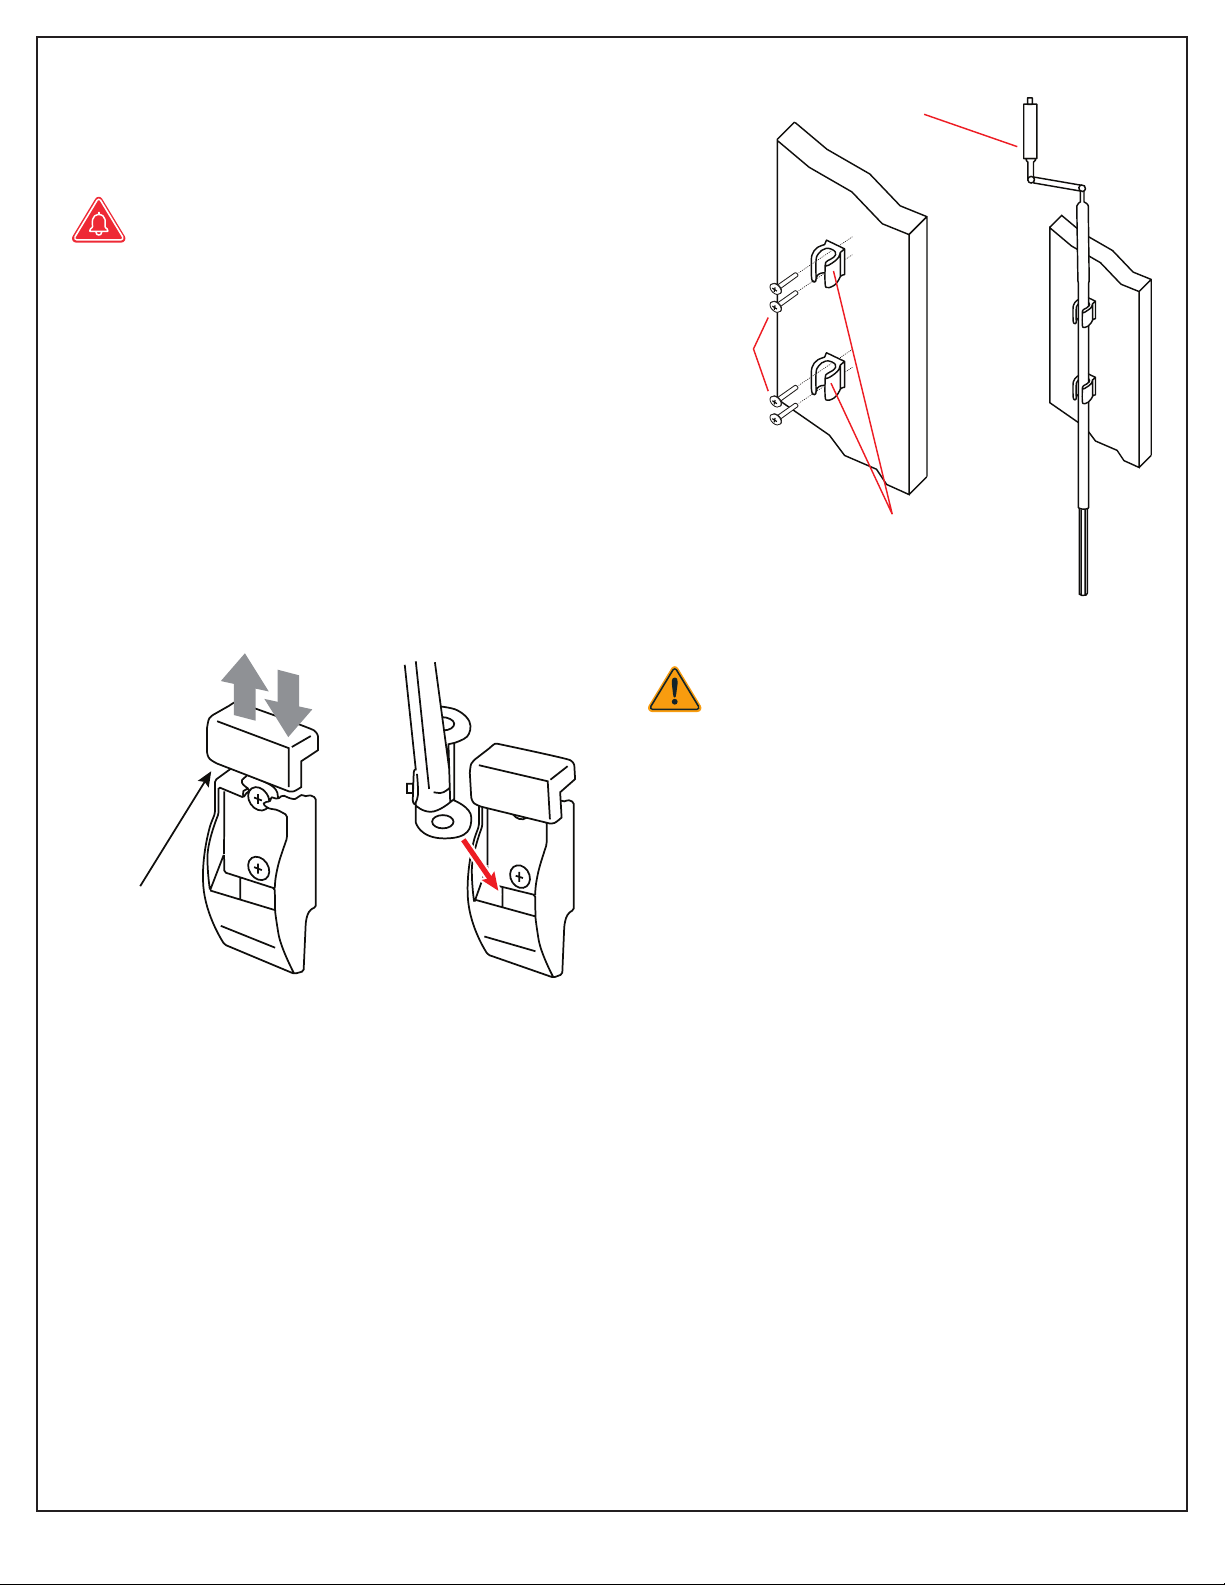
2. Decide where to attach the wall brackets.
Open the awning to the desired position.
The wall brackets must be installed verti-
cally in line with the support rods.
Loosen
Loosen
Tighten
Tighten
Loosen
Tighten
10.5mm holes
The vertical line shows the
position where the support
rod wall bracket is attached
Set Screws - M5 x 25mm
Silicone Caulking
Rod Feet Bracket
A1Electric Awning Guide V1.3-092723 12 Nomadic Awning Co
3. Apply the wall bracket to the vehicle’s
body and align it with the screw holes.
4. Drill two 10.5mm holes.
Be careful when drilling holes in the
vehicle’s body. If you make a mistake
when drilling a hole position, it can be
difficult to repair.
5. Caulk the threaded part with silicone to
be waterproof as shown in diagram on
previous page.
USAGE OF THE SUPPORT ROD BRACKET
Raise the lock clip to unlock the wall
bracket and then insert the leg. Lower the
lock clip to lock it pace.
STORE THE HAND CRANK
When the hand crank is not being used,
store it at out of the way in the vehicle.
Use the allocated hand crank wall bracket
for wall mounting.
Determine where the wall bracket will be
mounted. It should be somewhere safe
and clear.
Attach the handle wall brackets (2) with the
attached set screws M4-25mm.
NOTICE
Your Nomadic Electric Awning is intended
primarily to provide sun shade. Avoid using
the awning during inclement weather (heavy
rain or snow). Also avoid using the awning
during strong winds or if the temperature
drops below 32°F.
When using the awning, you should always
secure the support rods to the ground using
the stakes provided.
Please do not forget or leave the support
rods in the awning’ s front bar.
Lock
Lock
Lo
ck clip
Lock
Unlock
Hand crank handle
Se
t screws
M4-2
5mm
Hand crank wall brackets

Nomadic Awning Co 13 A1Electric Awning Guide V1.3-092723
AWNING MAINTENANCE
Please close the awning immediately
if heavy rain, snow accumuation, or
strong winds occur.
If the fabric gets wet, please spread
out the awning and let it dry as soon
as possible on a sunny day.
Reguarly check the fabric for scratch-
es, cuts, or holes. If the fabric is cut.
The awning may not stow properly.
Please store the fabric in a dry state. If
it is unavoidable to store the awning
in a wet state, dry the fabric as soon
as possible.
If the fabric ever becomes dirty, wash
it off with water. If it is very dirty, use a
neutral detergent to remove the dirt
and dust. Rinse off the awning thor-
oughly with water. After drying, close
the awning back up.
NEVER WASH THE AWNING WITH A
HIGH PRESSURE WASHER!
Please wash the outer case together
when washing the vehicle. If you clean
awning with wax, it will stay clean for
a longer time.
Do not use a drive-through car wash.
Before departure, please make sure
that the awning is stored correctly.
If you do not use the awning for an
extended period, check the awning
to ensure there are no problems with
the fabric or arms.
Please contact us about repacing the fabric
if it ever becomes necessary.
If you have any problems during instalation
or operation, please contact Nomadic
Awning Co. at 480-576-2489.
Thank you!

A1Electric Awning Guide V1.3-092723 14 Nomadic Awning Co
Heavy Rain, Snow, Thunderstorm
Using without standing poles
Strong Winds or Temp below 32°F
< 32°F
Using with standing poles
Sunny or cloudy days
PROPER USE OF AWNING

Nomadic Awning Co 15 A1Electric Awning Guide V1.3-092723
Nomadic Awning is dedicated to delivering
top-quality products and outstanding cus-
tomer service. We provide an industry-lead-
ing warranty for our products to ensure your
satisfaction and peace of mind. Please care-
fully review the following warranty policy.
1. Warranty Duration:
All A1units are covered by a one-year
warranty starting from the date of purchase.
2. Coverage:
During the warranty period, Nomadic Aw-
ning will cover the cost of shipping and
exchanges for any valid warranty caims. If
your A1unit experiences any defects due to
manufacturing or workmanship issues within
the first year, we will promptly arrange for
shipping and provide a repacement unit at
no additional cost to you.
3. Core Charge:
If the customer wishes to have a repace-
ment unit shipped prior to Nomadic Awning
receiving their old unit, a core charge of up
to 50% of the Manufacturer’s Suggested Re-
tail Price (MSRP) may apply. This core charge
is intended to ensure the return of the old
unit to Nomadic Awning. The core charge
will be added to the purchase price of the
repacement unit and will be refundable
upon Nomadic Awning’s receipt and eval-
uation of the returned unit. If the warranty
department determines that the defect was
due to Nomadic Awning’s fault, the core
charge will be refunded in full.
4. Labor Exclusion:
Nomadic Awning’s warranty policy does
not cover any abor costs associated with the
inspection, repair, or repacement of the X3
unit. Any additional expenses reated to a-
bor, including but not limited to instalation,
removal, or troubleshooting, are the sole
responsibility of the customer.
5. Exclusions and Limitations:
The following conditions are not covered
by the warranty:
• Damage caused by misuse,
negligence, accidents, or
unauthorized modifications.
• Damage resulting from improper
instalation, maintenance, or storage.
• Damage caused by natural disasters,
fire, water, or any other external fac-
tors beyond our control.
• Normal wear and tear, cosmetic dam-
ages, or minor imperfections that do
not affect the functionality of the
product.
6. Warranty Caim Process:
To initiate a warranty caim, please contact
Nomadic Awning’s customer support team
through the provided channels on our web-
site (www.nomadicawning.com). Our repre-
sentatives will guide you through the neces-
sary steps and provide instructions on how
to proceed with the warranty caim.
Please note that this warranty policy is
subject to the terms and conditions stated
herein and may be subject to change with-
out prior notice. Nomadic Awning reserves
the right to determine the validity of all war-
ranty caims and to make the final decision
regarding repairs, repacements, or refunds.
For further information or any inquiries
regarding our warranty policy, please refer
to our website or contact our customer
support team.
WARRANTY POLICY

A1Electric Awning Guide V1.3-092723 16 Nomadic Awning Co
Returns
Nomadic Awning will gadly accept returns
within 30 days of receiving the order. Only
items in their original condition with all pack-
aging, accessories, instruction manuals, war-
ranty cards, and UPC codes will be accepted.
Any returns after 30 days are subject to ap-
proval. Please speak with a Nomadic Awning
employee regarding your return. This can be
done through email or by calling Nomadic
Awning at (480) 576-2489.
There is a 15% restocking fee for all return
orders. Customers are responsible for the re-
turn shipping of any product to Nomadic Aw-
ning. Return shipping can be arranged for you
by Nomadic Awning or can be arranged on
your own but must include a tracking number.
If the product arrives back to Nomadic Awning
damage due to mishandling, poor packaging,
or in otherwise unusable condition for resale
then an additional fee may be assessed.
Products to be returned should be sent to:
Nomadic Awning Co
16680 N 51st Ave Unit 4-5
Glendale, AZ 85306
Due to some products being shipped direct-
ly from the manufacturer, please check with a
Nomadic Awning employee where to send all
other returns.
Returned products will be assessed for dam-
age upon receiving at Nomadic Awning.
Refunds will not be processed until the
product is received, inspected, and/or test-
ed at Nomadic Awning HQ. All refunds will
be processed back to the original payment
method and/or store credit in the form of a
gift card.
Order Cancelations
If you wish to cancel your order for any rea-
son, please let a Nomadic Awning employee
know as soon as possible. This can be done
through email or by calling Nomadic Awning.
If you are canceling before the order has
been fulfilled and/or shipped then we will
process a refund back to the original payment
method. If you are wishing to cancel and the
order has already been fulfilled then the
cancelation will be processed as a return and
is subject to a restocking fee. Please see the
returns section for more information. If ap-
plicable, the customer is responsible for any
“stop and return” fees.
Missing Items
Upon receiving your order from Nomadic
Awning please immediately open the package
and inspect the contents to ensure all items
from the order were included. If you suspect
that an item is missing or the incorrect item
was sent please notify a Nomadic Awning
employee ASAP so we can assess the order. If
you fail to notify a Nomadic Awning employee
within 14 days of receiving your order that an
item was missing or incorrect then the cus-
tomer will be responsible for all new shipping
costs for the missing or incorrect item(s).
To better prevent orders with missing or
duplicate items, and for ease of tracking,
Nomadic Awning will only be shipping or-
ders once all items in the order are ready for
shipping. Nomadic Awning will not send par-
tial shipments. Exceptions may occur when
specifically requested by the customer and/
or item(s) in the order are on backorder. Prod-
ucts will be shipped the same when ready
unless requested held by the customer.
RETURNS, CANCELLATIONS AND MISSING ITEMS
This manual suits for next models
1
Table of contents


