Noontec GV3785 User manual

GV3785 USERMANUAL
Contents
BRIEFINTRODUCTION.........................................................................1
FEATURE.................................................................................................1
BASICPERFORMANCE ..............................................................................1
PRODUCTDETAILS...............................................................................2
PACKING LIST..........................................................................................2
FRONTVIEW............................................................................................2
BACK VIEW.............................................................................................4
REMOTECONTROL...................................................................................4
BASICOPERATION................................................................................7
USAGEPREPARING ..................................................................................7
OPERATION OFFILESHARING..................................................................12
OPERATIONOFPRODUCT USAGE...................................................13
MAIN MENU...........................................................................................14
INTERNET SERVICES ...............................................................................20
FILE COPY MENU...................................................................................22
SETUP MENU..........................................................................................23
WIRELESS SETUP....................................................................................28
INSTALLAND USE OF BT/SAMBA.....................................................33
IPADDRESSSETTING...............................................................................33
NEIGHBOR WEBINTERFACE ....................................................................34
MAINTENANCENOTICE......................................................................40
FAQ..........................................................................................................40
OTHERS..................................................................................................46

1
Brief introduction
Feature
The productisanewkind ofmultimediaplayerproduct. The productcan
provide good watching.Meanwhile,itcan alsostoreand playmanykindsof
video files.Theproduct,whichisfacilitatedwithmanyports,can showyou
picturesand videoswithhigh definition.When the productisconnected tothe
internet, itcan supportthe internetserviceand BT/Samba,soyou can browse
photos,newsand download movies.It isreallyyourdesirableentertainment
product.
Basicperformance
Video decoding-MPEG1/2/4,Divx,Xvid,H.264,VC-1,RM/RMVB
Video Format-WMV,MKV,MOV,AVI,MP4,MPG,TS/M2TS/TP/TRP,
FLV,ISO,IFO,VOB,DAT,RM/RMVB
Audio-MP3,WMA,WAV,AAC,OGG,FLAC,DolbyDigital,DTSDigital
Image-JPG/BMP/PNG/GIF
USB HOST-Connection USBmass storage device
USB2.0-High speed USB2.0port
HDMI-HDMIhigh definition port
1080Poutput -FullHD 1080P(1920x1080)decoderoutput

2
Network -WLAN(IEEE802.11 b/g/n) RJ45 port,10/100M
External DVD-Support USBexternalDVDdrivetoplayDVDmovies
Productdetails
Packinglist
Check the accessoriesafterreceivethe product.Iftherearesomemissing,
pleasecontactimmediatelywithyoursuppliertoinsureyourconsumer s
right.
Frontview

3
Buttondefinition
Button button
definition instruction
①MENU Menu button Press shortlytoreturnthe
firstmenu
②SETUP Setup button Press shortlytoenterthe
setup menu
③■Stop button Press shortlytostop
current operation
④Left button Press shortlytomove
cursorleft
⑤Right button Press shortlytomove
cursorright
⑥OK Enterbutton Press shortlytoconfirm
the current operation
⑦Up button Press shortlytomove
cursorup
⑧Down button Press shortlytomove
cursordown
⑨Power
button/LED
Press shortlytoswitch
on/off the power,Blue
lightwhen switching on,
red lightwhen
standing-by.
4
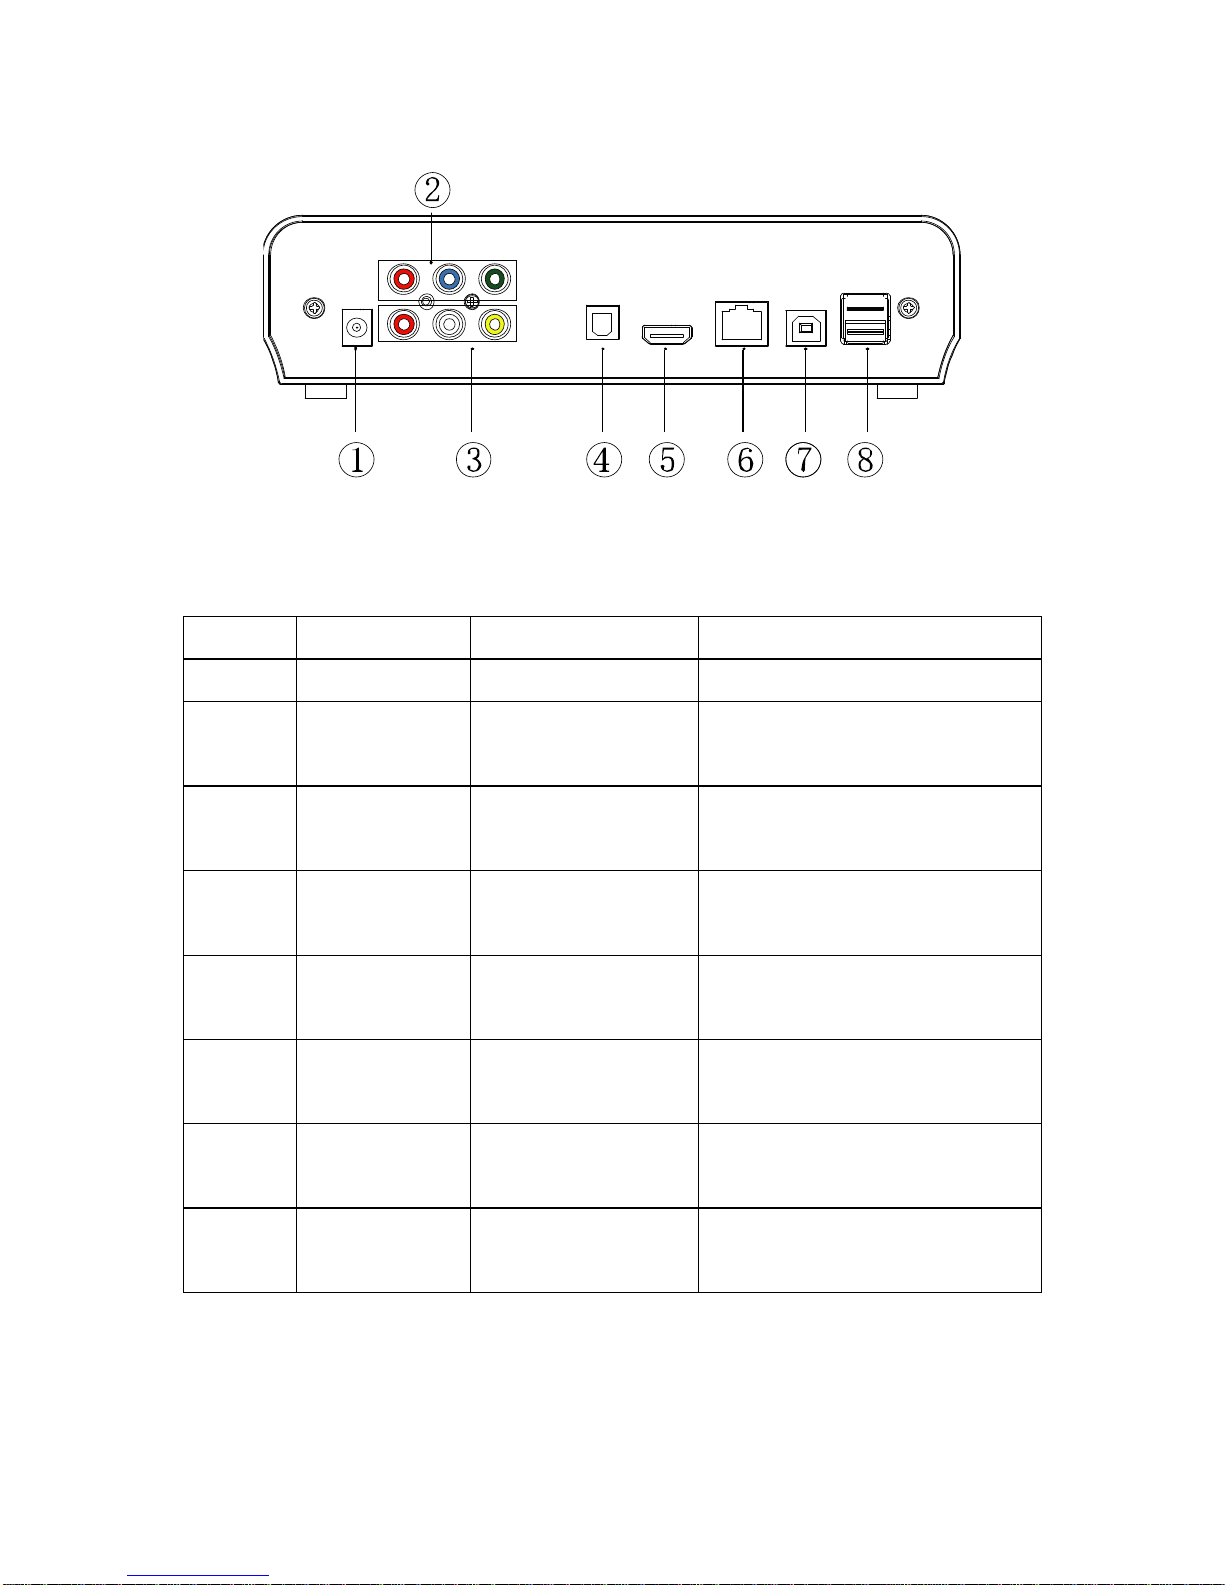
Back View
Portdefinition
Port Port definition Instruction
①DC IN Powerport Inputspower
②YPbPr Component
video output port
Outputsprogressivescan
componentvideo
③AV Composite
video output port
Outputscompositevideo
and audio
④Optical Audiooutput
port Outputsdigitalaudio
signal
⑤HDMI High definition
port Outputsdigitalsignalvia
HDMI port
⑥LAN Network port Connectstonetwork via
internet port
⑦USB USB port ViathisUSB portforPC
communication
⑧USB
HOST Outside USB
port readsand writesoutside
USB storage viaUSB port
Remotecontrol

5
BUTTON FUNCTION
POWER
Turnon and off inthe stand bymode
MUTE
Turnon orshut audiooutput
TV
SYSTEM
Press toswitchbetween NTSC
,PAL,
480P,576P,720P50HZ,720P60HZ,
1080I50HZand 1080I60HZ, 1080P
50HZ,1080P60HZ.
0-9 Press toinput digital
GOTO Press top
laythe video atthechapter
aftersetting schedule
GUIDESwitchtothe mainmenu.
FR
Press tofastrewind fromcurrentplay
and againtoselectthe speed
FF
Press tofastforwardfromcurrent play
and againtoselectthe speed
RETURN
Returntothepreviousmenu
SETUPOpensthe settingsmenu
Press shortlytomovecursorleft
Press shortlytomovecursorright
Press shortlytomovecursorup
Press shortlytomovecursordown
OK Press thisbutton confirmsaselection
and startsthe playback ofamediafile.
PREV
Press toreturntopreviousfile
NEXT
Press togo tonextfile
VOL- Press todecreasethe volume
VOL+ Press toincreasethe volume
OPTION
Open theoption menuinthebrowser
torenameordeletethe file
STOP
End the playbackofamediafile

6
PAUSE/ST
EP
Pausethe playbackorplaybackby
step
REPEAT
Press tosetrepeatoption:chapter,
Titleoroff
COPY Enterthe copymode
SELECT
Press toselectcopyfilesorfolders
in
the copymode
CONFIRM
Toconfirmthe selection
INFO
Press todisplaytime,title,information
of chapterwhen playvideo and photo
SUBTITLE
Switchthe subtitleifthe filesupported
SLOW Press tohaveslowmotion:(1X,3/4X
1/2X 1/4X 1/8X 1/16X.PressOK
to
resumeregularplaymode.
AUDIO Switchthe audioformat output
ZOOM
Press tozoomwhenplaying back
photosorVideo programs
Photozoomlevels: 2X,4X,8X,16X
Video zoomlevels: 1X,2X,3X,4X,8X
ALL Press thiskey, showall files
MUSIC Press thiskey, showall audiofiles
PHOTO
Press thiskey, showall picturefiles
MOVIES
Press thiskey, showall video files
7
Basicoperation
Usagepreparing
1Power connection
Takeout poweradapterfromthe package and connect
2ConnectionofTVaudio and video output
The productisdesigned withmulti-output,including composite(AV),
component(YPbPr),optical and HDMI.Individualscan selectdifferent
interfaceaccording variousneed.The productcandetectvideo output
automatically,making the operation friendlyand convenient. Pleasereferto
the following instruction forconnection toavoidanyproblem.
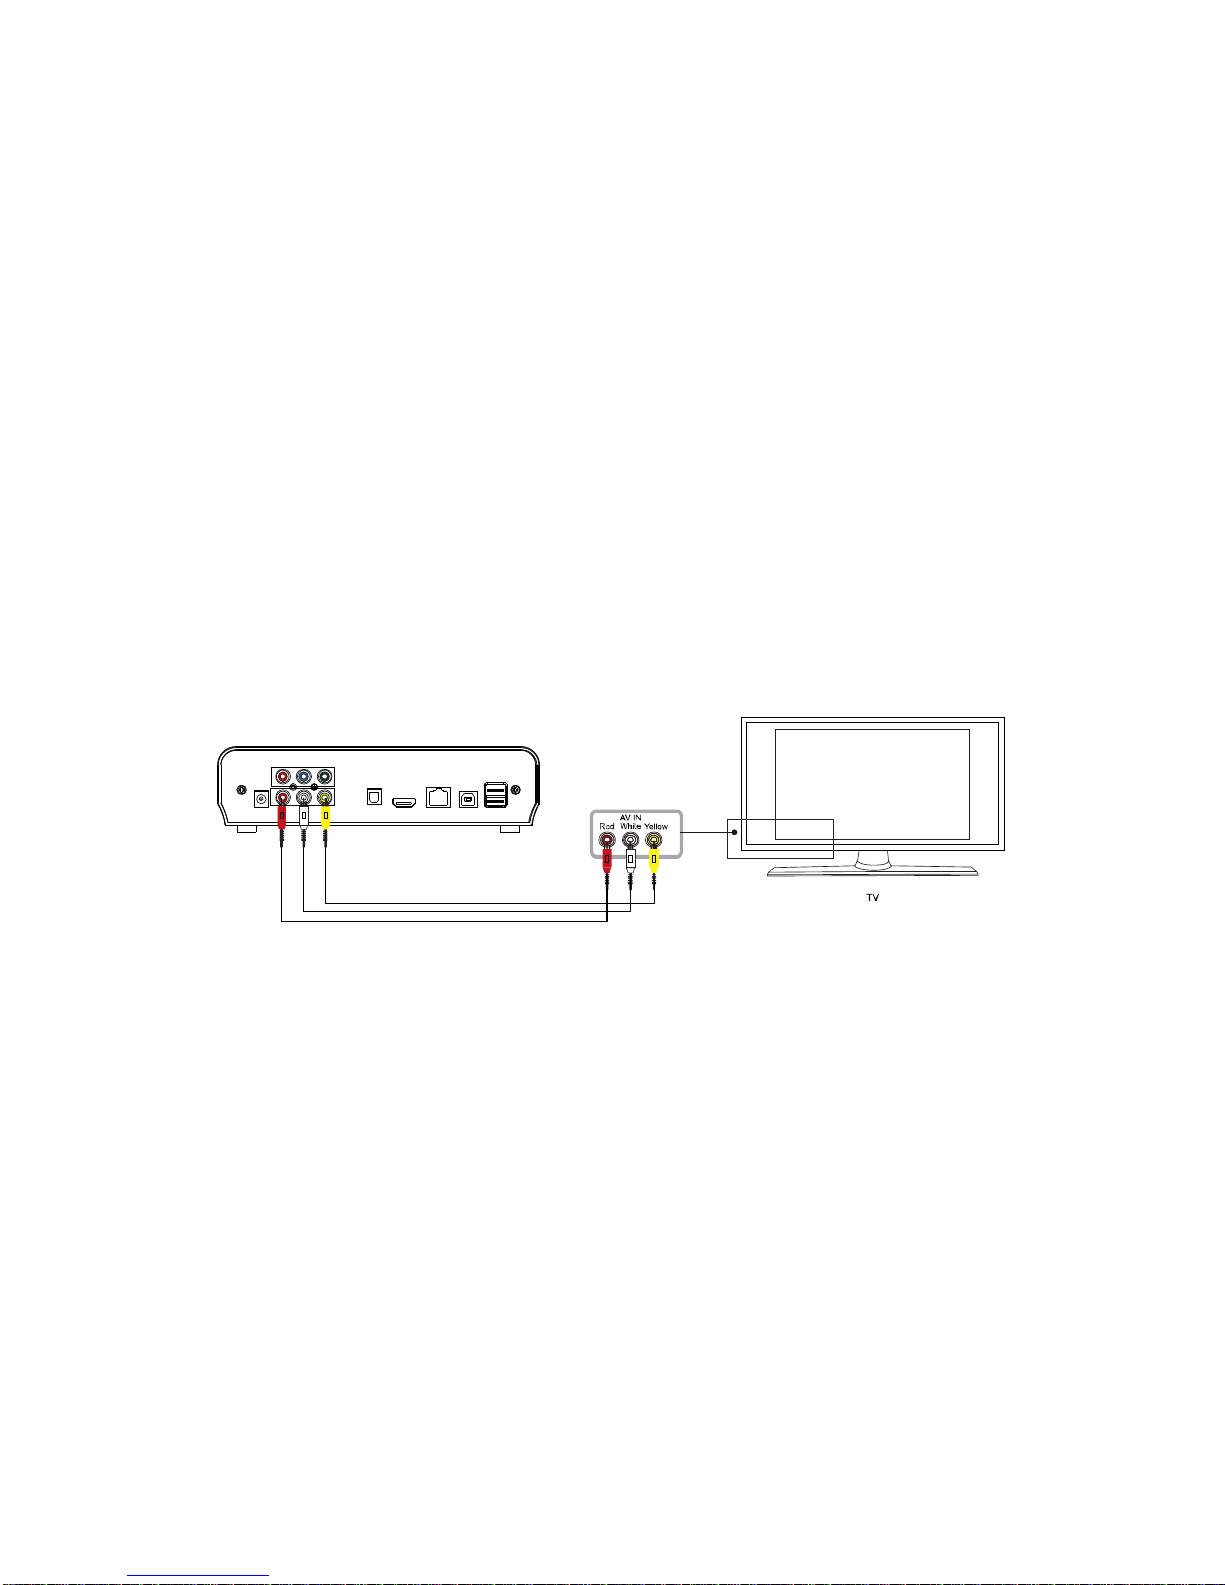
Compositeoutputconnection(AV)
Plug the yellowconnectorintotheAVoutputofproductand AVinputofTV,
and plug the red and whiteconnectorintothe audioinputofTVorHIFI.Turn
on the TVandselectAV mode.Turnonthe productand TVdisplaysthe
interfaceofinitiation.
8
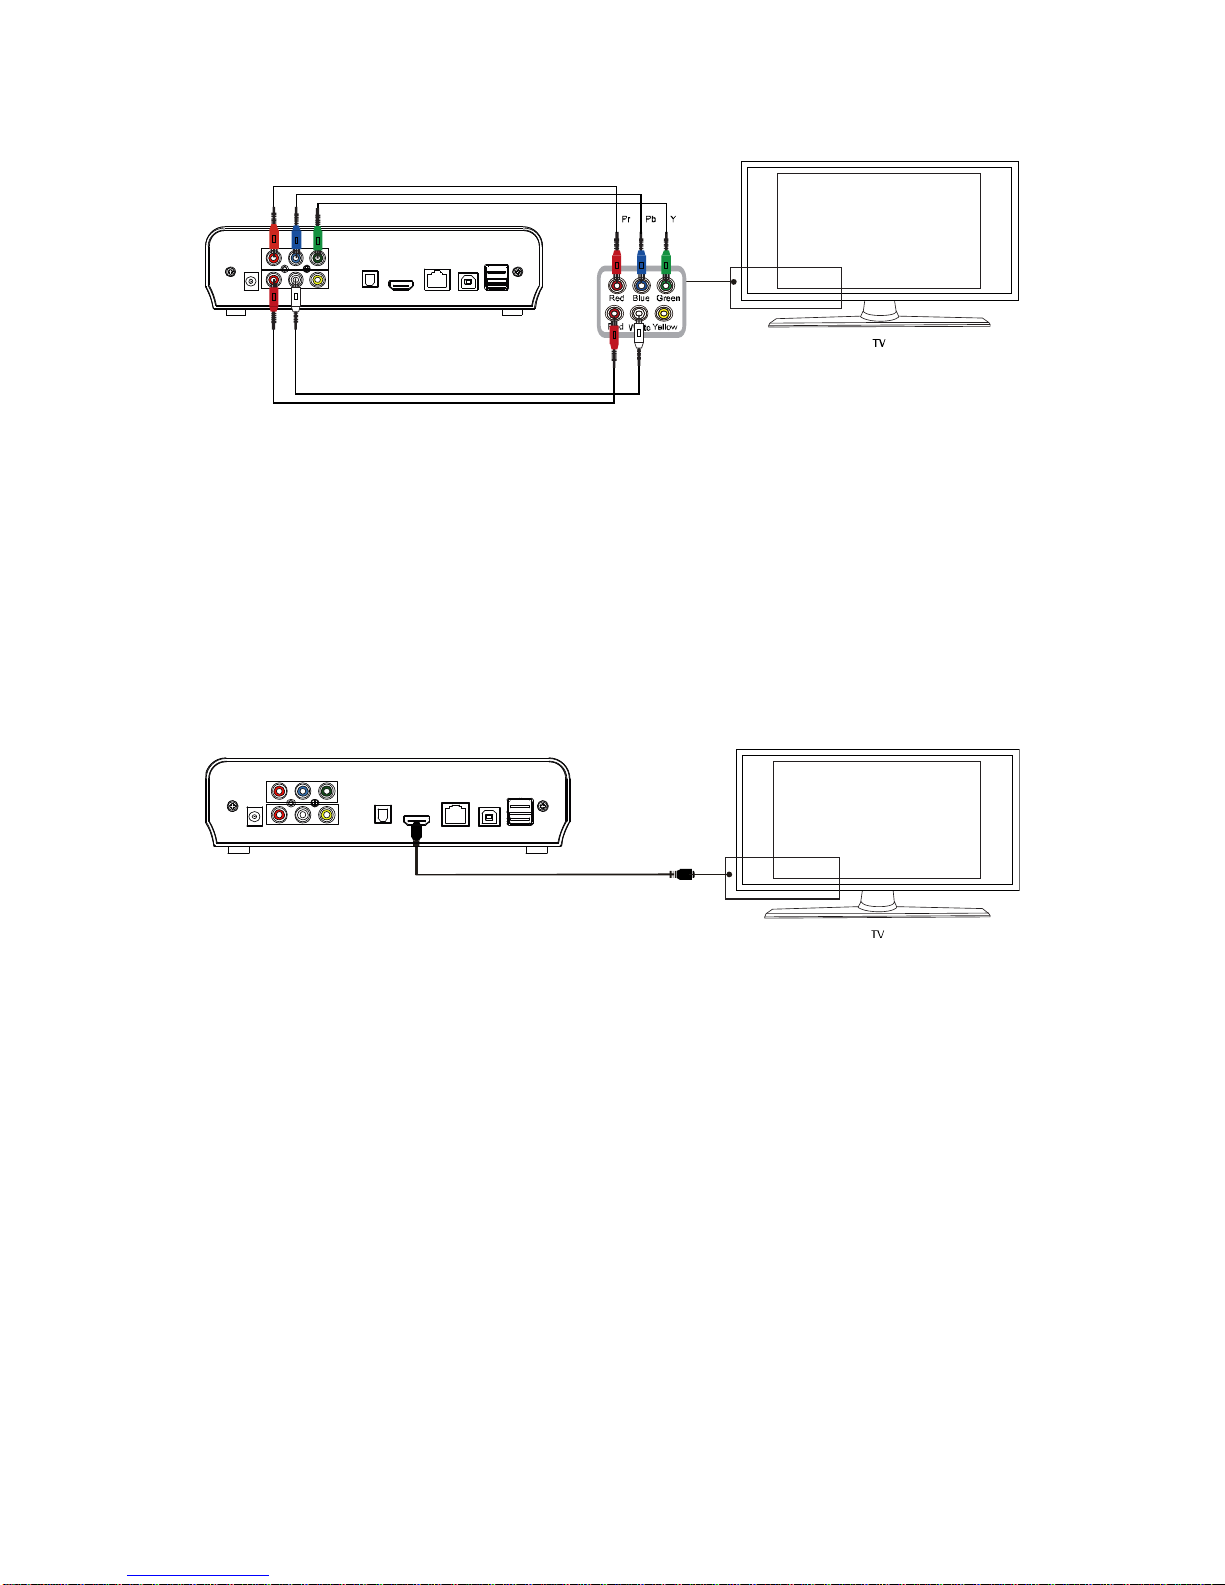
Componentoutputconnection (YPbPr)
Componentoutputmode:Plug the YPbPr cableintothe outputofproduct
and input ofTV. Becausethe cableisonlyforvideo signal, anotherAV cable
isnecessary.Plug the red and whiteconnectorofAVcableintothe audio
output of productandaudioinputofTVorHIFI. TurnonTVand selectYPbPr
mode.Turnon the product and TVdisplaysthe interfaceofinitiation.
HDMIoutputmode
HDMI isaoutputwithbestaudioand video effectwhichoutputsdigitalvideo
and audiocomposited atthe sametime.ConnectHDMIcabletooutputof
productand displaydevicewithHDMI input. SelectHDMI mode inTVuntilit
displaysthe interfaceof initiation.

9
Opticaloutputmode
Optical output:Connecttheproductopticalconnectorwiththe otherone from
video oraudiodevicebyopticalcable.Thenentertheproduct'saudio
interface,selectthe DigitalOutputoption "SPDIF LPCM"or"SPDIF RAW".
It isavailabletoenjoy5.1high qualitysoundsthrough amultichannel
decoder/amplifierwithopticalinput.
Connection andsetupofnetwork
The productcan playthe filesstored inthe PCdirectlythrough network.
Pleaseconnectthe RJ45 cableaccordingtothe following illustration.The
network connectswell when the LEDofnetwork statusblinks.
Connectthevideooutput.Press “setup”keyorselect “setup”menu inthe
initiation interface.Select “Network”option inthe setup windowand press

10
“OK”toconfirm. Itisavailableforbothautomaticand manualIPsetup. Press
“setup”keyagaintoexistaftersetup. Pleasesee " WiredLanSetup"for
moredetails.Beforeaccess the PCthrough network bythe product, the
mediafilesmust be shared inthe network.
Following isthe setup ofmediafilesharing inPC
Theuse andoperationsofUSBCDdrive
The playersupportsUSB connected externalDVDdrive.The productcan
playDVDthrough connecting toexternal drivebyUSB.Meanwhile,content in
DVDcan alsobe copied tothe harddisk,and then operationslikebackup
information and soon can be done.
Connectthe USBCDdrivetothe peripheral portof theproduct through USB
dataline,then choose “DVDmediaplay”inthe homepage of the productand
enter.IfthereisplayableCD inthe drive,and the “DVDautomaticplay”
option intheproduct ssystemison,the drivewill startplayingtheCD
automatically.Inthe playing process,you can press “STOP”inthe remote
controltostop playing,then press “Back”toreturntothe product smain
interface,and then press “STOP”inthe maininterfacetocontrolthe “OPEN”
or “CLOSE”operationsinthe drive.

11
Theuse ofUSBHOSTinterface
Playerwithabilitytoexpandlarge-capacity.TheUSBHOSTportcanread
externalmobileharddisk,Udisk,digital cameras,cardreadersand other
datastorage devices.
Even withoutthe installation ofharddriveplayers,youcan connectexternal
storage devicesthrough the USBHOSTinterface.Todirectplayavarietyof
high-definition formatshigh-fidelityaudioand video filesstored inexternal
storage devices. TowatchHD moviesand digital photosaremorepalatable,
atthe sametimethe outputdigital audiosignalstoaudioequipmentcan feel
the shock of high-fidelitysound effects.
TheUSBinterface connecttothePC
ThisHDDPlayerisalsoapersonalmultimediafilesstorage deviceand can
be used byconnecting tothe PC.
1, Connect tothe powersupply
Whileusing the HDD playerwithPC, powersupplyisalsoneeded.
2, Connect toPCwithUSB cable
Connectthe HDD PlayertoPCwithUSB cablethenyou can copyand
transferdata.
Followthe instruction of the abovepictureand connectthe devicetoPC.
Poweron the PCand enterthe system.The PCdetectsthe device

12
automaticallyand then the devicecan be used asan externalUSB storage
device.Afterdatatransferfinished,pleaseremovethe USB storage device
safely(click the USB deviceicon tostop the USB deviceand then pull outthe
USB cable).
Notes:
1.Pleasedon t poweroffwhen itconnecttoPCforreading and writing.
2.Ifthereisno USBdetectedafterconnected withUSBcable,maybe the
PCisoperating otherprogram,pleasepull off the USBcableand wait
about 10 secondsthen connect again.
ThisHDDPlayerisalsoapersonalmultimediafilesstorage deviceand can
be used byconnectingtothePC.Individualscan browseand copyfiles
easily.
Operationoffilesharing
Operationoffilesharingunder Windows
Twoconditionsarenecessary forasuccessfulplayof network connection.
1.Foldersharing and safetysetup
2.Set the samegatewayand subnet mark address.
Procedure offilesharingunder WindowsXP
1.Selectthe folderneed tobe shared,rightclick mouseandselectthe
option”Sharing and safety”,lift clickthe mouse.
2.Select “sharing”inthe propertyoption and select “sharethisfolderon the
network”and click “Apply”forconfirmingtoexist.
3.Open”Control panel-Managementtool-Computermanagement-Local
usersand groups”and click “Users”option.RightclickGuestand select
“Properties”.
4.Select'userscan notchange yourpassword'and'passwordnever
expires'. keep the othercheckboxesunchecked.
5.Open”Controlpanel-Network connection”,and select “LocalArea

13
connection”and rightclicktoselect “Properties”.
6.Inthe Pop-up window, select‘Internetprotocol (TCP/IP)
7.Setup the relevantIPaddress,subnetmaskandgateway,can also
choosetoautomaticallydesign.
8.Completion ofWindowsXPnetwork sharing.
9.Finally, pleaseclosethe WindowsNetwork Connection Firewall
Operationoffilesharingunder WindowsVista
1.Pleasemakesurethatthe Vistaoperation systemisinstalled as
Administratorsupperuser.
2.Fromthe desktop select ”start-setup-controlpanel-select useraccount”
3.Open Useraccountand select”open anewaccount”andnameit “Guest”
4.Selectthefolderneedtoshareand rightclickthemouse,thenselectthe
“sharing”option.
5.Open the shared folderand add guest accounttothe list
6.Givethe righttoallthe usersafteraddingthe Guest intothe list.
7.Select “sharing”, and then the folderisshared.
8.Finishsharing
9. Operatethe deviceasthe sameasoperateinXPsystem
Operationofproduct usage
When connecting the powersupplyforthe firsttime,the devicewillpower
on automaticallyand appearthebelowmenu.
Pleaseread the following instructionscarefullytounderstand the function of
eachoption.
Mainmenu: Browseand playthe mediafiles.
Pressing the “Up”and “Down”navigation buttonstochoosethe source
deviceson the mainmenu.Press movie,photo,musicorallbutton on the
remotecontroltobrowsermovie,photo,musicfilesstored inaHDD,USB
device, NETorPlaylist.and press OKbutton toplay.

14
Filecopy: Copyfilesfromone devicetoanother
Pressing COPY buttonson toenterthecopymode.Withthisfunction,
individual can copyfilesfromHardDisk, NET, USBfromadevicetoanother.
InternetService: Enjoyingvariousinternet serviceon TV
Withthisfunction,you can accesstonews,video ,photo,weather,and
download interfaceonline bywatching TV.Youcanenjoymanykindsof
internet service,withoutusing yourPCtogo totheinternet.
Setup: Enterthe setup menu
Toenterthe setup menu,select SETUPonthe remotecontrolorselect Setup
button on the mainmenu page.Withthisfunction,individualscan configure
System,movie, music,photo, network settings.
MainMenu
The mainmenuallowsyou browseand playmusic,photoand moviefiles
stored on aHDD oran external USBdevice, Network .Playlist.
Press “ ” and “ ” toselectthe deviceon whichthemediaisstored.
ChoosefromHDD,USB (formediastored on an externalflashdisk),NET
and pressOKbutton toconfirmand playthe filesintheselected device.
FileRangefunction
Tomakefilebrowsing and playingeasier, thereisafunctiontorange all files
intodifferentfoldersnamed “All”, “Music”, “Photo”and “Movie”,individuals
can switchtoanyfolderbypressing “All”, “Music”, “Photo”and “Movies”four
buttonson the remotecontrol.
BrowsingMusic
Press the MUSICbutton on the remotecontroltoenterthe musicplaymode.
Press “ ” and “ ”toselectthe foldercontaining youraudiofiles.A

15
thumbnailstripappearsatthe bottomofthe screen,along withsong
information. Press “ ”and “ ” toselect the fileyou want toplayand press
OK.Thisbrowsing musicfunction supportsMP3,WMA,WAV,
AAC,OGG,FLAC,DolbyDigital,DTSDigital…formatPlayback.
BrowsingPhotos
Press the PHOTO buttonon the remotecontrol toenterthephotoplaymode.
Press “ ” and “ ” toselectthefoldercontaining yourphotofiles.Enterthe
folderpress “ ” and “ ” toselectthephotoyouwanttoviewand pressOK
the photoisdisplayedfullscreen. Dependingon thetypeand sizeofthe
picture, you mayhavetowait sometimebeforethe playback starts.
Whilebrowsing aphoto,youcan press “ ” and “ ” torotateaphotoinany
angle.Beside rotatingaphoto,you can press ZOOMtozoomin/outthat
photo,fourzoomlevels(2X,4X.8X16X)areavailable.Thisbrowsing photos
functionsupportsHigh Definition Photo(JPG,BMP,PNG,GIF)Playback.
Ifthe SLIDESHOWisenabled intheSetup(“PhotoSetup”menu),then
press Setupbutton toreturntothe picturesyouwanttoplayback,the
slideshowwill start automatically.
Ifyou wanttoplayback somemusicduring the slideshow,simplymake
surethatyoucopyyourmusicfile(s)inthe samedirectoryasthepictures.
Thenchoosethe “Folder”option inBackground Music(“Photo
Setup ”menu).Press the OKbuttontoplayback yourslideshowwiththe
musicbackground.
Note:
1.Whilelistening toaudiofiles,you can browsethe photosatthe same
time.
2. Ifyou press ZOOMduringplaybackslideshow,the slideshowwill
automaticallystop.

16
BrowsingMovies
Pressthe MOVIES button on the remotecontroltoenterthe movie play
mode.
Press “ ”and “ ” toselectthe folder(s)containingyourmoviefiles.Enter
the folderpress “ ”and “ ” toselectthe movie you wanttoviewand press
OK.The movieisplayed fullscreen.
Thisbrowsing moviesfunction supportsHigh Definition
Video(720P,1080i,1080P) Playback.
Forexample:
1.MPEG1(DAT,MPG)
2.MPEG2(VOB, MPG,TS)
3.MPEG4(AVI,DIVX,XVID,MP4)
4.H.264(AVI,MKV,MOV)
5.RM/RMVB,FLV,ISO
Note:When playthe HD Video,you can according themovie resolution to
adjustHD Video output.See “Creating HD ResolutionofSETUPmenu”for
moredetails.
Subtitle
The productsupportssubtitledocumentsinformatsofSSA,SMI, SRT, SUB
and soon. When the video being played supportsthe corresponding subtitle
format,the subtitlecan beswitched,displayed,orhidden through pressing
the SUBTITLEcontrolling key.Meanwhile,the sizeand position ofthe
subtitlecan alsobe adjusted through direction keys.When themovieis
played withthe subtitleshowed on the screen,you can press “ ” and “ ” to
change the subtitlespositioninthe screen,andpress “ ” and “ ” to
change the sizeofthe subtitle,with “ ” toenlarge and “ ” toreduce.
Browsing All
Press ALL button on the remotecontrol toenterbrowsing allfile.
Press “ ” and “ ”toselectthefolder(s)containingyourallfiles(Beside
Music,Photoand Movie).Enterthe folderpress “ ” and “ ”toselectthe

17
fileyou want toviewand press OKtoplay.
NETWORK
My Shortcut
Whenyou arebrowsing network,you canchoosethe computernamefrom
menu oryou can set “SpecificFileServerIP”and accessitfrom “My
Shortcut”inthe menu.
My shortcutisthe easiestwaytogetfilesfromacomputerpreviously
configured.
1)Press [OPTION]intoMy_Shortcutsinterface.Then,chooseAdd,Modify,
Delete, Return.
2)Input NetUserID,Password, SpecificFileServerIPaddress.
3)When you completesettings, you can add anewshortcut.
4)Selectitand inputthe password,you can browsephotos,listen tomusic,
and watchvideosthrough the network account.
Note:When datasareconnected on computerwithaHDD,USB deviceor
CardreaderNetwork through the network,you can alsobrowsephotos,listen
tomusicorwatchvideosfromthesedevices.
UPNP
UPNPmeansUniversalPlug and Play,based on TCP/IPprotocol aswell as
newinternetprotocolsaimatcommunicationbetween facilities.Allthe
facilitiesconnected tothe internetcan communicatewithoutbeing interrupted
bygateway, sothat communication inthe internet can becomemorefluently,
documentstransmission can becomemoreconvenientand internet
applicationswhichcannotbe used beforecan beoperated. Theseareall the
conveniencebroughtbyUPNP.TheProductsupportsUPNP.Beforeusing
UPNPfunction,pleasemakesurethatconnectedcomputerinLANhas
softwarethatsupportsUPNP.Ifnot,pleaseinstallasoftwareorshared
softwarethatsupportsUPNPgatewayprotocol.Forexample,connectthe

18
playertothe familyLAN,and then sharemultimediadocumentsinMedia
Player11 toaccess the living roomthrough UPNP.
Stepstoproceed:
1/Connectthe producttothe Network.Refertonetwork connection
instructionstoconnect the player.
2/Install softwaresupporting UPNPgatewayprotocol.Beforeusing UPNP
function, you need toinstall softwarethat support UPNPgatewayprotocol.
3/Sharedocumentsthrough softwaresettings.Open thesoftwaresinterface,
choose “MediaBase”inmaininterface,and then choose “add tothe media
base”inthe pull-downmenu.Afteradding somedocumentsorfolderstothe
mediabase,choose “mediashare”.You canalsosetthe typesand positions
forthe shared documents, suchas “music, pictureorvideo”and soon.
4/Usethe ProductUPNPfunction.ChooseUPNPoptioninthe main
interfaceofthe Producttoenter,and then the playercan searchout
computersinstalled withUPNPsoftwareinLAN.Enteryourcomputer,and
you can see multimediadocumentsshared through MediaPlayer11 inyour
computer. Using UPNPismoreconvenient and fasterthan using the player s
network function.The productcan access tocomputerswithoutbeing
interruptedbygateway,avoidingoperationslikeinputtingusername,
passwordand soon.
Playlist
The productsupportsthe playlistfunction,whichallowsyou toadd your
favoritecontenttothe playlist. ThePlaylistallowsyoutoselectmusicfiles,
photosand videosstored on yourHDD.Tobuildyourplaylist, enterthe
folder,selectthe fileand press [SELECT]toadd theselected filestothe
playlist,then press [CONFIRM].

19
Useslideshowmode withaplaylist:
1-Inthe Musicmenu, selectbackground Slideshowthen "Playlist".
2-Select"LocalHDD”,then press “Music".
3-WheninMusicmode,press [select]on remotetoadd filestoplaylist,and
then press[Confirm]tosaveselection.
4-Gotomenu "My Playlist”,then pressred button on remotecontrolto
select "AllMedia".
5-In"All Media",startslideshowbypressing [Play],and themusicstarts
automatically.
Usethe slideshowmode withthe contentsofafolder:
1-IntheSetup menuEntertainment,selectbackground Slideshow,then
"Folder".
2-Copyphotosand musicyou want toplayduring slideshowinsamefolder.
3-Then startthe slideshowbypressing [OK].The photosand musicinthe
folderwillbe read simultaneously.
Notes:Onlydocumentscontained inthe diskcan be added tothe playlist.
The primary partition ofthe harddisk
FileEditMenu
Press “ ” and “ ”toselectthe fileorfolder,press OPTIONtodisplaythe
Edittab.
Return Selecttoreturntothe mainscreen.
Rename
Torenameafile,do the following:
1.Press “ ”and “ ” on the remotecontroltoselect
the Renametab fromthe menu bar.
2.Press OKon the remotecontrol.The nameentry
screen appears.
3.Usethe navigation arrowstoselectlettersand
Table of contents
Other Noontec Media Player manuals


