Noontec V9-T User manual

I
Welcome!
Thankyou forbuying ourMediaPlayer.Pleasehavearead of this
manual tofamiliarizeyourselfwithitbeforeuse.
The MediaPlayer sdesign ispatented –you shouldconsiderthe legal
liabilitiesforinfringement of thiscopyright.The componentsofthe
MediaPlayerhavebeen tested tocomplywiththe relevant safety
standardsapplicableforlow-voltage electronicproducts.
The unique serialnumberlabelon the MediaPlayeranditspackage is
required toobtainwarrantyservice –do not removeormodifythese
labels, asan illegiblelabelmaypreventusfromhonoring the product
warranty.
Not alloperating conditionsapplytothe Product.Weareonly
responsibleforquality-related after-salesserviceaccording tothe
guarantee offered.Wearenotresponsibleforanydata-loss or
consequentialdamagesarising fromaproduct failure.The Media
Playerspecification and contentsofthismanualmaybe amended from
timetotimewithoutpriornotification.
Disclaimer
1. Ourcompanyshallnot bearanyresponsibilityforanyloss due to
fire,
third-partyoperation, theft,damage, accidents, orinappropriateuses
(suchasusing the MediaPlayerforan unintended purpose), whichare
not linked toourCompany,ordue tonatural disasterslike
earthquakes,orstormsand other “actsofgod”.
2.Thisproductisnotused forcommercialpurposes.The useofthe
product willnotbe liableforanycommercial.

II
3. Ourcompanyshallnot bearanyresponsibilityforanyloss due to
anyusage outside the guidelinesoutlined inthisManual.
4. Ourcompanyshallnot bearanyresponsibilityforanyconsequential
loss caused bythe useofanydeviceorsoftwarewhichisnot provided
byourcompany.
5. Ourcompanyshallnot bearanylegalliabilityforanyconsequential
damaged hardwaredamage ordataloss.
6Thisproductwillmaketheupgrade fromtimetotime,the actual
contentand function ofthe productwillbe subjecttothe material
object..
7Forthe firmwareupdate,theremaybesomeexternalrisks,suchas
powersupplyinstability,poweroutages,filecorruption,etc.the
companywillviewthe updatefailureasman-made damage, not within
the scope foguarantee.Ifthe firmwareupgrateisnecessary,please
contactthe company'sauthorized distributorstomanage it.
Trademark
NOONTECisan exclusivetrademarkofourcompany.Allthe other
trademarksorproduct namesreferred tointhisManualaretrademarks
orregistered trademarksofourcompany.Trademarksof other
companiesaretheirownproperties.
Safetyprecautions
The MediaPlayerisdesigned fortrouble-free operation indailyuse.To
becomefamiliarwithit soperation, pleaserefertothe safety

III
precautions, on the productand accessories, and keepthisManual for
futurereference.
1. The componentsand accessoriesofthe MediaPlayeraretested to
complywiththe relevantsafetystandardsforlow-voltageelectronic
products.
2. The mains-poweryou provide totheMediaPlayermust complywith
the specification indicated on the power-pack rating plate.Ifyou are
not sureabout yourlocalmains-powersupply, pleasecontact the
distributororthe powercompany.Forcomponentswhichuse
batteries,pleaserefertorelevant batteryspecificationstochoosethe
correct battery cells.
3. Pleasekeep the MediaPlayerawayfromheat sourcesand humid
environments, and ensureit receivesgood ventilation, soasto
guarantee reliabilityand avoidthe dangeroffireand electricshock.
4. Anystrong electromagneticfieldmayaffectreading and writing
capabilitiesofharddrives –pleasekeep it awayfromthesefields.
5. LocatetheMediaPlayerinastableposition,and do not placeany
otherdeviceson top ofit.
6. Pleasedo not add un-necessary partstothe MediaPlayer,and in
normalusage, do notleavethe MediaPlayerdis-assembled.
7. Toavoiddamage caused bystormsorelectrical surges, we
recommend you turn-off and unplug the MediaPlayerfromthe mains
powersupplywhenthereisathunderstorm, orwhen the powersupply
isunstable.

IV
8. Incaseanyforeign object orliquidspillsintothe MediaPlayer,
immediatelyturn-off the powerand the computertoavoidshort
circuits.
9. Pleasedo not physicallyunplug ordisconnectthe MediaPlayer
fromyourcomputerwhen itisreading orwriting tothe drive,otherwise
the physicaldiskmaybedamaged and yourdatamaybe damaged.

V
V9-TUSERMANUAL
Contents
BRIEFINTRODUCTION..........................................................................1
FEATURE..................................................................................................1
PRODUCTDETAILS...............................................................................2
PACKING LIST...........................................................................................2
FRONTVIEW ............................................................................................2
BACK VIEW .............................................................................................4
REMOTE CONTROL..............................................................................5
BASIC OPERATION................................................................................6
POWERCONNECTION................................................................................6
CONNECTION OF TVAUDIOANDVIDEOOUTPUT ........................................7
CONNECTION METHODSTOWATCH TVAND USAGE ....................................9
CONNECTION OFRECORDING ANDUSAGE................................................11
CONNECTION AND SETUPOFNETWORK ...................................................15
OPERATIONOFPRODUCTUSAGE...................................................19
BROWSER ..............................................................................................20
TV/AV IN..............................................................................................27
TIMER ...................................................................................................27
INTERNET SERVICES...............................................................................29
FILE COPY .............................................................................................32
SETUP MENU .........................................................................................33
NETWORKFUNCTION........................................................................37

VI
WIRED LAN SETUP.................................................................................37
WIRELESS SETUP ...................................................................................39
INSTALLANDUSEOFBT/SAMBA.....................................................44
THEFIRSTINSTALL.................................................................................44
IP ADDRESSSETTING..............................................................................45
NEIGHBOR WEBINTERFACE ...................................................................46
PRODUCTSPECIFICATION................................................................50
MAINTENANCENOTICE....................................................................51
FAQ..........................................................................................................52
OTHERS.................................................................................................57

1
Brief introduction
Feature
V9-TisaHomeMediaCenter,withabuilt-in3.5“HDD.It allowsdisplayDigital TVHD
withitsTVtuner,playandrecord(HD)mediafilesinHighDefinition (movies,audiosand
photos)andwhen connected toPC, can alsocopyandplaysharedfilesvianetwork.
Basicperformance
TVshows-SupportfortheDVB-T digital terrestrialtelevisionsignal receptionandoutput
functions.
Recording-supportone –keyrec,TimerrecandTimeshift recording.
Video decoding-MPEG1/2/4,Divx,Xvid,H.264,VC-1,RM/RMVB
Video format-WMV,MKV,MOV,AVI,MP4,MPG,TS/M2TS/TP/TRP,FLV,ISO,IFO,
VOB,DAT,RM/RMVB
Audioformat-MP3,WMA,WAV,AAC,OGG,FLAC,DolbyDigital,DTSDigital
Image-JPG/BMP/PNG/GIF
Card-3in 1card(SD/MMC/MS).
USB HOST-Connection USBmass storagedevice(likeUSB FlashDrive,MP3,USB
HDD etc.)
USB2.0-highspeedUSB2.0port.
HDMI-HighDefiniton MultimediaInterface
ExternalDVD-SupportUSB external DVDdrivetoplayDVDmovies.
Network-RJ45 port,10/100Mbit/s,WLAN(IEEE 802.11b/g/n),supportinginternet
service.

2
Productdetails
Packing list
Check theaccessoriesafterreceivingtheproduct,belowaccessoriesshouldbe
included.
No. Name Quantity
1 Mediaplayer 1pcs
2 PowerAdapter 1pcs
3 RemoteController 1pcs
4 AVcable 2 pcs
5 USB cable 1pcs
6 UserManual 1 pcs
7 Batteries 2pcs
8 Screws several
Frontview
3
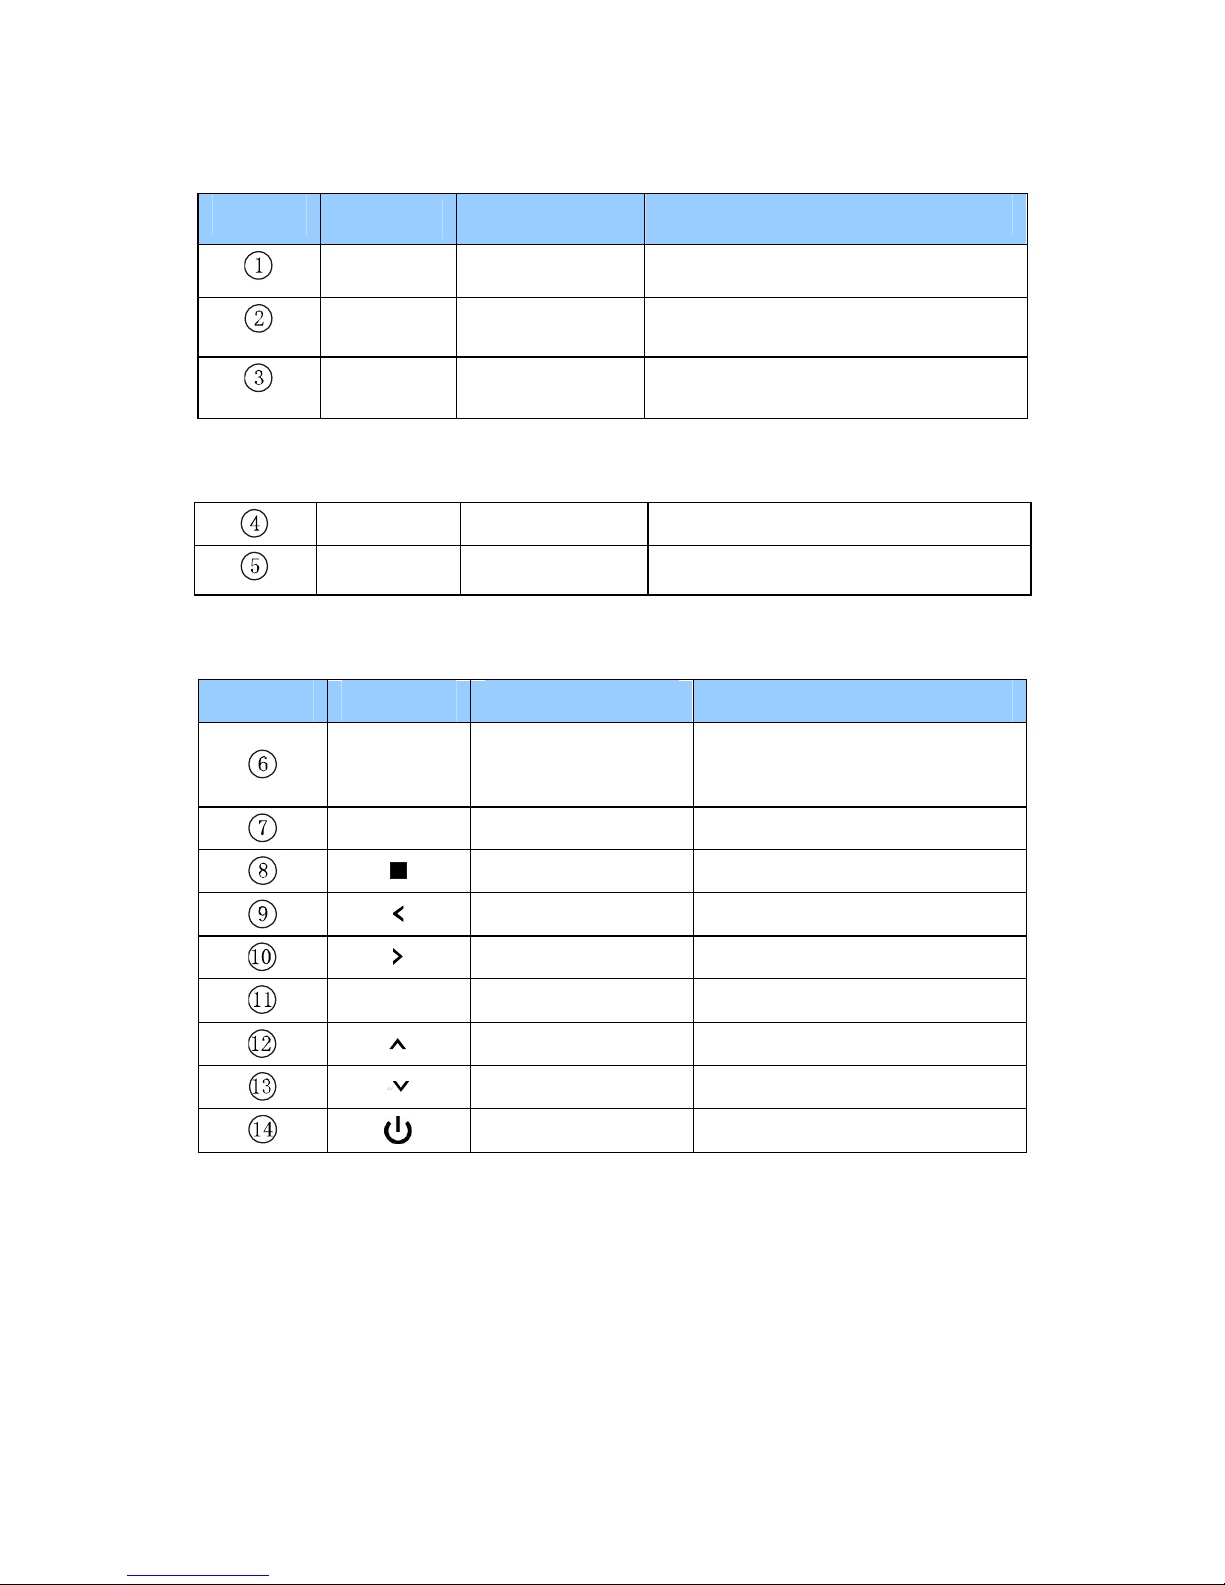
1LEDdefinition
LED LEDdefinition Instruction
REC RecLED Turnsredwhilerecording
PowerPowerLED Turnsyellowwhileswitched on
Stand-by Stand-byLED
Turnsredlightwhilestand-by
2Otherdefinition
IR Remotehead Remotecontrol receiver
Card-reader
3in1
card-reader Canread MS/ SD/ MMCcard
3Keydefinition
Key keydefinition instruction
REC RECkey Enterrecording mode.choose
theRectime
MENU Menukey Returntothemain menu
Stop key Stop currentoperation
Leftkey Movecursortoleft
Rightkey Movecursortoright
OK Enterkey Confirmthecurrent operation
Upkey movecursorup
Downkey Movecursordown
Powerkey Switchon/off thepower

4
Back View
Portdefinition
Port Portdefinition Instruction
LOOP RFoutputinterface OutputDVB-Tdigital television
signals.
ANTIN RF inputinterface InputDVB-Tdigital television
signals.
HDMI Highdefinition portOutputdigitalsignal viaHDMIport
AV IN Compositevideo
inputport
Inputvideo and audiowhen
connected tovideo device
Optical Fineoutputport Output5.1audioviaoptical port
YPbPr Component video
output port
Outputprogressivescan
componentvideo
AV Compositevideo
output port Output compositevideo andaudio
LAN networkport Connecttonetworkviainternetport
USB HOST
OutsideUSBport Read outsideUSB storagedevice
viaUSBport
USB
DEVICE USB port ViathisUSBportforPC
communication
ON/OFF PowerswitchTurnon oroff powerswitch
DC IN Powerinport Caninput power

5
Remotecontrol
BUTTON FUNCTION
POWER
Turn on and off in thestand by mode
MUTE Turn on or shutaudio output
REC Startrecording inRECmode,andifpressthis
key
repeatedly youcanselectthe recording time
STANDBY
Press itand enterthe STANDBY mode,offen using when
the product isscheduled recording.
BROWSER Enter thebrowser menu
TIMER
Enter theTimemenu toedit,add,deleterecording
schedule
COPY Enter thecopymode
GUIDE Enter themain menu
AV/TV Switchvideo inputsource
TELETEXT On /off withDVB-
related advertising thatcontains
information suchasthemenu
EPG On / off television programguide menu
REC LISTAlistofthedocumentslistedin record
VOL- Press todecreasethe volume
VOL+ Press toincreasethe volume
Navigation key for up,down, left and right
ENTER Press toconfirm
RETURN Return tothe previous menu
SETUP Enter themenu
Press toinputdigital
GOTO Press toplay thevideo at the chapteraftersettingschedule
TVSYSTEMSwitchbetween different TVsystem,

6
OPTION Press toselectoptionbar. Torenameor deletethe file.
PLAY
Press toplayfile
Or play recording file under timeshift mode.
STOP
Press tostop play/recording
PAUSE/STEP
Press topauseplay/recording,and again for step playing
PREV
Press toreturn toprevious file
NEXT
Press togotonext file
FR
Press tofast rewind fromcurrentplayand again toselect
the speed
FF
Press tofast forward fromcurrentplayand again toselect
the speed
SUBTITLE Switchthesubtitle if the file supported
DISPLAY Press todisplaytime,title,information
of chapter when play
video and photo.
AUDIO Switchtheaudio format output
ZOOM
Press tozoomwhen playing back photosor Video
programs.
Photozoomlevels:2X,4X,8X,16X;
Video zoomlevels:2X,3X,4X,8X.
TIMESHIFT
Press toactivatetimeshift inrecording mode.
Operation as follow:
Press ”Timeshift”and waituntil the screen display,Press
“pause”topauseprogram,press “Play”toresume
playback, and press “Stop”tostoptimeshift function.
Ifyouneedtousethe Timeshiftfunction,please
usethe
machine toformat thehard disk first.
REPEAT Press tosetrepeat option:chapter, Title oroff
SELECT Press toselectthefile and thenpress “confirm”toadd
or deletefile intheplaylist;Selectcopy filesor foldersin
the
copy mode
CONFIRM Press toadd ordeleteoption inplaylist
Basicoperation
Powerconnection
Takeoutpoweradapterfromthepackageandconnectit.
7
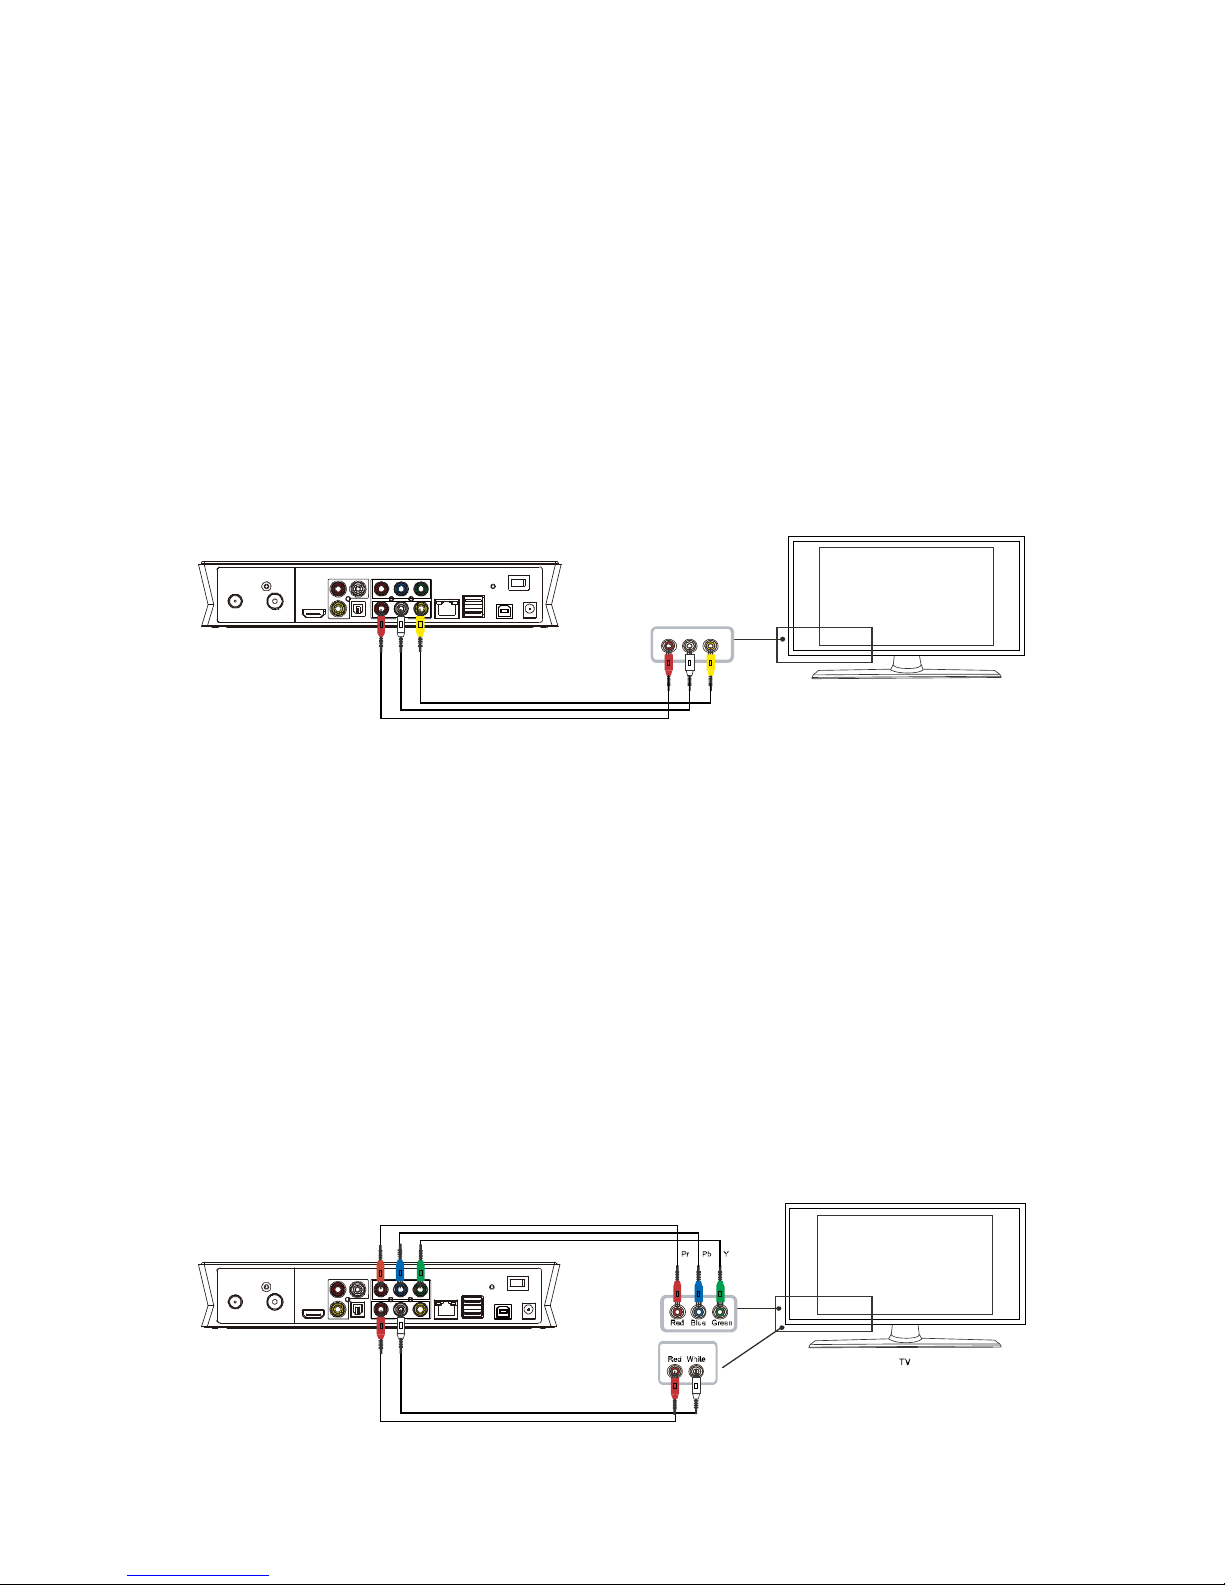
Connection ofTVaudioand videooutput
The productisdesigned withmulti-output,includingcomposite(AV),component(YPbPr)
andHDMI.Youcan selectdifferentinterfaceaccording variousneed.Theproductcan
detectvideo outputautomatically,makingtheoperationfriendlyand convenient. Please
refertothefollowing instructionforconnection toavoidanyproblem.。
Compositeoutputconnection(AV)
PlugtheyellowconnectorintotheAVoutputofproduct andAVinputofTV,andplugthe
redandwhiteconnectorintotheaudioinput ofTVorHIFI.Turnon theTVandselectAV
mode.Turnon theproductandTVdisplaystheinterfaceofinitiation.
Componentoutputconnection (YPbPr)
8
Componentoutputmode:PlugtheYPbPr cableintotheoutput ofproduct andinput ofTV.
Becausethecableisonlyforvideo signal,anotherAVcableisnecessary.Plug thered
andwhiteconnectorofAVcableintotheaudiooutput ofproductandaudioinput ofTVor
HIFI.TurnonTVandselectYPbPr mode.Turnon theproductandTVdisplaysthe
interfaceof initiation.
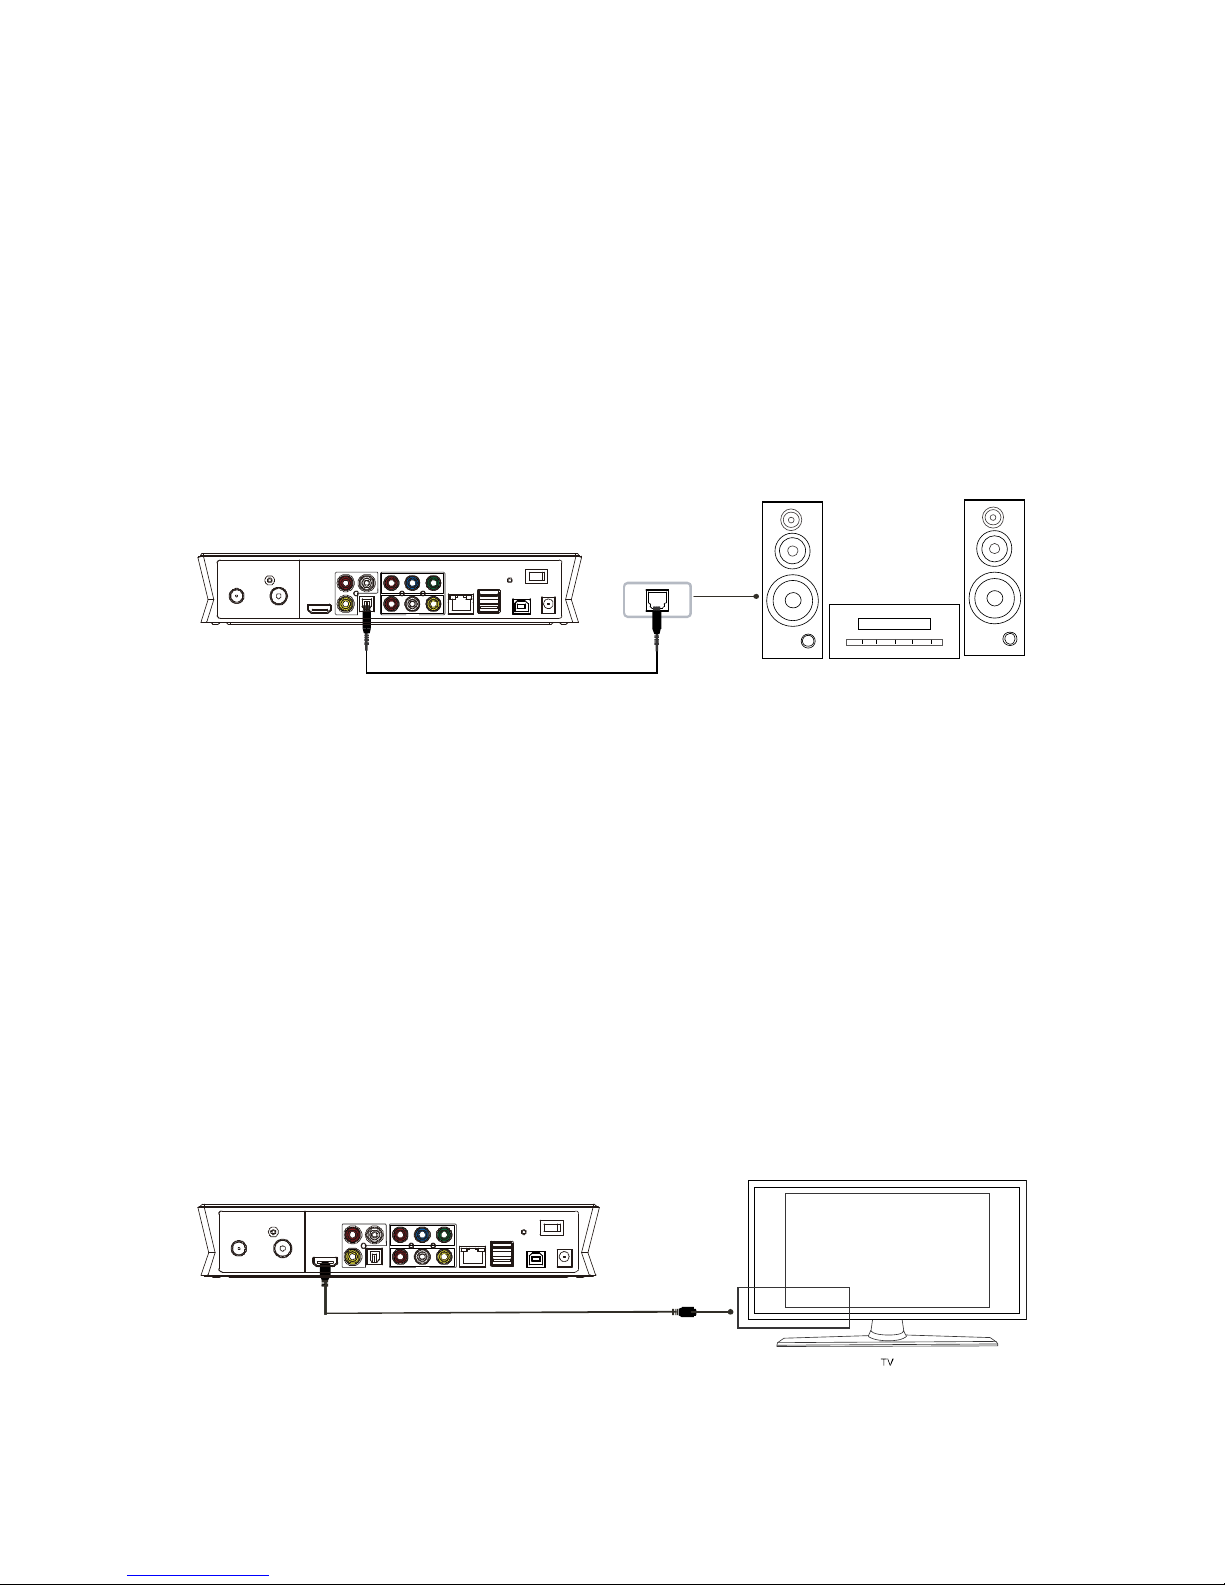
Opticaloutputconnection
Optical output:ConnecttheOptical connectorofthemediaplayerwiththeoptical
connectorofothervideo oraudiodevicebyOptical cable. Then entertheproduct'saudio
interface, selecttheDigitalOutputoption"SPDIF LPCM"or"SPDIF RAW". It isavailable
toenjoy5.1highqualitysoundsthroughamultichannel decoder/amplifierwithoptical
input.
HDMI outputconnection
HDMI isaoutputwithbestaudioand video effectwhichoutputsdigital video and audio

9
composited atthesametime.ConnectHDMIcabletooutputofproductand display
devicewithHDMIinput.SelectHDMImodeinTVuntilitdisplaystheinterfaceof
initiation.
Howtousememorycards
TheProducthasanintegrated multimediacardreadersupporting memorycards
includingMS,SD,and MMC.Gentlyinsertthememorycardintothereaderwiththe
arrowsideupwarduntiltheregoesa “click”sound.
Playbackfunction
WiththisHDD Recorder&player,individual can browsemovie,photoandmusicfiles
stored in HDD,USB,cardandnetwork.Pleaseenter “browser”toselectthemediaand
press “ENTER”keytoenter.
It isavailabletopreviewtheselected mediaandpress “ENTER”keytoplay.
Connection methodstowatchTVand usage
TVsignalinputinterface
ANT INinterfacecan receiveDVB-Tdigital television signals.LOOPinterfacecan output
DVB-T digitaltelevision signals. After accessingtotelevisionsignals, press SETUPkey
intotheinterfacesettings, selectTV, settobegin.
①TVsignal inputinterface
ANTINinterfacecan receiveDVB-Tdigital television signals.Afteraccessingto
television signals,press SETUPkeyintotheinterfacesettings, selectTVtoenter.

10
②TVsignal outputinterface
LOOPinterfacecan output DVB-T digital television signalsdirectlyaccessingtoTVinput
interface. However,theremustbeTVsignal inputfirst.
OperationSteps:
Step 1:TheANTIN①interfacemustinputDVB-TdigitalTVsignal,andtheother
interfaceLOOP②outputsTVsignalviatheproductstunner,ortheproductsother
interfaceseg.AVorHDMIoutputsvideo signal.
Step2:Afterturningon theproduct, press SETUPkeytoaccess tothesettingsinterface.
SelectTV,entertheTVRegion,chooseyourcountryorregion.
Atthesametime,chooseChanel Scanset. You can chooseAUTOSCANauto-search
television program.
Alsoyoucan chooseMANUALSCANtobegin manual setting,butyouneedtoknowthe
DVB-Tdigital television programsspecificBandwidthand Frequencyparameters. If you
donotknow,ask yourlocal DVB-Tdigital television signalsprovidertoobtain access.
Select theappropriatechannels(CH),Bandwidth,enterthecorrect Frequency,and then
press "ENTER"keytostartscanning.You cansee thescreen displaythenumberof
channelsandprogramssignal quality.Iftheparametersettingiswrong,itwilldisplay
"Error". Pleasere-set theparametersforscanning.
Youcanwatchtelevision programsat thesametimetorecordtelevision programs.
Press the"AV/TV"byRemotecontrolkeytoswitchbetweendifferentinputsources.

11
Connection ofrecording and usage
The productsupportstowatchtelevision programswhilerecordingtelevision
programs ,alsosupportsatelevisionchannel towatchprogramsatthesametime
anothertelevision channelprogramsforrecording.IntheDVB-Ttowatchdigital
terrestrial television, youcanpress RECkeyon theremotecontrol tostart recording.
Inaddition torecordtelevision programsoftheirown,aswellasotherinputsignalsare
recorded. TVsignal can begenerated fromTVset-top boxorsatellitereceiver,aslong
asisequipped withsatelliteTVset-top boxortelevisionreceiveruserscan achievethe
recordingfunction.
Importantnotice: TheproductalsosupportsTVrecordingfromotherset-top boxor
satelliteTVreceiver. Whentherecordingofsignal othertelevision set-topboxorsatellite
receiverinput,pleaserefertothefollowingillustration toconnecttheproduct.
A.Forset-topboxorsatelliteTVreceiverwithtwosignal outputs, pleaserefertobelow
connection:
B.Forset-top boxorsatellitewithonlyonesignaloutput, pleaserefertothebelow
connection:
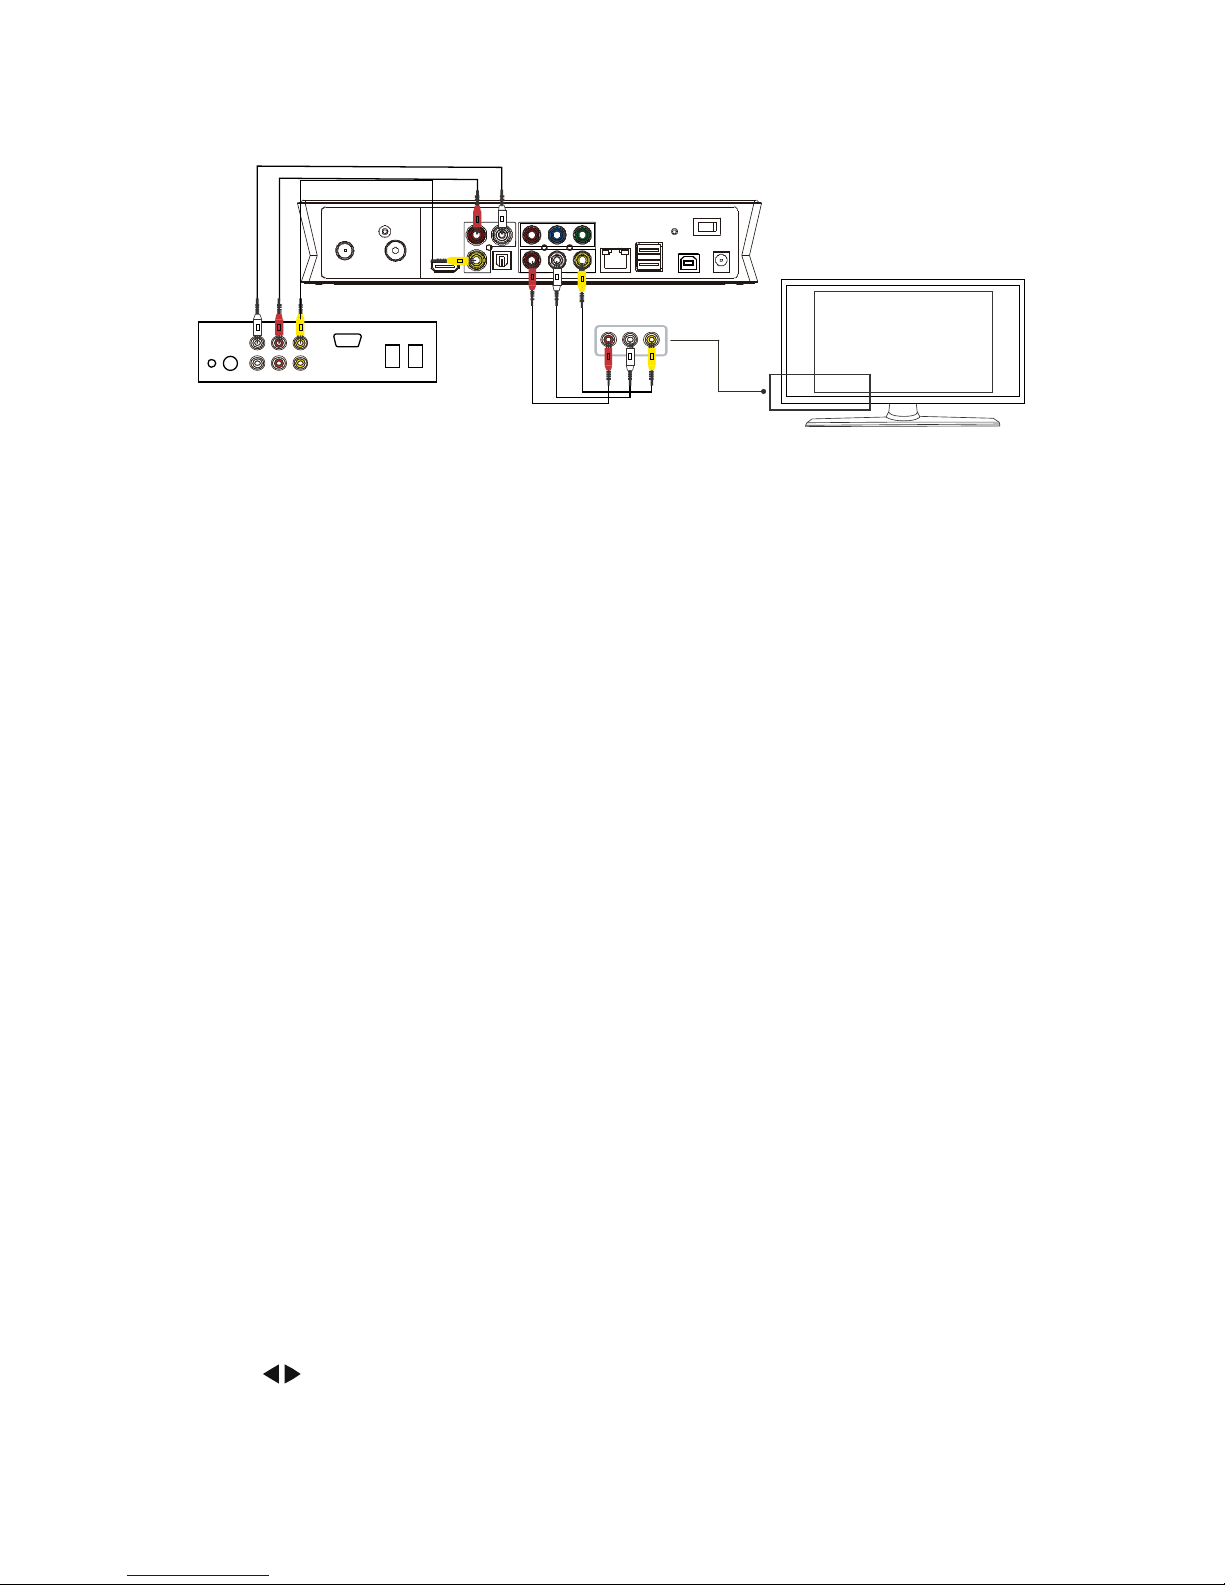
12
ThereareAVin,AUDIO-R,AUDIO-Landopticaloutputinthebackofproduct. Connect
AVINand set-top boxorsatelliteTVreceiverand makesuretheoutputofset-top boxor
satelliteTVreceiverworkswell.TurnonTVand selectAVmode.Turnon theproduct
andselectAVINafterenterthemenu.TheTVprogramdisplaysonscreenandisready
torecord.
Usageofstarting Record
Beforeusingrecording ,pleasechoosetherecorddevice.Press SETUPkeytoenter
setupinterface,then choose RECDevice andyou can chooseHDDorUSBdeviceto
recordthechannel.
1,HDDFormat
Ifyouchoose HDD in RECDevice (in Setup menu),itisneedtoformattheharddrive
beforerecording ,pleasecopyfilesinHDD firstlyin caseof losingdata.Then choosethe
HDD Formatoption inSystemSetupmenu.
HDD FormatSteps:
Step 1:Setting timeshift buffer
The productneedsthespecial spacefortimeshifttoassign theharddrive sspace.At
least onehour,maximum4hours. One-hourharddiskspaceoccupiedbyabout 4Gb, so
chooseupto4hoursofspaceoccupied bytime-lapseof about16Gb.
Step 2: Harddiskformat
Press / on theremotecontrol toselect “Back “or “Format”.

13
Whenhighlightmovethe “Format”key,Press “OK”tostart. Otherwise, select “Back”key
toback..
Step 3: CompletingHDDFormat.
WhenHDD formatisfinished,thesystemwillberetarted toaccess totheproductsmain
interface.
2. Recording
Whenusingrecording function ,therearetwoinputsourcesforrecording:video and
DTV.Press the"AV/TV"byRemotecontrol keytoswitchbetween differentinput
sources.AVINmodeandtunnermodearethetwowaysforrecording.
a.TVINmode(DVB-Tsignal input)
ANTINinterfacecanreceiveDVB-Tdigital television signal.Pleaserefertothebelow
connection.Afteraccessingtothetelevision signal,pressSETUPkeyintotheinterface
settings,selectTVoption tobegin setting(referringtothepreviouschapter “Connection
methodstowatchTVandusage”).Aftersetting,youcan watchthetelevision
programme,
Press “REC ”keyon theDeviceorremotecontrol,the “REC”LEDonfrontpanel of
recorderturnsred whichshowsthestartingofrecording.Press RECkeyrepeatedly,and
itcanswtchtherecordingtime( ORT30min,ORT60min, ORT90min). Press the “”keyon
remotecontrol ordevicetostop recording.
Watchingwhilerecording
Whenyou rewatchingonechannel,youcanalsorecordanotherchannelsprogramat
thesametime.When yourTVreceivestelevision signal,enterDTVinterfaceandpress
RECkeytostart recordding,andaredroundpointwilldisplayontheupperright corner
ofthescreen.
Ifyou press ENTERkey,thescreen will displaythePRmenu asfollowing.Press /
keytoselectthechannel youwanttowatch.Then press ENTERkeytoconfirm.Thus
youcan watchonechannel sprogramwhilerecording anotherchannel.

14
Ifyou want torecordtwochannel sprogramsatthesametime, pressENTERkeyagain
andselecttheonetorecord,and thescreenwillswitchtoanotherchannel.Atthis
time,press Reckeytostartrecording.Then you can recordtwochannel ‘s
programs.Press ENTERkeyandthescreenwilldisplaythemenuasfollowing.
Note:
1.The productcan record2channel synchronously.Whenyou recordtwochannels,
youcanonlywatchoneofthetwochannel sprogramswhichyouarerecording, the
rest channelscouldntbeused.
2.Thecontentsofyouhaverecordedhavekeeped in thefoldernamedthetimefrom
youstartrecording.
b.AVINmode
AftercorrectconnectionoftheAV-in signal,powerontheset-topbox(orsatelliteTV
receiver),TVandourrecorder, switchthesignal ofTVtoAV-insignal,
Table of contents
Other Noontec Media Player manuals


Popular Media Player manuals by other brands


Blue Raven
Blue Raven MediaMate 7040 Firmware Upgrade Instructions

Megavoice
Megavoice GODPOD G2 user manual

POPCORN HOUR
POPCORN HOUR A-300 installation guide

Cary Audio Design
Cary Audio Design AiOS owner's manual

Krell Industries
Krell Industries KPS 25sc Instructions for use

Grace Digital Audio
Grace Digital Audio GDI-IR3020 user guide


