Noontec V9 User manual

I
Welcome!
Thankyou forbuyingourMediaPlayer.Pleasehaveareadofthis
manual tofamiliarizeyourselfwithit beforeuse.
TheMediaPlayer sdesignispatented –you should considerthelegal
liabilitiesforinfringement ofthiscopyright.Thecomponentsofthe
MediaPlayerhavebeen testedtocomplywiththerelevantsafety
standardsapplicableforlow-voltageelectronicproducts.
TheuniqueserialnumberlabelontheMediaPlayerand itspackageis
requiredtoobtainwarrantyservice –donotremoveormodifythese
labels,asanillegiblelabelmaypreventusfromhonoringthe product
warranty.
NotalloperatingconditionsapplytotheProduct.Weareonly
responsibleforquality-relatedafter-salesserviceaccordingtothe
guaranteeoffered.Wearenotresponsibleforanydata-loss or
consequentialdamagesarisingfromaproductfailure.TheMedia
Playerspecificationandcontentsofthismanualmaybeamendedfrom
timetotimewithout priornotification.
Disclaimer
1.Ourcompanyshallnotbearanyresponsibilityforanyloss duetofire,
third-partyoperation,theft,damage,accidents,orinappropriateuses
(suchasusingtheMediaPlayerforanunintended purpose),whichare
notlinkedtoourCompany,ordue tonaturaldisasterslikeearthquakes,orstorms and
other “actsofgod”.
2.Thisproductisnotusedforcommercialpurposes.Theuseoftheproductwillnot
beliableforanycommercial.

II
3.Ourcompanyshallnotbearanyresponsibilityforanyloss dueto
anyusageoutsidethe guidelinesoutlinedin thisManual.
4.Ourcompanyshallnotbearanyresponsibilityforanyconsequential
losscausedbytheuseofanydeviceorsoftwarewhichisnotprovided
byourcompany.
5.Ourcompanyshallnotbearanylegal liabilityforanyconsequential
damaged hardwaredamageordataloss.
6Thisproductwill maketheupgrade fromtimetotime,theactualcontentand
functionoftheproductwillbesubjecttothematerialobject..
7Forthefirmwareupdate,theremaybesomeexternal risks,suchaspowersupply
instability,poweroutages,filecorruption,etc.thecompanywillviewtheupdatefailure
asman-madedamage,notwithinthescopefoguarantee.Ifthefirmwareupgrateis
necessary,pleasecontactthecompany'sauthorizeddistributorstomanageit.
Trademark
NOONTECisanexclusivetrademarkofourcompany.Alltheother
trademarksorproductnamesreferredtointhisManualaretrademarks
orregisteredtrademarksofourcompany.Trademarksofother
companiesaretheirownproperties.
Safetyprecautions
TheMediaPlayerisdesignedfortrouble-freeoperationindailyuse.To
becomefamiliarwithitsoperation,pleaserefertothesafety
precautions,ontheproduct andaccessories,and keepthisManualfor
futurereference.

III
1.ThecomponentsandaccessoriesoftheMediaPlayeraretestedto
complywiththe relevantsafetystandardsforlow-voltageelectronic
products.
2.Themains-poweryou providetotheMediaPlayermustcomplywith
thespecificationindicatedonthepower-packratingplate.Ifyouare
notsureabout yourlocalmains-powersupply,pleasecontactthe
distributororthepowercompany.Forcomponentswhichusebatteries,pleaserefer
torelevant batteryspecificationstochoosethecorrectbatterycells.
3.Pleasekeepthe Media Playerawayfromheat sourcesandhumid
environments,andensureitreceivesgoodventilation,soasto
guaranteereliabilityandavoidthedangeroffireand electricshock.
4.Anystrongelectromagneticfieldmayaffectreadingandwriting
capabilitiesofharddrives –pleasekeepitawayfromthesefields.
5.LocatetheMediaPlayerinastableposition, and donotplaceany
otherdevicesontopofit.
6.Pleasedonotadd un-necessarypartstotheMediaPlayer,andin
normalusage,do notleavethe MediaPlayerdis-assembled.
7.Toavoiddamagecaused bystorms orelectricalsurges,we
recommendyou turn-offandunplugthe MediaPlayerfromthe mains
powersupplywhen thereisathunderstorm,orwhen thepowersupply
isunstable.
8. IncaseanyforeignobjectorliquidspillsintotheMediaPlayer,
immediatelyturn-offthepowerandthecomputertoavoidshortcircuits.

IV
9.Pleasedonotphysicallyunplugordisconnectthe MediaPlayer
fromyourcomputerwhenitisreading orwritingtothedrive,otherwise
thephysicaldisk maybe damagedand yourdatamaybedamaged.

V
Contents
CONTENTS...........................................................................................V
BRIEFINTRODUCTION....................................................................1
FEATURE................................................................................................1
PRODUCTDETAILS............................................................................2
PACKINGLIST........................................................................................2
FRONTVIEW..........................................................................................3
BACK VIEW...........................................................................................4
REMOTECONTROL................................................................................4
BASICOPERATION.............................................................................7
POWERCONNECTION ............................................................................7
CONNECTIONOF TVAUDIOANDVIDEOOUTPUT.................................7
CONNECTIONOFRECORDINGAND USAGE ...........................................9
CONNECTIONAND SETUPOFNETWORK .............................................13
OPERATIONOFPRODUCTUSAGE.............................................16
BROWSER............................................................................................17
AV IN..................................................................................................23
TIMER..................................................................................................24
INTERNET SERVICES............................................................................25
SETUP MENU.......................................................................................29
NETWORKFUNCTION....................................................................33
WIRED LAN SETUP .............................................................................33

VI
WIRELESS SETUP ................................................................................34
INSTALLAND USEOFBT/SAMBA...............................................39
THEFIRSTINSTALL..............................................................................39
IPADDRESSSETTING...........................................................................40
NEIGHBOR WEBINTERFACE ...............................................................40
PRODUCTSPECIFICATION...........................................................44
MAINTENANCENOTICE................................................................45
FAQ.........................................................................................................46
OTHERS................................................................................................51

1
Brief introduction
Feature
Theproductisanewkindoffamilyhigh-definitionrecorder.Viaournewproducts,
you canrecordfavoriteprogramrandomlyandstoreitinthedevice,avoidingthe
inconveniencebroughtbychangetapefrequently.Theproductcan providelong
recordingand goodwatching.Meanwhile,itcan alsostoreandplaymanykindsof
videofiles.Theproductcan supportUPnPnetworkofmulti-media technology,
networkaccess functionsparticularly.ItsupportsBT/SAMBAandcoulddownload
networkmovies. Youcanalsoenjoytheinternetserviceonline byusingtheproduct,
suchasbrowsingvideos,newsandphotos.Theproduct,whichisfacilitatedwith
manyportsandHDMI,canshowyoupicturesandvideoswithhighdefinition.It is
reallyyourdesirableentertainmentproduct.
Basicperformance
Recording-supportone-keyrec,Timerrecand Timeshiftrecording.
Videodecoding-MPEG1/2/4,Divx,Xvid,H.264,VC-1,RM/RMVB
Videoformat-WMV,MKV,MOV, AVI,MP4,MPG,TS/M2TS/TP/TRP, FLV, ISO, IFO,
VOB,DAT,RM/RMVB
Audio format-MP3,WMA,WAV,AAC,OGG,FLAC,DolbyDigital,DTSDigital
Image-JPG/BMP/PNG/GIF
Card-3in1card(SD/MMC/MS).
USBHOST-ConnectionUSBmass storagedevice(likeUSBFlashDrive,MP3,
USBHDDetc.)
USB2.0-highspeed USB2.0port.
HDMI-HDMIhighdefinitionport.
ExternalDVD-SupportUSBexternalDVDdrivetoplayDVDmovies.

2
Internet-RJ45 port, 10/100Mbit /s, WLAN(IEEE802.11b/g/n),supportinginternet
service.
Productdetails
Packing list
Check theaccessoriesafterreceivingtheproduct,belowaccessoriesshouldbe
included.
3
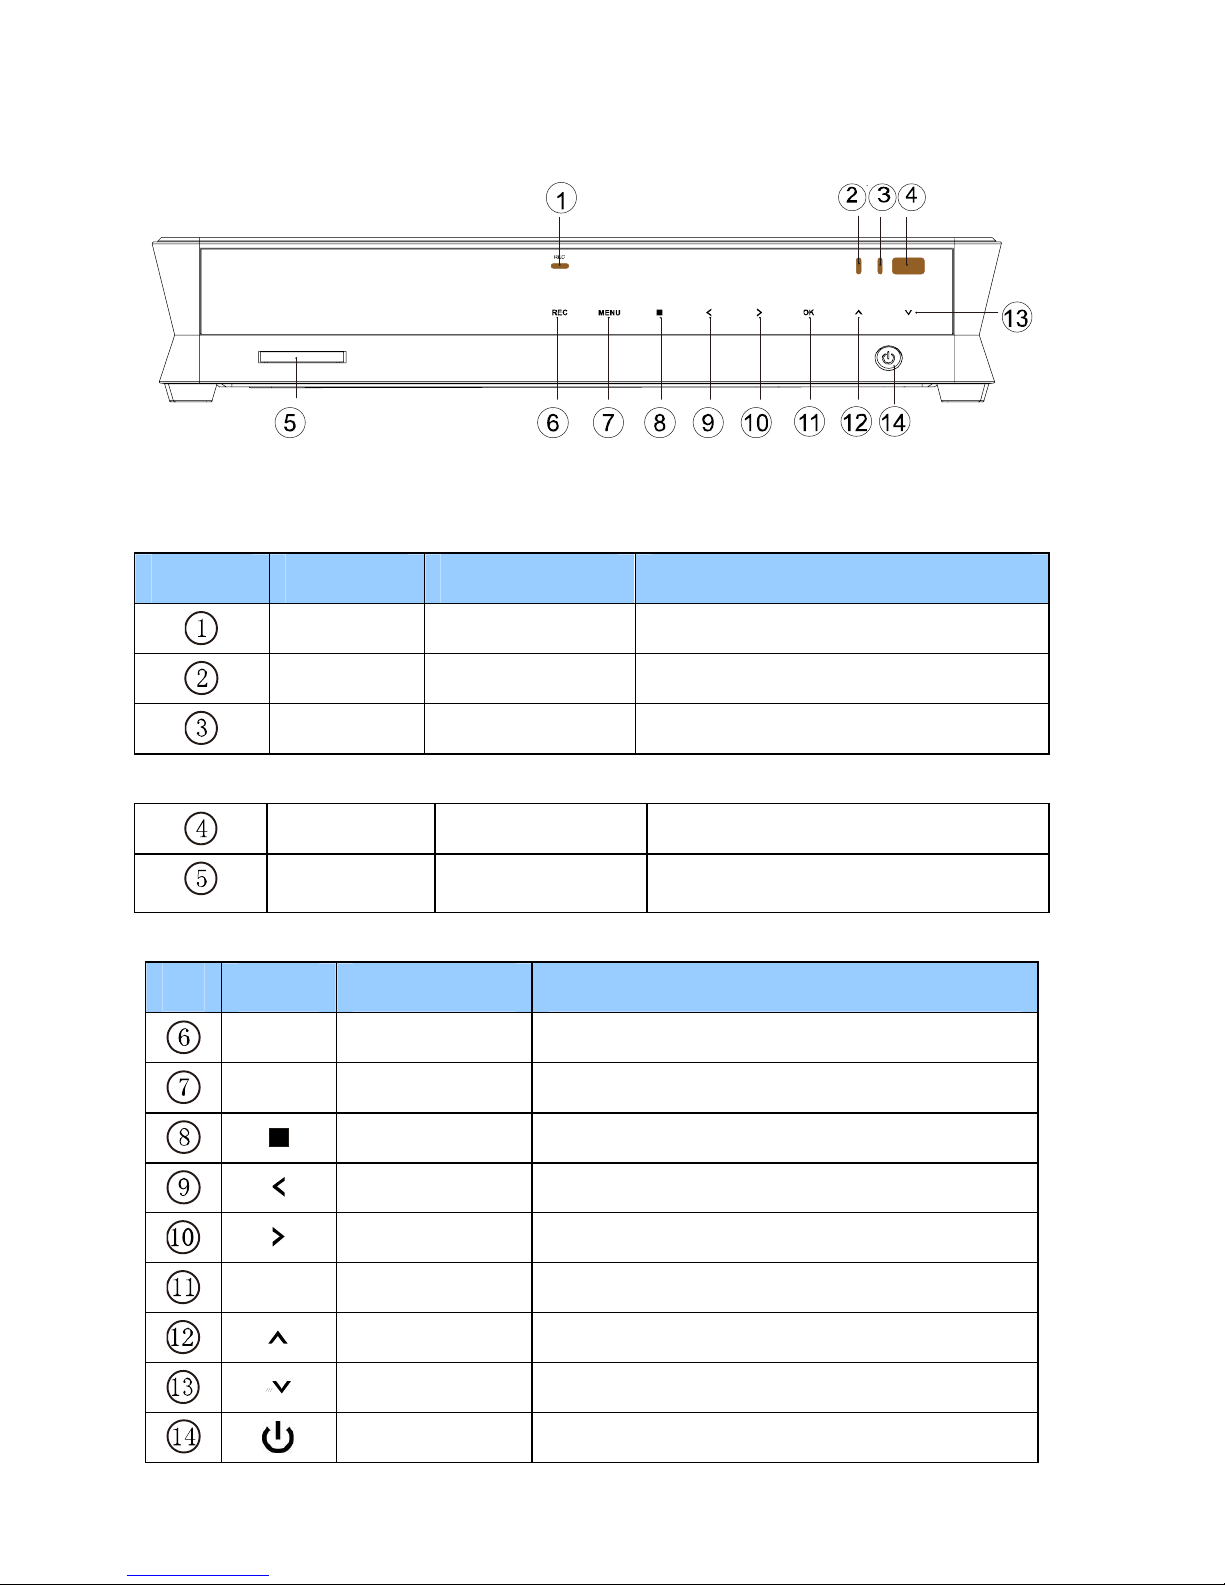
Frontview
1LEDdefinition
LED LEDdefinition
Instruction
REC RecLED Turnsredwhilerecording
Power PowerLED Turnsyellowwhileswitchedon
Stand-by Stand-byLED Turnsredlightwhile stand-by
2Otherdefinition
IR Remotehead Remotecontrolreceiver
Card-reader
3in1
card-reader Can read MS/ SD/ MMCcard
3Key definition
Key keydefinition
instruction
REC RECkey Enterrecordingmode.choosetheRectime
MENU
Menukey Returntothe main menu
Stopkey Stopcurrentoperation
Leftkey Movecursortoleft
Rightkey Movecursortoright
ENTER
Enterkey Confirmthe current operation
Upkey movecursorup
Downkey Movecursordown
Powerkey Switchon/offthepower

4
BackView
Portdefinition
Port Portdefinition Instruction
HDMI Highdefinitionport CanoutputdigitalsignalviaHDMIport
AVIN Compositevideo
inputport Caninputvideo andaudiowhen
connectedtovideodevice
OpticalFineoutputport Canoutput5.1audioviaopticalport
AVOUT
Compositevideo
outputport Canoutputcompositevideoandaudio
LAN networkport Canconnecttonetworkviainternetport
USB
HOST OutsideUSBport Canread outsideUSBstorageviaUSB
port
USB
DEVICE
USBport Via thisUSBportforPCcommunication
DCIN Powerinport Caninputpower
ON/OFF
PowerswitchTurnonoroff powerswitch
YPbPr Componentvideo
outputport Canoutputprogressivescancomponent
video
Remotecontrol
BUTTON FUNCTION
POWER
Turnonandoffinthestandbymode
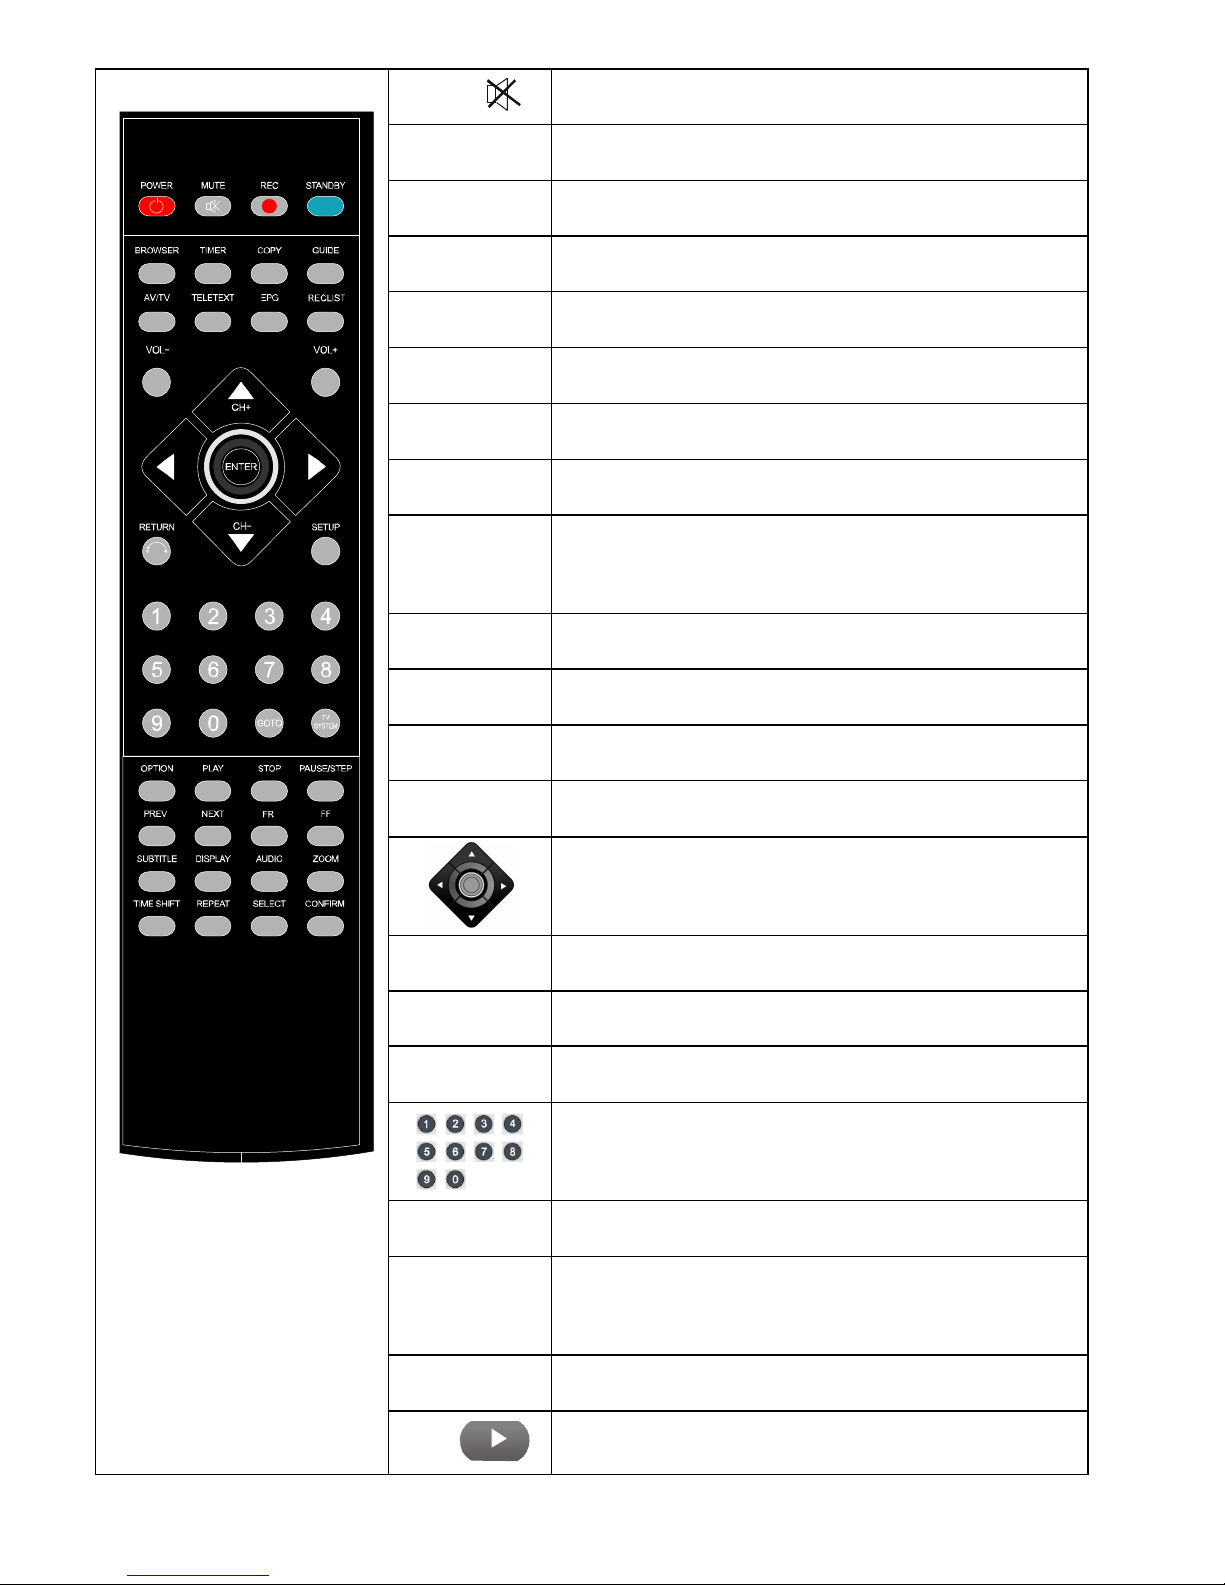
5
MUTE Turnonorshutaudio output
REC Startrecording inRECmode,and
ifpress thiskeyrepeat
youcanselectthe recordingtime
STANDBY
Press itandenterthe STANDBY mode,beusedwhenthe
productappointrecording
BROWSER Enterthebrowsermenu
TIMER EntertheTimemenutoedit,add,deleter
ecording
schedule
COPY Enterthecopymode
GUIDE Enterthemain menu
AV/TV Switchvideoinputsource
TELETEXT On/offwithDVB-
relatedadvertisingthatcontains
informationsuchasthemenu
EPG On/ offtelevision programguide menu
RECLISTAlist ofthedocumentslisted in record
VOL- Press todecreasethe volume
VOL+ Press toincreasethe volume
Navigationkeyforup,down,leftand right
ENTER Press toconfirm
RETURN Returntothe previousmenu
SETUP Enterthemenu
Press toinputdigital
GOTO Press toplaythevideoatthe chapteraftersettingschedule
TVSYSTEM Press toswitchbetweenNTSC
,PAL,480P,576P,720P
50HZ,720P60HZ,1080I50HZand 1080I60HZ.
OPTION Press toselectoptionbar.Torenameordeletethefile.
PLAY
Press toplayfile
Orplayrecording fileundertimeshiftmode.
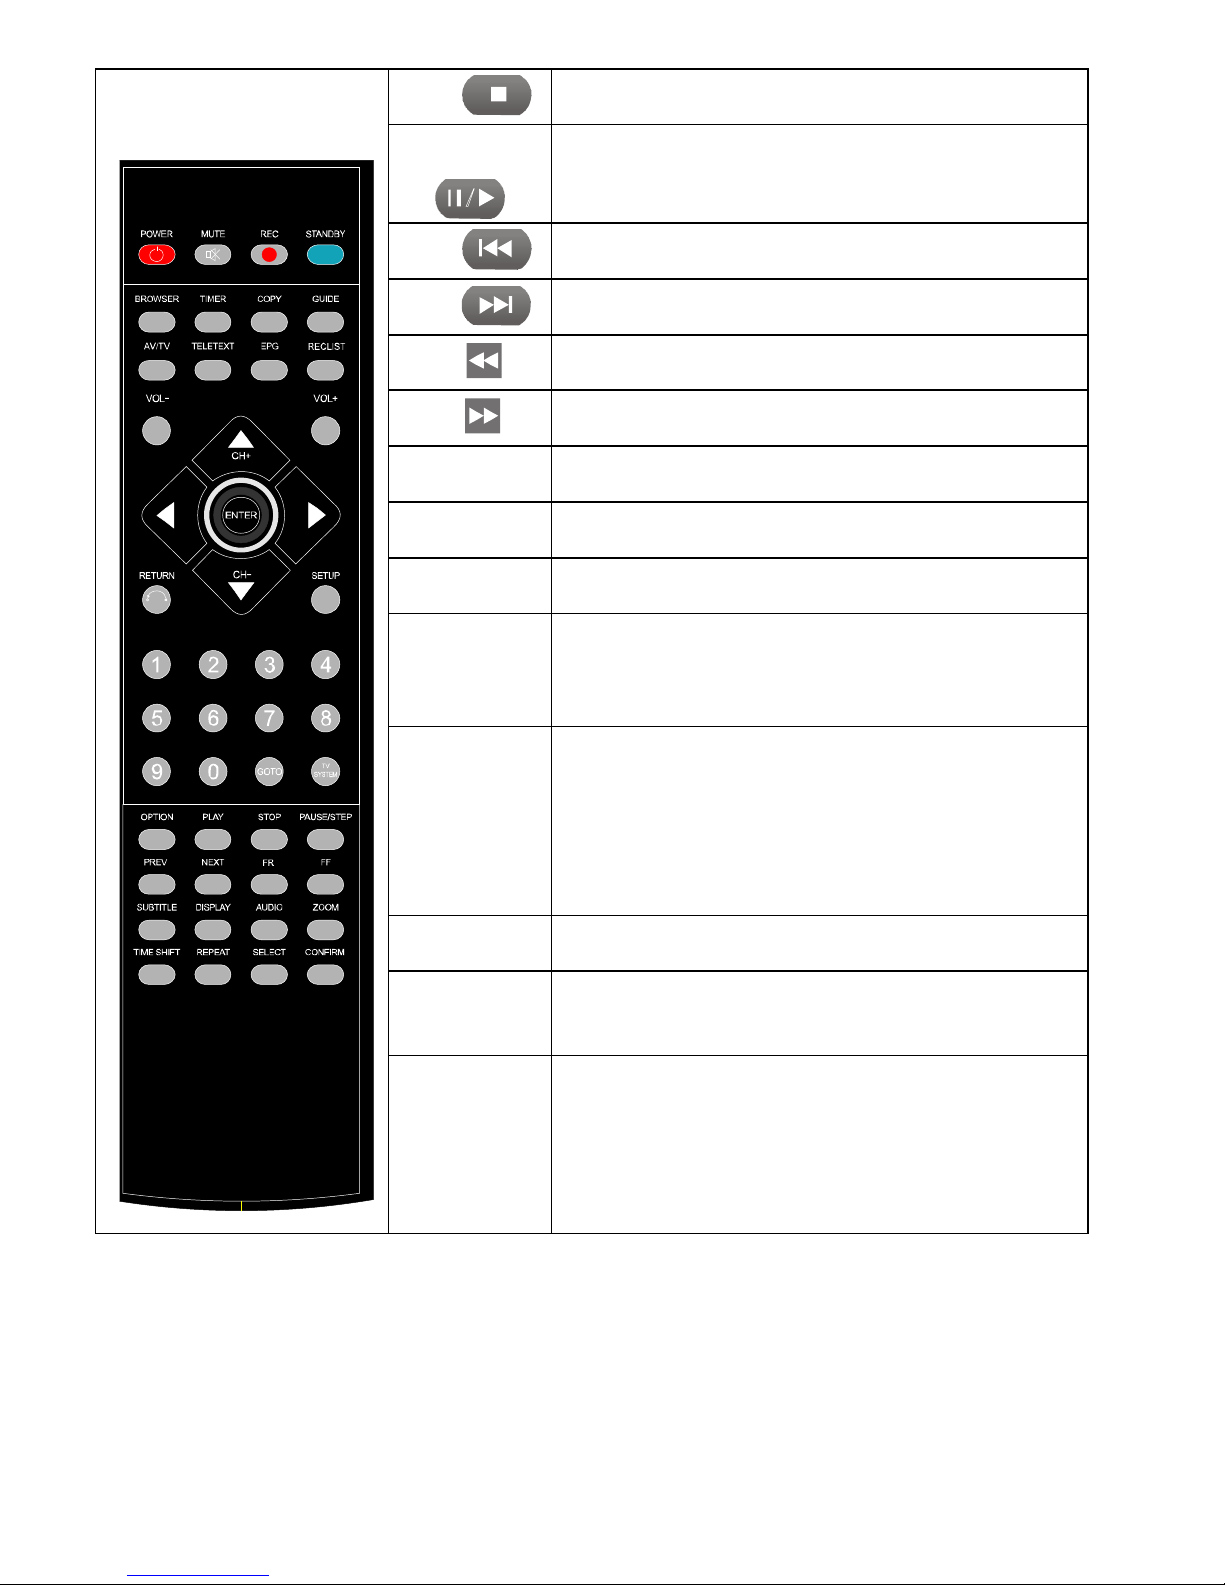
6
STOP
Press tostopplay/recording
PAUSE/STEP
Press topauseplay/recording,and againforstep playing
PREV
Press toreturntopreviousfile
NEXT
Press togotonextfile
FR
Press tofastrewind fromcurrentplayand againtoselect
the speed
FF
Press tofastforwardfromcurrentplayand againtoselect
the speed
SUBTITLE Switchthesubtitle ifthefilesupported
DISPLAY Press todisplaytime,tit
le,information ofchapterwhen play
videoandphoto.
AUDIO Switchtheaudio formatoutput
ZOOM
Press tozoomwhenplaying back photosorVideo
programs.
Photozoomlevels:2X,4X,8X,16X;
Video zoomlevels:2X,3X,4X,8X.
TIMESHIFT
Press toactivatetimeshiftinrecording mode.
Operation asfollow:
Press ”Timeshift”andwaituntilthescreen display,Press
“pause”topauseprogram,press “Play”toresume
playback,and press “Stop”tostoptimeshiftfunction.
IfyouneedtousetheTimeshiftfunction,please
usethe
machine toformattheharddiskfirst.
REPEAT Press tosetrepeatoption:chapter,Title oroff
SELECT Press toselectthefileand thenpress “confirm”toadd
ordeletefile intheplaylist;Selectcopyfilesorfoldersin
the
copymode
CONFIRM Press toadd ordeleteoption inplaylist

7
Basic operation
Powerconnection
Takeoutpoweradapterfromthepackage andconnectit.
Connection ofTVaudioand videooutput
Theproductisdesignedwithmulti-output,includingcomposite(AV),component
(YPbPr)andHDMI.Youcanselectdifferentinterfaceaccordingvariousneed.The
productcandetectvideo outputautomatically,making theoperationfriendlyand
convenient.Pleaserefertothefollowinginstructionforconnectiontoavoid any
problem.
Compositeoutputconnection (AV)
PlugtheyellowconnectorintotheAVoutputofproductandAVinputof TV,andplug
theredandwhiteconnectorintotheaudioinputofTVorHIFI.Turnonthe TVand
selectAVmode.Turnontheproduct and TVdisplaystheinterfaceofinitiation.
Componentoutputconnection (YPbPr)

8
Componentoutputmode:PlugtheYPbPrcableintotheoutputofproductandinput
ofTV.Becausethecableisonlyforvideosignal,anotherAVcableisnecessary. Plug
the redandwhiteconnectorofAVcable intothe audio outputofproductandaudio
input of TVorHIFI.Turnon TVand select YPbPrmode.Turnonthe productand TV
displays theinterfaceofinitiation.
Optical outputconnection
Opticaloutput:ConnecttheOpticalconnectorofthemediaplayerwiththeoptical
connectorofothervideo oraudio devicebyOptical cable.Then entertheproduct's
audiointerface,selecttheDigitalOutputoption "SPDIFLPCM"or"SPDIFRAW". Itis
availabletoenjoy5.1high qualitysoundsthroughamultichanneldecoder/amplifier
withopticalinput.
HDMI outputconnection
HDMIisaoutputwithbestaudioand videoeffectwhichoutputsdigitalvideo and

9
audiocomposited atthesametime.ConnectHDMIcabletooutputofproductand
displaydevicewithHDMIinput.SelectHDMImodeinTVuntilitdisplaysthe interface
ofinitiation.
Playback function
WiththisHDD Recorder&player,individualcanbrowsemovie,photoandmusicfiles
storedin HDD,USB,cardandnetwork.Pleaseenter “browser”toselectthemedia
and press “ENTER”keytoenter.
Itisavailabletopreviewtheselectedmediaandpress “ENTER”keytoplay.
Connection ofrecording and usage
Theproductsupportstowatchtelevisionprograms whilerecordingtelevision
programs.Towatchdigitalterrestrialtelevision,youcanpressRECkeyonthe
remotecontroltostart recording.
TVsignalcanbe generatedfromTVset-top boxorsatellitereceiver,aslongasis
equippedwithsatelliteTVset-topboxortelevision receiver,userscanachievethe
recordingfunction.
Importantnotice: TheproductalsosupportsTVrecordingfromotherset-top
boxorsatelliteTVreceiver.Whenthe recordingofsignalothertelevision set-topbox
orsatellitereceiverinput,pleaserefertothe followingillustration toconnectthe
product.
A.Forset-topboxorsatelliteTVreceiverwithtwosignaloutputs, pleaserefer
tobelowconnection:

10
B.Forset-topboxorsatellitewithonlyonesignal output,pleaserefertothe
belowconnection:
ThereareAVin,AUDIO-R,AUDIO-Landopticaloutputinthebackofproduct.
ConnectAVINand set-topboxorsatelliteTVreceiverandmakesuretheoutputof
set-topboxorsatelliteTVreceiverworkswell.Turnon TVandselectAVmode. Turn
onthe productandselectAVINafterenterthemenu.The TVprogramdisplayson
screenandisreadytorecord.
Usageofstarting Record
1. HDD Format
IfyouchooseHDDinRECDevice(inSetupmenu),itisneedtoformattheharddrive
beforerecording,pleasecopyfilesinHDDfirstlyincaseoflosingdata.Thenchoose
theHDD Formatoption inSystemSetupmenu. HDDFormatSteps:
Step1:Settingtimeshiftbuffer
Theproductneedsthe specialspacefortimeshifttoassign theharddrivesspace.At

11
leastonehour,maximum4hours.One-hourharddisk spaceoccupiedbyabout4Gb,
sochooseupto4hoursofspaceoccupiedbytime-lapseofabout16Gb.
Step2:Harddiskformat
Press / onthe remotecontroltoselect “Back “or “Format”.
Whenhighlightmovethe “Format”key,Press “ENTER”tostart.Otherwise,select
“Back”keytoback..
Step3:CompletingHDDFormat.
WhenHDDformat isfinished,the systemwillbe restartedtoaccesstotheproducts
maininterface.

12
2. Recording
Whenusingrecordingfunction,followthepreviousconnectingwaysandselectthe
option ofAVINintheguide menu.
AVINmode
Aftercorrect connection oftheAV-in signal, poweronthe set-topbox(orsatelliteTV
receiver),TVandourrecorder.
IfyouonlywanttowatchTV,donotpowerofftherecorderand keep theinput
signalof TVwiththeset-topboxsignal.
Whenyouwanttorecordtheprogramwhichyou like, pleasechoose “theinputvideo
frequency”theoptiontoenterthetelevisionpicture,thenchoosethetelevision
channelthrough theset-topbox(OrsatelliteTVreceiver).
Select “TV/AVIN”menu toentertheTVscreen,you can receiveTVprograms
throughset-topbox(orsatelliteTVreceiver)andpressRECkeytostartrecording.
Watchtherecorded video
Alltherecorded filesarerecordedinafilefoldernamed “REC”.
Press “RECLIST”keyonremotecontrolorenterthe “Browser”inthemain menu
andselectthe “HDD”,youwillfindthisfolderandrecordedvideosweresavedinthis
foldernamedbysystemtime.Anotherwayistoselect ‘RECLIST on theguide
menutoopenthe recordedvideofiles.
Itisavailabletopreviewtherecordedfilesandpress “ENTER”keytoplayback.

13
Connection andsetupofnetwork
Theproductcan playthefilesstoredin the networkdirectlythroughrouterorhub.
PleaseconnecttheRJ45cable accordingtothe followingillustration.Thenetwork
connectswellwhen theLEDofnetworkstatusandW/Rblinks.
Connect oneend oftheRJ45cabletotheproductlikethePCdoesandconnectthe
videooutput.Press “setup”keyorselect “setup”menu intheinitiationinterface.
Select “Network”option in thesetupwindowandpress “ENTER”toconfirm.Itis
availableforbothautomaticandmanualIPsetup.Press “setup”keyagaintoexist
aftersetup.Beforeaccessingthe PCthroughnetworkbytheproduct,themediafiles
mustbesharedinthenetwork.
HowtouseUSBHOSTinterface
Playerwithabilitytoexpandlarge-capacity.TheUSBHOSTportcanreadexternal
mobileharddisk,USBFlashDrive,digitalcameras,cardreadersand otherdata
storagedevices.
Evenwithoutthe installationofharddriveplayers,youcanconnectexternalstorage
devicesthrough theUSBHOSTinterface.Todirectplayavarietyofhigh-definition
formatshigh-fidelityaudioandvideofilesstoredinexternalstoragedevices.Towatch
HDmoviesanddigital photosaremorepalatable, atthesametimetheoutputdigital
audiosignalstoaudio equipmentcanfeeltheshockofhigh-fidelitysound effects.

14
HowtoconnectUSBinterface toPC
ThisHDDRecorder&Playerisalsoapersonalmultimediafilesstorage deviceand
canbeusedbyconnectingtoPCviaUSBinterface.
1,Connecttothepowersupply
While usingtheHDDrecorder&playerwithPC,powersupplyisalsoneeded.
2,ConnecttoPCwithUSBcable
ConnecttheHDDRecorder&playertoPCwithUSBcablethenyoucancopyand
transferdata.
FollowtheinstructionoftheabovepictureandconnectthedevicetoPC.
PoweronthePCandenterthe system.The PCdetectsthedeviceautomaticallyand
thenthedevicecanbeusedasanexternalUSBstorage device.
Afterdatatransferfinished,pleaseremovetheUSBstorage devicesafely(clickthe
USBdeviceicontostoptheUSBdeviceandthenpulloutthe USBcable).
Notes:
1,Pleasedontpoweroffwhen itconnecttoPCforreading andwriting.
2,IfthereisnoUSBdetectedafterconnectedwithUSBcable,maybethePCis
operatingotherprogram,pleasepull offtheUSBcable andwait about10 seconds
thenconnectagain.
ThisHDDRecorder&Playerisalsoapersonalmultimediafilesstorage deviceand
canbeusedbyconnectingtothePC.Youcanbrowseandcopyfileseasily.
Table of contents
Other Noontec Media Player manuals


