Noori V02 AIRY User manual
V02 AIRY 2021
MANUAL
2021
MANUAL
V02 AIRY


V02 AIRY
®
Este manual é composto por 52 páginas que apresentam
todas as informações necessárias de advertência, de mon-
tagem, de uso e de cuidado com seu Noori® V02 AIRY.
Aqui você vai encontrar imagens ilustrativas e explica-
ções. Leia nosso conteúdo antes de começar a montagem,
ele é muito importante para uma ótima experiência com
seu Noori® V02 AIRY, e volte a consultá-lo sempre que
necessário.
This manual is composed by 52 pages and provides all the
information you need to advertise, assemble, use and care
for your Noori® V02 AIRY.
Here you will find illustrative images and explanations.
Read our content before you begin assembly, it is very im-
portant for a great experience with your Noori® V02 AIRY,
and refer back to it whenever necessary.
Designed in Brazil
All Rights — Noori®
PATENT REQ. PCT/BR2019/050173
2 3
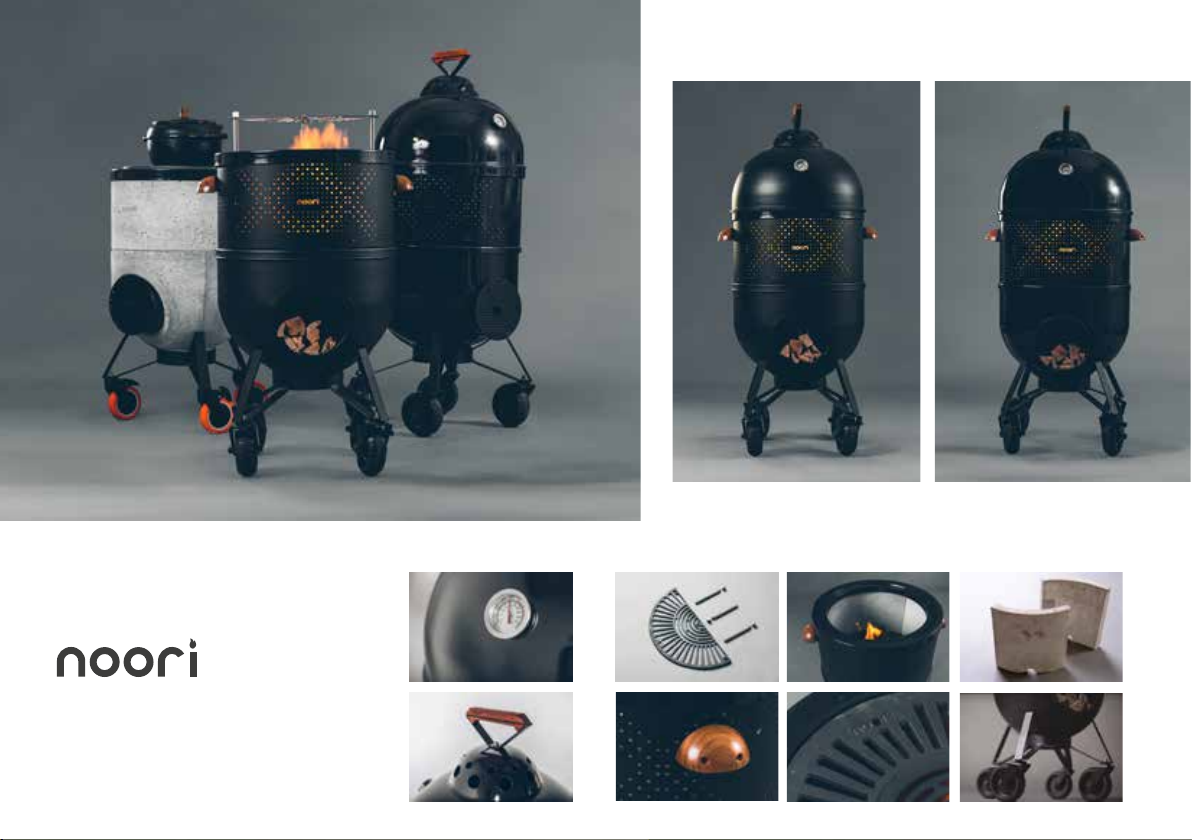
// Noori® V02 AIRY
Matte Black
// Detalhes / Details
// Noori® V02 AIRY
Shiny Black
// Rocket Stove
V02 AIRY
photos: @caio.palazzo

4 5
USOS / USES
SUGERIDOS-SUGGESTED
// Pizza Stove
// Pizza Stove
// Noori® Pizza Disk
// Airy Cylinder
// Airy Cylinder
// Rocket Stove
// Rocket Stove
// BBQ Grill
// BBQ Grill
// BBQ Grill
// Fire Pit
photos: @caio.palazzo

34 ORIENTAÇÕES DE USO
USE GUIDELINES
52 GARANTIA
WARRANTY
noções básicas
basic notions
35
acendimento
lighting
36
durante o uso
during use
38
movimentação
movement
40
limpeza
cleaning
44
transporte
transportation
42
armazenamento
storage
46
especificações técnicas
technical specifications
48
perguntas frequentes
technical specifications
50
ÍNDICE SUMMARY
08 O QUE VOCÊ PRECISA SABER
ANTES DE USAR SEU NOORI®
WHAT DO YOU NEED TO KNOW
BEFORE USING YOUR NOORI®
10
12
CONHEÇA SEU Noori®
KNOW YOUR Noori®
ACESSÓRIOS Noori®
Noori® ACCESSORIES
14 COMO MONTAR
HOW TO ASSEMBLE
20 FUNÇÕES
FUNCTIONS
22 o sistema rocket
the rocket system
24 fogão a lenha
rocket stove
26 churrasqueira
bbq grill
28 forno de pizza
pizza oven
30
32
aquecedor externo
firepit
sistema AIRY
AIRY system

8 9
Noori® is an
equipment
designed for use
with FIRE, for this
reason a special care
is required. Warn
everyone about the
heat of Noori® parts
to prevent burns.
Supervise children
and teens while
Noori® is on and hot.
Keep pets away from
touching the hot
surface.
Always wear gloves
to handle Noori®’s
lid and to approach
fire; Always use the
grill tool to handle
the grills when they
are hot.
Do not use Noori®
on flammable
floors without
proper protection.
Deck and wooden
floors, for example,
should be protected
with apparatus
under Noori®’s
nozzle.
To prevent falling
embers on the floor
also use the Noori®
Embers Protector.
Keep flammable
materials away
from Noori® such as
barbecue lighters,
alcohol, oil, cloth,
charcoal, firewood,
paper, cardboard
or other fuels that
could be struck by
embers or flames
while using Noori®.
Be carefull while
handling your
Noori® and never
move-it around
when in use.
Follow these
principles and
ensure safe use of
your Noori®, enjoy!
WHAT
DO YOU
NEED TO
KNOW
BEFORE
USING
YOUR
NOORI®
!
O Noori® é um
equipamento
desenhado para
uso com FOGO,
por essa razão
alguns cuidados
especiais são
necessários. Advirta
e alerte todas as
pessoas sobre o
calor das peças do
Noori® para evitar
queimaduras.
Supervisione
crianças e
adolescentes
enquanto o Noori®
estiver acesso
e quente. Afaste
animais domésticos
para evitar
que toquem na
superfífice quente.
Use sempre luvas
para manusear a
tampa do Noori® e
para se aproximar
do fogo; use sempre
a ferramenta
de grelha para
manusear as grelhas
quando estiverem
quentes.
Não use o Noori®
sobre pisos
inflamáveis sem a
devida proteção.
Deck e pisos de
madeira p.ex. devem
ser protegidos com
um aparato sob o
bocal do Noori®.
Para evitar a queda
de brasas no piso
utilize também o
Protetor de Brasas
Noori®.
Mantenha longe do
Noori® materiais
inflamáveis como
acendedores de
churrasqueira,
álcool, óleo, tecidos,
carvão, lenha,
papel, papelão ou
outros combustíveis
que possam ser
atingidos pelas
brasas ou pelas
labaredas durante o
uso do Noori®.
Muito cuidado
ao manusear, e
movimentar o seu
Noori®e nunca
movimente-o
aceso.
Siga esses princípios
e garanta um uso
seguro do seu
Noori®, aproveite!
O QUE
VOCÊ
PRECISA
SABER
ANTES
DE USAR
SEU
NOORI®
!

10 11
KNOW
YOUR NOORI®
YOUR NOORI® V01 IS MADE UP OF
11 PIECES THAT FIT TOGETHER.
PARTS ARE NAMED AND DISPLAYED
IN ILLUSTRATION NEXT >
O SEU NOORI® V01 É COMPOSTO
POR 11 PEÇAS QUE SE ENCAIXAM
ENTRE SI. AS PEÇAS SÃO NOMEADAS
E APRESENTADAS NA ILUSTRAÇÃO
AO LADO >
CONHEÇA SEU Noori® / KNOW YOUR Noori®
CONHEÇA
SEU NOORI®
COMPONENTS
NOORI V02 AIRY® BASIC
Upper Grates
(Half-Moon)
Enameled Cast Iron
Grelhas Superiores
(Meia-Lua)
Ferro Fundido Esmaltado
Noori®
Refractory Disk
Refractory Concrete
Disco Refratário
Noori®
Concreto Refratário
Lid Handle
Steel + Reclaimed Wood
Alça da Tampa
Aço + Madeira Reutilizada
Lid
Enamelled Steel
Tampa
Aço Esmaltado
Support Ring
Enameled Steel
Anel de Suporte
Aço Esmaltado
Quadripod
Galvanized Steel
Quadripé
Aço Galvanizado
“i” Tube (rocket system)
Enameled Steel
Tubo “i” (sistema rocket)
Aço Esmaltado
“L” Tube (rocket system)
Enameled Steel
Tubo “L” (sistema rocket)
Aço Esmaltado
Burner
Enameled Steel
Queimador
Aço Esmaltado
Side Handles
Reclaimed Wood
Alças Laterais
Madeira Reutilizada
Offroad Casters
Rodízios Offroad
Serial Number
Número de Série
Noori®
Refractory Plates
Refractory Concrete
Placas Refratárias
Noori®
Concreto Refratário
Cilindro Airy Noori®
Aço Esmaltado
Noori® Airy Cylinder
Enameled Steel
Lower Grate (intern disk)
Enameled Cast Iron
Grelha Inferior (disco interno)
Ferro Fundido Esmaltado
Lower Grate (extern disk)
Enameled Cast Iron
Grelha Inferior (disco externo)
Ferro Fundido Esmaltado
“L” Tube Support
Stainless Steel
Suporte do Tubo “L”
Aço Inox
Termômetro
Thermometer
Lower Ring
Enameled Steel
Anel Inferior
Aço esmaltado
Bolts and Nuts
Stainless Steel
Parafusos e Porcas
Aço Inox

12 13
ACCESSORIES
THOSE ARE NOORI’S V02 AIRY EXTRA
ACCESSORIES, FOLLOW OUR MEDIA
CHANNELS AND CHECK THE RECENT
LAUNCHES
ACESSÓRIOS
ESTES SÃO OS ACESSÓRIOS EXTRAS
DO NOORI® V02 AIRY, ACOMPANHE
NOSSOS CANAIS DE MIDIA E VEJA OS
LANÇAMENTOS RECENTES.
ACESSÓRIOS /ACCESSORIES
>>
KIT EXTENSOR
Formado por 03 pinos
de aço inox + 01 grelha
meia-lua.
Deve ser acoplado
sobre outra grelha
meia-lua.
>>
EXTENDER KIT
Composed by 03
stainless steel axles +
01 half-moon grate. It
must be pluged over
another half-moon
grate.
>>
PROTETOR
DE BRASA
Feito em aço esmalta-
do, deve ser acoplado
na abertura do tubo
rocket, para proteção
contra brasas que
possam cair.
>>
EMBER SHIELD
Made with enameled
steel, the shield must
be pluged into the
rocket tube opening,
protecting from un-
wanted embers drop.
14 15
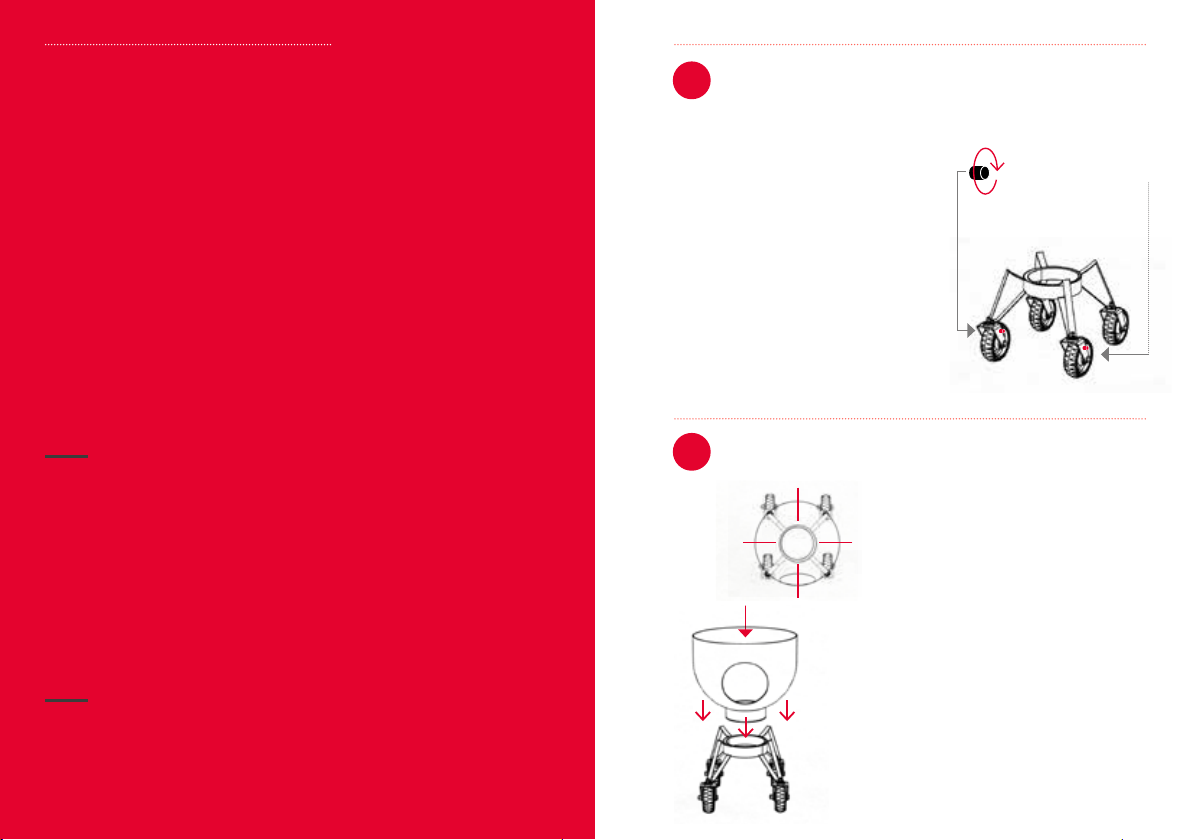
01
02
Antes de iniciar a
montagem do seu
Noori® coloque o
Quadripé sobre o
chão em local com
superfície plana,
lisa e livre de obs-
táculos.
Preferencialmente
monte o Noori® no
local onde ele vai
ser usado.
Com o Quadri-
pé posicionado,
acione os freios
dos dois rodízios
frontais
COMO MONTAR / HOW TO ASSEMBLE
Before you begin
mounting your
Noori®, place the
Quadripod on
the floor in a flat,
smooth and unob-
structed location.
Preferably mount
Noori® where it
will be used.
With the Quadri-
pod positioned,
apply the brakes
on both front
casters.
COMO
MONTAR
MONTAGEM DO SEU NOORI® A MONTAGEM
DO NOORI® É FEITA EM 9 ETAPAS. SIGA
ATENTAMENTE TODAS AS ORIENTAÇÕES E
CASO TENHA DÚVIDAS CONSULTE NOSSO SITE.
HOW TO
ASSEMBLE
NOORI® ASSEMBLY IS DONE IN 9 STEPS.
CAREFULLY FOLLOW ALL GUIDELINES AND IF
YOU HAVE QUESTIONS CHECK OUR WEBSITE
COMO MONTAR / HOW TO ASSEMBLE
Quadripé / Quadripod
Queimador / Burner
Rotacione o pino
para travar o rodízio
Rotate the pin to
lock the caster
Encaixe o Queima-
dor no Quadripé,
apoiando com
cuidado, de modo
que o bocal fique
centralizado entre
os 2 rodízios fron-
tais (aqueles com
freio), conforme a
imagem ao lado.
Apoie o Queimador
com cuidado evi-
tando movimentos
bruscos e evitando
soltar a peça antes
de estar completa-
mente apoiada.
Certifique-se que
o pino do Queima-
dor refratário se
encaixa no anel do
Quadripé.
Attach the Burner
to the Quadri-
pod, carefully
supporting it so
that the nozzle is
centered between
the 2 front cast-
ers (those with
brakes), as shown
in the adjacent
image.
Support the
Burner carefully
avoiding sudden
movements and
avoiding dropping
the part before it
is fully supported.
Make sure that the
refractory burner
pin fits into the
quadripod ring.

16 17
Para o encaixe do
Tubo L, do sistema
Rocket, no Quei-
mador, você deve
antes inserir o
Apoio do Tubo.
Esta peça de aço
inox, com uma
abertura lateral,
deve ser encaixada
na base interna do
Queimador.
To fit the L Tube,
of the Rocket Sys-
tem, on the Burner,
you must befor
place the Tube
Support.
This part, made by
stainless steel with
a lateral openning,
must be placed on
the internal base
of the Burner.
COMO MONTAR / HOW TO ASSEMBLE
Para o encaixe da
Anilha Airy, levante
segurando em suas
alças laterais, se-
gure com as duas
mãos na lateral,
uma mão de cada
lado, conforme
imagem ao lado.
Com o queimador
apoiado no quadri-
pé em sua frente,
apoie a Anilha Airy
com cuidado evi-
tando movimentos
bruscos e evitando
soltar a peça antes
dela estar comple-
tamente apoiada.
Alinhe a marca
Noori® na parte da
frente, centraliza-
da como ilustra a
fig. abaixo.
To fit the Airy
Cylinder, lift it by
holding its side
handles, hold it
with both hands
on the side, one
hand on each side,
as shown on the
side fig.
With the burner
resting on the
quad in front of
you,support the
Airy Cylinder care-
fully, avoiding su-
dden movements
and avoiding
releasing the piece
before it is fully
supported.
Align the Noori®
brand on the front,
centered as shown
in fig. bellow.
Insert the L tube into
the burner curving
the part, so that it
pass through the
opening, and the
longer surface land
above the Tube Sup-
port (iten 03), with
the upper burner
opening aligned.
Insira o Tubo L no
queimador, inclinando
a peça, de modo que o
bocal saia pelo furo do
Queimador, apoiando
a sua face de maior
comprimento no Apoio
de aço inox (item 03)
e com a abertura
superior do Queimador
alinhada.
COMO MONTAR / HOW TO ASSEMBLE
A
B
A
noori
Front
Back
Frente
Trás
B
03 Suporte do Tubo / Tube Support
04 Tubo L / L Tube
05 Anilha Airy / Airy Cylinder

18 19
1
3
4
5
6
2
1
2
COMO MONTAR / HOW TO ASSEMBLECOMO MONTAR / HOW TO ASSEMBLE
06
07
Grelha inferior / Lower Grate
Sistema Airy (placas + anilha)
/ Airy System (plates + cylinder)
Centralize o Tubo
“rocket” com a
Grelha Inferior, de
modo que a boca
horizontal do Tubo
“rocket” fique en-
caixada com o furo
central da grelha
inferior
Center the rock-
et tube with the
bottom grille so
that the horizontal
mouth of the rock-
et tube fits in with
the center hole of
the bottom grille
!
Montando as placas refratárias / Assembling the Refractory Plates
The first and second
plates (1,2) must
be right to the side
handles. Slowly drop
them and slide, fitting
the bolts on the side
handles on the holes
on the refractory
plate.
A primeira e segunda
placas (1,2)devem ser
colocadas proximas
as alças laterais.
Posicione devagar e
deslize, encaixando as
porcas nos rebaixos
das placas refratárias.
A
1
2
The refractory plates
(1,2) will be resting
above the lower ring,
and almost pluged
into the side handles
02 bolts
As placas refratárias
(1,2) apoiadas sobre
o anel inferior, e qua-
se que conectadas
aos parafusos das
alças laterais.
B
The (3,4,5) Plates
must be placed
vertically, placed
next to each other.
Not necessarily on
this order. Import-
ant: the last plate
(6) must be verti-
cally slided fitting
between the (4,5)
plates, carefully.
As Placas (3,4,5)
devem ser posicio-
nadas verticalmente,
posicionadas ao lado
de cada uma. (não
necessariamente
nesta ordem). Impor-
tante: A última Placa
(6) deve ser deslizada
verticalmente, en-
caixando-se entre as
placas (4,5), cuidado-
samente.
C
To complete the
assembly, fit the
support ring of the
grids on the set.
Then fit the tube I,
support the grids
on the support ring,
and the pizza stone
on the grids. There,
your Noori will be
ready to fire!
Remembering that
you can individually
remove the refrac-
tory plates for the
fire to be exposed
through the holes
of the Airy Cylinder.
Para finalizar a
montagem, encaixe
o anel de suporte
das grelhas sobre
o conjunto. Então
encaixe o tubo I,
apoie as grelhas
sobre o anel de
suporte, e a pedra
de pizza sobre as
grelhas. Pronto, seu
Noori estará pronto
para o fogo!
Lembrando que
você pode remover
individualmente as
placas refratárias
para o fogo ser
exposto através dos
furos do Cilindro
Airy.
D
20 21
FUNÇÕES
DO NOORI®
O NOORI® V02 AIRY PODE SER USADO COMO
(1) FOGÃO A LENHA; (3) CHURRASQUEIRA; (3)
FORNO DE PIZZA ; OU (4) FOGUEIRA. CADA
USO REQUER UMA MONTAGEM ESPECÍFICA,
CONFORME AS PRÓXIMAS PÁGINAS
NOORI’S
FUNCTIONS
NOORI® V02 AIRY CAN BE USED AS (1) WOOD
STOVE; (2) BARBECUE; (3) PIZZA OVEN; OR
(4) FIRE PIT. EACH USE REQUIRES A SPECIFIC
ASSEMBLY AS SHOWN IN THE FOLLOWING
PAGES
NOORI®V02 AIRY USOS / NOORI® V02 AIRY USES
22 23
03
04
04 04
01
02
CHAMA MODERADA
Inserir pela abertura
frontal do tubo L, na
posição horizontal e
inclinada, maior volume
sem obstruir
a passagem de ar
MODERATE FLAME
Insert through the front
opening of the L Tube in
a horizontal and inclined
position, larger volume
without obstructing
the air
fluxo de ar
carvão
carvão
lenha
Tubo I
TuboL
air flow
charcoal
charcoal
wood logs
I Tube
L Tube
CHAMA ALTA
Inserir pela
abertura superior,
do Tubo I poucas
lenhas na posição
HIGH FLAME
Insert through top
opening of the I
tube, few logs up-
right
03 CHAMA EXTREMA
Além de 01,02,03
inserir carvão em
volta do tubo I,
entre o Cilindro
Airy e o Tubo.(04)
EXTREME FLAME
Beyond 01,02,03
insert charcoal
around the I tube,
between the Airy
Cylinder and the
Tube. (04)
04
CHAMA BAIXA
Inserir pela
abertura frontal
do sistema, na
posição horizontal
e inclinada, poucas
lenhas.
LOW FLAME
Insert through
the front opening
of the system, in
the horizontal and
inclined position,
few logs.
01
02
The Rocket System
can generate dif-
ferent heat inten-
sities, from small
flames to large
flames.
See the illustration
on the next page
for the best way
to achieve the
desired heat in-
tegrity.
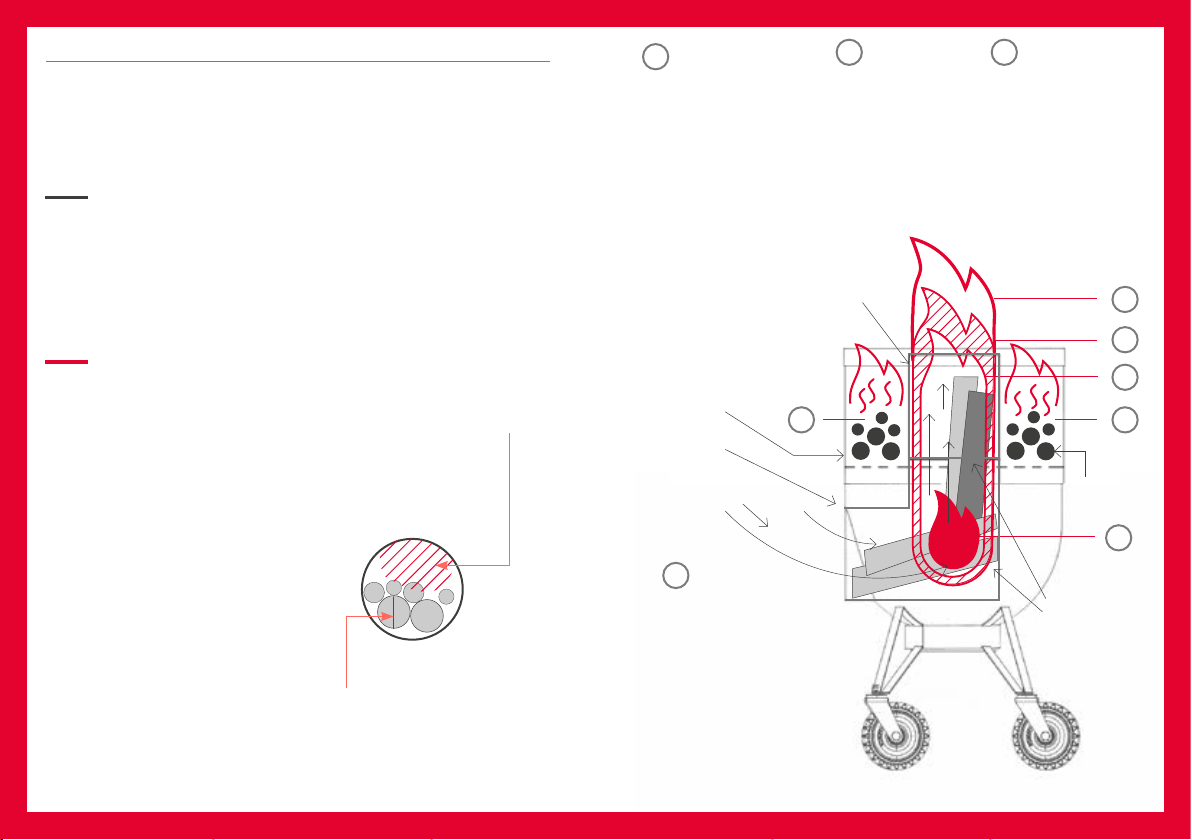
O Sistema Rocket
pode gerar dife-
rentes intensida-
des de calor, desde
pequenas chamas,
até grandes laba-
redas.
Veja na ilustração
na página ao lado
a melhor forma de
se obter a inten-
sidade de calor
desejada.
SISTEMA ROCKET / ROCKET SYSTEM
O SISTEMA
ROCKET
COMO UTILIZAR DA MELHOR FORMA
O SISTEMA ROCKET DE ACORDO
COM A SUA NECESSIDADE
THE ROCKET
SYSTEM
HOW TO USE THE ROCKET SYSTEM ON
ITS BEST WAY ACCORDING TO YOUR NEED
> TO MAINTAIN
THE CONSTANT AIR
FLOW, NEVER OBS-
TRUCT THE INLET
OF THE PIPE.
> PARA MANTER
O FLUXO DE
AR CONSTANTE
NUNCA OBSTRUA A
ENTRADA DO TUBO
Diametro sugerido,
máx ø: aprox. 6 cm
Comprimento sugerido:
aprox. 30 cm
Suggested diameter,
max ø: aprox. 2,3”
Suggested Lenght:
aprox. 11.8”

24 25
Chama centralizada
Inserir lenha.
pág. 22-23
Inserir lenha
(para chamas
maiores). pág.22-23
Inserir carvão
(para chamas
extremas). pág.22-
Centralized flame
Insert wood.
pág. 22-23
Insert wood
(for higher
flames). pág. 22-23
Insert charcoal
(for extreme
flames). pág. 22-23
fluxo de ar
air flow
Diametro
e comprimento
de lenha: pg 22
Wood diameter
and lenght: pg 22.
FUNÇÕES / FUNCTIONS
The function of
wood stove, is
practical and fast
for the preparation
of food in contain-
ers such as pots,
pans, and other
accessories.
This function
is based on the
proportion of the
rocket stove, a
widespread verti-
cal wood stove in
permaculture, for
the best use of en-
ergy. The pipes are
manufactures in
enamelled carbon
steel for durability.
A função de
fogão a lenha, é
pratica e rápida
para o preparo
de alimentos
em recipientes
como panelas,
frigideiras, e
outros acessórios.
Essa função
é baseada na
proporção do
rocket stove, um
fogão à lenha
vertical difundido
na permacultura,
para o melhor
aproveitamento de
energia. Os tubos
são fabricados
em aço carbono
esmaltado para
maior durabilidade.
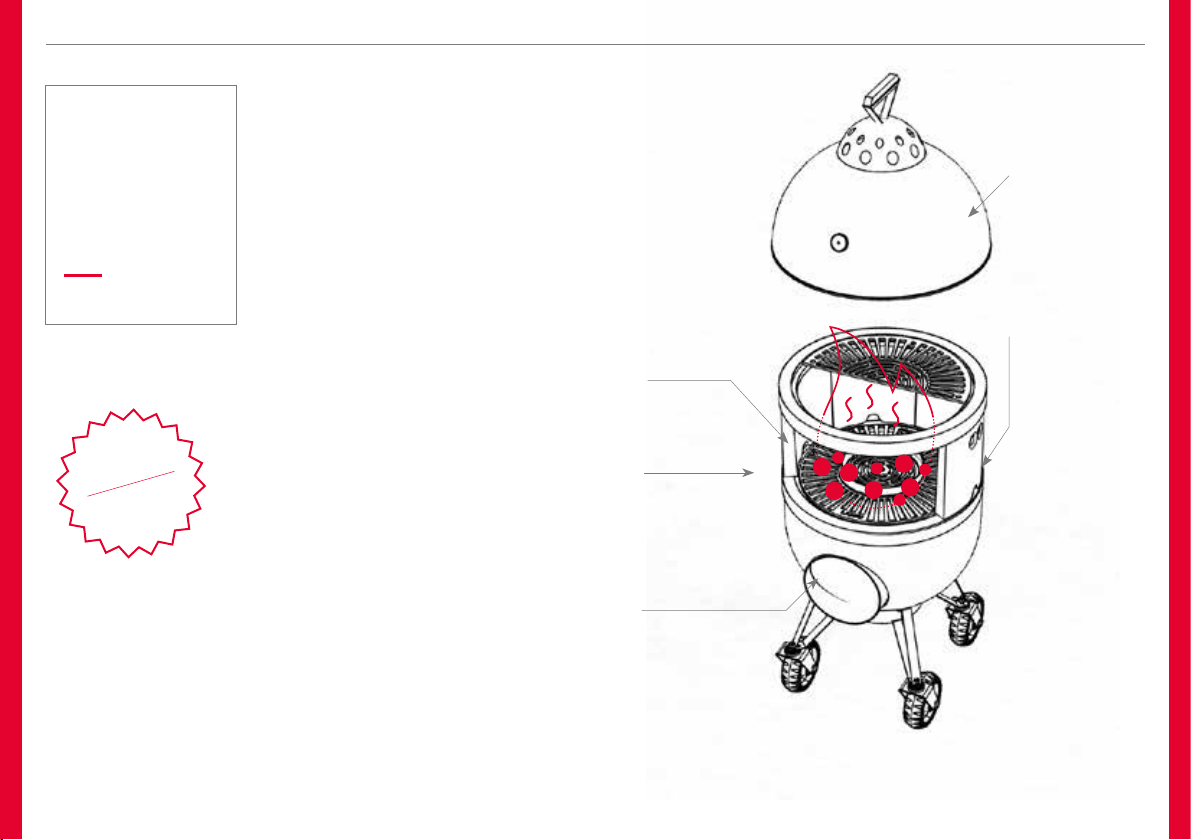
Para função
Rocket Stove
são necessários
os componen-
tes abaixo:
> Tampa
> Grelhas “meia
lua” (superiores)
> Anel de
suporte
> Tubo “i”
> Anilha Airy
> Grelha inferior
(dico externo)
> Tubo “L”
> Queimador
>Quadripé
com rodízios
For Rocket Stove
function the
following components
are required:
> Lid
> Superior Grates
(Half-Moon)
> Support Ring
> “i” Tube
> Airy
Cylinder
> Inferior Grate
(Extern Disk)
> “L” Tube
> Burner
> Quadripod
with wheels
FOGÃO A LENHA
ROCKET
STOVE
01
4,3,2,1
launch!
* Ver Rocket System pág. 22
* Check Rocket System pg. 22
SUGGESTED
FUELS:
A) CHARCOAL
B) WOOD*
C) BRIQUETTE*
COMBUSTÍVEIS
SUGERIDOS:
A) LENHA
B) CARVÃO*
C) BRIQUETTE*
FUNÇÕES / FUNCTIONS
26 27
Carvão
Placas refratárias Placas refratárias
Inserir lenha.
(opcional)
Charcoal
Refractory Plates Refractory Plates
Insert wood.
(optional)
FUNÇÕES / FUNCTIONS
Meat, poultry,
fish and vege-
tables can be
prepared exponen-
tially in this role.
Your refractory
body keeps the
heat longer, and
with the lid you
can prepare food
in the breath and
smoked.
Our plugs allow
you to create a
second floor
grate plate * and
also add a half-
moon plate.
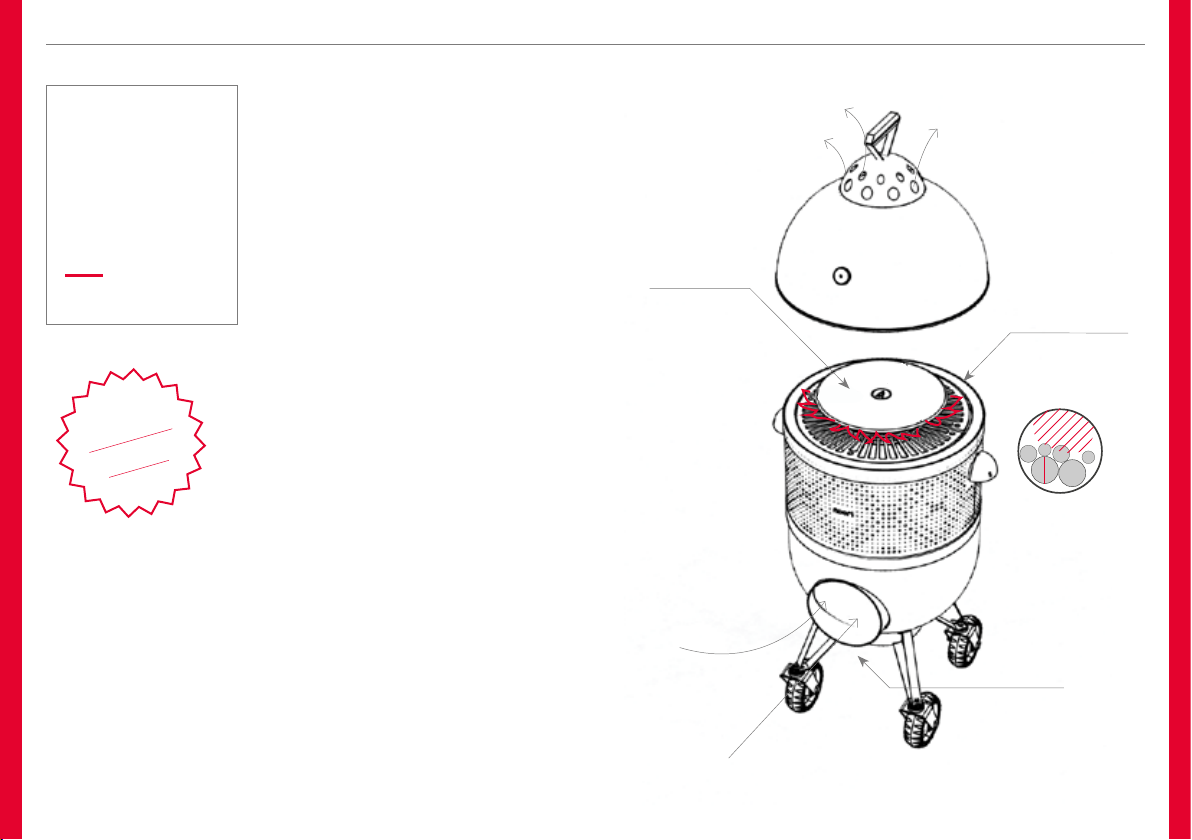
Carnes, Aves,
Peixes e vegetais
podem ser
preparados de
forma execpcional
nesta função. Seu
corpo refratário
mantém o calor
por mais tempo,
e com a tampa é
possível preparar
alimentos no bafo
e defuma- dos.
Nossos plugs
permitem criar um
segundo andar
de grelha*
adicionando uma
chapa meia-lua.
CHURRASQUEIRA
BBQ
GRILL
02
FUNÇÕES / FUNCTIONS
DEFUMAR
Para defumar
alimentos você
pode usar a tampa
MAIS CALOR
As placas refratárias
conservam o calor.
Você pode também
retirá-las para
contemplação do
fogo, ou aquecer o
ambiente. ver pag. 32
MORE HEAT
The refractory pla-
tes maintain the
heat. You can also
remove them to
fire contemplation
or heating the spa-
ce. Check pg. 32
SMOKE
To smoke ingre-
dients just use
the lid
FOGO!
FUEGO!
SUGGESTED
FUELS:
A) CHARCOAL
B) WOOD*
C) BRIQUETTE*
COMBUSTÍVEIS
SUGERIDOS:
A) LENHA
B) CARVÃO*
C) BRIQUETTE*
Para função
Churrasqueira
são necessários
os componen-
tes abaixo:
> Tampa
> Grelhas “meia
lua” (superiores)
> Anel de
suporte
> Anilha Airy
> Placas
Refratárias
> Grelha inferior
(dico externo)
> Grelha inferior
(dico interno)
> Tubo “L”
> Queimador
>Quadripé
com rodízios
For BBQ Grill
function the
following components
are required:
> Lid
> Superior Grates
(Half-Moon)
> Support Ring
> Airy
Cylinder
> Refractory
Plates
> Inferior Grate
(External Disk)
> Inferior Grate
(Internal Disk)
> “L” Tube
> Burner
> Quadripod
with wheels
28 29
FUNÇÕES / FUNCTIONS
Disco Refratário
Inserir lenha.
pág. 22-23
Inserir lenha/carvão
(para chamas
maiores). pág.22-23
Refractory Disk
Insert wood.
pág. 22-23
Insert wood/charcoal
(for higher flames).
pág. 22-23
fluxo de ar
air flow
fluxo de ar
air flow
Diametro
e comprimento
de lenha: pg 22
Wood diameter
and lenght: pg 22.
Just add the
Noori® Pizza Disc
to make delicious
pizzas in minutes.
The temperature
is regulated by the
amount of fire-
wood. It reaches
up to 400oC.
About the Noori®
Pizza Pie you can
also bake bread or
support oven-safe
containers such as
tempered glass,
aluminum or other
platters.
Basta adicionar
o Disco de Pizza
Noori® para pre-
parar deliciosas
pizzas em poucos
minutos.
A regulagem da
temperatura se dá
através da quanti-
dade de lenha. Ele
atinge até 400oC.
Sobre o Disco de
Pizza Noori® você
também pode as-
sar pães ou ainda
apoiar recipientes
apropriados para
forno, como tra-
vessas de vidro
temperado, de alu-
mínio ou outras.
* Ver Rocket System pág. 22
* Check Rocket System pg. 22
FORNO DE PIZZA
PIZZA
OVEN
03
FUNÇÕES / FUNCTIONS
MAMA
MIA!
SUGGESTED
FUELS:
A) CHARCOAL
B) WOOD*
C) BRIQUETTE*
COMBUSTÍVEIS
SUGERIDOS:
A) LENHA
B) CARVÃO*
C) BRIQUETTE*
Para função
Forno de Pizza
são necessários
os componen-
tes abaixo:
> Tampa
> Grelhas “meia
lua” (superiores)
> Anel de
suporte
> Anilha Airy
> Placas
Refratárias
> Tubo “i”
> Grelha inferior
(dico externo)
> Tubo “L”
> Queimador
>Quadripé
com rodízios
For Pizza Oven
function the
following components
are required:
> Lid
> Superior Grates
(Half-Moon)
> Support Ring
> Airy
Cylinder
> Refractory
Plates
> “i” Tube
> Inferior Grate
(External Disk)
> “L” Tube
> Burner
> Quadripod
with wheels
30 31
1
fluxo de ar
Grelha inferior interna
air flow
Inferior Inter Grate
12
2
FUNÇÕES / FUNCTIONS
The FirePit ver-
sion of the Noori®
V02 Airy is an
extremely prac-
tical solution for
heating cold days,
cooking, or even
as a scaled-down
option for easy
transport
A versão, FirePit
do Noori® V02
Airy é uma solução
extremamente
prática para
aquecer dias
frios, cozinhar,
ou até mesmo
como uma opção
reduzida para
ser facilmente
transportado.
AQUECEDOR EXTERNO
FIRE
PIT
04
FUNÇÕES / FUNCTIONS
GRELHA inferior
interna
Apoie a grelha inferior
interna base do
Queimador.
ANEL superior +
GRELHA inferior
externa
Você pode cozinhar
na versão FirePit,
encaixando o anel
com a grelha inferior
externa, sobre o
queimador. (ou usar
as grelhas meia-lua)
Lower internal
GRATE
Place the inferior
internal grate on
the base of the
Burner.
Superior support
RING + Lower
External GRATE
You can cook on
the FirePit version,
fitting the Superior
Ring with the lower
external Grate, on the
burner. ( or use the
Half-Moon Grates)
RELAX
TIME !
SUGGESTED
FUELS:
A) CHARCOAL
B) WOOD
C) BRIQUETTE
COMBUSTÍVEIS
SUGERIDOS:
A) CARVÃO
B) LENHA
C) BRIQUETTE
Para função
Fire Pit são
necessários os
componentes
abaixo:
> Anel de
suporte
> Grelha inferior
(dico externo)
> Grelha inferior
(dico interno)
> Queimador
>Quadripé
com rodízios
For Fire Pit
function the
following
components
are required:
> Support Ring
> Inferior Grate
(External Disk)
> Inferior Grate
(Internal Disk)
> Burner
> Quadripod
with wheels

32 33
A
Remova as placas, e exponha as
labaredas.
Remove the Plates, and the flames
will be exposed.
SISTEMA AIRY
AIRY
SYSTEM
05
SUGGESTED
FUELS:
A) CHARCOAL
B) WOOD
C) BRIQUETTE
COMBUSTÍVEIS
SUGERIDOS:
A) CARVÃO
B) LENHA
C) BRIQUETTE
FUNÇÕES / FUNCTIONS
O Noori® V02 AIRY
combina a leveza do
Aço esmaltado com
a Resistência Térmi-
ca do concreto ra-
fratário, agora distri-
buído em 06 placas
Internas criando o
inovador SISTEMA
AIRY - basta retirar
algumas placas de
dentro do cilindro
AIRY - e as chamas
ficam expostas,
dançando e permi-
tindo a hipnotizante
contemplação do
fogo. Para monta-
gem das placas ver
pág. 18.
The Noori® V02
AIRY combines the
lightness of the
enamelled steel-
with the Thermal
Resistance of the
refractory concrete,
now distributed on
06 Internal placas
creating the innova-
tive AIRY SYSTEM
— Just remove a
few plates inside
the AIRY cylinder —
and the flames are
exposed, dancing
and allowing the
mesmerizing fire
contemplation. To
assembly check
pg. 18.
BONUS
FEAT !
A esq. todas as placas,
acima, sem as placas da
frente.
Left. all plates, above,
without the front plates

34 35
NOÇÕES BASICAS
BASIC NOTIONS
01
> Sempre aqueça seu Noori®
de maneira lenta e gradual.
> Não submeta o Noori® a
choques mecânicos – ele
possui peças de cerâmica que
podem quebrar durante choques
mecânicos, tais como quedas,
trancos, colisões ou outros.
> Não submeta o Noori® a
choques térmicos – as peças
de concreto refratário resistem
a altas temperaturas, mas
podem trincar, rachar ou se
quebrar ao sofrer choques
térmicos, tais como contato
com água enquanto o Noori®
está quente.
> Não submeta os tubos “i” e
“rocket” a choques mecânicos
– o esmalte das peças pode
trincar e/ou lascar durante os
choques.
> Não submeta a tampa a
choques mecânicos – o
esmalte das peças pode trincar
e/ou lascar, e a tampa pode
amassar durante os choques.
> Always heat your Noori®
slowly and gradually.
> Do not subject Noori® to
mechanical shocks - it has
ceramic parts that can break
during mechanical shocks such
as falls, bumps, bumps or the like.
> Do not subject Noori® to
thermal shocks - refractory
castables resist high
temperatures, but may crack,
crack or break when thermally
shocked, such as contact with
water while Noori® is hot.
> Do not subject the “i” and
“rocket” pipes to mechanical
shocks - the enamel on parts may
crack and / or chip during shocks.
> Do not subject the cover to
mechanical shocks - the enamel
on the parts may crack and / or
chip, and the cover may dent
during shocks.
ORIENTAÇÕES DE USO / USE GUIDELINES
USE
GUIDELINES
ORIENTAÇÕES
DE USO
ORIENTAÇÕES DE USO / USE GUIDELINES
Table of contents
Popular Grill manuals by other brands


Lotus
Lotus CWK-74ET Instructions for installation and use

Somagic
Somagic TOM 704636i Assembly instructions

Louisiana Grills
Louisiana Grills Founders Premier Series owner's manual

Artusi
Artusi ABIBBQ4 Operation manual

Mak Grills
Mak Grills EP-429-2G owner's manual

Fisher & Paykel
Fisher & Paykel DCS BH136RGIL quick start guide


