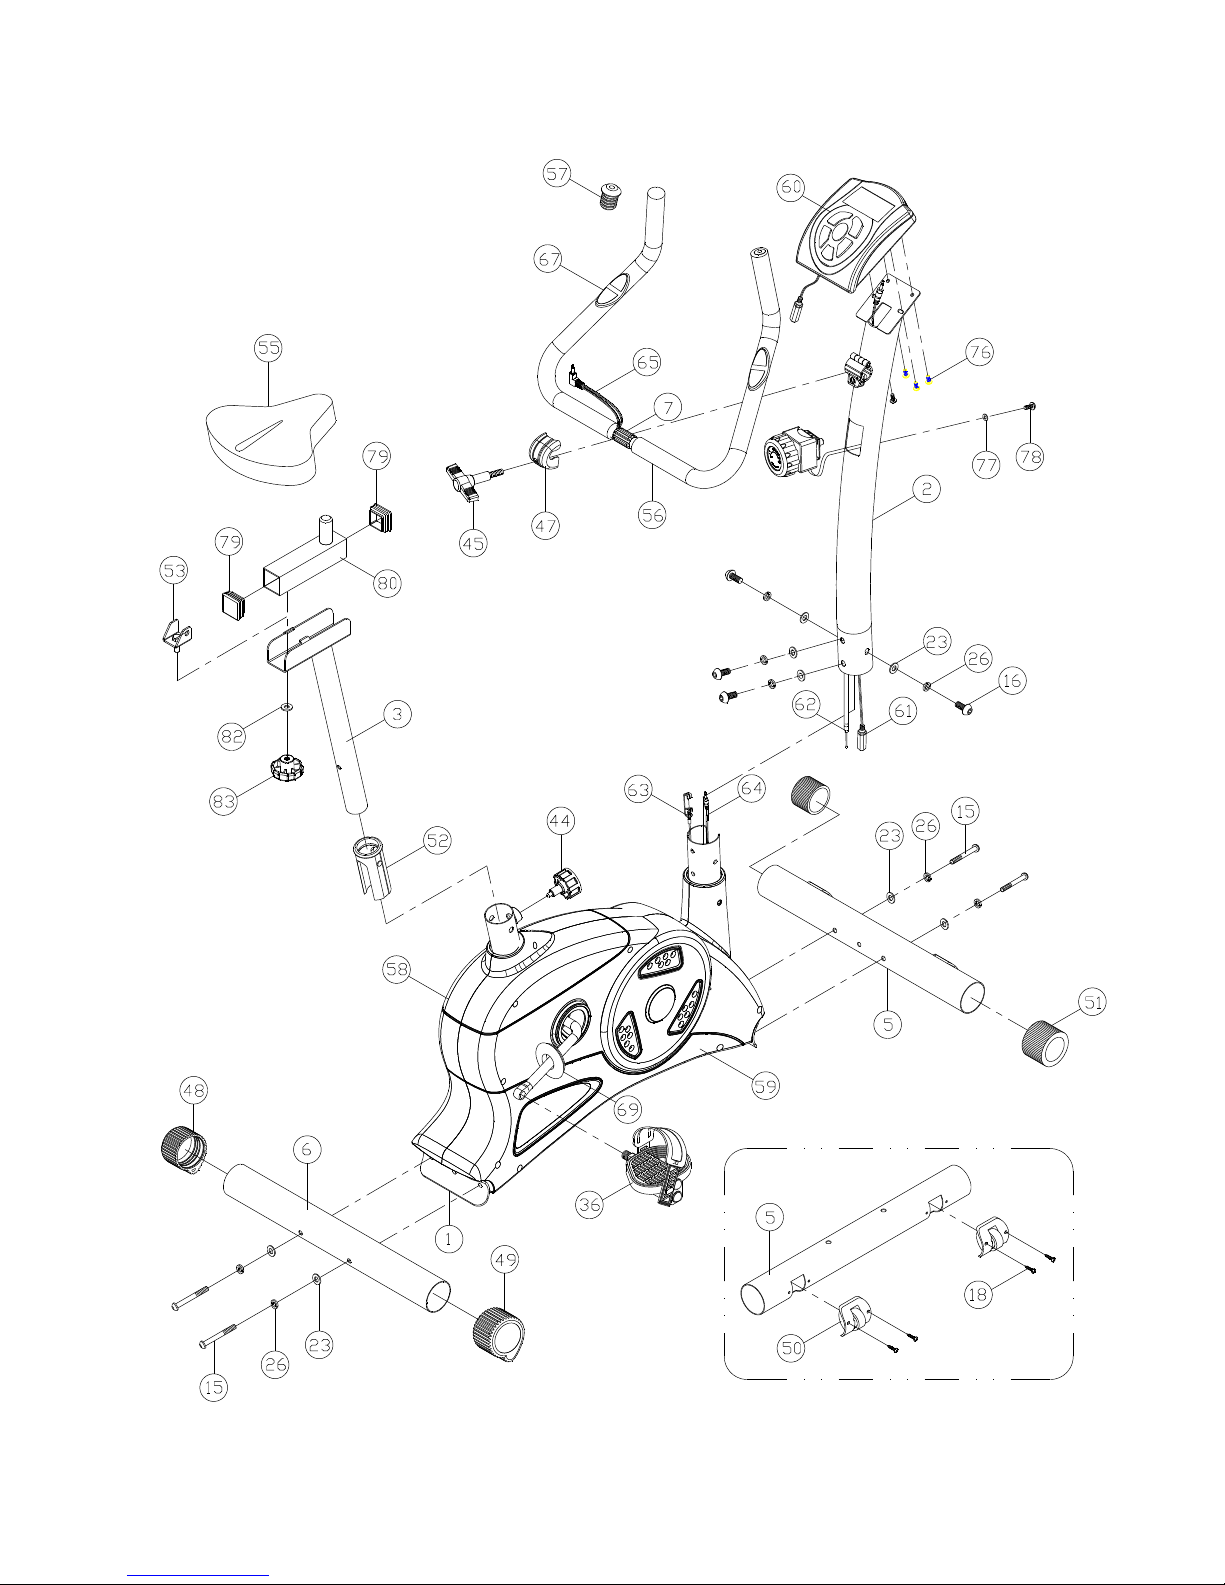
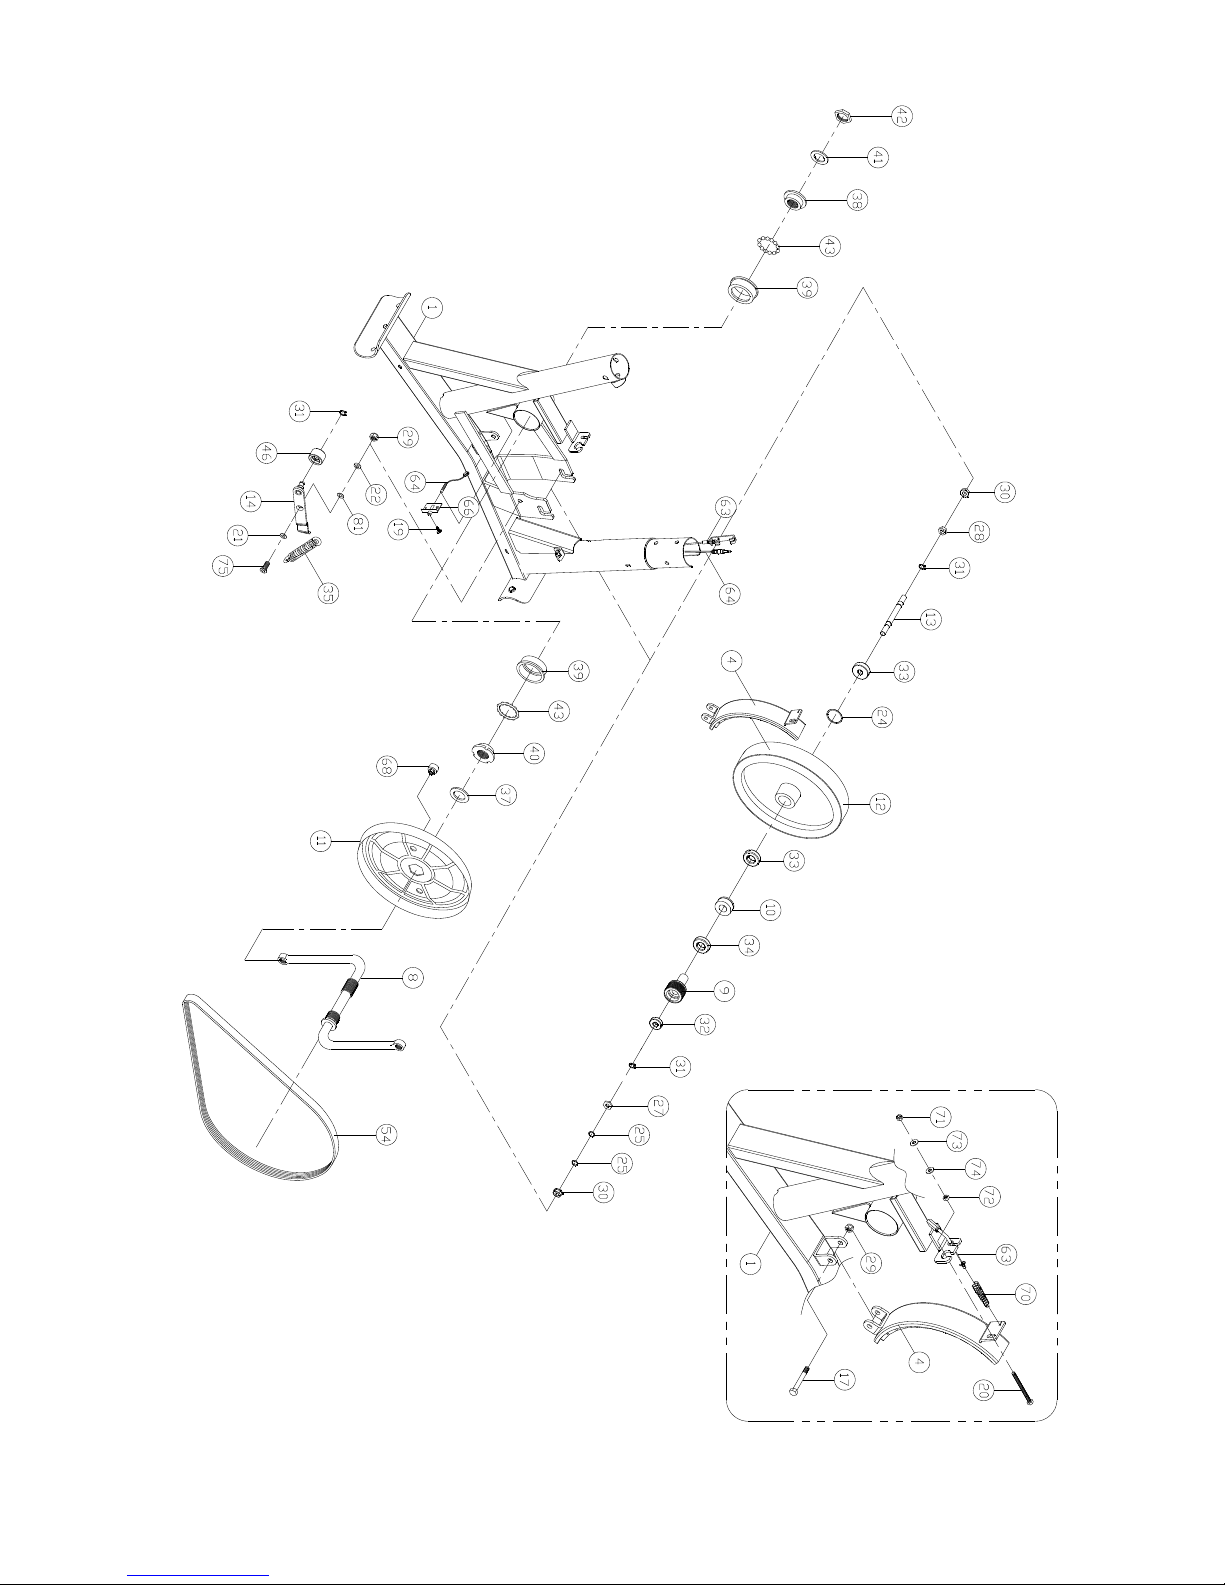
Nordic 220 cycle User manual

220 cycle
Owner's
Manual
SRS-968-NF
May 28, 2008 version 01

Kundeservice
Om det skulle oppstå feil ved ditt produkt, ber vi dem gjøre følgende:
Gå gjennom monteringsanvisningen for å sjekke om produktet er riktig montert.
Hvis computeren ikke fungerer, sjekk om batteriene er intakte.
Ta kontakt med Nordic Fitness Servicesenter dersom problemet vedvarer.
For øvrige tekniske spørsmål vedrørende ditt produkt, ta kontakt med Nordic Fitness
Servicesenter.
Nesten samtlige av de spørsmål eller problemer som måtte oppstå, kan løses ved å snakke
med en av Nordic Fitness sine serviceansvarlige.
For tekniske og brukermessige spørsmål, kontakt:
Nordic Fitness AS
Strandveien 33, 3050 Mjøndalen
Postboks 21, 3051 Mjøndalen
Servicesenter: 32 27 27 27
Hovedkontor: 32 27 27 00
Telefaks: 32 27 27 01
Åpningstider Nordic Fitness Servicesenter: Mandag –torsdag kl. 10.00 –20.00
Fredag kl. 10.00 –16.00
Denne manualen er ment som et hjelpemiddel til brukerne. Vi kan ikke garantere for feil i oversettelsen, eller
tekniske endringer på produktet.
The owner’s manual is only for the customer reference.

Explode Diagram


Part List
NO.
DESCRIPTION
Q'TY
NO.
DESCRIPTION
Q'TY
1
MAIN FRAME
1
49
REAR FOOT COVER R
1
2
UPRIGHT TUBE WELDMENT
1
50
MOVING WHEEL
2
3
SADDLE POST
1
51
FRONT FOOT COVER(L&R)
2
4
MAGNETIC HOLDER
1
52
SADDLE SUPPORT TUBE INSERT
1
5
FRONT FOOT
1
53
FIX PLATE
1
6
REAR FOOT
1
54
BELT
1
7
HANDLEBAR
1
55
SEAT
1
8
CRANK
1
56
FOAM GRIP
2
9
FRONT PULLEY
1
57
HANDLE BAR END CAP
2
10
ONE WAY BEARING FT-1735
1
58
CHAIN COVER L
1
11
REAR PULLEY
1
59
CHAIN COVER R
1
12
FLYWHEEL
1
60
COMPUTER
1
13
FLYWHEELAXLE
1
61
COMPUTER MIDDLE WIRE
1
14
JOCKEY WHEEL BRACKET
1
62
TENSION CONTROL
1
15
M8*72mm SCREW
4
63
TENSION CONNECTOR
1
16
M8*15mm SCREW
4
64
COMPUTER LOWER CABLE
1
17
M8*52mm HEX HEAD BOLT
1
65
PULSE WIRE
1
18
SCREW #8-32mm
4
66
SENSOR BRACKET
1
19
SCREW #6-32mm
1
67
PULSE GRIP UNIT
2
20
M6*65mm HEX HEAD BOLT
1
68
MAGNET
1
21
M8 WASHER
1
69
CRANK ARM COVER
2
22
M8 WASHER
1
70
CARGE SPRING
1
23
M8 WASHER
8
71
NYLOCK NUT M6
1
24
WASHER(Φ30*Φ34*t0.8)
1
72
M6SELF-LOCKING NUT
1
25
WASHER(Ø10*13*0.3)
2
73
M6 WASHER
1
26
M8 SPRING WASHER
8
74
M6 NYLON WASHER
1
27
3/8" SELF-LOCKING NUT(T3.0)
1
75
M8*20mm SCREW
1
28
3/8" SELF-LOCKING NUT(T9.0)
1
76
M5*15mm SCREW
4
29
NYLOCK NUT M8
2
77
M5 WASHER
1
30
3/8" WH NUT
2
78
M5*25mm SCREW
1
31
CLIP C10
3
79
PLASTIC BUSH
2
32
BEARING (6000ZZ)
1
80
MOVABEL SEAT POST
1
33
BEARING (6003ZZ)
2
81
NYLON WASHER M6*19*1.5T
1
34
BEARING (6300ZZ)
1
82
WAHER M10 <2mm>
1
35
PULLING SPRING
1
83
MOVABEL SEAT POST KNOB
1
36
PEDAL (LEFT&RIGHT)
1set
37
38mm WASHER
1
38
BALL BEARING RING NUT(R)
1
39
BEARING BOWL
2
40
BALL BEARING RING NUT(L)
1
41
35mm WASHER
1
42
RING NUT
1
43
BALL BEARING
2
44
SEAT HEIGHT ADJUSTING KNOB
1
45
HANDLEBAR SCREW
1
46
DRIVE BELT WHEEL
1
47
HANDLEBAR BRACKET
1
48
REAR FOOT COVER L
1

Assembly Instructions
1. Fasten Front Foot (5) to the Base Frame (1) using 2 x (23),
2 x (26), 2 x (15) and 2 x (51) as indicated.
2. Fasten Rear Foot (6) to the Base using 2 x (23), 2 x (26), 2
x (15) and 2 x (49) as indicated.
3. Connect Computer Upper Cable (61) to Computer Wire
(64).
4. Follow the diagram (A-1), (A-2), (A-3), (A-4) to connect
the tension control cable (62) to the tension control connector
(63)

5. Insert the Handlebar Post (2) into the Base (1) and attach it
with 4 x (23), 4 x (26) and 4 x (16).
6. Attach the clamp of seat (55) to the seat slide post (80) and
tighten the seat firmly into your desired position.
After assembling the seat slide post (80) at the seat post
with washer (82) seat post knob (83), you can move the
hole of seat post to adjust your desired position.
7. Insert the Saddle Post (3) into the Base (1).Align one of
the holes in the Saddle Post with the hole in the Base and
insert the Seat Knob (44) through the hole in the base into
the hole in the Saddle Post. Tighten the Seat Knob into the
Base.
8. Attach the Computer Upper Cable (18) to the Computer
(60). Attach the Computer (60) to the Handlebar Post with 4
x (76).
(Attention: Ensure that the cable loom are not crunched
or pinched during installation.)

9. Attach the Handlebar (7) to the Handlebar Post (2) using
Handle Screw (45) through Cover (47).
Insert the plug of hand pulse wire (65) to the jack of the
monitor (60).
10. Insert the Right Pedal (26) into the right arm of the
Crank Assembly (27) and finger tighten in a clockwise
direction until the thread is fully inserted in the crank.
Insert the Left Pedal (26) into the Left arm of the Crank
Assembly (27) and finger tighten in a counter-clockwise
until the thread is fully inserted in the crank.
.

Manual for B11032
Display Console Overview:
The things you should know before exercise
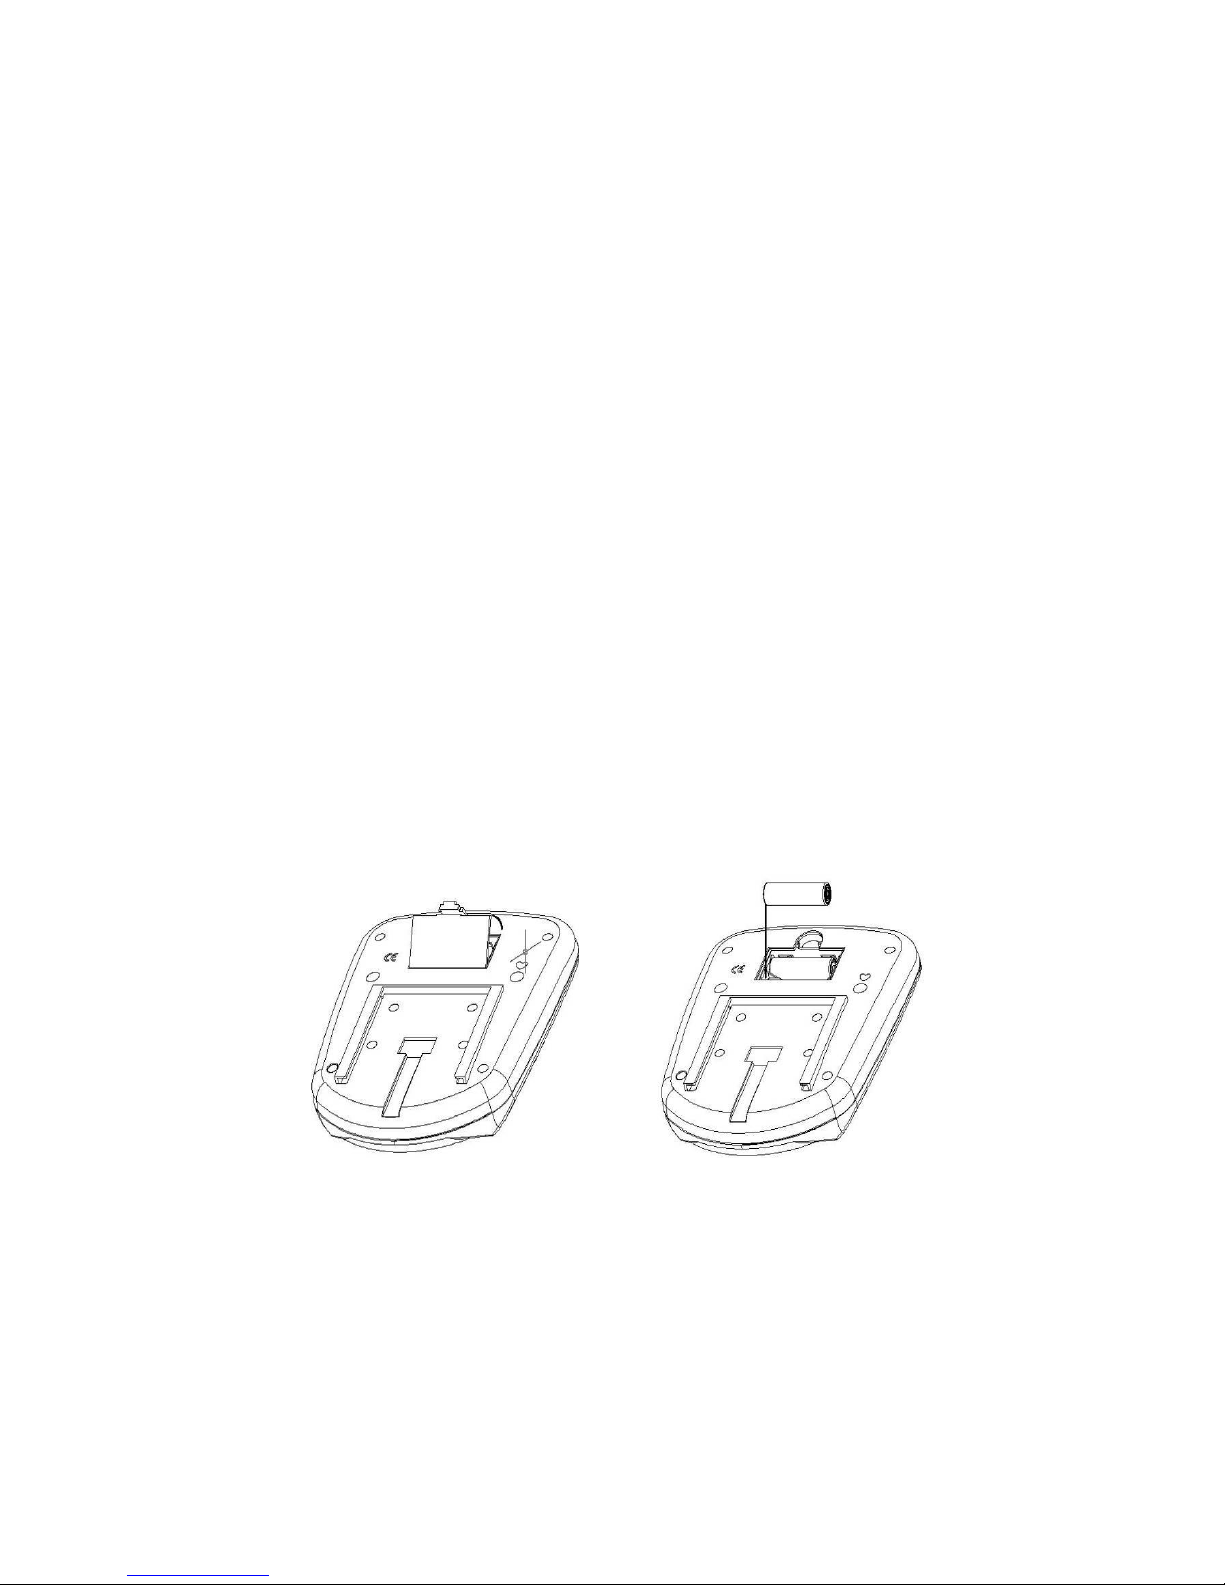
SLEEP MODE:
The monitor will entry SLEEP mode (LCD off) when there is no signal input and no key be
pressed after 4 minutes.
Functions and Features:
1. SCAN: At the exercise mode, press the MODE key until appears the SCAN on the LCD.
Monitor will display the following function and each function will keep 6 seconds on the
main screen.
TIME-SPEED-DISTANCE-CALORIE-RPM-PULSE
2. TIME: Shows your elapsed workout time in minutes and seconds. Your computer will
automatically count up from 0:00 to 99:59 in one second intervals. You may also program
your computer to count down from a set value by using the Set keys from 0:00 to 99:00. If
you continue exercising once the time has reached 0:00, the computer will begin beeping,
and count up from 0:00.
3. SPEED: Displays your workout speed value in KM/MILE per hour from 0.0 to 99.9.
4. DISTANCE: Displays the accumulative distance traveled during each workout up to a
maximum of 99.99KM/MILE. You may also program your computer to count down from a
set value by using the Set keys from 0.0 to 999.0. If you continue exercising once the
Distance has reached 0.0, the computer will begin beeping, and count up from 0.0.
5. CALORIES: Your computer will estimate the cumulative calories burned at any given time
during your workout. You may also program your computer to count down from a set value
by using the Set keys from 0 to 9999. If you continue exercising once the Distance has
reached 0.0, the computer will begin beeping, and count up from 0.0.

6. PULSE: Your computer displays your pulse rate in beats per minute during your workout. If
no pulse signal input then the computer will display 0 on the window.
7. RPM: Your pedal cadence.
Key function:
There are 3 button keys and the function description as follows:
1. SET key: During the STOP mode, press the key to increase the value of Time, Distance
and Calories.
2. RESET key: During the STOP mode, press the key to clear the exercising value or setting
value to zero.
3. MODE key: a. Press the key can accept these setting values of TIME, DISTANCE and
CALORIE. b. During the STOP mode, by holding this key for over two seconds then the
computer will re-power-on.
c. During the exercise mode, press the key can check the function from
SCAN-TIME-SPEED-DIST-CAL-RPM-PULSE for a circle.
How to replace the batteries:
Please move out the battery cover from the bottom housing then replacement the batteries.
The instruction as below,
Table of contents
Other Nordic Exercise Bike manuals