Nordic 440 User manual

4
440 cycle
Owner's
Manual
SRS-137M

Explode Diagram


Part List
NO.
DESCRIPTION
Q'TY
NO.
DESCRIPTION
Q'TY
1
BASE FRAME
1
49
BEARING <6003ZZ>
2
2
CHAIN COVER (L)
1
50
BEARING IC1735-FT
1
3
CHAIN COVER (R)
1
51
WASHER od34 id30*0.8t
1
4
TURNING PLATE COVER
2
52
3/8" WH NUT
2
5
HAND PULSE WIRE
1
53
3/8"-26*3t NUT
1
6
TRANSPORT ROLLER UNIT
2
54
3/8"-16*9t NUT
1
7
SCREW #8 * 16 mm
4
55
BEARING <6300ZZ>
1
8
REAR FOOT CAP (R)
1
56
SCREW M6 * 16 mm
4
9
REAR FOOT CAP (L)
1
57
WAHER M10
1
10
WASHER M8
9
58
SCREW M4 * 15mm
1
11
SPRING WASHER M8
8
59
DRIVE BELT WHEEL
1
12
SEAT
1
60
M8*1.0T WASHER (od22mm)
1
13
REAR FOOT
1
61
M8 NYLOCK NUT
2
14
FRONT FOOT
1
62
WASHER M6 <1.2mm>
1
15
SENSOR WIRE
1
63
PULLEY
1
16
COMPUTER CABLE (UPPER)
1
64
MAGNET
1
17
SERVO MOTOR W/ LOWER CABLE
1
65
MOVABEL SEAT POST KNOB
1
18
SERVO MOTOR
1
66
CLIP C17 <ID 15.7mm>
2
19
FRONT FOOT CAP
2
67
CLIP C12 <ID 11.1mm>
3
20
CRANK(L/R)
1SET
68
JOCKEY WHEEL BRACKET
1
21
WIRE ROD
1
69
PULLING SPRING
1
22
UPRIGHT TUBE WELDMENT
1
70
M6 NYLOCK NUT
1
23
ALLEN HEAD BOLT M8 * 15 mm
4
71
BELT
1
24
SEAT KNOB
1
72
M8*25 SCREW
1
25
M5*16mm SCREW
4
73
MAGNETIC HOLDER
1
26
PEDAL(L/R)
1SET
74
SCREW M8 * 52 mm
1
27
AXLE FOR PULLEY
1
75
SCNSOR BRACKET
1
28
SEAT POST INSERT
1
76
SCREW M6 * 65 mm
1
29
PLASTIC BUSH
2
77
M6 NUT
5
30
MOVABEL SEAT POST
1
78
M6 NYLONT WASHER
1
31
T KNOB
1
79
SPRING
1
32
SEAT POST
1
80
FLYWHEEL
1
33
SCREW M5 * 12 mm
4
81
M8*1.5T WASHER (od22mm)
1
34
FIX PLATE
1
82
FLYWHEELAXLE
1
35
SCREW (NYLOK)M8*25mm
2
83
M5 WH NUT
4
36
CRANK ARM CAP
2
84
SPRING WASHER M6
4
37
ALLEN HEAD BOLT M8 * 72 mm
4
85
CLAMP COVER
1
38
BEARING <6203ZZ>
2
39
M4*15mm SCREW
2
40
POWER CABLE
1
41
COMPUTER
1
42
END CAP OF HANDLEBAR
2
43
FOAM GRIP
2
44
SMALL HANDLEBAR
1
45
ADAPTOR
1
46
HAND PULSE
2
47
BEARING <6000ZZ>
1
48
FRONT PULLEY
1

Assembly Instruction
1. Fasten Front Foot (14) to the Base Frame (1) using 2 x
(10), 2 x (11) and 2 x (37) as indicated.
2. Fasten Rear Foot (13) to the Base using 2 x (10), 2 x (11)
and 2 x (37) as indicated.
3. Connect Computer Upper Cable (16) to Servo Motor &
Computer Lower Cable (17).
4. Insert the Handlebar Post (22) into the Base (1) and attach
it with 4 x (10), 4 x (11) and 4 x (23).

5. Attach the clamp of seat (12) to the seat slide post (30A)
and tighten the seat firmly into your desired position.
After assembling the seat slide post (30) at the seat post (32)
with washer (57) seat post knob (65), you can move the
hole of seat post to adjust your desired position.
6. Insert the Saddle Post (32) into the Base (1).Align one of
the holes in the Saddle Post with the hole in the Base and
insert the Seat Knob (24) through the hole in the base into the
hole in the Saddle Post. Tighten the Seat Knob into the Base.
7. Attach the Handlebar (14) to the Handlebar Post (22) using
Handle Screw (31) through Cover (85).
Insert the plug of hand pulse wire (5) to the jack of the
monitor (41).
8. Attach the Computer Upper Cable (16) to the Computer
(41). Attach the Computer (41) to the Handlebar Post (22)
with 4 x (33).
(Attention: Ensure that the cable loom are not crunched
or pinched during installation.)

9. Insert the Right Pedal (26R) into the right arm of
the Crank Assembly (27) and finger tighten in a
clockwise direction until the thread is fully inserted in
the crank.
Insert the Left Pedal (26L) into the right arm of the
Crank Assembly (27) and finger tighten in a
counter-clockwise direction until the thread is fully
inserted in the crank.
10. Plug the Adaptor (45).

Manual for B31122 (16PROGRAMS)
Display Console Overview:
The things you should know before exercise
A. Input Power
Plug in the adaptor to the equipment then the computer will produce a beep sound and turn on the
computer at the Manual mode.
Technical data of the current adapter:
1. Available for Input: 230V/50Hz or 60Hz Output: 6V AC/0.5A
2. Available for Input: 110V/50Hz or 60Hz Output: 6V AC/0.5A
B. Program select and setting value
1. Use the UP or DOWN keys to select program mode and then press ENTER to confirm your
exercise mode.
2. At the Manual mode, the computer will use the UP or DOWN keys to set up your exercise TIME,
DISTANCE, CALORIES.
3. Press the START/STOP key to start exercise.
4. When you reach the target, the computer will produce beep sounds and then stop.
5. If you set up more than one target and you would like to reach next target, press START/STOP key
to keep on exercise.
C. Clock Mode:
1. After plug-inAC adaptor then the LCD will display at the Clock mode for user to input the current
hour by 24 hours and minute by 60 minutes. After setting up the clock then the monitor will
display the hour-minute and second bar on the screen. Two seconds display one bar. Also
display the current temperature on the screen. Press any key to quit the CLOCK mode except

the ENTER key.
2. The computer will enter the clock mode when there is no signal input or no keys be pressed after
4 minutes. You can press ENTER key to switch the clock and temperature at the clock mode or
press other keys to quit the clock mode except the ENTER key.
3. By holding the ENTER and UP keys together for over two seconds, you can switch to the CLOCK
mode during the STOP mode.
4. You can set up the CLOCK by holding ENTER key for over 2 seconds when switch to CLOCK
mode from STOP mode then you can set up TIME by UP or DOWN keys.
Functions and Features:
1. Quick Start key: Allows you to start the computer without selecting a program. TIME automatically
begins to count up from zero. Use the UP and DOWN keys to adjust the resistance.
2. TIME: Shows your elapsed workout time in minutes and seconds. Your computer will automatically
count up from 0:00 to 99:59 in one second intervals. You can also program your computer to count
down from a set value by using the UP and DOWN keys. If you continue exercising once the time has
reached 0:00, the computer will begin beeping, and reset itself to the original time set, letting you know
your workout is done.
3. DISTANCE: Displays the accumulative distance traveled during each workout up to a maximum of
99.9KM/MILE.
4. RPM: Your pedal cadence.
5. SPEED: Displays your workout speed value in KM/MILE per hour.
6. CALORIES: Your computer will estimate the cumulative calories burned at any given time during your
workout.
7. PULSE: Your computer displays your pulse rate in beats per minute during your workout.
8. PULSE RECOVERY: During the START stage, leave the hands holding on grips or leave the chest
transmitter attached and then press “PULSE RECOVERY”key, all function displays will stop except
“TIME”. Time starts counting from 00:60 - 00:59 - - to 00:00. As soon as 00:00 is reached, the computer
will show your heart rate recovery status with the grade F1.0 to F6.0.
1.0 means OUTSTANDING
1.0<F<2.0 means EXCELLENT
2.0≦F≦2.9 means GOOD
3.0≦F≦3.9 means FAIR
4.0≦F≦5.9 means BELOW AVERAGE
6.0 means POOR
Note: If no pulse signal input then the computer will show “P”on the PULSE window. If the computer
shows “ERR”on the message window, please re-press the PULSE RECOVERY key and please make
sure your hands are keeping well on the grips or the chest transmitter is attached well.
Key function:
There are 6 button keys and the function description as follows:
1. START/STOP key: a. Quick Start key function: Allows you to start the computer without
selecting a program. Manual workout only. Time automatically begins
to count up from zero

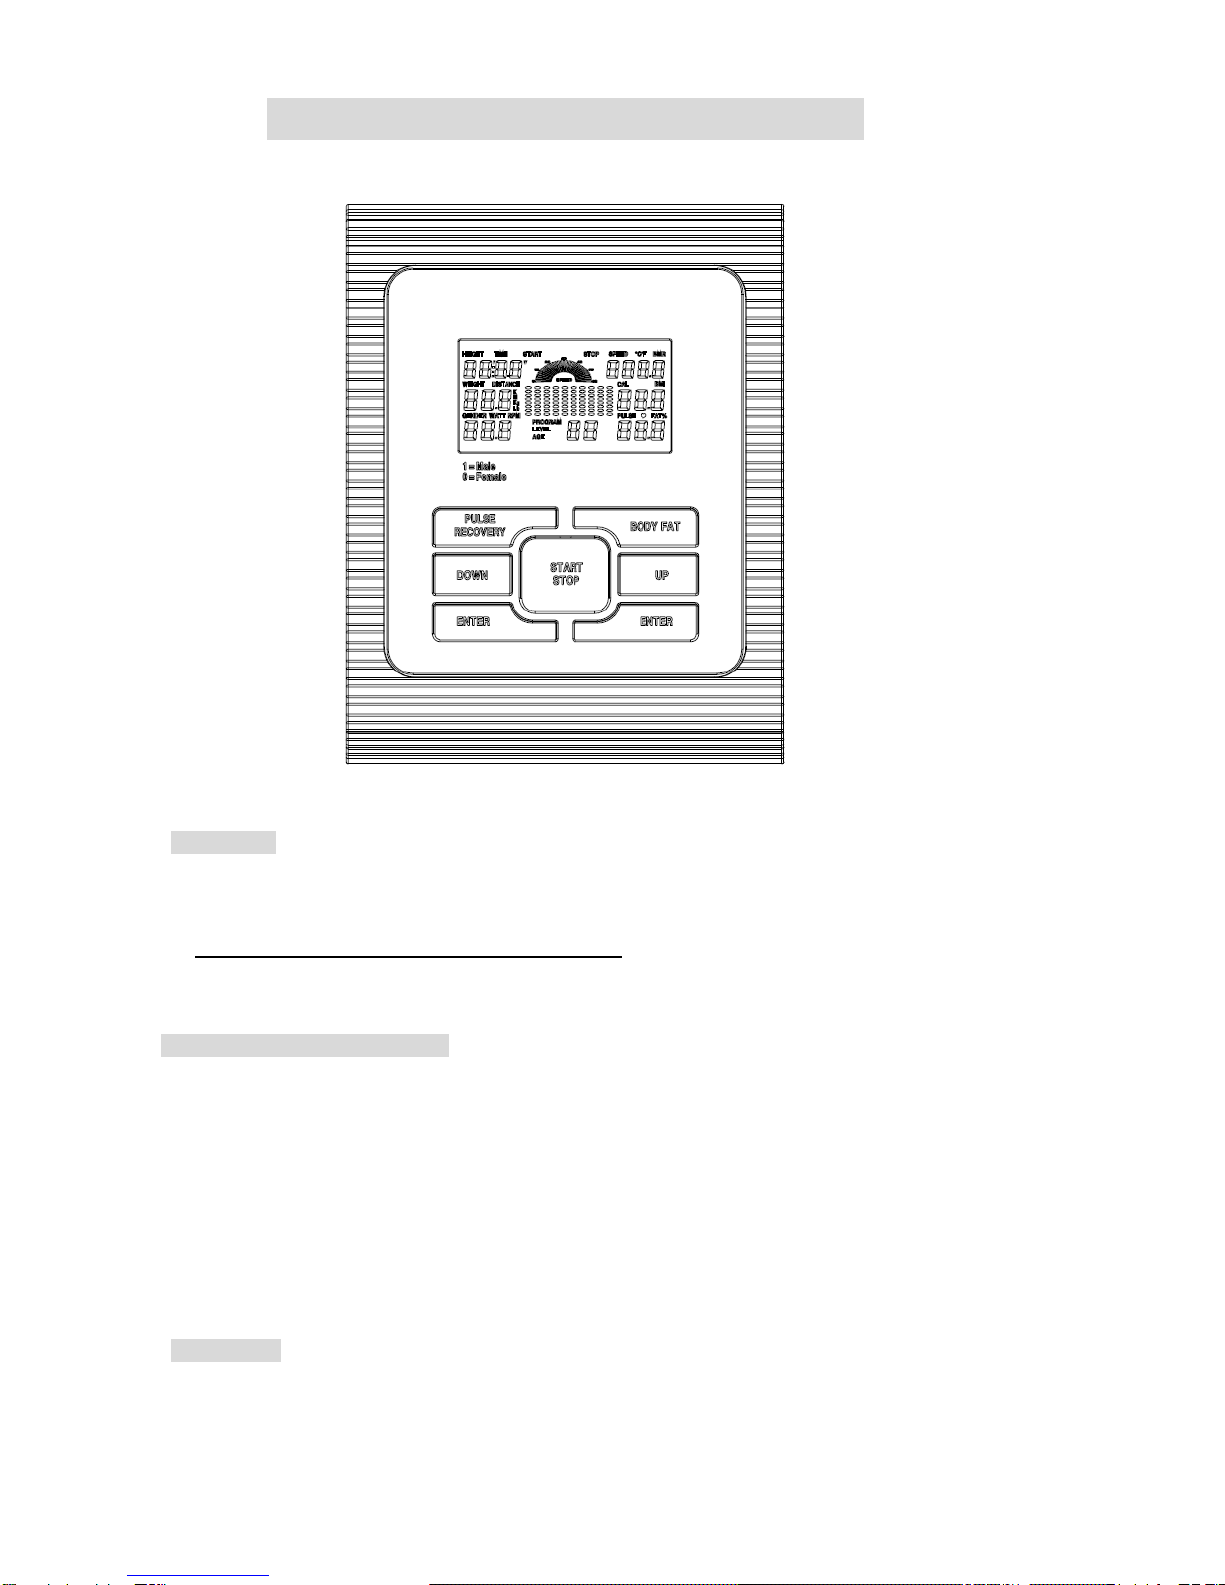
b. During the exercise mode, press the key to STOP exercise.
c. During the stop mode, press the key to START exercise.
2. UP key: a. Press the key to increase the resistance during exercise mode.
b. During the setting mode, press the key to increase the value of Time, Distance,
Calories,Age and select Gender and Program.
3. DOWN key: a. Press the key to decrease the resistance during exercise mode.
b. During the setting mode, press the key to decrease the value of Time,
Distance, Calories,Age and select Gender and Program.
4. ENTER/RESET key: a. During the setting mode, press the key to accept the current data entry.
b. At the stop mode, by holding this key for over two seconds the user
can reset all values to zero or default value.
c. During setting the Clock, press this key can accept the setting hour
and setting minute.
5. BODY FAT / MEASURE key: Press the key to input your HEIGHT, WEKGHT, GENDER and
AGE then to measure your body fat ratio,
6. PULSE RECOVERY key: Press the key to activate heart rate recovery function.
Program Introduction & Operation:
Manual Program: Manual
P1 is a manual program. User can start exercise by pressing START/STOP key. The default
resistance level is 5. Users may exercise in any desirous of resistance level (Adjusting by UP/DOWN
keys during the workout) with a period of time or a number of calories or a certain distance.
Operations: 1. Use UP/DOWN keys to select the MANUAL (P1) program.
2. Press the ENTER key to enter MANUAL program.
3. The TIME will flash and you can press UP or DOWN keys to setting your exercise
TIME. Press ENTER key to confirm your desired TIME.
4. The DISTANCE will flash and you can press UP or DOWN keys to setting your target
DISTANCE. Press ENTER key to confirm your desired DISTANCE.
5. The CALORIES will flash and you can press UP or DOWN keys to setting your
exercise CALORIES. Press ENTER key to confirm your desired CALORIES.
6 Press the START/STOP key to begin exercise.
Preset Program: Steps, Hill, Rolling, Valley, Fat Burn, Ramp, Mountain, Intervals, Random, Plateau,
Fartlek, Precipice Program
PROGRAM 2 to PROGRAM 13 is the preset programs. Users can exercise with different level of
loading in different intervals as the profiles show. Users may exercise in any desirous of resistance
level (Adjusting by UP/DOWN keys during the workout) with a period of time or a number of calories or
a certain distance.
Operations: 1. Use UP/DOWN keys to select one of the above programs from P2 to P9.
2. Press the ENTER key to enter your workout program.
3. The TIME will flash and you can press UP or DOWN keys to setting your exercise

TIME. Press ENTER key to confirm your desired TIME.
4. The DISTANCE will flash and you can press UP or DOWN keys to setting your target
DISTANCE. Press ENTER key to confirm your desired DISTANCE.
5 The CALORIES will flash and you can press UP or DOWN keys to setting your
exercise CALORIES. Press ENTER key to confirm your desired CALORIES.
6 Press the START/STOP key to begin exercise.
User Setting Program: User 1 and User 2
Program 14 and 15 is the user setting program. Users are free to create the values in the order of
TIME, DISTANCE, CALORIES and the resistance level in 10 columns. The values and profiles will be
stored in the memory after setup. Users may also change the ongoing loading in each column by
UP/DOWN keys, and they will not change the resistance level stored in the memory.
Operations: 1. Use UP/DOWN keys to select the USER 1 (P14) or USER 2 (p15) program.
2. Press the ENTER key to enter your workout program.
3. The column 1 will flash, and then use the UP/DOWN keys to create your personal
exercise profile. Press ENTER to confirm your first column of exercise profile. The
default level is load 1.
4. The column 2 will flash, and then use the UP/DOWN keys to create your personal
exercise profile. Press ENTER to confirm your second column of exercise profile.
5. Follow the above description 5 and 6 to finish your personal exercise profiles. Press
ENTER to confirm your desired exercise profile.
6. The TIME will flash and you can press UP or DOWN keys to setting your exercise
TIME. Press ENTER key to confirm your desired TIME.
7. The DISTANCE will flash and you can press UP or DOWN keys to setting your
target DISTANCE. Press ENTER key to confirm your desired DISTANCE.
8. The CALORIES will flash and you can press UP or DOWN keys to setting your
exercise CALORIES. Press ENTER key to confirm your desired CALORIES.
9. Press the START/STOP key to begin exercise.
Body Fat Program: Body Fat
Program 16 is a special program design to calculate users’body fat ratio and to offer a specific loading
profile for users. There are 3 body types divided according to the FAT% calculated.
Type1: BODY FAT% > 27
Type2: 27 ≧BODY FAT% ≧20
Type3: BODY FAT % < 20
The computer will show the test results of FAT PERCENT, BMI and BMR.
Operations: 1. Use UP/DOWN keys to select the BODY FAT (P16) program.
2. Press the ENTER key to enter your workout program.
3. The HEIGHT will flash and you can press UP or DOWN keys to set your HEIGHT.
Press ENTER key to confirm your HEIGHT. The default HEIGHT is 170cm or
5’07”(5feet 7 inches).

4. The WEIGHT will flash and you can press UP or DOWN keys to set your WEIGHT.
Press ENTER key to confirm your WEIGHT. The default WEIGHT is 70kgs or
155lbs.
5. The GENDER will flash and you can press UP or DOWN keys to select your sex.
Number 1 means man and number 0 means female. Press ENTER key to
confirm your Gender. The default sex is 1 (MAN).
6. The AGE will flash and you can press UP or DOWN keys to set yourAGE. Press
ENTER key to confirm yourAGE. The defaultAGE is 35.
7. Press the START/STOP key to begin body fat measurement. If the window show
E on the window, please make sure your hands are attached well on the grips or
the chest belt is touch well on your body. Then press the START/STOP key again
to begin body fat measurement.
8. After finished your measurement, the computer will show the values of BMR, BMI
and FAT PERCENT on the LCD display. Furthermore, the computer will show your
own exercise profile for your body type.
9. Press START/STOP key to begin exercise.
Operation guide:
1. Sleep Mode:
The computer will enter the sleep mode when there is no signal input and no keys be pressed after
4 minutes. You can press any key to wake up the computer.
2. BMI (Body Mass Index): BMI is a measure of body fat based on height and weight that applies to
both adult men and women.
3. BMR (Basal Metabolic Rate): Your Basal Metabolic Rate (BMR) shows the number of calories your
body needs to operate. This doesn’t account for any activity, it’s simply the energy needed to sustain
a heartbeat, breathing and normal body temperature. It measures the body at rest, not sleep, at room
temperature.
Error Message:
E1 (ERROR 1): Normal state: During workout, when the monitor did not get the count signal from the gear
motor more than 4 seconds and check under successive 3 times then the
LCD will show E1.
Power on state: The gear motor will return to zero automatically, when the signal of motor
cannot be detected for more than 4 seconds then the gear motor’s driver
will be cut off immediately and show the E1 on the LCD display.All the
other digital and function mark are blank, and the output signals are cut off
also.
E2 (ERROR 2): When the monitor read the memory data, if the I.D. code is not correct or the memory IC
damages then the monitor will show E2 immediately at power on.
E3 (ERROR 3):After 4 seconds by start mode, the computer detects the faulty motor did not leave the zero
point then the LCD bar displays “E3”.

LCD Workout Graphics
PRESET PROGRAM PROFILES:
PROGRAM 1 PROGRAM 2 PROGRAM 3
MANUAL STEPS HILL
PROGRAM 4 PROGRAM 5 PROGRAM 6
ROLLING VALLEY FAT BURN
PROGRAM 7 PROGRAM 8 PROGRAM 9
RAMP MOUNTAIN INTERVALS
PROGRAM 10 PROGRAM 11 PROGRAM 12
RANDOM PLATEAU FARTLEK
PROGRAM 13
PRECIPICE
USER SETTING PROGRAM
PROGRAM 14 PROGRAM 15
USER 1 USER 2

BODY FAT TEST PROGRAMS:
PROGRAM 16
BODY FAT (STOP MODE) BODY FAT (START MODE)
WORKOUT MODE:
a. BODY FAT PROGRAM FOR MAN
Workout Time: 40 minutes Workout Time: 40 minutes Workout time: 20 minutes
b. BODY FAT PROGRAMS FOR WOMAN
c. BODY FAT PROGRAMS FOR MAN AGE MORE THAN YEAR OF 55
d. BODY FAT PROGRAMS FOR LESS THAN 50KGS’MAN
Workout Time: 40 minutes Workout Time: 40 minutes Workout time: 20 minutes
Table of contents
Other Nordic Exercise Bike manuals
Popular Exercise Bike manuals by other brands

Insportline
Insportline IN 10895 inCondi UB20m user manual

Christopeit Sport
Christopeit Sport RS 100 manual

Stamina
Stamina Wirk owner's manual

Christopeit Sport
Christopeit Sport Ergometer ET 6 Assembly and exercise instructions

Verve
Verve VER-CAB-001 instruction manual

Tunturi
Tunturi Star Fit B100 user manual