Noritake itron Star Bright User manual

Star Bright
Remote Controller User Manual
DOCUMENT NO.:
E-M-0039-01
DATE OF ISSUE:
December 20, 2010
REVISION:
August 10, 2011
PUBLISHED BY:
Noritake Co., Inc.
Noritake Co., Inc.
East Coast
Midwest
West Coast
New Jersey
Chicago & Canada
Loss Angels
2635 Clearbrook Drive
(888) 296 –3423
(800) 779 –5846
(888) 795 –3423
Arlington Height, IL 60005
www.noritake-elec.com
Phone: (800) 779 –5846
Fax: (847) 593 –2285

Star Bright
Remote Controller User Manual
1 /11
DOCUMENT# E-M-0039-01 Date: August 10, 2011
This manual describes how to control Star Bright message display by using the Remote Controller
which is enclosed with Star Bright. Please follow the contents shown below to navigate through the
manual.
The contents of the manual is furnished for informational use only, is subject to change without notice,
and should not be construed as a commitment by Noritake Co., Inc.
©2010-2011 Noritake Co., Inc. All rights reserved
Contents
Remote Controller Power and Signal ......................................................................................................... 2
How to replace batteries.......................................................................................................................... 2
How to monitor battery power and signal output ................................................................................... 2
Where to aim on Star Bright with the remote controller ........................................................................ 2
Address Setup ............................................................................................................................................. 3
How to assign the address....................................................................................................................... 3
How to synchronize Star Bright and the remote controller .................................................................... 3
Navigation................................................................................................................................................... 4
How to select a message number............................................................................................................ 4
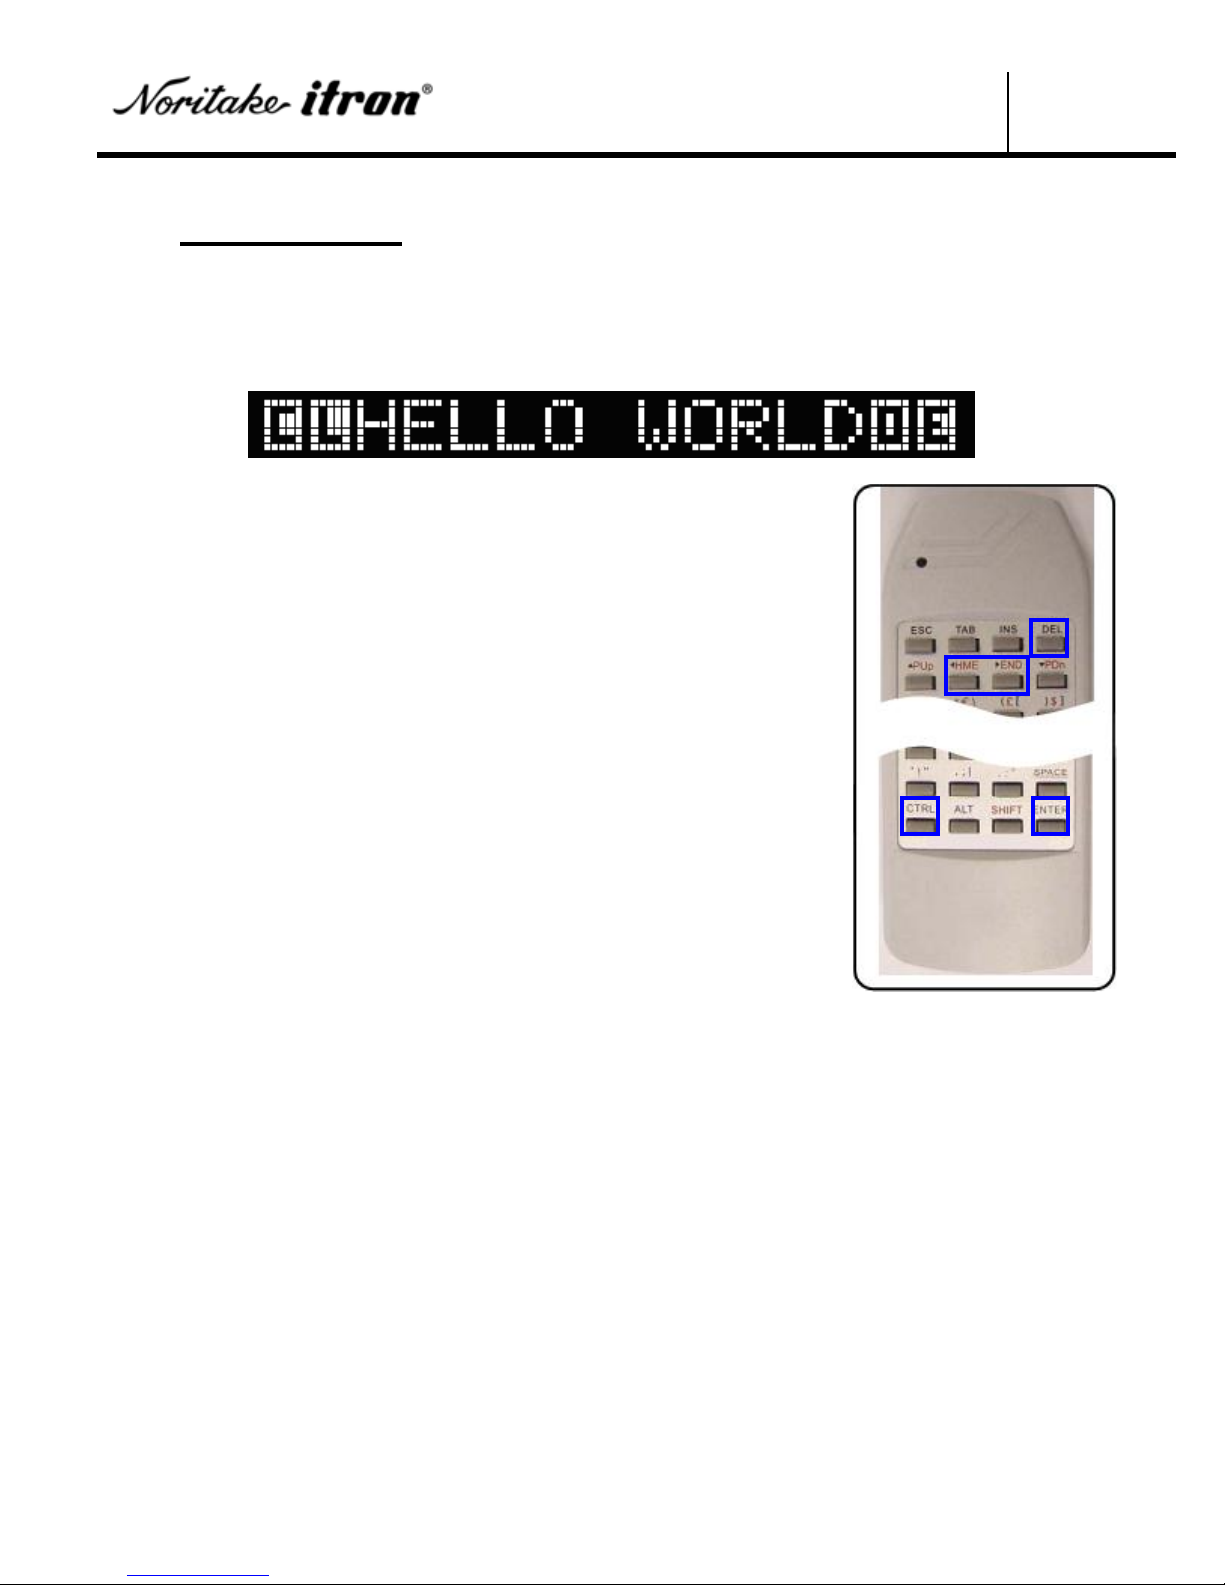
Message Input............................................................................................................................................. 5
How to create a message......................................................................................................................... 5
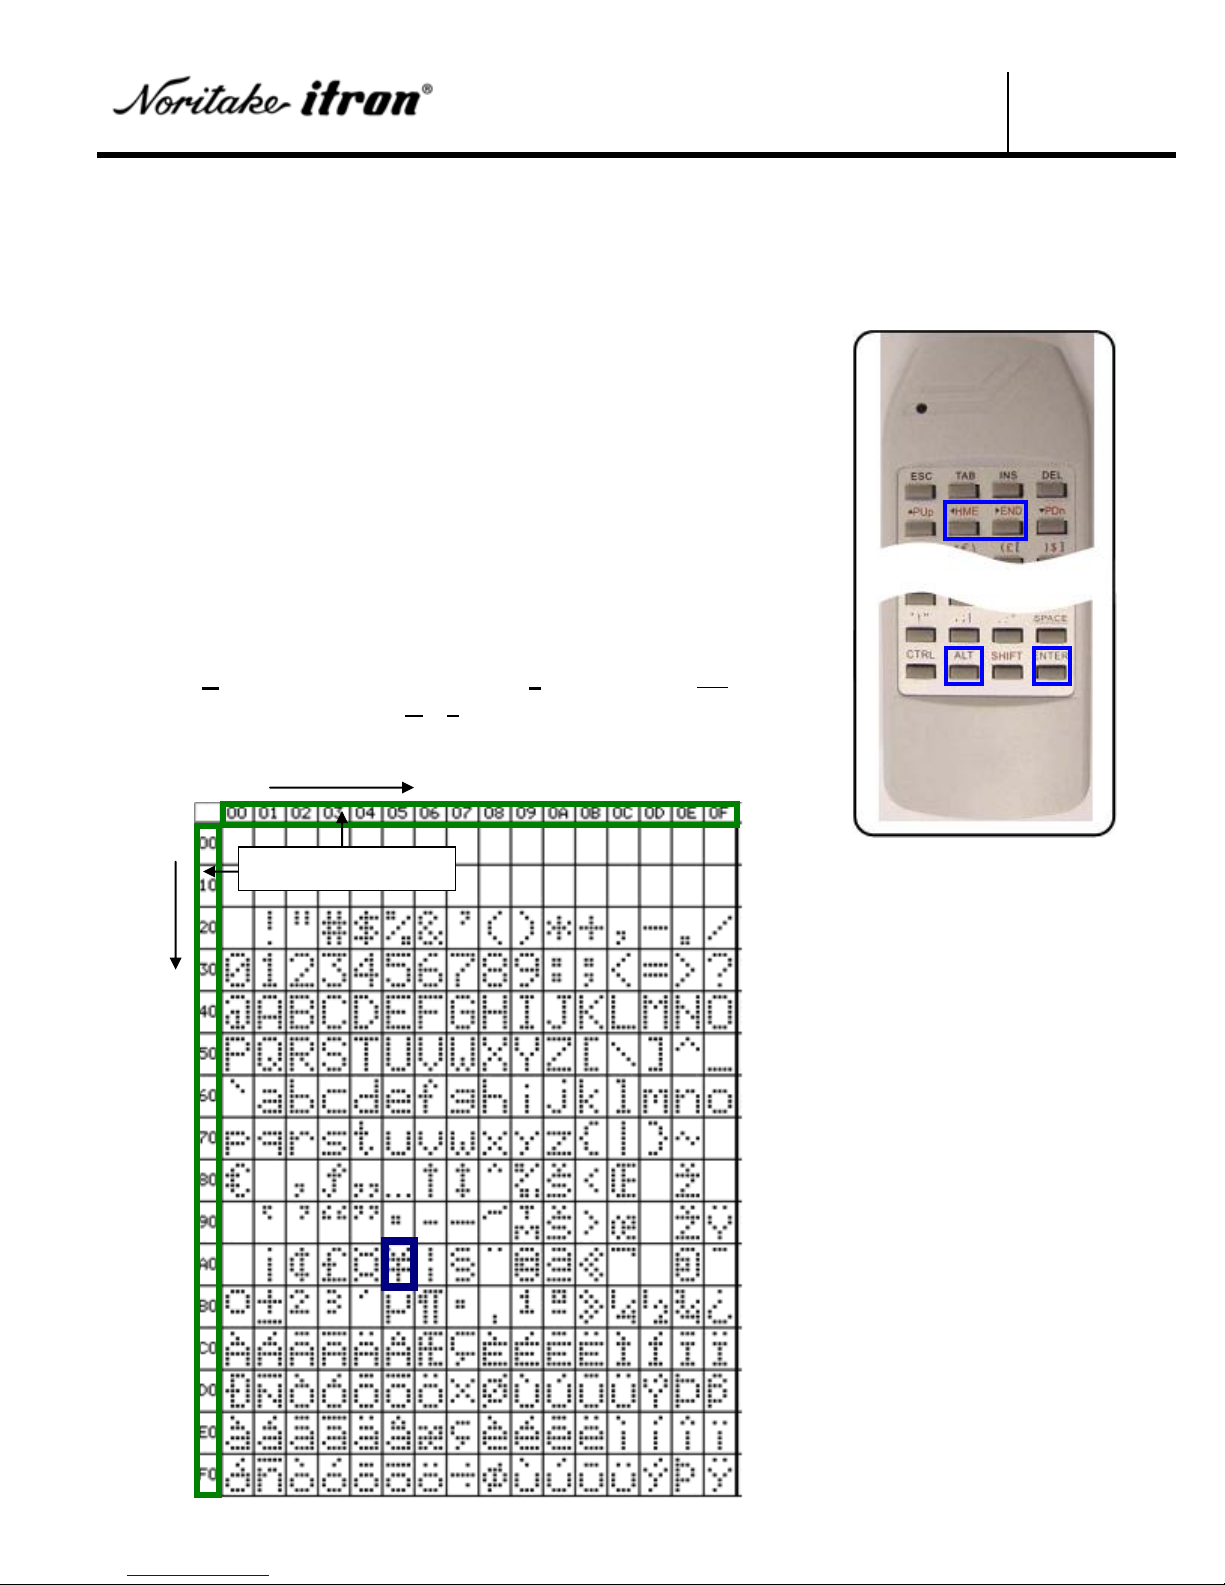
How to enter special characters .............................................................................................................. 7
Message Editing.......................................................................................................................................... 8
How to edit messages.............................................................................................................................. 8
How to set Caps Lock............................................................................................................................. 9
How to copy existing texts.................................................................................................................... 10
Resetting to Manufacturing Default Setting............................................................................................. 11
How to reset contents of message number............................................................................................ 11

Star Bright
Remote Controller User Manual
2 /11
DOCUMENT# E-M-0039-01 Date: August 10, 2011
Remote Controller Power and Signal
How to replace batteries
Remote controller is operated by battery power.
Please follow the steps below to replace batteries:
1. Locate the battery holder cover on the rear side of the remote
controller.
2. Facing the rear side of the remote towards the user, take the cover
off by squeezing the right side of the cover, and then pull the cover
towards the user.
3. Replace the old batteries with the new ones. Do not mistake the –
and + side when replacing batteries.
4. Place the cover back on the remote controller.
How to monitor battery power and signal output
The LED light on the remote controller is used as the visual indication of information transfer and
battery status.
Please follow the steps below to monitor signal and battery power:
1. Push any button on the remote controller.
2. Visually monitor the LED light.
Brighter LED light indicates stronger signal and battery life.
Where to aim on Star Bright with the remote controller
The remote controller has a capability of operating from visual distance of 16 feet (Approximately 5
meters). Star Bright has an infrared receiver on the front surface, where remote controller must be
pointed for the signal.
Please follow the steps below to input signals to Star
Bright:
1. Aim at the infrared receiver with a remote
controller. See right for the location of the
receiver.
2. Press the desired button on the remote controller
to check for the proper reaction by Star Bright.
IR Receiver

Star Bright
Remote Controller User Manual
3 /11
DOCUMENT# E-M-0039-01 Date: August 10, 2011
Address Setup
How to assign the address
Address assignment is used to prevent multiple devices from reacting simultaneously to a remote
controller signal.
Please follow the steps below to setup the address:
1. Connect all power cords between Star Bright and the AC adaptor.
2. Plug in the power adaptor at the wall to apply power to Star Bright.
3. Wait for 2 seconds.
4. Press ESC when “ADDRESS: None” message is displayed.
5. Input 2 characters from 00 to 99 and AA to ZZ or press DEL for no
address.
6. Press ESC to exit.
How to synchronize Star Bright and the remote controller
Star Bright and the remote controller need to be synchronized when an address is assigned. If the
address is unknown, please see the second instruction below.
Please follow the steps below to synchronize the two components:
1. Press ESC while Star Bright is powered on.
2. Press the known 2 character address following the ESC button.
If the address is unknown, please follow the steps below:
1. Unplug the USB cord from Star Bright and the power cord at the
wall then wait for 5 seconds if initially connected.
2. Plug in the power cord of Star Bright at the wall.
3. Wait for 2 seconds.
4. Star Bright will display the assigned address.
5. Proceed to Step 1 of “synchronize the two components”above.

Star Bright
Remote Controller User Manual
4 /11
DOCUMENT# E-M-0039-01 Date: August 10, 2011
Navigation
How to select a message number
The message number needs to be selected before inputting or editing messages. Selections include the
number-keys from „1‟ through „0‟, and the letter-keys from „A‟ through „F”. Please see below:
Total 16 message numbers are available.
Press a key in the selection to choose the message number.
Selecting a message number will display the programmed lines of text.
Each message number allows you to input multiple lines of text.

Star Bright
Remote Controller User Manual
5 /11
DOCUMENT# E-M-0039-01 Date: August 10, 2011
Message Input
How to create a message
Following message of “HELLO WORLD”will be used to explain the process of creating a message.
The code shown below is the full code required to display the message with left scroll out action.
Please follow the steps below to display the message “HELLO WORLD”.
1. Press ENTER to enter the edit mode.
2. Clear initial codes by moving the cursor all the way to the left and
repeat pressing DEL until all codes are erased.
Use ◄►buttons to move the cursor.
3. Choose the command from Command Table shown on the follow
page. Commands used are C and L for this example.
4. Press the buttons in the following order for command input.
a. CTRL, C
b. CTRL, L
5. Enter the message to display, which is “HELLO WORLD”.
6. Press the buttons in the following order to input message in capital
letters.
a. CTRL, SHIFT
b. H, E, L, L, O, SPACE, W, O, R, L, D
c. CTRL, CTRL
7. Complete the message with closing command, which are O and E.
8. Press the buttons in the following order to input command.
a. CTRL, O
b. CTRL, E
9. Press ENTER to exit the edit mode.
Cursor style will change to a line below the character when CTRL
is pressed.

Star Bright
Remote Controller User Manual
6 /11
DOCUMENT# E-M-0039-01 Date: August 10, 2011
COMMAND TABLE
Command
Display Action
Where to place
V
Set to operate in vertical mode 1 where the cable is at the bottom.
Start of message
V V
Set to operate in vertical mode 2 where the cable is at the top.
Start of message
C
Clear the display. Fills all the characters with Spaces.
Start of message
F
Set to fast action speed. All scroll actions will operate at twice the slow
mode speed.
Start of message
S
Set to slow (Normal) action speed.
Start of message
L
Set to scroll left as the action type. Text will appear at the right and move
left.
Start of Text
R
Set to scroll right as the action type. Text will appear on the left and move
right.
Start of Text
D
Set to scroll right as the action type. The text on the line will move down.
Start of Text
U
Set to scroll up as the action type. The text on the line will move up.
Start of Text
I
Set to instant write as the action type. Text will over write from left to right.
Start of Text
P
Set to Pixelate/Random as the action type. The text appears in random dots
over 1 second.
Start of Text
B
Blink the current display 5 times. Put BB for 10 seconds.
End of Text
O
Scroll remaining data off the screen in the direction specified by L, R, U or
D.
End of Text
H
Hold for 1 second. Ex: Put HH for 2 seconds for HHH for 3 seconds.
End of Text
E
Marks the end of the current message sequence, which then starts again.
End of message
Example 1:
Action details
1. Screen clears.
2. The message “HELLO WORLD”appears and holds for a second.
3. The message “HELLO WORLD”scrolls left as the message “BYE”enters to the screen scrolling
left.
4. The sequence ends by the E command.
Example 2:
Action details
1. Set to operate in fast action speed.
Only the scroll speed will be doubled relative to the normal scroll speed and not hold time.
2. Follow step1 to 4 of the example 1.
Example 3:
Action details
1. Set to operate in vertical mode 1.
Follows step 1 to 4 of the example 1.

Star Bright
Remote Controller User Manual
7 /11
DOCUMENT# E-M-0039-01 Date: August 10, 2011
How to enter special characters
There are some characters that cannot be keyed in by the remote controller, and that is where the Special
Character Table finds its role.
Please follow the steps below to insert special characters.
1. Press ENTER to enter the edit mode.
2. Move the cursor to the location where special character is placed.
Use ◄►buttons to move the cursor.
3. Press ALT.
Cursor style will change to a line below the character when ALT is
pressed.
4. Choose a character from Special Characters Table and locate the
character address.
(Move vertically then horizontally to obtain the character address.)
5. Press the proper buttons to input the address. If the vertical address
is A0 and the horizontal address is 05. Then type in “A5”to
display “¥”instead of “A005”.
SPECIAL CHARACTER TABLE
①
②
Character Address

Star Bright
Remote Controller User Manual
8 /11
DOCUMENT# E-M-0039-01 Date: August 10, 2011
Message Editing
How to edit messages
Please follow the steps below to edit messages.
1. Press ENTER to enter the edit mode.
2. Use the keys shown below to navigate through message editing.
Keys used to navigate the messages
◄(Left)
Move the cursor left by one character
►(Right)
Move the cursor right by one character
▲ (Up)
Advance left by one display width
▼ (Down)
Advance right by one display width
TAB
Advance right by 8 characters
SHIFT TAB
Advance left by 8 characters
SHIFT HME
Jump to start of previous message number
SHIFT END
Jump to start of next message number
DEL
Delete character at the cursor and scroll left
INS
Toggle insert mode and overwrite mode
ENTER
Exit edit mode and start running message
3. Move the cursor to the beginning of the message to edit.
4. Delete, insert, or over write new message.
5. Make sure to always conclude the message with the E command.
6. Press ENTER to exit the edit mode.

Star Bright
Remote Controller User Manual
9 /11
DOCUMENT# E-M-0039-01 Date: August 10, 2011
How to set Caps Lock
There are two methods to input capital letters. One method is non-continuous capital letter input, and
the other method is the continuous capital letter input.
Please follow the steps below to insert capital letters.
1. Press ENTER to enter the edit mode.
2. Move the cursor to the location where the letter is placed.
Use ◄►buttons to move the cursor.
3. Choose between Non-continuous and Continuous Method
Non-continuous Method
4. Press SHIFT.
Cursor style will change to a lines below the character.
5. Press the desired character to create a message.
6. Press ENTER to exit the edit mode.
Continuous Method (Caps Lock)
4. Press CTRL followed by the SHIFT button.
Cursor style will change to a line below the character.
5. Press the desired letter to create a message.
6. Press CTRL twice to cancel the continuous capital letter mode.
Cursor style will change to dots below the character.
7. Press ENTER to exit the edit mode.

Star Bright
Remote Controller User Manual
10 /11
DOCUMENT# E-M-0039-01 Date: August 10, 2011
How to copy existing texts
Copy function is used to copy existing characters in the message.
Please follow the steps below to copy existing texts.
1. Press ENTER to enter the edit mode.
2. Move the cursor to the first character to copy.
Use ◄►buttons to move the cursor.
3. Press CTRL followed by the HME button.
Cursor style will change to a line under the character when CTRL
is pressed.
4. Move the cursor to the end character to copy.
5. Press CTRL followed by the END button.
6. Choose the location to copy the flashing characters.
7. Move the cursor to desired location.
8. Press CTRL followed by the INS button to insert.
9. Press CTRL twice to cancel the copy mode.
Cursor style will change to dots under the character when CTRL is
pressed twice.
10. Press ENTER to exit the edit mode.

Star Bright
Remote Controller User Manual
11 /11
DOCUMENT# E-M-0039-01 Date: August 10, 2011
Resetting to Manufacturing Default Setting
How to reset contents of message number
Individual message numbers can be reset. When a message number is reset, the manufacturer‟s pre-
loaded message will appear on the screen. The manufacturer‟s pre-loaded message will display “Folder
1”if viewing message number 1. The folder number displayed varies depending on which message
number is reset.
Please follow the steps below to reset a message number.
1. Choose the message number to reset.
2. Press ENTER to enter the edit mode.
3. Press the buttons in the following order.
CTRL, ALT, SHIFT, DEL.
Cursor style will change to a line under the character when CTRL
is pressed.
4. Press Y to confirm reset when the prompt appears.
5. When resetting is complete, it returns to the edit mode.
6. Press ENTER to exit the edit mode.
Table of contents
Popular Remote Control manuals by other brands

Mosaic
Mosaic IPTV - Amino Receiver Remote Control & DVR user guide

Sony
Sony RM-NX7000 Navitus Software manual

Jolly
Jolly Universal Family for Sony instructions

DÖRR
DÖRR SRT-100 instruction manual

Controlli
Controlli Enerbrain eNode24 Installer manual

Universal Remote Control
Universal Remote Control PHAZR-5 UR5U-9000 operating instructions