Noritsu LS-600 User manual

LS-600/LS-1100
Installation Manual
Before installation, carefully read and understand Workflow explained in this Installation
Manual.
For details, see ☞1.1 Workflow (Windows XP) or ☞1.2 Workflow (Windows Vista).


Preface
We greatly appreciate your purchase of this product.
Before using this product, read the manual carefully, and make sure that you understand the procedure described. Be sure to
store the paper manual near the product so it can be referred to immediately should you have questions about operation or
should any problems arise.
If you should lose or heavily damage the manual, contact your place of purchase.
[Issued in June, 2008]
!It is prohibited to copy or reproduce this manual.
!The manual is subject to change without notice.
!Illustrations in the manual may vary depending on the model or manufacturing lot.
!If should you find any unclear points or errors, or should you have any comments for the manual, please contact your place
of purchase.
!If there is a missing page or incorrect pagination in this manual, please contact your place of purchase to receive a
replacement.

ii
Description of warnings (signal words)
• Signal words identify the level of injuries that can potentially occur.
• The signal words used in this manual and found on labels, DANGER, WARNING and CAUTION, are assigned
according to the level of potential risk.
• Warning labels are located at or near the part of the system that poses the indicated danger. Ignoring a warning may
cause death or serious injury, or system malfunction. Be sure to follow the indications in the manuals and on the warning
labels.
• The warnings include a signal word, the type and extent of the danger, and information on avoiding the danger.
• Carefully read and understand the warnings included in this manual and on the warning labels before operating the
system.
Example of warning label
This indicates situations that if not immediately avoided could result in serious injury or death.
This indicates situations that if not avoided could result in serious injury or death.
This indicates situations that if not avoided could result in non-life threatening injury. It is also used to indicate situations
which may cause damage to physical property.
Warning text (warning
indication)
Symbol (warning indication)
Warning (signal word)
SIGNALWORD

iii
Symbols used in this manual
This section explains the definitions of the symbols used in this manual.
The symbols shown below are used in this manual. Confirm the meaning of each of them before reading the manual.
The pointing finger
indicates the manual or
section where you can find
additional information.
The Note symbol indicates useful
information on functions and
instructions.
The Important symbol indicates
supplementary explanations,
operations or procedures that
require caution, and
instructions that must be
followed.
This is called the alert symbol.
Text following this symbol contains particularly important information concerning
safety. Be sure to heed this information. This symbol is used in conjunction with the
words DANGER, WARNING and CAUTION, according to the possible degree of
injury to people or damage to physical property.
Reference
G068176

iv
TABLE OF CONTENTS
Preface
Description of warnings (signal words) ...................................................................................................ii
Symbols used in this manual ................................................................................................................. iii
1 Before installation........................................................................................................................... 1
1.1 Workflow (Windows XP)....................................................................................................................................... 1
1.2 Workflow (Windows Vista) ................................................................................................................................... 2
1.3 Outline of connecting devices ................................................................................................................................ 3
1.4 Installation place..................................................................................................................................................... 3
1.5 Required items........................................................................................................................................................ 3
1.6 Removing packing angle brackets and antirust material........................................................................................ 4
2 Confirming the component parts .................................................................................................... 6
3 Configuring monitor display settings .............................................................................................. 7
4 Setting up the PC ......................................................................................................................... 12
4.1 Configuring power options................................................................................................................................... 12
4.2 Configuring the virtual memory........................................................................................................................... 15
4.3 Configuring the Transfer Mode............................................................................................................................ 17
4.4 Turning off Autoplay of media drives.................................................................................................................. 20
4.5 Setting the taskbar ................................................................................................................................................ 23
4.6 Turning off the hotkey function (shortcut key function) on the resident application .......................................... 23
4.7 Configuring the User Account Control setting..................................................................................................... 24
4.8 Configuring Sidebar settings ................................................................................................................................ 25
5 Installing the TWAIN driver .......................................................................................................... 27
5.1 Installation procedure ........................................................................................................................................... 27
5.2 Installing the Windows Installer 3.1..................................................................................................................... 29
5.3 Installing the Microsoft Visual C++ 2005 SP1 Redistributable........................................................................... 30
5.4 Installing the Microsoft .NET Framework Version 3.0 ....................................................................................... 31
5.5 Installing the PostgreSQL8.1 ............................................................................................................................... 32
5.6 Installing the MSXML 4.0 SP2 Parser and SDK ................................................................................................. 33
5.7 Installing the MSXML 6.0 Parser ........................................................................................................................ 36
5.8 Installing the Sentinel Protection Installer 7.3.0 .................................................................................................. 38
5.9 Installing the EZ Controller.................................................................................................................................. 41
5.10 Installing the EZ Controller ImgDataProc Additional Software.......................................................................... 41
5.11 Installing the System Capture............................................................................................................................... 43
6 Installing the SYSTEM PROGRAM.............................................................................................. 45
7 Connecting the power supply and setting the USB driver............................................................ 49
7.1 Connecting the power supply ............................................................................................................................... 49
7.2 Configuring USB driver settings.......................................................................................................................... 50
8 Configuring various settings......................................................................................................... 56
8.1 Configuring the USB power Management setting ............................................................................................... 56
8.2 Configuring the installation date and display settings.......................................................................................... 58
8.3 Configuring the display unit and resolution name settings .................................................................................. 61
9 Creating print channels ................................................................................................................ 64
9.1 Creating print channels......................................................................................................................................... 64

v
10 Quick reference............................................................................................................................ 66
10.1 If installing TWAIN driver or SYSTEM PROGRAM failed............................................................................... 66
10.2 If connecting the USB cable and starting the PC before installing the scanner software .................................... 71

This page is intentionally blank.

1 Before installation
1
1 Before installation
1.1 Workflow (Windows XP)
When connecting the scanner to the PC on which the controller is not
installed (our printer is not connected)
When connecting the scanner to the PC on which the controller is
installed (our printer is connected)
Confirming the component parts
See ☞2 Confirming the component parts to check that all the necessary items are prepared.
Configuring monitor display settings
• For details, see
☞3 Configuring monitor display settings.
Setting up the PC
• For details, see
☞4 Setting up the PC.
Installing the TWAIN driver
• For details, see ☞5 Installing the TWAIN driver.
Installing the SYSTEM PROGRAM
• For details, see ☞6 Installing the SYSTEM PROGRAM.
Connecting the power supply and setting the USB driver
• For details, see
☞7 Connecting the power supply and setting the USB driver.
Creating print channels
• For details, see
☞9 Creating print channels.
Configuring various settings
• For details, see
☞8 Configuring various settings.
Removing packing angle brackets and antirust material
• For details, see
☞1.6 Removing packing angle brackets and antirust material.
G089244

1 Before installation
2
1.2 Workflow (Windows Vista)
When connecting the scanner to the PC on which the controller is not
installed (our printer is not connected)
When connecting the scanner to the PC on which the controller is
installed (our printer is connected)
Confirming the component parts
See ☞2 Confirming the component parts to check that all the necessary items are prepared.
Configuring monitor display settings
• For details, see
☞3 Configuring monitor display settings.
Setting up the PC
• For details, see
☞4 Setting up the PC.
Installing the TWAIN driver
• For details, see ☞5 Installing the TWAIN driver.
Installing the SYSTEM PROGRAM
• For details, see ☞6 Installing the SYSTEM PROGRAM.
Connecting the power supply and setting the USB driver
• For details, see
☞7 Connecting the power supply and setting the USB driver.
Creating print channels
• For details, see
☞9 Creating print channels.
Configuring various settings
• For details, see
☞8 Configuring various settings.
Removing packing angle brackets and antirust material
• For details, see
☞1.6 Removing packing angle brackets and antirust material.
G089244

1 Before installation
3
1.3 Outline of connecting devices
Example: If the scanner is connected to a PC on which the Controller is not installed
Example: If the scanner is connected to a PC on which the Controller is installed
1.4 Installation place
!
!!
!Weight
• LS-600: approx. 16.7 kg
• LS-1100: approx. 17.5 kg
!
!!
!Conditions for installation place
• Requires strength to support the scanner weight.
• Must be level, and not cause vibration. Vibration should be 3 m/s2(0.3 G) or less in each direction at the installation
place.
!
!!
!Conditions for power supply
• Confirm that a power supply with ground resistance of 100Ωor less is available.
1.5 Required items
The following items are required.
USB
Scanner PC (prepared by users)
G087688
USB LAN
Scanner
Printer
PC on which the Controller is
installed
G088478

1 Before installation
4
Confirm that the following items are prepared before you start working.
1.6 Removing packing angle brackets and antirust material
The removed packing angle brackets are not reused. However, they are necessary when the product is sent back because of
failure, etc. Be sure to keep them.
1. Remove the packing angle brackets.
(1) Open the front cover and side cover (left).
Required item Required item
PC
(See the Specifications
for details about the
recommended
specification of the PC)
Grounding adapter
(as necessary)
Philips blade screwdriver
(large)
Power cord
(Power code is supplied
in Japan and North
America. For other
countries, prepare a
power code that meets the
following specifications.)
• Input voltage: 250 V
(220 V-240 V) and
rating capacity of 6
A or more
• Plug type:
acceptable one in
each country
• Cable type: one of
the following type
and 19 AWG (0.75
mm2) or more
• 20195
• SJT
• SVT
• UL/CSA/VDE-
approved products
Front cover
Side cover
G087613

1 Before installation
5
(2) Remove packing material, packing angle bracket 1 (two screws) and packing angle bracket 2 (one
screw).
(3) Press the side cover (left) and the holder, then securely close the front cover.
2. Remove the antirust material from the back of the product.
This completes removing packing angle brackets and antirust material.
Next, go to ☞2 Confirming the component parts.
Packing angle
bracket 2
Screw
Packing angle
bracket 1
Screws
Packing material
G088628
Holder
Side cover (left)
Front cover
G088629
Antirust material
G088441
2 Confirming the component parts
6
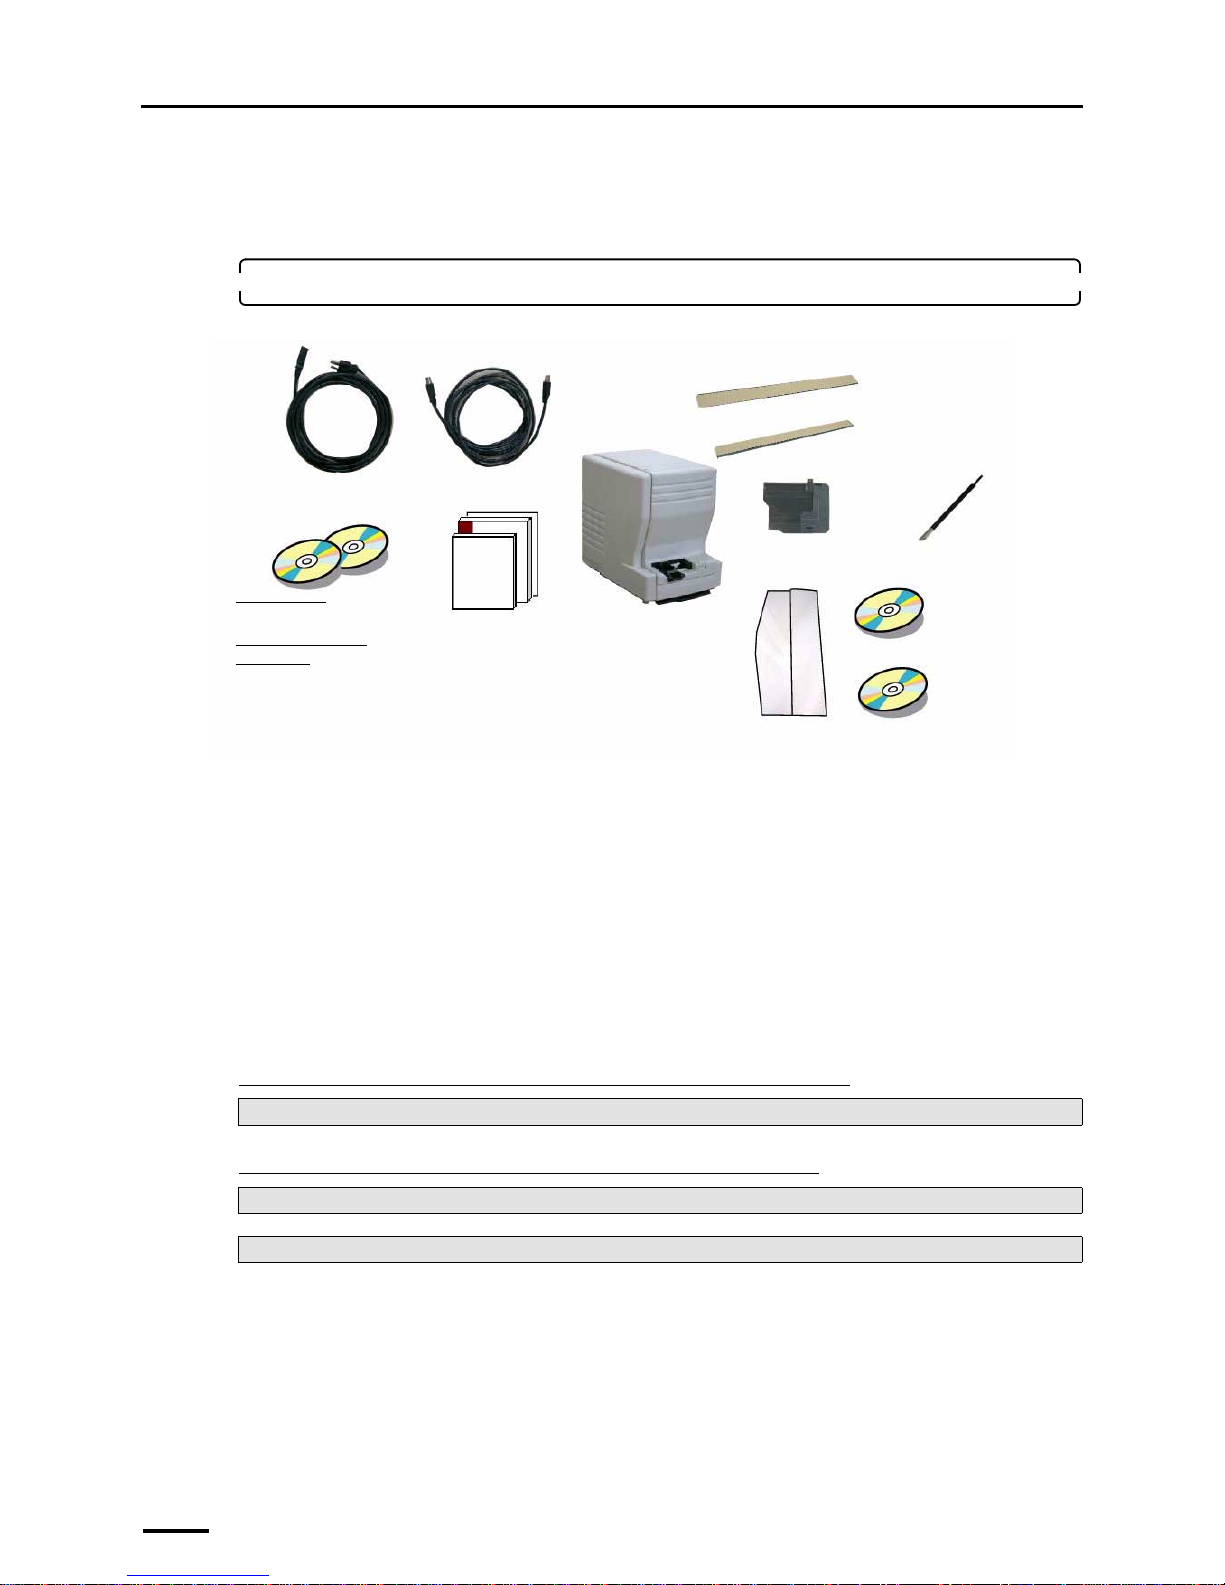
2 Confirming the component parts
Confirm that all components are supplied.
1. Confirm the component parts.
Check whether all components are supplied.
Following components are used when installing this system.
• Power cord
*3
• USB cable
• TWAIN driver (CD-ROM), LS-####SYSTEM PROGRAM (CD-ROM)*2
• Manual
*1. Used only for connecting the scanner to the PC on which the controller is not installed.
*2. The model name is shown in ####.
*3. Supplied only in Japan and North America.
This completes confirming the component parts.
"
""
"Next, go to •••
If connecting the scanner to the PC on which the controller is not installed
If connecting the scanner to the PC on which the controller is installed
Perform ☞3 Configuring monitor display settings.
For Windows XP, go to ☞6 Installing the SYSTEM PROGRAM.
For Windows Vista, go to ☞7 Connecting the power supply and setting the USB driver.
Scanner
Power cord *3 USB cable
• TWAIN driver (CD-
ROM)*1
• L S - ####SYSTEM
PROGRAM (CD-ROM)*2
135 cleaning leader
Cleaning leader case
IX240 adapter
240 cleaning leader B
Maintenance stick
Manual
• Installation Manual
• Starting Guide
• Specifications
• License agreement
CD manual
CD parts list (only
for outside Japan)
G087641

3 Configuring monitor display settings
7
3 Configuring monitor display settings
This operation is not necessary if the Controller is installed on the PC.
For Windows XP
1. Start the PC.
Turn on the power of the display monitor.
2. Right-click on the desktop, and select Properties.
The Display Properties display is shown.
3. Select the Settings tab to configure the resolution setting and color setting of the monitor
display.
Configure the resolution and color settings of the display monitor as shown below.
• Screen resolution
Match the resolution to the recommended resolution of the monitor.
IMPORTANT
• Confirm the recommended resolution in the Operator's Manual of the monitor.
Example:
• If the recommended number of pixels is 1024×768: 1024×768 pixels
• If the recommended number of pixels is 1280×1024: 1280×1024 pixels
• Color quality
Highest (32 bit)
S088116

3 Configuring monitor display settings
8
4. Select Windows Classic for Theme in the Themes tab.
5. Click OK.
For Windows Vista
1. Start the PC.
Turn on the power of the display monitor.
2. Access the Personalization display.
Bringing up the display
Start → Control Panel → Appearance and Personalization → Personalization
S088407

3 Configuring monitor display settings
9
3. Click Display Settings.
4. Configure the Resolution and Colors settings.
Configure the resolution and color settings of the display monitor as shown below.
• Screen resolution
Match the resolution to the recommended resolution of the monitor.
IMPORTANT
• Confirm the recommended resolution in the Operator's Manual of the monitor.
Example:
• If the recommended number of pixels is 1024×768: 1024×768 pixels
• If the recommended number of pixels is 1280×1024: 1280×1024 pixels
• Color quality
High (32 bit)
S091811

3 Configuring monitor display settings
10
5. Click OK.
6. Click Theme.
S091796
S091811

3 Configuring monitor display settings
11
7. Select Windows Classic for Theme.
8. Click OK.
9. Click the Close button at the upper right of the Personalization display to close it.
This completes configuring monitor display settings.
Next, go to ☞4 Setting up the PC.
S091797

4 Setting up the PC
12
4 Setting up the PC
This operation is not necessary if the Controller is installed on the PC.
4.1 Configuring power options
For Windows XP
1. Access the Control Panel display.
Bringing up the display
Start → Control Panel
2. Double-click the Power Options icon.
The icon slightly varies depending on the OS.
Example:
The Power Options Properties display is shown.
3. Select Never for all the items below in the Power Schemes tab, and click OK.
• Turn off monitor
• Turn off hard disks
• System standby
• System hibernates
Example:
4. Click the Close button at the upper right of the Control Panel display to close it.
S079073
S088647
Other manuals for LS-600
1
This manual suits for next models
1
Table of contents
Other Noritsu Scanner manuals


