PASCO OS-8441 User manual

Product Manual
012-16243B
800-772-8700 www.pasco.com
Wireless Diffraction Scanner
OS-8441
Included Equipment
1 Wireless Diffraction Scanner 2 Micro USB cable
For connecting the accessory to a USB charger or a
USB port of a computer.
Required Equipment
The following table lists the equipment required to perform experiments with the Wireless Diffraction Scanner. Only one of
the options provided for each item is required.
Item
Options
Item
Options
Track
OS-8508 1.2 m Optics Track
Laser
OS-8525 Red Diode Laser
ME-9493 1.2 m Aluminum Dynamics Track
1
OS-8458 Green Diode Laser
ME-9779 2.2 m Aluminum Dynamics Track
1
Diffraction Slits
OS-8442 Diffraction Slits
ME-6960 PAStrack
1
OS-8453 Precision Diffraction Slits
Software
PASCO Capstone
SPARKvue
1Requires the OS-8472A Dynamics Track Optics Carriages.

OS-8441 Wireless Diffraction Scanner
012-16243B
Components
1 Battery status LED
Red blink
Battery needs to be recharged soon.
Green solid
Battery is fully charged.
Yellow solid
Battery is charging.
5 Micro USB port
For connecting the included USB cable to a charger or
USB port of a computer.
2 Bluetooth status LED
Red blink
Ready to be paired with software.
Green blink
Paired with software.
Yellow blink
Remotely logging data.
6 Crank
Turn to change the position of the diffraction scanner
head.
3 Aperture selection knob
Turn the knob to adjust the aperture width.
7 Thumbscrew
For mounting the Diffraction Scanner to an optics
track or an optics carriage.
4 Power button
Press and hold to turn the power on or off.
8 Micro USB port
For connecting the included USB cable to a charger to
charge the battery.
Getting Started
Before using the device with students for the first time,
perform the following tasks:
1. Charge the battery.
2. Update your PASCO data collection software.
3. Update the firmware.
To charge the battery
1. Connect the micro USB cable to the micro USB
port on the Diffraction Scanner. Connect the other
end of the cable to a USB charger or port.
2. Allow the battery to charge for at least three
hours. The battery status LED will turn green
when fully charged.
Charging automatically stops when the battery is fully
charged. The device can remain connected to a power
source when fully charged without damaging the battery.
To update PASCO data collection software
1. Open the PASCO data collection software.
2. The software will display a message if an update
is available. Follow the instructions on the screen.
If you do not receive a message, the software is
up to date.

OS-8441 Wireless Diffraction Scanner
012-16243B
You can also check for an update by doing the following:
Go to the Help menu then click Check for Updates.
Select the menu icon and select Check for Updates.
To update the firmware
The device contains firmware that controls how it
functions. It is important to make sure that your device has
the latest version of the firmware installed.
1. Connect the device to your software. It is
recommended to use a USB connection since
this will result in a faster update.
2. The software will prompt you if a firmware update
is available. Follow the instructions on the screen
if prompted. If you do not receive a prompt, the
firmware is up to date.
Connecting to Software
The device can be connected to software using USB or
Bluetooth.
To connect using USB
1. Connect the device to a computer using the USB
cable.
2. Open your PASCO software. The device
automatically connects with the software.
To connect using Bluetooth
1. Press and hold the power button until the battery
status LED turns on.
2. Open Capstone and click Hardware Setup.
3. Select the wireless device that matches your
device ID.
1. Press and hold the power button until the battery
status LED turns on.
2. Open SPARKvue and select Sensor Data.
3. Under Connected Devices, select the wireless
device that matches your device ID.
Experimental Setup
The Diffraction Scanner is designed to be used with a
PASCO laser, diffraction slits, and track (see Required
Equipment). The Diffraction Scanner can be mounted to
an optics track or a dynamics track using the included
Dynamics Track Optics Carriages. The setup works best
when the Diffraction Scanner is mounted at least 1 meter
from the diffraction slits (Figure 1).
Figure 1. Setup with laser and diffraction slits.
To mount to an optics track
1. Loosen the mounting screws without removing
the nut or the screw from the apparatus.
2. Insert the square nuts into the center slot of the
optics track with the aperture facing the track
(Figure 2).
3. Slide the Diffraction Scanner to the desired
position on the track then tighten the front and
rear mounting screws.
Figure 2. Inserting the Diffraction Scanner into an optics track.

OS-8441 Wireless Diffraction Scanner
012-16243B
To mount to a dynamics track
1. Loosen the mounting screws without removing
the nut or the screw from the apparatus.
2. Insert the front square nut into the center slot of a
Dynamics Track Carriage then tighten the front
mounting screw (Figure 3).
3. Insert the rear square nut into the center slot of
another Dynamics Track Carriage then tighten
the rear mounting screw.
4. Snap the Dynamics Track Carriages on the
desired position on the track with the aperture
facing the opposite end of the track.
Use the two remaining Dynamics Track Carriages to
mount the laser and diffraction slits to the dynamics track.
Figure 3. Diffraction Scanner mounted to two Dynamics Optics
Carriages.
Taking Measurements
The Wireless Diffraction Scanner combines a position
sensor with a light sensor for scanning diffraction
patterns. PASCO Capstone or SPARKvue are used to
plot light intensity versus position of the diffraction pattern.
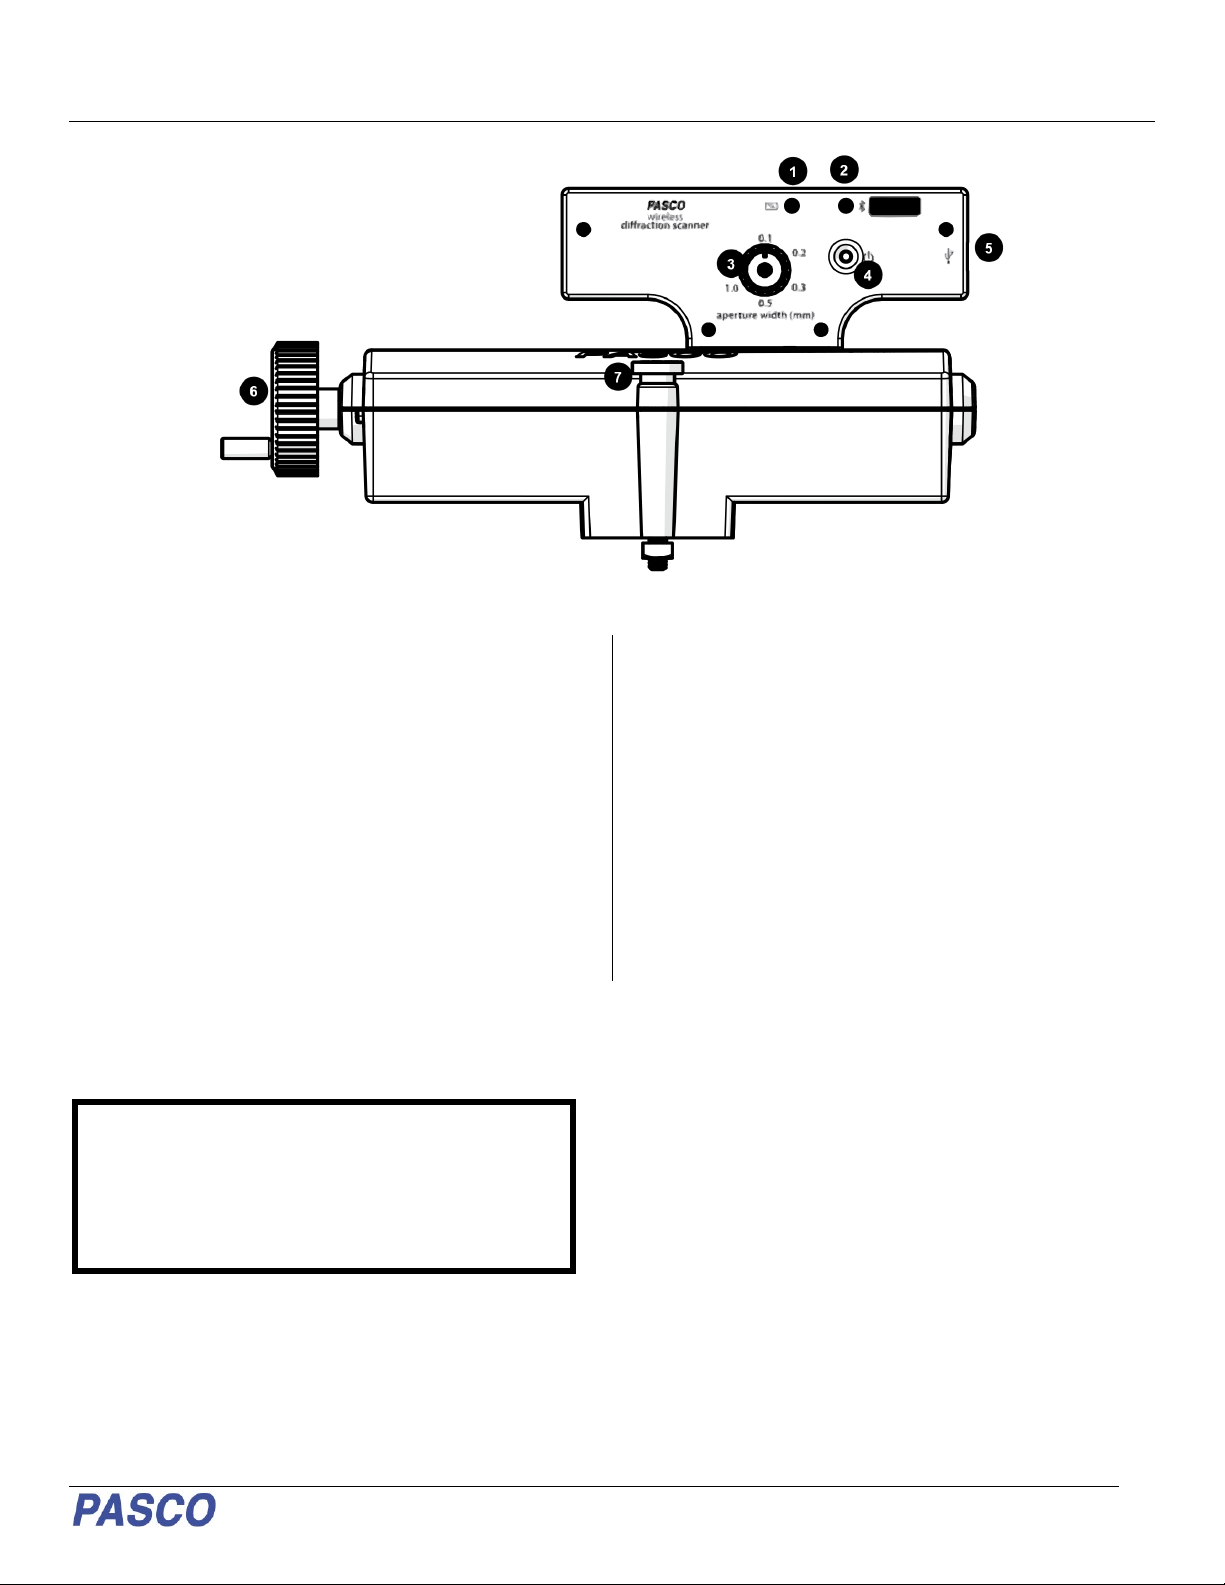
Light Intensity
The Diffraction Scanner contains a slit aperture centered
on a white screen. The width of the aperture can be
changed to control the spatial resolution and amount of
light entering the light intensity sensor. Six apertures of
different widths are installed on a wheel inside of the
Diffraction Scanner casing (Figure 4). The approximate
widths of the apertures are 0.1 mm, 0.2 mm, 0.3 mm,
0.5 mm, 1.0 mm, and 1.5 mm.
Change the aperture width by turning the aperture knob.
Select a wider slit to allow more light into the sensor or a
narrower slit to improve the spatial resolution.
Figure 4. Aperture wheel inside the Diffraction Scanner casing.
Position
The light sensor is mounted on a track that can move
laterally by turning the crank on the side of the Diffraction
Scanner. The position is measured by a rotary encoder
attached to the crank. To obtain the best data, turn the
crank at a slow rate.
Experiments
Copy-ready experiment worksheets for classroom use
are available on the PASCO website. Download the
experiments for free at:
www.pasco.com/resources/lab-experiments
Replacement Parts
Replacement parts can be purchased from the PASCO
website. Contact Technical Support if the part you need
is not listed below.
•PS-3584 Micro USB Cable
Specifications
Property
Value
Position Range
155 mm
Position Resolution
0.01 mm
Slit Aperture Width
0.1, 0.2, 0.3, 0.5, 1.0, 1.5 mm

OS-8441 Wireless Diffraction Scanner
012-16243B
Technical Support
For assistance with PASCO products, contact PASCO
Technical Support at:
Address: PASCO scientific
10101 Foothills Blvd.
Roseville, CA 95747-7100
Phone:
916-462-8384
Web:
www.pasco.com
Email:
support@pasco.com
FCC Statement
This digital device complies with part 15 of the FCC Rules. Operation is
subject to the following two conditions: (1) This device may not cause
harmful interference, and (2) this device must accept any interference
received, including interference that may cause undesired operation.
Product End of Life Disposal Instructions
This electronic product is subject to disposal and recycling regulations
that vary by country and region. It is your responsibility to recycle your
electronic equipment per your local environmental laws and regulations
to ensure that it will be recycled in a manner that protects human health
and the environment. To find out where you can drop off your waste
equipment for recycling, please contact your local waste
recycle/disposal service, or the place where you purchased the product.
The European Union WEEE (Waste Electronic and Electrical
Equipment) symbol (to the right) and on the product or its
packaging indicates that this product must not be disposed
of in a standard waste container.
Warranty, Copyright, and Trademarks
Limited Warranty For a description of the product warranty, see the
PASCO catalog.
Copyright This document is copyrighted with all rights reserved.
Permission is granted to non-profit educational institutions for
reproduction of any part of this manual, providing the reproductions are
used only in their laboratories and classrooms, and are not sold for profit.
Reproduction under any other circumstances, without the written
consent of PASCO scientific, is prohibited.
Trademarks PASCO and PASCO scientific are trademarks or
registered trademarks of PASCO scientific, in the United States and/or
in other countries. All other brands, products, or service names are or
may be trademarks or service marks of, and are used to identify,
products or services of, their respective owners. For more information
visit www.pasco.com/legal.
Table of contents
Other PASCO Scanner manuals
Popular Scanner manuals by other brands

Honeywell
Honeywell Voyager XP 1470g Series quick start guide

Avision
Avision AV630C user manual

Technology Solutions
Technology Solutions Handscanner user guide

Lexmark
Lexmark X4500 Service manual

Agilent Technologies
Agilent Technologies SureScan G4900DA user guide

Metrologic
Metrologic MS951 Installation and user guide