NORSE PROFESSIONAL SK125 User manual
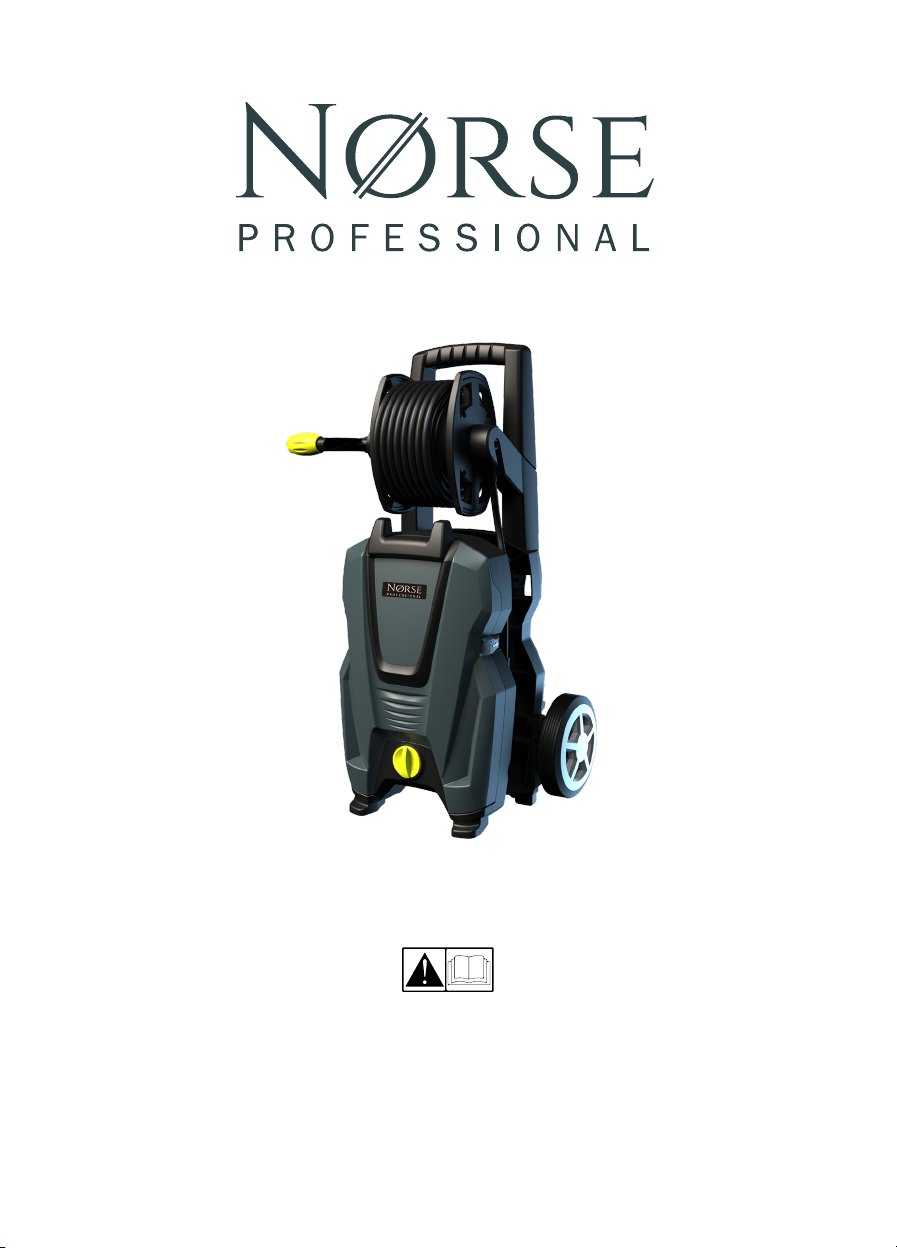
SK125
Electric Pressure Washer
OPERATION MANUAL
Read this manual carefully before use and keep it for future reference. Failure to do so
may result in injury, property damage and may void the warranty.
Products covered by this manual may vary in appearance, assembly, inclusions,
specications, description or packaging.
V 3.2
English Français Deutsch Italiano Español

SK125
© NØRSE
2© NØRSE
English
2 Contents
3 Quick Start Guide
5 Parts guide
7 General cleaning
8 Detergent
9 Drawing from a barrel
10 Patio brush and triangle brush
10 Post operation / storage
12 Safety Symbols
12 Safety and Warning Information
14 Troubleshooting
14 Technical Data
15 Disposal Regulations
15 Wiring diagram
16 CE Certication
16 - Français
31 - Deutsch
46 - Italiano
61 - Español
Contents Languages
Attach the wheels by slotting them into
the underside of the rear of the washer.
They will click into place and lock.
Quick Start Guide
Open the front of the washer by
releasing the catch.

SK125
© NØRSE 3
© NØRSE
English
2 Contents
3 Quick Start Guide
5 Parts guide
7 General cleaning
8 Detergent
9 Drawing from a barrel
10 Patio brush and triangle brush
10 Post operation / storage
12 Safety Symbols
12 Safety and Warning Information
14 Troubleshooting
14 Technical Data
15 Disposal Regulations
15 Wiring diagram
16 CE Certication
16 - Français
31 - Deutsch
46 - Italiano
61 - Español
Contents Languages
Attach the wheels by slotting them into
the underside of the rear of the washer.
They will click into place and lock.
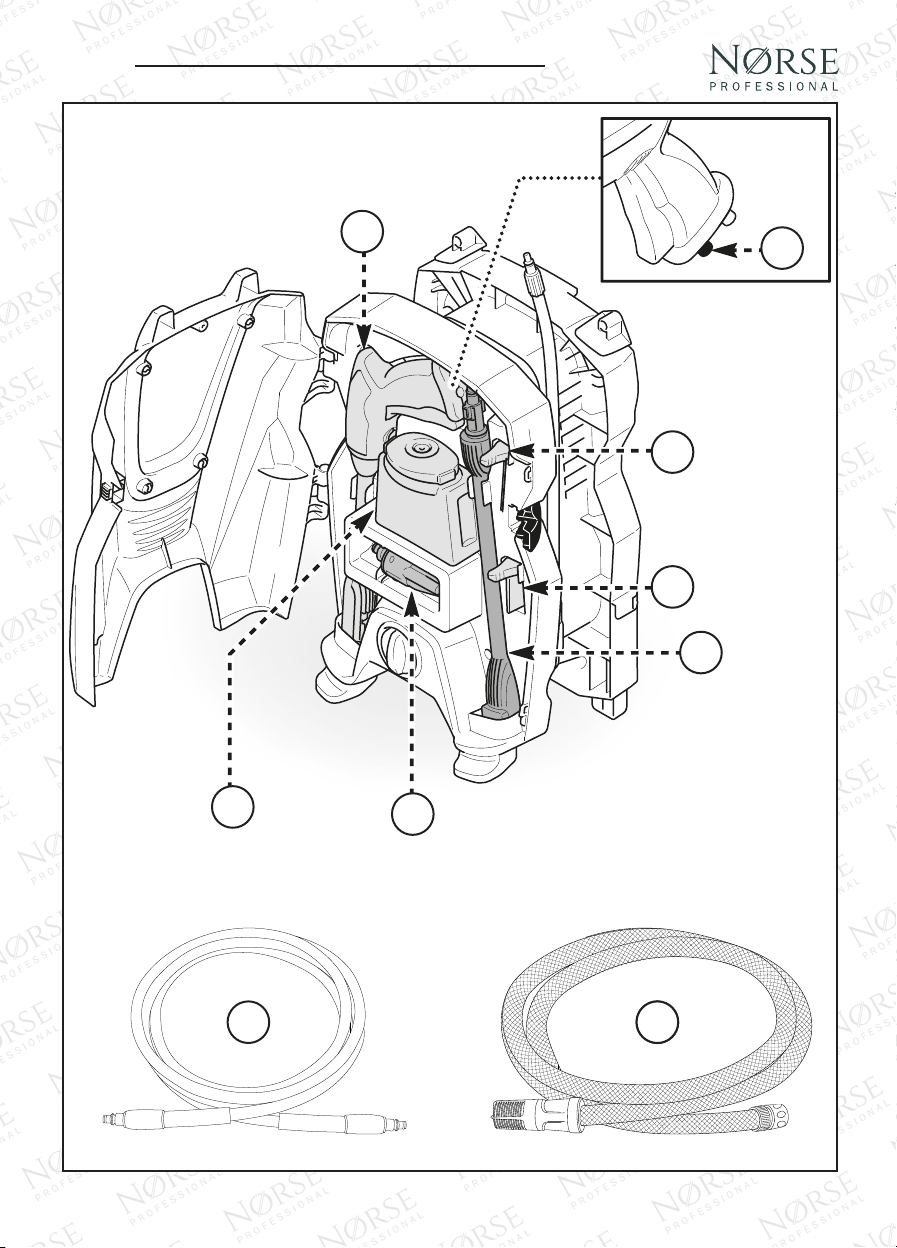
Fit the hose reel to the brackets on the top side of the washer
using the supplied screws. The handle attaches to the reel
and is secured using the supplied screws. Slot the reel crank
handle into place.
Quick Start Guide
Open the front of the washer by
releasing the catch.
Install the quick connector lter by screwing it onto the water
inlet of the power washer.
These steps describe the quickest method to get your pressure washer up and running.
However, it is essential you fully read this manual to ensure you are familiar with the general
safety features, precautions and functions necessary to operate the product. Failure to do so
may result in injury and damage to your washer or personal items.

SK125
© NØRSE
4© NØRSE
English
Attach the hose from the reel to the spray gun.
Next, connect the spray gun lance attachment and
variable nozzle to the spray gun. A small amount of
lubrication can be applied to help tting.
1. Screw the quick hose connector on to
your garden hose and slide onto the quick
connector filter, it will “click” into place.
2. Plug in the washer to the mains power
supply.
Start Up:
Stand clear of the unit taking care not to aim the
gun towards the pressure washer.
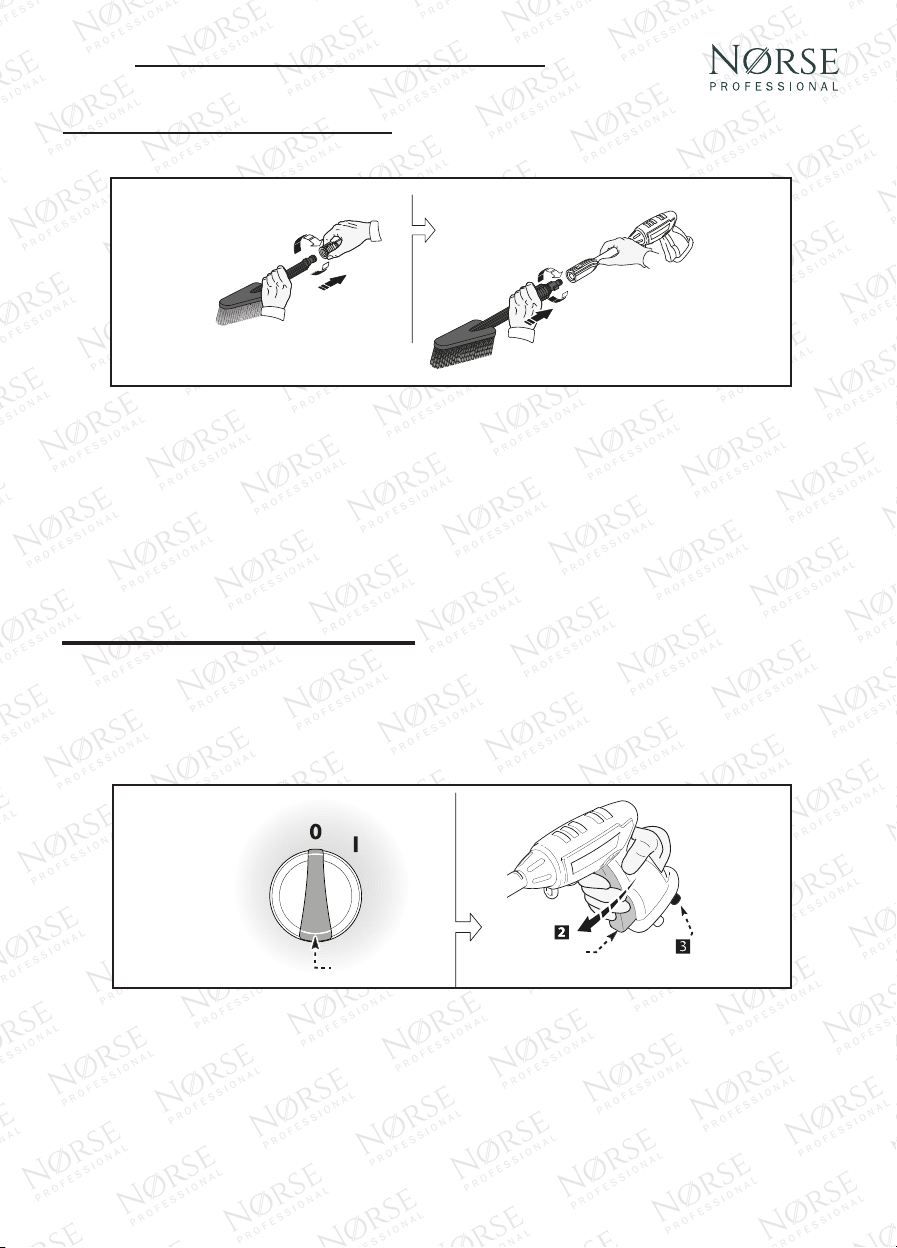
1. Release the safety button
2. Depress the trigger
3. Turn on the washer
Ø13
The variable nozzle has a wide range of uses and will deliver varying intensities of pressure depending
on your requirements. Twist the nozzle to change from a low pressure fan spray, ideal for large surfaces,
to a narrow jet of high pressure which will blast small areas for intense cleaning.
For detergent use, ll the tank ‘13’ before twisting the nozzle to the detergent position.
1. Hose reel
2. Handle
3. Reel crank handle
4. Quick connector filter
5. Quick hose connector
6. Wheels
7. Spray gun
8. Spray gun water inlet
9. Nozzle cleaning tool
10. Lubricant (certain models)

SK125
© NØRSE 5
© NØRSE
English
Before starting up the appliance check that the water supply hose is connected properly;
use of the appliance without water will damage it; do not cover the ventilation grilles when
the appliance is in use.
The variable nozzle has a wide range of uses and will deliver varying intensities of pressure depending
on your requirements. Twist the nozzle to change from a low pressure fan spray, ideal for large surfaces,
to a narrow jet of high pressure which will blast small areas for intense cleaning.
For detergent use, ll the tank ‘13’ before twisting the nozzle to the detergent position.
Parts guide
01
04
03
02
05
06
1. Hose reel
2. Handle
3. Reel crank handle
4. Quick connector filter
5. Quick hose connector
6. Wheels
7. Spray gun
8. Spray gun water inlet
9. Nozzle cleaning tool
10. Lubricant (certain models)
11. Spray gun lance
12. Variable nozzle
13. Detergent tank (certain models)
14. Filtered hose
15. Fiber extension hose
16. Rotary brush
17. Triangle brush
18. Patio brush
18a. Angle connector
19. 90 turbo nozzle
20. Wall mount brackets
17
18
18a 19
16
20
SK125
© NØRSE
6© NØRSE
English
07 08
09
10
11
12
13
Distance from Cleaning Surface
Another factor that determines the impact force of the water is the distance from the variable nozzle to
the cleaning surface
Angle to the Cleaning Surface
When spraying water against a surface, maximum impact is generated when the water strikes the
surface head on. However, this type of impact tends to cause dirt particles to embed in the surface,
thereby preventing the desired cleaning action. The optimum angle for spraying water against a surface
is 45 degrees.
Avoid Damaging Surfaces
Damage to surfaces occurs because the impact force of the water exceeds the durability of the surface.
Never use a narrow high impact stream or a turbo / rotary nozzle on a surface that is susceptible to
damage.
The surest way to avoid damaging surfaces:
1. Adjust the nozzle to a wide spray pattern.
2. Place the variable nozzle approximately 4-5 feet from and 45 degrees to the cleaning surface.
3. Vary the spray pattern, spray angle and the distance to the cleaning surface until optimum
cleaning efficiency is achieved without damaging the surface.
Looking After your Product
1. This pressure washer is not meant to pump hot water. Never connect to a hot water supply.
2. Never operate the unit for more than one minute without spraying water. This will cause a heat
build-up that can damage the pump.
3. Only use the nozzles supplied with the machine.
General cleaning
01
14
15

SK125
© NØRSE 7
© NØRSE
English
Distance from Cleaning Surface
Another factor that determines the impact force of the water is the distance from the variable nozzle to
the cleaning surface
Angle to the Cleaning Surface
When spraying water against a surface, maximum impact is generated when the water strikes the
surface head on. However, this type of impact tends to cause dirt particles to embed in the surface,
thereby preventing the desired cleaning action. The optimum angle for spraying water against a surface
is 45 degrees.
Avoid Damaging Surfaces
Damage to surfaces occurs because the impact force of the water exceeds the durability of the surface.
Never use a narrow high impact stream or a turbo / rotary nozzle on a surface that is susceptible to
damage.
The surest way to avoid damaging surfaces:
1. Adjust the nozzle to a wide spray pattern.
2. Place the variable nozzle approximately 4-5 feet from and 45 degrees to the cleaning surface.
3. Vary the spray pattern, spray angle and the distance to the cleaning surface until optimum
cleaning efficiency is achieved without damaging the surface.
Looking After your Product
1. This pressure washer is not meant to pump hot water. Never connect to a hot water supply.
2. Never operate the unit for more than one minute without spraying water. This will cause a heat
build-up that can damage the pump.
3. Only use the nozzles supplied with the machine.
A cleaning tool is supplied to remove any debris from the nozzle before and after use.
General cleaning

SK125
© NØRSE
8© NØRSE
English
The following cleaning procedure will ensure that you achieve the most benecial results in the shortest
amount of time.
Surface preparation
Clear the working area and make sure that all windows and doors are closed tightly. Make sure that all
plants and trees adjacent to the cleaning area are protected by a drop cloth.
Initial high pressure rinse
The next step is to spray the cleaning surface with water to clear off any dirt or grime that may have
collected on the surface. If you use detergent, this will allow your detergent to attack the dirt that has
worked its way into the cleaning surface. Before triggering the gun, adjust the nozzle to a wide spray
pattern and slowly adjust to the desired spray pattern. This will help you avoid applying too much
pressure to the surface that could cause damage.
Detergent application
Only use detergents formulated for pressure washers. Test the detergent in an inconspicuous area before
use. Follow the manufacturer’s label directions for mixing the correct concentrations of detergent to
water.
Detergent
4. Never store the pressure washer outdoors or where it could freeze. The pump will be seriously
damaged. Any components with water left inside will also be damaged, e.g. the pressure gun.
5. Release the trigger when changing the spray pattern. Failure to do so could result in damage.
6. Do not operate the pressure washer with the inlet water screen removed. Be sure to keep the
screen clear of debris and sediment.
7. Make sure you clean the machine every three months and inspect the filter and the nozzle prior
to every use, ensuring there is no debris that may impair use.
Drawing from a barrel
First ensure the machine is switched off before connecting / disconnecting any hoses or attachments.
Instead of attaching the hose from pump to tap, use the supplied hose and lter set placing the lter end
in the water supply.
It is advised that the water supply is on the same level as the washer. If you struggle to get initial suction,
remove the outlet hose from the pump and try drawing again - this reduces the pressure on the pump
making it easier to draw. Once owing, turn engine off and reconnect outlet hose before re-starting.
1. Unscrew the top of detergent tank and fill with detergent.
2. Put the top of detergent applicator back on.
3. Set variable nozzle to detergent feature.
4. Apply the detergent so it thoroughly covers the cleaning surface. Apply from bottom to top to
prevent the detergent from sliding down and streaking.
5. Allow the detergent to remain on the surface for a few minutes. This is a good time to use a
brush to lightly scrub heavily soiled areas. Never allow detergent to dry on the cleaning surface.
6. Rotate the variable nozzle from the detergent setting to the wide angle fan spray.
7. Rinse detergent from surface.
8. Rinse the detergent tank with clean water following each use.
9. Final rinse. Make sure you thoroughly rinse the surface and that all detergent has been removed.
Shut down
1. Make sure all detergent is flushed from the system.
2. Turn off the motor.
3. Turn off the water supply.
4. Trigger the spray gun to de-pressurise the system.
5. After each use, wipe all surfaces of the pressure washer with a clean, damp cloth.

SK125
© NØRSE 9
© NØRSE
English
The following cleaning procedure will ensure that you achieve the most benecial results in the shortest
amount of time.
Surface preparation
Clear the working area and make sure that all windows and doors are closed tightly. Make sure that all
plants and trees adjacent to the cleaning area are protected by a drop cloth.
Initial high pressure rinse
The next step is to spray the cleaning surface with water to clear off any dirt or grime that may have
collected on the surface. If you use detergent, this will allow your detergent to attack the dirt that has
worked its way into the cleaning surface. Before triggering the gun, adjust the nozzle to a wide spray
pattern and slowly adjust to the desired spray pattern. This will help you avoid applying too much
pressure to the surface that could cause damage.
Detergent application
Only use detergents formulated for pressure washers. Test the detergent in an inconspicuous area before
use. Follow the manufacturer’s label directions for mixing the correct concentrations of detergent to
water.
4. Never store the pressure washer outdoors or where it could freeze. The pump will be seriously
damaged. Any components with water left inside will also be damaged, e.g. the pressure gun.
5. Release the trigger when changing the spray pattern. Failure to do so could result in damage.
6. Do not operate the pressure washer with the inlet water screen removed. Be sure to keep the
screen clear of debris and sediment.
7. Make sure you clean the machine every three months and inspect the filter and the nozzle prior
to every use, ensuring there is no debris that may impair use.
Drawing from a barrel
First ensure the machine is switched off before connecting / disconnecting any hoses or attachments.
Instead of attaching the hose from pump to tap, use the supplied hose and lter set placing the lter end
in the water supply.
It is advised that the water supply is on the same level as the washer. If you struggle to get initial suction,
remove the outlet hose from the pump and try drawing again - this reduces the pressure on the pump
making it easier to draw. Once owing, turn engine off and reconnect outlet hose before re-starting.
1. Unscrew the top of detergent tank and fill with detergent.
2. Put the top of detergent applicator back on.
3. Set variable nozzle to detergent feature.
4. Apply the detergent so it thoroughly covers the cleaning surface. Apply from bottom to top to
prevent the detergent from sliding down and streaking.
5. Allow the detergent to remain on the surface for a few minutes. This is a good time to use a
brush to lightly scrub heavily soiled areas. Never allow detergent to dry on the cleaning surface.
6. Rotate the variable nozzle from the detergent setting to the wide angle fan spray.
7. Rinse detergent from surface.
8. Rinse the detergent tank with clean water following each use.
9. Final rinse. Make sure you thoroughly rinse the surface and that all detergent has been removed.
Shut down
1. Make sure all detergent is flushed from the system.
2. Turn off the motor.
3. Turn off the water supply.
4. Trigger the spray gun to de-pressurise the system.
5. After each use, wipe all surfaces of the pressure washer with a clean, damp cloth.
Ø13
SK125
© NØRSE
10 © NØRSE
English
Post operation / storage
• Do not store the pressure washer outdoors or in a location where it may freeze. Any water left
in the machine, gun or any other components will expand if allowed to freeze, causing damage.
• Always turn the motor off before turning the water supply off.
• Never disconnect the hose from machine while the system is pressurized. To de-pressurise,
turn the motor off, then turn the water supply off and squeeze spray gun trigger 2-3 times.
Shut down:
1. Turn off the washer
2. Release the gun trigger
3. Lock the safety button
Patio brush and triangle brush
The triangle brush is specially designed to clean
rims and the wheel of vehicles.
Screw the adaptor on the triangle brush. Then
align the tongues of the adaptor with the grooves
of the spray gun and insert it.
Securely t the accessory by turning it clockwise
and let it lock into place.
Wall Mounting

SK125
© NØRSE 11
© NØRSE
English
Patio brush and triangle brush Wall Mounting
R L
RL
The SK125 includes two brackets which can be used to hang your
pressure washer on the wall.
Drill the holes for the brackets as shown. Ensure you mount to a solid
wall.
Remove the wheels from your pressure washer.
Hang your pressure washer on the brackets via the designated cut
outs on the back of the washer. The brackets also have integrated
clips on the sides which can be used to hang your hose and lance.
40mm 40mm
200mm
08mm
08mm
SK125
© NØRSE
12 © NØRSE
English
Safety Symbols
Safety and Warning Information
CAUTION: Indicates a
potentially hazardous
situation which, if not
avoided, may result in
minor or moderate injury.
WARNING: Indicates a
potentially hazardous
situation which, if not
avoided, could result in
death or serious injury.
WARNING: The electrical supply connection must be made by a qualied person and comply
with IEC 60364-1. The electric supply to this machine should include either a residual-
current device / circuit breaker that will interrupt the supply if the current to earth exceeds
30 mA for 30 ms.
Risk of
electrocution
WARNING: When the machine is used, the following precautions should always be
considered:
• To reduce the risk of injury, close supervision is necessary when the machine is used near
children.
• Follow all safety codes as well as the Occupational Safety and Health Act (OSHA).
• Ensure safety devices are operating properly before using the machine. Do not remove or
modify any part of the gun or main unit of the machine.
• Stay alert at all times when using the machine and always hold the gun firmly when operating
the machine.
• Do not operate the machine when fatigued, suffering from reduced physical, sensory or mental
capabilities or whilst under the influence of alcohol or drugs.
• Keep the operation area clear of all electrical equipment, persons, animals and pets. Do not
leave the machine unattended when setup for use. Always engage the trigger safety latch after
use.
• Do not point the pressure gun at anyone whilst the unit is connected to a water supply.
• Do not overreach or stand on an unstable support. Keep good footing and balance at all times.
• Use a cleaning agent supplied or recommend by the manufacturer. Always protect your eyes,
skin, and respiratory system from detergent use.
• If your eyes (or any other sensitive part of your body) comes into contact with detergent, rinse
with plenty of clean water.
• In the event of an accident, switch off the machine, pull the plug from the socket outlet and
disconnect the water supply.
• Always wear safety goggles, ear protection and protective clothing even when performing
maintenance.
• Never put hands or fingers over the spray tip while operating the unit.
• Never try to stop or deflect leaks with any body part.

SK125
© NØRSE 13
© NØRSE
English
WARNING: The electrical supply connection must be made by a qualied person and comply
with IEC 60364-1. The electric supply to this machine should include either a residual-
current device / circuit breaker that will interrupt the supply if the current to earth exceeds
30 mA for 30 ms.
Risk of
electrocution
• To reduce the risk of injury, close supervision is necessary when the machine is used near
children.
• Follow all safety codes as well as the Occupational Safety and Health Act (OSHA).
• Ensure safety devices are operating properly before using the machine. Do not remove or
modify any part of the gun or main unit of the machine.
• Stay alert at all times when using the machine and always hold the gun firmly when operating
the machine.
• Do not operate the machine when fatigued, suffering from reduced physical, sensory or mental
capabilities or whilst under the influence of alcohol or drugs.
• Keep the operation area clear of all electrical equipment, persons, animals and pets. Do not
leave the machine unattended when setup for use. Always engage the trigger safety latch after
use.
• Do not point the pressure gun at anyone whilst the unit is connected to a water supply.
• Do not overreach or stand on an unstable support. Keep good footing and balance at all times.
• Use a cleaning agent supplied or recommend by the manufacturer. Always protect your eyes,
skin, and respiratory system from detergent use.
• If your eyes (or any other sensitive part of your body) comes into contact with detergent, rinse
with plenty of clean water.
• In the event of an accident, switch off the machine, pull the plug from the socket outlet and
disconnect the water supply.
• Always wear safety goggles, ear protection and protective clothing even when performing
maintenance.
• Never put hands or fingers over the spray tip while operating the unit.
• Never try to stop or deflect leaks with any body part.
WARNING: This is a double-insulated machine so two systems of insulation are provided
instead of grounding. No grounding means are provided for a double-insulated machine, nor
should grounding means be added to the machine. Servicing a double-insulated machine
requires extreme care and knowledge of the system. It should be done only by qualied
service personnel. Replacement parts for a double-insulated machine must be identical to
the original parts.
WARNING: To reduce the risk of electrocution, keep all connections dry and off the
ground. Do not touch the plug with wet hands.
WARNING: Do not use the machine if the supply cord or any important parts of the
machine are damaged (e.g. safety devices, high pressure hoses, etc).
WARNING: Do not use an inlet pressure that exceeds the operating pressure of any of the parts (hoses,
ttings, etc). Ensure all equipment and accessories are rated to withstand the maximum working
pressure of the unit.
WARNING: Never spray ammable liquids or use the pressure washer in areas containing combustible
dust, liquids or vapours.
WARNING: Do not spray electrical apparatus and wiring.
WARNING: To ensure machine safety, please only use original spare parts (including nozzles) from the
manufacturer or approved by the manufacturer.
WARNING: Make sure the inlet water is maintained between 0.01MPa and 0.4MPa.
WARNING: If the mains cable is damaged it must be replaced by the manufacturer, or its service agent
or similarly qualied person to avoid a hazard or injury.
WARNING: Use only extension cords intended for outdoor use and that have an electrical rating equal to
or more than the rating of the machine. Examine the cord before using and replace it if damaged. Keep
the cord away from heat and sharp edges. It is recommended that you use a cord reel that keeps the
socket at least 60mm above the ground.
CAUTION: Keep the hose away from sharp objects. Bursting hoses may cause injury. Examine the hose
regularly and replace it if damaged. Do not attempt to repair a damaged hose.
• Never disconnect the high pressure outlet hose from the machine while the system is pressurised. To
de-pressurise machine, turn power and water supply off, then press gun trigger 2-3 times.
• Never operate the machine without all of the components properly connected to the machine (handle,
gun / lance assembly, nozzle, etc).
• Never operate the pressure washer with broken or missing parts. Check equipment regularly and
repair or replace worn or damaged parts immediately.
SK125
© NØRSE
14 © NØRSE
English
Troubleshooting
Technical Data
Symptom Possible Cause(s) Corrective Actions
No detergent
suction 1. Detergent tank is clogged 1. Clean detergent tank with warm water
Pressure washer
does not start up
1. Unit is pressurised
2. Plug is not connected correctly or
electrical supply is damaged / faulty
3. Thermal safety switch has tripped
1. Clean water inlet
2. Check that connections are properly
tightened
3. Switch off unit and allow to cool down
Pump does not
reach necessary
pressure
1. Water inlet is clogged
2. Pump sucking air from hose
connections
3. Variable spray nozzle is worn or not
correct size
4. Unloader / valves are clogged/ worn
1. Clean quick connector filter
2. Check that connections are properly
tightened
3. Call the dealer
4. Call the dealer
Fluctuating
pressure
1. Pump is sucking air
2. Clogged nozzle
3. Valves dirty, worn or clogged
4. Water seals worn
1. Check that hoses and connections are
tight
2. Clean with tip cleaner
3. Call the dealer
4. Call the dealer
Motor stops
suddenly 1. Thermal safety switch has tripped
due to overheating 1. Check mains supply voltage
corresponds to specifications
Item SK125
Working pressure 11.8 MPa / 118 BAR / 1750 PSI
Allowable pressure 16 MPa / 160 BAR / 2350 PSI
Maximum ow rate 460 Litres / hour
Motor capacity 2200 Watt
Power supply voltage 240V ~ 50HZ
Intake water pressure Min 0.1MPa / Max 1MPa
Max input temperature 50 °
Motor insulation rating Class F
Dimensions 355 x 255 x 950mm
Weight 11.5Kg

SK125
© NØRSE 15
© NØRSE
English
Symptom Possible Cause(s) Corrective Actions
No detergent
suction 1. Detergent tank is clogged 1. Clean detergent tank with warm water
Pressure washer
does not start up
1. Unit is pressurised
2. Plug is not connected correctly or
electrical supply is damaged / faulty
3. Thermal safety switch has tripped
1. Clean water inlet
2. Check that connections are properly
tightened
3. Switch off unit and allow to cool down
Pump does not
reach necessary
pressure
1. Water inlet is clogged
2. Pump sucking air from hose
connections
3. Variable spray nozzle is worn or not
correct size
4. Unloader / valves are clogged/ worn
1. Clean quick connector filter
2. Check that connections are properly
tightened
3. Call the dealer
4. Call the dealer
Fluctuating
pressure
1. Pump is sucking air
2. Clogged nozzle
3. Valves dirty, worn or clogged
4. Water seals worn
1. Check that hoses and connections are
tight
2. Clean with tip cleaner
3. Call the dealer
4. Call the dealer
Motor stops
suddenly 1. Thermal safety switch has tripped
due to overheating 1. Check mains supply voltage
corresponds to specifications
Disposal Regulations
Do not dispose of electrical machines as unsorted municipal waste, use separate collection facilities.
Contact your local government for information regarding the collection systems available. If electrical
machines are disposed of in landlls or dumps, hazardous substances can leak into the groundwater and
get into the food chain, damaging your health and well-being.
For transportation safety, the machine should comply with ISTA.
Wiring diagram
© NØRSE
SK125
© NØRSE
16
English
We hereby declare that the machine described below complies with the relevant basic safety and health
requirements of the EU Directives, both in its basic design and construction as well as in the version put
into circulation by us. This declaration shall cease to be valid if the machine is modied without our prior
approval.
The undersigned: Michael S McQuaide
as authorised by: Union Mart Ltd
Declares that
Description: Electric Pressure Washer
Identication code: NØRSE SK125
Conforms to the following European Directives:
2006/42/EG, 2006/95/EG, 2011/65/EG, 2002/96/EG, 2004/108/EG, 2000/14/EG
--
And are manufactured in accordance to the following standards or standardised documents:
EN 60335-1; EN 60335-2-79; EN 55014-1; EN55014-2; EN 61000-3-2; EN 61000-3-3; EN 61000-3-11;
EN 60704-1
Sound power level: Measured: 93 dB (A) – Guaranteed: 94 dB (A)
CE marking was afxed
Notied body: TÜV SÜD Product Service GmbH
The technical documentation is kept by: Union Mart Ltd
Date: 02/12/19
Signed:
Michael S McQuaide
Chief Executive Ofcer
Name and address of the manufacturer:
Union Mart Ltd, Company No. 8384155.
Registered address: Unit 15, Brickeld Industrial Estate Brickeld Lane, Chandler’s Ford, Eastleigh,
SO53 4DR
CE Certication
SK125
Nettoyeur à Pression Electrique
MANUEL D’UTILISATION
Lisez attentivement ce manuel avant de l’utiliser et conservez-le pour vous y référer
ultérieurement. Le non-respect de ces consignes peut entraîner des blessures, des
dommages matériels et peut entraîner l’annulation de la garantie. Les produits couverts
par ce manuel peuvent varier en termes d’apparence, d’assemblage, d’inclusions, de
spécications, de description ou d’emballage.

© NØRSE© NØRSE
We hereby declare that the machine described below complies with the relevant basic safety and health
requirements of the EU Directives, both in its basic design and construction as well as in the version put
into circulation by us. This declaration shall cease to be valid if the machine is modied without our prior
approval.
The undersigned: Michael S McQuaide
as authorised by: Union Mart Ltd
Declares that
Description: Electric Pressure Washer
Identication code: NØRSE SK125
Conforms to the following European Directives:
2006/42/EG, 2006/95/EG, 2011/65/EG, 2002/96/EG, 2004/108/EG, 2000/14/EG
--
And are manufactured in accordance to the following standards or standardised documents:
EN 60335-1; EN 60335-2-79; EN 55014-1; EN55014-2; EN 61000-3-2; EN 61000-3-3; EN 61000-3-11;
EN 60704-1
Sound power level: Measured: 93 dB (A) – Guaranteed: 94 dB (A)
CE marking was afxed
Notied body: TÜV SÜD Product Service GmbH
The technical documentation is kept by: Union Mart Ltd
Date: 02/12/19
Signed:
Michael S McQuaide
Chief Executive Ofcer
Name and address of the manufacturer:
Union Mart Ltd, Company No. 8384155.
Registered address: Unit 15, Brickeld Industrial Estate Brickeld Lane, Chandler’s Ford, Eastleigh,
SO53 4DR
SK125
Nettoyeur à Pression Electrique
MANUEL D’UTILISATION
Lisez attentivement ce manuel avant de l’utiliser et conservez-le pour vous y référer
ultérieurement. Le non-respect de ces consignes peut entraîner des blessures, des
dommages matériels et peut entraîner l’annulation de la garantie. Les produits couverts
par ce manuel peuvent varier en termes d’apparence, d’assemblage, d’inclusions, de
spécications, de description ou d’emballage.
Français

SK125
© NØRSE
18 © NØRSE
Français
18 Contenus
19 Guide de démarrage rapide
21 Guide des pièces détachées
23 Nettoyage général
24 Détergent
25 Extraire du cylindre
26 Brosse de patio et brosse triangulaire
26 Après utilisation / rangement
28 Symboles de sécurité
28 Informations sur la sécurité et les avertissements
30 Dépannage
30 Données techniques
31 Règlements sur l’élimination des déchets
31 Schéma de câblage
32 Certication CE
Contenus

SK125
© NØRSE 19
© NØRSE
Français
18 Contenus
19 Guide de démarrage rapide
21 Guide des pièces détachées
23 Nettoyage général
24 Détergent
25 Extraire du cylindre
26 Brosse de patio et brosse triangulaire
26 Après utilisation / rangement
28 Symboles de sécurité
28 Informations sur la sécurité et les avertissements
30 Dépannage
30 Données techniques
31 Règlements sur l’élimination des déchets
31 Schéma de câblage
32 Certication CE
Fixez les roues en les emboîtant dans la
partie inférieure de l’arrière de la machine.
Elles s’enclenchent et se verrouillent.
Fixez l’enrouleur de tuyau sur les supports situés sur la face
supérieure de la pièce en utilisant les vis fournies. La poignée se
xe sur l’enrouleur et est xée à l’aide des vis fournies. Mettez la
manivelle du dévidoir en place.
Guide de démarrage rapide
Ouvrez l’avant du nettoyeur en libérant le
loquet.
Installez le ltre à raccord rapide en le vissant sur l’entrée d’eau de
la pièce mécanique.
Il est essentiel que vous lisiez entièrement ce manuel pour vous familiariser avec les
caractéristiques générales de sécurité, les précautions et les fonctions nécessaires au
fonctionnement du produit. Le non-respect de ces consignes peut entraîner des blessures
et des dommages sur votre nettoyeur ou vos articles personnels.

SK125
© NØRSE
20 © NØRSE
Français
Fixez le tuyau du dévidoir au pistolet de pulvérisation.
Ensuite, connectez la xation de la lance du pistolet
pulvérisateur et la buse variable au pistolet pulvérisateur.
Une petite quantité de lubriant peut être appliquée pour
faciliter le montage.
1. Vissez le raccord rapide sur votre tuyau
d’arrosage et faites-le glisser sur le filtre du
raccord rapide, il s’enclenchera pour se mettre
en place.
2. Branchez la pièce sur l’alimentation électrique
Pour commencer :
Éloignez-vous de l’unité en prenant soin de ne pas
pointer le pistolet vers le nettoyeur à pression.
1. Relâchez le bouton de sécurité
2. Appuyer sur la gâchette
3. Allumer la machine
Ø13
La buse variable a de nombreuses utilisations et délivrera des intensités de pression variables en fonction de vos
besoins. Tournez la buse pour passer d’un jet en éventail à basse pression, idéal pour les grandes surfaces, à un jet
étroit à haute pression qui soufera de petites zones pour un nettoyage intense.
Pour l’utilisation de détergent, remplissez le réservoir ‘13’ avant de tourner la buse en position détergent.
Table of contents
Languages:
Other NORSE PROFESSIONAL Pressure Washer manuals

Popular Pressure Washer manuals by other brands


Briggs & Stratton
Briggs & Stratton Electric Pressure Washer Operator's manual

Nilfisk-Advance
Nilfisk-Advance P 160.2-15 SUPER PRO X-TRA operating instructions

GÜDE
GÜDE GHD 100 Translation of original operating instructions

STERWINS
STERWINS 135C EPW.4 Assembly, Use, Maintenance Manual

Kärcher
Kärcher K 2.250 instructions

Craftsman
Craftsman 580.751651 owner's manual