Norseman Silhouette GL User manual
Tested and approved to Australian
Standards AS/NZS 2918:2001 and
A S / N Z S 4 0 1 3 / 4 0 1 2 : 1 9 9 9 .
(Silhouette GL and GLI tested to
AS/NZS4013/4012:2014)
Prior to installation check with your
stateandlocalauthoritiesregarding
any specific regulations that may
apply.
Please keep these instructions for
future reference. Burn hardwood
only.
Ownersmanualfor
SilhouetteWoodHeaters
Modelscovered-
SilhouetteGL
SilhouetteGLIInsert
SilhouetteGLX

FIRSTTHINGSFIRST...
Congratulationsonyourpurchaseofaqualitywoodheater.Thisproductisdesignedaccordingto
strictenvironmental,qualityandsafetystandardsandshouldgiveyouyearsoftroublefreehome
heating.
Readtheseinstructionscarefullytogetthemostoutofyourheaterandtoensuresafeand
satisfactory heater performance. In particular, we would like to draw your attention to these
warnings.
Becarefulofwhatyouburn:
*Useonlydry,wellseasonedhardwood.
*Donotusecoalorbriquettes.
*WARNING: DO NOT USE FLAMMABLE
LIQUIDSORAEROSOLSTOSTARTOR
REKINDLETHEFIRE.
*Do not burn garbage in the firebox as
garbagecancauseadangeroussootbuild
upandincreasetheamountofsmokeyour
heaterproduces.
*Donotburnchemicallytreatedtimberasthe
poisonous gases given off could damage
yourstove.
*CAUTION:THEUSEOFSOMETYPESOF
PRESERVATIVE-TREATED WOOD AS
FUELCANBEHAZARDOUS.
*Donotplaceanytypesofbuildersboardeg
fibro, cement sheeting (or any other
materials not specified and tested by the
manufacturer)insidethefirebox.
Protect yourself and your family
fromburns:
WARNING: OPEN AIR CONTROL BEFORE
OPENINGFIRINGDOOR.
*The exterior surfaces of the heater will
becomehotduringoperation.Forprotection
ofchildren, the elderlyorinfirm, provide a
firescreen to prevent contact with the
applianceinoperation.
*To protect against injury from burns, use
caution when operating the appliance. In
particular,whenloadingthefirebox,provide
adequateprotectionforyourhands.
Useyourheateraccordingtothese
instructions:
*CAUTION:THISAPPLIANCESHOULDBE
MAINTAINED AND OPERATED AT ALL
TIMES IN ACCORDANCE WITH THESE
INSTRUCTIONS.
*DONOTBURNWITHDOOROPEN.
*CAUTION: THIS APPLIANCE SHOULD
NOT BE OPERATED WITH A CRACKED
GLASS.
*Donot throw logsintothe firebox. Always
placelogscarefully.
*Loadlogswithendspointingtothefrontof
theheater.Thiswillhelppreventlogsrolling
forward.
*Donotoverfire(allowfireboxtoglowred)as
thiscoulddamageyourfirebox.
*Alwaysleaveaminimumof25mm(1)ofash
inthebottomofthefirebox.Neveremptyit
completely.
*WARNING:ANYMODIFICATIONOFTHE
APPLIANCE THAT HAS NOT BEEN
APP R O V ED I N W R IT I N G B Y T H E
TESTING AUTHORITY IS CONSIDERED
ASBREACHINGAS/NZS4013.
*Theapplianceorfluesystemshouldnotbe
modified in any way without the written
approvalofthemanufacturer.
The heater can get very hot, so
watchobviousfirehazards:
*Donotplaceclothingorothercombustible
materialsontopoftheheater.
*WARNING: DO NOT USE FLAMMABLE
LIQUIDS OR AEROSOLS OR PLACE
THESE IN THE VICINITY OF THIS
APPLIANCEWHENITISOPERATING.
*WARNING: DO NOT STORE FUEL
W I T H I N H E A T E R I N S T A L L A T I O N
CLEARANCES.
*Do not store flammable liquids near the
heater.
ExclusionofLiability
Whilsteverycarehasbeentakeninformulatingtheseinstructions,noresponsibilitywhatsoeverwillattach
toand/orclaimlieagainst,themanufacturerand/orthedistributoroftheheaterasaresultofanyfailureto
followthewholeoranypartoftheinstructionsand/orasaresultofincorrectinformationhereinand/orany
omissionherefrom.
2
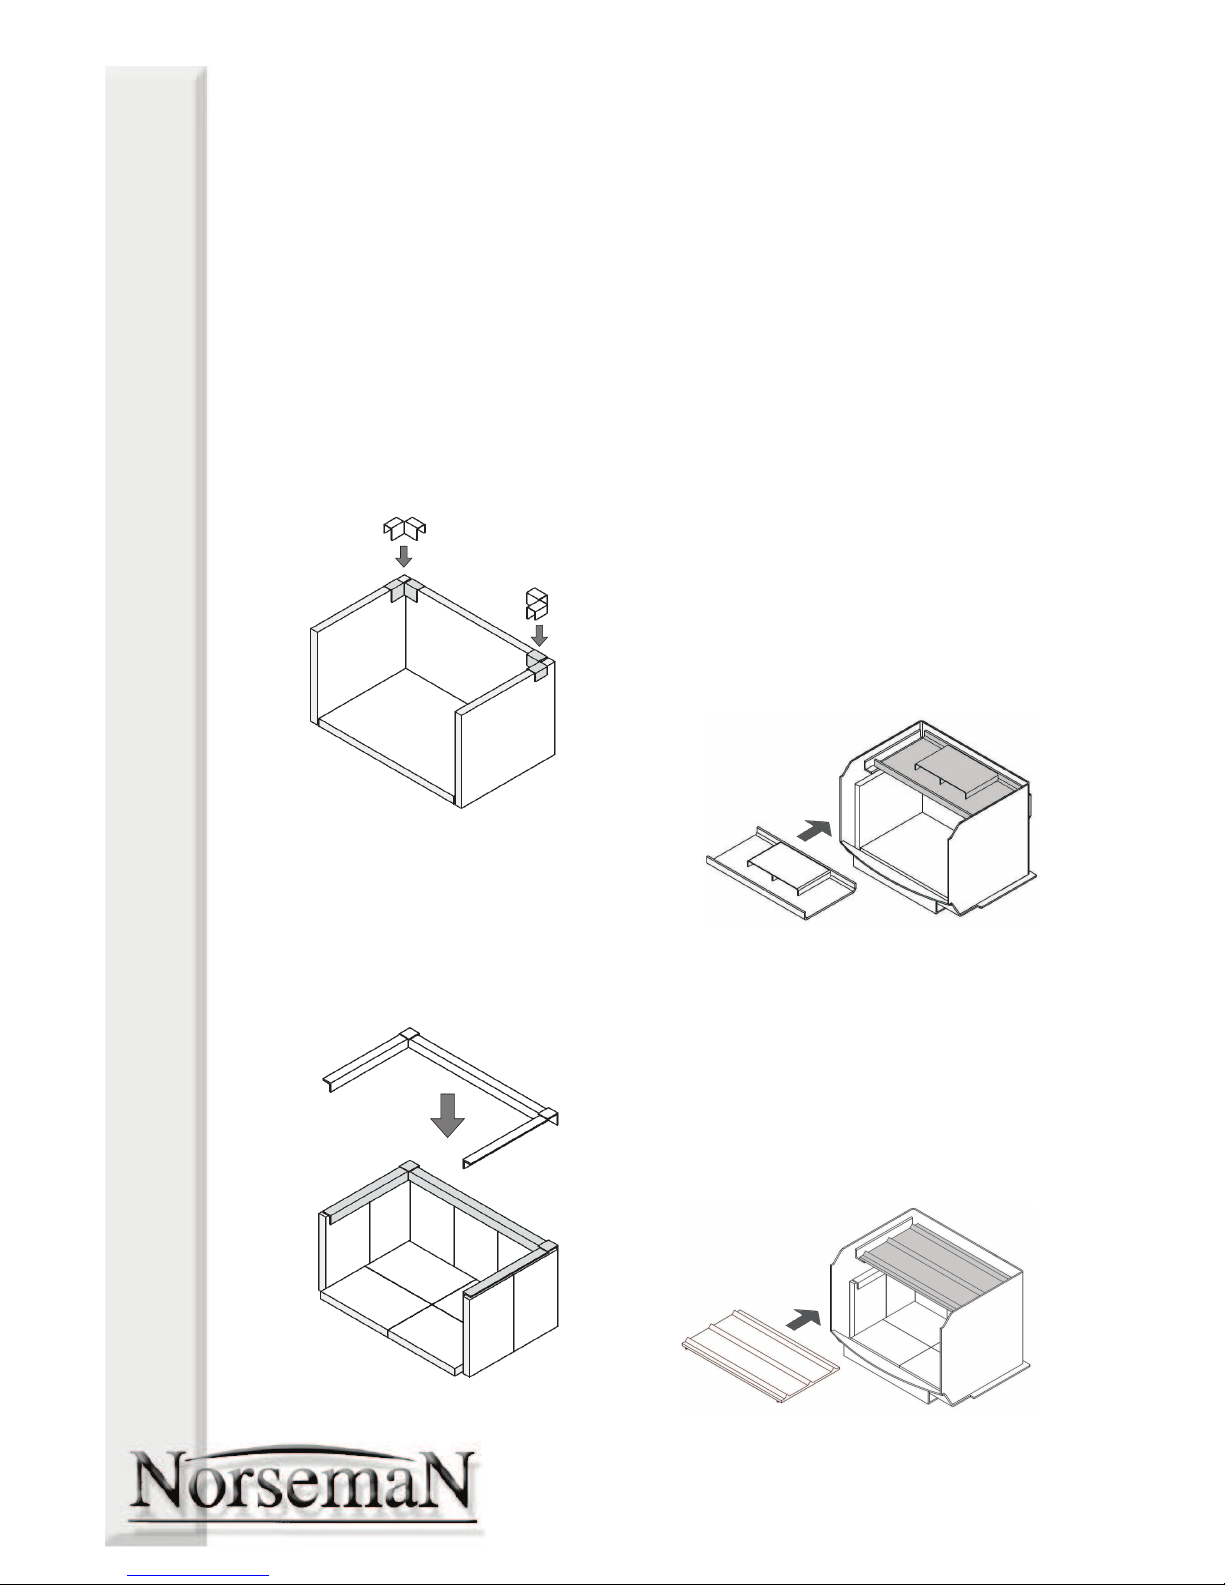
Yourheatercomesalmostcompletelyassembled.Thereisonlyasimplematterofplacingthe
bricksandbrickretainer,positioningthebaffleplate,andtheheaterisreadytobeinstalled.
ASSEMBLINGYOURNEWHEATER
3
GLX
TheGLXmodelhassmallerfirebricks.These
areplacedintheheaterasshownbelow.
Thethreenarrowerbricksgoattheback.
Thebrickretainersitsoverthetopofallthe
bricks.
FireBricksandBrickRetainer
GLandGLI
The firebricks in the GL and GLI models
follow the configuration as shown in the
diagrambelow.
Thebrickretainerssitoverthebricksinthe
backcorners.
BafflePlate
Whenplacingthebaffleplateintotheheater,
youmayneedtoanglethebaffleplateupon
onesidetogetitthroughthedoor.
You should then lift the baffle over one
bracket,pushituptothetopofthefirebox,
andthenliftitovertheotherbracket.
Pushthebaffleplateallthewaytothebackof
the heater to ensure it is in the correct
position.
GLandGLI
Theseheatersfeatureaweldedsteelbaffle.
Thebafflesitsontwobracketswiththefolds
facinguptowardsthetopofthefireboxand
thehat towardstheback.’
GLX
TheGLXmodelhasacastbaffleplate.The
baffleplatesitsontwobracketstowardsthe
topofthefirebox.Theridgesgoupandthe
flatsidegoesdown.
Ensurethelocationridgesonthebottomof
theplatearebetweenthebrackets.
INSTALLATION-GENERALNOTES
BeforeBeginning
Beforebeginningtheinstallationofyourwood
heater, you should note the following
precautions:
*WARNING: THE APPLIANCE AND
FLUE-SYSTEMSHALLBEINSTALLED
INACCORDANCEWITH AS/NZS 2918
A N D T H E A P P R O P R I A T E
REQUIREMENTS OF THE RELEVANT
BUILDINGCODEORCODES.
*WARNING: APPLIANCES INSTALLED
I N A C C O R D A N C E W I T H T H I S
STANDARD SHALL COMPLY WITH
THEREQUIREMENTSOFAS/NZS4013
W H E R E R E Q U I R E D B Y T H E
REGULATORY AUTHORITY I.E. THE
APPLIANCESHALLBEIDENTIFIABLE
BYACOMPLIANCEPLATEWITHTHE
MARKINGTESTEDTOAS/NZS4013.
*WARNING: ANY MODIFICATION OF
THE APPLIANCE THAT HAS NOT
BEENAPPROVEDINWRITINGBYTHE
T E S T I N G A U T H O R I T Y I S
CONSIDERED TO BE IN BREACH OF
THE APPROVAL GRANTED FOR
COMPLIANCEWITHAS/NZS4013.
*CAUTION: CRACKED AND BROKEN
COMPONENTS, e.g. GLASS PANELS
OR CERAMIC TILES, MAY RENDER
THEINSTALLATIONUNSAFE.
*It is strongly recommended that a
certified/qualified installer perform the
installation.
*You may need to get council approval
priortoinstallation.
*Youshouldalsocheckwithyourinsurer
foranyrequirementstheymayhave.
HearthRequirements
If your wood heater is to be installed on
carpet, timber or any other combustible
material, you must place a hearth (also
known as a floor protector) underneath the
heater.Pleaseobservethefollowing:
*Thehearthmustconsistofatleast12mm
ofnoncombustiblematerial
*Itisnotrecommendedthatyoumakeyour
ownhearth
*Thehearthandheaterassemblymustbe
placedonafirmandlevelsurface.
FlueInstallation
The correct flue system is critical to the
performance of your wood heater. It must
eitherbetestedwiththeheaterorbeadefault
fluekit.
WerecommendyouuseaMaxiheatDefault
FlueKit.
CAUTION: MIXING OF APPLIANCE OR
FLUE-SYSTEM COMPONENTS FROM
DIFFERENT SOURCES OR MODIFYING
THE DIMENSIONAL SPECIFICATION OF
C O M P O N E N T S M A Y R E S U L T I N
HAZARDOUS CONDITIONS. WHERE
SUCH ACTION IS CONSIDERED, THE
M A N U F A C T U R E R S H O U L D B E
CONSULTEDINTHEFIRSTINSTANCE.
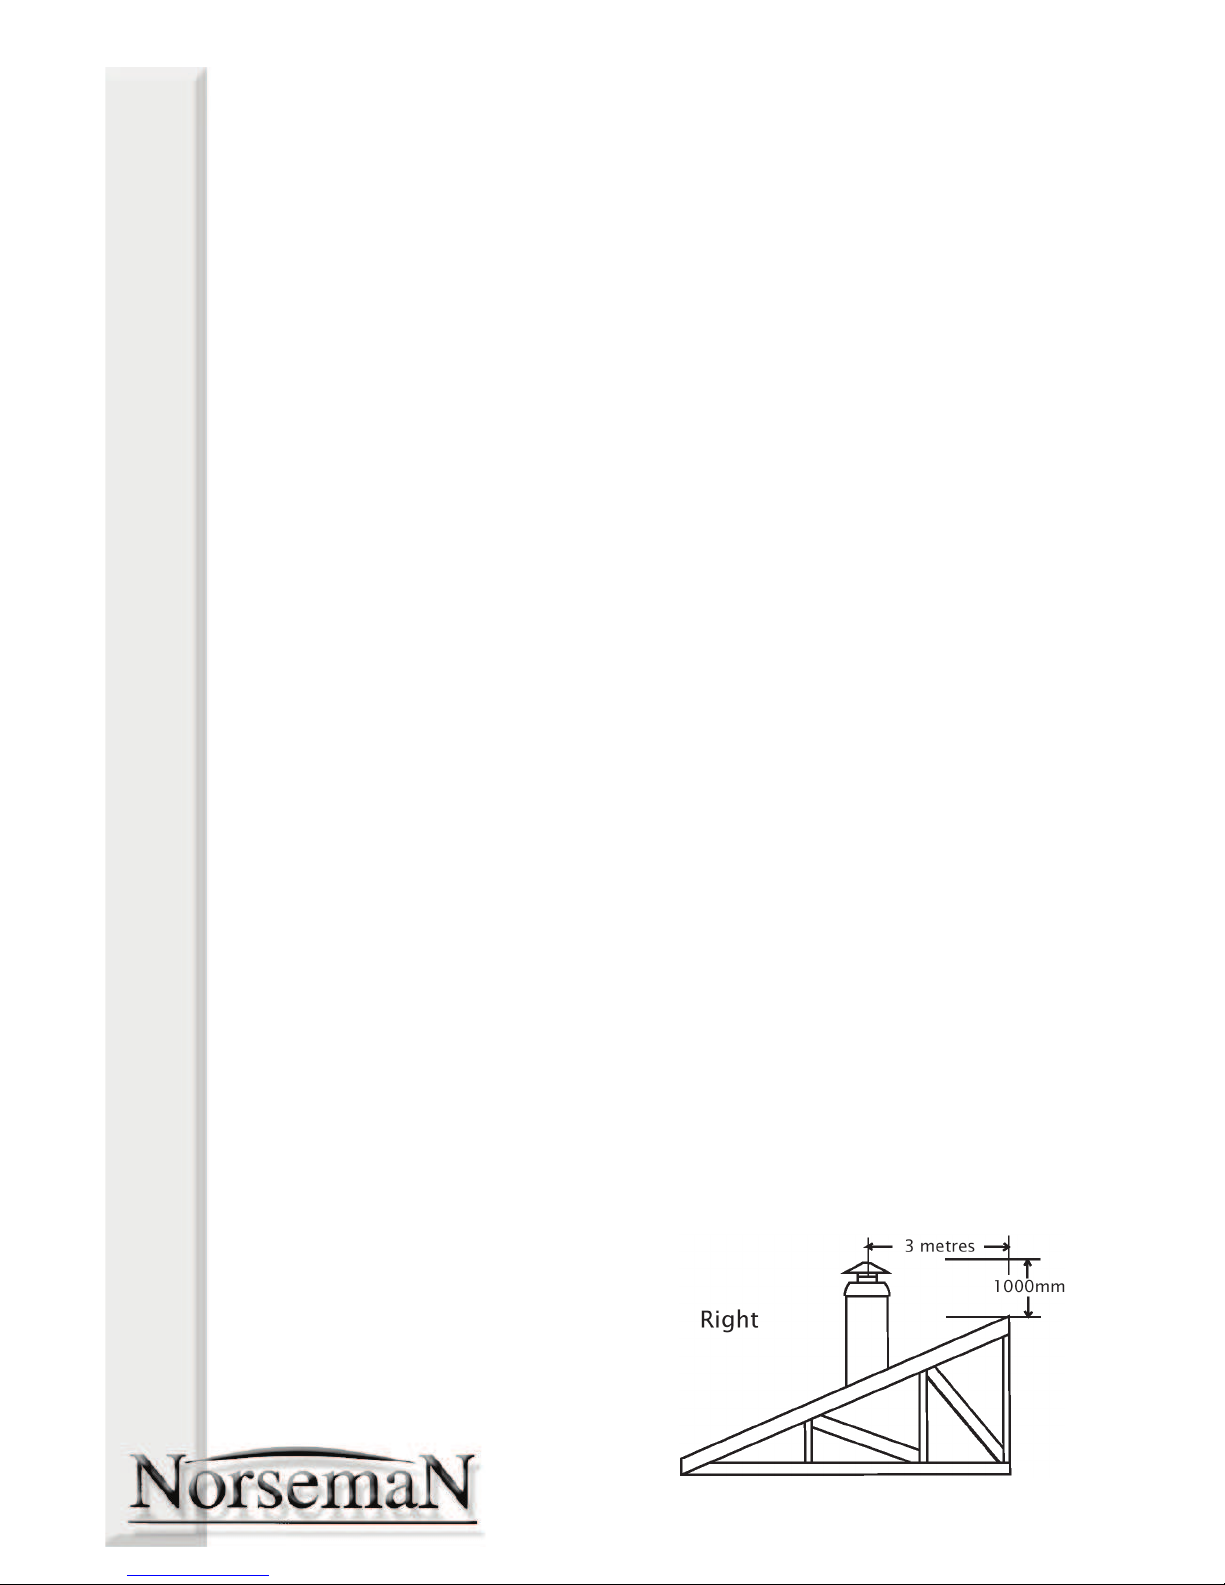
FlueHeightRequirements
Your flue must extend the required height
aboveyourrooftopromotesufficientdraught.
Iftheflueisnothighenough,theheaterwill
not draw properly causing smoke to spill
backintotheroom.
Theminimumheightoftheactivefluemustbe
4.6m in length measured from the hearth
plate to the flue termination point. The flue
mustextendatleast1moutoftheroof.The
fluemustclearanyridgeorobstructionwithin
a3mradiusbyaminimumof1m.
Forverysteeproofs(45°orsteeper)itisoften
impractical to get above the highest point.
The use of an anti-downdraft cowl is
advisable.
Onflatroofs,thefluemustextendaminimum
of1.5m.
There are other variables that can affect
draught(egtreesortallbuildingsnearby).If
youhavethecorrectflueheightandstillhave
problems,consultyourdealer.
4
INSTALLATION-FREESTANDINGHEATERSONLY
Location
Select a location for your wood heater with
greatcare.
*Donotplaceyourheaterinareasofhigh
traffic,nearfurnitureordraperies.
*Check that the intended location will not
interferewithceilingjoists,rafters,valleys
andridges.
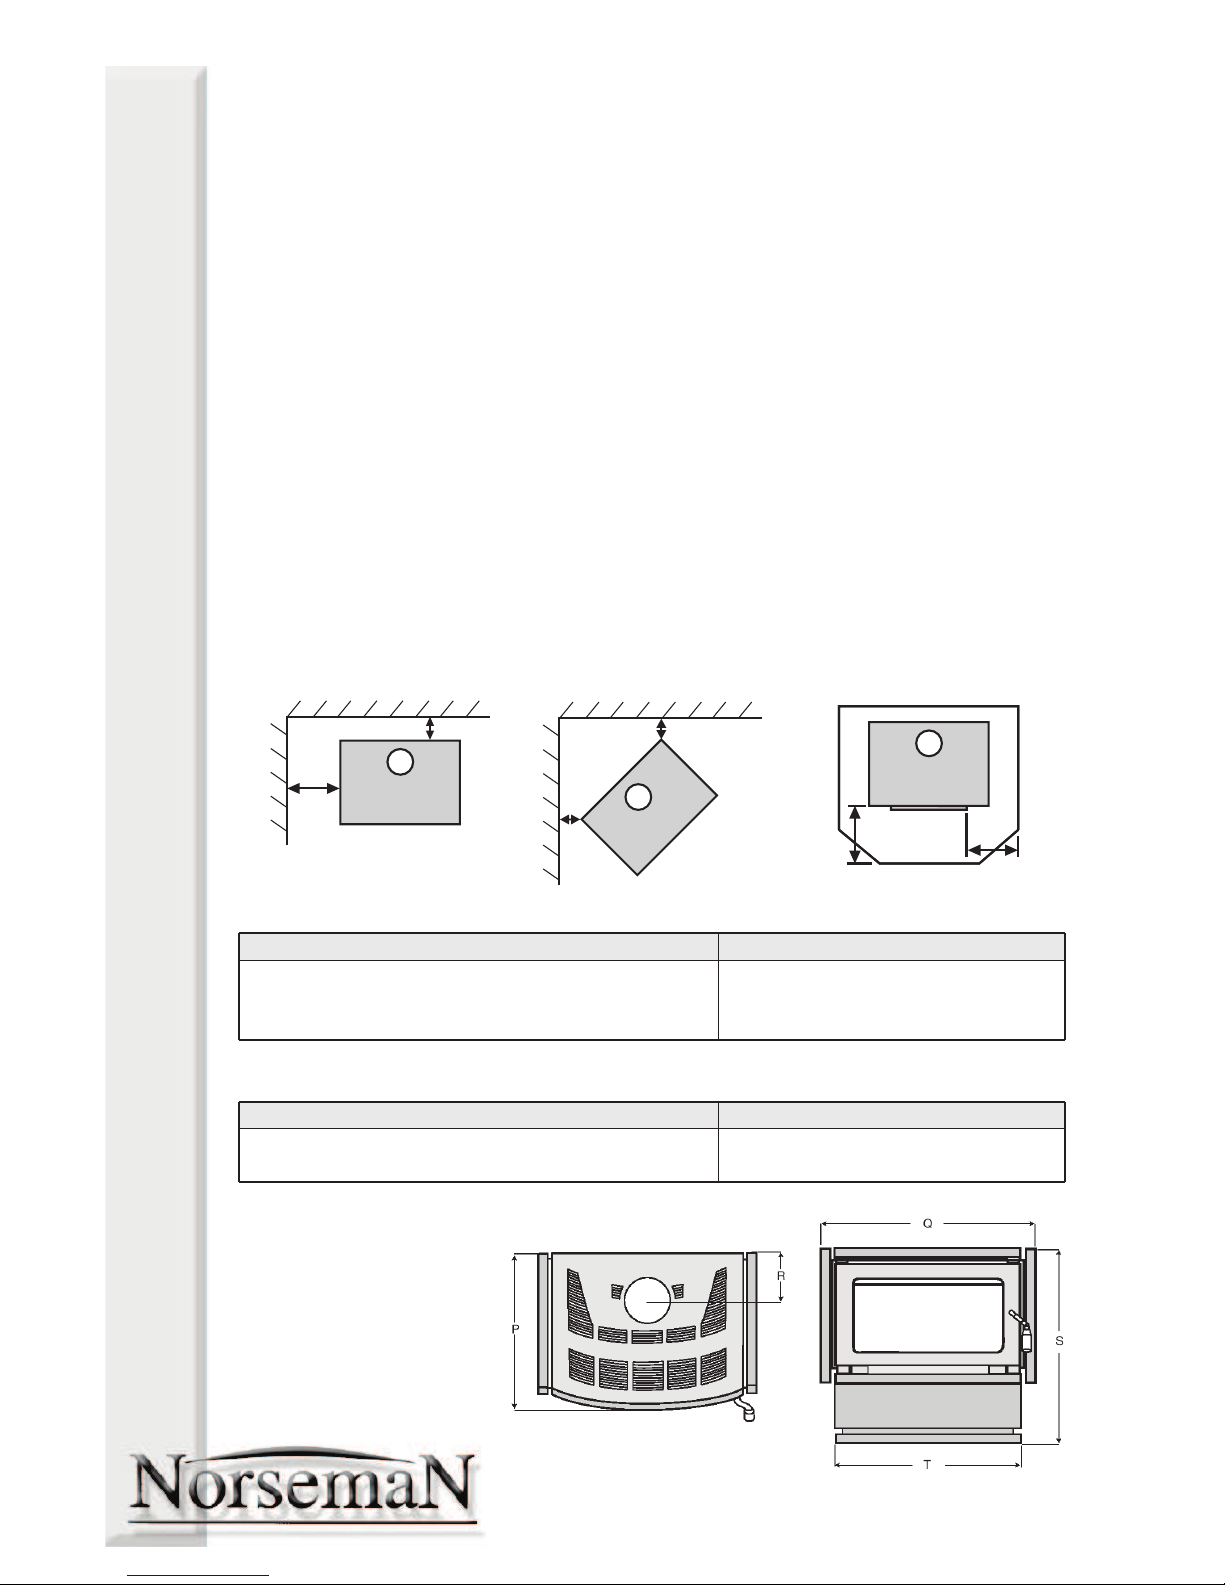
Clearances
Itisvitalthattheheaterbeinstalledtheproper
distancefromcombustiblesurfaceslikewood,
gyprockandcurtains.
Thediagramsshowbothparallelandcorner
installations.
Failuretomaintaintheseminimumdistances
mayresultinafireforwhichyourinsurermay
refusetocover.
ReducedClearances
Theseclearancescanbereducedwithproper
heat shielding. Basically a noncombustible
surfaceisplacedbetweentheheaterandthe
co m b ust i ble w all . I t i s v ita l tha t an
unobstructedairflowbemaintainedbetween
thetwosurfacestoremoveexcessheat.
HearthClearances
It is necessary to ensure that the heater is
positioned on the hearth so that the
requirementsbelowareobserved.Thefrontof
thehearthshouldextendpasttheheaterdoor
bythedistancespecifiedasD.Thesideofthe
hearthshouldextendpasttheheaterdoorby
thedistancespecifiedasEoneachside.
E
D
HearthClearances
C
CornerInstallation
A
B
ParallelInstallation
HeaterDimensions(inmillimetres)
GL
GLX
TSRQP
730770183830670
690730172790580
5
Clearances(inmillimetres)
GLwithMaxiheatDecromeshDefaultFlueKit
GLXwithdecromeshplusheatshield(MXRSOB)on
theoutside(back)ofdecromesh
EDCBA
20030050
350
75
20035075275100
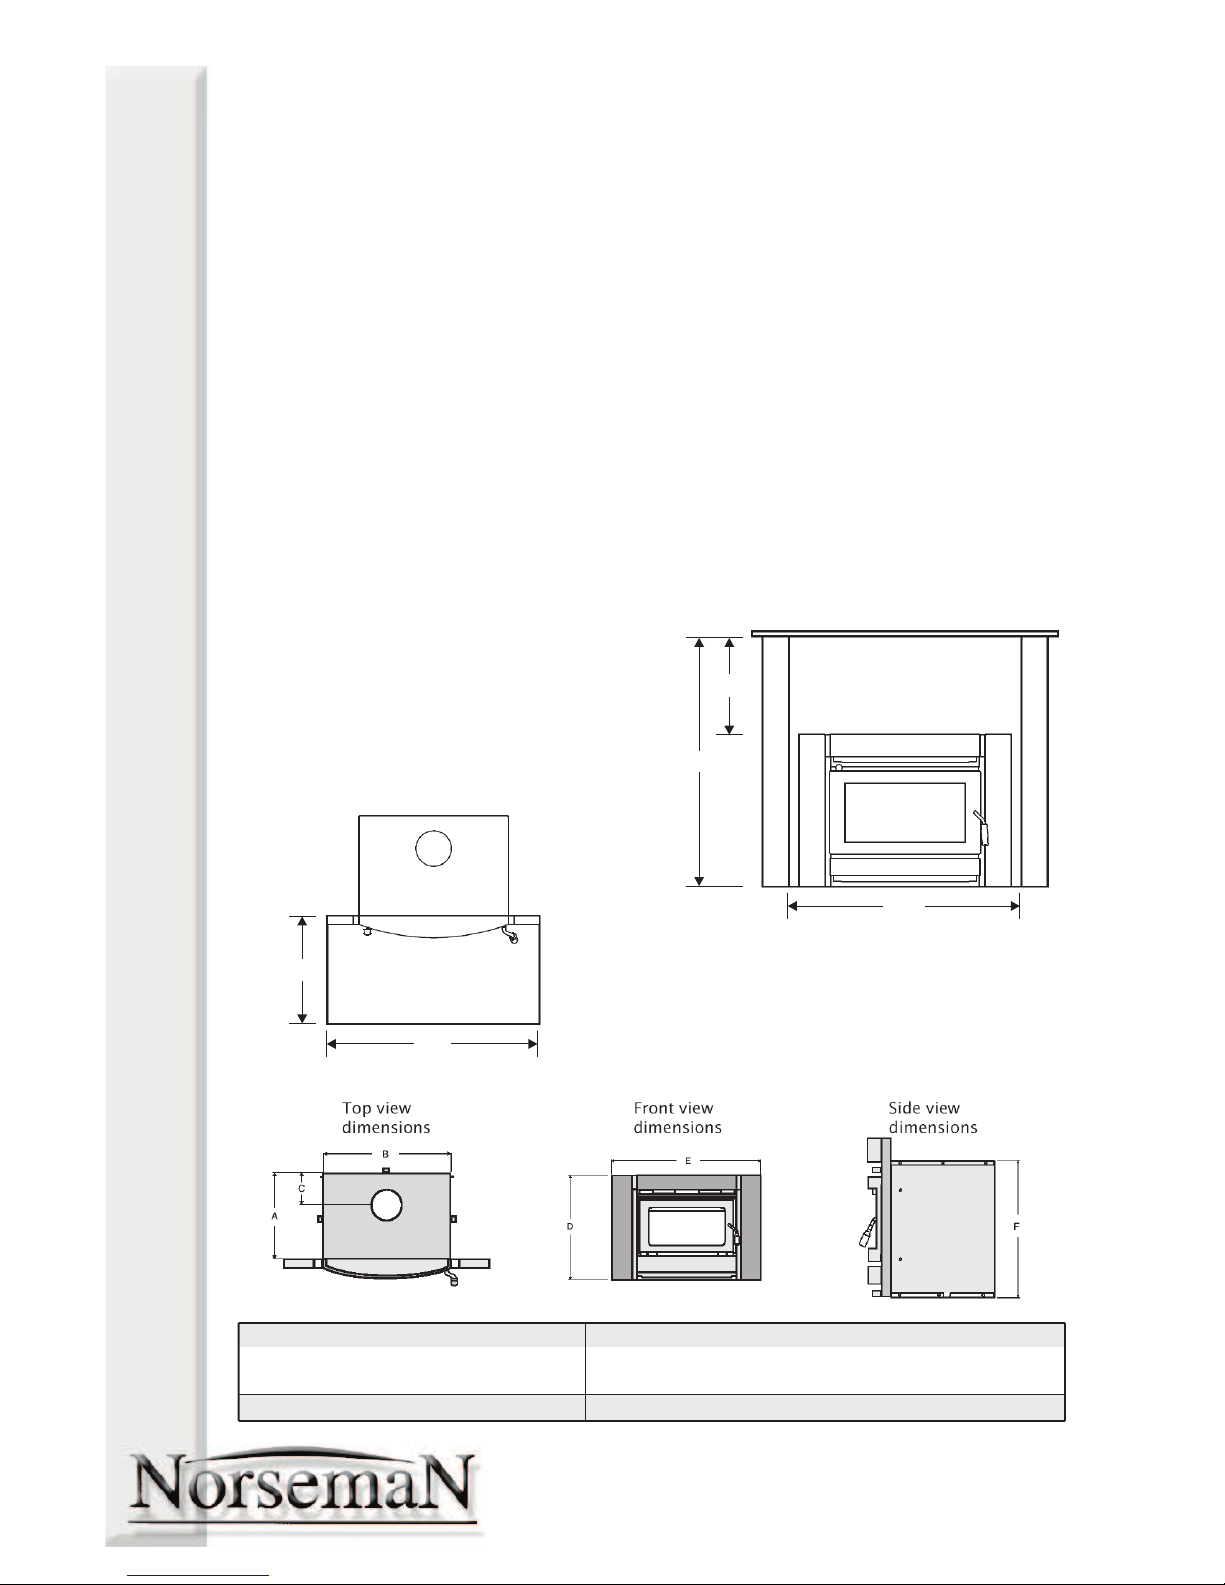
INSTALLATION-INSERTHEATERSONLY
WARNING:ThisapplianceandflueMUSTbeinstalledinafullmasonryfireplace,andmustbe
installedbyaqualifiedwoodheaterinstalleraccordingtothelatestversionofAS2918.
FireplaceConstruction
Thiswoodheater beinstalledinafullmust
masonry fireplace,whichnon-combustible
has been carefully inspected for cracks or
deterioration. The chimney should be
cleanedpriortoinstallation
You installafluetheentirelengthofthemust
chimney.Thiswillhelpyourheaterperformto
itsfullcapabilities.Itisalsoeasiertoclean.
HearthConstruction
The diagram below shows the minimum
dimensions (in millimetres) for the hearth.
Thehearth shallconsistofnoless than45
mm thick compressed fibre cement sheet,
with thermal conductivity not greater than
0.33W/m°K.
Donotbuildthehearthoverthefrontofthe
heaterasthiswillpreventaccesstothefan
throughthefrontbottomairinletcover.
6
590
980
Dimensions(inmillimetres)
GLI
FEDCBA
firebox
height
facia
width
f acia
height
flueto
rear
firebox
width
firebox
depth
600980700152690460
ClearancestoCombustibles
The diagram below shows the minimum
clearances (in millimetres) to combustible
materials.
There must be not less than 1150 mm
betweenthetopofthehearthtotheunderside
of the combustible mantlepiece. This is
equivalentto450 mm above thetopof the
heaterfascia.
Thecombustiblesurroundcolumnsmustbe
notlessthan1075mmapart.
1150
1075
450
WOODSELECTION
Fewthingsaffecttheperformanceofyourheaterasmuchasthefuelyouburn.Takenoteofthe
following:
WhatNotToBurn
*Softwood(exceptkindling)
*Wetorunseasonedwood
*Treatedorpaintedtimber
*Saltwaterwood
*Coalorcharcoal
*Garbage,plasticetc
*Any solvents, kerosene, petrol or any
flammableliquid.
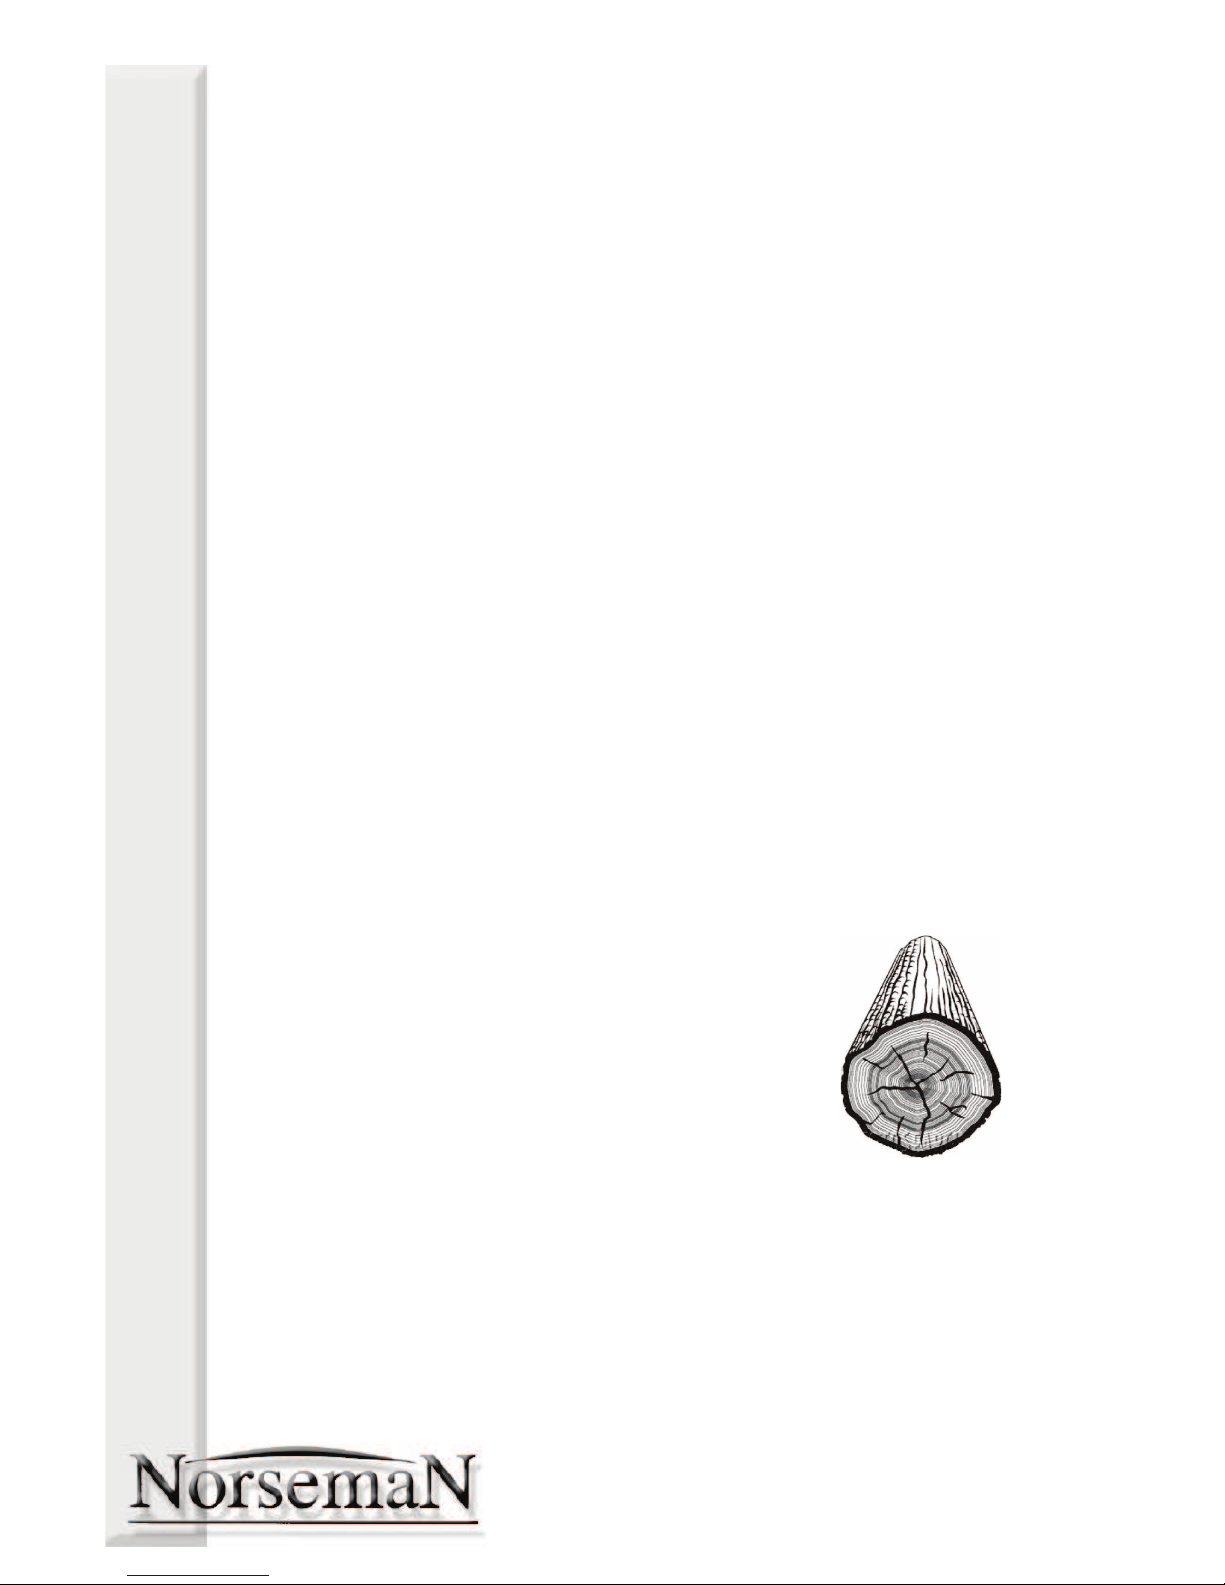
WhatToBurn
Quitesimply,dryseasonedhardwood.
Fromwhenwoodisfirstcutdown,ittakesup
to12monthsofdrystorageforthewoodto
seasonproperly.The seasoning process is
underwaywhencracksbegintoappearatthe
endsofcuttimber.
Useofmoistorunseasonedwoodwillresult
inexcessivesmoke,longerstartuptimes,a
lazyflamethatrequiresmoreairtostayalight,
creosotebuildupintheflueandonthedoor
glass, and a much less powerful fire. The
reasonissimple.Heatthatwouldnormallybe
goingintotheroomiswasted boilingwater
that is trapped inside the wood. This poor
performancecostsyoumoneyinwastedfuel
andincreasedmaintenance.
Itisdifficulttodetermineifwoodisdryjustby
lookingatit.Ifyoucanhearthewoodsizzle
andhiss,orcanseemoisturebubblingfrom
thewoodsurface,thenyourwoodistoowet.
Inpractice,thebestthingyoucandoistobe
sure of the source. Buy your wood from
reputable wood merchants. Make sure you
storethewoodcorrectly.
WoodStorage
It is important that wood be stored under
cover.Evenwoodthatisyearsoldwillabsorb
largequantitiesofmoistureifexposedtothe
elements.
Itisadvisablethatwoodisstackedtoallow
someairflowinandaroundthelogs.Thiswill
helpkeepthewooddry.
WoodSplitting
Itisbest to have onhanda good range of
woodsizestohelpcontrolthefire.Theruleof
thumbis:thehotterthefire,thebiggerthelog
youcanputin.
*Youneedverysmallpiecesofkindlingto
getthefirestartedefficiently.
*Smallpiecesuptoabout50mmthickare
go od whe n t he f ir e is st ill be ing
established,orwhenyouwanttorevivea
firethathasburntlow.
*Larger logs are excellent for long burns
oncethefireiswellestablished.
7

USINGYOURHEATER
Beforeusingyourwoodheater,studythisentiresectioncarefully.Itwillassistyouinachieving
maximumefficiencyandenjoyment.
CuringthePaint
Various parts of your heater have been
coatedwithhighqualitypaintstoprotectthem
andtogivethemanattractivefinish.Youwill
needtobreak-inyourheatertohardenor
curethesecoatings.
While curing, be careful not to touch the
paintedsurfacesasthepaintwillbequitesoft.
The basic rule is: cure slowly, over about
three burns, without a hot fire. During the
curingprocessitisnormalforsomesmoke
andsmelltobegivenofffromthesurfaceof
theheater.Eachtime,somewindowsshould
be opened to allow the paint odours to
escape.Usingafanalsohelpsdispersethe
odours.Forthisreasonitisbestdoneduring
theday.
1.The firstfireshould bekindling onlyand
should last for about 20 minutes. Leave
thedoorslightlyajartostopthedoorrope
fromsticking.
2.Oncetheheaterhascooleddown,repeat
theprocess.
3.Thethirdfireshouldbeanormalfireofat
least45minutes.
Bythistime,yourheatershouldbecured.In
colderconditions,oriftheheaterusesafan,it
maytakeslightlylonger.Thehouseshouldbe
ventilateduntilallodoursaregone.
OperatingTheAirControl
Youcancontrolwhetheryourheaterburnson
highorlowwiththeaircontrolleverfoundon
either the front or the side of the heater,
dependingonthemodel.Thehighandlow
positionsareclearlymarkedonallmodels.
For low burns - Use this setting for low
burning,orforextendedburntimes.
Formediumburns-Thisistheoptimalsetting
fornormaluse.
Forhighburns-Usethissettingforstarting
the fire and for at least 30 minutes after
loadingandreloading.
LightingTheFire
Woodburnsmostefficientlywhenplacedina
veryhotfire.Theseproceduresaredesigned
tobringyourfireboxtotherighttemperature
asquicklyaspossible.
Puttheaircontrolonhigh.
Placealargeamountofkindlinginacriss-
cross pattern over a firelighter. Make sure
plentyofaircangetintothestackandaround
eachpieceofkindling.
Addafewsmallpiecesofwoodontop.The
fireboxshouldbeabouthalffulloffuel.
Ignitethefirelighter.
Continuetoaddsmallpiecesofwooduntila
bedofhotglowingcoalsisestablished.
Placetwo orthreethoroughlydrysplit logs
(about 80-100mm diameter) on the well
establishedfire.Logswillburnbetterifthey
areplacedwiththeirendsneartheglass,ie
fronttoback.
Leave the air control on high for about 30
minutes.Afterthistime,thefireboxshouldbe
hotenoughfornormaloperation,soyoucan
turndowntomediumorlow.
Adding fresh wood cools the fire down, so
whenyouneedtoreplenishthefuel,turnthe
air control to high for about 30 minutes to
bring the firebox temperatures back up to
normal
Always leave the air control on high for at
least30minutesafterreloading.
AFewHints
Woodshouldbestackedfronttoback-with
the ends facing the door - and with space
betweenthemforairtoflowaround.
Thedoorshould remain closed atalltimes
except when first establishing the fire and
whenloading.
There are many factors that can affect the
wayyourheaterburns,includingflueheight,
wood type, shape, amount, the way it is
stacked, wind conditions and outside air
temperaturestonameafew.Youwillfindthat
before long you will get to know how your
heaterworksbestforyou.
8

USINGYOURHEATER
OvernightBurns
Largeunsplitlogsarethebestfueltouse.
Make sure you have a good strong bed of
glowing coals and the heater is hot before
loadingthelogs.
Placealoadofwoodonthestrongbasefire
andcoals,shutthedoorandleaveonhighfor
about30minutesoruntilthelogsarecharred
allover.
Turndowntolow.
Restarting After an Overnight
Burn
Adjustaircontroltohigh.
Rakethehotcoals.
Place some kindling and small logs on the
coals.
Oncethefireisestablished,startputtingon
largerlogs.
RemovingAshes
When the ashes are level with the firebox
opening,it stimeforacleanout.Thisshould’
onlybedonewhenthefireboxhascompletely
cooled.Removinghotashesishazardous.
Push chunks of charred wood to one side.
Thesewillburninthenextfire,soitwouldbea
shametowastethem.Usingametalscoop,
remove excess ash and place in a metal
container.
Youshouldleaveasmallamountofashinthe
fireboxtoprovideaninsulatingbaseforthe
nextfire.Rakethemoversotheyformaflat
bed.
Whendisposingoftheashes,keepthemina
metal or other non-combustible container
with a tight fitting lid. Move them outdoors
immediatelytoanareaclearofcombustible
materials. Do not place them in plastic
receptacles.
9
HeaterFans
All Norseman Silhouette heaters are fitted
withauniqueelectroniccontrolthatensures
yourheateralwaysburnsefficientlyandwith
theminimumemissionsbeingemitted.
As such, if the fan is on and you open the
heaterdoor,thefanwillautomaticallyturnoff
and automatically restart approximately 20
minutesafterthedoorisclosed.
Also, if the fan is on and the air control is
turnedtolow,thefanwillnotoperate.If,or
when,theaircontrolisopenedfromthelow
setting, the fan will automatically restart
approximately20minutesaftertheaircontrol
ismovedfromthelowposition.
There is an LED indicator next to the fan
switch.Itwilleitherflashorbeon(i.e.solid
and non-flashing) depending on the
operationofthefan.
The LED will be on whenever the fan is in
operation.
The LED will flash when the fan is not in
operation,suchaswhenthedoorisopen,or
theaircontrolisturnedtolow,orduringthe
20minutedelayperiod.

CAREANDMAINTENANCE
Your heater has been designed as a heavy duty appliance capable of withstanding normal
operatingconditions.
Care
Thefireboxlinerswherefittedmustbetreated
withcare.Avoidthrowinglogsintothefirebox
asthismayfracturetheliners.
Cleaning
Paintedsurfaces:tocleanpaintedsurfaces,
wipeoverwithasoft,dampcloth.Donotuse
harshsolventsandcleaningagentsasthese
candamagethecoating.Buffdrywithasoft,
drycloth.
If your heater is installed in a coastal
environment, where salt air will come in
contactwiththeheater,thiscleaningprocess
shouldbeperformedweeklytoavoidthesalt
causing deterioration of the paint and
subsequentlyrust.
Door glass: sometimes black deposits will
buildupontheinsideofthedoorglass.To
removethisbuildup,rubgentlywithaplastic
scourer pad moistened with water and
detergent.Thenusethedampanddrycloths
asbefore.Hotglasscleanerisalsoavailable
fromyourheaterretailer.
RoutineMaintenanceSchedule
Atbeginningoftheseasonandatleastevery
8weeksduringtheseason
*Inspectandcleanthefluesystem.Todo
this,removethebaffleplateandfluecowl,
andcleanoutwithafluebrush.
*Checkthepaintedsurfaces.Ifthereisany
wear, for instance from cleaning or
abrasion,touchuppaintisavailablefrom
yourdealer.
Atendofseason
*Inspectthedoorglassforanycracksand
replaceifnecessary.
*Inspectdoorropeandsealsandreplaceif
necessary.
*Inspect firebox for wear or excessive
corrosion.
*Inspectfirebrickswherefittedandreplace
ifbroken.
*Checkthattheairslidemovessmoothly.If
it is sticky, lubricate it with high
temperature grease available from your
localhardwarestore.
CreosoteBuildUp
When the heater is continually burnt with
lowerthannormalfiretemperatures,egdue
tounseasonedwood,higherthanacceptable
amounts of smoke are produced which
condenseontheinsideoftheflue.Thisbuilds
upasablack,tar-likedepositcalledcreosote.
A thin layer of creosote inside the flue is
normalandwillnotcauseaproblem.Once
there is a layer more than 3mm thick,
problemscanoccur.
1.Ifthelayeristhickenough,itrestrictsthe
flueandcancauseinsufficientdrawand
evensmokespillagebackintothehouse.
2. More seriously, creosote is combustible,
andcanignite.Afluefireiseasytodetect,
involving a roaring sound, a vibration of
the flue, and sometimes flames and
sparksshootoutofthetopoftheflue.
Toavoidcreosotebuildupandthefiresthat
mayresult,burnseasonedwoodwiththeair
controlsettomediumorhighformostofthe
time.
Toremove creosotewhen itdoesbuild up,
removethebaffleplateandfluecowl,anduse
a flue brush to clean the flue system. To
removethebaffleplate,slidetheplateupon
onesideandthendownaroundthebrackets
ontheother.
Incaseofafluefire,donotpanic.Yourflue
system has been constructed to withstand
hightemperatures.Immediatelyclosetheair
controldowntoitslowestsetting.Donotopen
thedoor.Oncethefirehasextinguished,you
shouldhaveyourfluesysteminspectedbya
qualifiedserviceperson.
10

CARINGFORTHEENVIRONMENT
Caringforourplanetmeansreducingpollutionandmanagingourresourcesintelligently.Every
resourceweusetodayweareborrowingfromourfuturegenerations.
Thekeytosuccessfullymeetingourfutureenergyrequirementsliesinourabilitytomanage
existingresourceswisely.Unlikefossilfuelssuchasoil,coalandgas,woodcanbemanagedona
sustainablebasis.
Thisiswhywoodisoneofthewisest,mostcosteffectiveandenvironmentallyefficientformsof
homeheatingavailabletoday.
Youcanmakeafurtherpositivecontributiontotheenvironmentbyfollowingtheseimportant
steps:-
OperatingYourHeater
*Alwaysburngood,dryhardwood.Thiswill
yieldthegreatestamountofheatforthe
leastamountoffuel.
*Neverburngreenorunseasonedwood,or
woodthatiswet.Thiswillwasteenergy,
cause excessive smoke and reduce the
performanceofyourwoodheater.
*Donotallowyourwoodtosmoulder.Your
fire should always burn brightly and
cleanly.Checktheflueoccasionallytosee
ifthereisanyexcessivesmoke.
OtherThingsYouCanDo
*En sur e yo ur h ome is a deq uat el y
insulated. This will reduce your energy
requirements,andlessenyourfuelbills,or
the need to gather fuel. This in turn
reducespollution.
*Donotoverheatyourhome!Ifyoufeelhot
evenwhenwearinglightclothing,thenyou
arewastingenergy.
*Install ceiling fans in the main rooms.
Theseareanexcellentinvestmentinyear
round comfort. Because hot air rises,
ceilingfanspushthishotairbackcloserto
groundleveltokeepyouwarmer.
Landcare
Aportionofthesaleofyourheaterisdonated
directlytoLandcarebytheAustralianHome
HeatingAssociation.
Landcare is one of the most proactive
community based environmental groups in
Australia today. Almost 5000 Landcare
groupshavesprouted across Australia and
like the millions of trees Landcare has
planted, they're still growing. One of three
farmersisamemberofLandcare.
These groups get involved in activities like
tree planting and revegetation, weed
removal,fencing,feralanimalcontrol,water
qualitymonitoring,naturesurveys,riverbank
re pai r, and sus ta ina ble ag ric ult ur al
techniques.
Landcaregroupsareusuallyformedbecause
thereisaproblem.Localsnoticechangesin
their environment and decide to do
something about it. Landcare groups can
grow out of ne ig hb ouring farms, or
neighboursinthecitythatsharealocalpark.
Landcare groups are working on all
imaginableecosystemsinAustralia,fromdry
and dusty central Australia, to tropical
rainforestsofQueenslandandthemountains
inTasmania.
WOODHEATINGISGOODHEATING
11
NEEDACCESSORIES?
YourBarbequesGalorestorealsosellsarangeofattractive,good
value accessories for your heater like mesh guards, toolsets and
woodbaskets.
Also,youcanaskaboutmaintenanceproducts,firelighters,touchup
paint,fluecleaningproductsandmore.
ForyournearestBarbequesGalorestorecall
1300BARBEQUES
G.L.G.AustraliaPtyLtd
BuildingA2,CampusBusinessPark
350-374ParramattaRoad
Homebush,NSW2140
HIPA-080P
25112015
This manual suits for next models
2
Table of contents
Popular Wood Stove manuals by other brands


RAIS
RAIS attika NEXO 100 GAS installation guide

WoodPro
WoodPro WS-TS-1500 owner's manual

Contura
Contura C 586W installation instructions

Palazzetti
Palazzetti EVA GENERAL INFORMATION - WARNINGS - INSTALLATION - MAINTENANCE

Lopi
Lopi 1250 Republic owner's manual

Panadero
Panadero CAPRI 3V Usage and maintenance instructions