Norsup CYCLONE Series Operation instructions
ROBOTIC POOL CLEANER
TYPE CYCLONE
ORIGINAL MANUAL
AUTOMATISCHER
SCHWIMMBECKENREINIGER
ART CYCLONE
ORIGINALBETRIEBSANLEITUNG
NETTOYEUR DE PISCINE
TYPE CYCLONE
NOTICE ORIGINALE

ROBOTIC POOL CLEANER
TYPE CYCLONE 4
ORIGINAL MANUAL
AUTOMATISCHER SCHWIMM-
BECKENREINIGER ART CYCLONE 20
ORIGINALBETRIEBSANLEITUNG
NETTOYEUR DE PISCINE
TYPE CYCLONE 36
NOTICE ORIGINALE
4
32
18
www.norsup.eu Google Play Store Apple Appstore
Laden Sie die App norsup one:
Download the norsup one app:
Téléchargez l‘application norsup one:
EN
FR
DE
45
Alterations which serve the technological progress as well as errors excepted! ORIGINAL MANUAL NORSUPWWW.NORSUP.EU Alterations which serve the technological progress as well as errors excepted!
EN
FR
DE
ROBOTIC POOL CLEANER TYPE CYCLONEROBOTIC POOL CLEANER TYPE CYCLONE
Errors and technical modifications subject
to change, reproduction as well as electronic
duplication only with our written permission.
© NORSUP
Edition: 11.2020
1. QUICK START GUIDE 6
2. FLOAT INSTALLATION 6
3. SAFETY 7
4. INTRODUCTION 7
4.1 System Overview 7
42 How the Robotic Cleaner Cleans Your Pool 7
4.3 Operating Conditions 8
5. COMPONENTS 8
5.1 Cleaner And The Main Parts 8
5.2 Power and Control Unit 8
6. OPERATION 8
6.1 Before First Use 8
6.2 Placing Cleaner Unit into the Water 9
6.3 Starting the Robotic Cleaner 10
6.4 Cleaning Cycle 10
6.5 Stopping Robotic Cleaner Operation 10
6.6 Pulling Cleaner Unit out of the Water 10
7. MAINTENANCE 11
7.1 Cleaning the Filters 11
7.2 Storing the Robotic Cleaner 11
7.3 Checking Water Outlet Propeller 11
8. ROBOTIC CLEANER PROGRAMMING 12
8.1 Control Panel - Buttons and Indicators 12
8.2 Overlay buttons 14
8.3 Using an External Timer 15
9. TROUBLESHOOTING 15
10. REMOTE CONTROL 17
10.1 Remote Control Overview 17
10.2 Using the Remote Control 17
11. CADDY (OPTIONAL) 17
11.1 Overview 17
11.2 Assembling the Caddy 17
11.3 Loading the Robotic Cleaner on the Caddy 17
12. TROLLY (OPTIONAL) 18
12.1 Overview 18
12.2 Assembling the Trolly 18
CONTENTS
67
Alterations which serve the technological progress as well as errors excepted! ORIGINAL MANUAL NORSUPWWW.NORSUP.EU Alterations which serve the technological progress as well as errors excepted!
EN
FR
DE
ROBOTIC POOL CLEANER TYPE CYCLONEROBOTIC POOL CLEANER TYPE CYCLONE
3. SAFETY
IMPORTANT SAFETY INSTRUCTIONS
READ AND FOLLOW ALL THE INSTRUCTIONS
CAUTION: Do not plug the power supply into a
grounded outlet or do not switch the pool cleaner
“ON” if it is not fully immersed in water. Operating the
cleaner out of water will cause severe damage
immediately and will result in loss of warranty.
Allow the cleaner to remain in the pool for 15 to 20
minutes following the end of its cleaning cycle. This
will allow the motors to cool adequately. Do not leave
the cleaner in the pool all the time. Always remember
to turn the power supply “OFF” and unplug it from
the power outlet before removing the cleaner from
the pool.
Safety Note
- The unit must be supplied through a residual
current device (RCD) having a rated residual
operating current not exceeding 30 mA
- The connection to the branch circuit should be
consistent with the local and national wiring rules
(electrical code).
- Mishandling of the unit can result in leakage of
lubricants.
- If the supply cord is damaged, it must be replaced
by the manufacturer’s service agent or a qualified
and trained person in order to avoid hazards.
Grounding
The power supply must be connected to a grounded 3
conductor socket. The mains power supply must be
connected via a GFCI (ground fault circuit interrupter)
or RCD (residual current device) having a rated
residual operating current not greater than 30mA.
Fuse
The fuse must be changed by an authorized service
agent or trained and qualified person only. For
continued protection against risk of fire, replace only
with the same type and rating of fuse.
Maintenance and safety
The cover should not be removed except by an autho-
rized service agent or trained and qualified person. No
internal adjustment or component replacement can
be carried out by the user. The power cable must be
disconnected before removing the cover. If the power
supply cord is damaged, it must be replaced by an
authorized service agent or trained and qualified person.
Do not operate the supply if the cord is damaged.
Environmental conditions
The power supply is designed to work both indoors
and outdoors. However, the unit should not be opera-
ted in direct sunlight or be exposed to water. The
power supply should not be operated in an ambient
temperature in excess of 40ºC.
4. INTRODUCTION
4.1 SYSTEM OVERVIEW
The robotic cleaner sweeps the pool floor and walls to
collect dirt and debris into its internal filters. This user
manual explains how to operate the robotic cleaner, in-
cluding cleaning, maintenance and storage procedures.
4.2 How the Robotic Cleaner Cleans Your Pool
After the robotic cleaner is placed in the pool and
activated, it operates according to the program set via
the power and control unit. The robotic cleaner moves
along the floor and walls of the pool, covering the
entire area of the pool floor and walls. When the
robotic cleaner has finished its program, it remains
inactive on the pool floor.
1. QUICK START GUIDE
WARNING
The cleaner must not be used when people are in
the water. For use with swimming pool only
NOTE
This manual reviews several robotic cleaner models.
There are some variations in components according
to specific model.
NOTE
Wall climbing is an optional feature. When the wall
climbing feature is enabled, the robotic cleaner climbs
the wall at intervals according to its internal program.
The robotic cleaner ability to climb over stairs in swim-
ming pool is subject to stair geometry and material.
WARNING
A Ground Fault Current Interrupter (GFCI-USA) or a
Residual Current Device (RCD-EUROPE) must be
installed to protect your electric outlet and prevent
any possible electric shock.
SAVE THESE INSTRUCTIONS
This appliance is not intended for use by persons
(including children) with reduced physical, sensory
or mental capabilities, or lack of experience and
knowledge, unless they have been given
supervision or instruction concerning use of the
appliance by a person responsible for their safety.
Children should be supervised to ensure that they
do not play with the appliance.
12 cm
(4.7 inch)
1
Quick start guide
Guide de démarrage rapide
Kurzanleitung
Manuale di avvio rapido
Guía de inicio rápido
Guia de início rápido
2
4
5
6 7
3
Chlorine
2-4 ppm
pH
7.2-7.6
Temp
13°C-35°C
55°F-95°F
NaCl
4000 ppm
(max)
NO
SWIM
3.6m/11.8ft
12 cm
(4.7 inch)
1
Quick start guide
Guide de démarrage rapide
Kurzanleitung
Manuale di avvio rapido
Guía de inicio rápido
Guia de início rápido
2
4
5 6 7
3
Chlorine
2-4 ppm
pH
7.2-7.6
Temp
13°C-35°C
55°F-95°F
NaCl
4000 ppm
(max)
NO
SWIM
3.6m/11.8ft
B2
B3
A2
A3
A4
B4
A1
Float installation
L’installation de flotteurs
Schwimmende Schaum Installation
Instalación de flotador
Instalação de flutuar
Installazione di flottante
B1
B2
B3
A2
A3
A4
B4
A1
Float installation
L’installation de flotteurs
Schwimmende Schaum Installation
Instalación de flotador
Instalação de flutuar
Installazione di flottante
B1
B2
B3
A2
A3
A4
B4
A1
Float installation
L’installation de flotteurs
Schwimmende Schaum Installation
Instalación de flotador
Instalação de flutuar
Installazione di flottante
B1
B2
B3
A2
A3
A4
B4
A1
Float installation
L’installation de flotteurs
Schwimmende Schaum Installation
Instalación de flotador
Instalação de flutuar
Installazione di flottante
B1
2. FLOAT INSTALLATION

89
Alterations which serve the technological progress as well as errors excepted! ORIGINAL MANUAL NORSUPWWW.NORSUP.EU Alterations which serve the technological progress as well as errors excepted!
EN
FR
DE
ROBOTIC POOL CLEANER TYPE CYCLONEROBOTIC POOL CLEANER TYPE CYCLONE
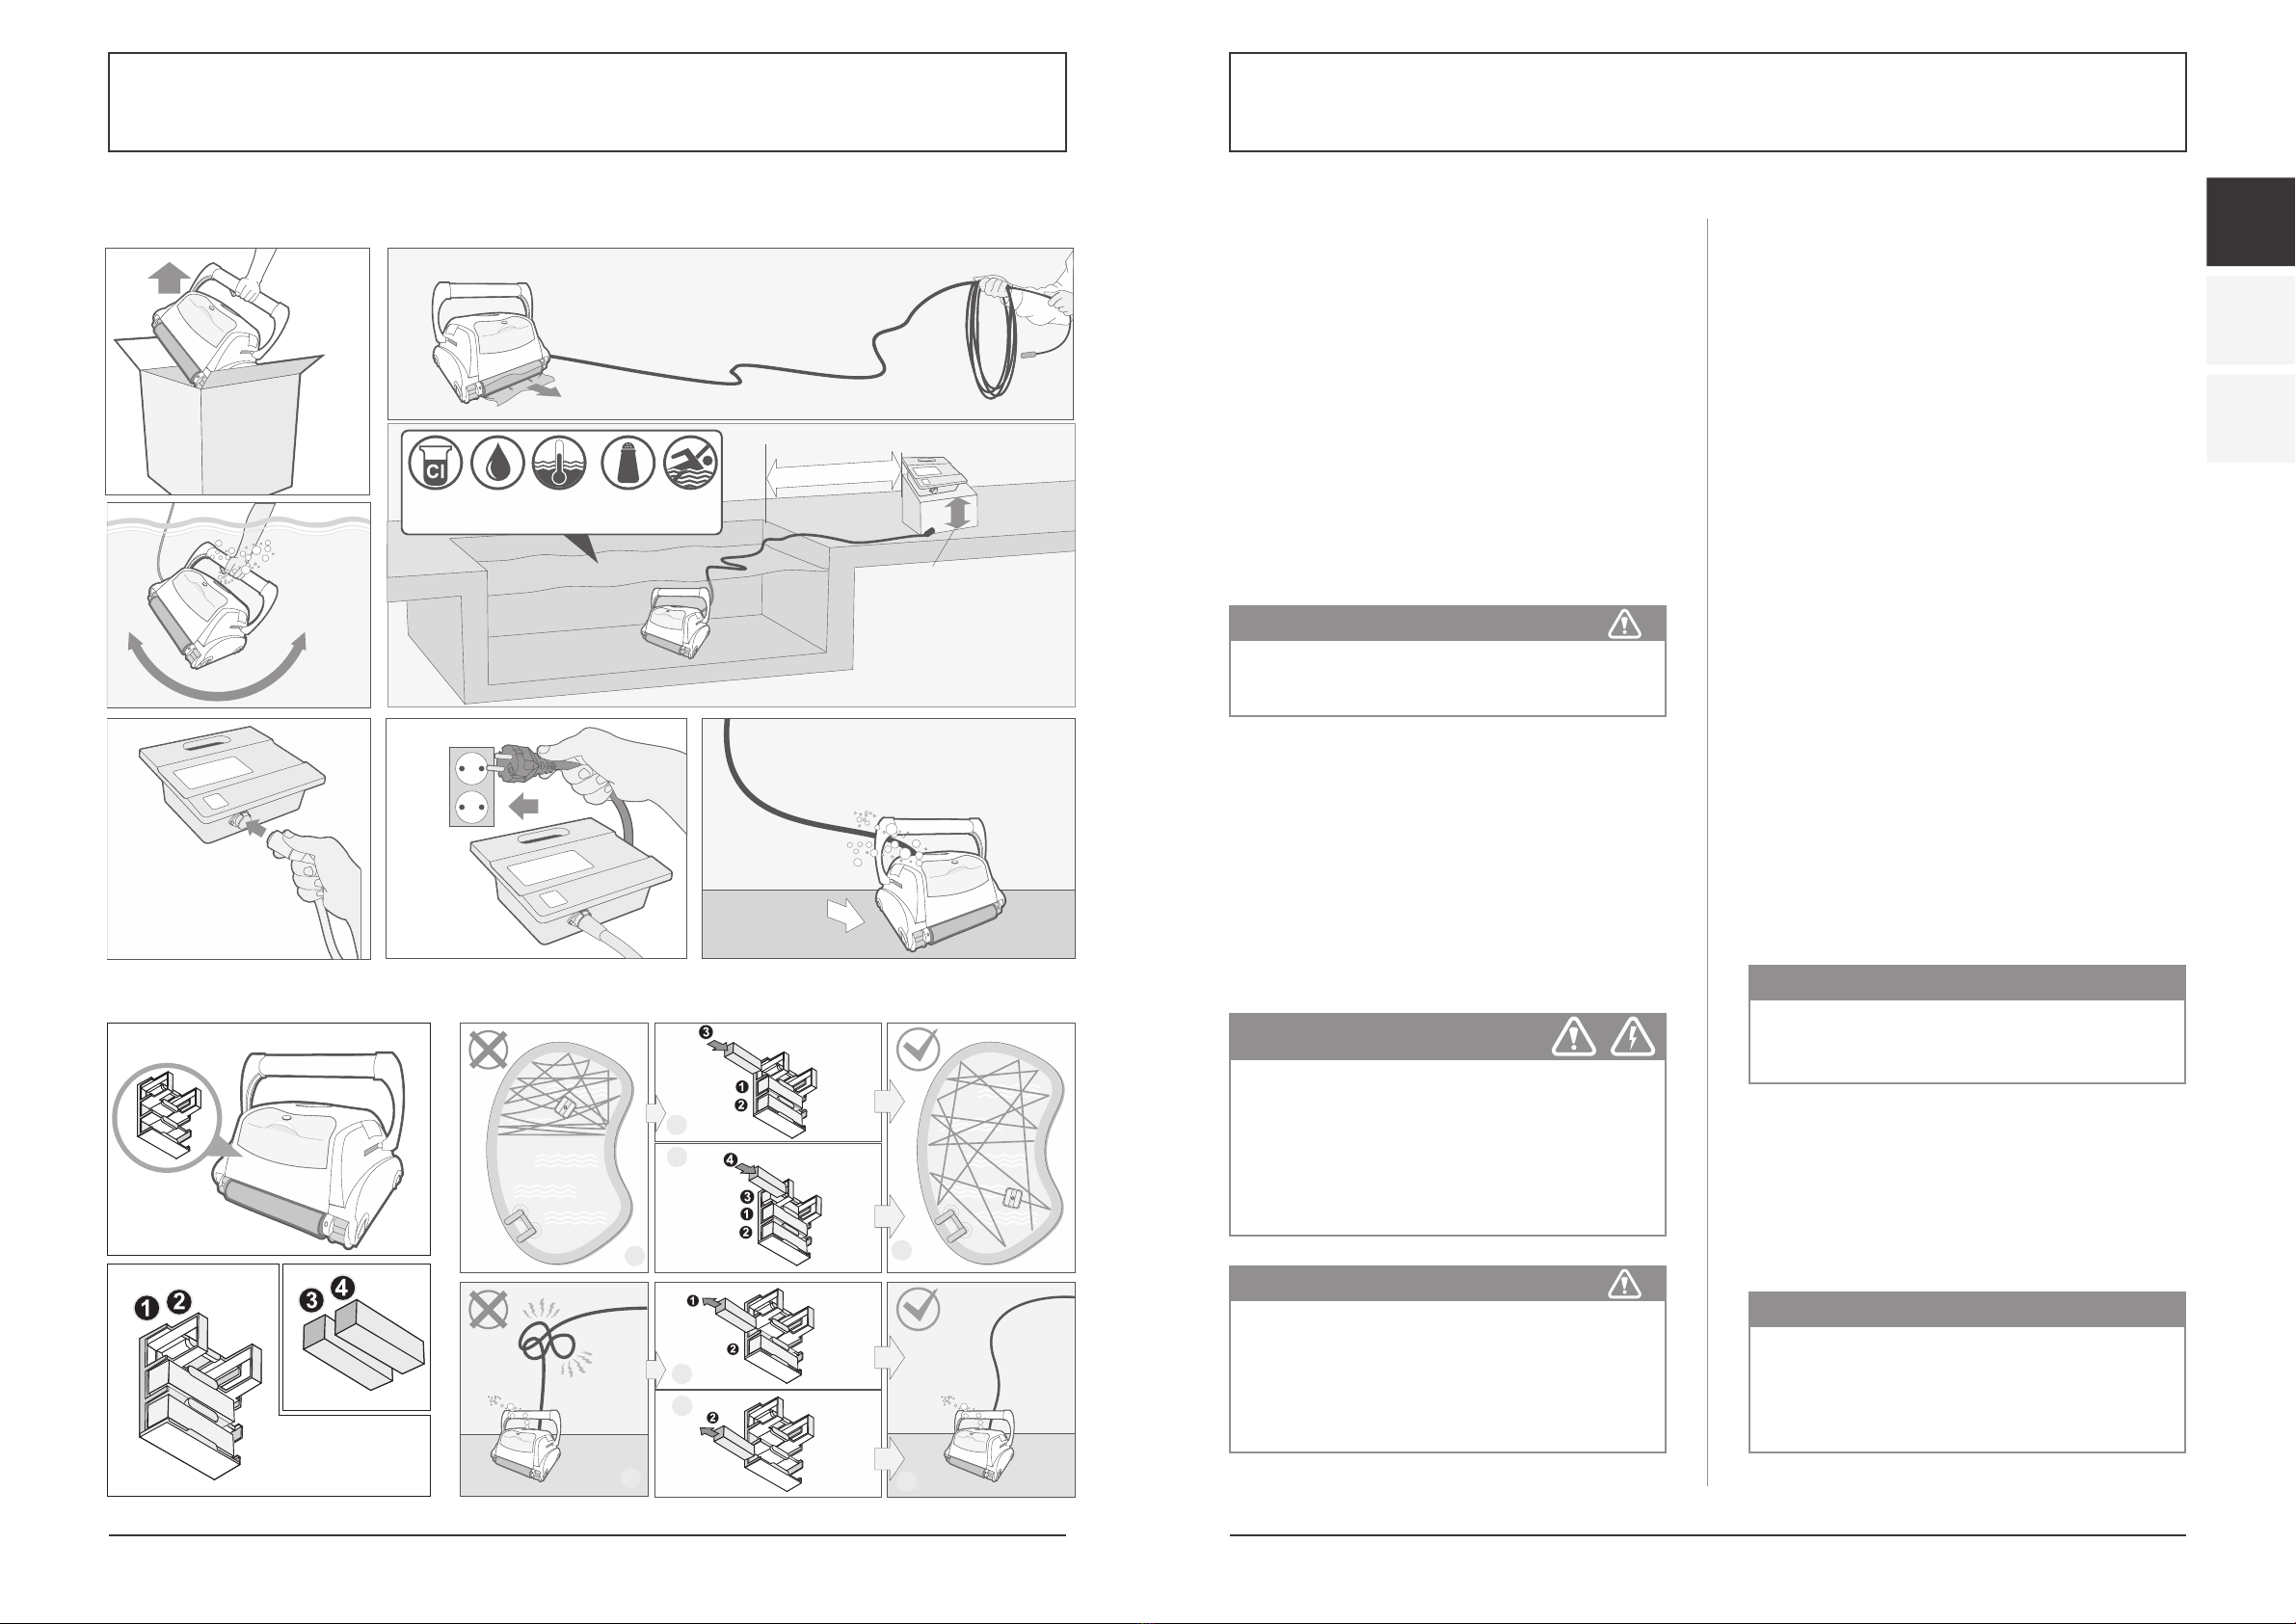
Adjusting Floating Handle
On wall climbing models, set the floating handle:
1. Press the lock button (1 or 2 according to the model)
to release the handle lock.
2. Place the handle (3) diagonally at maximum position.
3. Repeat steps 1 and 2 on the other side of the
cleaner unit.
Removing Brush Covers
The robotic cleaner is shipped
with a protective cover over
the scrubbing brushes.
Carefully remove the nylon
covers from the scrubbing
brushes.
Placing the Power and Control Unit
4. Place the power and control unit at least 3.6 meters
/11.8 feet from the pool and at least 12 cm/4 inches
above the surface.
5. Release floating cable plastic ties, which are used to
secure the cables during shipping, by pressing
plastic snap on the tie.
Before placing the cleaner unit in the water
1. Make sure there are no people in the pool.
2. Make sure that the filters are clean.
3. Make sure the pool conditions are met;
(see “Operating Conditions”).
6.2. PLACING CLEANER UNIT INTO THE WATER
1. Unroll the floating cable. It is recommended to
extend a length of cable that is equal to the pool
diagonal size plus an additional two meters.
2. Place the cleaner unit in the pool.
3. Let the robotic cleaner sink to the bottom of the
pool. Do not start operation before the robotic
cleaner is settled on the pool floor.
4. Spread the floating cable across the pool. Make sure
that only the required length of cable is spread
across the pool. Smooth out coils or twists in the
cable. Roll extra cable outside the pool near the
power and control unit.
5. Connect the floating cable (A) to the socket (B)
located on the power and control unit.
4.3 Operating Conditions
The robotic cleaner is intended for use in swimming
pools in the following conditions:
- Temperatures ranging from 13°C-35°C (55°F-95°F),
recommended temperature is between 22°C-32°C
(72°F-90°F).
- Water pH : 7.2 - 7.6
- Chlorine level: pool is maintained according to the
pool manufacturer’s instructions. (recommended
2-4 ppm)
5. COMPONENTS
5.1. CLEANER AND THE MAIN PARTS
1. Handle
2. Outlet Top
3. Filter Lock Release
4. Filter Top Access
5. Handle Lock Mechanism
6. Drive Track
7. Scrubbing Brush
8. Unit Body
9. Water Inlet
10. Power Supply
Optional
11. Remote Control
12.“Trolley” Cart
13.“Caddy” Cart
14. Timer (purchased separately)
5.2. POWER AND CONTROL UNIT
The power and control unit is connected to the
robotic cleaner via the floating cable. The unit is
powered by AC power (1) and supplies low voltage
and commands to the cleaner unit through the
outlet socket (2). The unit features a control panel (3)
with various controls to operate the robotic cleaner.
Contents of Packing Box
The robotic cleaner is packed in a box containing:
- Robotic cleaner and floating cable
- Power and control unit
- User manual
According to the model purchased, the following
accessories may be included in the package:
- Remote Control
- Caddy
- Trolley
- Additional Accessories
6. OPERATION
6.1. BEFORE FIRST USE
Adjusting Suction Height: Positioning the suction
inlet (2) close to the pool surface increases the
suction power and the cleaning quality. Lowering the
suction inlet could result in interference with
obstacles on the swimming pool floor or walls.
Use a screw driver to adjust the suction inlet position
knob (1).
- IN – pulls the suction inlet away from the pool surface
and reduces the suction power.
- OUT – brings the suction inlet closer to the pool sur-
face and increases the suction power.
NOTE
Failure to maintain the pool according to the
recommended operating conditions could prevent
the robotic cleaner from functioning properly.
Remove the cleaner out of water when performing
„Chemical Shock Treatment“ to the pool water.
112
2
4
3
4
3
5
System Overview
The robotic cleaner sweeps the pool floor and walls to collect dirt and debris
into its internal filters. This user manual explains how to operate the robotic
cleaner, including cleaning, maintenance and storage procedures.
Note:
This manual reviews several robotic cleaner models. There are some
variations in components according to specific model.
How the Robotic Cleaner Cleans Your Pool
After the robotic cleaner is placed in the pool and activated, it operates
according to the program set via the power and control unit. The robotic cleaner
moves along the floor and walls of the pool, covering the entire area of the pool
floor and walls. When the robotic cleaner has finished its program, it remains
inactive on the pool floor.
Note:
Wall climbing is an optional feature. When the wall climbing feature is enabled,
the robotic cleaner climbs the wall at intervals according to its internal program.
The robotic cleaner ability to climb over stairs in swimming pool is subject to
stair geometry and material.
Operating Conditions
The robotic cleaner is intended for use in swimming pools in the following
conditions:
- Temperatures ranging from 13°C-35°C (55°F-95°F), recommended
temperature is between 22°C-32°C (72°F-90°F).
- Water pH : 7.2 - 7.6
- Chlorine level: pool is maintained according to the pool manufacturer’s
instructions. (recommended 2-4 ppm)
Note:
Failure to maintain the pool according to the recommended operating
conditions could prevent the robotic cleaner from functioning properly.
Remove the cleaner out of water when performing "Chemical Shock
Treatment" to the pool water.
1) Handle
2) Outlet Top
3) Filter Lock Release
4) Filter Top Access
5) Handle Lock Mechanism
6) Drive Track
7) Scrubbing Brush
8) Unit Body
9) Water Inlet
10) Power Supply
OPTIONAL
11) Remote Control
12) “Trolley” Cart
13) “Caddy” Cart
14) Timer (purchased separately)
Optional
Components Introduction
14 13
12
11
10
9
876
6
7
8
4
Power and Control Unit
The power and control unit is
connected to the robotic
cleaner via the floating cable.
The unit is powered by AC
power (1) and supplies low
voltage and commands to the
cleaner unit through the outlet
socket (2).
The unit features a control
panel (3) with various controls
to operate the robotic cleaner.
Contents of Packing Box
The robotic cleaner is packed in a box containing:
- Robotic cleaner and floating cable
- Power and control unit
- User manual
According to the model purchased, the following accessories may be included
in the package:
- Remote Control
- Caddy
- Trolley
- Additional Accessories
Adjusting Floating Handle
On wall climbing models, set the floating handle:
1. Press the lock button (1 or 2 according to the model) to release the handle
lock.
2. Place the handle (3) diagonally at maximum position.
3. Repeat steps 1 and 2 on the other side of the cleaner unit.
Before First Use
Adjusting Suction Height: Positioning the suction inlet (2) close to the pool
surface increases the suction power and the cleaning quality. Lowering the
suction inlet could result in interference with obstacles on the swimming
pool floor or walls.
Use a screw driver to adjust the suction inlet position knob (1).
- IN – pulls the suction inlet away from the pool surface and reduces the
suction power.
- OUT – brings the suction inlet closer to the pool surface and increases the
suction power.
2 31 Handle lock vertical Handle lock horizontal
1
2
1
2
3
Components Operation
5
Placing the Power and Control Unit
4. Place the power and control unit at least 3.6 meters/11.8 feet from
the pool and at least 12 cm/4 inches above the surface.
CAUTION: The power and control unit must not be exposed to
water or to direct sunlight.
5. Release floating cable plastic ties, which are used to secure the
cables during shipping, by pressing plastic snap on the tie.
Before placing the cleaner unit in the water
1. Make sure there are no people in the pool.
2. Make sure that the filters are clean.
3. Make sure the pool conditions are met; (see “Operating
Conditions” ).
Placing Cleaner Unit into the Water
1. Unroll the floating cable. It is recommended to extend a length of
cable that is equal to the pool diagonal size plus an additional two
meters.
2. Place the cleaner unit in the pool.
3. Let the robotic cleaner sink to the bottom of the pool.
Do not start operation before the robotic cleaner is settled on the
pool floor.
4. Spread the floating cable across the pool. Make sure that only the
required length of cable is spread across the pool. Smooth out
coils or twists in the cable. Roll extra cable outside the pool near
the power and control unit.
5. Connect the floating cable (A) to the socket (B) located on the
power and control unit.
CAUTION: Operating the cleaner out of water causes
immediate severe damage and results in loss of warranty.
12 cm
(4.7 inch)
Operation
Removing Brush Covers
The robotic cleaner is shipped with a protective
cover over the scrubbing brushes. Carefully
remove the nylon covers from the scrubbing
brushes.
CAUTION: Do not use a sharp tool to remove
the cover as it could harm the brushes.
Chlorine
2-4 ppm
pH
7.2-7.6
Temp
13°C-35°C
55°F-95°F
NaCl
4000 ppm
(max)
NO
SWIM
Socket (B)
Cable plug (A)
3.6m/11.8ft
6
CAUTION
Do not use a sharp tool to remove the cover as
it could harm the brushes.
CAUTION
Operating the cleaner out of water causes immediate
severe damage and results in loss of warranty.
CAUTION
The power and control unit must not be exposed to
water or to direct sunlight.
10 11
Alterations which serve the technological progress as well as errors excepted! ORIGINAL MANUAL NORSUPWWW.NORSUP.EU Alterations which serve the technological progress as well as errors excepted!
EN
FR
DE
ROBOTIC POOL CLEANER TYPE CYCLONEROBOTIC POOL CLEANER TYPE CYCLONE
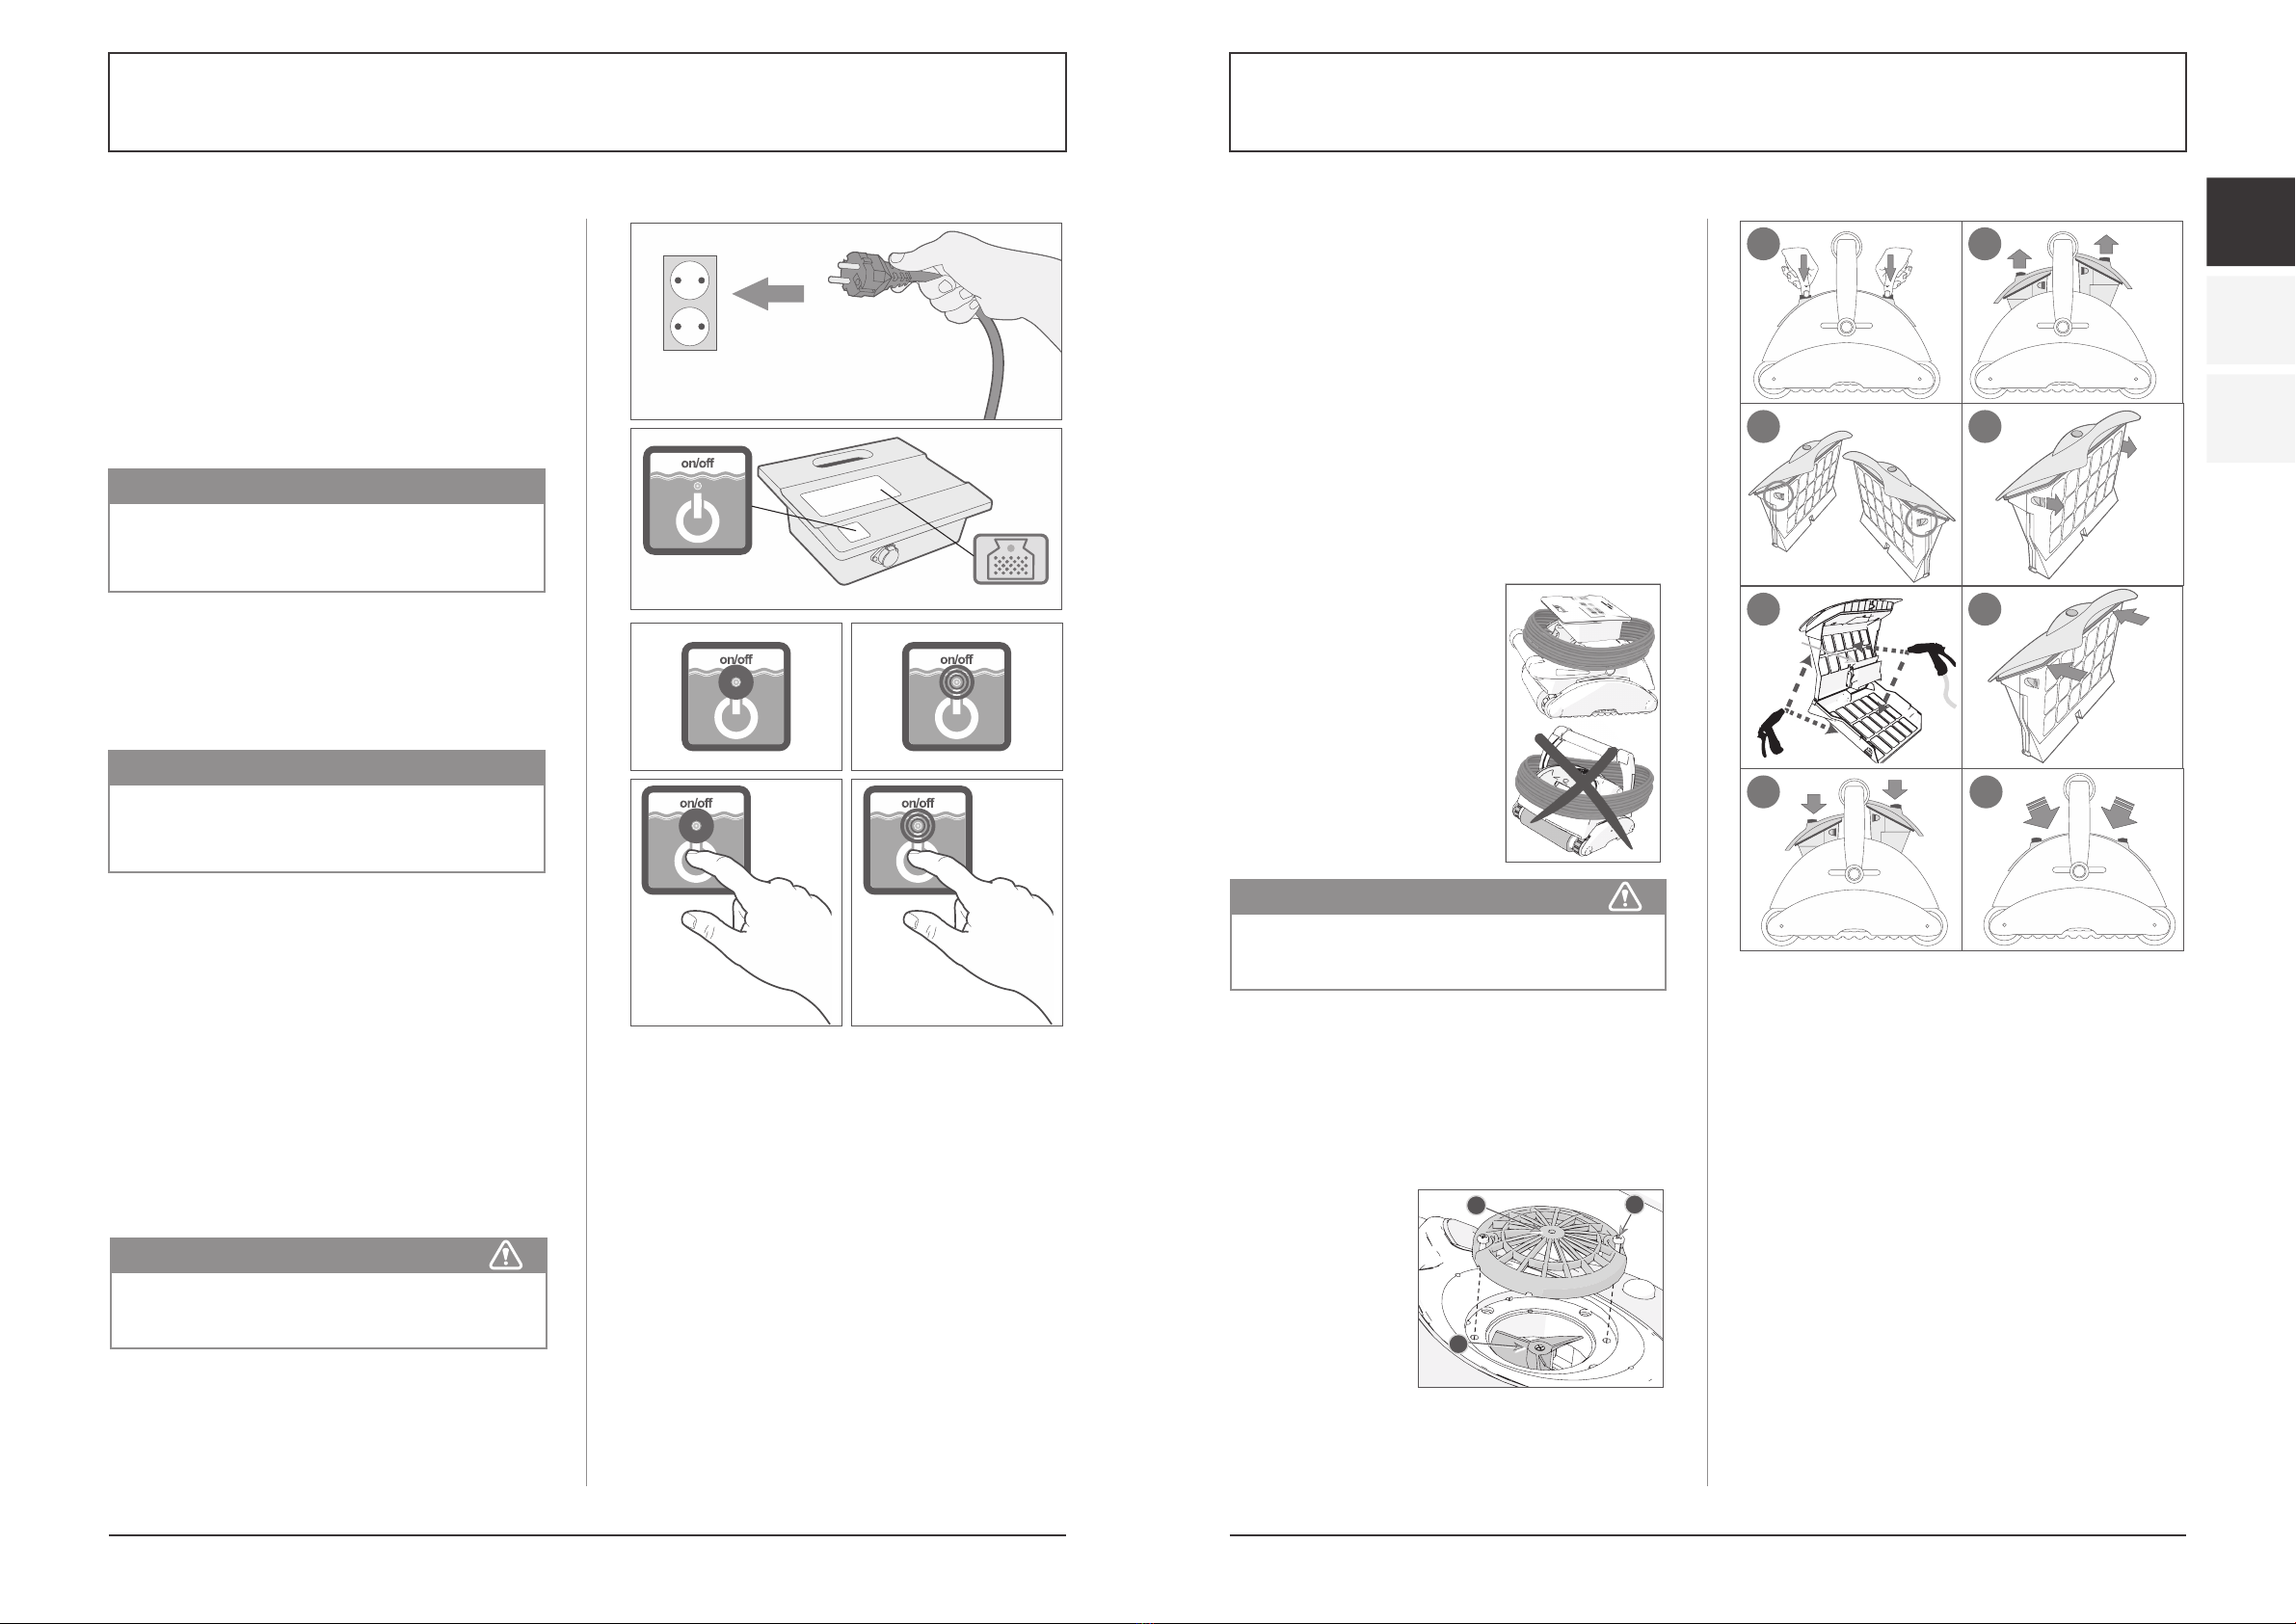
7. MAINTENANCE
7.1. CLEANING THE FILTERS
The two filters must be cleaned after each cleaning cycle.
1. Release the filter and pull it out of the cleaner unit. (1), (2)
2. Pull the filter door against the filter housing to
open the filter case. (3), (4)
3. Spray water on the outer sides of the filter and
then spray water towards the inner side of the filter
to clean all the dirt and debris. (5)
4. Verify that the small plastic shutter (2) is in place
and not broken, then close the filter. (6)
5. Insert the filter back into its location until a click is
heard to secure the filter in place.(7), (8)
7.2. STORING THE ROBOTIC CLEANER
Follow these instructions to store the robotic cleaner
when not in use:
1. Disconnect the power cord
from the wall outlet.
2. Disconnect the floating cable
from the power and control
unit.
3. Spread out the floating cable
and release any twists in the
cable.
4. Wash the cleaner unit interior
space with fresh water and let
it dry.
5. Roll the floating cable and
place it ON THE CLEANER
unit.
6. Store the robotic cleaner components in a dry,
closed location.
7. Verify that the power and control unit is not
exposed to water.
7.3. CHECKING WATER OUTLET PROPELLER
It is recommended to periodically clean debris
and hair from the propeller of the water outlet:
1. Remove the screws
(3) that holds water
outlet cover(2).
2. Remove the water
outlet cover (2).
3. Clean any hairs, dirt,
or debris.
4. Verify that the
propeller (1) is not
broken.
5. Return the cover (2)
and fasten it with
the screws (3).
6.3. STARTING THE ROBOTIC CLEANER
Connect the power and control unit to the wall
socket (1). The Operation LED is lit (4) and the robotic
cleaner starts its cleaning program.
If the power and control unit is already connected to
the AC socket, the Operation LED flashes (5) to
indicate that the robotic cleaner is in standby mode.
Press the Operation button (6). The Operation LED
turns on (6) and the robotic cleaner starts
the cleaning program.
6.4. CLEANING CYCLE
During the cleaning cycle, the robotic cleaner:
- Moves across the pool floor picking up dirt and debris.
- Changes direction and rotates automatically
according to the selected program.
- Climbs the pool walls every few minutes, as set in its
internal program.
6.5. STOPPING ROBOTIC CLEANER OPERATION
The robotic cleaner moves automatically to STANDBY
after every cleaning cycle and the operation LED
starts flashing (5).
To stop the cleaner operation during a cleaning cycle,
press the operation button (7) once. The operation LED
starts flushing (7) and the cleaner is in standby mode.
6.6. PULLING CLEANER UNIT OUT OF THE WATER
1. Unplug the floating cable from the power and
control unit.
2. Pull up on the floating cable to pull the cleaner
unit closer until it is possible to take hold of the
handle.
3. Using the handle, lift the cleaner unit out of the
pool.
NOTE
When the Check Filter LED (3) (optional in some
models.) is lit, the robotic cleaner filters must be
cleaned before placing the cleaner unit in the pool.
NOTE
The robotic cleaner might occasionally stop
moving for a few seconds. This is part of normal
operation, not a malfunction.
CAUTION
Do not use the floating cable to lift the cleaner unit
out of the water.
CAUTION
DO NOT ROLL the floating cable ON THE HANDLE
of the cleaner unit.
Starting the Robotic Cleaner
Connect the power and control unit to the wall socket (1). The Operation LED is lit (4) and the
robotic cleaner starts its cleaning program.
If the power and control unit is already connected to the AC socket, the Operation LED flashes
(5) to indicate that the robotic cleaner is in standby mode.
Press the Operation button (6). The Operation LED turns on (6) and the robotic cleaner starts
the cleaning program.
Note: When the Check Filter LED (3) (optional in some models.) is lit, the robotic cleaner
filters must be cleaned before placing the cleaner unit in the pool.
Cleaning Cycle
During the cleaning cycle, the robotic cleaner:
- Moves across the pool floor picking up dirt and debris.
- Changes direction and rotates automatically according to the selected program
- Climbs the pool walls every few minutes, as set in its internal program.
Note: The robotic cleaner might occasionally stop moving for a few seconds. This is
part of normal operation, not a malfunction.
Stopping Robotic Cleaner Operation
The robotic cleaner moves automatically to STANDBY after every cleaning cycle and the
operation LED starts flashing (5).
To stop the cleaner operation during a cleaning cycle, press the operation button (7) once. The
operation LED starts flushing (7) and the cleaner is in standby mode.
Pulling Cleaner Unit out of the Water
1. Unplug the floating cable from the power and control unit.
2. Pull up on the floating cable to pull the cleaner unit closer until it is possible to take hold of the
handle.
3. Using the handle, lift the cleaner unit out of the pool.
CAUTION: Do not use the floating cable to lift the cleaner unit out of the water.
Operation
Optional
1
2
3
4 5
6 7
7
4
3
12
CLICK!
CLICK!
8
7
6
5
Maintenance
Cleaning the Filters
The two filters must be cleaned after each cleaning cycle.
1. Release the filter and pull it out of the cleaner unit. (1), (2)
2. Pull the filter door against the filter housing to open the filter case. (3), (4)
3. Spray water on the outer sides of the filter and then spray water towards the inner side of the
filter to clean all the dirt and debris. (5)
4. Verify that the small plastic shutter (2) is in place and not broken, then close the filter. (6)
5. Insert the filter back into its location until a click is heard to secure the filter in place.(7), (8)
Storing the Robotic Cleaner
Follow these instructions to store the robotic cleaner when not in
use:
1. Disconnect the power cord from the wall outlet.
2. Disconnect the floating cable from the power and control unit.
3. Spread out the floating cable and release any twists in the
cable.
4. Wash the cleaner unit interior space with fresh water and let it
dry.
5. Roll the floating cable and place it ON THE CLEANER unit.
Caution: DO NOT ROLL the floating cable ON THE HANDLE
of the cleaner unit.
6. Store the robotic cleaner components in a dry, closed location.
7. Verify that the power and control unit is not exposed to water.
shutter
Checking Water Outlet Propeller
It is recommended to periodically clean debris
and hair from the propeller of the water outlet:
1. Remove the screws (3) that holds water outlet
cover(2).
2. Remove the water outlet cover (2).
3. Clean any hairs, dirt, or debris.
4. Verify that the propeller (1) is not broken.
5. Return the cover (2) and fasten it with the
screws (3).
3
2
1
8

12 13
Alterations which serve the technological progress as well as errors excepted! ORIGINAL MANUAL NORSUPWWW.NORSUP.EU Alterations which serve the technological progress as well as errors excepted!
EN
FR
DE
ROBOTIC POOL CLEANER TYPE CYCLONEROBOTIC POOL CLEANER TYPE CYCLONE
8. ROBOTIC CLEANER PROGRAMMING
This chapter reviews the programming options. Skip
this chapter if your model is not programmable or if
the robotic cleaner is already programmed.
8.1. CONTROL PANEL - BUTTONS AND INDICATORS
The control panel consists of:
- On/Off power (1) – starts and stops the robotic
cleaner operation.
- Function description (2) – describes the function
- Control buttons (3) – dark blue, enables selecting
relevant function.
- Status display (4) – indication LED lit to display the
selected option or the cleaner state.
SPS 100 SPS 200
PROGRAM
02
PROGRAM
03
PROGRAM
01
96h
48h
72h
Cleaning program
Mode nettoyage
Programa de limpieza
Reinigungsprogramm
Programma di pulizia
Programa de limpeza
Check filter
Vérifiez le filtre
Revise el filtro
Filter uberprufen
Controllare il sacchetto filtrante
Verifique o Filtro
Internal timer
Minuterie interne
Temporizador interno
Interne Zeitschaltuhr
Timer interno
Temporizador interno
External timer
Minuterie externe
Temporizador externo
Externe Zeitschaltuhr
Timer esterno
Temporizador externo
SPS 300
SPS 400
PROGRAM
02
PROGRAM
03
PROGRAM
01
HIGH
NORMAL
96h
48h
72h
Cleaning program
Mode nettoyage
Programa de limpieza
Reinigungsprogramm
Programma di pulizia
Programa de limpeza
Internal timer
Minuterie interne
Temporizador interno
Interne Zeitschaltuhr
Timer interno
Temporizador interno
External timer
Minuterie externe
Temporizador externo
Externe Zeitschaltuhr
Timer esterno
Temporizador externo
Swivel
Pivot
Swivel
Drehlager
Manopola di disattorcigliamento
Swivel
Auto detect
Auto detection
Auto detección
Automatische erkennung
Auto diagnosi
Detecção automática
Pool shape
Forme de piscine
Forme de la piscine
Beckenform
Forma piscine
Forma da piscina
Check filter
Vérifiez le filtre
Revise el filtro
Filter uberprufen
Controllare il sacchetto filtrante
Verifique o Filtro
Cleaning program
Mode nettoyage
Programa de limpieza
Reinigungsprogramm
Programma di pulizia
Programa de limpeza
Internal timer
Minuterie interne
Temporizador interno
Interne Zeitschaltuhr
Timer interno
Temporizador interno
Check filter
Vérifiez le filtre
Revise el filtro
Filter uberprufen
Controllare il
sacchetto filtrante
Verifique o Filtro
External timer
Minuterie externe
Temporizador externo
Externe Zeitschaltuhr
Timer esterno
Temporizador externo
Swivel
Pivot
Swivel
Drehlager
Manopola di
disattorcigliamento
Swivel
PROGRAM
02
PROGRAM
03
PROGRAM
01
96h
48h
72h
HIGH
NORMAL
PROGRAM
02
PROGRAM
03
PROGRAM
01
HIGH
NORMAL
Cleaning program
Mode nettoyage
Programa de limpieza
Reinigungsprogramm
Programma di pulizia
Programa de limpeza
Cleaning Level
Niveau de Nettoyage
Nivel de Limpieza
Reinigungsstufe
Livello di Pulizia
Nível de Limpeza
Delay
Retard
Retrasar
Verzögerung
Ritardo
Atrasar
Swivel
Pivot
Swivel
Drehlager
Manopola di disattorcigliamento
Swivel
Auto detect
Auto detection
Auto detección
Automatische erkennung
Auto diagnosi
Detecção automática
Pool shape
Forme de piscine
Forme de la piscine
Beckenform
Forma piscine
Forma da piscina
Check filter
Vérifiez le filtre
Revise el filtro
Filter uberprufen
Controllare il sacchetto filtrante
Verifique o Filtro
SPS 500
External timer
Minuterie externe
Temporizador externo
Externe Zeitschaltuhr
Timer esterno
Temporizador externo
2
3
4
1
This chapter reviews the
programming options.
Skip this chapter if your
model is not programmable
or if the robotic cleaner is
already programmed.
Control Panel
The control panel consists of:
- On/Off power (1) – starts and stops the robotic
cleaner operation.
- Status display (4) – indication LED lit to display
the selected option or the cleaner state.
- Control buttons (3) – dark blue, enables
selecting relevant function.
- Function description (2) – describes the
function
9

14 15
Alterations which serve the technological progress as well as errors excepted! ORIGINAL MANUAL NORSUPWWW.NORSUP.EU Alterations which serve the technological progress as well as errors excepted!
EN
FR
DE
ROBOTIC POOL CLEANER TYPE CYCLONEROBOTIC POOL CLEANER TYPE CYCLONE
8.3. USING AN EXTERNAL TIMER
(Optional, should be purchased separately)
An external timer can be used to automatically
activate the Cleaner on pre-set time. The external
timer should be connected between the wall socket
and the Power and Control unit
1. Unit
2. Cable
3. Power supply
4. Power supply plug
5. External timer (purchased separately)
6. Outlet
9. TROUBLESHOOTING
CLEANER DOES NOT TURN ON.
There is no electricity in the wall socket.
1. Disconnect cleaner from the power and control
unit.
2. Disconnect power supply from the wall socket,
wait 30 seconds and reconnect.
3. Turn power ON. If not activated, connect the unit
to a different wall socket.
Floating cable not connected properly to the power
and control unit.
Reconnect the floating cable to the power and
control unit.
Obstacle in the drive system of the cleaner unit.
1. Turn the cleaner unit carefully to view the underside.
2. Rotate the tracks and scrubbing brushes by hand.
It should rotate but it should not rotate freely.
3. Clean and remove obstacles and debris if necessary.
Propeller is seized due to accumulation of hair.
Check if the propeller is broken or needs to be
cleaned (see “Checking Water Outlet Propeller”).
CLEANER MOVES BUT DOES NOT PUMP WATER.
Filters are dirty.
1. Remove the filters
2. Run the robotic cleaner in the pool without the
filters. If working properly, clean the filters well or
replace the filters.
Propeller is broken or seized due to accumulation
of hair.
Check if the propeller is broken or needs cleaning
(see “Checking Water Outlet Propeller”).
CLEANER PUMPS WATER BUT DOES NOT MOVE.
Obstacle in the drive system of the cleaner unit.
1. Turn the cleaner unit carefully to view the underside.
2. Rotate the tracks and scrubbing brushes by hand.
It should rotate but it should not rotate freely.
3. Clean and remove obstacles and debris if
necessary.
CLEANER STARTS AND SHUTS OFF AFTER A SHORT
TIME.
Filters are dirty.
1. Remove the filters.
2. Run the robotic cleaner without the filters. If
working properly, clean the filters well or replace
the filters.
Propeller is broken or seized due to accumulation
of hair.
1. Remove the top screws on the top outlet.
2. Check if the propeller is broken or needs to be
cleaned.
Obstacle in the drive system of the cleaner unit.
1. Turn the cleaner unit carefully to view the underside.
2. Rotate the tracks and scrubbing brushes by hand.
It should rotate but it should not rotate freely.
3. Clean and remove obstacles and debris if necessary.
CLEANER DOES NOT PICK UP DIRT.
Filters are dirty or have holes.
Clean as needed and verify that there no holes in the
filters.
Propeller is broken or seized due to accumulation
of hair.
Check if the propeller is broken or needs cleaning
(see “Checking Water Outlet Propeller”).
The suction inlet is not close enough to the pool
floor.
Move the suction inlet OUT (see “Adjusting Suction
Height”).
DIRT COMES OUT OF THE CLEANER WHEN
REMOVING IT FROM POOL.
Filter shutter is broken or missing.
Open the filters and verify that the filter shutter is
not broken and functions properly (see “Cleaning
Filters”)
Holes in the filters.
Open the filters and verify that there are no holes in
the filter screens (see “Cleaning Filters”)
Bottom lid is not properly closed.
Make sure that the bottom lid is properly closed.
Overlay buttonsModel
Cleaning level – Change the cleaning performance
Quick: Choose if your pool has small amount of dirt
Regular: Choose for daily maintenance
Thorough: Choose if your pool has large amount of dirt
Delay
When this option is On, the robot will start to work after 2 hours of delay.
This feature is used to let debris and dust sink on the floor before starting the robot's cleaning.
500
500
Pool shape:
Allows the robot to calculate the most efficient cleaning pattern for the pool shape chosen. Press the button to select the drawing most suitable to the
shape of the pool. A red light will indicate your selection.
400/500
External Timer
Auto-Detect - OFF. Choose this option if your pool has obstacles on the floor such as high drain. This will prevent the unit from changing direction
upon hitting the obstacle.
Auto-Detect - ON. Choose this option if the pool floor is free of obstacles.
Auto detect: this feature prevents the robot from getting stuck on obstacles in the pool such as main drains, steps, ladders etc. Press this button to
choose one of the following options:
400/500
Using External Timer
(Optional, should be purchased
separately)
An external timer can be used to
automatically activate the Cleaner
on pre-set time.
The external timer should be
connected between the wall socket
and the Power and Control unit
1. Unit
2. Cable
3. Power supply
4. Power supply plug
5. External timer (purchased separately)
6. Outlet
1
2 3
456
11
Overlay buttonsModel
Cleaning level – Change the cleaning performance
Quick: Choose if your pool has small amount of dirt
Regular: Choose for daily maintenance
Thorough: Choose if your pool has large amount of dirt
Delay
When this option is On, the robot will start to work after 2 hours of delay.
This feature is used to let debris and dust sink on the floor before starting the robot's cleaning.
500
500
Pool shape:
Allows the robot to calculate the most efficient cleaning pattern for the pool shape chosen. Press the button to select the drawing most suitable to the
shape of the pool. A red light will indicate your selection.
400/500
External Timer
Auto-Detect - OFF. Choose this option if your pool has obstacles on the floor such as high drain. This will prevent the unit from changing direction
upon hitting the obstacle.
Auto-Detect - ON. Choose this option if the pool floor is free of obstacles.
Auto detect: this feature prevents the robot from getting stuck on obstacles in the pool such as main drains, steps, ladders etc. Press this button to
choose one of the following options:
400/500
Using External Timer
(Optional, should be purchased
separately)
An external timer can be used to
automatically activate the Cleaner
on pre-set time.
The external timer should be
connected between the wall socket
and the Power and Control unit
1. Unit
2. Cable
3. Power supply
4. Power supply plug
5. External timer (purchased separately)
6. Outlet
1
2 3
4
56
11
8.2. OVERLAY BUTTONS
Cleaning time
- time duration spent cleaning the pool.
Press the button to select the desired time. A red light will indicate your selection.
This feature can only be selected when the Power supply is in standby mode
Overlay buttons
Check filter
- Illuminated light means the filter bag must be removed, cleaned and properly installed back into the robot to work efficiently.
In Models 300, 400, 500 - the robotic cleaner will stop climbing on the walls once the Check Filter is illuminated
Cleaning program selection:
Program 01 – 1 hour floor and wall cleaning
Program 02 – 1.5 hour floor and wall cleaning.
Program 03 – 2 hour floor and wall cleaning.
Internal timer - Automatic operation option:
Every 48 hours
Every 72 hours
Every 96 hours
External timer
This feature gives the option to the end user to program the cleaning schedule through an external timer (sold separately). Pressing this button enables
and disables this feature.
Swivel – adjust the robots rate of turns in the pool.
Normal – Standard operation
High – Different rate of turns
100/200
300/400
500
100
200/300
200
300/400
200
300/400
300/400
500
Cleaning program selection:
Program 01 – 1.5 hour floor only cleaning program
Program 02 – 2 hour floor and wall cleaning.
Program 03 – 2.5 hour floor and wall cleaning.
Model
400
500
Cleaning program selection.
Program 01 – 2 hour floor only cleaning program
Program 02 – 4 hour floor and wall cleaning. (on certain models wall cleaning feature is not available)
Program 03 – 5 hour floor and wall cleaning. (on certain models wall cleaning feature is not available)
10
Overlay buttonsModel
Cleaning level – Change the cleaning performance
Quick: Choose if your pool has small amount of dirt
Regular: Choose for daily maintenance
Thorough: Choose if your pool has large amount of dirt
Delay
When this option is On, the robot will start to work after 2 hours of delay.
This feature is used to let debris and dust sink on the floor before starting the robot's cleaning.
500
500
Pool shape:
Allows the robot to calculate the most efficient cleaning pattern for the pool shape chosen. Press the button to select the drawing most suitable to the
shape of the pool. A red light will indicate your selection.
400/500
External Timer
Auto-Detect - OFF. Choose this option if your pool has obstacles on the floor such as high drain. This will prevent the unit from changing direction
upon hitting the obstacle.
Auto-Detect - ON. Choose this option if the pool floor is free of obstacles.
Auto detect: this feature prevents the robot from getting stuck on obstacles in the pool such as main drains, steps, ladders etc. Press this button to
choose one of the following options:
400/500
Using External Timer
(Optional, should be purchased
separately)
An external timer can be used to
automatically activate the Cleaner
on pre-set time.
The external timer should be
connected between the wall socket
and the Power and Control unit
1. Unit
2. Cable
3. Power supply
4. Power supply plug
5. External timer (purchased separately)
6. Outlet
1
2 3
456
11
MODEL
16 17
Alterations which serve the technological progress as well as errors excepted! ORIGINAL MANUAL NORSUPWWW.NORSUP.EU Alterations which serve the technological progress as well as errors excepted!
EN
FR
DE
ROBOTIC POOL CLEANER TYPE CYCLONEROBOTIC POOL CLEANER TYPE CYCLONE
CLEANER UNIT DOES NOT COVER THE ENTIRE POOL.
Filters are dirty.
Clean the filters.
There is not enough length of the floating cable in
the water to reach the far end of the pool, or the
cable is tangled.
1. Verify that there is enough length of the floating
cable in the water to reach the far end of the pool.
2. Make sure that the floating cable is properly
spread out and is not tangled.
The angle of the floating handle affects the cleaner
movement.
Increase diagonal angle of the floating handle (see
“Adjusting Floating Handle”).
Pool pH level is incorrect.
Make sure that the pH level is between 7.2 and 7.6.
Chlorine level is incorrect.
Check water chlorine treatment and correct if
required (Remove the cleaner from the pool
during the treatment.)
Propeller is broken or seized due to accumulation
of hair.
1. Remove the top screws on the top outlet.
2. Check if the propeller is broken or needs cleaning.
Obstacle in the drive system of the cleaner unit.
1. Turn the cleaner unit carefully to view the underside.
2. Rotate the tracks and scrubbing brushes by hand.
It should rotate but it should not rotate freely.
3. Clean and remove obstacles and debris if necessary.
THE CLEANER DOES NOT CLIMB WALLS.
The cleaner is not climbing the pool walls.
1. Verify that your robotic cleaner is not a floor-only model.
2. Verify that P1, floor cleaning only, is not selected on
the power and control unit (see “Robotic Cleaner
Programming”).
Filters are dirty.
Clean the filters.
Propeller is broken or seized due to accumulation
of hair.
Check if the propeller is broken or needs cleaning
(see “Checking Water Outlet Propeller”).
pH level is incorrect.
Make sure that pH is between 7.2 and 7.6.
Chlorine level is incorrect.
Check water chlorine treatment (remove the cleaner
from the pool during treatment).
Water temperature is not optimal.
Recommended temperature is between 22°C–32°C
(72°F–90°F).
THE CABLE IS TANGLED.
Filters are dirty.
Clean the filters.
Bottom lid is not properly closed.
Make sure that the bottom lid is properly closed.
Cable is not spread out before putting the cleaner
unit into the pool.
Make sure that the floating cable is properly spread
out and not tangled before operating the robotic
cleaner.
The length of the cable in the water is too long.
Verify that the length of cable in the water equal to
the pool diagonal length plus two meters.
Propeller is broken or seized due to accumulation
of hair.
Check if the propeller is broken or needs cleaning
(see “Checking Water Outlet Propeller”).
REMOTE CONTROL DOES NOT WORK.
The battery is empty. The LED is blinking or OFF.
Check the battery by pressing one of the buttons.
The red light on the remote control unit does not
blink or stay lit continuously if the battery is empty.
Contact your dealer or service center.
10. REMOTE CONTROL
This chapter reviews the operation of the optional
remote control unit. The remote control is included
in some models.
10.1. REMOTE CONTROL OVERVIEW
The remote control is an optional feature that enables
controlling the robotic cleaner via remote command
buttons. When pressing the remote control buttons,
radio signal is transmitted to the power and control
unit. This signal is transferred into a command sent to
the robotic cleaner via the floating cable.
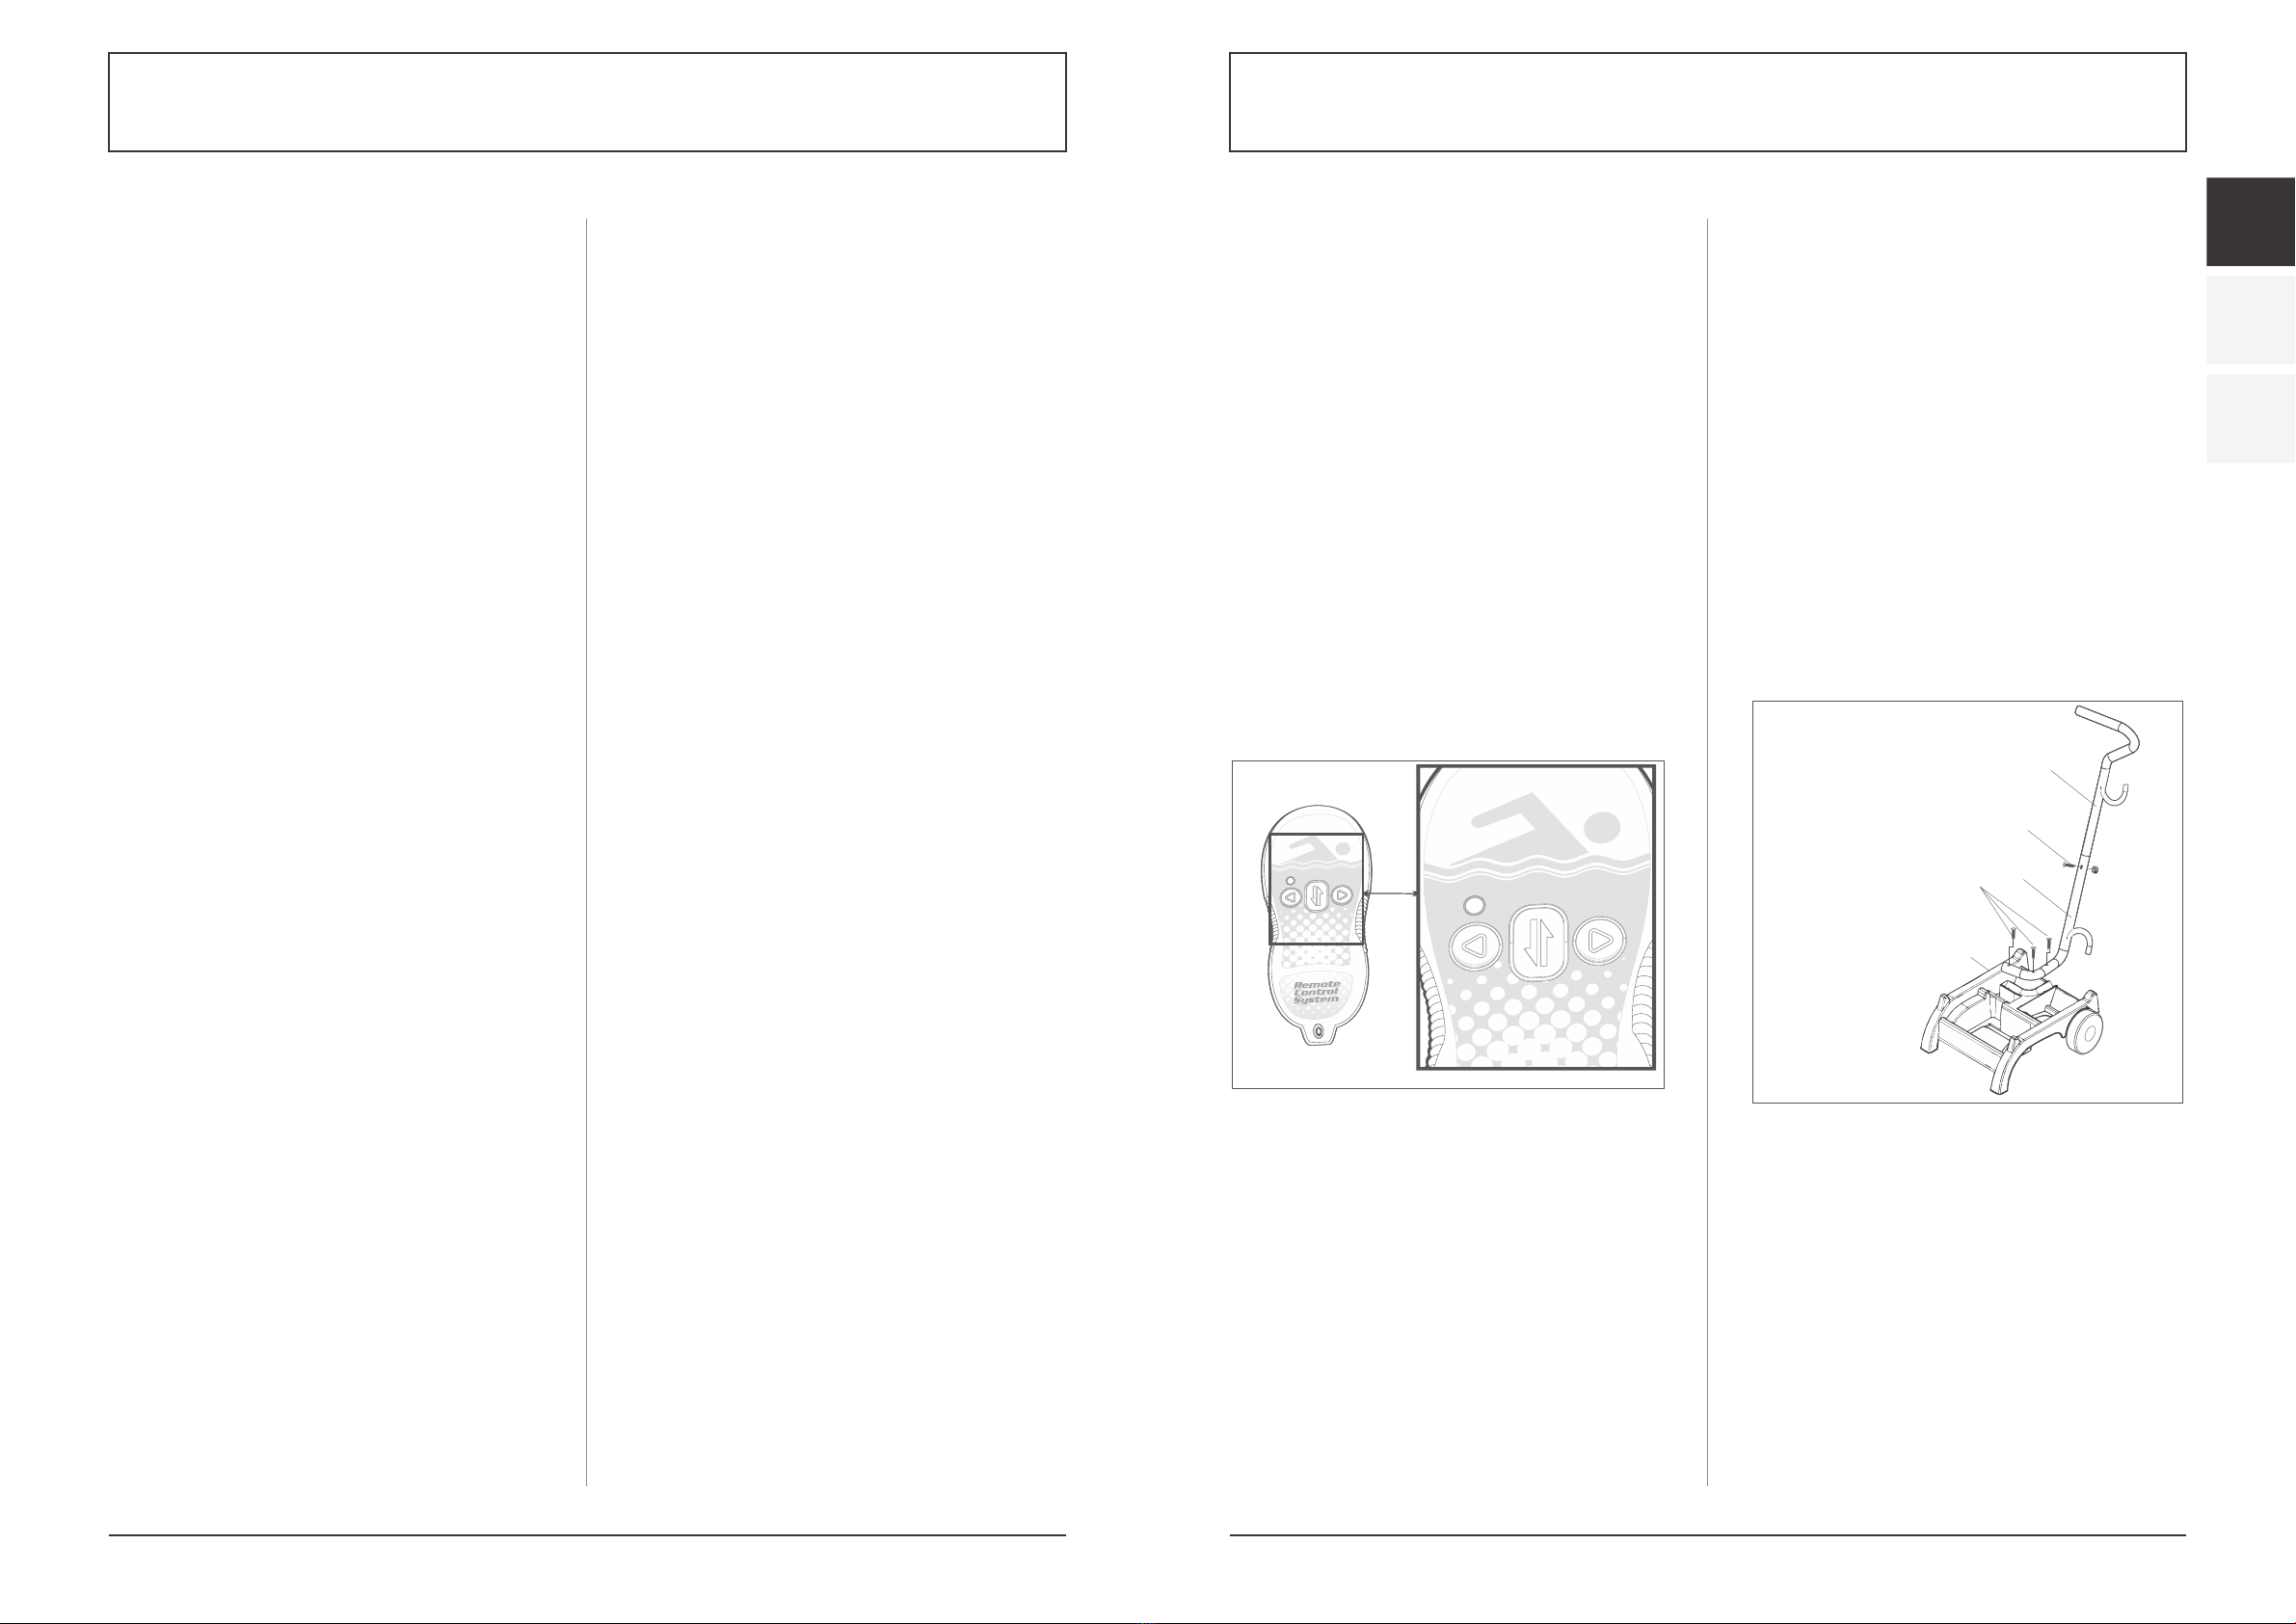
10.2. USING THE REMOTE CONTROL
1. Press the right button (3) to turn the robotic cleaner
right. The robotic cleaner continues turning to the
right until the button is released.
2. Press the left button (1) to turn the robotic cleaner
left. The robotic cleaner continues turning to the left
until the button is released.
3. Press the Forward/Reverse button (2) to stop the
robotic cleaner and change its direction of movement.
The remote control LED is lit after each command. If
the LED does not respond or
flashing, replace the battery.
11. CADDY (OPTIONAL)
11.1. OVERVIEW
The caddy is an optional accessory that makes it easy
to move the robotic cleaner, floating cable and the
power and control unit from place to place.
11.2. ASSEMBLING THE CADDY
To assemble the caddy, you need a standard
screwdriver and a 8 mm wrench.
Connecting the Caddy Handle
1. Fasten the handle bottom part (3) to the caddy
frame (5) with the three screws (4) and nuts.
2. Connect the handle top part (1) to the handle
bottom part (3) using screw (2) and nut.
11.3. LOADING THE ROBOTIC CLEANER ON THE
CADDY
1. Place the cleaner unit on the caddy base.
2. Coil the floating cable and place it on the cleaner
unit.
3. Place the power and control unit on top of the
floating cable coil.
Remote Control (optional) Caddy (optional)
The caddy is an optional accessory that makes it easy to move the robotic cleaner,
floating cable and the power and control unit from place to place.
Assembling the Caddy
To assemble the caddy, you need a standard screwdriver and a 8 mm wrench.
Connecting the Caddy Handle
1. Fasten the handle bottom part (3) to the caddy frame (5) with the three screws
(4) and nuts.
2. Connect the handle top part (1) to the handle bottom part (3) using screw (2)
and nut.
Loading the Robotic Cleaner on the Caddy
1. Place the cleaner unit on the caddy base.
2. Coil the floating cable and place it on the cleaner unit.
3. Place the power and control unit on top of the floating cable coil.
2
4
5
1. Handle (Top Part)
2. Handle Screws
3. Handle (Bottom Part)
4. Frame screws
5. Caddy Frame
This chapter reviews the operation of the optional remote control unit. The remote
control is included in some models.
Remote Control Overview
The remote control is an optional feature that enables controlling the robotic
cleaner via remote command buttons. When pressing the remote control buttons,
radio signal is transmitted to the power and control unit. This signal is transferred
into a command sent to the robotic cleaner via the floating cable.
Using the Remote Control
1. Press the right button (3) to turn the robotic cleaner right. The robotic cleaner
continues turning to the right until the button is released.
2. Press the left button (1) to turn the robotic cleaner left. The robotic cleaner
continues turning to the left until the button is released.
3. Press the Forward/Reverse button (2) to stop the robotic cleaner and change its
direction of movement.
The remote control LED is lit after each command. If the LED does not respond or
flashing, replace the battery.
1
3
14

18 19
Alterations which serve the technological progress as well as errors excepted! ORIGINAL MANUAL NORSUPWWW.NORSUP.EU Alterations which serve the technological progress as well as errors excepted!
ROBOTIC POOL CLEANER TYPE CYCLONEROBOTIC POOL CLEANER TYPE CYCLONE
12. TROLLY (OPTIONAL)
12.1. OVERVIEW
The trolly is an optional accessory that makes it easy
to move the robotic cleaner and provides a mounting
site for the power and control unit.
12.2 ASSEMBLING THE TROLLY:
1. Attach the wheels to both sides of the trolly base
and fasten each wheel with the screw and install
the cover.
2. Assemble the two sections of the handle.
3. Attach the power and control unit housing by
clicking the upper tabs into the holes in the
handle.
4. Insert the handle into the trolly base. Click the
lower tabs of the power and control unit housing
into the trolly base.
5. Attach the remote control holder by inserting the
upper part into the trolly handle and turning the
holder downward until the lower part clicks.
6. Attach the cable of the power supply
7. Place the power and control unit cable in the
groove in the trolly base.
8. Place the upper part of the power and control unit
in the housing and push the lower part downward
until it clicks into the trolly base.
Trolly (optional)
12 3
The trolly is an optional accessory that makes it easy to move the robotic
cleaner and provides a mounting site for the power and control unit.
To assemble the trolly:
1. Attach the wheels to both sides of the trolly base and fasten each
wheel with the screw and install the cover.
2. Assemble the two sections of the handle.
3. Attach the power and control unit housing by clicking the upper tabs
into the holes in the handle.
Assembly Diagram
Parts
15
56
78
4
4. Insert the handle into the trolly
base. Click the lower tabs of the
power and control unit housing
into the trolly base.
5. Attach the remote control holder
by inserting the upper part into
the trolly handle and turning the
holder downward until the lower
part clicks.
6. Attach the cable of the power
supply
7. Place the power and control unit
cable in the groove in the trolly
base.
8. Place the upper part of the
power and control unit in the
housing and push the lower part
downward until it clicks into the
trolly base.
Trolly (optional)
16
NOTES
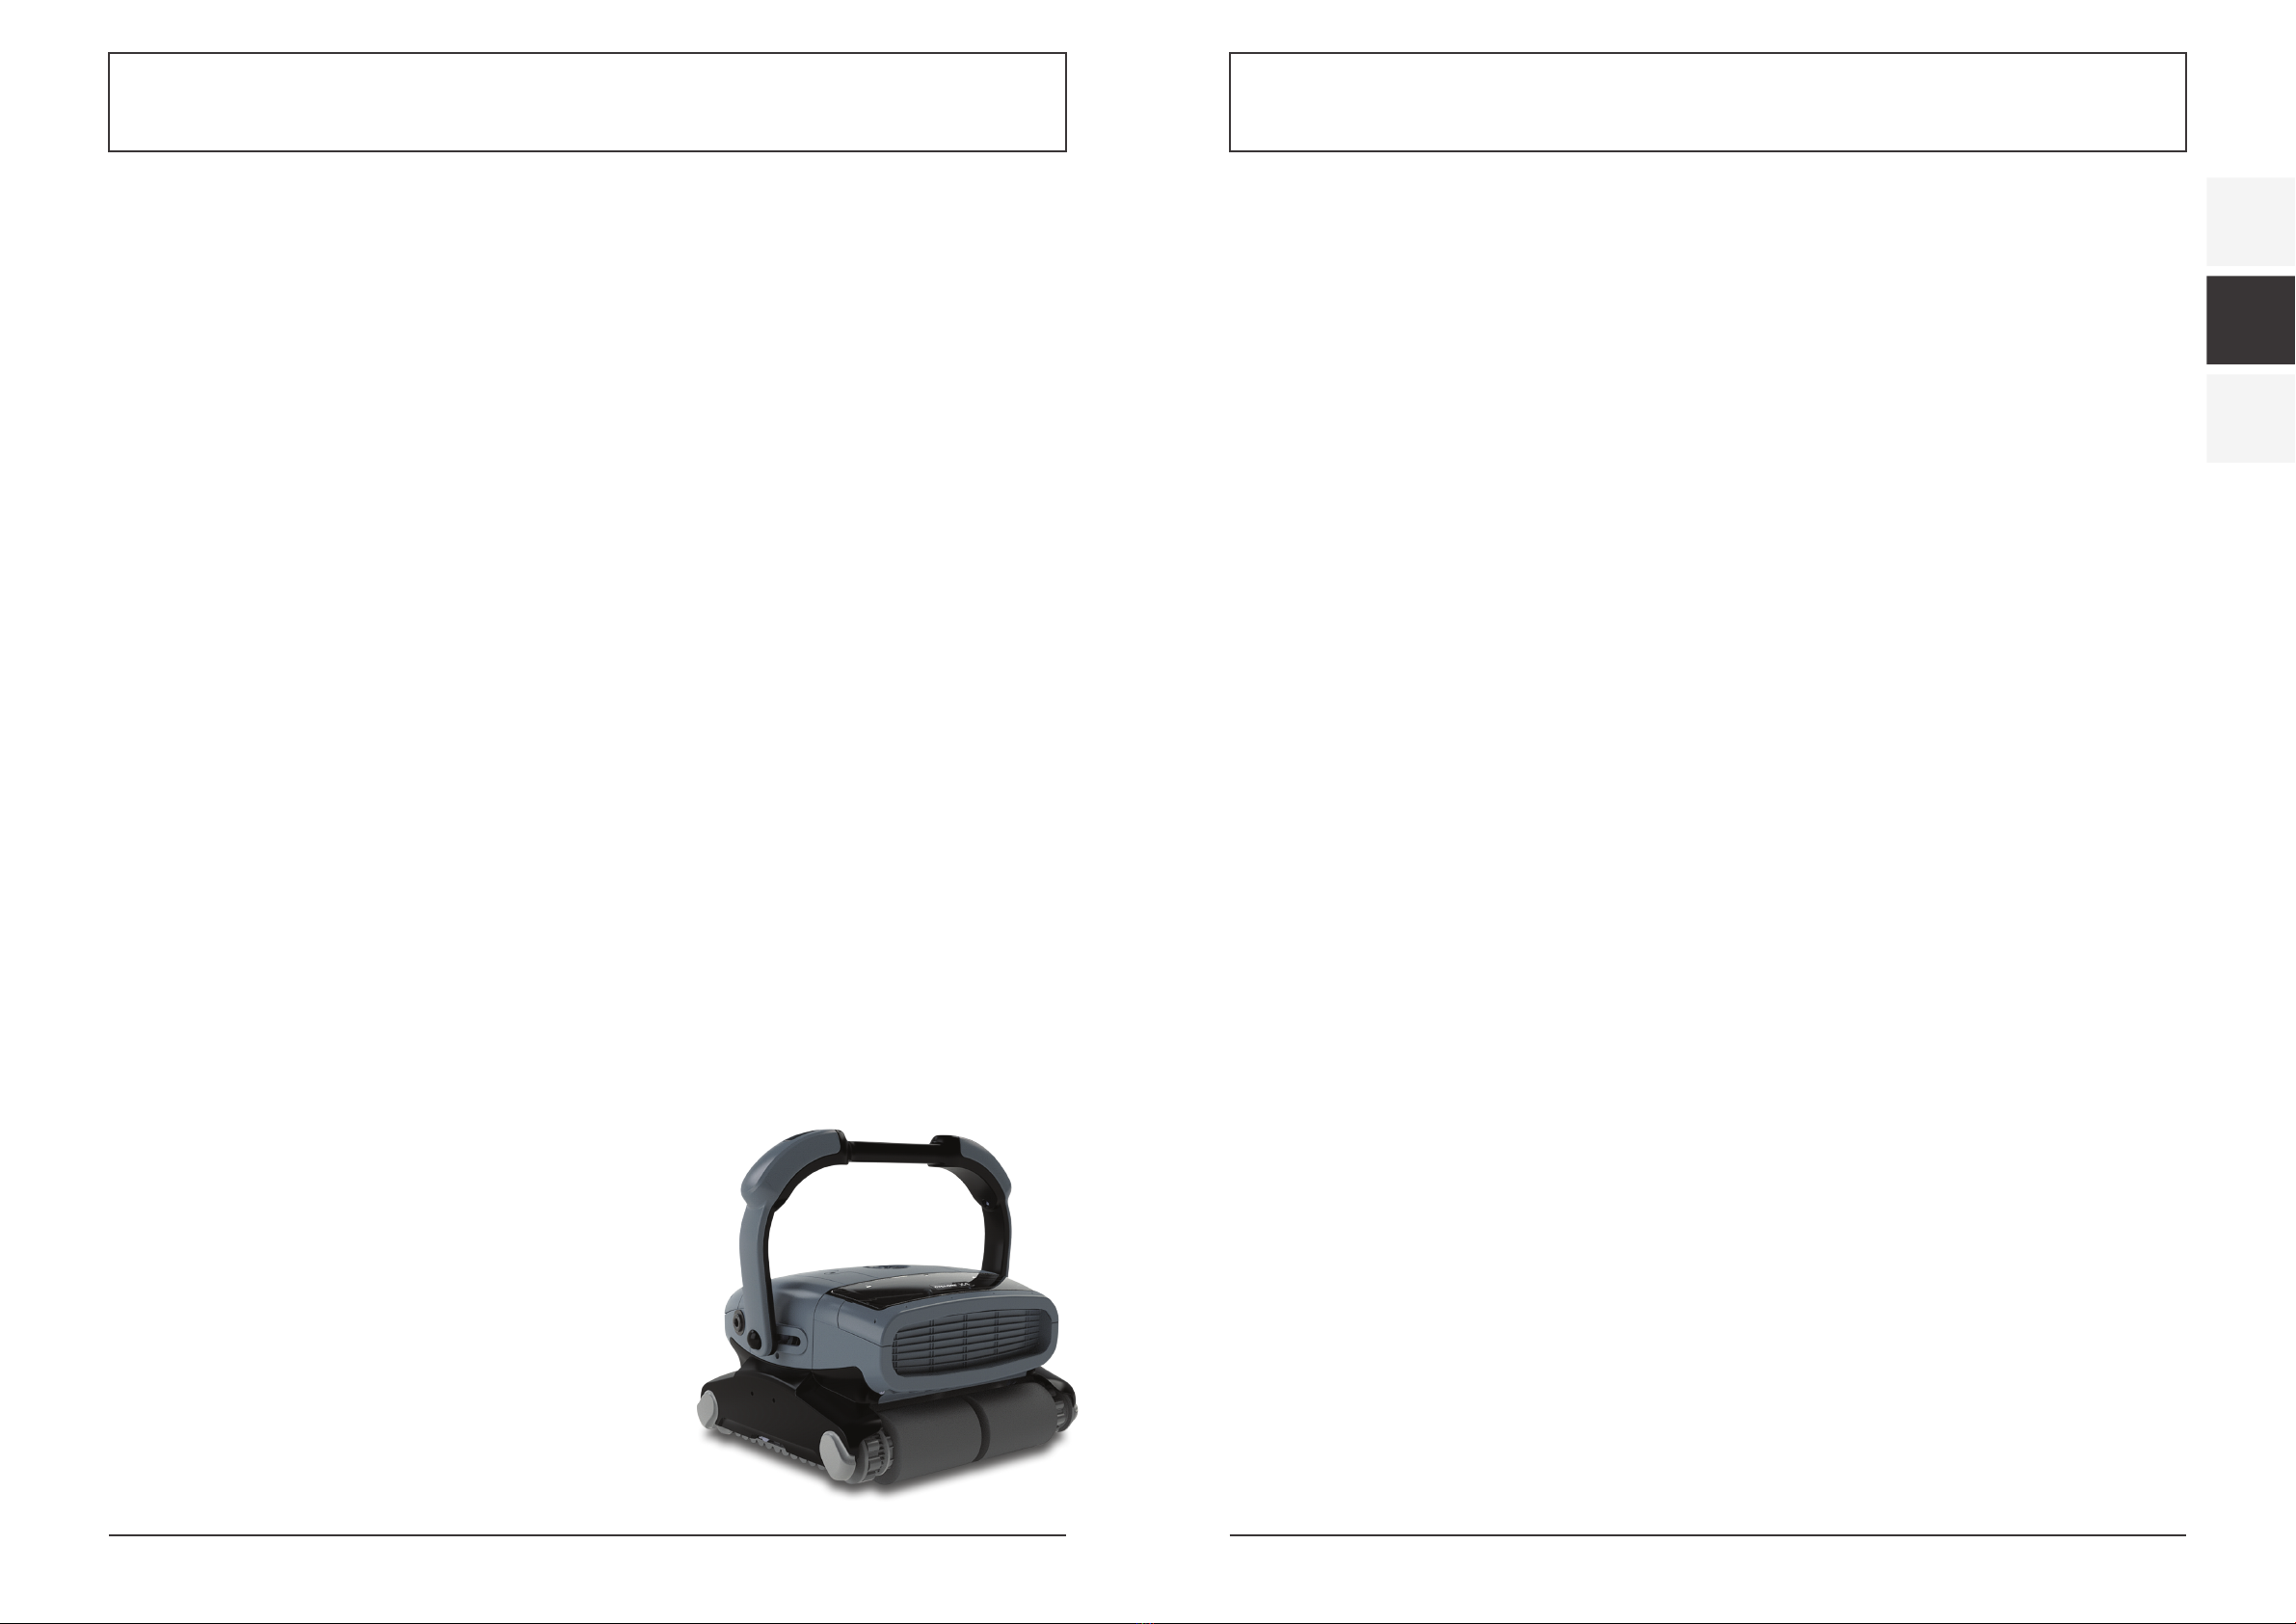
20 21
Änderungen, die dem technischen Fortschritt dienen, sowie Irrtümer vorbehalten! ORIGINALBETRIEBSANLEITUNG NORSUPWWW.NORSUP.EU Änderungen, die dem technischen Fortschritt dienen, sowie Irrtümer vorbehalten!
EN
FR
DE
AUTOMATISCHER SCHWIMMBECKENREINIGER ART CYCLONEAUTOMATISCHER SCHWIMMBECKENREINIGER ART CYCLONE AUTOMATISCHER SCHWIMMBECKENREINIGER ART CYCLONE
Fehler und technische Änderungen können
nur mit unserer schriftlichen Genehmigung
geändert, reproduziert oder elektronisch
vervielfältigt werden.
© NORSUP
Auflage: 11.2020
EINHALT
1. KURZANLEITUNG 22
2. SCHWIMMENDE SCHAUM INSTALLATION 22
3. WICHTIGE SICHERHEITSHINWEISE 23
4. EINFÜHRUNG 23
4.1 Systemübersicht 23
4.2 Wie der Robotische Reiniger Ihr Schwimmbecken reinigt 23
4.3 Betriebsbedingungen 24
5. KOMPONENTEN 24
5.1 Der robotische Reiniger 24
5.2 Strom- und Steuereinheit 24
6. BETRIEB 24
6.1 Vor der ersten Inbetriebnahme 24
6.2 Absetzen des Reinigers ins Wasser 25
6.3 Inbetriebnahme des robotischen Reinigers 26
6.4 Reinigungszyklus 26
6.5 Den Betrieb des robotischen Reinigers anhalten 26
6.6 Den Reiniger aus dem Wasser ziehen 26
7. WARTUNG 27
7.1 Reinigung der Filter 27
7.2 Lagerung des robotischen Reinigers 27
7.3 Überprüfen des Wasserauslass-Propellers 27
8. PROGRAMMIEROPTIONEN 28
8.1 Steuerkonsole 28
8.2 Einblendungstasten 30
8.3 Verwendung eines externen Timers 31
9. FEHLERBESEITIGUNG 31
10. FERNBEDIENUNG 33
10.1 Übersicht Fernbedienung 33
10.2 Verwendung der Fernbedienung 33
11. TRANSPORTBEHÄLTER (OPTIONAL) 33
11.1 Overview 33
11.2 Montage des Transportbehälters 33
11.3 Laden des robotischen Reinigers auf den Transportbehälter 33
12. TRANSPORTWAGEN (OPTIONAL) 34
12.1 Overview 34
12.2 Montage des Transportwagens 34
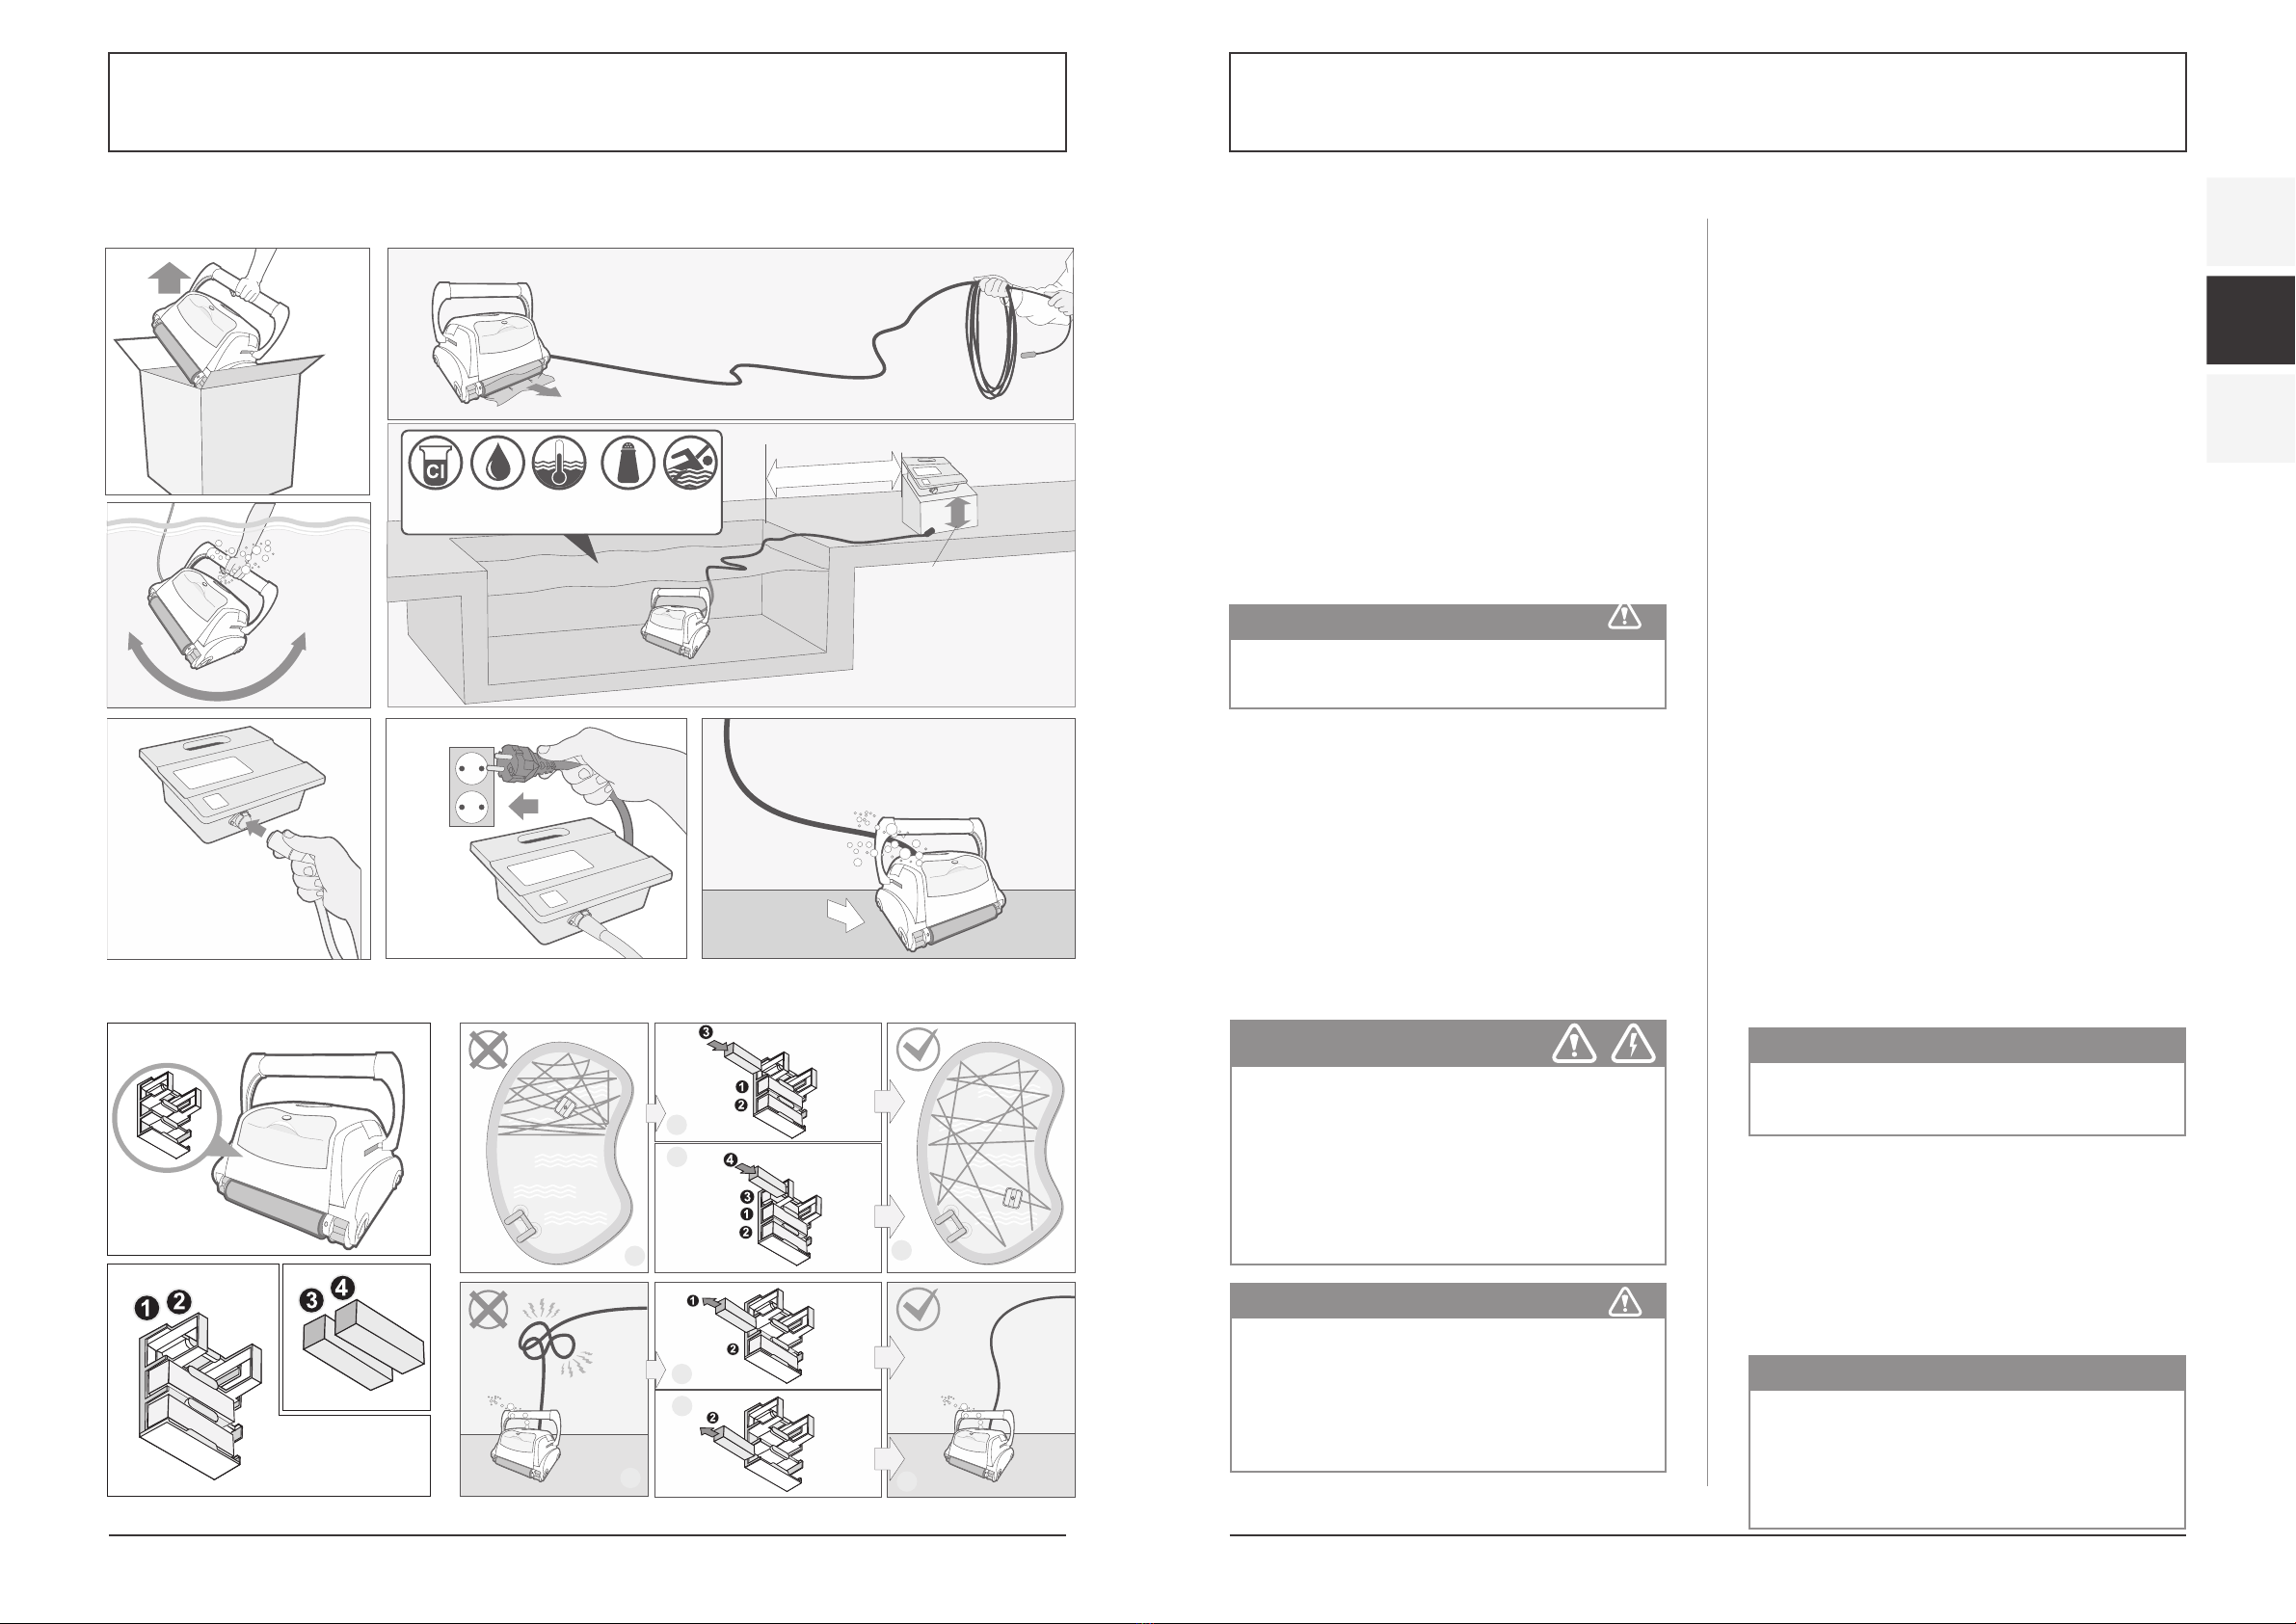
22 23
Änderungen, die dem technischen Fortschritt dienen, sowie Irrtümer vorbehalten! ORIGINALBETRIEBSANLEITUNG NORSUPWWW.NORSUP.EU Änderungen, die dem technischen Fortschritt dienen, sowie Irrtümer vorbehalten!
EN
FR
DE
AUTOMATISCHER SCHWIMMBECKENREINIGER ART CYCLONEAUTOMATISCHER SCHWIMMBECKENREINIGER ART CYCLONE
3. WICHTIGE SICHERHEITSHINWEISE
BITTE LESEN UND BEFOLGEN SIE ALLE ANWEISUNGEN
ACHTUNG: Schließen Sie die Stromversorgung nicht an
eine geerdete Steckdose an oder schalten Sie nicht den
Schwimmbeckenreiniger auf “ON (AN)”, wenn er nicht
vollständig im Wasser eingetaucht ist. Das Betätigen
des Reinigers außerhalb des Wassers führt sofort zu
ernsthaften Schäden und zum Verlust der Garantie.
Belassen Sie den Reiniger im Schwimmbecken zwischen
15 und 20 Minuten bis zum Ende seines Reinigungszy-
klus. Dadurch werden die Motoren ausreichend gekühlt.
Belassen Sie den Reiniger aber nicht die ganze Zeit im
Schwimmbecken. Denken Sie immer daran, die
Stromversorgung auf “OFF (AUS)” zu schalten and den
Stromanschluss aus der Netzsteckdose zu ziehen, bevor
Sie den Reiniger aus dem Schwimmbecken entfernen.
Sicherheitshinweis
- Das Gerät muss mit einem Fehlerstromschutz-
schalter (RCD) ausgestattet sein, der einen restlichen
Nennbetriebsstrom von 30 mA nicht überschreitet.
- Der Anschluss zum Abzweigstromkreis sollte mit
den örtlichen und nationalen Verdrahtungs-
vorschriften (Sicherheitsstandard für Elektro-
installationen) übereinstimmen.
- Falsche Bedienung des Gerätes kann zum Auslaufen
von Schmiermitteln führen.
- Sollte das Netzkabel beschädigt sein, muss es von
einem Wartungsservice des Herstellers oder einer
qualifiziert-ausgebildeten Person ersetzt werden,
um Gefahren zu vermeiden.
Erdung
Das Netzteil muss an eine geerdete 3-adrige Steck-
dose angeschlossen werden. Der Netzanschluss muss
an einem GFCI/RCD (FI-Schutzschalter) angeschlossen
sein, der einen bestimmten Differenzstrom von nicht
mehr als 30 mA überschreitet.
Sicherung
Die Sicherung sollte nur von einem autorisierten
Kundendienstmitarbeiter oder einem qualifizierten
Techniker ersetzt werden. Ersetzen Sie die Sicherung
nur mit demselben Typ und derselben Absicherung für
den fortlaufenden Schutz gegen Brandgefahr.
Wartung und Sicherheit
Die Abdeckung sollte nur von einem autorisierten
Kundendienstmitarbeiter oder einem qualifizierten
Techniker entfernt werden. Kein(e) interne Einstellung
oder Komponentenaustausch sollte vom Benutzer durch-
geführt werden. Das Netzkabel muss vor dem Entfernen
der Abdeckung von der Steckdose getrennt werden.
Wenn das Netzanschlusskabel beschädigt ist, muss es
durch einen autorisierten Kundendienst-mitarbeiter
oder qualifizierten Techniker ersetzt werden. Bedienen
Sie das Gerät nicht, wenn das Kabel beschädigt ist.
Äußere Bedingungen
Das Netzteil wird so konzipiert, um im Innen- und
Außenbereich zu funktionieren. Jedoch sollte die
Einheit keinem direkten Sonnenlicht oder Wasser
ausgesetzt sein und in keiner Umgebungstemperatur
von über 40º C bedient werden.
4. EINFÜHRUNG
4.1 SYSTEMÜBERSICHT
Der robotische Reiniger säubert den Boden und die
Wände des Schwimmbeckens, um Schmutz und
Verunreinigung in seinen internenFiltern zu sammeln.
Diese Bedienungsanleitung erklärt, wie man den
robotischen Reiniger einschließlich Reinigung,
Wartung und Lagerung bedient.
4.2 Wie der Robotische Reiniger Ihr Schwimmbecken
reinigt
Nachdem der robotische Reiniger im Schwimmbecken
platziert und aktiviert wurde, arbeitet er das Programm
ab, das auf der Strom- und Steuereinheit eingestellt
wurde. Der robotische Reiniger bewegt sich entlang des
Bodens und der Wände des Schwimmbeckens, um den
vollständigen Bereich abzudecken. Wenn der robotische
Reiniger sein Programm beendet hat, verbleibt er inaktiv
auf dem Schwimmbeckenboden.
1. KURZANLEITUNG
VORSICHT:
Verwenden Sie Ihren Reiniger nur für
Schwimmbecken und verwenden Sie ihn nicht,
während sich Menschen im Wasser befinden.
HINWEIS
Diese Anleitung bespricht mehrere Modelle von robo-
tischen Reinigern. Einige Variationen von Komponenten
sind gemäß dem spezifischen Modell vorhanden.
HINWEIS
Das Wändeklettern ist eine optionale Funktion. Ist die
Wändekletter- Funktion aktiviert,steigt der robotische
Reiniger in Intervallen die Wand hoch, die durch sein
internes Programm festgelegt wurden. Die Fähigkeit des
Reinigers im Schwimmbecken über Stufen zu klettern,
hängt von der Stufengeometrie und dem Material ab.
VORSICHT
Ein Erdschlussstromunterbrecher (GFCI-USA) oder
ein Fehlerstromschutzschalter (RCD-EUROPE) muss
installiert werden, um Ihre Steckdose zu schützen
und mögliche Stromschläge zu verhindern.
BEWAHREN SIE DIESE ANWEISUNGEN
Der Umgang mit diesem Elektrogerät ist für
Personen (einschließlich Kinder) mit körperlichen,
sensorischen oder geistigen Einschränkungen,
oder mit mangelnden Erfahrungen und Kennt-
nissen nicht geeignet, außer wenn sie beim Umgang
mit dem Gerät von einer für ihre Sicherheit verant-
wortlichen Person beaufsichtigt und angeleitet
werden. Kinder sollten beaufsichtigt werden, um
das Spielen mit dem Elektrogerät zu verhindern.
12 cm
(4.7 inch)
1
Quick start guide
Guide de démarrage rapide
Kurzanleitung
Manuale di avvio rapido
Guía de inicio rápido
Guia de início rápido
2
4
5
6 7
3
Chlorine
2-4 ppm
pH
7.2-7.6
Temp
13°C-35°C
55°F-95°F
NaCl
4000 ppm
(max)
NO
SWIM
3.6m/11.8ft
12 cm
(4.7 inch)
1
Quick start guide
Guide de démarrage rapide
Kurzanleitung
Manuale di avvio rapido
Guía de inicio rápido
Guia de início rápido
2
4
5 6 7
3
Chlorine
2-4 ppm
pH
7.2-7.6
Temp
13°C-35°C
55°F-95°F
NaCl
4000 ppm
(max)
NO
SWIM
3.6m/11.8ft
B2
B3
A2
A3
A4
B4
A1
Float installation
L’installation de flotteurs
Schwimmende Schaum Installation
Instalación de flotador
Instalação de flutuar
Installazione di flottante
B1
B2
B3
A2
A3
A4
B4
A1
Float installation
L’installation de flotteurs
Schwimmende Schaum Installation
Instalación de flotador
Instalação de flutuar
Installazione di flottante
B1
B2
B3
A2
A3
A4
B4
A1
Float installation
L’installation de flotteurs
Schwimmende Schaum Installation
Instalación de flotador
Instalação de flutuar
Installazione di flottante
B1
B2
B3
A2
A3
A4
B4
A1
Float installation
L’installation de flotteurs
Schwimmende Schaum Installation
Instalación de flotador
Instalação de flutuar
Installazione di flottante
B1
2. SCHWIMMENDE SCHAUM INSTALLATION

24 25
Änderungen, die dem technischen Fortschritt dienen, sowie Irrtümer vorbehalten! ORIGINALBETRIEBSANLEITUNG NORSUPWWW.NORSUP.EU Änderungen, die dem technischen Fortschritt dienen, sowie Irrtümer vorbehalten!
EN
FR
DE
AUTOMATISCHER SCHWIMMBECKENREINIGER ART CYCLONEAUTOMATISCHER SCHWIMMBECKENREINIGER ART CYCLONE
Einstellung des Gleitgriffs
Einstellung des Gleitgriffs bei Modellen mit
Wändekletterfunktion:
1. Drücken Sie die Verriegelungstaste (1 oder 2 gemäß
Modell), um den Verriegelungsgriff zu lösen.
2. Platzieren Sie den Griff (3) diagonal an der
maximalen Position.
3. Wiederholen Sie die Schritte 1 und 2 auf der
anderen Seite des Reinigers.
Entfernen der
Bürstenabdeckungen
Der robotische Reiniger wird
mit einer Schutzabdeckung
auf den Reinigungsbürsten
versendet. Entfernen Sie
vorsichtig die Nylonhüllen von
den Reinigungsbürsten.
Platzierung der Strom- und Steuereinheit
4. Platzieren Sie die Strom- und Steuereinheit mindestens
3,6 Meter/11,8 Fuß vom Schwimmbecken und
mindestens 12 cm/4 Zoll über der Oberfläche.
5. Lösen Sie das Schwimmkabel vom den Plastikbändern,
die die Kabel während des Versandes sichern, indem
Sie die Plastikschnapper auf den Bändern drücken.
Bevor Sie den Reiniger ins Wasser lassen:
1. Achten Sie darauf, dass sich keine Personen im
Schwimmbecken befinden.
2. Achten Sie darauf, dass die Filter sauber sind.
3. Achten Sie auf die Einhaltung der Bedingungen für
Schwimmbecken; (siehe “Betriebsbedingungen” ).
6.2. ABSETZEN DES REINIGERS INS WASSER
1. Rollen Sie das Schwimmkabel ab. Es wird empfohlen,
die Kabellänge zu verlängern, damit sie der
Schwimmbeckendiagonale plus 2 Meter entspricht.
2. Setzen Sie den Reiniger im Schwimmbecken ab.
3. Lassen Sie den Reiniger auf den Grund des
Schwimmbeckens sinken. Fangen Sie nicht mit
dem Betrieb an, bevor sich der robotische Reiniger
auf den Schwimmbeckenboden abgesetzt hat.
4. Verteilen Sie das Schwimmkabel über das
Schwimmbecken. Achten Sie darauf, dass nur die
erforderliche Kabellänge über das Schwimmbecken
verteilt wird. Glätten Sie Windungen oder
Verdrehungen im Kabel. Rollen Sie Extrakabel
außerhalb des Schwimmbeckens in der Nähe von
der Strom- und Steuereinheit auf.
5. Verbinden Sie das Schwimmkabel (A) mit der
Anschlussbuchse (B) auf der Strom- und
Steuereinheit.
4.3 Betriebsbedingungen
Der robotische Reiniger ist ausschließlich für den
Einsatz in Schwimmbecken unter folgenden
Bedingungen geeignet:
- Temperaturen von 13 °C - 35 °C (55 °F - 95 °F), emp-
fohlene Temperatur zwischen 22 °C - 32 °C (72 °F - 90 °F).
- Wasser pH : 7,2 - 7,6
- Chlorgehalt: das Schwimmbecken wird entspre-
chend der Herstellerangaben instandgehalten.
5. KOMPONENTEN
5.1. DER ROBOTISCHE REINIGER
1. Griff
2. Auslassdeckel
3. Entriegelung für den Filter
4. Oberer Zugang zum Filter
5. Verriegelungsmecha-
nismus des Griffs
6. Antriebsführung
7. Reinigungsbürste
8. Gerätegehäuse
9. Saugöffnung
10.Netzteil
Optional
11. Fernbedienungr
12.Transportbehälter
13.Transportwagen
14.ExternerTimer (separat verkauft)
5.2. STROM- UND STEUEREINHEIT
Die Strom- und Steuereinheit ist mit dem robotischen
Reiniger durch ein Schwimmkabel verbunden. DasGerät
wird mit Wechselstrom (1) gespeist und versorgt den
Reiniger mit Niederspannung und Befehlen aus der
Steckdose (2). Es besitzt eine Steuerkonsole (3) mit
verschiedenen Steuerfunktionen, um den
robotischen Reiniger zu bedienen.
Inhalt der Verpackung
Der robotische Reiniger befindet sich in einer Verpa-
ckung mit folgendem Inhalt:
- Robotischer Reiniger und Schwimmkabel
- Strom- und Steuereinheit
- Bedienungsanleitung
Gemäß dem gekauften Modell können folgende Zu-
behörteile im Paket enthalten sein:
- Fernbedienung
- Transportbehälter
- Transportwagen
- Weiteres Zubehör
6. BETRIEB
6.1. VOR DER ERSTEN INBETRIEBNAHME
Einstellung der Saughöhe: Die Positionierung der
Saugöffnung (2) nahe der Schwimmbecken-Ober-
fläche erhöht die Saugleistung und die Reinigungs-
qualität. Das Senken der Saugöffnung könnte zur
Interferenz mit Hindernissen auf dem Boden oder
den Wänden des Schwimmbeckens führen.
Verwenden Sie einen Schraubenzieher, um den Ein-
stellknopf der Saugöffnung (1) zu justieren.
- IN – bewegt die Saugöffnung von der Schwimmbe-
cken-Oberfläche weg und vermindert die Saugleistung.
- OUT – bewegt die Saugöffnung näher zur Schwimm-
becken-Oberfläche und erhöht die Saugleistung.
HINWEIS
Werden diese empfohlenen Betriebsbedingungen
für das Schwimmbecken nicht eingehalten,
könnte der robotische Reiniger nicht richtig
funktionieren.
112
2
4
3
4
3
5
System Overview
The robotic cleaner sweeps the pool floor and walls to collect dirt and debris
into its internal filters. This user manual explains how to operate the robotic
cleaner, including cleaning, maintenance and storage procedures.
Note:
This manual reviews several robotic cleaner models. There are some
variations in components according to specific model.
How the Robotic Cleaner Cleans Your Pool
After the robotic cleaner is placed in the pool and activated, it operates
according to the program set via the power and control unit. The robotic cleaner
moves along the floor and walls of the pool, covering the entire area of the pool
floor and walls. When the robotic cleaner has finished its program, it remains
inactive on the pool floor.
Note:
Wall climbing is an optional feature. When the wall climbing feature is enabled,
the robotic cleaner climbs the wall at intervals according to its internal program.
The robotic cleaner ability to climb over stairs in swimming pool is subject to
stair geometry and material.
Operating Conditions
The robotic cleaner is intended for use in swimming pools in the following
conditions:
- Temperatures ranging from 13°C-35°C (55°F-95°F), recommended
temperature is between 22°C-32°C (72°F-90°F).
- Water pH : 7.2 - 7.6
- Chlorine level: pool is maintained according to the pool manufacturer’s
instructions. (recommended 2-4 ppm)
Note:
Failure to maintain the pool according to the recommended operating
conditions could prevent the robotic cleaner from functioning properly.
Remove the cleaner out of water when performing "Chemical Shock
Treatment" to the pool water.
1) Handle
2) Outlet Top
3) Filter Lock Release
4) Filter Top Access
5) Handle Lock Mechanism
6) Drive Track
7) Scrubbing Brush
8) Unit Body
9) Water Inlet
10) Power Supply
OPTIONAL
11) Remote Control
12) “Trolley” Cart
13) “Caddy” Cart
14) Timer (purchased separately)
Optional
Components Introduction
14 13
12
11
10
9
876
6
7
8
4
Power and Control Unit
The power and control unit is
connected to the robotic
cleaner via the floating cable.
The unit is powered by AC
power (1) and supplies low
voltage and commands to the
cleaner unit through the outlet
socket (2).
The unit features a control
panel (3) with various controls
to operate the robotic cleaner.
Contents of Packing Box
The robotic cleaner is packed in a box containing:
- Robotic cleaner and floating cable
- Power and control unit
- User manual
According to the model purchased, the following accessories may be included
in the package:
- Remote Control
- Caddy
- Trolley
- Additional Accessories
Adjusting Floating Handle
On wall climbing models, set the floating handle:
1. Press the lock button (1 or 2 according to the model) to release the handle
lock.
2. Place the handle (3) diagonally at maximum position.
3. Repeat steps 1 and 2 on the other side of the cleaner unit.
Before First Use
Adjusting Suction Height: Positioning the suction inlet (2) close to the pool
surface increases the suction power and the cleaning quality. Lowering the
suction inlet could result in interference with obstacles on the swimming
pool floor or walls.
Use a screw driver to adjust the suction inlet position knob (1).
- IN – pulls the suction inlet away from the pool surface and reduces the
suction power.
- OUT – brings the suction inlet closer to the pool surface and increases the
suction power.
2 31 Handle lock vertical Handle lock horizontal
1
2
1
2
3
Components Operation
5
Strom- und Steuereinheit
Die Strom- und Steuereinheit
ist mit dem robotischen
Reiniger durch ein
Schwimmkabel verbunden.
DasGerät wird mit
Wechselstrom (1) gespeist
und versorgt den Reiniger mit
Niederspannung und Befehlen
aus der Steckdose (2).
Inhalt der Verpackung
Der robotische Reiniger befindet sich in einer Verpackung mit folgendem
Inhalt:
- Robotischer Reiniger und Schwimmkabel
- Strom- und Steuereinheit
- Bedienungsanleitung
Gemäß dem gekauften Modell können folgende Zubehörteile im Paket
enthalten sein:
- Fernbedienung
- Transportbehälter
- Transportwagen
- Weiteres Zubehör
Einstellung des Gleitgriffs
Einstellung des Gleitgriffs bei Modellen mit Wändekletterfunktion:
1. Drücken Sie die Verriegelungstaste (1 oder 2 gemäß Modell), um den
Verriegelungsgriff zu lösen.
2. Platzieren Sie den Griff (3) diagonal an der maximalen Position.
3. Wiederholen Sie die Schritte 1 und 2 auf der anderen Seite des Reinigers.
Vor der ersten Inbetriebnahme
Einstellung der Saughöhe: Die Positionierung der Saugöffnung (2) nahe der
Schwimmbecken-Oberfläche erhöht die Saugleistung und die
Reinigungsqualität. Das Senken der Saugöffnung könnte zur Interferenz mit
Hindernissen auf dem Boden oder den Wänden des Schwimmbeckens führen.
Verwenden Sie einen Schraubenzieher, um den Einstellknopf der Saugöffnung
(1) zu justieren.
- IN – bewegt die Saugöffnung von der Schwimmbecken-Oberfläche weg und
vermindert die Saugleistung.
- OUT – bewegt die Saugöffnung näher zur Schwimmbecken-Oberfläche und
erhöht die Saugleistung.
2 31
Komponenten Betrieb
Es besitzt eine Steuerkonsole (3) mit verschiedenen Steuerfunktionen, um
den robotischen Reiniger zu bedienen.
Senkrechte Handsperre Waagrechte Handsperre
47
1
2
1
2
3
Platzierung der Strom- und Steuereinheit
4. Platzieren Sie die Strom- und Steuereinheit mindestens 3,6
Meter/11,8 Fuß vom Schwimmbecken und mindestens 12 cm/4
Zoll über der Oberfläche.
VORSICHTSMASSNAHMEN: Die Strom- und Steuereinheit
sollte keinem direkten Sonnenlicht oder Wasser ausgesetzt sein
5. Lösen Sie das Schwimmkabel vom den Plastikbändern, die die
Kabel während des Versandes sichern, indem Sie die
Plastikschnapper auf den Bändern drücken.
Bevor Sie den Reiniger ins Wasser lassen:
1. Achten Sie darauf, dass sich keine Personen im Schwimmbecken
befinden.
2. Achten Sie darauf, dass die Filter sauber sind.
3. Achten Sie auf die Einhaltung der Bedingungen für
Schwimmbecken; (siehe “Betriebsbedingungen” ).
Absetzen des Reinigers ins Wasser
1. Rollen Sie das Schwimmkabel ab. Es wird empfohlen, die
Kabellänge zu verlängern, damit sie der
Schwimmbeckendiagonale plus 2 Meter entspricht.
2. Setzen Sie den Reiniger im Schwimmbecken ab.
3. Lassen Sie den Reiniger auf den Grund des Schwimmbeckens
sinken. Fangen Sie nicht mit dem Betrieb an, bevor sich der
robotische Reiniger auf den Schwimmbeckenboden abgesetzt
hat.
4. Verteilen Sie das Schwimmkabel über das Schwimmbecken.
Achten Sie darauf, dass nur die erforderliche Kabellänge über
das Schwimmbecken verteilt wird. Glätten Sie Windungen oder
Verdrehungen im Kabel. Rollen Sie Extrakabel außerhalb des
Schwimmbeckens in der Nähe von der Strom- und Steuereinheit
auf.
5. Verbinden Sie das Schwimmkabel (A) mit der Anschlussbuchse
(B) auf der Strom- und Steuereinheit.
VORSICHTSMASSNAHMEN: Das Betätigen des Roboters
außerhalb des Wassers führt sofort zu ernsthaften Schäden und
zum Verlust der Garantie.
12 cm
(4.7 inch)
Betrieb
Entfernen der Bürstenabdeckungen
Der robotische Reiniger wird mit einer
Schutzabdeckung auf den Reinigungsbürsten
versendet. Entfernen Sie vorsichtig die
Nylonhüllen von den Reinigungsbürsten.
VORSICHTSMASSNAHMEN: Verwenden Sie
keine scharfen Werkzeuge, um die Abdeckung
zu entfernen, da sonst die Bürsten beschädigt
werden könnten.
Chlorine
2-4 ppm
pH
7.2-7.6
Temp
13°C-35°C
55°F-95°F
NaCl
4000 ppm
(max)
NO
SWIM
3.6m/11.8ft
Socket (B)
Stecker des Kabels (A)
48
Placing the Power and Control Unit
4. Place the power and control unit at least 3.6 meters/11.8 feet from
the pool and at least 12 cm/4 inches above the surface.
CAUTION: The power and control unit must not be exposed to
water or to direct sunlight.
5. Release floating cable plastic ties, which are used to secure the
cables during shipping, by pressing plastic snap on the tie.
Before placing the cleaner unit in the water
1. Make sure there are no people in the pool.
2. Make sure that the filters are clean.
3. Make sure the pool conditions are met; (see “Operating
Conditions” ).
Placing Cleaner Unit into the Water
1. Unroll the floating cable. It is recommended to extend a length of
cable that is equal to the pool diagonal size plus an additional two
meters.
2. Place the cleaner unit in the pool.
3. Let the robotic cleaner sink to the bottom of the pool.
Do not start operation before the robotic cleaner is settled on the
pool floor.
4. Spread the floating cable across the pool. Make sure that only the
required length of cable is spread across the pool. Smooth out
coils or twists in the cable. Roll extra cable outside the pool near
the power and control unit.
5. Connect the floating cable (A) to the socket (B) located on the
power and control unit.
CAUTION: Operating the cleaner out of water causes
immediate severe damage and results in loss of warranty.
12 cm
(4.7 inch)
Operation
Removing Brush Covers
The robotic cleaner is shipped with a protective
cover over the scrubbing brushes. Carefully
remove the nylon covers from the scrubbing
brushes.
CAUTION: Do not use a sharp tool to remove
the cover as it could harm the brushes.
Chlorine
2-4 ppm
pH
7.2-7.6
Temp
13°C-35°C
55°F-95°F
NaCl
4000 ppm
(max)
NO
SWIM
Socket (B)
Cable plug (A)
3.6m/11.8ft
6
VORSICHTS MASSNAHMEN
Verwenden Sie keine scharfen Werkzeuge, um die
Abdeckung zu entfernen, da sonst die Bürsten
beschädigt werden könnten.
VORSICHTS MASSNAHMEN
Das Betätigen des Roboters außerhalb des Wassers
führt sofort zu ernsthaften Schäden und zum Verlust
der Garantie.
VORSICHTS MASSNAHMEN
Die Strom- und Steuereinheit sollte keinem direkten
Sonnenlicht oder Wasser ausgesetzt sein
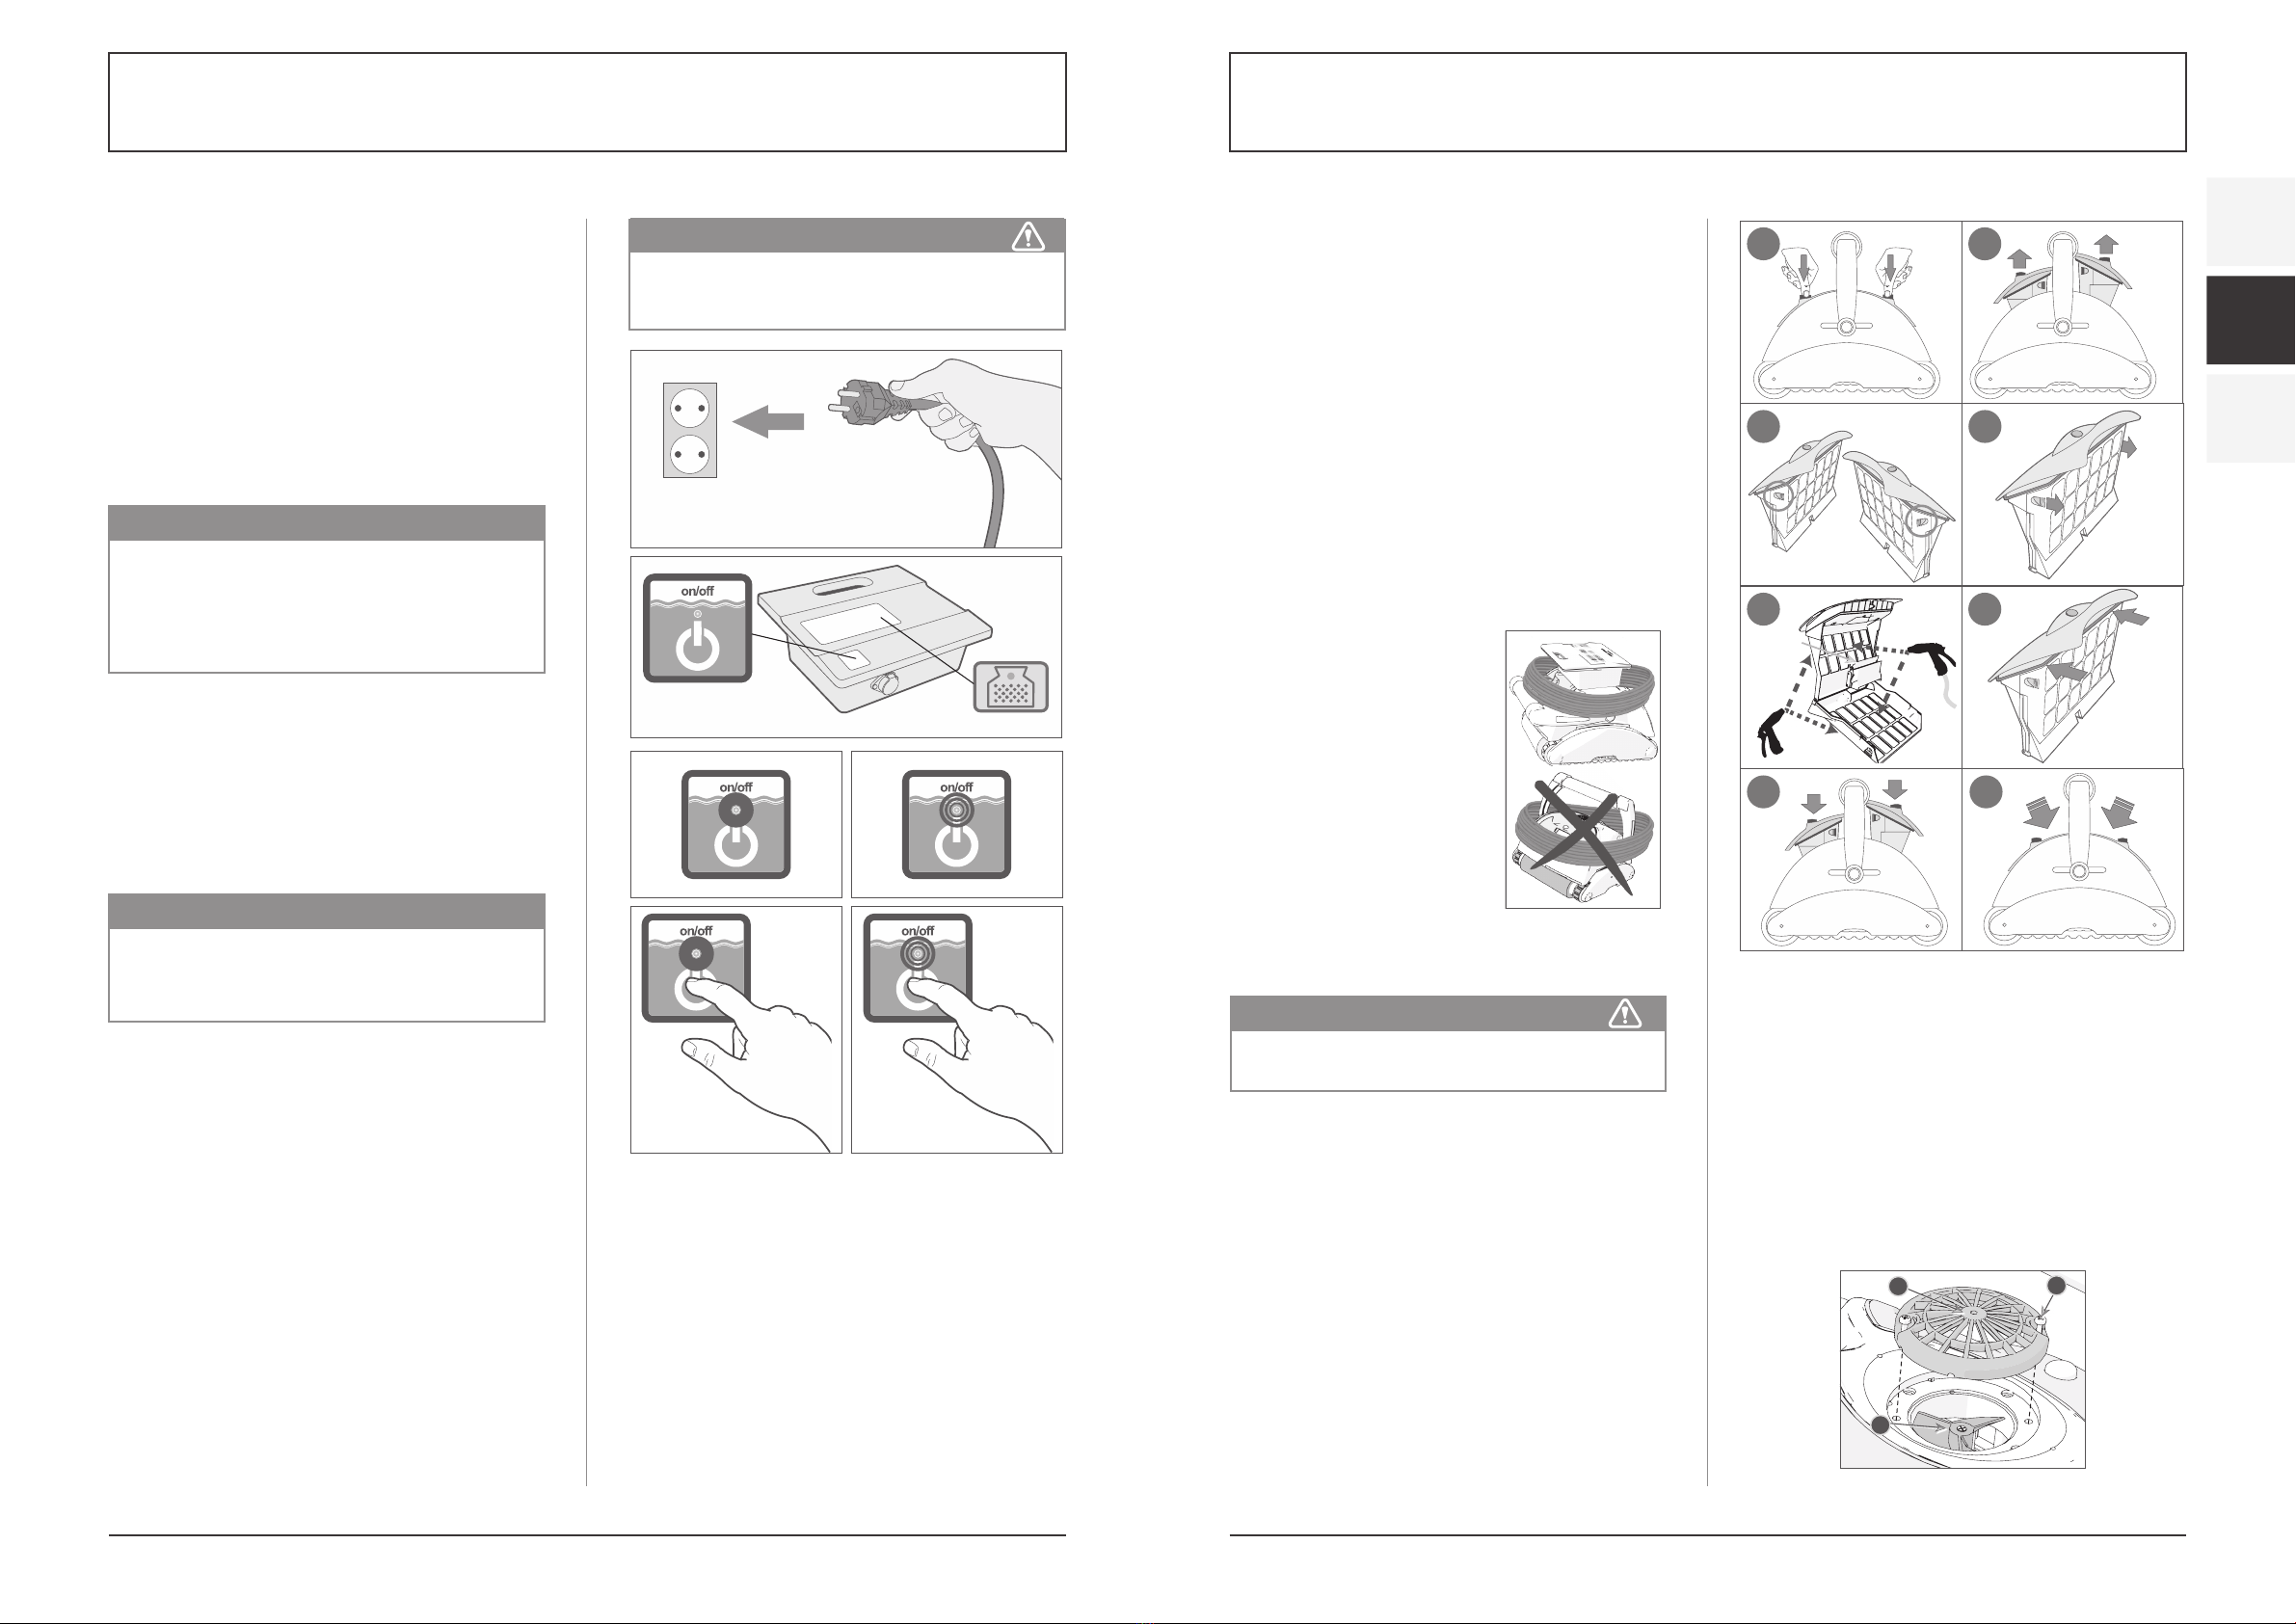
26 27
Änderungen, die dem technischen Fortschritt dienen, sowie Irrtümer vorbehalten! ORIGINALBETRIEBSANLEITUNG NORSUPWWW.NORSUP.EU Änderungen, die dem technischen Fortschritt dienen, sowie Irrtümer vorbehalten!
EN
FR
DE
AUTOMATISCHER SCHWIMMBECKENREINIGER ART CYCLONEAUTOMATISCHER SCHWIMMBECKENREINIGER ART CYCLONE
7. WARTUNG
7.1. REINIGUNG DER FILTER
Die zwei Filter müssen nach jedem Reinigungszyklus
gereinigt werden.
1. Lösen Sie den Filter und ziehen Sie ihn aus dem Reiniger.
2. Ziehen Sie die Filtertür (2) gegen das Filtergehäuse
(2), um den Filterkasten zu öffnen.
3. Sprühen Sie Wasser auf den Außenseiten (1) und
danach auf die Innenseite (3) des Filters, um sämtlichen
Schmutz und Verunreinigungen zu entfernen.
4. Prüfen Sie, ob der kleine Plastikverschluss (2) an der
richtigen Stelle und nicht beschädigt ist.
5. Schließen Sie den Filter.
6. Setzen Sie den Filter zurück in seine Position ein, bis
ein Klicken zu hören ist, um sicherzustellen, dass
der Filter an der richtigen Stelle ist.
7. Wiederholen Sie den Reinigungsvorgang für den
zweiten Filter.
7.2. LAGERUNG DES
ROBOTISCHEN REINIGERS
Befolgen Sie diese Anweisungen,
um den robotischen Reiniger bei
Nichtverwendung zu lagern:
1. Ziehen Sie das Netzkabel aus
der Steckdose.
2. Trennen Sie das Schwimmkabel
von der Strom- und Steuereinheit.
3. Verteilen Sie das Schwimmkabel
und lösen Sie sämtliche
Verdrehungen im Kabel.
4. Waschen Sie den Innenraum
des Reinigers mit frischem
Wasser und lassen Sie ihn
trocknen.
5. Rollen Sie das Schwimmkabel auf und legen Sie es
auf den Reiniger.
6. Lagern Sie die Reiniger-Komponenten in einem
trockenen, geschlossenen Ort.
7. Überprüfen Sie, dass die Strom- und Steuereinheit
keinem Wasser ausgesetzt ist.
7.3. ÜBERPRÜFEN DES WASSERAUSLASS-
PROPELLERS
Es wird empfohlen, regelmäßig Verunreinigungen
und Haare vom Propeller des Wasserauslasses zu
entfernen:
1. Entfernen Sie die Schrauben (3), um die
Abdeckung des Wasserauslasses (2) zu lösen.
2. Entfernen Sie die Abdeckung des Wasserauslasses
3. Reinigen Sie diesen von Haaren, Schmutz oder
Verunreinigungen.
4. Prüfen Sie nach, dass der Propeller (1) nicht
beschädigt ist.
5. Bringen Sie die Abdeckung (2) wieder an und
befestigen Sie diese mit den Schrauben (3).
6.3. INBETRIEBNAHME DES ROBOTISCHEN REINIGERS
Schließen Sie die Strom- und Steuereinheit an die
Steckdose an. Die Betriebs-LED (1) leuchtet auf und
der robotische Reiniger fängt mit seinem
Reinigungsprogramm an..
Wenn die Strom- und Steuereinheit bereits an die
Netzsteckdose angeschlossen ist, blinkt die Betriebs-
LED (5) auf, um anzuzeigen, dass der robotische
Reiniger im Standby-Modus ist.
Drücken Sie die Bedientaste (6). Die Betriebs-LED
leuchtet auf und der robotische Reiniger fängtmit
seinem Reinigungsprogramm an.“
6.4. REINIGUNGSZYKLUS
Während des Reinigungszyklus sollte der robotische
Reiniger:
- Über den Schwimmbeckenboden laufen, um
Schmutz und Verunreinigungen aufzusammeln.
- Automatisch gemäß dem ausgewählten Programm
lenken und drehen.
- Schwimmbeckenwände alle paar Minuten
hochklettern, wie in seinem internen Programm
eingestellt.
6.5. DEN BETRIEB DES ROBOTISCHEN REINIGERS
ANHALTEN
Der robotische Reiniger geht automatisch nach
jedem Reinigungszyklus in STANDBY und die
Betriebs-LED (5) blinkt auf.
Um den Reinigerbetrieb während eines
Reinigungszyklus anzuhalten, drücken Sie die
Bedienungstaste (7) einmal. Die Betriebs-LED (7)
blinkt auf und der Reiniger ist im Standby Modus.
6.6. DEN REINIGER AUS DEM WASSER ZIEHEN
1. Trennen Sie das Schwimmkabel von der Strom-
und Steuereinheit.
2. Ziehen Sie am Schwimmkabel den Reiniger näher
heran, bis man den Griff fassen kann.
3. Heben Sie den Reiniger am Griff aus dem
Schwimmbecken.
HINWEIS
Wenn die LED “„Filter überprüfen““ aufleuchtet,
müssen die Filter des robotischen Reinigers im
Schwimmbecken gereinigt werden, bevor Sie den
Reiniger ins Wasser lassen. Die LED „“Filter
überprüfen““ ist in einigen Modellen optional.
HINWEIS
Der robotische Reiniger könnte gelegentlich
aufhören, sich für paar Sekunden zu bewegen. Das
ist ein Teil des Normalbetriebes, keine Fehlfunktion.
VORSICHTSMASSNAHMEN
Verwenden Sie nicht das Schwimmkabel, um den
Reiniger aus dem Wasser zu heben.
VORSICHTS MASSNAHMEN
Rollen Sie das Schwimmkabel nicht auf
dem Griff des Reinigers auf.
Starting the Robotic Cleaner
Connect the power and control unit to the wall socket (1). The Operation LED is lit (4) and the
robotic cleaner starts its cleaning program.
If the power and control unit is already connected to the AC socket, the Operation LED flashes
(5) to indicate that the robotic cleaner is in standby mode.
Press the Operation button (6). The Operation LED turns on (6) and the robotic cleaner starts
the cleaning program.
Note: When the Check Filter LED (3) (optional in some models.) is lit, the robotic cleaner
filters must be cleaned before placing the cleaner unit in the pool.
Cleaning Cycle
During the cleaning cycle, the robotic cleaner:
- Moves across the pool floor picking up dirt and debris.
- Changes direction and rotates automatically according to the selected program
- Climbs the pool walls every few minutes, as set in its internal program.
Note: The robotic cleaner might occasionally stop moving for a few seconds. This is
part of normal operation, not a malfunction.
Stopping Robotic Cleaner Operation
The robotic cleaner moves automatically to STANDBY after every cleaning cycle and the
operation LED starts flashing (5).
To stop the cleaner operation during a cleaning cycle, press the operation button (7) once. The
operation LED starts flushing (7) and the cleaner is in standby mode.
Pulling Cleaner Unit out of the Water
1. Unplug the floating cable from the power and control unit.
2. Pull up on the floating cable to pull the cleaner unit closer until it is possible to take hold of the
handle.
3. Using the handle, lift the cleaner unit out of the pool.
CAUTION: Do not use the floating cable to lift the cleaner unit out of the water.
Operation
Optional
1
2
3
4 5
6 7
7
4
3
12
CLICK!
CLICK!
8
7
6
5
Maintenance
Cleaning the Filters
The two filters must be cleaned after each cleaning cycle.
1. Release the filter and pull it out of the cleaner unit. (1), (2)
2. Pull the filter door against the filter housing to open the filter case. (3), (4)
3. Spray water on the outer sides of the filter and then spray water towards the inner side of the
filter to clean all the dirt and debris. (5)
4. Verify that the small plastic shutter (2) is in place and not broken, then close the filter. (6)
5. Insert the filter back into its location until a click is heard to secure the filter in place.(7), (8)
Storing the Robotic Cleaner
Follow these instructions to store the robotic cleaner when not in
use:
1. Disconnect the power cord from the wall outlet.
2. Disconnect the floating cable from the power and control unit.
3. Spread out the floating cable and release any twists in the
cable.
4. Wash the cleaner unit interior space with fresh water and let it
dry.
5. Roll the floating cable and place it ON THE CLEANER unit.
Caution: DO NOT ROLL the floating cable ON THE HANDLE
of the cleaner unit.
6. Store the robotic cleaner components in a dry, closed location.
7. Verify that the power and control unit is not exposed to water.
shutter
Checking Water Outlet Propeller
It is recommended to periodically clean debris
and hair from the propeller of the water outlet:
1. Remove the screws (3) that holds water outlet
cover(2).
2. Remove the water outlet cover (2).
3. Clean any hairs, dirt, or debris.
4. Verify that the propeller (1) is not broken.
5. Return the cover (2) and fasten it with the
screws (3).
3
2
1
8
4
3
12
CLICK!
CLICK!
8
7
6
5
Maintenance
Cleaning the Filters
The two filters must be cleaned after each cleaning cycle.
1. Release the filter and pull it out of the cleaner unit. (1), (2)
2. Pull the filter door against the filter housing to open the filter case. (3), (4)
3. Spray water on the outer sides of the filter and then spray water towards the inner side of the
filter to clean all the dirt and debris. (5)
4. Verify that the small plastic shutter (2) is in place and not broken, then close the filter. (6)
5. Insert the filter back into its location until a click is heard to secure the filter in place.(7), (8)
Storing the Robotic Cleaner
Follow these instructions to store the robotic cleaner when not in
use:
1. Disconnect the power cord from the wall outlet.
2. Disconnect the floating cable from the power and control unit.
3. Spread out the floating cable and release any twists in the
cable.
4. Wash the cleaner unit interior space with fresh water and let it
dry.
5. Roll the floating cable and place it ON THE CLEANER unit.
Caution: DO NOT ROLL the floating cable ON THE HANDLE
of the cleaner unit.
6. Store the robotic cleaner components in a dry, closed location.
7. Verify that the power and control unit is not exposed to water.
shutter
Checking Water Outlet Propeller
It is recommended to periodically clean debris
and hair from the propeller of the water outlet:
1. Remove the screws (3) that holds water outlet
cover(2).
2. Remove the water outlet cover (2).
3. Clean any hairs, dirt, or debris.
4. Verify that the propeller (1) is not broken.
5. Return the cover (2) and fasten it with the
screws (3).
3
2
1
8
4
3
12
CLICK!
CLICK!
8
7
6
5
Maintenance
Cleaning the Filters
The two filters must be cleaned after each cleaning cycle.
1. Release the filter and pull it out of the cleaner unit. (1), (2)
2. Pull the filter door against the filter housing to open the filter case. (3), (4)
3. Spray water on the outer sides of the filter and then spray water towards the inner side of the
filter to clean all the dirt and debris. (5)
4. Verify that the small plastic shutter (2) is in place and not broken, then close the filter. (6)
5. Insert the filter back into its location until a click is heard to secure the filter in place.(7), (8)
Storing the Robotic Cleaner
Follow these instructions to store the robotic cleaner when not in
use:
1. Disconnect the power cord from the wall outlet.
2. Disconnect the floating cable from the power and control unit.
3. Spread out the floating cable and release any twists in the
cable.
4. Wash the cleaner unit interior space with fresh water and let it
dry.
5. Roll the floating cable and place it ON THE CLEANER unit.
Caution: DO NOT ROLL the floating cable ON THE HANDLE
of the cleaner unit.
6. Store the robotic cleaner components in a dry, closed location.
7. Verify that the power and control unit is not exposed to water.
shutter
Checking Water Outlet Propeller
It is recommended to periodically clean debris
and hair from the propeller of the water outlet:
1. Remove the screws (3) that holds water outlet
cover(2).
2. Remove the water outlet cover (2).
3. Clean any hairs, dirt, or debris.
4. Verify that the propeller (1) is not broken.
5. Return the cover (2) and fasten it with the
screws (3).
3
2
1
8
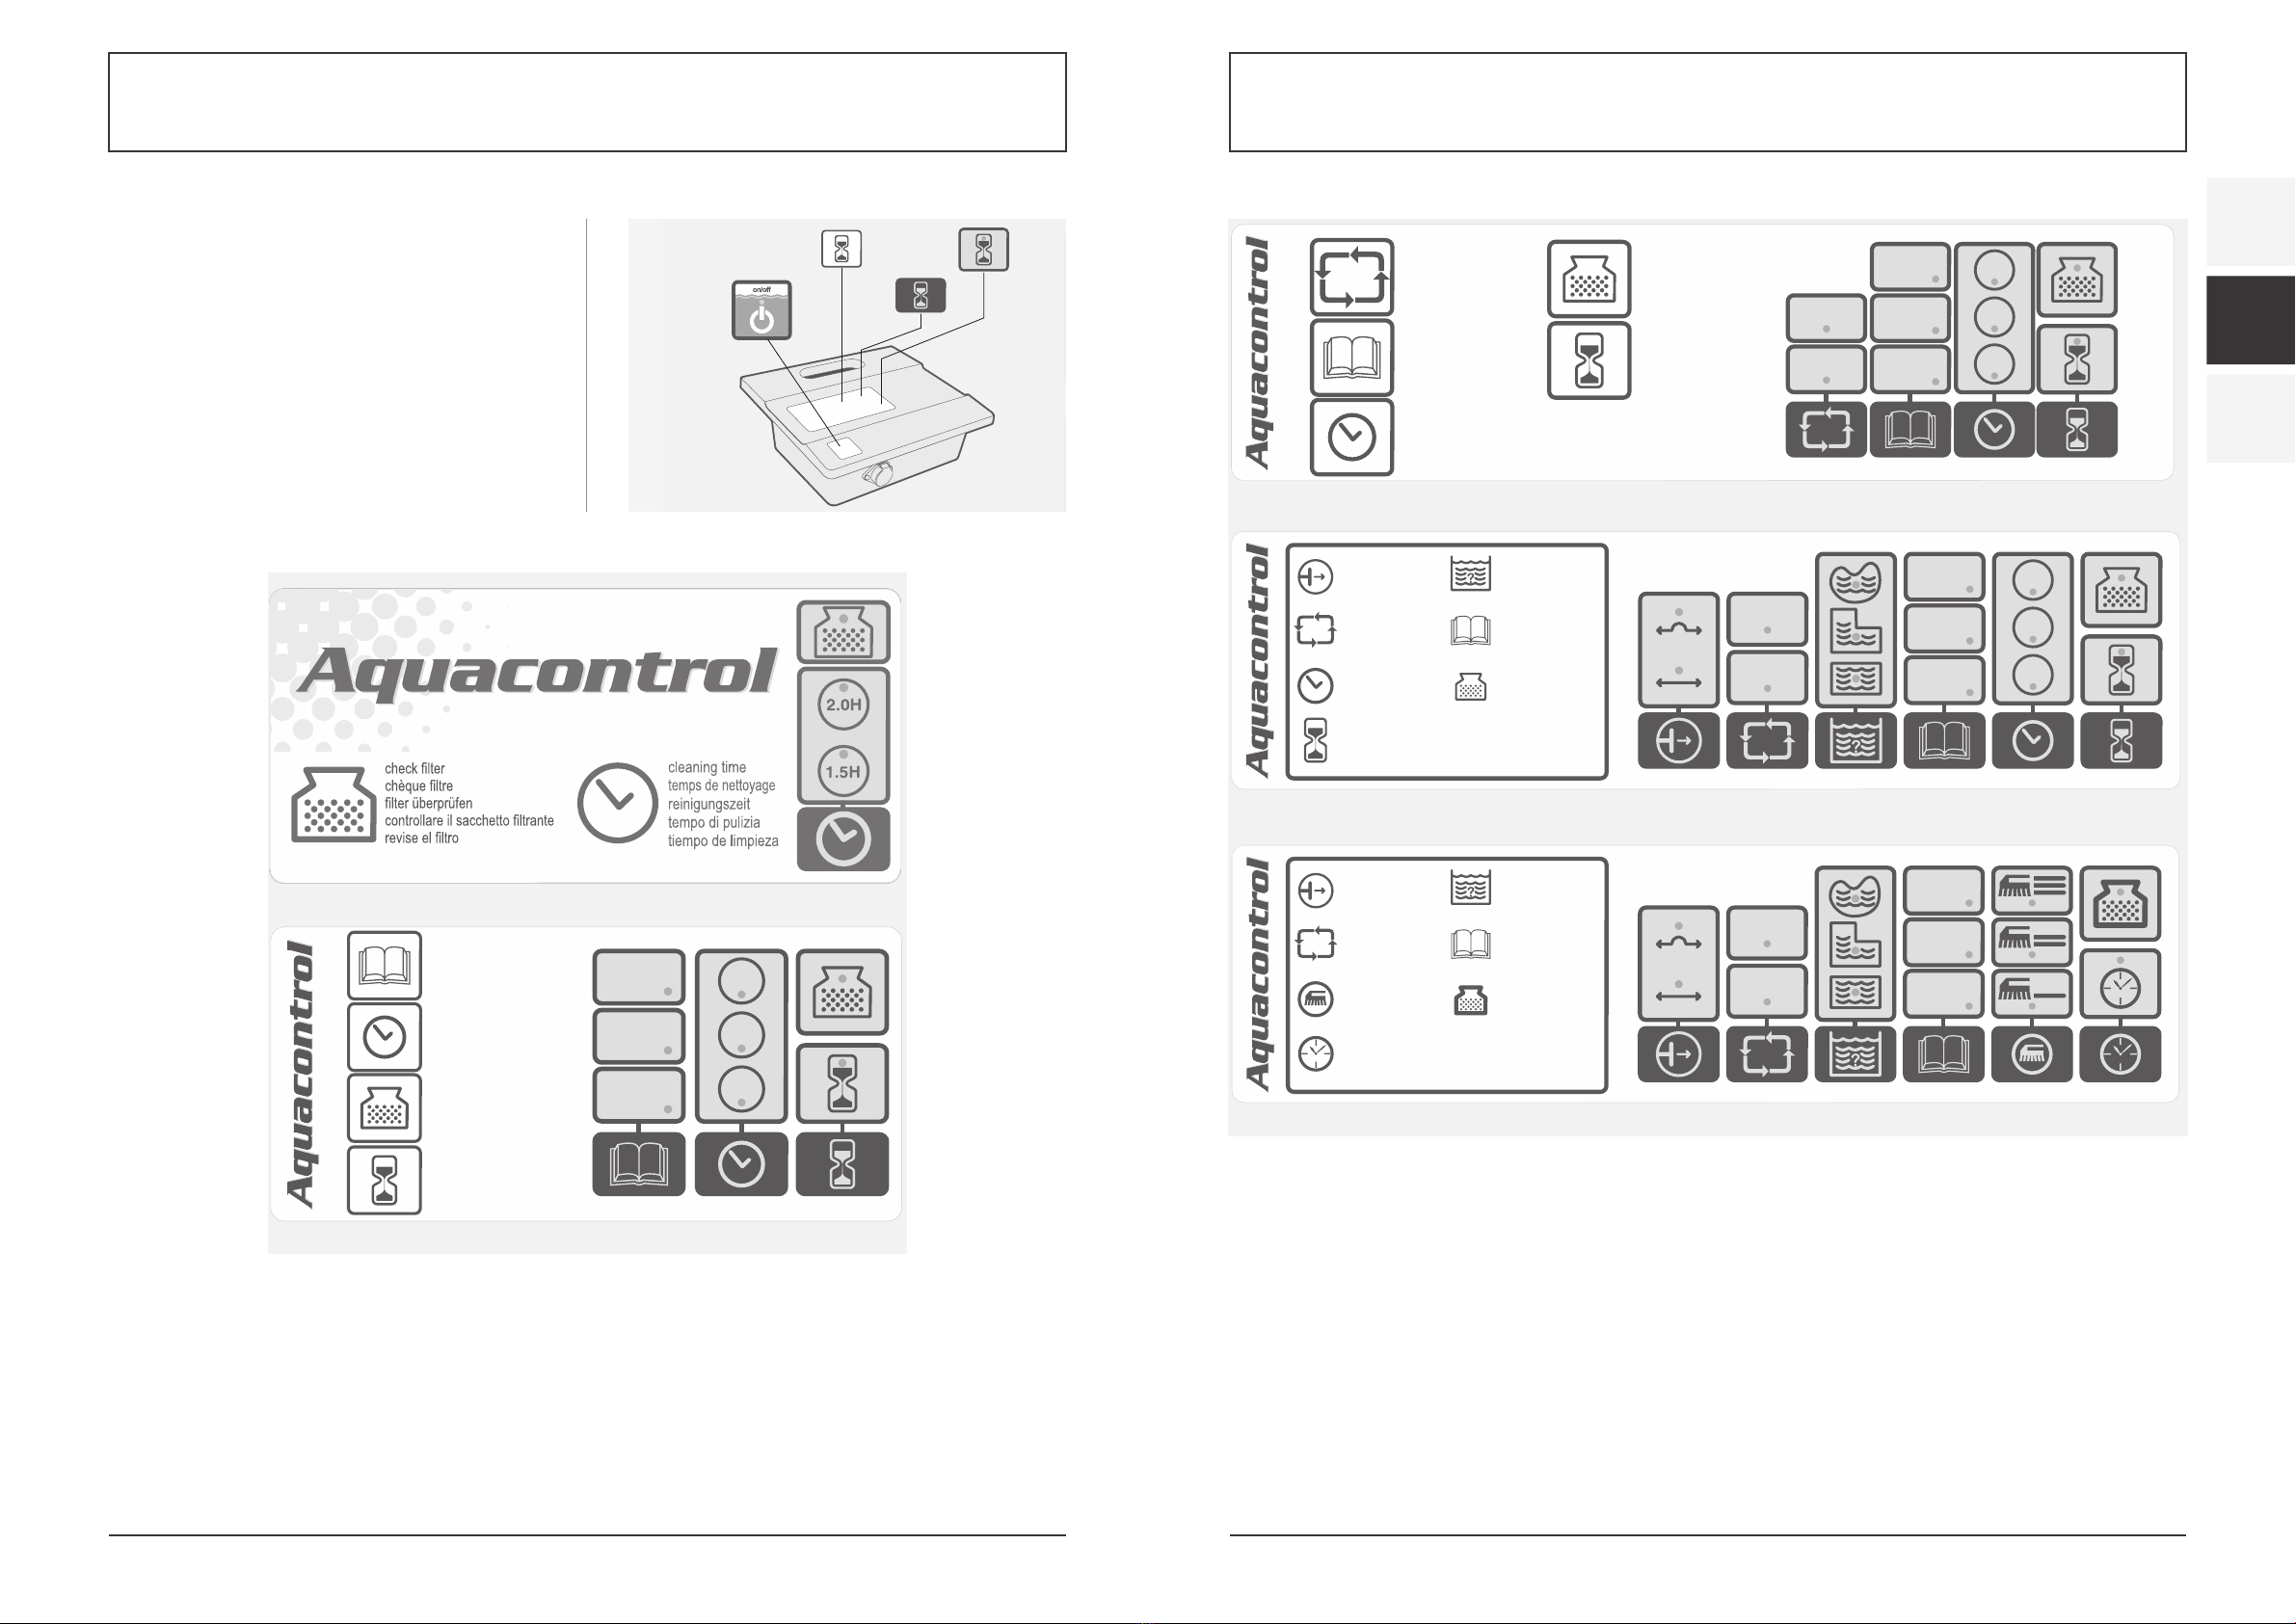
28 29
Änderungen, die dem technischen Fortschritt dienen, sowie Irrtümer vorbehalten! ORIGINALBETRIEBSANLEITUNG NORSUPWWW.NORSUP.EU Änderungen, die dem technischen Fortschritt dienen, sowie Irrtümer vorbehalten!
EN
FR
DE
AUTOMATISCHER SCHWIMMBECKENREINIGER ART CYCLONEAUTOMATISCHER SCHWIMMBECKENREINIGER ART CYCLONE
8. PROGRAMMIEROPTIONEN
Dieses Kapitel bespricht die Programmieroptionen.
Überspringen Sie dieses Kapitel, wenn Ihr Modell
nicht programmierbar ist, oder wenn der robotische
Reiniger bereits programmiert ist.
8.1. STEUERKONSOLE
Die Steuerkonsole besteht aus:
- On/Off (Ein-/Ausschalttaste) (1) – startet und stoppt
den Betrieb des robotischen Reinigers.
- Funktionsbeschreibung (2 ) – beschreibt die
Funktion
- Steuertasten (3) – blau markiert, aktivieren die
ausgewählte Funktion.
- Status-Anzeige (4) – LED-Anzeige leuchtet auf, um
die ausgewählte Option oder den Reiniger-Zustand
anzuzeigen
SPS 100 SPS 200
PROGRAM
02
PROGRAM
03
PROGRAM
01
96h
48h
72h
Cleaning program
Mode nettoyage
Programa de limpieza
Reinigungsprogramm
Programma di pulizia
Programa de limpeza
Check filter
Vérifiez le filtre
Revise el filtro
Filter uberprufen
Controllare il sacchetto filtrante
Verifique o Filtro
Internal timer
Minuterie interne
Temporizador interno
Interne Zeitschaltuhr
Timer interno
Temporizador interno
External timer
Minuterie externe
Temporizador externo
Externe Zeitschaltuhr
Timer esterno
Temporizador externo
SPS 300
SPS 400
PROGRAM
02
PROGRAM
03
PROGRAM
01
HIGH
NORMAL
96h
48h
72h
Cleaning program
Mode nettoyage
Programa de limpieza
Reinigungsprogramm
Programma di pulizia
Programa de limpeza
Internal timer
Minuterie interne
Temporizador interno
Interne Zeitschaltuhr
Timer interno
Temporizador interno
External timer
Minuterie externe
Temporizador externo
Externe Zeitschaltuhr
Timer esterno
Temporizador externo
Swivel
Pivot
Swivel
Drehlager
Manopola di disattorcigliamento
Swivel
Auto detect
Auto detection
Auto detección
Automatische erkennung
Auto diagnosi
Detecção automática
Pool shape
Forme de piscine
Forme de la piscine
Beckenform
Forma piscine
Forma da piscina
Check filter
Vérifiez le filtre
Revise el filtro
Filter uberprufen
Controllare il sacchetto filtrante
Verifique o Filtro
Cleaning program
Mode nettoyage
Programa de limpieza
Reinigungsprogramm
Programma di pulizia
Programa de limpeza
Internal timer
Minuterie interne
Temporizador interno
Interne Zeitschaltuhr
Timer interno
Temporizador interno
Check filter
Vérifiez le filtre
Revise el filtro
Filter uberprufen
Controllare il
sacchetto filtrante
Verifique o Filtro
External timer
Minuterie externe
Temporizador externo
Externe Zeitschaltuhr
Timer esterno
Temporizador externo
Swivel
Pivot
Swivel
Drehlager
Manopola di
disattorcigliamento
Swivel
PROGRAM
02
PROGRAM
03
PROGRAM
01
96h
48h
72h
HIGH
NORMAL
PROGRAM
02
PROGRAM
03
PROGRAM
01
HIGH
NORMAL
Cleaning program
Mode nettoyage
Programa de limpieza
Reinigungsprogramm
Programma di pulizia
Programa de limpeza
Cleaning Level
Niveau de Nettoyage
Nivel de Limpieza
Reinigungsstufe
Livello di Pulizia
Nível de Limpeza
Delay
Retard
Retrasar
Verzögerung
Ritardo
Atrasar
Swivel
Pivot
Swivel
Drehlager
Manopola di disattorcigliamento
Swivel
Auto detect
Auto detection
Auto detección
Automatische erkennung
Auto diagnosi
Detecção automática
Pool shape
Forme de piscine
Forme de la piscine
Beckenform
Forma piscine
Forma da piscina
Check filter
Vérifiez le filtre
Revise el filtro
Filter uberprufen
Controllare il sacchetto filtrante
Verifique o Filtro
SPS 500
External timer
Minuterie externe
Temporizador externo
Externe Zeitschaltuhr
Timer esterno
Temporizador externo
2
3
4
1
This chapter reviews the
programming options.
Skip this chapter if your
model is not programmable
or if the robotic cleaner is
already programmed.
Control Panel
The control panel consists of:
- On/Off power (1) – starts and stops the robotic
cleaner operation.
- Status display (4) – indication LED lit to display
the selected option or the cleaner state.
- Control buttons (3) – dark blue, enables
selecting relevant function.
- Function description (2) – describes the
function
9

30 31
Änderungen, die dem technischen Fortschritt dienen, sowie Irrtümer vorbehalten! ORIGINALBETRIEBSANLEITUNG NORSUPWWW.NORSUP.EU Änderungen, die dem technischen Fortschritt dienen, sowie Irrtümer vorbehalten!
EN
FR
DE
AUTOMATISCHER SCHWIMMBECKENREINIGER ART CYCLONEAUTOMATISCHER SCHWIMMBECKENREINIGER ART CYCLONE
8.2. EINBLENDUNGSTASTEN 8.3. VERWENDUNG EINES EXTERNEN TIMERS
(Optional, sollte separat gekauft werden)
Ein externer Timer kann zur automatischen
Aktivierung des Reinigers für eine voreingestellte
Zeit verwendet werden. Der externe Timer sollte
zwischen der Steckdose und der Strom- und
Steuereinheit angeschlossen sein.
1. Unit
2. Kabel
3. Stromversorgung
4. Trafostecker
5. Externe Timer (sollte separat gekauft werden)
6. Auslauf
9. FEHLERBESEITIGUNG
DER REINIGER IST NICHT ANGESCHALTET (ON).
Die Steckdose wird nicht mit Strom versorgt.
1. Trennen Sie den Reiniger von der Strom- und
Steuereinheit.
2. Trennen Sie die Stromversorgung von der
Steckdose, warten Sie 30 Sekunden und schließen
Sie diese erneut an.
3. Schalten Sie die Stromzufuhr an (ON). Falls nicht
aktiviert, schließen Sie das Gerät an eine andere
Steckdose an.
Das Schwimmkabel ist nicht ordnungsgemäß an
die Strom- und Steuereinheit angeschlossen.
Schließen Sie das Schwimmkabel erneut an
dieStrom- und Steuereinheit an.
Hindernis im AntriebssystemdesReinigers.
1. Drehen Sie den Reiniger vorsichtig um, um die
Unterseite zu prüfen.
2. Drehen Sie die Antriebsführungen und Reinigungs-
bürsten per Hand. Sie sollten sich drehen, aber
nicht locker sein.
3. Reinigen und entfernen Sie ggf. Hindernisse und
Verunreinigungen.
Der Propeller sitzt aufgrund von Haaren oder
Verunreinigungen fest.
Überprüfen Sie, ob der Propeller beschädigt ist oder
gereinigt werden muss (siehe
“Überprüfen des Wasserauslass-Propellers”).
DER REINIGER BEWEGT SICH, ABER PUMPT
KEIN WASSER:
Die Filter sind schmutzig.
1. Entfernen Sie die Filter.
2. Lassen Sie den robotischen Reiniger ohne Filter
im Schwimmbecken laufen. Bei einwandfreier
Funktionstüchtigkeit ersetzen oder reinigen Sie
die Filter sorgfältig.
Der Propeller sitzt aufgrund von Haaren oder
Verunreinigungen fest oder ist beschädigt.
Überprüfen Sie, ob der Propeller beschädigt ist
oder gereinigt werden muss (siehe “Überprüfen
des Wasserauslass-Propellers”).
DER REINIGER PUMPT WASSER, ABER BEWEGT
SICH NICHT.
Hindernis im AntriebssystemdesReinigers.
1. Drehen Sie den Reiniger vorsichtig um, um die
Unterseite zu prüfen.
2. Drehen Sie die Antriebsführungen und
Reinigungsbürsten per Hand. Sie sollten sich
drehen, aber nicht locker sein.
3. Reinigen und entfernen Sie ggf. Hindernisse
und Verunreinigungen.
REINIGER STARTET UND SCHALTET NACH EINER
KURZEN ZEIT AB.
Die Filter sind schmutzig.
1. Entfernen Sie die Filter.
2. Lassen Sie den robotischen Reiniger ohne Filter
laufen. Bei einwandfreier Funktionstüchtigkeit
ersetzen oder reinigen Sie die Filter sorgfältig.
Der Propeller sitzt aufgrund von Haaren oder
Verunreinigungen fest oder ist beschädigt.
1. Entfernen Sie die oberen Schrauben am oberen
Auslass.
2. Überprüfen Sie, ob der Propeller beschädigt ist
oder gereinigt werden muss.
Hindernis im AntriebssystemdesReinigers.
1. Drehen Sie den Reiniger vorsichtig um, um die
Unterseite zu prüfen.
2. Drehen Sie die Antriebsführungen und
Reinigungsbürsten per Hand. Sie sollten sich
drehen, aber nicht locker sein.
3. Reinigen und entfernen Sie ggf. Hindernisse und
Verunreinigungen.
DER REINIGER SAMMELT KEINEN SCHMUTZ AUF.
Die Filter sind schmutzig oder habenLöcher.
Reinigen Sie nach Bedarf und überprüfen Sie,
ob keineLöcher in den Filtern sind.
Der Propeller sitzt aufgrund von Haaren oder
Verunreinigungen fest oder ist beschädigt.
Überprüfen Sie, ob der Propeller beschädigt ist
oder gereinigt werden muss (siehe “Überprüfen
des Wasserauslass-Propellers”).
Overlay buttonsModel
Cleaning level – Change the cleaning performance
Quick: Choose if your pool has small amount of dirt
Regular: Choose for daily maintenance
Thorough: Choose if your pool has large amount of dirt
Delay
When this option is On, the robot will start to work after 2 hours of delay.
This feature is used to let debris and dust sink on the floor before starting the robot's cleaning.
500
500
Pool shape:
Allows the robot to calculate the most efficient cleaning pattern for the pool shape chosen. Press the button to select the drawing most suitable to the
shape of the pool. A red light will indicate your selection.
400/500
External Timer
Auto-Detect - OFF. Choose this option if your pool has obstacles on the floor such as high drain. This will prevent the unit from changing direction
upon hitting the obstacle.
Auto-Detect - ON. Choose this option if the pool floor is free of obstacles.
Auto detect: this feature prevents the robot from getting stuck on obstacles in the pool such as main drains, steps, ladders etc. Press this button to
choose one of the following options:
400/500
Using External Timer
(Optional, should be purchased
separately)
An external timer can be used to
automatically activate the Cleaner
on pre-set time.
The external timer should be
connected between the wall socket
and the Power and Control unit
1. Unit
2. Cable
3. Power supply
4. Power supply plug
5. External timer (purchased separately)
6. Outlet
1
2 3
456
11
Overlay buttonsModel
Cleaning level – Change the cleaning performance
Quick: Choose if your pool has small amount of dirt
Regular: Choose for daily maintenance
Thorough: Choose if your pool has large amount of dirt
Delay
When this option is On, the robot will start to work after 2 hours of delay.
This feature is used to let debris and dust sink on the floor before starting the robot's cleaning.
500
500
Pool shape:
Allows the robot to calculate the most efficient cleaning pattern for the pool shape chosen. Press the button to select the drawing most suitable to the
shape of the pool. A red light will indicate your selection.
400/500
External Timer
Auto-Detect - OFF. Choose this option if your pool has obstacles on the floor such as high drain. This will prevent the unit from changing direction
upon hitting the obstacle.
Auto-Detect - ON. Choose this option if the pool floor is free of obstacles.
Auto detect: this feature prevents the robot from getting stuck on obstacles in the pool such as main drains, steps, ladders etc. Press this button to
choose one of the following options:
400/500
Using External Timer
(Optional, should be purchased
separately)
An external timer can be used to
automatically activate the Cleaner
on pre-set time.
The external timer should be
connected between the wall socket
and the Power and Control unit
1. Unit
2. Cable
3. Power supply
4. Power supply plug
5. External timer (purchased separately)
6. Outlet
1
2 3
4
56
11
Reinigungszeit - Zeit, die zur Reinigung des Schwimmbeckens benötigt wird.
Drücken Sie die Taste, um die gewünschte Zeit einzustellen. Ein rotes Licht wird Ihre Wahl anzeigen.
Diese Funktion ist nur wählbar, wenn das Netzteil im Standby-Modus befindet
Einblendungstasten
Filter überprüfen
– Das Aufleuchten der Lampe bedeutet, dass der Filterbeutel ordnungsgemäß entfernt, gereinigt und wieder in den Roboter eingesetzt werden muss,
um effizient zu arbeiten.
Bei den Modellen 300, 400, 500 hört der robotische Reiniger auf die Wände hochzuklettern, sobald "Filter überprüfen" aufleuchtet.
Auswahl für Reinigungsprogramm:
Programm 01 – 1 Stunden für Boden- und Wandreinigung.
Programm 02 – 1,5 Stunden für Boden- und Wandreinigung.
Programm 03 – 2 Stunden für Boden- und Wandreinigung.
Interner Timer - Automatische Betriebsoption:
Alle 48 Stunden
Alle 72 Stunden
Alle 96 Stunden
Externer Timer –
Diese Funktion ermöglicht dem Endbenutzer, den Reinigungsplan mithilfe eines externen Timers (separat verkauft) zu programmieren. Das Drücken
dieser Taste aktiviert und deaktiviert diese Funktion.
Swivel – stellt die Anzahl der Wenden im Schwimmbecken für den Roboter passend ein.
Normal – Normalbetrieb
High – Verschiedene Wendezahlen
100/200
300/400
500
100
200/300
200
300/400
200
300/400
300/400
500
Auswahl für Reinigungsprogramm:
Programm 01 – 1,5 Stunden für Boden
Programm 02 – 2 Stunden für Boden- und Wandreinigung.
Programm 03 – 2,5 Stunden für Boden- und Wandreinigung.
Modell
400
500
Auswahl für Reinigungsprogramm:
Program 01 – 2 Stunden für Boden
Program 02 – 4 Stunden für Boden- und Wandreinigung. (auf einigen Modellen ist keine Wandreinigungsfunktion verfügbar)
Program 03 – 5 Stunden für Boden- und Wandreinigung. (auf einigen Modellen ist keine Wandreinigungsfunktion verfügbar)
52
Reinigungsstufe – Ändern Sie die Reinigungsleistung
Schnell: Auswählen, wenn Ihr Schwimmbecken gering verschmutzt ist.
Regelmäßig: Für die tägliche Wartung auswählen.
Gründlich: Auswählen, wenn Ihr Schwimmbecken stark verschmutzt ist.
Verzögerung
Wenn die Option eingeschaltet ist, fängt der Roboter nach 2 Stunden Verzögerung an zu arbeiten.
Mit dieser Funktion können Verunreinigungen und Staub auf den Boden sinken, bevor der Roboter mit der Arbeit anfängt.
500
500
Schwimmbeckenumriss:
Damit kann der Roboter das effizienteste Reinigungsmuster für das ausgewählte Schwimmbeckenformat berechnen. Drücken Sie die Taste, um die
passendste Zeichnung auszuwählen, die zum Umriss des Schwimmbeckens passt. Ein rotes Licht zeigt Ihre Auswahl an.
400/500
Externen Timer
Auto-Detect - OFF (AUS). Diese Option sollte ausgewählt werden, wenn Ihr Schwimmbeckenreiniger in der Mitte des Schwimmbeckens die
Richtung ändert, ohne auf Hindernisse zu treffen.
Auto-Detect - ON (AN). Der Schwimmbeckenreiniger sollte die Richtung ändern, sobald er auf Hindernisse trifft. Wählen Sie diese Option, wenn
im Schwimmbecken Hindernisse vorhanden sind, so wie bei Bodenreinigungssystemen, Hauptabflussleitungen und Leitern.
Auto-Detect (autom. Erkennung): diese Funktion verhindert, dass der Roboter nicht an Hindernissen im Schwimmbecken stecken bleibt wie
Hauptabflussleitungen, Stufen, Leitern usw. Drücken Sie diese Taste, um eine der folgenden Optionen zu wählen:
400/500
Verwendung eines externen Timers
(Optional, sollte separat gekauft
werden)
Ein externer Timer kann zur
automatischen Aktivierung des
Reinigers für eine voreingestellte Zeit
verwendet werden.
Der externe Timer sollte zwischen der
Steckdose und der Strom- und
Steuereinheit angeschlossen sein.
1. Unit
2. Kabel
3. Stromversorgung
4. Trafostecker
5. Externe Timer (sollte separat gekauft werden)
6. Auslauf
1
2 3
456
EinblendungstastenModell
53
MODELL

32 33
Änderungen, die dem technischen Fortschritt dienen, sowie Irrtümer vorbehalten! ORIGINALBETRIEBSANLEITUNG NORSUPWWW.NORSUP.EU Änderungen, die dem technischen Fortschritt dienen, sowie Irrtümer vorbehalten!
EN
FR
DE
AUTOMATISCHER SCHWIMMBECKENREINIGER ART CYCLONEAUTOMATISCHER SCHWIMMBECKENREINIGER ART CYCLONE
Die Saugöffnung ist nicht nahe genug am
Schwimmbeckenboden.
Ziehen Sie die Saugöffnung HERAUS (siehe
“Einstellung der Saughöhe”).
VERUNREINIGUNG KOMMT AUS DEM GERÄT, WENN
ES AUS DEM SCHWIMMBECKEN ENTFERNT WIRD.
Der Filterverschluss ist beschädigt oderfehlt.
Öffnen Sie die Filter und überprüfen Sie, ob der
Filterverschluss richtig funktioniert und nicht
beschädigt ist (siehe “Reinigung der Filter”)
Löcher in den Filtern.
Öffnen Sie die Filter und überprüfen Sie, ob keine
Löcher im Filtersieb sind (siehe “Reinigung der Filter”)
Der Deckel des Unterteils ist nicht richtiggeschlossen.
Achten Sie darauf, dass der Deckel des Unterteils
richtig geschlossen ist.
DER REINIGER SCHEINT NICHT DAS KOMPLETTE
SCHWIMMBECKEN ZU REINIGEN.
Die Filter sind schmutzig. Reinigen Sie die Filter.
Die Länge des Schwimmkabels im Wasser ist nicht
ausreichend, um das andere Ende des Schwimm-
beckens zu erreichen, oder das Kabel ist verwickelt.
1. Überprüfen Sie, ob die Länge des Schwimmkabels
im Wasser ausreichend ist, um das andere Ende
des Schwimmbeckens zu erreichen.
2. Achten Sie darauf, dass das Schwimmkabel
ordnungsgemäß ausgebreitet und entwirrt ist.
Der Winkel des Gleitgriffes beeinträchtigt die
Bewegung des Reinigers.
Erhöhen Sie den Diagonalwinkel des Gleitgriffs
(siehe “Einstellung des Gleitgriffs”).
Der pH-Wert des Schwimmbeckens ist falsch.
Achten Sie darauf, dass der pH-Wert zwischen7,2 und
7,6 liegt.
Der Chlorgehalt ist falsch.
Überprüfen Sie die Chlorbehandlung des Wassers
und korrigieren diese bei Bedarf (Entfernen Sie
während der Behandlung den Reiniger aus dem
Schwimmbecken).
Der Propeller sitzt aufgrund von Haaren oder
Verunreinigungen fest oder ist beschädigt.
1. Entfernen Sie die oberen Schrauben am oberen Auslass.
2. Überprüfen Sie, ob der Propeller beschädigt ist
oder gereinigt werden muss.
Hindernis im Antriebssystemdes Reinigers.
1. Drehen Sie den Reiniger vorsichtig um, um die
Unterseite zu prüfen.
2. Drehen Sie die Antriebsführungen und Reinigungs-
bürsten per Hand. Sie sollten sich drehen, aber
nicht locker sein.
3. Reinigen und entfernen Sie ggf. Hindernisse und
Verunreinigungen.
DAS GERÄT STEIGT NICHT DIE WÄNDE HOCH.
Der Reiniger steigt nicht die Schwimmbecken-
wände hoch.
1. Überprüfen Sie, ob Ihr robotischer Reiniger nur ein
Modell für die Bodenreinigung ist.
2. Prüfen Sie nach, dass P1, nur für Bodenreinigung, ist
nicht auf der Strom- und Steuereinheit ausgewählt
(siehe “Programmierung des robotischen Reinigers” ).
Die Filter sind schmutzig. Reinigen Sie die Filter.
Der propeller sitzt aufgrund von haaren oder
verunreinigungen fest oder ist beschädigt.
Überprüfen Sie, ob der Propeller beschädigt ist oder
gereinigt werden muss (siehe “Überprüfen des
Wasserauslass-Propellers”).
Der pH-Wert ist falsch.
Achten Sie darauf, dass der pH-Wert zwischen 7,2
und 7,6 liegt.
Der Chlorgehalt ist falsch.
Überprüfen Sie die Chlorbehandlung des Wassers
(entfernen Sie während der Behandlung den
Reiniger aus dem Schwimmbecken).
Die Wassertemperatur ist nichtoptimal.
Empfohlene Temperatur liegt zwischen 22 °C - 32 °C
(72 °F - 90 °F).
DAS KABELHAT SICH VERWICKELT.
Die Filter sind schmutzig. Reinigen Sie die Filter.
Der Deckel des Unterteils ist nicht richtiggeschlossen.
Achten Sie darauf, dass der Deckel des Unterteils
richtig geschlossen ist.
Das Kabel ist nicht ausgebreitet, bevor der Reiniger
im Schwimmbecken abgesetzt wurde.
Achten Sie darauf, dass das Schwimmkabel
ordnungsgemäß ausgebreitet und entwirrt ist, bevor
Sie den Reiniger in Betrieb setzen.
Die Kabellänge ist imWasser zu lang.
Überprüfen Sie, ob die Länge des Kabels im Wasser
der Länge der Schwimmbeckendiagonale plus 2
Meter entspricht.
Der Propeller sitzt aufgrund von Haaren oder
Verunreinigungen fest oder ist beschädigt
Überprüfen Sie, ob der Propeller beschädigt ist oder
gereinigt werden muss (siehe “Überprüfen des
Wasserauslass-Propellers”).
DIE FERNBEDIENUNG FUNKTIONIERT NICHT.
Die Batterie ist leer. LED blinkt oder ist
abgeschaltet (OFF).
Überprüfen Sie die Batterie, indem Sie eine der Tasten
drücken. Das rote Licht auf der Fernbedienung blinkt
oder leuchtet nicht ständig auf, wenn die Batterie leer
ist. Setzen Sie sich mit einem Fachhändler oder
Kundendienst in Verbindung.
10. FERNBEDIENUNG
Dieses Kapitel bespricht die Bedienung der
optionalen Fernbedienung. Die Fernbedienung ist in
einigen Modellen beigefügt.
10.1. ÜBERSICHT FERNBEDIENUNG
Die Fernbedienung ist eine optionale Zusatzeinrichtung,
die den robotischen Reiniger über ferngesteuerte
Befehlstasten steuern kann. Wenn Sie die Fernbedien-
ungstasten drücken, wird ein Funksignal an die Strom-
und Steuereinheit übermittelt. Dieses Signal wird in
einen Befehl umgewandelt und an den robotischen
Reiniger über das Schwimmkabel gesendet.
10.2. VERWENDUNG DER FERNBEDIENUNG
1. Drücken Sie die rechte Taste (3), um den
robotischen Reiniger nach rechts zu drehen. Der
robotische Reiniger dreht sich solange nach rechts,
bis die Taste losgelassen wird.
2. Drücken Sie die linke Taste (1), um den robotischen
Reiniger nach links zu drehen. Der robotische
Reiniger dreht sich solange nach links, bis die Taste
losgelassen wird.
3. Drücken Sie die Taste Vorwärts/Rückwärts (2), um den
robotischen Reiniger anzuhalten und seine
Bewegungsrichtung zu ändern..
Die Fernbedienungs-LED leuchtet nach jedem Befehl
auf. Wenn die LED-Anzeige nicht reagiert, ersetzen
Sie die Batterie.
11. TRANSPORTBEHÄLTER (OPTIONAL)
11.1. OVERVIEW
Der Transportbehälter ist ein optionales Zubehörteil,
um leicht und einfach den robotischen Reiniger, das
Schwimmkabel und die Strom -und Steuereinheit
von Ort zu Ort zu bewegen.
11.2. MONTAGE DES TRANSPORTBEHÄLTERS
Um den Transportbehälter zu montieren, brauchen
Sie einen Standardschraubendreher und einen 8
mm Schraubenschlüssel.
Anbringung des Transportbehältergriffs
1. Befestigen Sie das Unterteil des Griffs (3) an den
Rahmen des Transportbehälters (5) mit drei
Schrauben (4) und Muttern.
2. Befestigen Sie das Oberteil des Griffs (1) an das
Unterteil (3) mit einer Schraube (2) und einer
Mutter.
11.3. LADEN DES ROBOTISCHEN REINIGERS AUF
DEN TRANSPORTBEHÄLTER
1. Stellen Sie den Reiniger auf den Sockel des
Transportbehälters.
2. Rollen Sie das Schwimmkabel auf und legen Sie es
auf den Reiniger.
3. Legen Sie die Strom- und Steuereinheit oben auf
der Schwimmkabel-Wicklung.
Remote Control (optional) Caddy (optional)
The caddy is an optional accessory that makes it easy to move the robotic cleaner,
floating cable and the power and control unit from place to place.
Assembling the Caddy
To assemble the caddy, you need a standard screwdriver and a 8 mm wrench.
Connecting the Caddy Handle
1. Fasten the handle bottom part (3) to the caddy frame (5) with the three screws
(4) and nuts.
2. Connect the handle top part (1) to the handle bottom part (3) using screw (2)
and nut.
Loading the Robotic Cleaner on the Caddy
1. Place the cleaner unit on the caddy base.
2. Coil the floating cable and place it on the cleaner unit.
3. Place the power and control unit on top of the floating cable coil.
2
4
5
1. Handle (Top Part)
2. Handle Screws
3. Handle (Bottom Part)
4. Frame screws
5. Caddy Frame
This chapter reviews the operation of the optional remote control unit. The remote
control is included in some models.
Remote Control Overview
The remote control is an optional feature that enables controlling the robotic
cleaner via remote command buttons. When pressing the remote control buttons,
radio signal is transmitted to the power and control unit. This signal is transferred
into a command sent to the robotic cleaner via the floating cable.
Using the Remote Control
1. Press the right button (3) to turn the robotic cleaner right. The robotic cleaner
continues turning to the right until the button is released.
2. Press the left button (1) to turn the robotic cleaner left. The robotic cleaner
continues turning to the left until the button is released.
3. Press the Forward/Reverse button (2) to stop the robotic cleaner and change its
direction of movement.
The remote control LED is lit after each command. If the LED does not respond or
flashing, replace the battery.
1
3
14

34 35
Änderungen, die dem technischen Fortschritt dienen, sowie Irrtümer vorbehalten! ORIGINALBETRIEBSANLEITUNG NORSUPWWW.NORSUP.EU Änderungen, die dem technischen Fortschritt dienen, sowie Irrtümer vorbehalten!
AUTOMATISCHER SCHWIMMBECKENREINIGER ART CYCLONEAUTOMATISCHER SCHWIMMBECKENREINIGER ART CYCLONE
12. TRANSPORTWAGEN (OPTIONAL)
12.1. OVERVIEW
Der Transportwagen ist ein optionales Zubehörteil,
um leicht und einfach den robotischen Reiniger zu
bewegen und bietet einen Montageort für Strom-
und Steuereinheit.
12.2. MONTAGE DES TRANSPORTWAGENS:
1. Befestigen Sie die Räder an beide Seiten des
Fahrwerks.
2. Befestigen Sie jedes Rad mit einer Schraube und
installieren Sie die Abdeckung.
3. Montieren Sie die zwei Abschnitte des Griffs.
4. Stecken Sie den Griff in das Fahrwerk hinein.
Rasten Sie die unteren Laschen des Gehäuses der
Strom-und Steuereinheit in das Fahrwerk ein.
5. Befestigen Sie den Fernbedienungshalter, indem
Sie den oberen Teil in den Transportwagengriff
stecken und den Halter nach unten drehen, bis der
untere Teile einrastet.
6. Legen Sie das Kabel der Stromund Steuereinheit
in die Einkerbung des Fahrwerks.
7. Bringen Sie das Gehäuse der Strom- und
Steuereinheit an, indem Sie die oberen Laschen in
die Öffnungen im Griff einrasten.
8. Legen Sie den oberen Teil der Strom- und
Steuereinheit ins Gehäuse und drücken Sie den
unteren Teil nach unten, bis er im Fahrwerk
einrastet.
Transportwagen (optional)
12 3
Der Transportwagen ist ein optionales Zubehörteil, um leicht und einfach
den robotischen Reiniger zu bewegen und bietet einen Montageort für
Strom- und Steuereinheit.
Um den Transportwagen zu montieren:
1. Befestigen Sie die Räder an beide Seiten des Fahrwerks.
2. Befestigen Sie jedes Rad mit einer Schraube und installieren Sie die
Abdeckung.
3. Montieren Sie die zwei Abschnitte des Griffs.
Montage des Transportwagens
Komponenten
57
56
78
4
4. Insert the handle into the trolly
base. Click the lower tabs of the
power and control unit housing
into the trolly base.
5. Attach the remote control holder
by inserting the upper part into
the trolly handle and turning the
holder downward until the lower
part clicks.
6. Attach the cable of the power
supply
7. Place the power and control unit
cable in the groove in the trolly
base.
8. Place the upper part of the
power and control unit in the
housing and push the lower part
downward until it clicks into the
trolly base.
Trolly (optional)
16
ANMERKUNGEN

36 37
Des altérations au service du progrès technologique ainsi que des erreurs sauf! NOTICE ORIGINALE NORSUPWWW.NORSUP.EU Des altérations au service du progrès technologique ainsi que des erreurs sauf!
EN
FR
DE
NETTOYEUR DE PISCINE TYPE CYCLONENETTOYEUR DE PISCINE TYPE CYCLONE
Les erreurs et modifications techniques sont
sujettes à changement, reproduction ainsi
que duplication électronique uniquement
avec notre autorisation écrite.
© NORSUP
Édition: 11.2020
1. GUIDE DE DÉMARRAGE RAPIDE 38
2. L’INSTALLATION DE FLOTTEURS 38
3. CONSIGNES DE SÉCURITÉ 39
4. INTRODUCTION 39
4.1 Présentation du système 39
4.2 Comment le robot nettoyeur débarrasse votre piscine des saletés 39
4.3 Conditions d‘utilisation 40
5. COMPOSANTS 40
5.1 Robot nettoyeur 40
5.2 Module de commande et d‘alimentation 40
5.3 Contenu de la caisse d‘emballage 40
6. FONCTIONNEMENT 40
6.1 Avant la première utilisation 40
6.2 Placer le module de nettoyage dans l‘eau 41
6.3 Démarrage du robot nettoyeur 42
6.4 Cycle de nettoyage 42
6.5 Arrêter le robot nettoyeur 42
6.6 Retirer le module de nettoyage de l‘eau 42
7. ENTRETIEN ET RÉGLAGE 43
7.1 Nettoyage des filtres 43
7.2 Rangement du robot nettoyeur 43
7.3 Vérification de la sortie d‘eau de l’hélice 43
8. PANNEAU DE COMMANDE 44
8.1 Boutons superposés 46
8.2 Utiliser une minuterie externe 47
9. DÉPANNAGE 47
10. TÉLÉCOMMANDE 49
10.1 Présentation de la télécommande 49
10.2 Utilisation de la télécommande 49
11. CADDY (EN OPTION) 49
11.1 Overview 49
11.2 Montage du caddy 49
11.3 Chargement du robot nettoyeur sur le caddy 49
12. CHARIOT “TROLLY” (EN OPTION) 50
12.1 Overview 50
12.2 Montage du chariot 50
SOMMAIRE
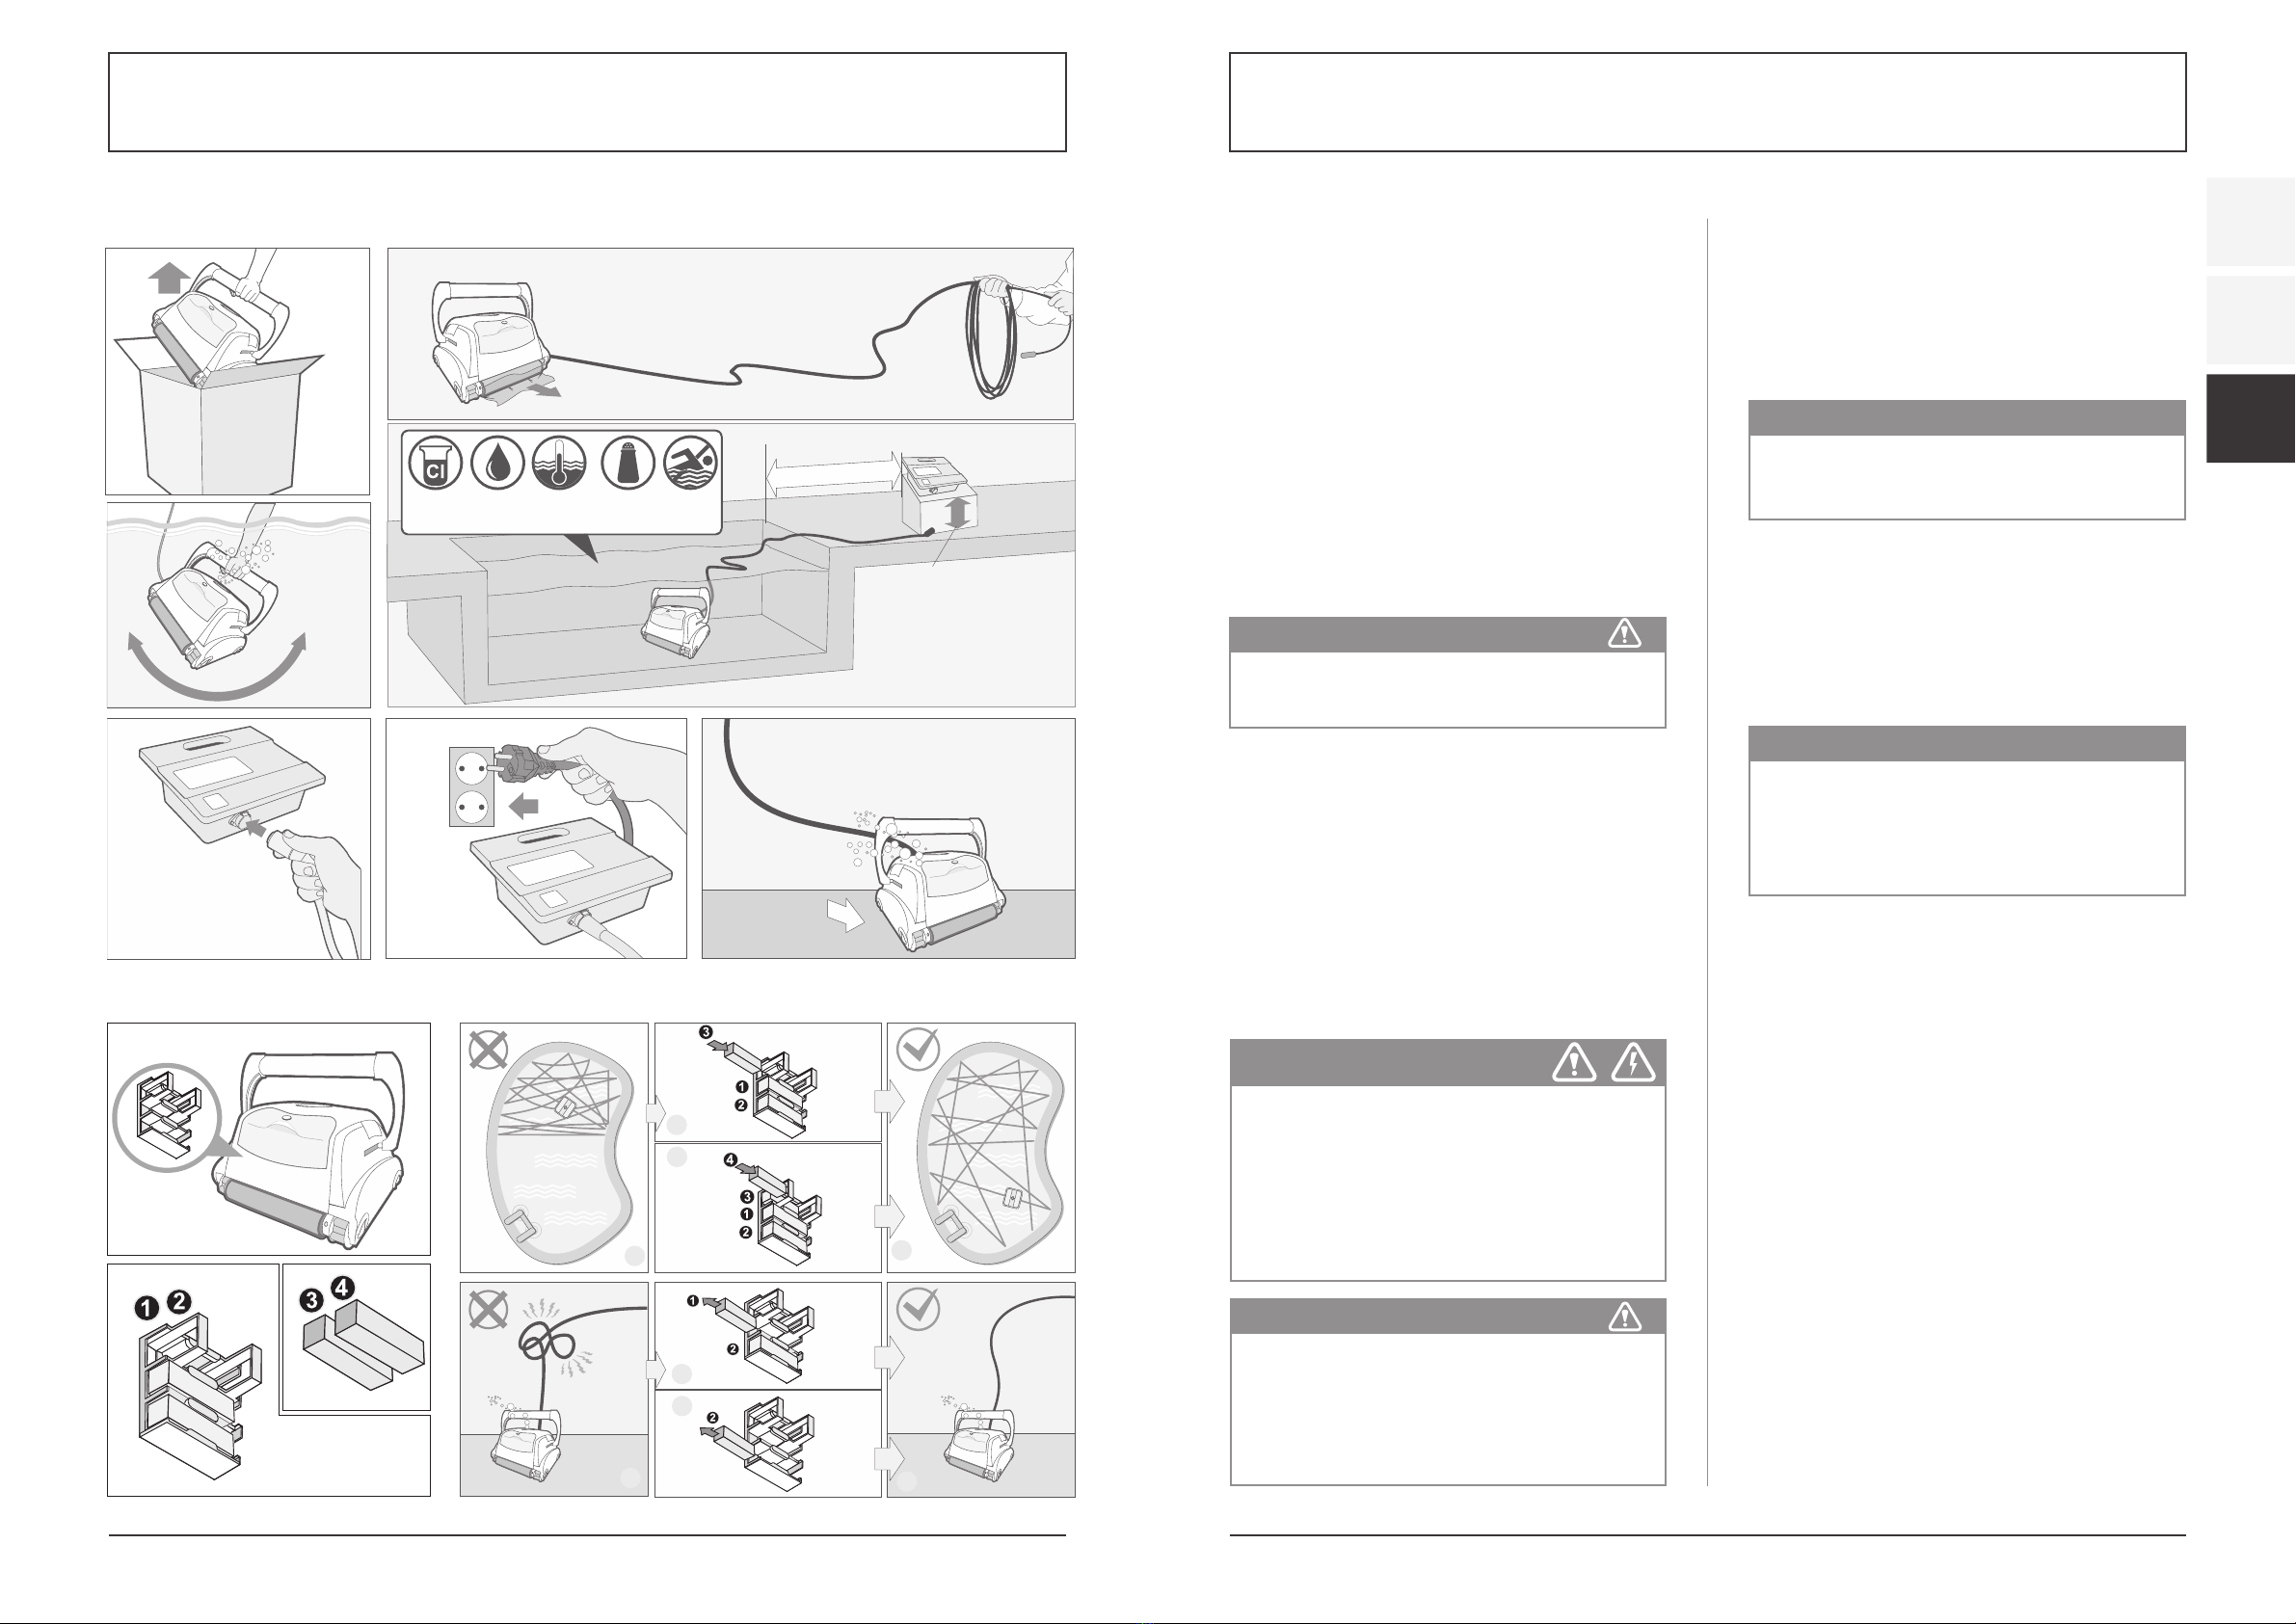
38 39
Des altérations au service du progrès technologique ainsi que des erreurs sauf! NOTICE ORIGINALE NORSUPWWW.NORSUP.EU Des altérations au service du progrès technologique ainsi que des erreurs sauf!
EN
FR
DE
NETTOYEUR DE PISCINE TYPE CYCLONENETTOYEUR DE PISCINE TYPE CYCLONE
3. CONSIGNES DE SÉCURITÉ
CONSIGNES DE SÉCURITÉ IMPORTANTES
LIRE ET SUIVRE TOUTES LES INSTRUCTIONS
ATTENTION : Ne pas brancher le bloc d‘alimentation à
une prise de terre ou ne pas mettre le nettoyeur de
piscine sur « MARCHE » s‘il n‘est pas totalement
immergé dans l‘eau. L‘utilisation du nettoyeur hors de
l‘eau cause immédiatement de sérieux dégâts et se
traduit par une perte de garantie.
Laisser le nettoyeur dans la piscine pendant 15 à 20
minutes à la fin de son cycle de nettoyage. Cela
permettra aux moteurs de refroidir convenablement.
Ne pas laisser le nettoyeur dans la piscine tout le
temps. Rappelez-vous toujours de mettre
l‘alimentation sur « ARRÊT » et de débrancher la prise
de courant avant de retirer le nettoyeur de la piscine.
Note de sécurité
- L‘appareil doit être alimenté par un dispositif
différentiel à courant résiduel (DDR) ayant un
fonctionnement nominal de courant résiduel ne
dépassant pas 30 mA.
- Le raccordement au circuit de dérivation doit être
compatible avec les règles de câblage locales et
nationales (code de l‘électricité).
- Une mauvaise manipulation de l‘appareil peut
entraîner des fuites de lubrifiants.
- Si le cordon d‘alimentation est endommagé, il doit
être remplacé par un agent de maintenance du
fabricant ou une personne qualifiée et formée afin
d‘éviter les dangers.
4. INTRODUCTION
4.1 PRÉSENTATION DU SYSTÈME
Le robot nettoie le fond et les parois de la piscine pour
collecter les impropretés et les débris dans ses filtres
internes. Le présent manuel explique comment faire
fonctionner le robot nettoyeur, y compris les
procédures de nettoyage, d‘entretien et de stockage.
4.2 Comment le robot nettoyeur débarrasse votre
piscine des saletés
Une fois placé dans la piscine et activé, le robot
nettoyeur fonctionne selon le programme établi par le
module de contrôle et d‘alimentation. Il se déplace le
long du fond et des parois de la piscine en couvrant
toute la zone. Lorsque le robot nettoyeur a terminé
son programme, il reste inactif au fond de la piscine.
AVERTISSEMENT
Le nettoyeur ne doit pas être utilisé lorsqu‘il y a des gens
dans l‘eau. À utiliser dans une piscine uniquement
REMARQUE
Le présent manuel passe en revue différents
modèles de robots nettoyeurs. Les composants
varient selon le type de modèle.
REMARQUE
L‘escalade des parois est en option. Lorsque la fonction
d‘escalade des parois est activée,le robot nettoyeur
effectue cette manoeuvre par intervalles conformé-
ment à son programme interne. La capacité d‘un robot
nettoyeur à franchir des escaliers en piscine est
soumise à la géométrie et au matériau de l‘escalier.
AVERTISSEMENT
un interrupteur de défaut à la terre (GFCI-USA) ou
un dispositif différentiel à courant résiduel (DDR-
Europe) doit être installé pour protéger votre prise
électrique et éviter tout risque d‘électrocution.
CONSERVEZ CES INSTRUCTIONS
Cet appareil n‘est pas destiné à être utilisé par des
personnes (y compris les enfants) dont les capacités
physiques, sensorielles ou mentales sont réduites,
ou qui manquent d‘expérience et de connaissances,
à moins qu‘elles n‘aient bénéficié de surveillance ou
d‘instructions concernant l‘utilisation de l‘appareil
de la part d‘une personne responsable de leur
sécurité. Les enfants doivent être surveillés pour
s‘assurer qu‘ils ne jouent pas avec l‘appareil.
1. GUIDE DE DÉMARRAGE RAPIDE
12 cm
(4.7 inch)
1
Quick start guide
Guide de démarrage rapide
Kurzanleitung
Manuale di avvio rapido
Guía de inicio rápido
Guia de início rápido
2
4
5
6 7
3
Chlorine
2-4 ppm
pH
7.2-7.6
Temp
13°C-35°C
55°F-95°F
NaCl
4000 ppm
(max)
NO
SWIM
3.6m/11.8ft
12 cm
(4.7 inch)
1
Quick start guide
Guide de démarrage rapide
Kurzanleitung
Manuale di avvio rapido
Guía de inicio rápido
Guia de início rápido
2
4
5 6 7
3
Chlorine
2-4 ppm
pH
7.2-7.6
Temp
13°C-35°C
55°F-95°F
NaCl
4000 ppm
(max)
NO
SWIM
3.6m/11.8ft
B2
B3
A2
A3
A4
B4
A1
Float installation
L’installation de flotteurs
Schwimmende Schaum Installation
Instalación de flotador
Instalação de flutuar
Installazione di flottante
B1
B2
B3
A2
A3
A4
B4
A1
Float installation
L’installation de flotteurs
Schwimmende Schaum Installation
Instalación de flotador
Instalação de flutuar
Installazione di flottante
B1
B2
B3
A2
A3
A4
B4
A1
Float installation
L’installation de flotteurs
Schwimmende Schaum Installation
Instalación de flotador
Instalação de flutuar
Installazione di flottante
B1
B2
B3
A2
A3
A4
B4
A1
Float installation
L’installation de flotteurs
Schwimmende Schaum Installation
Instalación de flotador
Instalação de flutuar
Installazione di flottante
B1
2. L’INSTALLATION DE FLOTTEURS
This manual suits for next models
3
Table of contents


