Northern Tool 1000993 User manual
PARTLIST
Instruction
Manual
FRAMINGNAILER
IMPORTANT
MODEL1000993
12
Pleasemakecertainthatthepersonwhois
tousethisequipmentcarefullyreadsand
understandstheseinstructionsbefore
startingoperations.
Description
Spring
O-ring5.5x1.5
TriggerValveStem
O-ring24.8x2
TriggerValveGuide
Spring
TriggerAssembly
Assembly
Washer
Pin
Screw
SpringWasher
Washer
DriveGuide
Plate
Spring
LatchSleeve
LatchAssembly
SpringPin
FrontPlate
SpringPin
Nut
CoilSpring
Pin
FeederBracket
TorsionSpring
FeederShoe
Screw
Magazine
Screw
Retainer
Screw
MagazineCap
Nut
SpringPin
Rail
Nut
Support
SoftGripSleeve
O-ring48.82.5
EndCap
AirPlug
Description
Screw
Bushing
ExhaustCover
Washer
Screw
SpringWasher
CylinderCap
Gasket
Seal
Spring
O-ring20.32.5
O-ring57.52.6
Valve
O-ring49.23.5
O-ring31.53.5
Screw
Collar
O-ring43.33.5
PistonAssembly
Cylinder
O-ring52.42.5
SealedBelt
O-ring78.42
RestrictivePlate
Bumper
Body
BaseSeal
RestrictivePlate
Base
Screw
SafeBracket
No-marTip
Screw
Washer
SafeGuider
SpringPin
O-ring20.3x1.5
ValveSet
O-ring9.5x1.9
O-ring10.3x1.9
TriggerValveHead
O-ring12.8x1.9
Item
1
2
3
4
5
6
7
8
9
10
11
12
13
14
15
16
17
18
19
20
21
22
23
24
25
26
27
28
29
30
31
32
33
34
35
36
37
38
39
40
41
42
Item
43
44
45
46
47
48
49
50
51
52
53
54
55
56
57
58
59
60
61
62
63
64
65
66
67
68
69
70
71
72
73
74
75
76
77
78
79
80
81
82
83

Fig.1
EXPLODEDVIEWDRAWING
Fig.2
Fig.3
211
WARNING: Whenusingpneumatictools,basicsafetyprecautionsshould
alwaysbefollowedtoreducetheriskofpersonalinjury,includingthe
Therearecertainapplicationsforwhichthistoolwasdesigned.Westrongly
recommendthatthistoolSHALLNOTbemodifiedand/orusedforany
applicationotherthanforwhichitwasdesigned.Ifyouhaveanyquestions
relativetoitsapplication,pleasecontactanauthorizeddealer.
IMPORTANTSAFETYINSTRUCTIONS
following: READANDFOLLOWALLINSTRUCTIONS.
1.KEEPWORKINGAREACLEAN.
3.USESAFETYGLASSES.
5.ONLYUSECLEAN,
6.DONOTCONNECTTOOL
7.ONLYUSEAIRHOSETHATIS
RATED
Clutteredareasinviteinjuries.
Toprevent
eyeinjuries,thetooloperatorandall
personsintheworkingareamustwear
safetyglasseswithpermanently
attached,rigid,plasticsideshields.
Thesesafetyglassesmustconformto
ANSIZ87.1requirements(approved
glasseshave Z87”printedorstamped
dryand
regulatedcompressedairat70to120
to
pressurethatpotentially
2.DON'TALLOWCHILDRENNEAR
THEWORKINGAREA.
4.USEEARPROTECTION.
Don'tlet
The
workingareamaybeexposedtohigh
noiselevelsthatcanleadtohearing
for150%ofthe
systempressure.Please
ahoseofID3/8
exceeds
maximum
trytouse
˝connecting nailerwith
compressor.
onthem).(Fig.1)
damaged.
PSI,(4.8to8.3BAR).(Fig.2)
themhandlethetool.
180PSI(12.3BAR).

CAUTION:
Disconnecttoolfromairsupplybeforeperforming
anyServiceProcedure.
PROBLEM
Airleakingneartopof
toolorattriggerarea.
Tooldoesnothingor
operatessluggishly.
Airleakingnearbottomof
tool.
Tooljammingfrequently.
Other.
PROBLEMCAUSE
Loosescrews.
O-ringorsealiswornor
damaged.
Inadequateairsupply.
Inadequatelubrication.
O-ringsorsealiswornor
damaged.
Loosescrews.
O-ringsorsealiswornor
damaged.
Incorrectfasteners.
Damagedfasteners.
Magazineornose
screwsloose.
Magazineisdirty.
Driveriswornordamaged.
8.NEVERUSEOXYGEN,CARBON
DIOXIDE,combustiblegasesorany
otherbottledgasasapowersourcefor
thistool:explosionandserious
personalinjurycouldresult.(Fig.3)
(Fig.5)
9.ONLYDISCONNECTQUICK
CONNECTOR
10.DISCONNECTTOOLFROMAIR
SUPPLYHOSE
atthebodytailportion
airinlet,sincedischargeof
compressedaircannotbeguaranteed.
Ifoperatingisnotcorrect,thetoolcan
remainchargedwithairafterbeing
disconnectedandstillbeabletodrivea
fastener,causingpersonalinjury.
(Fig.4)
beforedoingtool
maintenance,clearingajammed
fastener,leavingworkarea,moving
tooltoanotherlocation,orhandingthe
carefully
checkifthereisanypartdamagedto
obtainidealresults.Donotusethetool
ifthetoolhasanyairleakage,
damagedpartsor
tooltoanotherperson.
needsrepairing.
10 3
CAUTION:
Disconnecttoolfromairsupplybeforecleaningand
inspection.Correctallproblemsbeforeoperating.
Wipethetoolcleanandinspectforwearordamage.Usenon-flammable
cleaningsolutionstowipeexterioroftoolonlyifnecessary.Donotsoak
toolwithcleaningsolutions,sincesuchsolutionscandamageinternalparts.
Inspecttriggerandsafetymechanismtoassuresystemiscompleteand
Keepallscrewstight.Loosescrewscancausepersonalinjuryordamagetool.
Iftoolisusedwithoutanin-lineoiler:place5or6dropsofpneumatictooloil
Allqualitytoolseventuallyrequireservicingofreplacementofpartsdueto
wearfromnormaluse.Someuserserviceablecomponentsaredescribedin
theTROUBLESHOOTINGSection.Allrepairsmadebylocalagenciesarefully
guaranteedagainstdefectivematerialandworkmanship.Wecannot
guaranteerepairsmadeorattemptedbyanyoneotherthantheseagencies.
Shouldyouhaveanyquestionsaboutyourtool,pleasecontactwithusatany
time.Inanycommunications,pleasegiveallinformationshownonthe
CORRECTION
Tightenscrews.
Supplyadequateairsupply.
Place5or6dropsofoilintoairinlet.
Install TOP”MaintenanceKit.
Tightenscrews.
Supplyapprovedfastenersofcorrect
size.
Replaceundamagedfasteners.
Tightenscrews.
Cleanmagazine.
Contactalocalagencies.
Replacedamagedorworncomponents.
Replacedamagedorworncomponents.
Replacedamagedorworncomponents.
Fig.5
Fig.6
Fig.7
Fig.4
WARNING!
WearANSIapprovedimpact
goggles.
Disconnectfromairsupply
whenservicing,clearing
jams,ornotusing.
Donotuseoxygenor
combustiblegasses.
Removefingerfromtrigger,
whennotoperating.
MAINTENANCE
CLEANANDINSPECTDAILY
SERVICEANDREPAIRS
intotheairinletofthetoolatthebeginningofeachworkday.
functional:nolooseormissingparts,nobindingorstickingparts.
nameplateofyourtool(modelnumber,type,serialnumber,etc.).
TROUBLESHOOTING

15.DISCONNECTTOOLFROMAIR
SUPPLYBEFORE
,topreventafastener
frombeingfiredduringconnection.
Thetooldrivingmechanismmaycycle
whentoolisconnectedtotheair
supply.Whennotinuse,removeall
thefastenersfromthemagazine.
(Fig.8)
Implement.
fastener.(Fig.9)
LOADING
FASTENERS
16.ALWAYSASSUMETHETOOL
CONTAINSFASTENERS.
17.DONOTLOADFASTENERS
18.REMOVEFINGERFROM
TRIGGER
19.DON TOVERREACH.
Keepthe
toolpointedawayfromyourselfand
othersatalltimes.Nohorseplay
respectthetoolasaworking
withtriggerorsafetydepressed,to
preventunintentionalfiringofa
whennotdrivingfasteners.
Nevercarrytoolwithfingerontrigger:
toolwillfireafastenerifsafetyis
bumpedwhiletriggerisdepressed.
(Fig.10)
Keep
properfootingandbalanceatalltimes
whenusingorhandingthetool.(Fig.11)
─
4 9
1.Disconnecttoolfromairsupply.
2.Removeanyremainingfastenersfromthenailer.
CAUTION:
A.Pullfeedershoeretainer,depressthefeedershoeandslideitto
frontendofmagazine(SeeFig.20).
B.Depressleafdownandremovethefastenersfrommagazine(see
Fig.21).
3.Openthelatchanduseapairofneedlenosepliersoraflatscrewdriverto
removebentfastenerfromguidebody(SeeFig.22,23).
Fig.8
Fig.10
Fig.11
Fig.9
Fig.22 Fig.23
Fig.20 Fig.21
AB
CLEANINGAJAMMEDFASTENER
CAUTION:
DoNot
Removefingerfromtriggerwhennotdriving
Neverattempttodriveafastenerintomaterialthatistoohard,or
attoosteepanangle,orneartheedgeoftheworkpiece.The
Disconnecttoolfromairsupplybeforeperformingmaintenance,
clearingajammedfastener,leavingworkarea,movingtoolto
anotherlocation,handingthetooltoanotherperson,or
Cleanandinspecttooldaily.Carefullycheckforproperoperation
oftriggerandsafetymechanism.usethetoolunlessboth
thetriggerandthesafetymechanismarefunctional,orifthetool
fasteners.
making
adjustments.
Nevercarrytoolwithfingerontrigger:toolwillfireafastenerif
Keeptoolpointedinasafedirectionatalltimes.
20.FIREFASTENERSINTOWORK
SURFACEONLY:
21.GRIPTOOLFIRMLYTO
MAINTAINCONTROL
22.DONOTDRIVEFASTENERS
23.DONOTDRIVEFASTENERS
CLOSE
24.KEEPHANDSANDBODY
PARTS
neverintomaterials
whileallowing
tooltorecoilawayfromworksurface
asfastenerisdriven.Ifsafetybracket
isallowedtocontactworksurface
againbeforetriggerisreleased,an
unwantedfastenerwillbefired.
on
topofotherfasteners,orwiththetool
attoosteepanangle:thefasteners
canricochetcausingpersonalinjury.
(SeeFig.12)
totheedgeoftheworkpiece.
Theworkpieceislikelytosplit
allowingthefastenertoflyfreeor
ricochet,causingpersonalinjury.(See
Fig.13)
awayfromareashownin
Employermustenforcecompliancewiththesafetywarningsandallother
instructionscontainedinthismanual.
Keepthismanualavailableforusebyallpeopleassignedtousethistool.
Forpersonalsafetyandproperoperionofthistool,readandfollowallof
theseinstructionscarefully. at
85
Fig.19Fig.18
AA
Fig.12
Fig.13
Fig.13A
Thedepthtowhichafastenerisdrivenisadjustedbytheadjustingnut
onthesafebracket(A)Fig,19.Thedepthofdriveisadjustedtoa
maximumsettingbythefactory.Rotateadjustingnut(A)Fig.19to
desiredposition,fireanotherfastenerandcheckdepth.REPEATAS
NECESSARYTOACHIEVEDESIREDRESULTS.Theamountofair
pressurerequiredwillvarydependingonthesizeofthesettingto
determinethelowestsettingthatwillconsistentlyperformthejobat
hand.Airpressureinexcessofthatrequiredcancausepremature
Arubblenosecushion(B)Fig.19,isprovidedtoreducemarringofthe
worksurface.Therubbercushioncanbepulledofftoprovideincreased
safetyisbumped.
fastenercanricochetcausingpersonalinjury.
CAUTION:Disconnecttoolfromairsupplybeforeremovingor
reinstallingrubbercushion.
wearand/ordamagetothetool.
toohardtopenetrate.
Fig.13A,toavoidinjury.
EMPLOYER SRESPONSIBILITIES
depth-of-drive.
isleakingairorneedsanyotherrepair.
B

Thistoolisdesignedtooperateonclean,dry,compressedairat
regulatedpressuresbetween70and120PSI(PoundsperSquare
Inch).Thepreferredsystemwouldincludeafilter,apressureregula
tor,andautomaticoilerlocatedasclosetothetoolaspossible(within
15feetisideal).Allcompressedaircontainsmoistureandother
contaminatesthataredetrimentaltointernalcomponentsofthetool.
Anairlinefilterwillremovemostofthesecontaminatesandsignifi
cantlyprolongthelifeofthetool.Ifanin-lineoilerisnotavailable:
placefiveorsixdropsofoil,intothetool’sairinletatthebeginningof
3.Pushfastenersforwardbeyondstoppedpositionoftheleaf(SeeFig.
16).
4.Pullfeedershoeretainerbackwardunderthecoilspringforce.The
feedershoewillpushthefastenersforwardtofrontendofthemagazine
(SeeFig.17).
5.Adjustdirectionalexhaustdeflector(seeFig.18onfollowingpage),so
thattheexhaustairblastwillbedirectedawayfromtheoperator.Grasp
thedeflectorandrotateittothedesiredpositionforthecurrent
application.
67
CompleteallstepsofPREPARINGTHETOOLbeforeusingthetool.
Fullsequentialfireonlyforthisitem.
Fig.17Fig.16
B
Fig.14 Fig.15
A
OPERATINGINSTRUCTIONS
FOREWORD
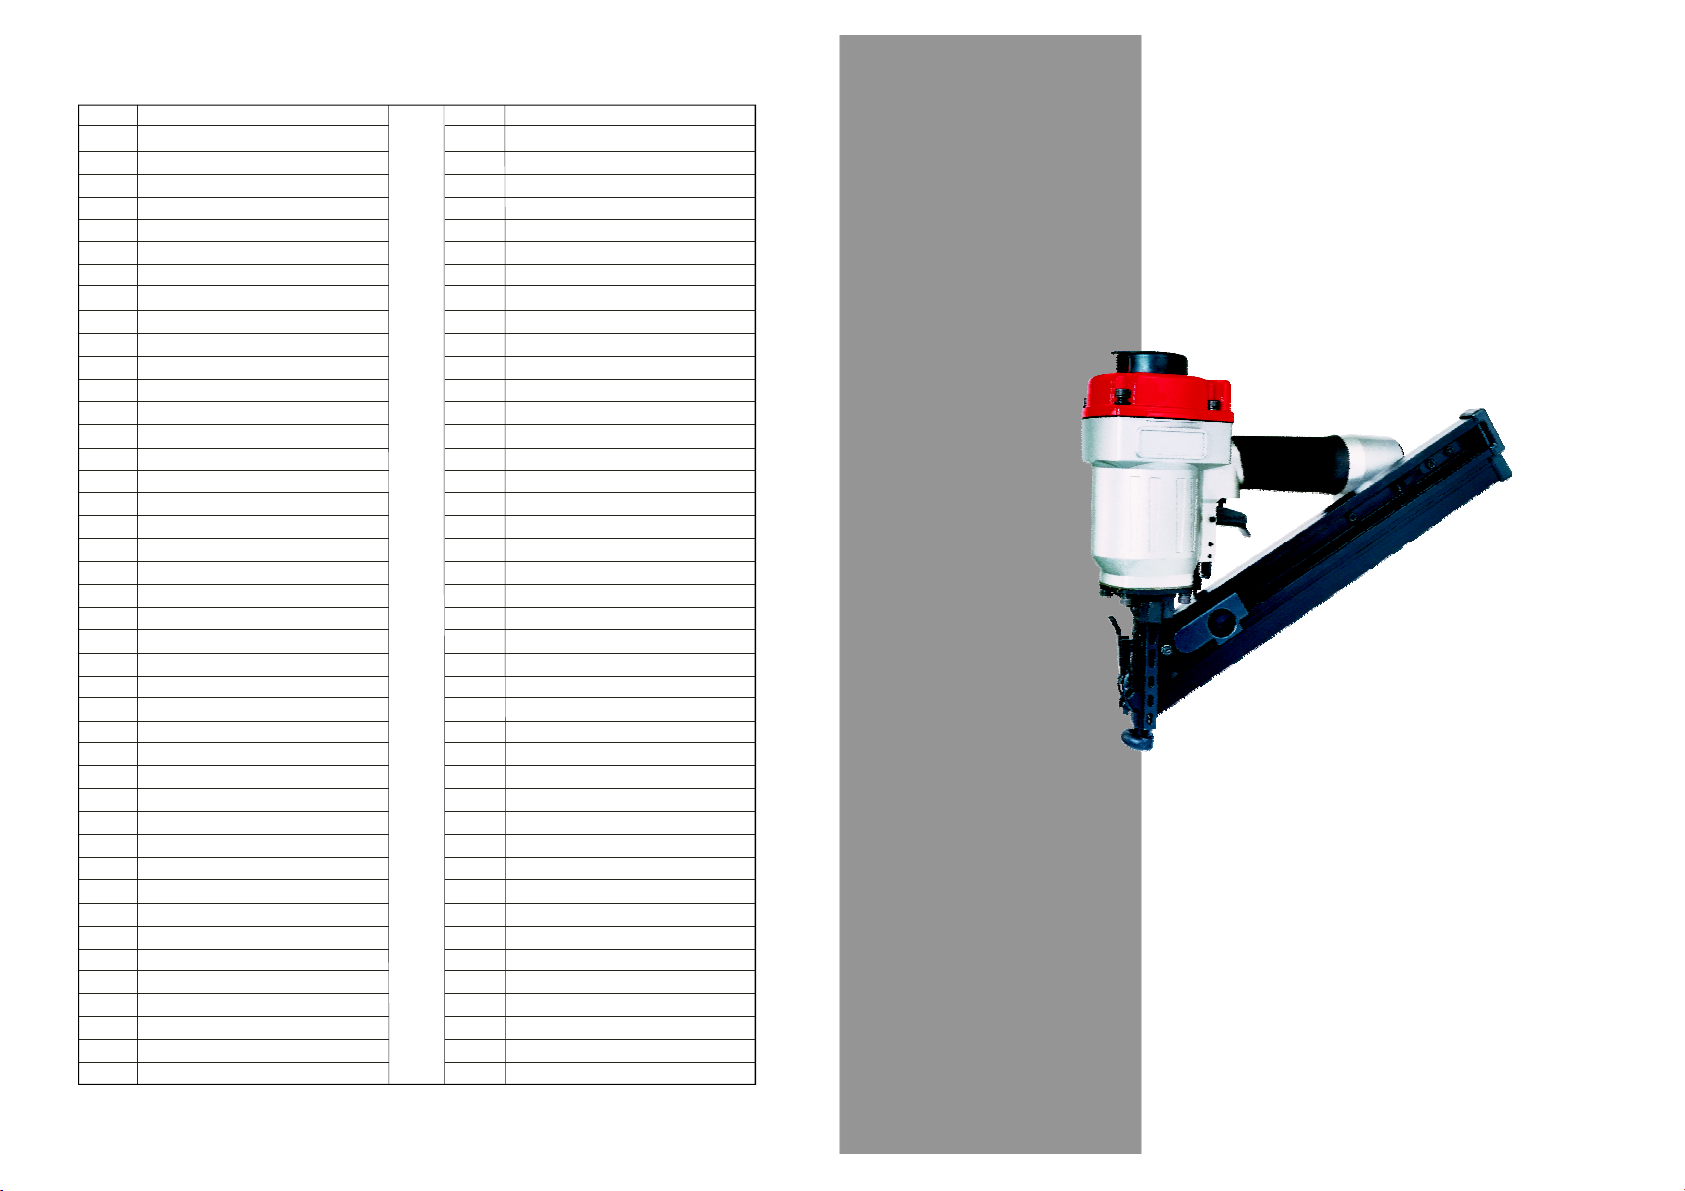
Model1000993ispneumaticframingnailer.Itisdesignedtoinstall15
ga.diameterframingnailsofvariouslengths(1/˝to2/˝long).
Fastenercollationangleis34°.
11
22
POWERSOURCE
eachworkday.
CAUTION:
Alllinecomponents(hoses,connectors,filters,
regulators,etc.)musthavea150%ofmaximumsystem
potential.PeriodtrytouseahoseofID3/8˝connectingnailer
withcompressor.
Donotconnectthistooltoasystemwithmaximumpotential
pressuregreaterthan180PSI(12.3BAR).
Onlydisconnectquickconnectorconnectedtothebodytail
portionairinletnocompressedairtheworddischargecanbe
guaranteedwhendisconnecting.(Fig.14)
Disconnecttoolfromairsupplybeforeperforming
maintenance,clearingajammedfastener,leavingworkarea,
movingtooltoanotherlocation,orhandingthetooltoanother
person.
—
1.Afterreadingandunderstandingthisentiremanual,connecttoolto
airsupply. Keeptoolpointedawayfromyourselfandothersatalltimes.
CAUTION:
PREPARINGTHETOOLBEFOREDRIVING
2.Putthefastenersintomagazinefromthegrooveofthe
magazinetailportion(SeeFig.15). “”T
Neveruseatoolthatleaksairorneedsrepair.
AlwayswearZ87approvedsafetyglasses,andhearingprotection
whenpreparingoroperatingthetool.
Donotloadfastenerswithtriggerorsafetydepressed.
Alwaysconnecttooltoairsupplybeforeloadingfasteners.
USINGTHETOOL
Putthenoseontheworkingsurface,lightlypushthetooltowardthe
workingsurfaceuntilthesafebracketisdepressed,then,depressthe
triggertodrivethefasteners.This triggerfire”methodprovidesthe
mostaccuratefastenerplacement.Inthismethod,thesafebracketcan
beadjustdownwardswithknobtoavoidstrikingtwonailsatonetime.
Table of contents


