Norvell PRESTIGE 2100 Guide
US
Instruction Manual and Users Guide
PRESTIGE 2100™
Model# P2100
Spray Tanning System

PRESTIGE 2100
Contents
1. Explanation of symbols used .....................................................1
2. Field of application ..............................................................1
3. Important Safety Instructions ....................................................1
4. Processable materials ............................................................4
5. Non-processable materials .......................................................4
6. Preparation of the spray area.....................................................6
7. General preparations before the application of spray tanning solution.............6
8. General maintenance after the application of spray tanning solution ..............7
9. Start-up .........................................................................8
10. Operation ......................................................................9
11. Tips on using the spray tanning system........................................10
12. After application of the spray tanning solution ................................10
13. Cleaning the spray tanning system............................................11
14. Maintenance ................................................................. 12
15. Storage ......................................................................13
16. Spare parts ..................................................................14
17. Correction of Malfunctions....................................................15
1
US
PRESTIGE 2100
Congratulations on purchasing a Norvell Skin Solutions, LLC Spray System.This product has
been specially designed to provide an ecient application of tanning solution products.
Take a minute to read and understand how to operate your new Norvell® system and you
will be able to provide the perfect tan with every application.
Read all safety information before operating the equipment. Save
these instructions.
1. Explanation of symbols used
Indicates a hazardous situation which, if not avoided, could result
in death or serious injury.
i
Indicates tips for use and other particularly useful information.
DO NOT sit or stand on the base unit. Danger of tilting/breaking!
2. Field of application
The Prestige 2100™ Spray Tanning System has been specically developed for the
professional application of liquid spray tanning solution. Any application other than that
described in this operating manual is not permitted.
3. Important Safety Instructions
To reduce the risks of re or explosion, electrical shock and the
injury to persons, read and understand all instructions included in
this manual. Be familiar with the controls and proper usage of the
equipment.
WARNING! EXPLOSION HAZARD!
DO NOT store ammable materials in the base unit!
Materials may only be stored in hermetically sealed containers in
the base unit! Any material spills in the base unit must be wiped
up immediately and allowed to dry completely before operation!
DO NOT store solvent-based materials in the base unit during
operation!
•
DO NOT use the spray guns to spray ammable substances.

2
PRESTIGE 2100
US
•
DO NOT clean spray guns with ammable solvents.
•
There must be no sources of ignition such as open res, smoke of lit cigarettes, cigars and
tobacco pipes, sparks, glowing wires, hot surfaces, etc. in the vicinity during spraying.
•
Caution against dangers that can arise from the sprayed substance and observe the
text and information on the containers or the specications given by the substance
manufacturer directly or via a SDS (Safety Data Sheet).
•
DO NOT spray any liquid of unknown hazard potential.
•
ATTENTION! Spray tanning solutions do not generally oer any protection against
sunburn. Repeated unprotected contact with the sun increases the risk of skin cancer,
skin aging and other harmful eects.
•
This Spray Tanning System is intended for use by persons 14 years and over.
•
DO NOT let children play with the Spray Tanning System.
•
NEVER leave spray tanning system unattended.
•
Stay alert and watch what you are doing.
•
DO NOT operate the unit when fatigued or under the inuence of drugs or alcohol.
•
Follow all appropriate local, state, and national codes governing ventilation, re
prevention, and operation.
•
The United States Government Safety Standards have been adopted under the
Occupational Safety and Health Act (OSHA). These standards, particularly part 1910
of the General Standards and part 1926 of the Construction Standards should be
consulted.
•
NEVER direct the spray gun at animals.
•
Ensure that the spray area is well ventilated.
•
DO NOT breathe in spray tanning solution. Wearing nasal plugs and operating an
extraction fan designed for the purpose is recommended.
•
DO NOT spray into the eyes.
•
If spray tanning solution is sprayed into the eyes, wash them out with water
immediately and consult a doctor.
•
DO NOT spray spray tanning solution into open wounds or onto damaged skin.
•
Cover your hair when spraying your face. Otherwise bleached hair in particular could
be stained by the spray tanning solution.
•
NEVER immerse the Spray Tanning System into water.
• WARNING!NEVER use your Spray Tanning System near bath tubs, shower
trays or other receptacles that contain water.
•
NEVER place the Spray Tanning System near a washbasin or another water source.
Water always represents a hazard even when the system is switched o.
•
NEVER expose the equipment to rain.
•
DO NOT use outdoors or operate where aerosol (spray) products are being used.
•
NEVER drop or insert any object into any opening or hose.
•
NEVER block air openings of the spray turbine.
•
Keep electrical cord plug and spray gun trigger free from liquids.
NEVER hold the cord at plug connections to support the cord. Failure to observe may
result in an electrical shock.

3
PRESTIGE 2100 US
•
Keep cord away from heated surfaces.
•
NEVER operate spray tanning system if cord or plug is damaged.
•
As additional protection, the installation of a circuit protective device such as ALCI or
GFCI is recommended. Ask your installer for advice.
•
Connect to a grounded outlet and use grounded extension cords.
•
DO NOT use a 3 to 2 adapter.
•
The system is equipped with a thermal release which disconnects the system in case
of overheating. In this case, turn o the system, remove the plug and let the system
cool down for at least 1/2 hour. Eliminate the cause of heating, e.g. bent hose, soiled
air lter, slots for air intake covered.
•
Unplug turbine before cleaning any parts.
•
Use only manufacturer authorized parts. User assumes all risks and liabilities when
using parts that do not meet the minimum specications and safety devices of the
turbine manufacturer.
•
NEVER open the Spray Tanning System yourself to carry out electrical repairs!
•
DO NOT place the spray gun on its side, as material could leak out.
Grounding Instructions
This product must be grounded. In the event of an electrical short circuit, grounding
reduces the risk of electric shock by providing an escape wire for the electric current.This
product is equipped with a cord having a grounding wire with an appropriate grounding
plug. The plug must be plugged into an outlet that is properly installed and grounded in
accordance with all local codes and ordinances.
WARNING Improper installation of the grounding plug can result in a
risk of electric shock.
Ifrepairorreplacementofthecordorplugisnecessary,donotconnectthegreengroundingwire
toeitheratbladeterminal.Thewirewithinsulationhavingagreenoutersurfacewithorwithout
yellow stripes is the grounding wire and must be connected to the grounding pin.
Check with a qualied electrician or serviceman if the grounding instructions are not
completely understood, or if you are in doubt as to whether the product is properly
grounded. Do not modify the plug provided. If the plug will not t the outlet, have the
proper outlet installed by a qualied electrician.
This product is for use on a nominal 120 volt ac circuit and has a grounding plug that looks
like the plug illustrated below. Make sure that the product is connected to an outlet having
the same conguration as the plug. No adapter shall be used with this product.
Grounded Outlet
Grounding Pin
Cover for grounded outlet box

4
PRESTIGE 2100
US
Important Electrical Information
Use only a 3-wire extension cord that has a 3-blade grounding plug and a 3-slot receptacle
that will accept the plug on the product. Make sure your extension cord is in good condition.
When using an extension cord, be sure to use one heavy enough to carry the current your
product will draw. An undersized cord will cause a drop in line voltage resulting in loss of
power and overheating. A SJT type cord is required. Cord shall be 14 AWG minimum for
general indoor use.
SAVE THESE INSTRUCTIONS
4. Processable materials
Liquid spray tanning solution
i
Only use spray tanning solution up to the expiry date specied on the package.
12 M
means, for example, that the substance can be used for 12 months after
opening. Actual date of opening needs to be noted by the user and marked
on the container or package.
5. Non-processable materials
All materials not approved for skin treatment

5
PRESTIGE 2100 US
Description (Fig. 1)
1) Air cap /Nozzle
2) Union nut
3) Spray attachment (3 pcs.)
4) Trigger
5) Gun handle
6) Air volume control
7) Air hose
8) ON/OFF switch
9) Material volume regulation
10) Carry handle
11) Gun holder
12) Container
13) Closure
14) Air hose connection
15) Mains switch
16) Deposition tray for small parts
17) Cover of air lter compartment
18) Air hose retainer
19) Deposition tray
1
1
2
3
4
5
6
78
9
12
10
11
13
14
16
15
17
18
19

6
PRESTIGE 2100
US
6. Preparation of the spray area
•
The cleanliness of your spray area is a direct reection on your business, therefore
make sure your spray area is well organzied and throughly cleaned.
•
Keep in room merchandise well organized and free from overspray build-up.
•
The use of an overspray extracting spray booth or combination spray tent and
tanning extraction fan is recommended to reduce the amount of overspray ltered
through the air.
•
Work in a room with a smooth, easy-to-clean surface. Between each spray session
wipe any overspray that may have collected from the interior of your spray booth or
spray tent.
7. General preparations before the application of spray
tanning solution
24-48 Hours Prior to Session
•Exfoliate. Exfoliate. Exfoliate.
We cannot over-stress the importance of pre-session exfoliation. 24-hours prior to
your appointment, clear away any dry, dead skin cells with a pH balancing scrub such
as Norvell® Renewing Sunless Exfoliator™. For extreme areas use a deep exfoliator
such as Intensive Detox Salt Scrub™, no less that 24-hours prior to your session.
•Protect Your Skins’ pH Levels.
Avoid using bar soaps, high pH shower products, or in shower moisturizers. These
products can neutralize the DHA bronzing reaction within the skin.
•Hair Removal:
Any depilatory creams, waxing or shaving should be completed 24-hours prior to your
session.
Day of Session
•Don’t Create Sunless Barriers.
Avoid applying anything to the skin that may act as a barrier between the sunless
solution and the skin. Deep penetration of the solution is key to beautiful lasting
color. Do not apply lotions, creams, or perfumes prior to session. Use deodorant
sparingly.
•Remove any make-up prior to the sunless application.
•Arrive Prepared.
Wear loose FItting dark colored clothing and remove jewelry. Tight clothing can rub or
smear bronzers, especially around the knees, elbows, chest and waist.
Immediately Prior to Session
•Optimize pH Levels.
Apply Norvell® Pre Sunless pH Balancing xLaTan™ spray to stabilize the skins’pH
level as well as to provide a quick surge of moisture within the skin. Having the proper
skin pH boosts DHA development, speeding result times and resulting in a deeper,
darker tan. Having a stable skin pH combats the dreaded“orange eect”.

7
PRESTIGE 2100 US
•Forget to exfoliate? Pressed for time?
We recommend using our eXmitt® Pre-tan Body Bu to instantly clear away any dead
skin cells, clean the skin of any barriers, and balance the pH level of the skins surface.
Infused with our proprietary pH balancing formula, the eXmitt® is designed to gently
exfoliated and bu the skin while accelerating DHA color development without the
need for water.
8. General maintenance after the application of spray
tanning solution
•
Once dry, apply Post Sunless HydroFirm™ Moisturizing Spray to add moisture, seal
sunless results and boost the DHA reaction.
•
You should refrain from showering as long as possible (up to 24-hours). As with all
DHA products, sunless color begins showing development approx. 4-hours after
application and continues to darken for up to 24-hours.
•
If you must shower during the 4 to 24-hours following the application, WARM
WATER RINSE ONLY. The use of soap can inhibit the full development of DHA color.
•
Important: Cosmetic instant bronzers will wash away during the rst shower. Pools
and spas that utilize chlorine can cause fading.
•
When showering after 24-hours, use only a mild pH balancing shower gel such as pH
Balancing Shower Cleanser™. Refrain from using scrubs or high pH soaps as these
will strip away your sunless color.
•
Extend and build color between sessions with a daily application of Color Extending
Pro-Long™ moisturizer.
Need Touch-ups? Use Bronzing 4-Faces™ or any other Norvell® self-tanning product
between full sessions.
iNOTE: The tips listed herein are instructions to achieve the very best sunless
tanning results; however, you can still achieve beautiful just o the beach™
color as a Norvell® walk-in client.
8
PRESTIGE 2100
US
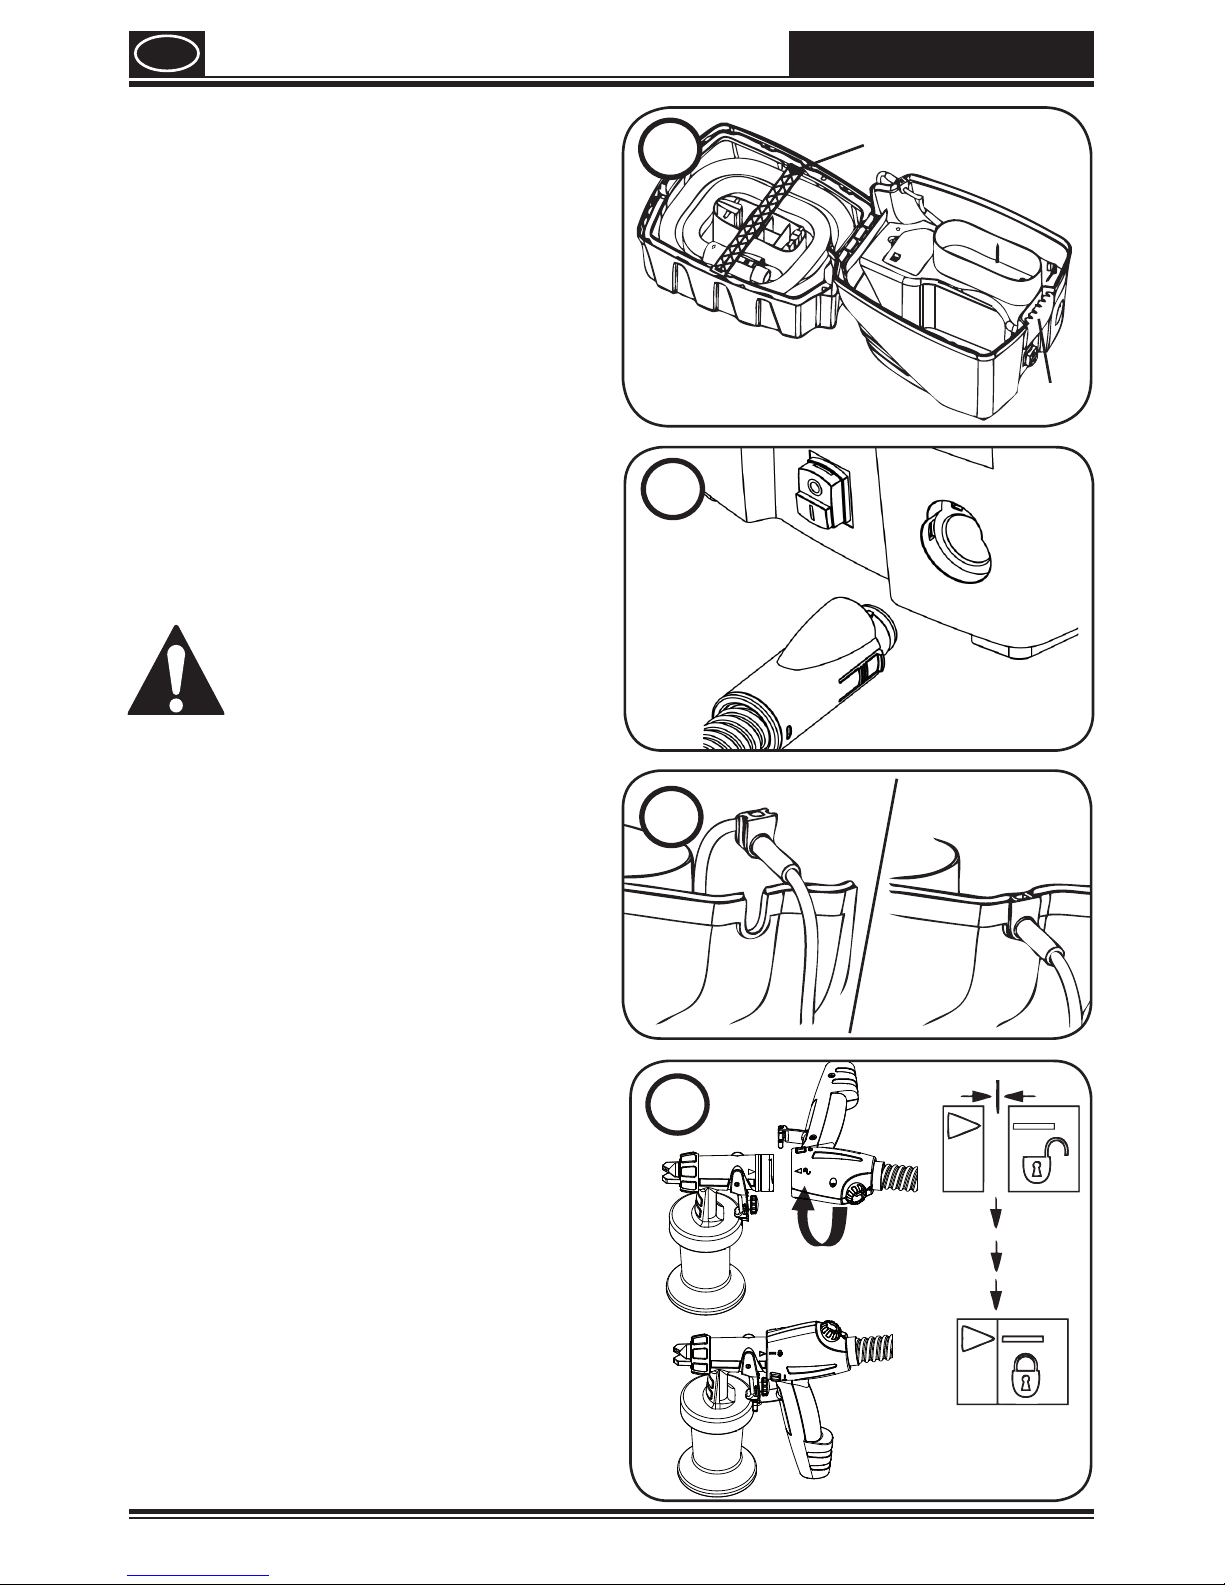
9. Start-up
Before connecting to the power supply, be
sure that the supply voltage is identical with
the value given on the rating plate.
Always lower the carry handle in the cover
before opening the cover. Press the locking
device on both sides to this purpose.
1.
Open the closure (Fig. 2, 1) and fold open
the cover of the device.
2. Open the air hose retainer (Fig. 2, 2).
3.
Remove the air hose and connect it to the
air hose connection (Fig. 3).
4. Close the air hose retainer again.
5. Unroll the power cord and slide the cord
grommet into the provided recess (Fig. 4)
WARNING: DO NOT close the
cover if the cord grommet is
not positioned correctly. The
power cord could otherwise be
damaged!
6. Remove the spray attachment from the
deposition tray.
7.
Unscrew the container from the spray
attachment.
8.
Prepare spray tanning solution according
to manufacturer's instructions and pour
into the container.
9.
Screw the container rmly onto the spray
attachment.
10.
Connect the front part of the gun and the
gun handle to each other. (Fig. 5)
11. Close the device cover and pull the carry
handle upwards. This makes the gun
holder accessible.
12. Put the spray gun onto the gun holder at
the turbine.
13.
Place the turbine only on a clean, at
horizontal surface. Otherwise, the turbine
may suck in dust, etc.
2
1
2
3
4
5

9
PRESTIGE 2100 US
14. Switch on the mains switch by pressing
"I" at the turbine (Fig. 6).
10. Operation
How the SprayTanning system is handled,
including preparation of the work place
and spray tanning solution as well as the
nal result, is the sole responsibility of
the operator.
Norvell excludes any liability for damage
which may arise from overspray, applica-
tion errors, touch-ups, or non-compliance
with the instructions provided here.
•
Press the On/O switch at the gun handle
(Fig. 7, 1).
•
Turn the material control (Fig. 7, 2), in
order to adjust the desired delivery rate.
lower material volume (-):
turn anti-clockwise
higher material volume (+):
turn clockwise
Your goal is a 4 inch wide spray
pattern spraying 4 inches away.
•
Turn the air volume control (Fig. 7, 3), in
order to optimize the atomization and
reduce overspray.
less air (-): turn anti-clockwise
more air (+): turn clockwise
•
Turn the air cap (Fig. 8, 1) with the union
nut (2) slightly unscrewed, to adjust the
shape of the spray jet:
Fig. 9a vertical at jet:
For spray movements from left to
right
Fig. 9b horizontal at jet:
For spray movements from top to
bottom
•
Pull the trigger to spray the tanning
solution.
a
b
9
6
7
1
2
3
8
1
2

10
PRESTIGE 2100
US
11. Tips on using the spray tanning system
Before commencing application, check that all necessary protective
measures (nasal plugs, hair covering) have been taken.
iPractice on a large piece of newspaper or cotton towel rst in order to nd the
optimal settings for the spray tanning solution used.
•
If a tanning extraction fan is available,
place in the near vicinity of spraying and
switch on.
•
Avoid interruptions during the spray
movement. Maintain a constant pace.
•
The spray movement should come
from the arm, not just from the wrist.
This ensures that a uniform distance is
maintained between the spray gun and
the body during the spray operation.
Fig. 10 a: CORRECT even distance
Fig. 10 b: INCORRECT uneven distance
will result in uneven tanning
•
Move the spray gun at an even speed.
•
When tanning is complete, switch o
turbine and any tanning extraction fan (if
used) after fumes/mist have cleared.
12. After application of the spray tanning solution
i
The full tanning eect develops
during the rst 6-12 hours after
the treatment.
•
Allow the spray tanning solution to dry for
5-10 minutes before getting dressed again.
iYou can also use the air from the
air hose to accelerate the drying
process of the spray tanning
solution. To do this, simply
remove the spray attachment
from the handle and switch the
system on.
•
Do not shower or bathe in the first 6-8 hours after application, as this will affect the
tanning result. This will vary depending on the tanning solution used.
•
Prolonged hot baths and showers should be avoided, in order to maintain the tanning
effect for as long as possible. Daily moisturizing of the skin is also recommended.
4 inches
a
b
10
11
PRESTIGE 2100 US
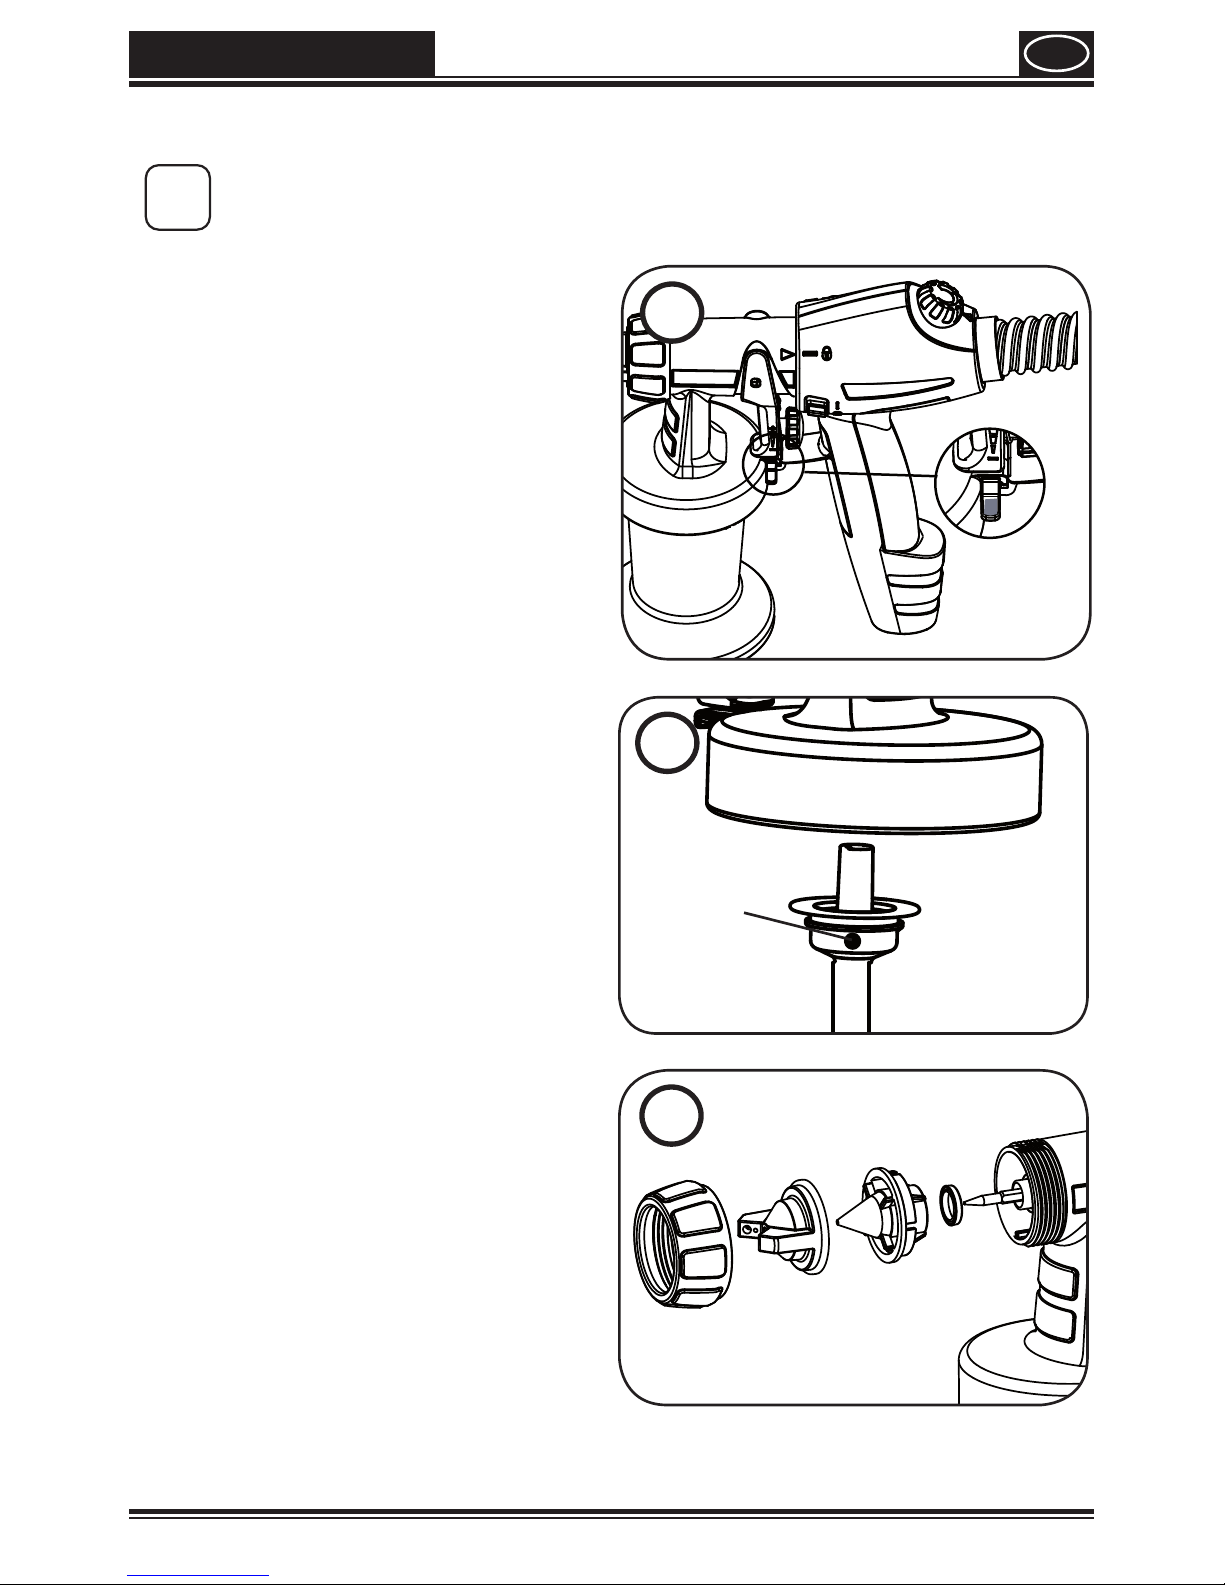
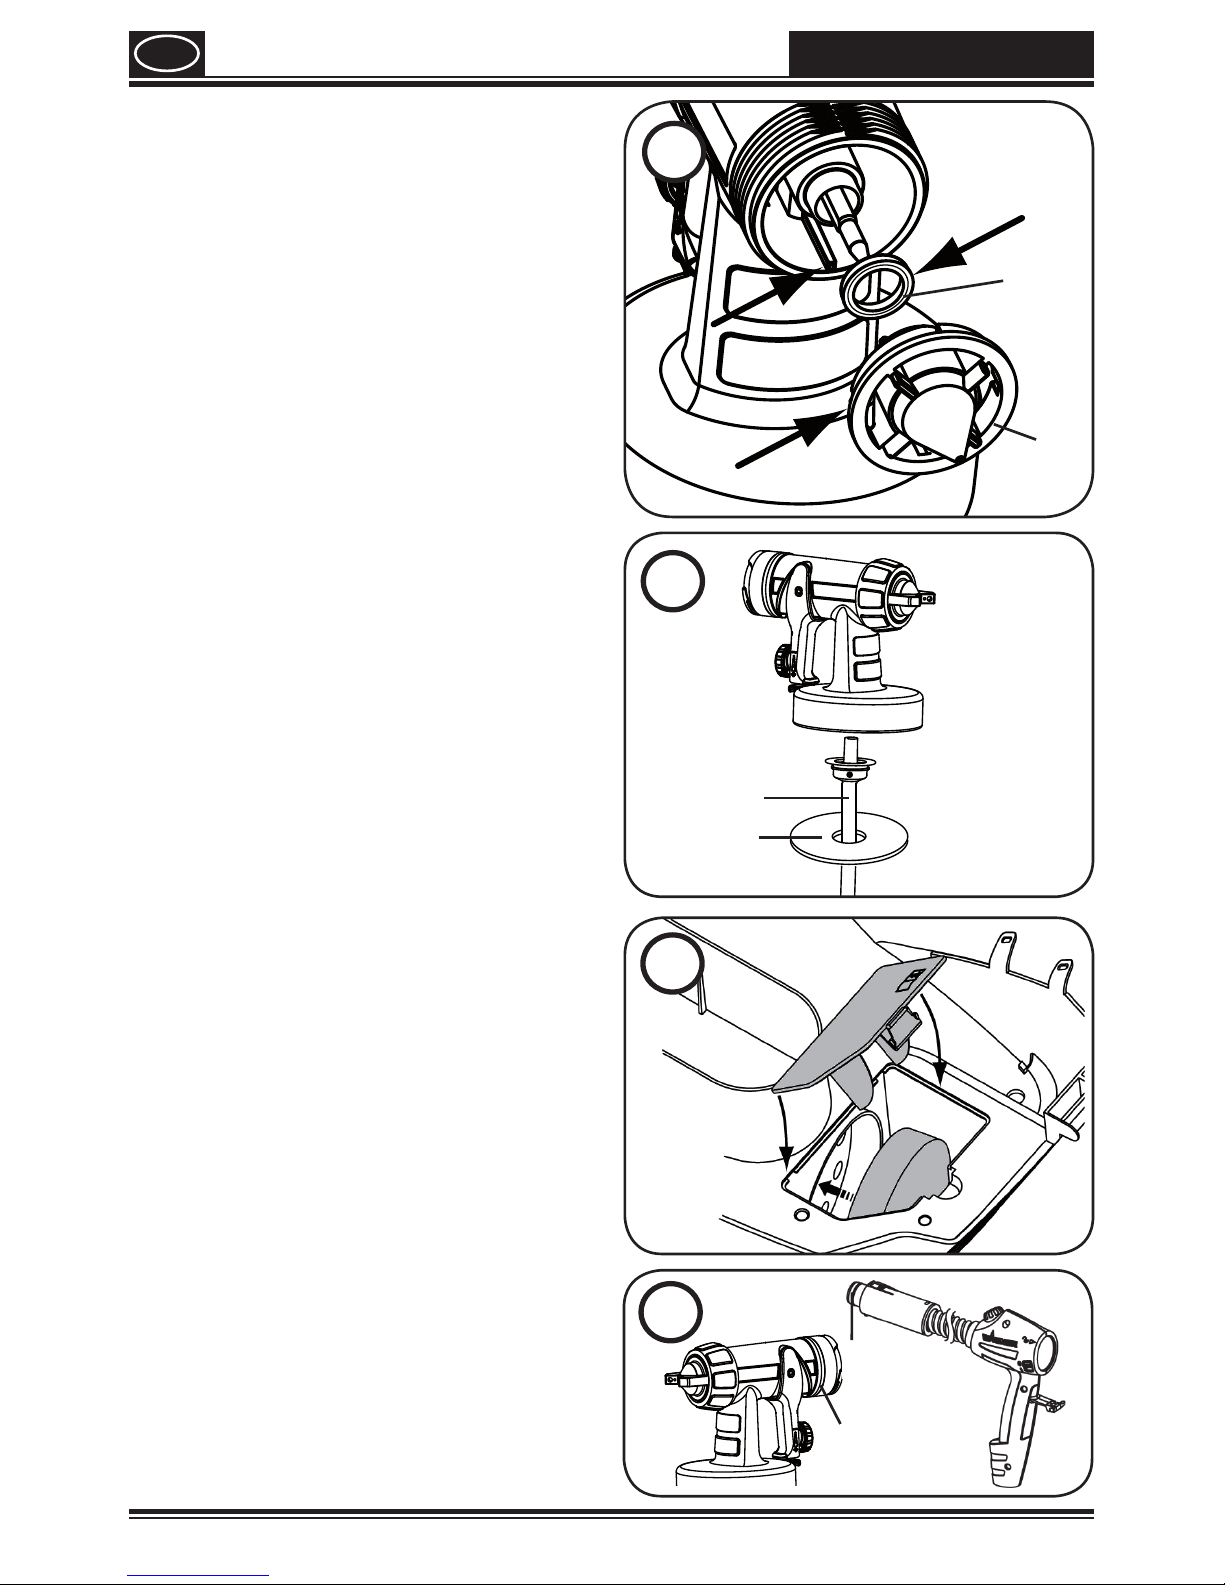
13. Cleaning the spray tanning system
i
Clean the SprayTanning System as required at the end of the working day. Dried
spray tanning solution makes cleaning more dicult and can even damage
the system.
1) Turn the system o.
2) Divide the spray gun. Press the hook
(Fig. 11 "click") slightly downwards.
Turn the gun front part and gun rear
part against each other.
WARNING: NEVER hold the gun
handle under water or immerse it
into liquids. Clean the housing only
with a moistened cloth.
3) Unscrew the container.
4)
Pour any remaining spray tanning
solution back into the original packaging.
5) Clean the container and feed tube with
a brush.
6) Clean the ventilating bore (Fig. 12, 1).
7) Pour water into the container. Screw
the container back on.
DO NOT use ammable materials for
cleaning purposes.
8) Assemble the gun again.
9) Turn on the system and spray the water
into a sink or a cloth.
10)
Repeat the above procedure until the
water emerging from the nozzle is clear.
11)Turn o the system and divide the spray
gun.
12)
Screw o the container and empty it. Pull
out the feed tub with container seal.
CAUTION! NEVER clean seals, nozzles or
air holes of the spray gun with
metal objects.
13)Unscrew the union nut and remove the
air cap and nozzle (Fig. 13). Clean the air
cap, nozzle seal and nozzle with a brush
and water.
CLICK
11
1
12
13
12
PRESTIGE 2100
US
14)Clean the outside of the spray gun and
container with a cloth soaked in water.
15)Assemble the parts again (see
“Assembly”).
Assembly
1) Slide the nozzle seal (Fig. 14, 1) with the
groove (slot) facing forwards into the
nozzle (2).
2)
Put the nozzle onto the gun body and
nd the correct position by turning it.
3)
Put the air cap onto the nozzle and
tighten it using the union nut.
4) Place the container seal (Fig. 15, 1) from
below on the feed tube (2) and slide
it over the collar, while turning the
container seal slightly.
5) Insert the feed tube with container seal
in the gun body.
14. Maintenance
Important! NEVER operate the system
without the air lter; dirt could
be sucked in and interfere with
the function of the system.
DO NOT store any objects in
the air lter compartment.
1) Change the air lter if it is soiled (check
daily).
2)
Open the cover of the air filter
compartment (Fig. 16).
3)
Insert a new air filter into the
compartment.
4)
Close the cover of the air filter
compartment.
In order to mount the gun more easily
apply lubricating grease (enclosed)
liberally to the O-ring at the spray
attachment (Fig. 17, 1) and to the O-ring
of the plug connection of the air hose (Fig.
17, 2).
16
15
1
2
17
1
2
1
2
14

13
PRESTIGE 2100 US
15. Storage
Store unit in a safe place after air hose
(Fig. 18, 1) and all accessories have been
placed inside unit.
1
18

14
PRESTIGE 2100
US
16. Spare parts
This unit contains no user servicable electrical parts.
DO NOT attempt to service unit yourself.
Spare Parts List (Fig. 19)
Pos. Designation Order No.
1 Spray attachment complete with 6.75 . oz container PR2334403
2 Union nut PR2334405
3 Air cap PR2334407
4 Nozzle PR2334409
5 Nozzle seal PR0417706
6 O-ring of spray attachment PR0417308
7 Feed tube PR2334413
8 Container seal PR2323039
9 Container with cover 6.75 . oz PR2334417
10 O-ring of air hose PR0420 316
11 Gun handle with air hose PR2334421
12 Air hose retainer PR0111000
13 Cover of air lter compartment PR2347839
14 Air lter (2 pcs.) PR2334431
15 Closure PR0222000
Lubricant LUBE

15
PRESTIGE 2100 US
6
15
8
9
7
13
1
14
43212
10
19
5
11
17. Correction of Malfunctions
Malfunction Cause Remedy
No spray tanning
solution comes out
of the nozzle
•
Nozzle clogged
•
Material volume setting
turned too far anticlockwise
•
No pressure build-up in
container
•
Container empty
•
Feed tube loose
•
Feed tube clogged
➞Clean
➞Turn clockwise
➞Tighten container
➞Rell
➞Insert
➞Clean
Spray tanning
solution drips out
of the nozzle
•
Spray tanning lotion has
accumulated on the air cap,
nozzle or needle
•
Nozzle loose
•
Nozzle seal worn
•
Nozzle worn
➞Clean
➞Union nut tighten
➞Change
➞Change

16
PRESTIGE 2100
US
Malfunction Cause Remedy
Atomization too
coarse •
Material volume setting
turned too far clockwise
•
Nozzle contaminated
•
Too little pressure build-up in
container
•
Air lter heavily soiled
•
Amount of air too low
➞Turn material volume
setting anticlockwise
➞Clean
➞Tighten container
➞Replace
➞Increase air volume
Uneven spray
pattern •
Spray tanning solution in the
container is running out
•
Nozzle seal worn
•
Air lter heavily soiled
➞Rell
➞Replace
➞Replace
Excessive overspray •
Distance too large
•
Material volume setting
turned too far clockwise
•
Amount of air too high
➞Reduce distance
➞Turn material volume
setting anticlockwise
➞Reduce air volume
Spray tanning
solution runs down
body
•
Too much spray tanning
solution applied
•
Spray paths overlap too much
•
Spraying distance too small or
spray movement too slow
➞Carefully dab aected
points with a towel,
reduce ow setting if
required and lightly
overspray again
The tan is patchy or
blotchy •
Skin was not correctly
prepared
•
Spray movement not even
enough
➞Correct by lightly
overspraying
Customer's skin
appears orange •
Too much spray tanning
lotion applied
•
Skin was not correctly
prepared
•
High sensitivity to active
ingredient DHA
➞Remove spray tanning
lotion from the skin.
Prepare skin correctly for
new application, reduce
ow setting
➞Use another shade with
lower concentration of
DHA
System no longer
functions during
use
•
System overheated ➞Unplug the power plug,
let the system cool down
approx. 30 minutes, do not
bend the hose, check the
air lter, do not cover the
intake slots

17
PRESTIGE 2100 US
Technical Data
Power source: 120 V ~, 60 Hz
Current: 5.0 A
Protection class: I
Sound pressure level: 80 dB (A); Uncertainty K= 4 dB
Sound pressure output: 93 dB (A); Uncertainty K= 4 dB
Oscillation level: < 8.2 ft/s²; Uncertainty K = 4.9 ft/s²
Air hose length: 11.5 ft
Container capacity: 6.75 . oz
Weight: approx. 13.7 lbs
Environmental protection
The appliance and accessories should be recycled in an environmentally
friendly way. Do not dispose of the appliance with household waste. Support
environmental protection by taking the appliance to a local collection point or
obtain information from a specialist retailer.
Norvell Skin Solutions, LLC
12 Month Limited warranty
This machine and equipment is guaranteed by Norvell for a total period of TWELVE
MONTHS from the ORIGINAL date of purchase by the ORIGINAL PURCHASER. Proof
of purchase to be included and all SHIPPING CHARGES on returns are to be pre-paid.
Client is responsible for shipping both the return and the replacement unit.
Norvell upon examination of the machine/equipment will replace or repair at their
discretion any defects in material or workmanship.
This WARRANTY does NOT include: misuse, damage, neglect, alterations, disassembled
equipment or modications, lack of maintenance, cleaning, water damage to electrical
parts and INCORRECT VOLTAGE CONNECTION. This WARRANTY is in lieu of all other
express warranties, any WARRANTY implied by law, including but not limited to implied
warranties of merchantability or tness, is excluded to the maximum extent permitted
by law and, if not excludable, it is limited to the duration of the express warranty. No
representative or person is authorised to extend this warranty or to create for Norvell
any other liability in connection with the sale of any Norvell product.
Norvell shall not be liable for any consequential, incidental, or special damages of any
kind directly or indirectly resulting from breach of any express or implied warranty.
Some States do allow the exclusion of limitation of incidental or consequential
damages or limitations on the length of any warranty so that the above limitations and
exclusions may not apply to you; however, to the maximum extent permitted under
applicable law, the only rights and remedies shall be to obtain a replacement for any
defective product. This warranty gives you specic legal rights and you may also have

18
PRESTIGE 2100
US
other rights.
PLEASE CONTACT NORVELL FOR ALL
WARRANTY AND SUPPORT ISSUES
Norvell Skin Solutions, LLC
115 Edgewood
Alexandria, TN 37130
Tech Support:
888.829.2831 (US)
615.529.1250 (International)
www.NorvellSunless.com
Part. no. instruction manual 2350548 08/2014_RS Not responsible for errors and changes.
Table of contents
Other Norvell Paint Sprayer manuals


Popular Paint Sprayer manuals by other brands


Finixa
Finixa ELITE PRO-33 instruction manual

RedMax
RedMax BM46I Owner's/operator's manual

RONSEAL
RONSEAL Precision Finish Fence Sprayer user guide

RedMax
RedMax HM20_letter_801 Owner's/operator's manual

SnowEx
SnowEx Liqui Maxx 170802 Owner's manual and installation instructions

DeVilbiss
DeVilbiss GTI-520P Service bulletin


