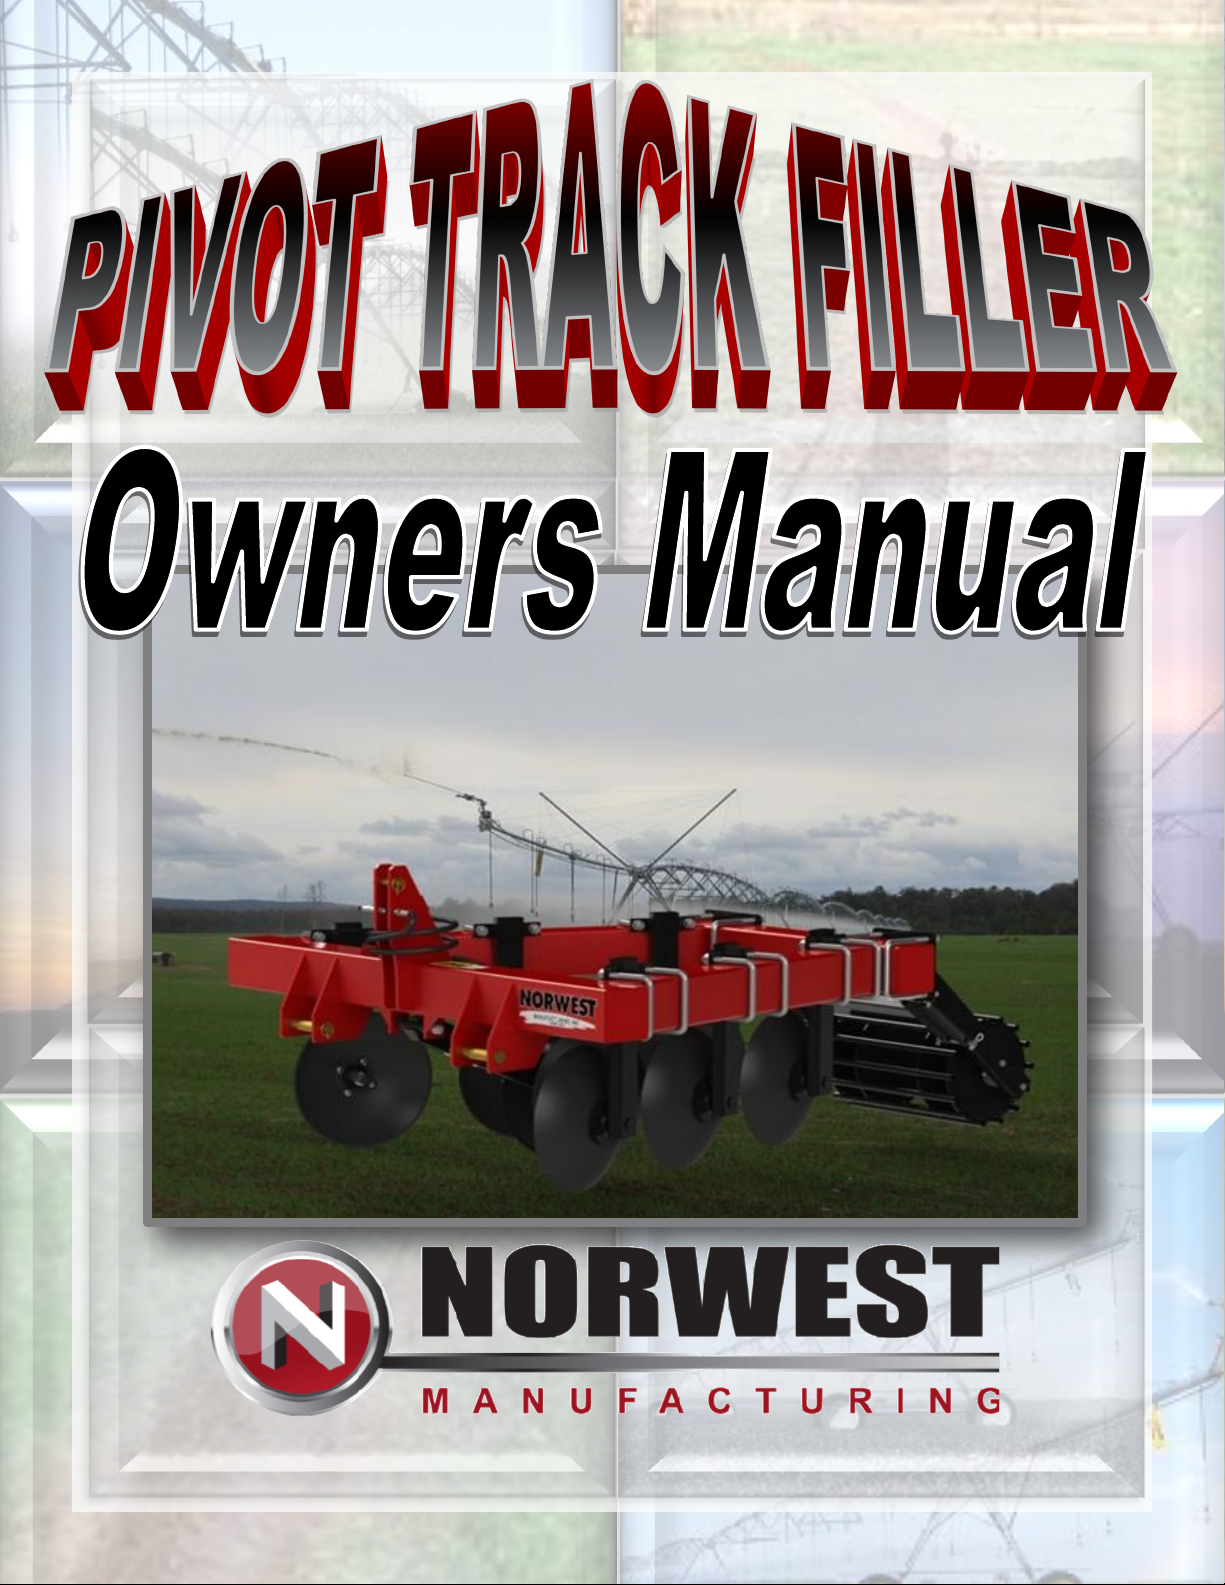
Norwest Pivot track filler User manual
71 South 215 West - Rupert ID, 83350 ● Phone: (208) 436-1770 ● Fax: (208) 436-1776
www.norwest-mfg.com

2
Norwest Pivot Track Filler
OWNER’S MANUAL
71 SOUTH 215 WEST
RUPERT, IDAHO 83350
Phone: (208) 436-1770
Fax: (208) 436-1776
Norwest Online Catalog & Website:
www.norwest-mfg.com

3
TABLE OF CONTENTS
INTRODUCTION............................................................................................................. 4
WARRANTY.................................................................................................................... 4
SAFETY .......................................................................................................................... 4
SAFETY SIGNAL WORDS.............................................................................................. 5
GENERAL SAFETY GUIDELINES.................................................................................. 5
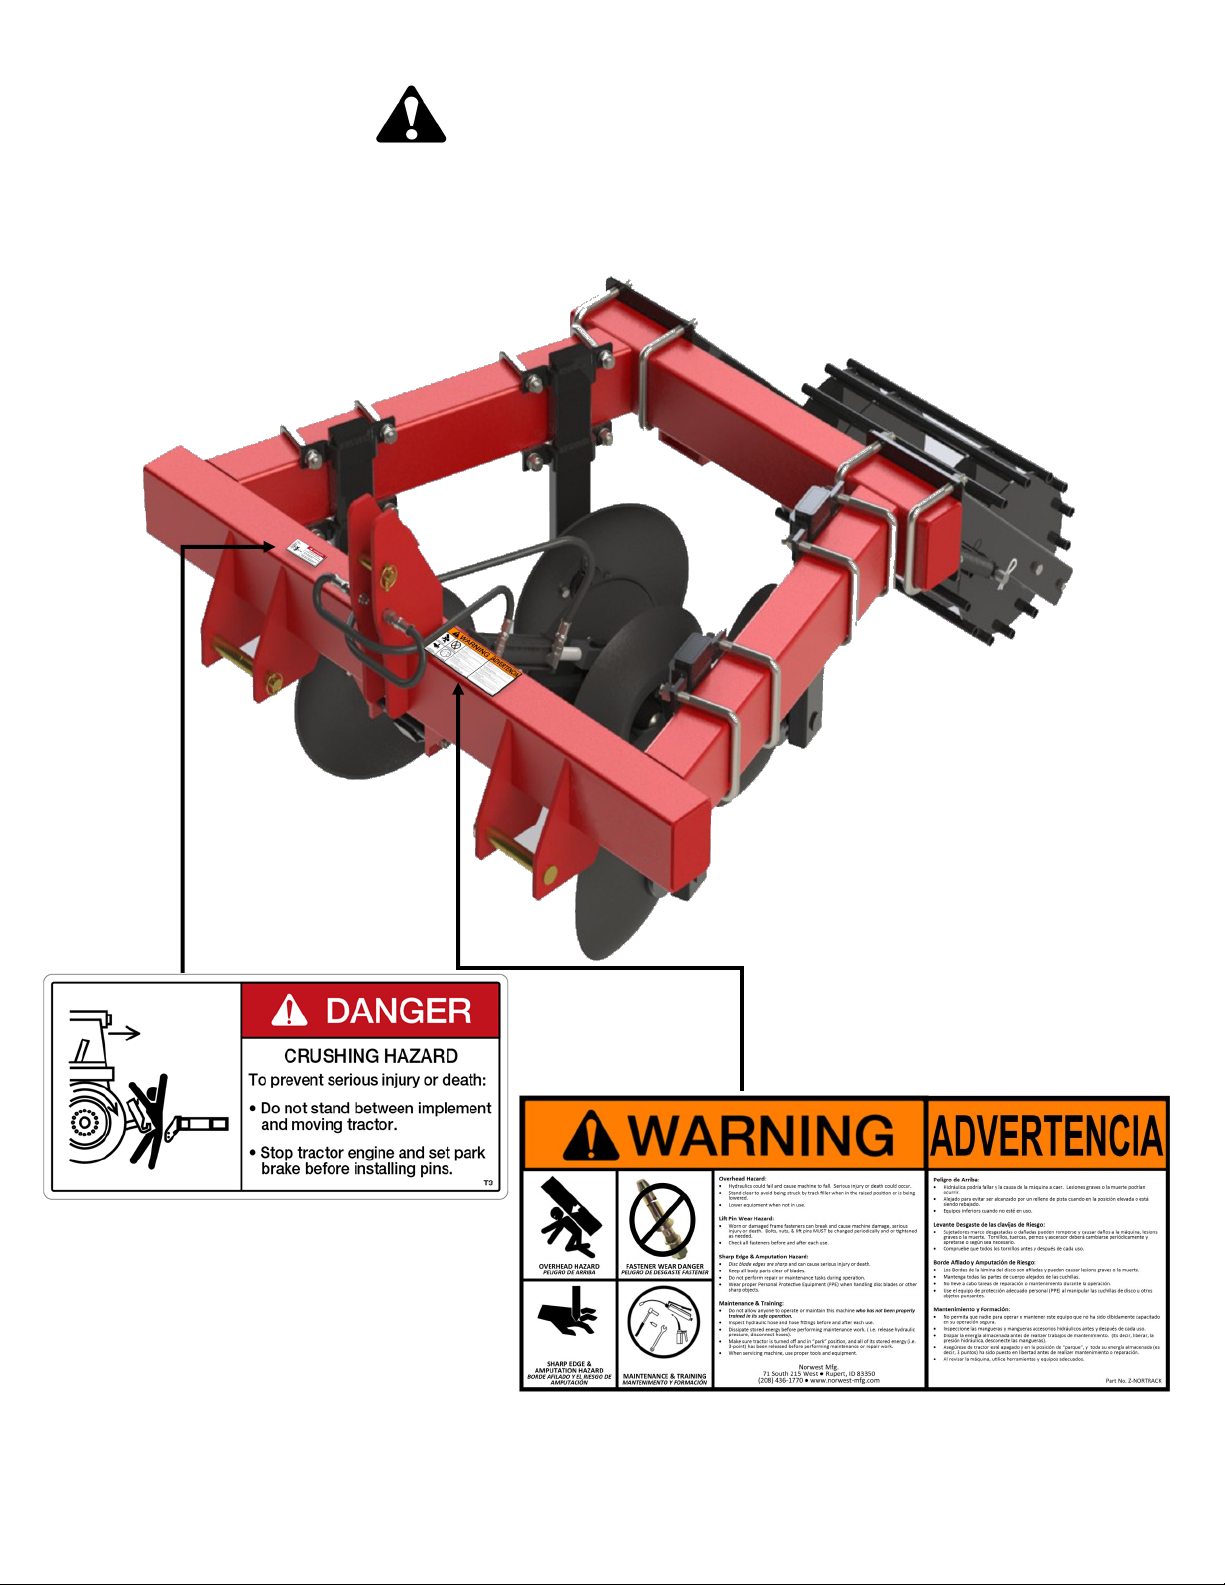
SAFETY SIGN LOCATIONS ........................................................................................... 6
SAFETY DECAL CARE................................................................................................... 7
LIGHTING AND MARKING ............................................................................................. 7
BEFORE OPERATION.................................................................................................... 8
DURING OPERATION .................................................................................................... 9
HIGHWAY AND TRANSPORT OPERATIONS ........................................................ 10,11
FOLLOWING OPERATION........................................................................................... 11
PERFORMING MAINTENANCE .............................................................................. 12,13
MAINTENANCE CHART ............................................................................................... 13
TROUBLESHOOTING .................................................................................................. 14
USE AND CARE TIPS FROM THE FACTORY............................................................. 15
ASSISTANCE................................................................................................................ 15

4
THIS SYMBOL MEANS
ATTENTION!
BECOME ALERT!
YOUR SAFETY IS INVOLVED!
INTRODUCTION
Thank you for purchasing the Pivot Track Filler. We hope you will get many years of producve use from it.
This implement is designed to be pulled by a Roll Over Protecve System (ROPS) protected tractor of proper
size. All product users must read and understand this manual prior to equipment operaon. This manual is
considered part of your machine and should remain with the machine at all mes. Do not allow anyone to
operate or maintain this equipment who has not fully read and comprehended this manual. Failure to follow
the recommended procedures may result in personal injury or death or equipment damage.
WARRANTY
Norwest Manufacturing has manufactured farm implements for over 18 years and has an excellent reputaon
for quality and workmanship. Please contact the manufacturer if you feel a component has not lasted to your
expectaon. These concerns will be handled on a case-by-case basis. Contact Norwest Manufacturing or your
dealer for replacement parts.
SAFETY
Read and understand this manual and all safety signs before operang and maintaining. Review the safety
instrucons and precauons annually.
TAKE NOTE! THIS SAFETY ALERT SYMBOL FOUND THROUGHOUT THIS MANUAL IS USED TO
CALL YOUR ATTENTION TO INSTRUCTIONS INVOLVING YOUR PERSONAL SAFETY AND THE
SAFETY OF OTHERS. FAILURE TO FOLLOW THESE INSTRUCTIONS CAN RESULT IN INJURY OR
DEATH.

5
SAFETY SIGNAL WORDS
Note the use of the signal words DANGER, WARNING and CAUTION with the safety messages. The
appropriate signal word for each has been selected using the following guidelines:
DANGER: Indicates an imminently hazardous situaon that, if not avoided, will result in death
or serious injury. This signal word is to be limited to the most extreme situaons typically for machine
components which, for funconal purposes, cannot be guarded.
WARNING: Indicates a potenally hazardous situaon that, if not avoided, could result in
death or serious injury, and includes hazards that are exposed when guards are removed. It may also
be used to alert against unsafe pracces.
CAUTION: Indicates a potenally hazardous situaon that, if not avoided, may result in
minor or moderate injury. It may also be used to alert against unsafe pracces.
GENERAL SAFETY GUIDELINES
Safety of the operator is one of the main concerns in designing and developing a new piece of equipment.
Designers and manufacturers build in as many safety features as possible. However, every year many
accidents occur which could have been avoided by a few seconds of thought and a more careful approach to
handling equipment. You, the operator, can avoid many accidents by observing the following precauons in
this secon. To avoid personal injury, study the following precauons and insist those working with you, or
for you, follow them.
Replace any CAUTION, WARNING, DANGER or instrucon safety decal that is not readable or is missing.
Locaon of such decals is indicated in this booklet.
Do not aempt to operate this equipment under the inuence of drugs or alcohol.
Review the safety instrucons with all users annually.
This equipment is dangerous to children and persons unfamiliar with its operaon. The operator should be a
responsible adult familiar with farm machinery and trained in this equipment’s operaons. Do not allow
persons to operate or assemble this unit unl they have read this manual and have developed a thorough
understanding of the safety precauons and of how it works.
To prevent injury or death, use a tractor equipped with a Roll Over Protecve System (ROPS). Do not paint
over, remove or deface any safety signs or warning decals on your equipment. Observe all safety signs and
pracce the instrucons on them.
Never exceed the limits of a piece of machinery.
If its ability to do a job, or to do so safely, is in queson - DO NOT TRY IT!
6
SAFETY SIGN LOCATIONS
Safety Sign locaon(s) is/are shown below.
REMEMBER: If Safety Signs have been damaged, removed, become illegible, or parts are replaced without
decals, new decals must be applied. New decals are available from your authorized distributor or Norwest
Manufacturing.

7
SAFETY DECAL CARE
Keep safety signs clean and legible at all mes.
Replace safety signs that are missing or have become illegible.
Replaced parts that displayed a safety sign should also display the current sign.
Safety signs are available from your distributor or dealer parts department or the factory.
How to Install Safety Signs:
Be sure that the installaon area is clean and dry. Remove the smallest poron of backing paper
Align the decal over the specied area and carefully press the exposed scky backing in place.
Slowly peel back the remaining paper and carefully smooth the remaining poron of the decal in place.
Small air pockets can be pierced with a pin and smoothed out using the decal backing paper.
LIGHTING AND MARKING
It is the responsibility of the customer to know the lighng and marking requirements of the local
highway authories and to install and maintain the equipment to provide compliance with the
regulaons. Add extra lights when transporng at night or during periods of limited visibility.

8
BEFORE OPERATION
Carefully study and understand this manual.
Do not wear loose-ng clothing which may catch in moving parts.
Always wear protecve clothing and substanal shoes.
Keep wheel lug nuts or bolts ghtened to specied torque.
Assure that agricultural implement res are inated evenly.
Give the unit a visual inspecon for any loose bolts, worn parts or cracked welds, and make necessary
repairs. Follow the maintenance safety instrucons included in this manual.
Be sure that there are no tools lying on or in the equipment.
Do not use the unit unl you are sure that the area is clear, especially of children and animals.
Don’t hurry the learning process or take the unit for granted. Ease into it and become familiar with your
new equipment.
Pracce operaon of your equipment and its aachments. Completely familiarize yourself and other
operators with its operaon before using.
Use a tractor equipped with a Roll Over Protecve System (ROPS) and fasten your seat belt prior to
starng the engine.
The manufacturer does not recommend usage of tractor with ROPS removed.
Move tractor wheels to the widest recommended sengs to increase stability.
A Norwest Category II & III hitch should be used to ensure proper liing capacity.
Securely aach to towing unit. Use a high strength, appropriately-sized hitch pin with a mechanical
retainer and aach safety chain.
Do not allow anyone to stand between the
tongue or hitch and the towing vehicle when
backing up to the equipment.
Do not ride or stand on machine while in
operaon.

9
DURING OPERATION
Children should not be allowed on the product.
Clear the area of small children and bystanders before moving the culvator.
Shi towing unit to a lower gear before going down steep downgrades, thus using the engine as a
retarding force. Keep towing vehicle in gear at all mes. Slow down for corners and rough terrain.
Make sure you are in compliance with all local and state regulaons regarding transporng equipment on
public roads and highways. Lights and slow moving signs must be clean and visible by overtaking or
oncoming trac when track ller is transported.
SAFETY CHAIN - If equipment is going to be transported on a public highway, a safety chain should be
obtained and installed. Always follow state and local regulaons regarding a safety chain and auxiliary
lighng when towing farm equipment on a public highway. Be sure to check with local law enforcement
agencies for your own parcular regulaons. Only a safety chain (not an elasc or nylon/plasc tow
strap) should be used to retain the connecon between the towing and towed machines in the event of
separaon of the primary aaching system.
Beware of bystanders, parcularly children! Always look around to make sure that it is safe to start the
engine of the towing vehicle or move the unit. This is parcularly important with higher noise levels and
quiet cabs, as you may not hear people shoung.
NO PASSENGERS ALLOWED - Do not carry passengers anywhere on, or in, the tractor or equipment,
except as required for operaon.
Keep hands and clothing clear of moving parts.
Do not clean, lubricate or adjust your equipment while it is moving.
When halng operaon, even periodically, set the tractor or towing vehicle brakes, disengage the PTO,
shut o the engine and remove the ignion key.
Be especially observant of the operang area and terrain - watch for holes, rocks or other hidden
hazards. Always inspect the area prior to operaon.
- DO NOT operate near the edge of drop-os or banks.
- DO NOT operate on steep slopes as overturn may result.
- Operate up and down (not across) intermediate slopes. Avoid sudden starts and stops.

10
HIGHWAY AND TRANSPORT OPERATIONS
Adopt safe driving pracces:
- Keep the brake pedals latched together at all mes. NEVER USE INDEPENDENT BRAKING WITH
MACHINE IN TOW AS LOSS OF CONTROL AND/OR UPSET OF UNIT CAN RESULT.
- Always drive at a safe speed relave to local condions and ensure that your speed is low enough for
an emergency stop to be safe and secure. Keep speed to a minimum.
- Reduce speed prior to turns to avoid the risk of overturning.
- Avoid sudden uphill turns on steep slopes.
- Always keep the tractor or towing vehicle in gear to provide engine braking when going downhill. Do
not coast.
- Do not drink and drive!
Comply with state and local laws governing highway safety and movement of farm machinery on public
roads.
Use approved accessory lighng ags and necessary warning devices to protect operators of other
vehicles on the highway during daylight and nighme transport. Various safety lights and devices are
available from your dealer.
The use of ashing amber lights is acceptable in most localies. However, some localies prohibit their
use. Local laws should be checked for all highway lighng and marking requirements.
When driving the tractor and equipment on the road or highway under 40 kph (20 mph) at night or
during the day, use ashing amber warning lights and a slow moving vehicle (SMV) idencaon emblem.
Plan your route to avoid heavy trac.
Be a safe and courteous driver. Always yield to oncoming trac in all situaons, including narrow
bridges, intersecons, etc.
Be observant of bridge loading rangs. Do not cross bridges rated lower than the gross weight at which
you are operang.
Watch for obstrucons overhead and to the side while transporng.
Always operate equipment in a posion to provide maximum visibility at all mes. Make allowances for
increased length and weight of the equipment when making turns, stopping the unit, etc.
Pick the levelest possible route when transporng across elds. Avoid the edges of ditches or gullies and
steep hillsides.

11
HIGHWAY AND TRANSPORT OPERATIONS (cont.)
Be extra careful when working on inclines.
Maneuver the tractor or towing vehicle at safe speeds.
Avoid overhead wires or other obstacles. Contact with overhead lines could cause serious injury or
death.
Avoid loose ll, rocks and holes; they can be dangerous for equipment operaon or movement.
Allow for unit length when making turns.
Operate the towing vehicle from the operator’s seat only.
Never stand alongside of unit with engine running or aempt to start engine and/or operate machine
while standing alongside of unit.
Never leave running equipment aachments unaended.
As a precauon, always recheck the hardware on equipment following every 100 hours of operaon.
Correct all problems. Follow the maintenance safety procedures.
FOLLOWING OPERATION
Following operaon, or when unhitching, stop the tractor or towing vehicle, set the brakes, disengage the
PTO and all power drives, shut o the engine and remove the ignion keys.
Store the unit in an area away from human acvity.
Do not permit children to play on or around the stored unit.
Make sure all parked machines are on a hard, level surface and engage all safety devices.
Wheel chocks may be needed to prevent unit from rolling.

12
PERFORMING MAINTENANCE
Good maintenance is your responsibility. Poor maintenance is an invitaon to trouble.
Make sure there is plenty of venlaon. Never operate the engine of the towing vehicle in a closed
building. The exhaust fumes may cause asphyxiaon.
Before working on the pivot track ller, stop the towing vehicle, set the brakes, disengage the PTO and all
power drives, shut o the engine and remove the ignion keys.
Be certain all moving parts on aachments have come to a complete stop before aempng to perform
maintenance.
Always use a safety support and block the wheels. Never use a jack to support the track ller.
Always use the proper tools or equipment for the job at hand.
Use extreme cauon when making adjustments.
Never replace hex bolts with less than grade ve bolts unless otherwise specied.
Aer servicing, be sure all tools, parts and service equipment are removed.
Where replacement parts are necessary for periodic maintenance and servicing, genuine factory
replacement parts must be used to restore your equipment to original specicaons. The manufacturer
will not claim responsibility for use of unapproved parts and/or accessories and other damages as a
result of their use.
If equipment has been altered in any way from original design, the manufacturer does not accept any
liability for injury or warranty.
OSHA’s requirements for lockout/tagout are covered in Secon 1910.147 of the OSHA standards. OSHA
outlines a six-step procedure for controlling hazardous energy:
Step 1: Prepare for shutdown. It must be determined what type of power system is going to be
deacvated including electrical, hydraulic, pneumac (air) or other energy sources. Knowledge of
shut down methods is necessary.
Step 2: Shutdown the equipment. This should be completed consistent with the manufacturer’s
instrucons for the shutdown procedure and could be as simple as placing a switch in the “o”
posion or pressing a buon.
Step 3: Isolate the equipment. This step involves closing of valves, throwing the main disconnects
or circuit breakers and disconnecng or capping any auxiliary power sources or secondary
electrical systems.
Step 4: Apply the lockout/tagout device. This is done to prevent restoraon of the ow of
energy and is done at all disconnect switches, valves or other energy isolang devices. Locks are
the preferred method of controlling energy and should be supplemented with tags. Various
lockout devices are available including group lockout hasps. Locks should be individually assigned
and have only one key.

13
Step 5: Control the stored energy. This step includes the release, disconnect or restraint of any
residual hazardous energy which may be present and a check that all moving parts have stopped
moving. It may also include the installaon of “pancakes” or blanking of pipe anges, the installaon
of ground wires to discharge electrical capacitors and the blocking or supporng of elevated
equipment.
Step 6: Verify isolaon of equipment. Double-check the steps and verify that the equipment indeed
has been shut down and that the lock and tag do control the stored energy. Employees should be
warned and the system tested, including pressing of all start buons to assure that the equipment will
not start.
Note: Each individual required to lockout ANY equipment, must be trained in Lockout/Tagout Procedures
and the OSHA Standard. Training must take place PRIOR to performing set-up or maintenance procedures.
MAINTENANCE CHART
ITEM INTERVAL
Grease guide wheel bearings As Needed
Inspect hydraulic hoses and ngs for damage, leaks, or wear Before each use
Ensure all ngs, nuts, and bolts are ght Before each use
Ensure all pins and li pins are in place, and in proper working order. Before each use
IF LIFT PINS ARE SHOWING SIGNS OF DISTRESS (CRACKS, CHIPS, BENDS, ETC.),
THEY MUST BE REPLACED. SERIOUS INJURY COULD OCCUR OTHERWISE. IMMEDIATELY!
Grease Hubs As needed
Review safety instrucons Annually
Clean and paint As needed
Replace Warning Decals As needed

14
TROUBLESHOOTING
PROBLEM POSSIBLE CAUSE SOLUTION
Not able to keep guide wheel in track
1. Guide wheel not low enough
2. Hydraulics not on “Float”
3. Side linkage set too rigid
1) Guide wheel should be at least to mid
point of wheel horizontal to ground
level
2) Put hydraulic lever in “oat” posion
3) Loosen side linkage to allow more
side movement
Not able to keep guide wheels in the track
when lling inner tracks closest to pivot
point
Not compensang for ghter turns
Run the outside tractor wheels as close to
the pivot track as possible. (Outside
wheels are the wheels furthest from the
pivot point)
Throwing too much dirt/making a hill Front blades digging too deep
1) Adjust pitch of machine to raise front
blades
or
2) Remove front blades (on OR600
“Track King” models only)
NOTES:

15
USE AND CARE TIPS FROM THE FACTORY
1. Keeping the pivot track ller cleaned and painted will help to prolong the usefulness of this product.
2. Failure to clean the track ller rounely may cause a buildup of dirt and debris, which may cause the
implement to hold moisture and cause rust.
3. When not aached to the tractor, support the front of the implement with appropriate safety supports.
Park this track ller in a level area if possible.
4. Grease all bearings as needed.
ASSISTANCE
If you have quesons not answered in this manual, or require addional copies, or the manual is damaged,
please contact your dealer or:
71 SOUTH 215 WEST
RUPERT, IDAHO 83350
PHONE: (208) 436-1770
FAX: (208) 436-1776
www.norwest-mfg.com

16
71 South 215 West - Rupert ID, 83350 ● Phone: (208) 436-1770 ● Fax: (208) 436-1776
www.norwest-mfg.com
Table of contents
Popular Farm Equipment manuals by other brands

Unverferth
Unverferth BLU-JET SubTiller II manual

BSL
BSL Strautmann Sherpa 1201 Translation of the original operating instructions

May Wes
May Wes QD2 Assembly instructions

Raven
Raven Spray Air 2010 Predator instruction manual

Jacobsen
Jacobsen Turfcat 628 ROPS Cab manual

LOFTNESS
LOFTNESS 61G4 Series Owner's manual and parts book


