PBZ CropCare PA1500 User manual

by PBZ
Picking Assistant
Model PA1500
Form: PA1500OM Rev. B
PBZ LLC | 295 Wood Corner Rd | Lititz PA 17543
www.CropCareEquipment.com | (717) 738-7365
A Paul B Zimmerman Inc. Company
Owner's Manual


3
Table Of Contents
Before You Begin............................................................................................................................................................3
Safety Precautions.........................................................................................................................................................4
General Guidelines.............................................................................................................................................4
Before Operation ................................................................................................................................................4
During Operation ...............................................................................................................................................4
Operating Instructions ................................................................................................................................................5
Moving the Picking Assistant.........................................................................................................................5
Row Width Adjustment ....................................................................................................................................5
Operator Adjustments......................................................................................................................................5
Picking Assistant Operation............................................................................................................................7
Assembling the Canopy...................................................................................................................................8
Maintenance Instructions ..........................................................................................................................................9
Routine Maintenance........................................................................................................................................9
Battery Maintenance.........................................................................................................................................9
Battery Storage................................................................................................................................................. 10
Wiring Diagram........................................................................................................................................................... 11
PA1500 Wiring Harness.................................................................................................................................. 11
CropCare®Limited Warranty .................................................................................................................................. 12
Notes............................................................................................................................................................................... 13
Contact Us..................................................................................................................................................................... 14
Ordering Parts................................................................................................................................................... 14
ThankyourforpurchasingthisCropCareproduct.Thisownersmanualcontainshelpfulinformationregardingtheinstallation,operation
and maintenance of your product. For parts and service please contact your local CropCare dealer.
• Be aware of all safety guidelines, warnings, and cautions.
• Familiarize yourself and other operators with the picking assistant’s components and how all parts are operated.
Before You Begin
Please read and understand this manual and its instructions and warnings completely before operating
the picking assistant.

4
Safety Precautions
Every year many unnecessary accidents occur due to improper equipment handling and a disregard for safety precautions. You, the
operator, can avoid accidents by observing the precautions in this section.
• The operator should be a responsible adult. Do
not allow persons to operate this machine until they
have displayed a thorough understanding of the safety
precautions and operational use!
• Do not permit children to play on or around the picking
assistant.
• Never attempt to operate this machine while under the
inuence of alcohol or drugs.
• The best defense against accidents is a careful and
responsible operator.
• Ifthereisanyportion of thismanual thatyou donot fully
understand, please contact an authorized CropCare®
dealer.
General Guidelines
During Operation
• Always be aware of bystanders, particularly children!
Always look before moving the picking assistant.
• Be aware of dangerous terrain such as holes, slopes,
drop-os, banks, rocks, and hidden hazards.
• When operating on inclines, be sure to properly adjust
the height of each wheel so that the operator and
produce trays are level.
Figure 2: Owner’s Manual Decal (DE39)
Before Operation
• Give the picking assistant a visual inspection for any
worn parts, loose bolts, or other visible problems, and
make any needed repairs. See the maintenance section
(page 9).
• Carefullystudy and understand thisowner’smanual.
• When transporting the picking assistant be sure to
remove the canopy as it cannot withstand speeds
over 15 MPH.
• Nopassengers areallowed on or in the pickingassistant
at anytime.
• Rememberthataccidentscanevenhappentoseasoned
operators. Always take your time and follow all safety
instructions.
• Neverallow passengers on the machine while it is being
towed.

5
Operating Instructions
Row Width Adjustment
Moving the Picking Assistant
1. The height of the picking assistant should be adjusted to
best suit the crop height, and the length of the operator’s
arms.
2. To adjust the height of the picking assistant, rmly grip
the lifting handle (c) to relieve pressure on the pull-pin,
pull the pull-pin (d) located on the wheel adjustment
clamp (b), which is located on the main frame tube, and
The Picking Assistant can be moved either by hand or towed
by an ATV or tractor.
1. Be sure that both motors (a) are in the neutral position, as
shown (Figure 1) before attempting to move the picking
assistant.
2. Rotate the steering arm (b) clockwise towards the front
of the machine as shown (Figure 2).
3. The picking assistant can be moved by hand using the
handles (a), or steering arm (b), or by towing it with
an ATV or tractor using the hitch pin (c) to connect it
(Figure 2).
4. Never allow passengers on the machine while it is being
towed.
5. Upon arriving at the desired location, rotate the steering
arm back to the operating position, and be sure to move
the motors back to one of the three operation positions.
Upon arriving at the desired location, it is now necessary to
make the proper adjustments to the picking assistant to best
suit the application and the operator.
1. Using a 3/4”wrench or socket, loosen the 1/2”ange nut
(a) on the right rear wheel adjustment clamp (b) (Figure
3). With the nut loosened, the wheel assembly should
slide easily on the frame rail. Slide the wheel assembly to
the desired width and re-tighten the ange nut (a)
Before going out to the field, the wheel spacing should be
set to accommodate the crop that is to be harvested. This
requires a 3/4”wrench or socket.
Figure 1: Front wheel in picking position
b
a
Figure 3: Wheel spacing and height adjustment
cd
Figure 2: Front wheel in towing position
Operator Adjustments
raise or lower the machine as needed. When you reach
the desired height, release the pull-pin (d) (Figure 3). Be
sure the pull-pin locks properly into an adjustment hole.
3. After making a height adjustment, tie up any extra wire
withthebungeetiesothewirecannotbecomeentangled
in the drive wheel.
4. Repeat this process for all three wheels.
5. Note: On hillsides the rear wheel heights should be
separately adjusted to level the machine.
a
b
a
c

6
6. Next, adjust the chest pad spacing by loosening the two
knobs (a) on the bottom of the frame tube spacer (b).
Set the chest pad (c) so it is centered on the row to be
harvested (Figure 4). Re-tighten the knobs after making
adjustments.
7. The foot rest (a) can be adjusted to suit the height of the
operator by loosening the two wing nuts (b) and sliding
the footrest along the slot in the foot rest support tube (c).
The foot rest can also be moved to the left or right using
the two sets of square holes (d) (Figure 5). Re-tighten the
wing nuts after making adjustments.
8. The head rest can now be set to the proper position for
the operator. This is easiest to do while laying on the
picking assistant. Adjust the head rest (a) by loosening
the two knobs (b) on the head rest clamp (c) and sliding
the headrest to the desired position (Figure 6). Re-tighten
the knobs after making adjustments.
9. The nal adjustment to make is the picking tray. The
picking tray (d) position can be moved up and down by
loosening the two knobs (e) and removing the pin (h) on
the picking tray clamp (f). The tray can also be rotated.
Do this by placing the pin (h) in the desired hole of the
picking tray tube (i). Rotate tray tube (i) and drop into the
crown on the picking tray clamp (f) at the desired angle.
While the two knobs (e) are loose the picking tray clamp
can be slid back and forth on the main frame. The picking
tray can also be moved from side to side by loosening the
two knobs (g) on the bottom of the tray (Figure 6). The
picking tray (d) can be tilted to various angle positions
when knobs (g) are loose as well. Re-tighten the knobs
after making adjustments.
Operator Adjustments ... continued
Operating Instructions
Figure 4: Chest pad adjustment
ba
c
Figure 5: Foot rest adjustment
b
a
c
d
Figure 6: Head rest and picking tray
d
b
a
c
d
e
f
g
h
i

7
Picking Assistant Operation
1. Check to be sure the batteries on the picking assistant are
chargedand readyforuse. Pressthebattery checkbutton
(a) on the switch box, and read the gauge (b) above it to
assure the batteries are adequately charged (Figure 7).
See page 9 for more information on battery level.
2. Make sure the motor assembly (a) is rmly engaged
against the tire and that the pull-pin is properly locked
into one of the operating position holes (b) as shown
(Figure 8).
3. 3. Turn the picking assistant on by moving the switch
(c) from the “o” position to either the “forward” or
“reverse” position (Figure 7).
4. With the switch in either the “forward” or “reverse”
position, press and hold the foot switch (a), located
on the foot rest (b), with your left foot to move in the
selected direction (Figure 9).
5. As you move along the row, use the steering arm (a) to
steer the picking assistant (Figure 10).
6. When the batteries needs to be charged, see the
instructions in the battery maintenance section (page 9).
7. If the picking assistant is to be stored on an incline, be
sure to have one, or both, motors engaged to prevent the
picking assistant from moving.
8. Always ip the power switch (c) (Figure 7) to the o
positionwhenleavingthepickingassistantunattendedfor
any reason.
9. To switch from low speed to high speed rst press pedal
(a) to move then press pedal (c) for the second speed.
Both pedals need to be pressed. Releasing pedal (c)
reduces speed back to low speed (Figure 9).
Operating Instructions
Figure 7: Control box
b
a
c
Figure 8: Operating position
b
a
Figure 9: Foot switch
Figure 10: Steering arm
a
c
b
a

8
1. Install the canopy frame brace (a). First, place a 15/16”
shaft collar (b) 2” from the end of the pipe as shown
(Figure 11). With the rst shaft collar in place, slide the
canopy brace through the hole in the picking assistant
frame and place a second shaft collar (d) on the inside of
theframe tubeto keepthecanopybracefrompulling out.
Install the 2-1/2” square poly plug (c) on the end of the
frame tube as shown (Figure 11).
2. Install the horizontal canopy pipes (a). First, place a
15/16” shaft collar (b) 29” from the end of the canopy
pipe as shown (Figure 12). With the rst shaft collar
in place, slide the pipe through the hole in the vertical
canopy tube. Then place a second shaft collar on the
front side of the vertical canopy tube as shown.
3. Install the front canopy end pipe (a) by inserting the pegs
into the horizontal canopy pipes (b). Be sure that the peg
also goes through the hole in the canopy frame brace (c)
as shown (Figure 13).
4. Insert the top (larger) horizontal canopy pipe (a) over
the top peg on the front canopy end pipe (c) as shown
(Figure 14).
5. Insert the rear canopy end pipe (b) into the three
horizontal canopy pipes as shown (Figure 14).
6. Install the canopy (a) as shown with the logos facing out
to allow for proper water drainage (Figure 15).
7. With the canopy in place, secure it to the canopy end
pipes and the horizontal canopy pipes using the ball
bungee straps (a) (Figure 16).
8. Note: When you rst place the canopy over the picking
assistant, secure it to the end pipes at the four corners
with ball bungee straps before moving on to fully secure
the canopy.
ab
Figure 14: Rear canopy end pipe
a
Figure 15: Canopy
a
Figure 16: Securing canopy with straps
c
Figure 11: Canopy frame brace
a
d
c
b
2”
a
c
b
Figure 13: Front canopy end pipe
b
a
Assembling the Canopy
Operating Instructions
Whentransporting thepickingassistantbesuretoremovethe
canopy as it cannot withstand speeds over 15 MPH. Follow
these instructions to properly reassemble the canopy upon
arrival.
a
b
29”
Figure 12: Horizontal canopy pipes

9
Maintenance Instructions
Routine Maintenance
It is very important to perform routine maintenance on your picking assistant before and after each use. Good maintenance practices
will help to guard against any unnecessary machine breakdowns or accidents.
1. It is recommended to perform a visual and physical
inspection for any worn parts, loose bolts, or other
visible problems. Make all necessary repairs before
operating. Contact an authorized CropCare®dealer
for instructions on ordering parts and technical help.
2. Always be sure to have the tires properly inated (36 psi).
Under-inated tires could cause a number of problems,
including shorter battery life, and inadequate traction for
the motor gears.
3. Be sure that all of the adjustment knobs are properly
tightened.
4. Always rinse o any mud and dirt from the motor gears
and tires after every use.
5. To prevent mold from forming, never leave the canopy
sides rolled up if they are wet. If the canopy is wet, roll
the sides down and leave the machine sit in a dry area till
the tarp is completely dry before rolling them back up.
6. If the picking assistant is to be stored outside during the
winter, be sure to remove the canopy before storage.
Any snow or ice accumulation on the canopy could cause
thecanopytocollapseanddamagethecanopyand/orthe
machine.
7. Check the tire pressure before using the picking assistant.
Tire pressure should be set at 36psi.
Battery Maintenance
1. Keep the batteries and battery compartment clean
and corrosion free. Dirty, corroded batteries can
selfdischarge, which will aect performance and life.
2. Checkthe state-of-chargeofthebatteriesby pressingthe
battery check button (a) on the switch box (Figure 7, page
7). If the reading is above 12.4 volts, the battery is at least
75% charged and should be OK. If below 12.4 volts, it
should be charged.
3. When charging the batteries, unplug the charger before
connectingordisconnectingabatterytoavoiddangerous
sparks which can cause a battery to explode.
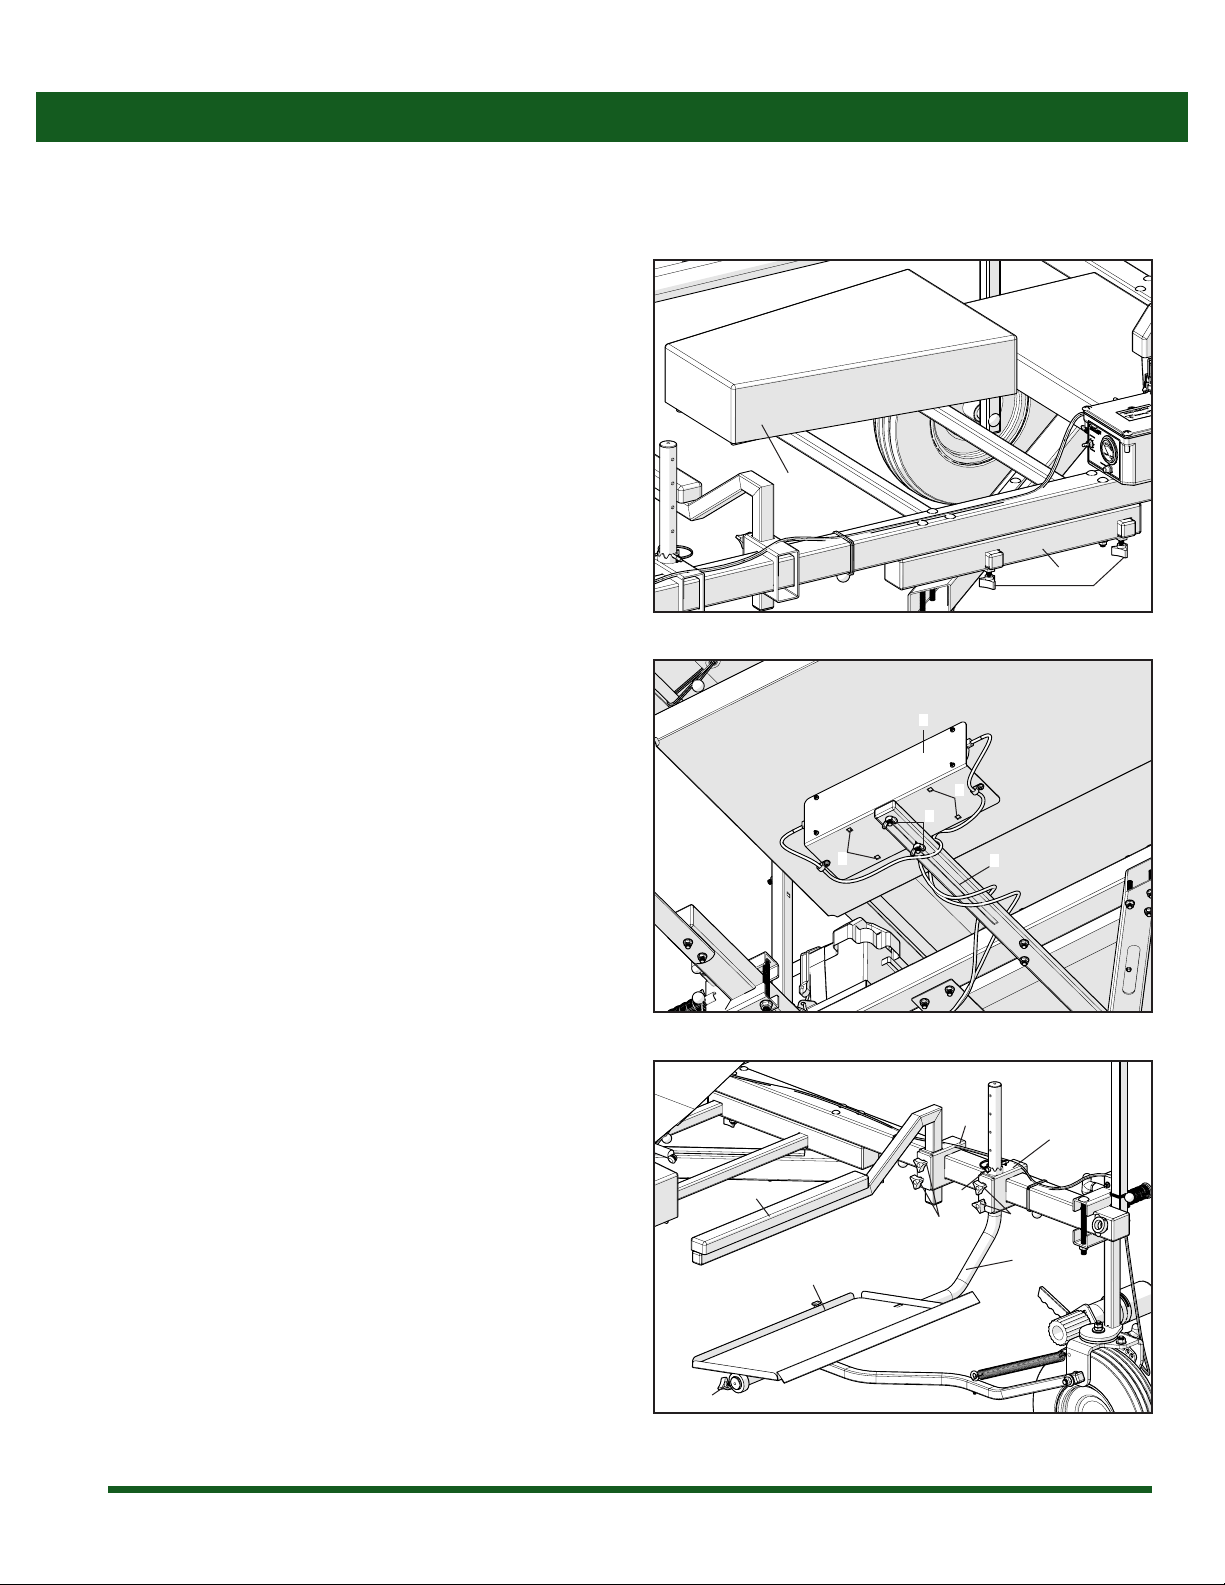
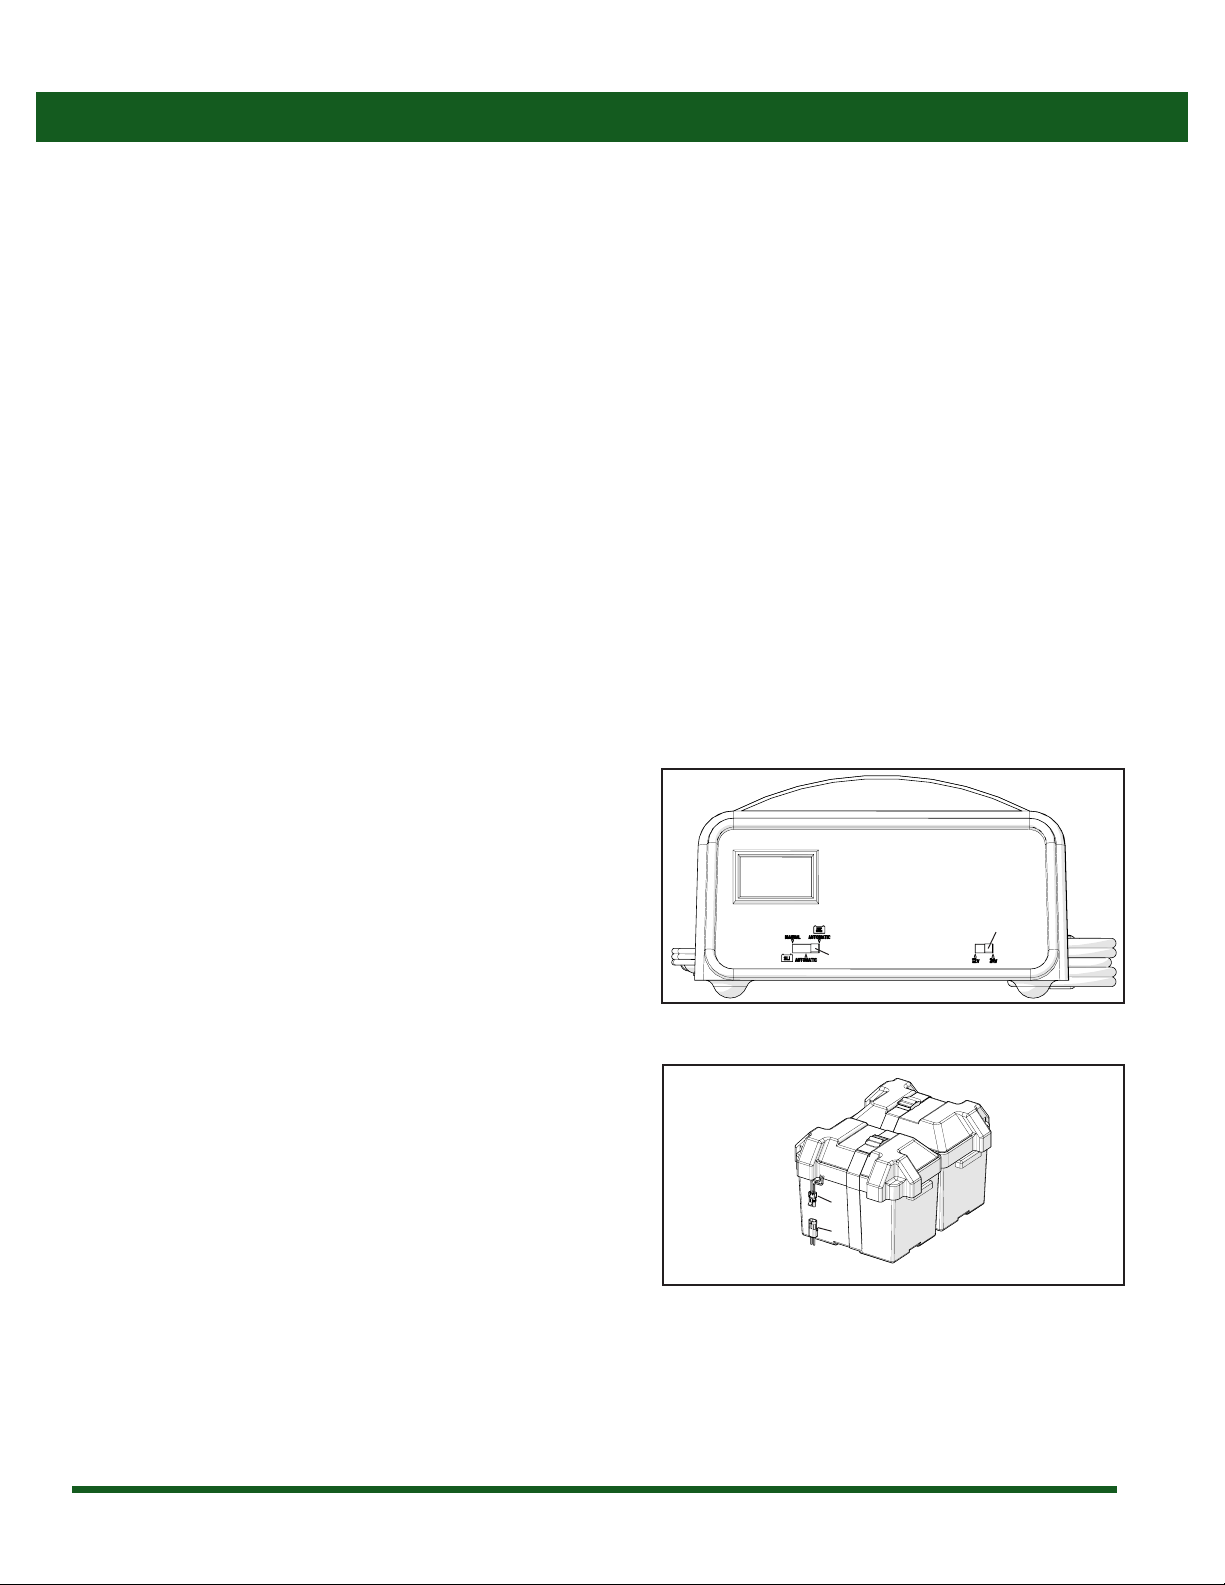
4. To avoid over-charging when using the battery charger
supplied by CropCare®, use the automatic deep cycle
charge setting as shown (Figure 17 a). On the automatic
setting, the charger will stop charging when the battery
is fully charged. Note: Both batteries must be charged at
the same time for charger to work. Charger must be set
to 24 volts (Figure 17 b).
5. Refer to the battery charger manual for more instructions
on battery charging and safety precautions.
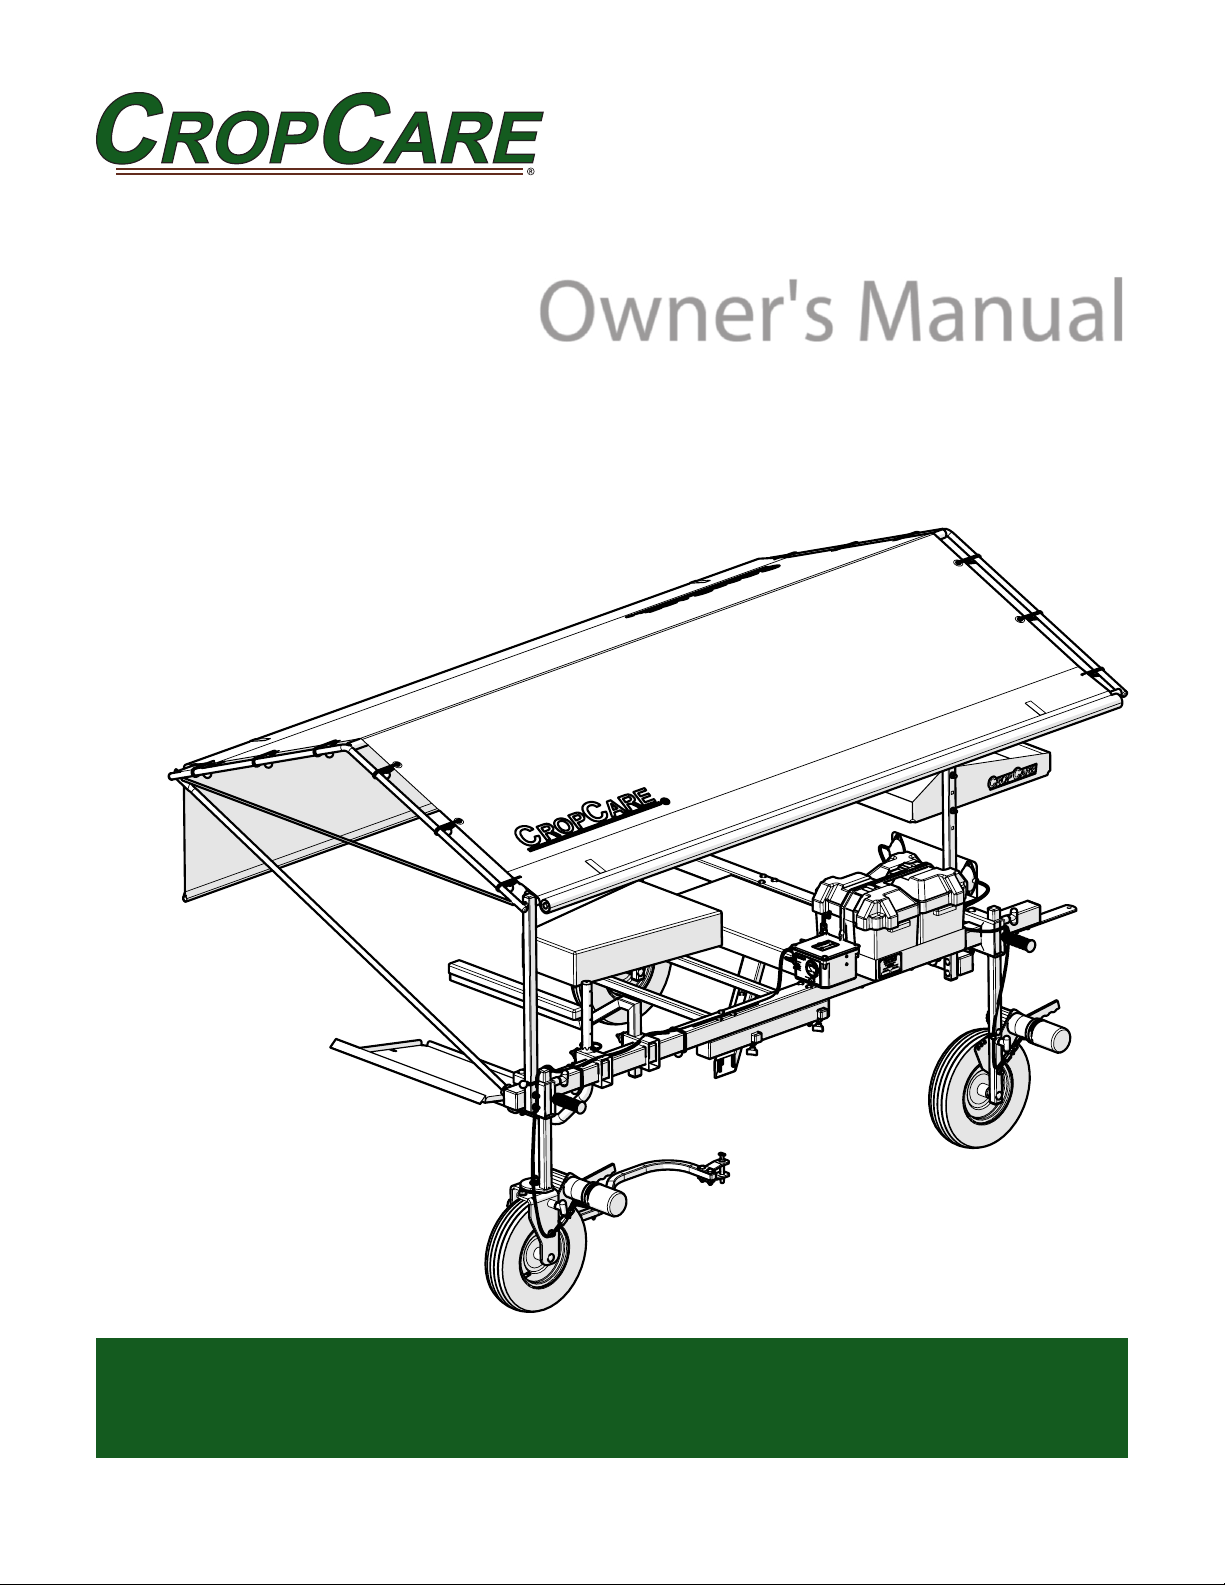
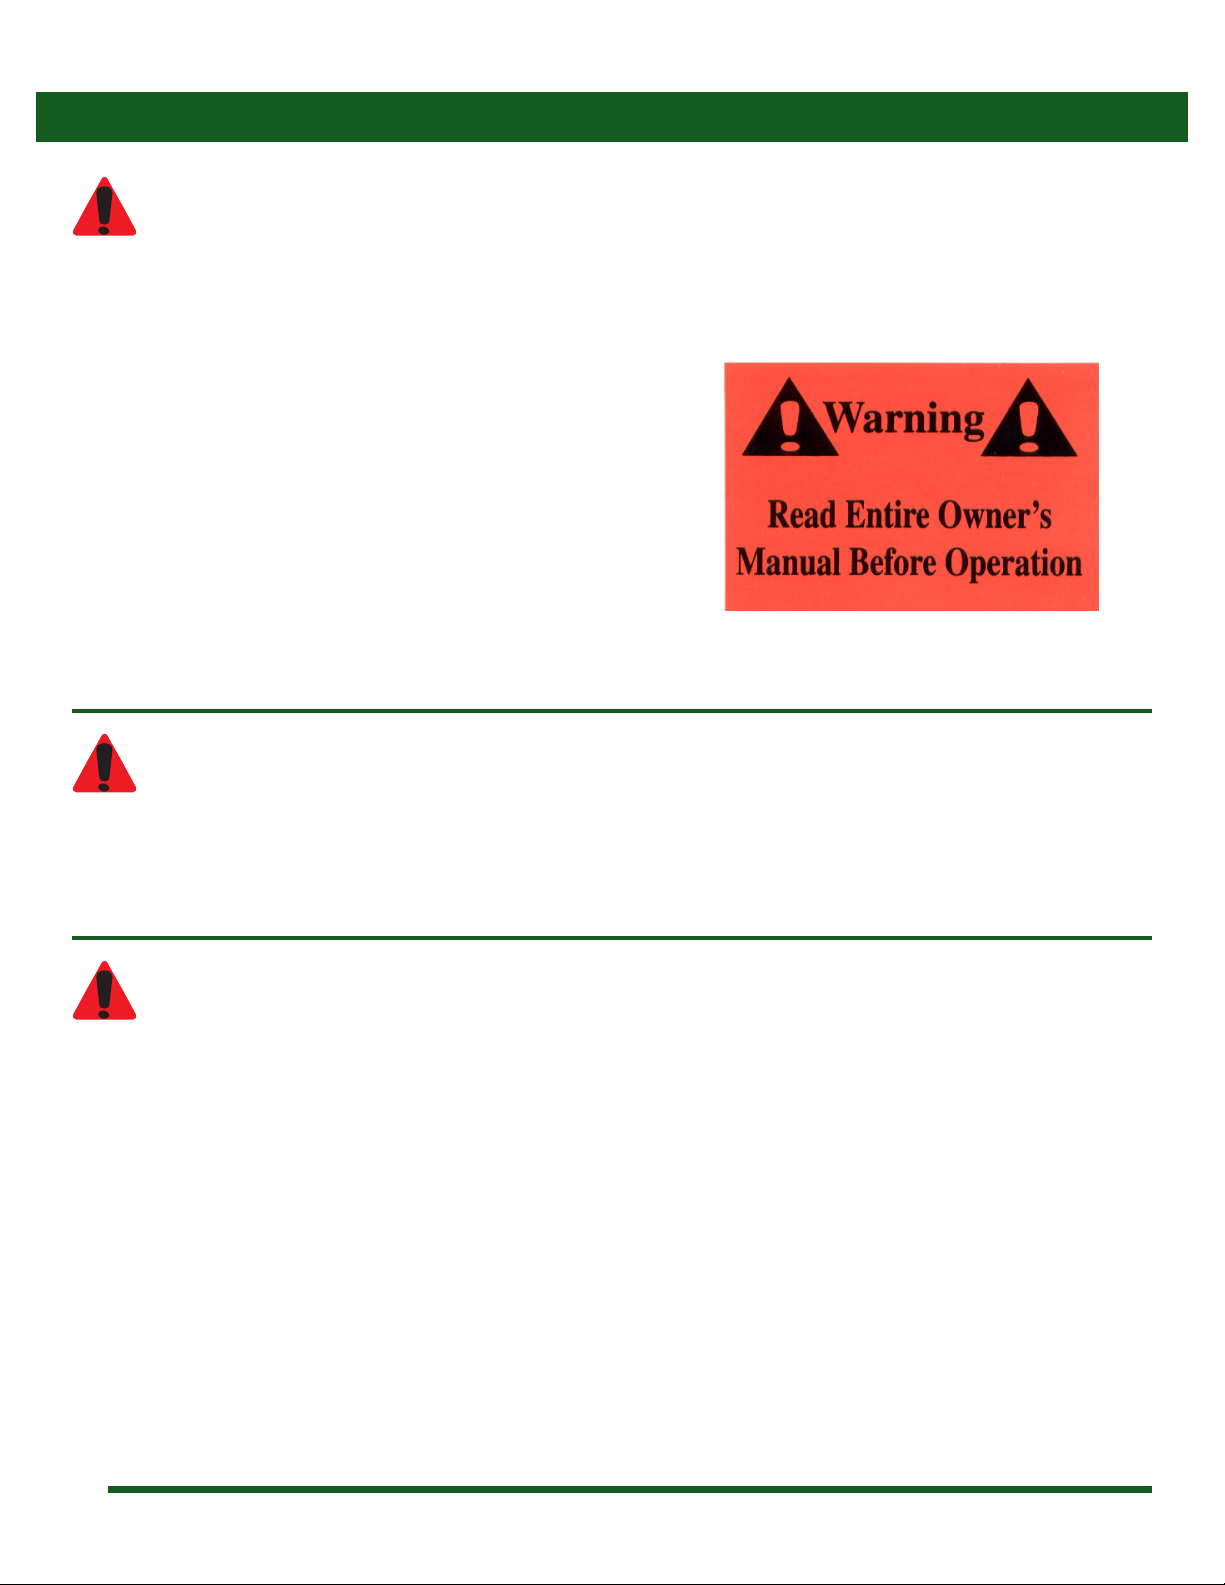
6. To use the battery charger, unplug the battery wire
harness (a) fromthe pickingassistant wireharness (b)and
plug the battery wire harness into the charger. (Figure
18).
To ensure maximum battery life and performance, practice the following battery care and maintenance procedures.
Figure 18: Connecting Charger
Figure 17: Charger settings
b
a
b
a

10
Maintenance Instructions
1. Disconnect the batteries to avoid self-discharge due to
parasitic loads such as clocks, ground faults, etc.
2. Put into storage fully charged and keep above 75% state-
of-charge. Check every 90 days and recharge if necessary.
Batteries that are not in use during the o-season must be cared for as follows to extend battery life and reliability.
Battery Storage
3. Ideally, store batteries in a cool, dry place with
temperatures not below 32ºF (0ºC) or above 80ºF (27ºC).
7. When using any other charger, remove the battery box lid
to access the battery terminals and follow the directions
supplied by the charger manufacturer.
8. Batteries must be charged equally to prevent premature
failure of batteries. Batteries should always be replaced at
the same time.
9. If using a regular battery charger, or a deep cycle charger
onthemanualsetting,donotleaveabatteryonthecharger
for more than 48 hours to avoid damaging the battery by
over-charging.Ifgassingor spewingof electrolyteoccurs,
or the battery case feels hot, reduce or temporarily halt
charging to avoid damaging the battery.
Battery Maintenance ... continued
10. Stopthechargewhentwovoltagereadingsrecordedtwo
hours apart indicate no increase. Further charging would
be useless and may damage the battery and shorten its
life. If the battery won’t come up to full charge, replace it.
11. NEVER attempt to charge a frozen battery. To avoid
explosion and serious injury, allow it to warm to 60°F
(16°C) before charging.
12. 12. NEVER leave a battery on a trickle charger longer
than 48 hours. Serious damage to the battery WILL occur.

11
PA1500 Wiring Harness Schematic
Wiring Diagram
Front
Motor
Rear
Motor
CONTROL
SWITCH
Foot
Switch
On/O
Plug
Plug
Plug
Plug
1
46
Plug
Plug
Fuse
(20 amp)
+ -
12 volts
Plug
Plug
Fuse
(20 amp)
+ -
12 volts
Foot
Switch
HI/LO
VOLT
TEST
T-TAP
1
2
3
4 5
6
7
8
BLACK (-)
RED (+)
RED (+)
RED (+)
BLACK (-)
BLACK (-)
RED (+)
RED (+)
RED (+)
BLACK (-)
BLACK (-)
BLACK (-)
RED (+)

12
CropCare®Limited Warranty
Warranty Coverage
Warranty Is Void if:
Getting Service
Picking Assistant: Model PA1500
1. The picking assistant has been subjected to, in the opinion of CropCare®, negligent handling, misuse, an accident or if the
instructions in the owner's manual were not completely followed.
2. The picking assistant's components have been altered in any manner or repairs have taken place with unapproved parts.
All Picking Assistant warranty claims must be made through an authorized CropCare®dealer. All warranty claims must be submitted
with an invoice or a proof of purchase that denotes the purchase date and place of purchase. If you have any questions or comments
concerning this warranty, please contact an authorized CropCare®dealer.
CropCare®hereby provides a Limited Two (2) Year Warranty on Picking Assistants, manufactured by CropCare®. Picking Assistants
manufactured by CropCare®are warrantied against any manufacturer’s defects in any of the picking assistant’s components in the 24
months following the original date of purchase.
Defective components will be repaired or replaced at the discretion of the manufacturer. It is the responsibility of the purchaser
to return warranted components to the manufacturer. This warranty is limited to the repair or replacement of picking assistant
components only. CropCare®is not to be held liable for incidental or consequential damages of any kind. This warranty covers the
purchaser of this picking assistant and any other owners who own it during the two year warranty period.
To retain the warranty, the picking assistant must be operated and maintained as ascribed by its owner’s manual. For warranty service,
please have a copy of the purchase invoice available.

13
Notes

14
Contact Us
We desire to give you continuing service in the best manner possible. This includes listening to your comments, suggestions, and
problems. We will do our best to answer all questions thoroughly and in a timely manner. Please feel free to contact our customer
service department.
Ordering Parts
Please contact your authorized CropCare®dealer to order replacement parts for your product.
Manufactured by PBZ LLC
A Paul B Zimmerman Inc. Company
295 Woodcorner Road
Lititz PA 17543
(717) 738-7365
Fax (717) 738-7375
www.CropCareEquipment.com
Table of contents
Other PBZ Farm Equipment manuals