Norwolf Tools X-DRIVER User manual

Page 1of 7
14-1201
X-DRIVER™
HYDRAULIC TORQUE WRENCH
M-DRIVE USER GUIDE
X DRIVER™
M DRIVE
LOW HEAD
RATCHET
CASSETTE
LOW HEAD
OPEN
SPANNER
LOW HEAD
SPLIT LINK
Norwolf Tool Works Asia
T: +65 9795 0752
W: www.norwolftools.sg

Page 2of 7
14-1201
Please contact Norwolf Tool Works, Inc. for guidance if or when you are in doubt as to the
operation of this product with your application.
Read all instructions, cautions, warnings and notes carefully. Follow all safety precautions to
avoid personal injury or property damage during use. Norwolf cannot be held responsible for any
damage caused by improper use, lack of maintenance, or incorrect application.
The X-Driver is compatible with three styles of cartridges. The A-Drive, a fixed hex cartridge, the
V-Drive, a square drive cartridge and the M-Drive, which houses any of the following three links:
ratchet cassette, spanner and split link. The connection of the X-Driver to the A, M or V Drive
cartridge is a simple snap-in latch connection.
INSTRUCTIONS
The X-Driver™ operates in union with an air or electric hydraulic pump. The maximum working
pressure of the X-Driver™ is 10,000 PSI. Pump and hose must have the same pressure rating.
WARNING: When pressurized, the X-Driver™ links exert a great reaction force. Follow
instructions for proper tool placement. Keep reaction area free of interference.
WARNIING: Wear personal protective gear, including eye protection, when operating any
hydraulic equipment.
SYSTEM CONNECTION
The X-Driver™ connects with the pump via a double line 10,000 PSI hydraulic hose. Ensure the
connectors (couplers) are fully engaged, with no gap between the male and female fittings.
Threaded connections must be securely tightened and leak free.
WARNING: Never handle pressurized hoses. Escaping oil under pressure can penetrate the skin
causing serious injury. If this occurs seek immediate medical attention.
SETTING TORQUE
NOTE: The pump is to be controlled by the TOOL OPERATOR only.
With the system fully connected, locate desired torque on the conversion chart provided with your
tool. Set the pump to the corresponding pressure. (At this point, the tool is not on the application.)
Turn on the pump, press down on the remote control button and hold. Take reading on the gauge.
To increase pressure, loosen the locking ring on the pressure regulator valve and turn the
thumbscrew clockwise, to decrease pressure turn counter-clockwise. Once the desired pressure
is stabilized, retighten the locking ring.
NOTE: When decreasing pressure, it is necessary to turn pressure setting below what is desired
and gradually increase pressure to the desired level.
Prior to tool operation, again, press down on the remote control button and confirm the correct
pressure has been set on the pump.
NOTE: For “loosening”, set pump at 9500 PSI.
Norwolf Tool Works Asia
T: +65 9795 0752
W: www.norwolftools.sg

Page 3of 7
14-1201
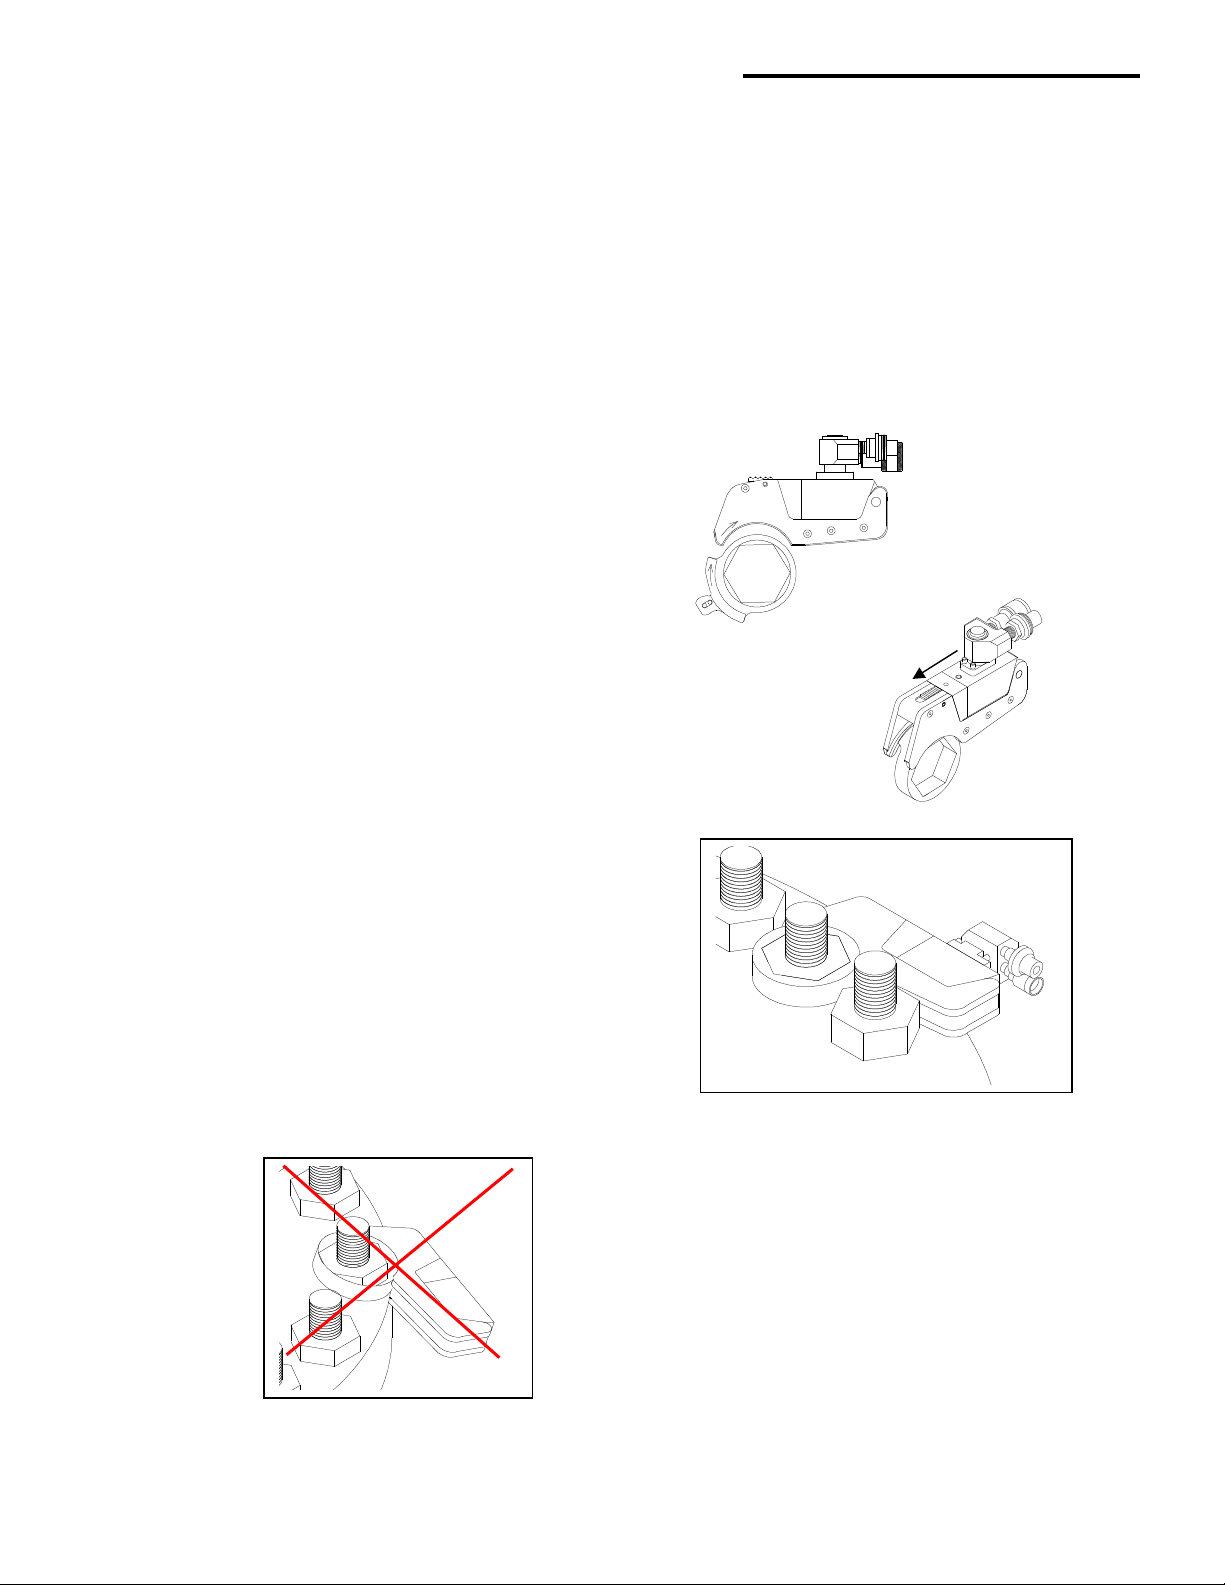
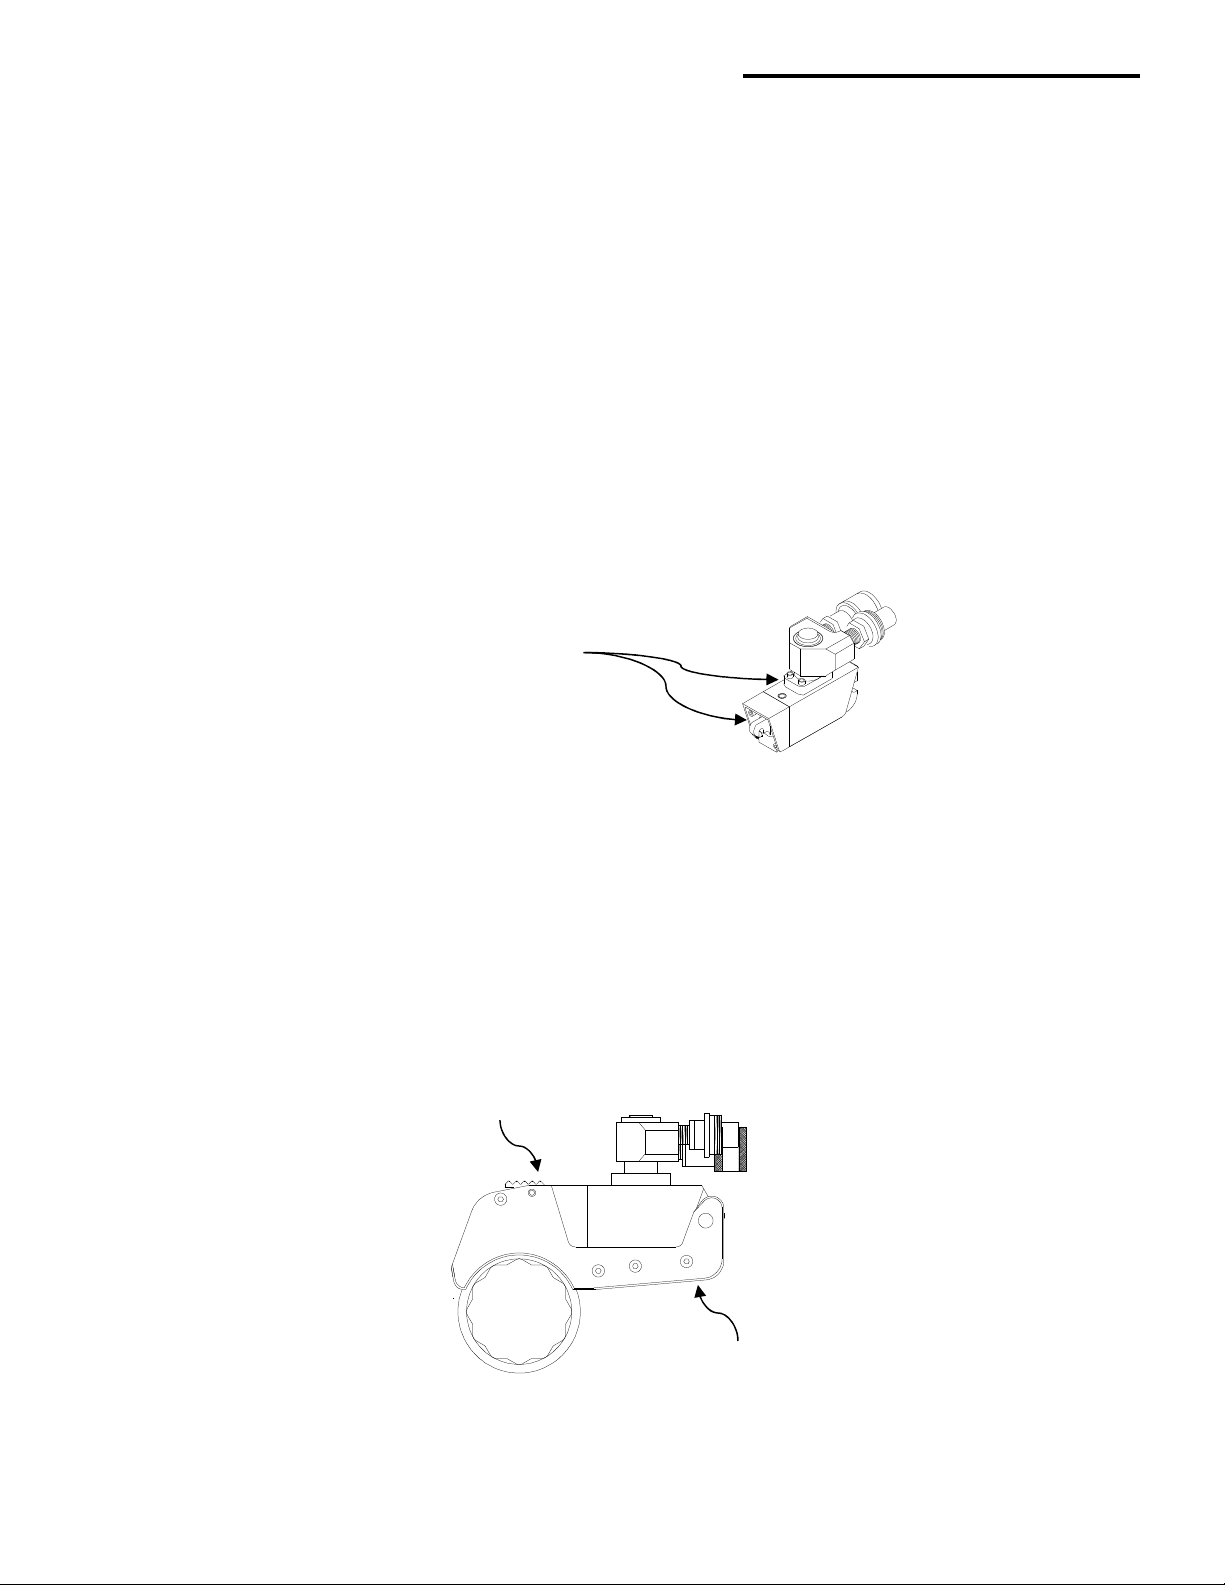
X-DRIVER™ AND M-DRIVE CONNECTION
Note: The X Driver™ piston rod must be vertically aligned (“A”) as well as the base of piston
within 1/16” of housing (“B”) as in manner depicted.
The X-Driver™ easily connects in manner depicted.
INTERCHANGABLE CASSETTES
The following links/cassettes are available for the M Drive:
6 and 12 pt. Ratchet Cassette and 12 pt. only Open Spanner and Split Link
Align X-Driver™ with M Drive at
reaction pin and snap into place
X-Driver™ Front view X-Driver™ Side view
Base of piston must be within
1/16” of housing
Hook of piston must be
centered vertically
“A” “B”
Norwolf Tool Works Asia
T: +65 9795 0752
W: www.norwolftools.sg
Page 4of 7
14-1201
CASSETTE TO DRIVE CONNECTION
Align engraved arrow on link with engraved arrow on drive and guide along grove. Slide cassette
in until audible “click” is heard which indicates the cassette is locked in.
Note, the X-Driver must be in place in order for the M cassette to lock in.
DISASSEMBLY OF TOOL
Slide latch on M Drive for easy disconnect from X Driver.
Note, the X-Driver must be removed from the M Drive
before removing cassette link.
WARNING: REACTION MUST BE ON ENTIRE
SURFACE OF TOOL REACTION ARM,
AS DEPICTED HERE:
WARNING: NEVER COCK TOOL TO SIDE
REACTING OFF ONLY A PIECE OF HOUSING.
Norwolf Tool Works Asia
T: +65 9795 0752
W: www.norwolftools.sg

Page 5of 7
14-1201
TOOL PLACEMENT
Positioning the tool determines whether the action will loosen or tighten the nut. Refer to above
diagram for correct positioning. Assure the reaction area is firmly abutted against a stationary
object (i.e. adjacent nut or flange) as illustrated.
WARNING: Make sure there is no interference between reaction points.
WARNING: Hose and fitting will rupture if reacted upon.
Place tool on nut making sure the hex is fully engaged. Apply momentary pressure to the system
to ensure proper tool placement. If the tool tends to “ride up” or “creep”, stop and re-adjust the
reaction area to a more solid and secure position.
By pushing down on the remote control button, the rear of the tool will be pushed back until
reaction area contacts its reaction point. Continue to hold down the button until the ratchet no
longer turns which will signify the hydraulic cylinder inside the tool is fully extended. There will be
a rapid buildup of pressure until the preset pressure level is achieved.
NOTE: This rapid buildup of pressure after the cylinder is extended DOES NOT indicate that the
desired torque is achieved. It only indicates that the cylinder is fully extended and cannot turn the
nut any further.
Release the remote control button and the cylinder will retract automatically. While retracting, you
will hear 1-3 “clicks” indicating that the tool has reset itself. Each time the cylinder is extended and
retracted is called a cycle. Successive cycles are made until the tool “stalls” (the tool will no longer
advance and no audible clicks are heard on retraction). At this point, the pre-set Torque/PSI is
achieved with an accuracy of +/-3%.
NOTE: Always attempt one final cycle to insure the “stall” point has been reached.
TO TIGHTEN
TOOL PLACEMENT
TO LOOSEN
MUST REACT OFF ENTIRE
SURFACE / HEIGHT OF
REACTION AREA
Norwolf Tool Works Asia
T: +65 9795 0752
W: www.norwolftools.sg
Page 6of 7
14-1201
PREVENTIVE MAINTENANCE
Tool failure (although rare) does occur. Such failure is most often in the hydraulic couplers or
hose. These items are replaceable immediately and are available universally. Failure of structural
members of the tool is quite rare but replacement parts are available from stock.
Clean the outside of tool after use.
X-Driver Maintenance
Clean the outside of tool thoroughly. Ensure piston rod is centered vertically. Tighten all screws.
Ensure swivel port block moves freely.
M-Drive Maintenance
After every major use, clean the outside of tool. Ensure all moving parts function freely. Ensure
latch and latch spring move freely. Ensure housing screws are tight.
Clean and inspect guide rails after every use on both the M Drive and cassette links. Lightly sand
or buff any pitting or gouge marks on rails. Apply Molykote to female guides. After every major
use clean and re-lube ratchet.
The M Drive has a limited 6 month warranty for material and workmanship only. Wear on the rails
is not included in warranty.
TIGHTEN ALL SCREWS
(4) housing and (4) swivel post
LATCH and
LATCH SPRING
(4) HOUSING SCREWS
Norwolf Tool Works Asia
T: +65 9795 0752
W: www.norwolftools.sg

Page 7of 7
14-1201
X – M Troubleshoot:
PROBLEM PROBABLE CAUSE REMEDY
X Driver will not connect to M
Drive
X Driver piston rod not aligned Align piston with adjustable wrench
X Driver “sticks” when connecting
or disconnecting with V Drive
Parts are “tight” Tap with soft-faced mallet
X Driver will not advance 1. Coupling not connected securely
2. Coupling damage
1. Screw together securely
2. Replace coupling
X Driver will not retract 1. Coupling not connected securely
2. Coupling damage
1. Screw together securely
2. Replace coupling
X Driver will not build pressure 1. Piston seal damage
2. Pump coupling is broken
1. Replace piston seal
2. Replace coupling
X Driver leaks Seal damage Replace seal
Swivel leak Seal damage Clean swivel and replace seals
Norwolf Tool Works Asia
T: +65 9795 0752
W: www.norwolftools.sg
This manual suits for next models
1
Table of contents
Other Norwolf Tools Power Tools manuals


