Nothern Industrial tools 132140 User manual

THANK YOUFOR CHOOSINGA NORTHERN TOOL+ EQUIPMENTCO., INC. PRODUCT!
For future reference,please complete theowner's record below:
Model: _______________ PurchaseDate: _______________
Save the receipt,warranty,and instruction manual.It is importantthat you readthe entire
manual to becomefamiliar with thisproduct before youbegin using it.
This machine isdesigned for certainapplications only. NorthernTool+ Equipment cannot
be responsible forissues arising frommodification. Westrongly recommend thismachine is
not modified and/orused for anyapplication other thanthat for whichit was designed.If you
have any questionsrelative to aparticular application, DONOT usethe machine untilyou
have first contactedNorthern Tool + Equipmentto determine ifit can orshould be performed
on the product.
For technical questionsplease call1-800-222-5381.
INTENDED USE
This electric bicycleis installed withan electric drivesystem. Althoughthis product
operates much likea standard bicycle,there are differences. Please carefullyread the
User's Manual beforeuse.
CAUTION: Do not lendthis electric bicycleto those whocannot ride abicycle.
HELMETS SAVE LIVES!Always wear aproperly fitted helmetwhen riding yourelectric
bicycle. Do notride at night.Avoidriding in wetor hazardous conditions.
TECHNICAL SPECIFICATIONS
1 OF 13
Electric Driving System
Frame Size
Frame
Wheel Size
Fork
Gear Shifter
Rear Derailleur
Chain
Rims
Brake
Spoke
Tire
Battery
Max Speed
Charging Time
Battery Life Span
Motor
Riding Distance atone charge
Recommended Load Capacity
Max ClimbingAngle
1:1.5 ASSISTPOWER
26"
Alloy
26"
Suspension
7 SPEED
M310 7TSHIMANO
HP20
26"
Front: Disc brake,Rear: V-brake
UCP
26" 1.75
Lithium-Ion (24V/8Ah)
15 1/2 MPH(25km/h)
5-6 hours
500 times
24V 180W
15 1/2 miles(25Km)
165 lbs. (75kg)
7
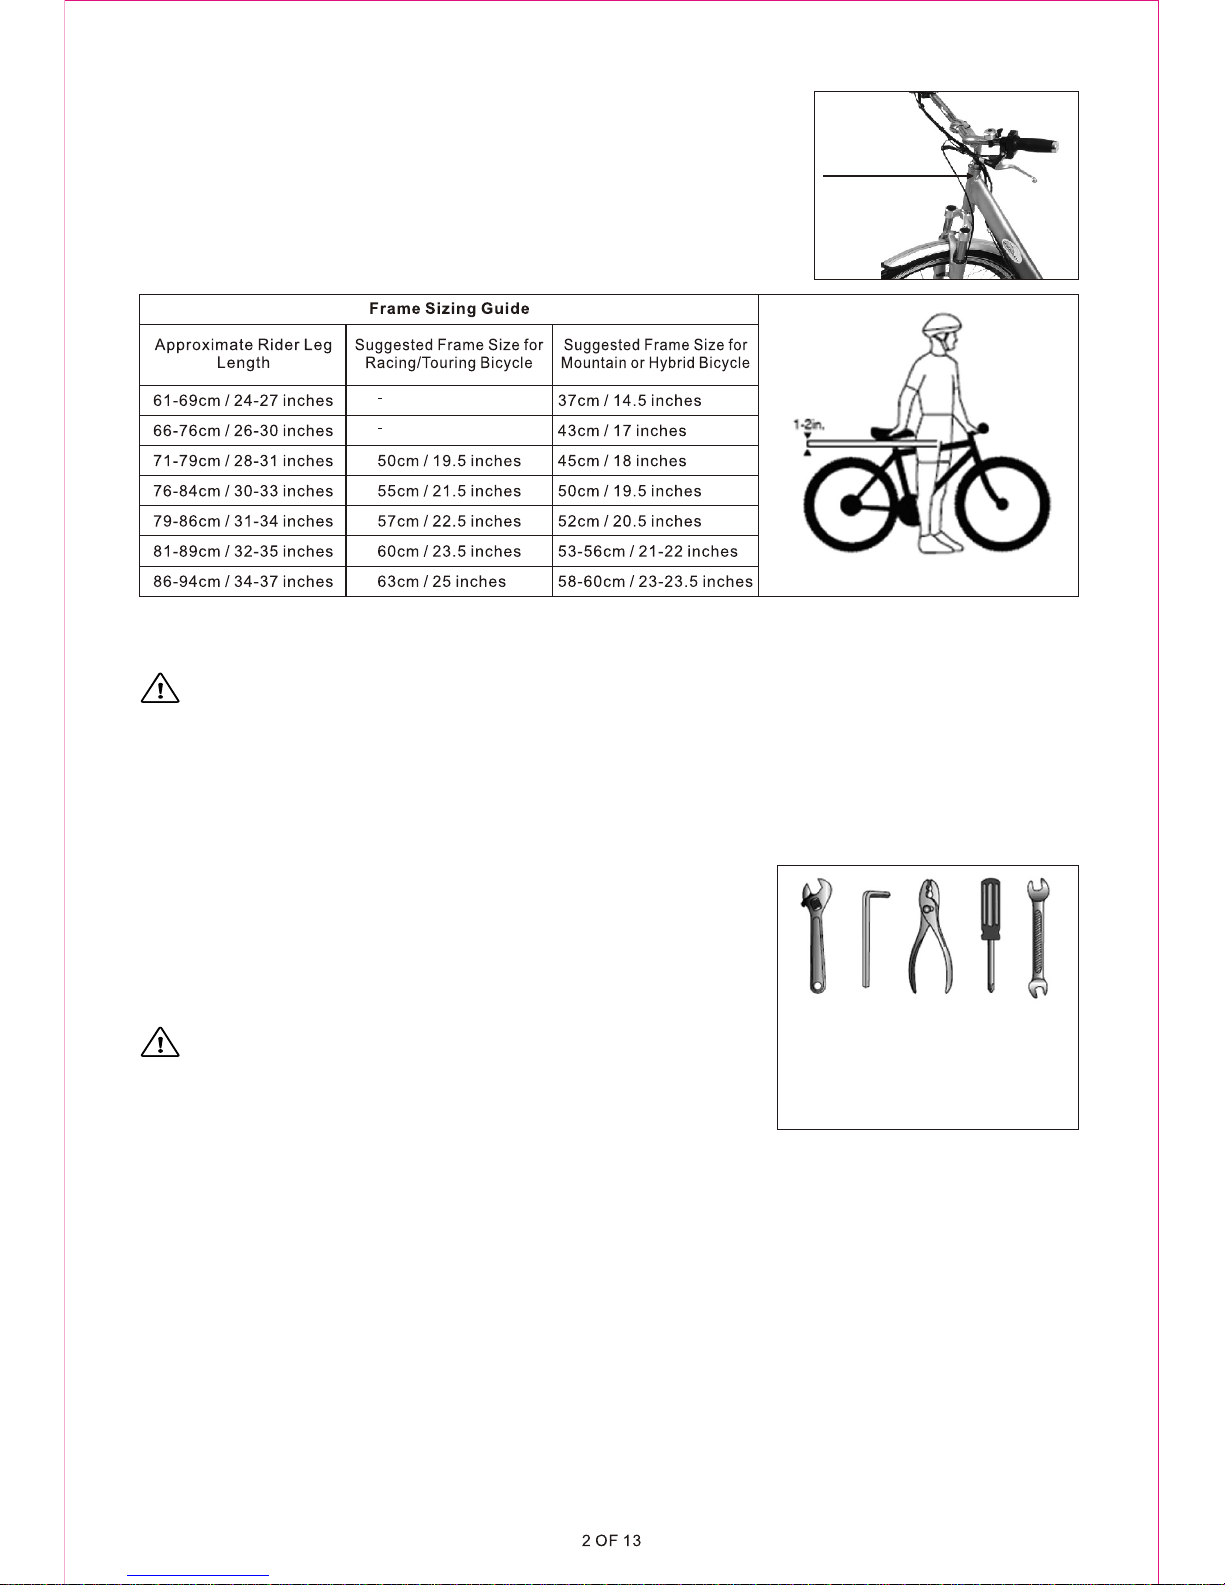
CORRECT FRAME SIZE
When selecting anew bicycle, framesize is veryimportant.
Most full-sized bicyclescome in arange of framesizes. These
sizes usually referto the distancebetween the centerof the
bottom bracket andthe top ofthe frame seattube.
The above chartand diagram willhelp you findthe correct
frame size. Riderleg length shouldbe measured fromthe inseam.
WARNING:For riding safetyand comfort, thereshould be noless than 1"to 2" of
clearance between theintended rider andthe top tubeof the bicycleframe.
The ideal clearancewill vary basedon rider preference.These basicrules are inplace to
make straddling theframe when off the saddleeasier and safer.
When measuring thefit of thebicycle, make sureyou have bothfeet flat onthe ground. Itis
okay for womento use amen's bike todetermine proper fit.
ASSEMBLYINSTRUCTIONS
Yournew bicycle wasassembled and tunedin the factory
and then partiallydisassembled for shipping.Youmay have
purchased the bicyclealready fully assembledand ready to
ride or inthe shipping cartonin the partiallydisassembled
form. Thefollowing instructions willenable you toprepare
your bicycle foryears of ridingenjoyment.
WARNING:We recommendthat you consulta bicycle
technician if youhave doubts orconcerns about yourability
to properly assembly, repair,or maintain yourbicycle.
GETTING STARTED
Open the cartonfrom the topand remove thebicycle. Remove thestraps and protective
wrapping. Inspect thebicycle and allaccessories and partsfor damaged ormissing parts. It
is recommended thatthe threads belubricated prior toinstallation. Do notdiscard packing
materials until assemblyis complete toinsure that norequired parts areaccidentally
discarded. Assembleyour bicycle followingthe steps thatpertain to yourmodel.
Handlebars
Remove the bubblebag from thehandlebar. Placethe handlebar steminto the topof the
handle tube, ensuringthat all cablesare free oftangles. Tightenthe stem boltobserving the
minimum insertion markand checking thatthe forks andthe handlebars arefacing
forward.
ToolsRequired: Inner HexWrench (notincluded)
Serial Number
ToolsRequired:
- Philips headscrewdriver
- 4mm5mm6mm& 8mmAllenkeys
-Adjustable wrenchora9mm,10mm,
14mm& 15mm open andbox end
wrenches
-Apair of pliers withcablecuttingability

WARNING: Over tighteningthe stem boltor headset assemblymay cause damageto
the bicycle and/orinjury to therider.
If the stemis not insertedto at leastthe "Minimum Insertion" mark, it ispossible to over-
tighten the stembolt and damagethe fork steeringtube. Thiscould result inunsafe
conditions and aninjury risk tothe rider.Check steering tightnessprior to ridingby
straddling the frontwheel and turningthe handlebar.If you canturn it withoutthe front
wheel turning, thestem is tooloose. Re-align thehandlebar with thefront wheel andre-
tighten the stembolt.
Seat
Insert the seatassembly into theframe of thebicycle and adjustthe seat tothe desired
height. Theseat post mustbe inserted toat least the"Minimum Insertion" line marked on
the seat post.Move the quickrelease lever tothe closed position.Youshould feel
considerable resistance whilemoving the lever. If not,re-open and re-tightenthe lever,then
move it tothe closed positionso it isin line withthe frame. Positionthe top ofthe seat
parallel with theground. Push thefront of theseat up anddown to firmlymesh the serrations
together.The serrations mustmesh completely togetherto insure astable riding position.
Check for tightnessby twisting theseat from sideto side, andfrom front toback. If theseat
moves at theseat clamp orquick release, repositionand re-tighten theappropriate
clamping mechanism.
Pedals
Start each pedalspindle by handto avoid strippingthe threads, thentighten with a15mm
narrow open-ended wrench.It is veryimportant that youcheck the crankset for correct
adjustment and tightnessbefore riding yourbicycle. Thenew crank maybecome loose with
initial use. Oncethe pedals havebeen attached, checkthat the crankarm rotates smoothly
and that thereis no lateralmovement.
WARNING:Attachment ofan incorrect pedalinto a crankarm will causeirreparable
damage.
Final Check
All other partslike front wheel,front disc brakes,headlights etc. wereassembled by the
factory; no otherassembly needed.
Tire Pressure:Check the tirepressure and inflateto the rangerecommended on thetire
sidewalls.
WARNING:Before riding, ensureall nuts, boltsand fittings onthe bicycle havebeen
correctly tightened.
GENERAL SAFETYRULES
· Bicyclists are expectedto obey thesame laws asall other roadvehicles. Theseinclude
giving way topedestrians and stoppingat red lightsand stop signs.For further information,
contact the Departmentof Transportationin your State.
· Ride in apredictable manner.Always ridewith traffic.
· Always use handsignals to indicateturning and stopping.
· Ride defensively. To other roadusers, you maybe hard tosee.
· Concentrate on what'sahead. Avoid pot holes,loose gravel, wetroad markings, oil,curbs,
speed bumps, drainagegrates and otherobstacles if atall possible.
· Cross train tracksat a 90-degreeangle or walkyour bicycle across.
· Expect the unexpected,such as openingcar doors orcars backing outof concealed
driveways.
· Be extra carefulat intersections andwhen attempting topass other vehicles.
· Familiarize yourself withall of thebicycle's features. Practicegear shifts, braking,and the
use of toeclips and straps,if fitted.
· Wear properriding attire andavoid open toeshoes. When wearingloose pants, useleg
clips or elasticbands to preventthem from beingcaught in thechain.
3 OF 13

· Do not carrypackages or passengersthat will interferewith your visibilityor diminish
control of thebicycle.
· Do not useitems that mayrestrict your hearing.
· When braking, alwaysapply the rearbrake first, thenthe front.The front brakeis more
powerful and ifit is notcorrectly applied, youmay lose control.Never lock upthe brakes.
· Maintain a safestopping distance fromall other riders,vehicles, and objects.Safe braking
Distances are subjectto the prevailingweather conditions.
Wet WeatherRiding
CAUTION: Riding inwet weather isnot recommended. Followthese precautions:
· Brake earlier andprovide yourself witha longer stoppingdistance.
· Decrease your ridingspeed, avoid suddenbraking and takecorners with additional
caution.
· Wear reflectiveclothing and usesafety lights forgreater visibility whenriding.
· Takeextra care aroundpotholes and slipperysurfaces, such asline markings andtrain
tracks.
Riding At Night
CAUTION: Ride atnight only whennecessary.Follow these precautions:
· Ensure the bicycleis equipped witha full setof clean, correctlypositioned reflectors.
· Use properly functioninglights, with awhite headlight anda red taillight.
· If the lightsare battery powered,make sure thebatteries are wellcharged.
· Certain taillights havea flashing mechanism,which enhances visibility.
· Always wear reflectiveor light coloredclothing.
· Slow down anduse familiar roadswith street lighting,whenever possible.
Hill Technique
· Gear down beforea climb andcontinue gearing downas required tomaintain pedaling
speed.
· If you reachthe lowest gearand are struggling,stand up onyour pedals.This will giveyou
more power fromeach pedal revolution.
· When descending, usethe high gearsto avoid rapidpedaling.
· Do not exceeda comfortable speed;maintain control andtake additional care.
Cornering Technique
· Brake slightly beforecornering and prepareto lean yourbody into thecorner.
· Keep the insidepedal at the12 o'clock positionand slightly pointthe inside kneein the
direction you areturning. Keep theother leg straight;don't pedal throughfast or tight
corners.
MAINTENANCE INSTRUCTIONS
Every time youride your bicycle,its condition changes.The moreyou ride, themore
frequently maintenance willbe required. We recommend youspend a littletime on regular
maintenance tasks.The following schedulesare a usefulguide. You should beable to
accomplish most tasks.For additional assistancewe recommend yousee a bicycle
technician.
Brakes
The correct adjustmentand operation ofyour bicycle's brakesis extremely importantfor
safe operation. Brakesshould be checkedfor effectiveoperation before everyride.
Frequent checking foradjustments is necessaryas the controlcable will stretchand the
brake pads willbecome worn withuse.
WARNING:Never ride abicycle unless thebrakes are functioningproperly.
4 OF 13

Inspection
Brake levers shouldbe checked fortightness at leastevery three months.They shouldbe
set in acomfortable position withineasy reach ofthe rider's hands.Brake levers shouldbe
firmly affixedto the handlebar. Thebrake pads shouldbe checked forcorrect positioning
and tightness beforeevery ride, andthe various boltsand nuts atleast every threemonths.
Squeeze each brakelever to makesure they operatefreely and thatthe brake padspress
hard enough onthe rims tostop the bike.There shouldbe about 1mm2mmclearance
between each padand the rimwhen the brakesare not applied.The brakepads must be
properly centered formaximum contact withthe rim. Replacethe brake padsif they areover
worn (when thegrooves or patterncan't be seen).The brakecable wires shouldbe checked
for kinks, rust,broken strands, orfrayed ends.The outer casingshould also bechecked for
kinks, stretched coils,and other damage.If the cablesare damaged, theyshould be
replaced.
Cables and CableHousing
Cables and housingare one ofthe most over-lookedparts on thebicycle. Thefirst indication
that your cablesand housing needto be replacedis an increasedamount of pressure
needed to operatethe brakes orshifters. Before everyride, check thatthere are nokinks or
frays in thecables and housing.Also checkthat the housingis seated properlyinto each
cable stop onthe bicycle. Itis recommended thatthe cables andhousing be replacedat
least every ridingseason to prolongthe life ofyour bike.
WARNING:Do not ridea bicycle thatis not operatingproperly.
Hub Bearing
When checked, thehub bearings ofeither wheel willrequire adjustment ifthere is anyplay.
1.Check tomake sure locknutsare tight.
2.To adjust, removewheel from bicycleand loosen thelocknut on oneside of thehub while
holding the bearingcone with aflat open-end wrench.
3.Rotate theadjusting cone asneeded to eliminateplay.
4.Re-tighten thelocknut while holdingthe adjusting conein position.
5.Re-check thatthe wheel canturn freely withoutexcessive play.
Wheel Inspection
It is importantthat wheels arekept in topcondition. Properly maintainingyour bicycle's
wheels will helpbraking performance andstability when riding.Be aware ofthe following
potential problems:
Dirty or greasyrims
CAUTION: Dirty or greasyrims can renderyour brakes ineffective. When cleaning,use
a clean ragand wash withsoapy water,rinse and airdry.Don't ride whilethe wheels arestill
wet. When lubricatingyour bicycle, donot get oilon the rim.
Straight wheels
Lift each wheeloff theground and spinthem to seeif they arestraight and true.If wheels are
not straight, theywill need tobe adjusted.This is difficult and isbest left toa bicycle
technician.
Broken or loosespokes
Check that allspokes are tightand that noneare missing ordamaged.
CAUTION: Damaged spokes cancause serious injury.
Loose hub bearings
Lift each wheeloff theground and tryto move thewheel from sideto side.
CAUTION: If thereis movement betweenthe axle andthe hub, adjustmentis
required.
5 OF 13
Axle nuts
Check that theyare tight beforeeach ride.
Quick release
Check that theyare set toa closed positionand are properlytensioned before eachride.
CAUTION: Maintain the closedposition and thecorrect adjustment. Failureto do so
may result inserious injury.
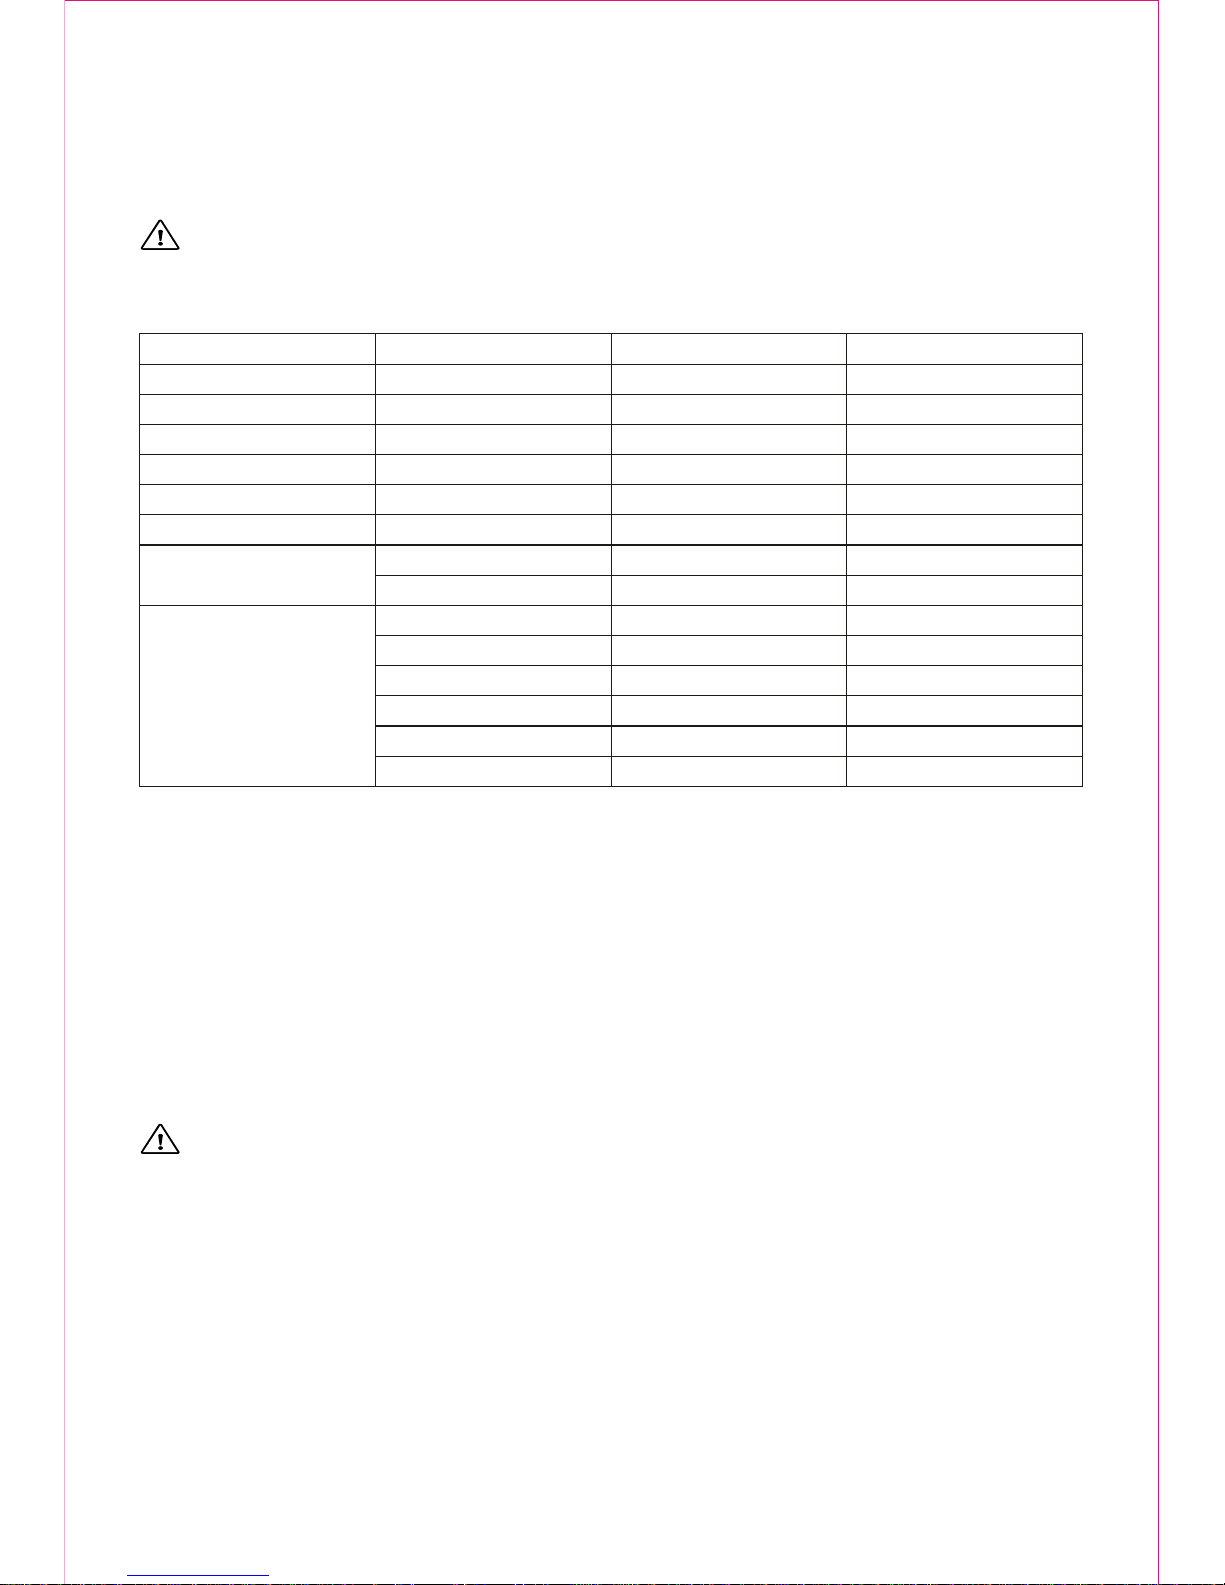
Lubrication
Reflectors
Yourbicycle is suppliedwith one front,one rear,two wheel, andtwo pedal reflectors.These
are an importantsafety and legalrequirement. Theyshould remain securelyfitted and in
good, clean conditionat all times.Periodically,inspect all reflectors,brackets, and
mounting hardware forsigns of wearor damage. Replaceimmediately if damaged.
Tires
Tires mustbe maintained properlyto ensure stability. Check thefollowing areas:
Inflation: Use atire gauge tocheck that thetires are inflatedto the pressureindicated on the
tire sidewalls.
CAUTION: If inflating tireswith a servicestation pump, takecare. Over-inflation can
cause a tireblow out.
Bead Seating: Wheninflating or refittingtire, make surethat the beadis properly seatedin
the rim.
Tread: Checkthat the treadshows no signsof excessive wearor flat spots,and that there
are no cutsor other damage.
Valves:Make sure valvecaps are fittedand that valvesare free fromdirt. Allowingdirt in the
valve can leadto a flattire, and seriousinjury.
Recommended TirePressures
The recommended pressureon the sidewallof the tireshould match thefollowing chart. Use
this as ageneral guide.
6 OF 13
Frequency
Weekly
Monthly
Every Six Months
Yearly
Component
chain
derailleur wheels
derailleur
brake calipers
brake levers
shift levers
freewheels
brake cables
bottom bracket
pedals
derailleur cables
wheel bearings
headset
seat pillar
Lubricant
chain lube orlight oil
chain lube orlight oil
oil
oil
oil
lithium-based grease
oil
lithium-based grease
lithium-based grease
lithium-based grease
lithium based grease
lithium based grease
lithium based grease
lithium based grease
How to Lubricate
brush on or squirt
brush on or squirt
oil can
3 drops fromoil can
2 drops fromoil can
disassemble
2 squirts fromoil can
disassemble
disassemble
disassemble
disassemble
disassemble
disassemble
disassemble
Note: The frequency ofmaintenance should increase withuse in wet ordusty conditions. Do notover lubricate-remove
excess lubricant toprevent dirt build-up.Never use adegreaser to lubricateyour chain.
BMX: 35-50 PSI
MTB: 46-65 PSI
Road Touring: 70-90 PSI(Recommended)
Road Racing: 110-125 PSI
Hybrid/Cross: 60-100 PSI
How To Fix aFlat Tire
If you needto repair atire, follow thesesteps:
1.Remove thewheel from thebicycle.
2.Deflate thetire completely throughthe valve. Loosenthe tire beadby pushing itinward.
3.Press oneside of thetire bead upover the edgeof the rim.
Note: Use tire levers.Using a screwdrivermay damage therim.
4.Remove thetube, leaving thetire on therim.
5.Patch theleaks using atube repair kit,or replace thetube.
Note: Make sure thatthe size ofthe replacement tubematches the sizestated on thetire
sidewall and thatthe valve isthe correct typefor your bicycle.
6.Match theposition of theleak in thetube with thetire to locatethe possible causeand
mark the locationon the tire.
7.Remove thetire completely andinspect it fornails, glass, etc.The insideof the rimshould
also be inspectedto make surethere are noprotruding spokes, rustor other potential
causes. Replace therim tape, whichcovers the spokeends, if damaged.
8.Remount oneside of thetire onto therim.
9.Using ahand pump, inflatethe tube justenough to giveit some shape.
10.Place thevalve stem throughthe hole inthe rim andwork the tubeinto the tire.Note: Do
not let thetube twist.
11.Using your handsonly,remount the otherside of thetire by pushingthe edge towardthe
center of therim. Start oneither side ofthe valve andwork around therim.
12.Before thetire is completelymounted, push thevalve up intothe rim sothat the tiresits
squarely in position.
13.Fit therest of thetire, rolling thelast, most difficult, part onwith your thumbs.Note: Avoid
using tire leversas these canpuncture the tubeor damage thetire.
14.Check thatthe tube isnot caught betweenthe rim andthe tire beadat ay point.
15.Using ahand pump, inflatethe tube untilthe tire beginsto take shape.Check that thetire
bead is evenlyseated all theway around therim. When properlyseated, fully inflatethe tire
to the pressuremarked on thesidewall. Use atire gauge tocheck.
16.Place thewheel into theframe checking thatall gears, brakesand quick releaselevers
are properly adjusted.
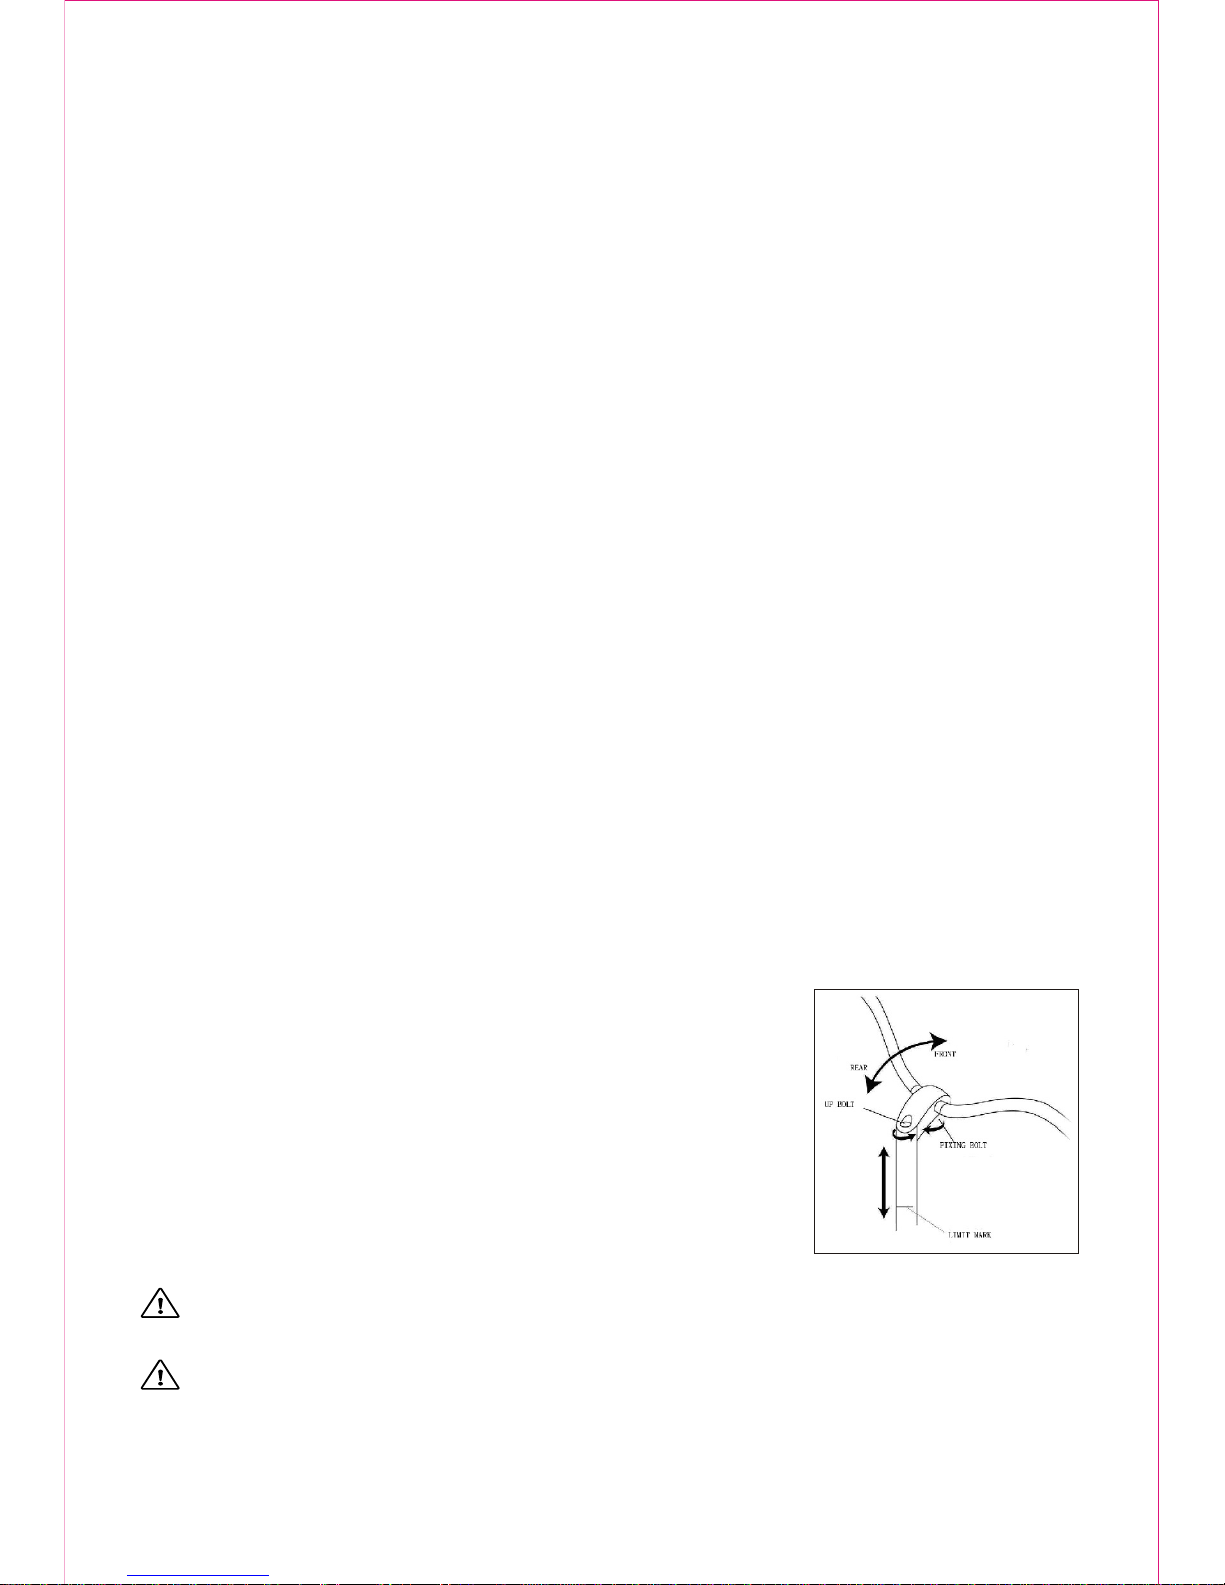
Handlebar Stem
The handlebar stemfits into thesteering column. Itis held firm
by the actionof a binderbolt and expanderwedge which, when
tightened, binds withthe inside ofthe fork steerertube.
When removing thestem, loosen thestem bolt twoor three
turns, and thentap it toloosen the wedgeinside.
Tolubricate, first wipeoff anygrease and grime.Next, apply a
thin film ofgrease to thepart, including thewedge that willbe
inserted into theframe. Theheight of thehandlebar can be
adjusted for comfort.The stemis marked withthe words max.
height/minimum insertion.
WARNING:Never ride abicycle if thestem has beenraised so thatthe max.
height/minimum insertion linecan be seen.
WARNING:Over tightening thestem bolt orheadset assembly maycause damage to
the bicycle and/orinjury to therider.
When re-fitting thestem, make surethe handlebar iscorrectly aligned andtightened using
the appropriate hexwrench.
7 OF 13
Testthe security ofthe handlebar withinthe stem, andthe stem withinthe fork steerertube,
by clamping thefront wheel betweenyour knees andtrying to movethe handlebar upand
down, and fromside to side.The handlebarshould not movewhen applying pressure.
Handlebars
The exact positioningof the handlebaris a matterof personal comfort.Make sure the
handlebar and thefork are facingforward. If youneed to replacethe fork, pleaseconsult a
qualified bicycle technician.
WARNING:Never ride unlessthe handlebar clampingmechanism has beensecurely
tightened.
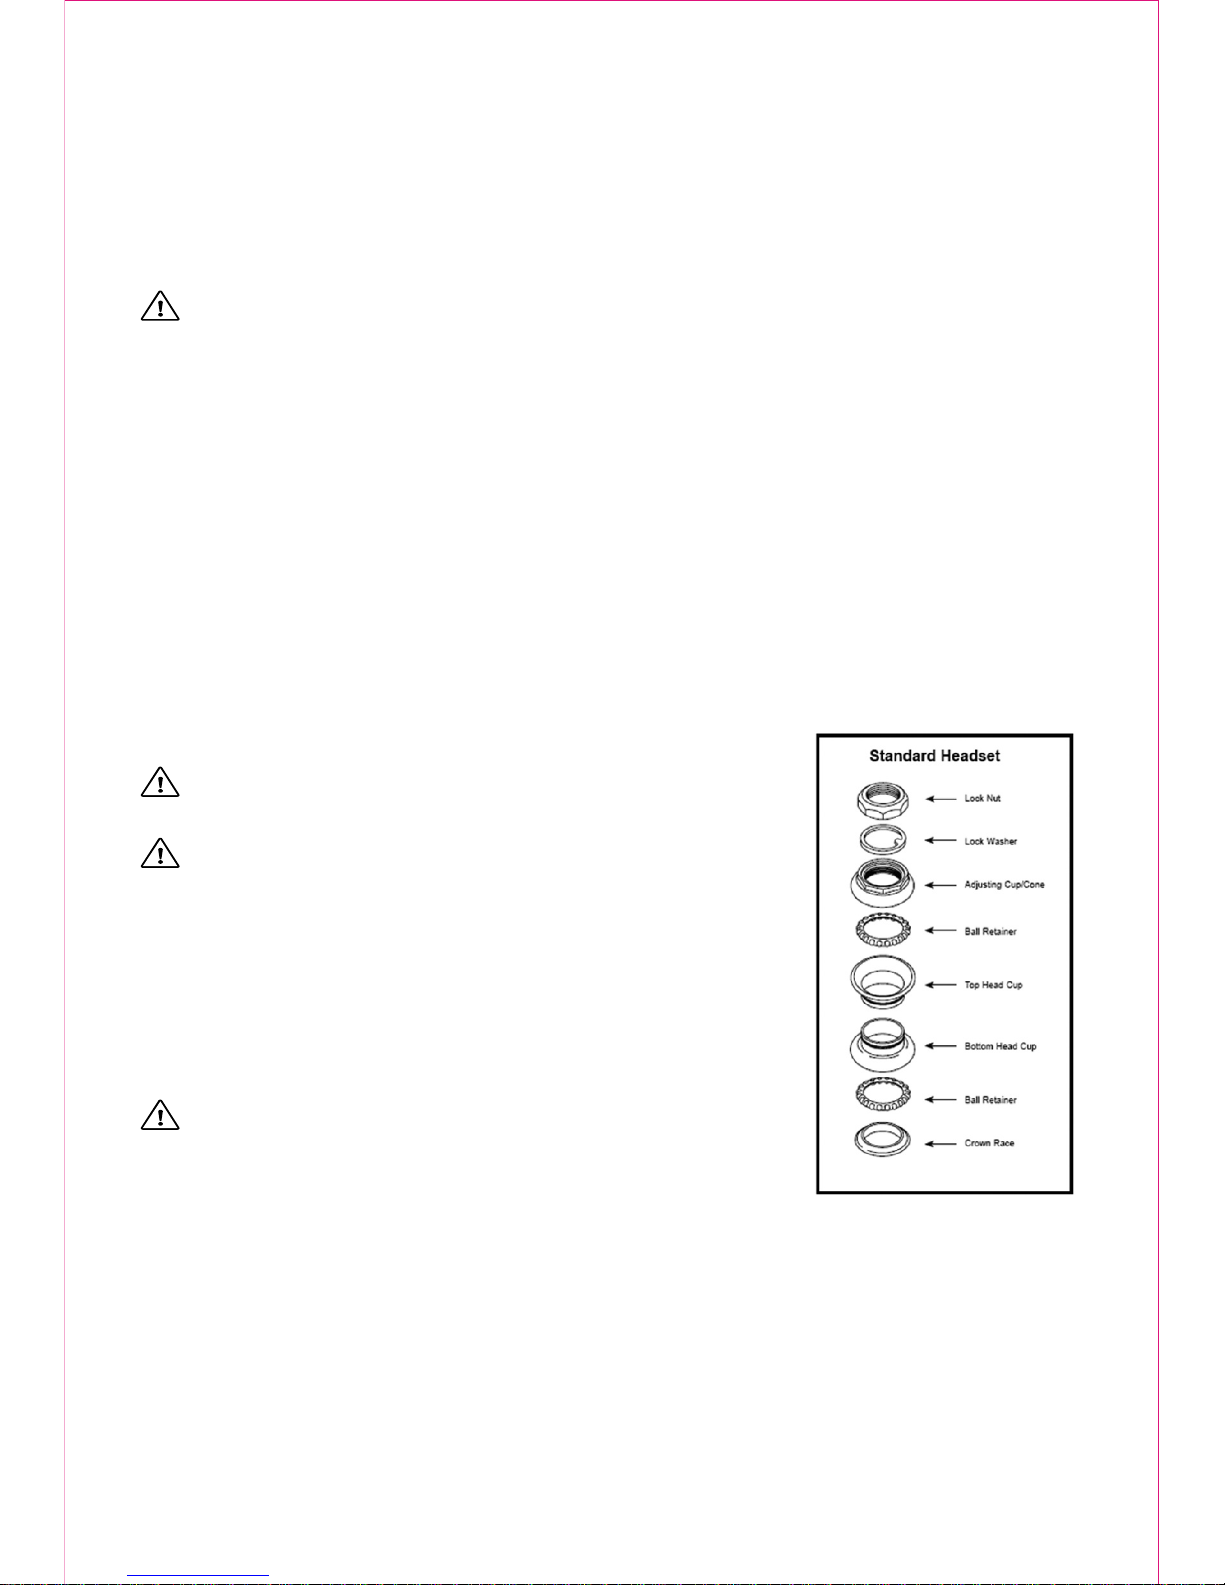
Headset Inspection
The headset bearingadjustment should bechecked every month.This isimportant because
the headset locksthe fork intothe frame, andif loose, cancause damage orresult in an
accident. Stand overthe frame toptube with bothfeet on theground. Applythe front brake
firmly and rockthe bicycle backand forth. Ifyou detect anylooseness in theheadset, it will
need adjustment.
Check that theheadset is notoverly tight byslowly rotating thefork to theright and left.If
the fork tendsto stick orbind at anypoint, the bearingsare too tight.
Note: If your bikeis equipped witha threadless headset,please see aqualified bicycle
technician for repairsand adjustments.
Headset Adjustment
Loosen the toplocknut (or removeit completely) alongwith the reflectorbracket, if fitted.
Turn theadjusting cup clockwiseuntil finger tight.Replace the lockwasher and reflector
bracket, and thenre-tighten the locknut using asuitable wrench.
Note: Do not overtighten or bearingdamage will occur.
WARNING:Always make surethat the headsetis properly
adjusted and thatthe headset locknutis tight beforeriding.
WARNING:Over tightening thestem bolt orheadset
assembly may causedamage to thebicycle and /orinjury to the
rider.
Saddle and SeatPost
Inspection:
The seat fixingbolt and theseat post binderbolt should be
checked for tightnessand adjustment everymonth. On
removing the seatpost from theframe, you willnotice a mark
with words max.height/minimum insertion.
WARNING:To avoid damage,the minimum insertionmark
must be insidethe frame.
Lubrication:
Remove the seatpost from theframe and wipeoff anygrease,
rust or dirt.Apply athin film ofnew grease tothe part thatwill be insertedinto the frame.Re-
insert, adjust, andtighten the seatpost.
Adjustment:
The seat canbe adjusted inheight, angle, anddistance from thehandlebars to suitthe
individual rider.Saddle angle isa matter ofpersonal preference butthe most comfortable
position will usuallybe found whenthe top ofthe seat isalmost parallel tothe ground, or
slightly raised atthe front.
The saddle canalso be adjustedby sliding itforward or backalong the mountingrails.
When fitting, positionthe seat postinto the clampunder the seatand place itin the frame
without tightening.Adjust it tothe desired angleand position, andtighten the clamping
8 OF 13
Indicator
Power indicator lightis red
Power and Chargingindicator light isred
Power indicator lightis red andcharging indicator lightis green
Charger State
Power on
Charging State
Full State
Please see thelabel on thecharger for additionalinstruction.
mechanism.
Testit by graspingthe seat andtrying to turnit sideways. Ifit moves, tightenthe binder bolt.
Note: Remember thatthe minimum insertionmark must remaininside the frameassembly.
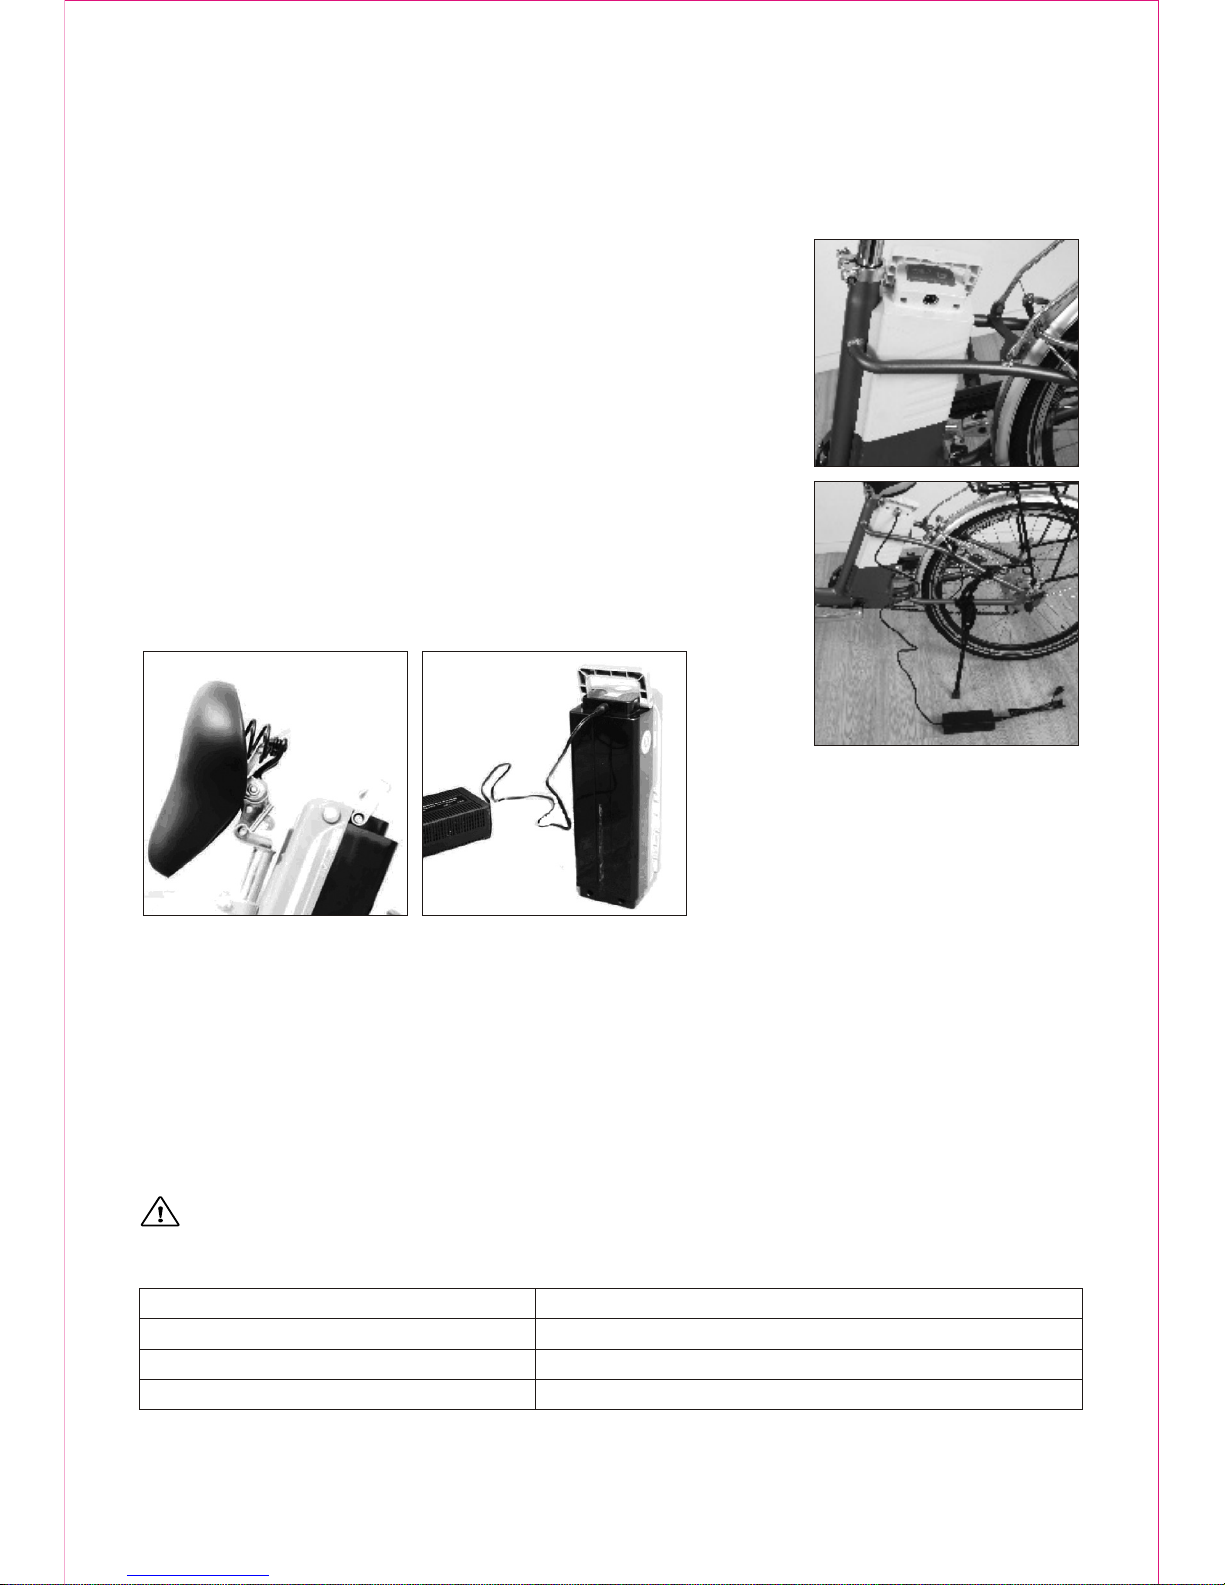
CHARGING THE BATTERY
The battery ofthe electric bicyclecan be chargedwith the bicycle
or independently.
Please use thespecial charger provided.
Charging the batteryon the bicycle
1.Stop theelectric bicycle atsuitable place andturn the main
switch to OFFposition.
2.Turnthe handle ofbattery box toexpose the charginginlet.
3.Insert theplug into thecharging inlet.
4.When finished,unplug it andclose the handle.
Charging the batteryafter removing
1.Place thebicycle on aneven surface.
2.Turnthe main switchto the OFFposition and takeout the key.
3.Insert thekey into thebattery lock andturn 180° counter
clockwise.
4.Lift thebar under thesaddle so thatthe saddle isvertical. Pull
the handle ofbattery box toremove the battery
Installing the battery
1.Hold thehandle of batterybox and re-insertthe battery.
2.Turnthe key 180°clockwise, then removethe key.
3.Pull backthe handle ofbattery box.
4.Return thesaddle to itsnormal position.
5.Connect theplug.
Charging Method
1.Plug ofcharger into thecharging socket ofthe battery.
2.Plug ofcharger into anoutlet (110V).
WARNING: Thebattery should bekept upright whencharging.
Indication of ChargerState
9 OF 13

Charging Environment
A dry, level surface
Should be outof direct sunlight
Make sure thereis proper ventilation
Keep away fromchildren and pets
Temperaturerange should be0-40 C duringcharging
Cautions for chargingthe battery
Please refer tothe charger instructionsfor detailed information.
Battery should becharged once every2 months whennot used.
Remove the batterywhen not usedfrequently.
Charge the batterybefore using.
WARNING:
Battery should onlybe charged usingthe charger provided.
Keep the batteryand charger awayfrom children andpets.
Do not touchthe charger plugand power supplywith wet hands.
Do not turnthe pedal whencharging (on thebicycle).
Do not usethe charger forother electric bicyclesand electrical products.
Charger will becomewarm when charging.Do not cover.
Store the chargerin a dry, secure environment.
Follow all operatinginstructions.
Keep the chargerfree of dirt,dust, and moisture.
Dispose of thebattery in aproper manner.
OPERATINGTHE ELECTRIC BICYCLE
This electric bicycleis motor-driven.
This product complieswith the statestandards.
The product performsat its beston flat, evensurfaces. Hills anduneven surfaces will
increase the burdenon the motorand battery. Please usethe pedals forbetter performance.
This will increasethe driving distanceand prolong thelife of thebicycle and thebattery.
Power Supply
Insert the keyinto the mainpower switch.Turn itclockwise to activateit.
The controller shouldindicate that thepower is on.The handleindicator should belit. The
electric bike isnow ready.
CAUTION: Please turn themain power switchto the OFFposition when finishedriding.
Riding with theMotor
When riding thebicycle, you canadjust the speedfrom 315 1/2MPH (525 km/h).
Tostop the motor, simply letoff thethrottle and applythe front orrear brake.
Avoid powerfailure by makingsure the batteryis charged.
Riding without theMotor
This electric bicyclecan also beridden using thepedals.
Since an electricbicycle is heavierthan a normalbicycle, extra forceis required topedal it.
Battery voltage indication
This electric bicycleis installed withpower volume indicator
The power volumeindicator will lighton when thebattery is fullycharged.
The indicator willgradually diminish withuse. Battery shouldbe charged whenthere is only
one indicator lighton.
Instruction
Please take into consideration howfar you planon going whenassessing whether the
battery needs charging.
10 OF 13

Estimated distance witha fully-charged, newbattery
On a flatroad: 1224 mile(2545 km) range.
Note: There are anumber of factorsthat can affect riding distance:How many timesyou
stop and start,the amount ofweight on thebicycle, the slopeand condition ofthe road, wind
conditions, temperature, andtire pressure.
Temperaturehas a directeffect onthe battery. Lower temperaturesdecrease battery
performance.
Load Goods
Recommended max. loadof this electricbicycle (weight ofthe passengers andgoods) is
165 lbs. (75kg).NOTE: Increased weight willaffect travelspeed and milerange.
The loading capacityand goods sizeof the bracketand luggage tankare shown below:
Toomany goods willimpact traveling distanceand battery andmotor performance.
WARNING:Do not exceedmaximum load weightand size. Overloadingand improperly
affixed loadscan result inunsafe riding conditionsand serious injury.
Instructions for parkingand storing theelectric bicycle
Stop the electricbicycle on evenand solid surface.
Hold the rackand kick thesupport.
CAUTION: Lock the supportrods after parkingthe bicycle.Turn themain power switch
to OFF positionor refer tothe power lockindication mark.
Turnthe main powerswitch to theOFF position
If the mainpower switch isnot turned off, it cancause driving systemfailure due to
inadequate power supply, and mayresult in aloss of batteryperformance.
Takeout the key
Takethe key outto avoid theftafter the bicycleis stopped.
Check before operating
Make sure tothoroughly inspect theelectric bicycle beforedriving.
Max Load
Size of Goods
Bracket
Luggage Tank
Width
Length
Height
6 lbs. (3kg)
22 lbs. (10kg)
3.9" (10cm) leftand right ofthe luggage tank
3.9" (10cm) behindthe luggage tank
15.7" (40cm) upthe luggage tank
11 OF 13

Confirm before driving
1.Make surethe handlebar isstable.
2.Ring ofbell.
3.Inspect thebrakes and brakelevers.
Hold the frontand rear brake,confirm that thereis 1/2"
of distance betweenthe brake andbrake handle
Check the wearof brake rubber
Please replace thebrake rubber ifthe slot isless than 1/32"
(1mm).
Slot of brakerubber exceeds 1/32"(1mm).
4.Height ofsaddle and handlebar
The saddle isthe proper heightwhen your feettips touch theground when sittingon the bike.
Yourelbows should beslightly bent whenholding the handlebar.
5.Power volumeof battery
Turn themain switch toON position, confirmremaining power throughthe power indicator.
6.Installation ofbattery
Confirm the batteryis tightly installedin the bicycle.
7.Check thewheel shaft
Confirm that thefront and rearwheels are tight(recommended torque isshown below)
Rotation Torque of FrontShaft Nut: 265-354in-lbs. (300-400kgfcm) (30-40Nm)
Rotation Torque of RearShaft Nut: 398-637in-lbs. (450-720kgfcm) (45-72Nm)
8.Air pressureand damage totires
Confirm the airpressure of tires.Low air pressuremay cause
broken wheels orswaying. Inspect thetires for damage,
including foreign objectssuch as nailsand glass.
9.Confirm thatthe pedals arestable.
If there isplay in thepedals, tighten thebolts immediately.
10.Make surethe saddle istight and freefrom movement.
11.Check the chaintension.
Please adjust thechain if itexceeds 46" (1015mm).
12.Confirm thechain is lubricated(30# machine oil)and works smoothly.
Length contacting with floor
3 1/24" (9-10cm)
Test condition
Weight of passenger
132 lbs. (60kg)
Air pressure
44 PSI (300kpa)
12 OF 13

TROUBLESHOOTING
Electric Driving System
Charger
WARRANTY
One-Year LimitedWarranty
Phenomenon
Electric driving systemis unstable
Low speed
Power indicator isoff
Electric driving systemmakes
noise
Electric driving systemgenerates
smoke or odor
Battery power indicatorlights on,
but the motordoesn't work
Drive distance is short
Check
Battery is notcharged
Tire pressure islow
Tire is damaged
Overloading
Does plug tightly connectwith
the battery
Is the batteryfully charged?
Is it usedin a low temperature
environment?
Battery service lifehas expired
Solution
Charge the battery
Inflate the tire
Repair the tire
Limit the goodsat max load
Tightly connect theplug
If this doesn'tsolve the problem,it is possible
that the batteryterminal or wireis loose.
Please contact theseller
Check for foreignobjects in theelectric driving
system or alack of lubricant
Please contact theseller
Electric driving system isfaulty
Please contact theseller
Wire is loose orelectric drive system isfaulty
Please contact theseller
Charge the battery
Operate in warmerenvironment
Please replace the battery.
The Battery servicelife is expiredwhen the dis
charging time isless than 70minutes at 5A
current in the20 environment after charging.
Connect it again.If it stillwon't charge, that
means the chargerhas failed orthe fuse is
damaged
Please contact theseller
Confirm the chargingmethod and charge
again If itstill doesn't charge,you have charger
failure
Please contact theseller
Immediately unplug thepower socket andstop
using.
Please contact theseller
Immediately unplug thepower socket andstop
using.
Please contact theseller
Charge failure
Charger generates noise,odor
and smoke
Charger becomes warm
Is the powersocket tightly
connected with chargingplug?
Is the chargerindicator light on?
It may generateheat when
o
charging (4060 C)
13 OF 13

Northern Tool + EquipmentCo.,
2800 Southcross DriveWest
P.O. Box 1499Burnsville, MN 5337-0499
Made in China
WARNING
Some dust createdby power sanding,sawing, grinding, drilling,and other construction
activities contains chemicalsknown to theState of Californiato cause cancer, birth defects
or other reproductiveharm. Some examplesof these chemicalsare:
Lead from lead-basedpaints
Crystalline silica frombricks and cementand other masonryproducts, and arsenicand
chromium from chemically-treatedlumber.
Yourrisk from theseexposures varies, dependingon how oftenyou do thistype of work.To
reduce your exposureto these chemicals:work in awell ventilated area,and work with
approved safety equipment,such as thosedust masks thatare specially designedto filter
out microscopic particles.
·
·
Tools
Table of contents


