NOVAS NV03G User manual
Apartment Smart Lock
User Manual
Please read the manual carefully before use
Note:
* be sure to carry the mechanical key with you or put it in
an outdoor safe place for any emergency use.
* Do not install this lock in a fire exit door.

2
1) Before installation
1.1)Professional installation recommended
1.2)To avoid any circuit function fault, please do not crumple the cable.
1.3)Keep the door open until finishing the installation and lock function test.
1.4)Factory initial password is 123456#. Please check whether fingerprint, card,
password, key, inside knob unlock function well after installation.
1.5)If any function mentioned above doesn’t work appropriately, check again if the
cable is well connected or if there any improper operation during installation then
reinstall it strictly following our diagram.
2) Installation diagram
Steps:
2.1) Open the front panel and insert the lock cylinder (refer to diagram 7,8).
2.2) As shown in the diagram, use the studs to connect the front panel and cylinder
panel then tighten the screws to fix (refer to diagram 4,5,6).
2.3) Fix the rim mortise on the door then cover it with the back panel and fix it (refer
to diagram 1,2,3).

3
3) Buckle installation
Steps:
3.1) Use the screws to fix the buckle plate on the door.
3.2) Use screws to fix the buckle.
3.3) When finish the installation, test the knob of the rim lock making sure the
deadbolt fit the buckle slot well. If the unlock operation is not smooth enough, try
adjusting the buckle postion.
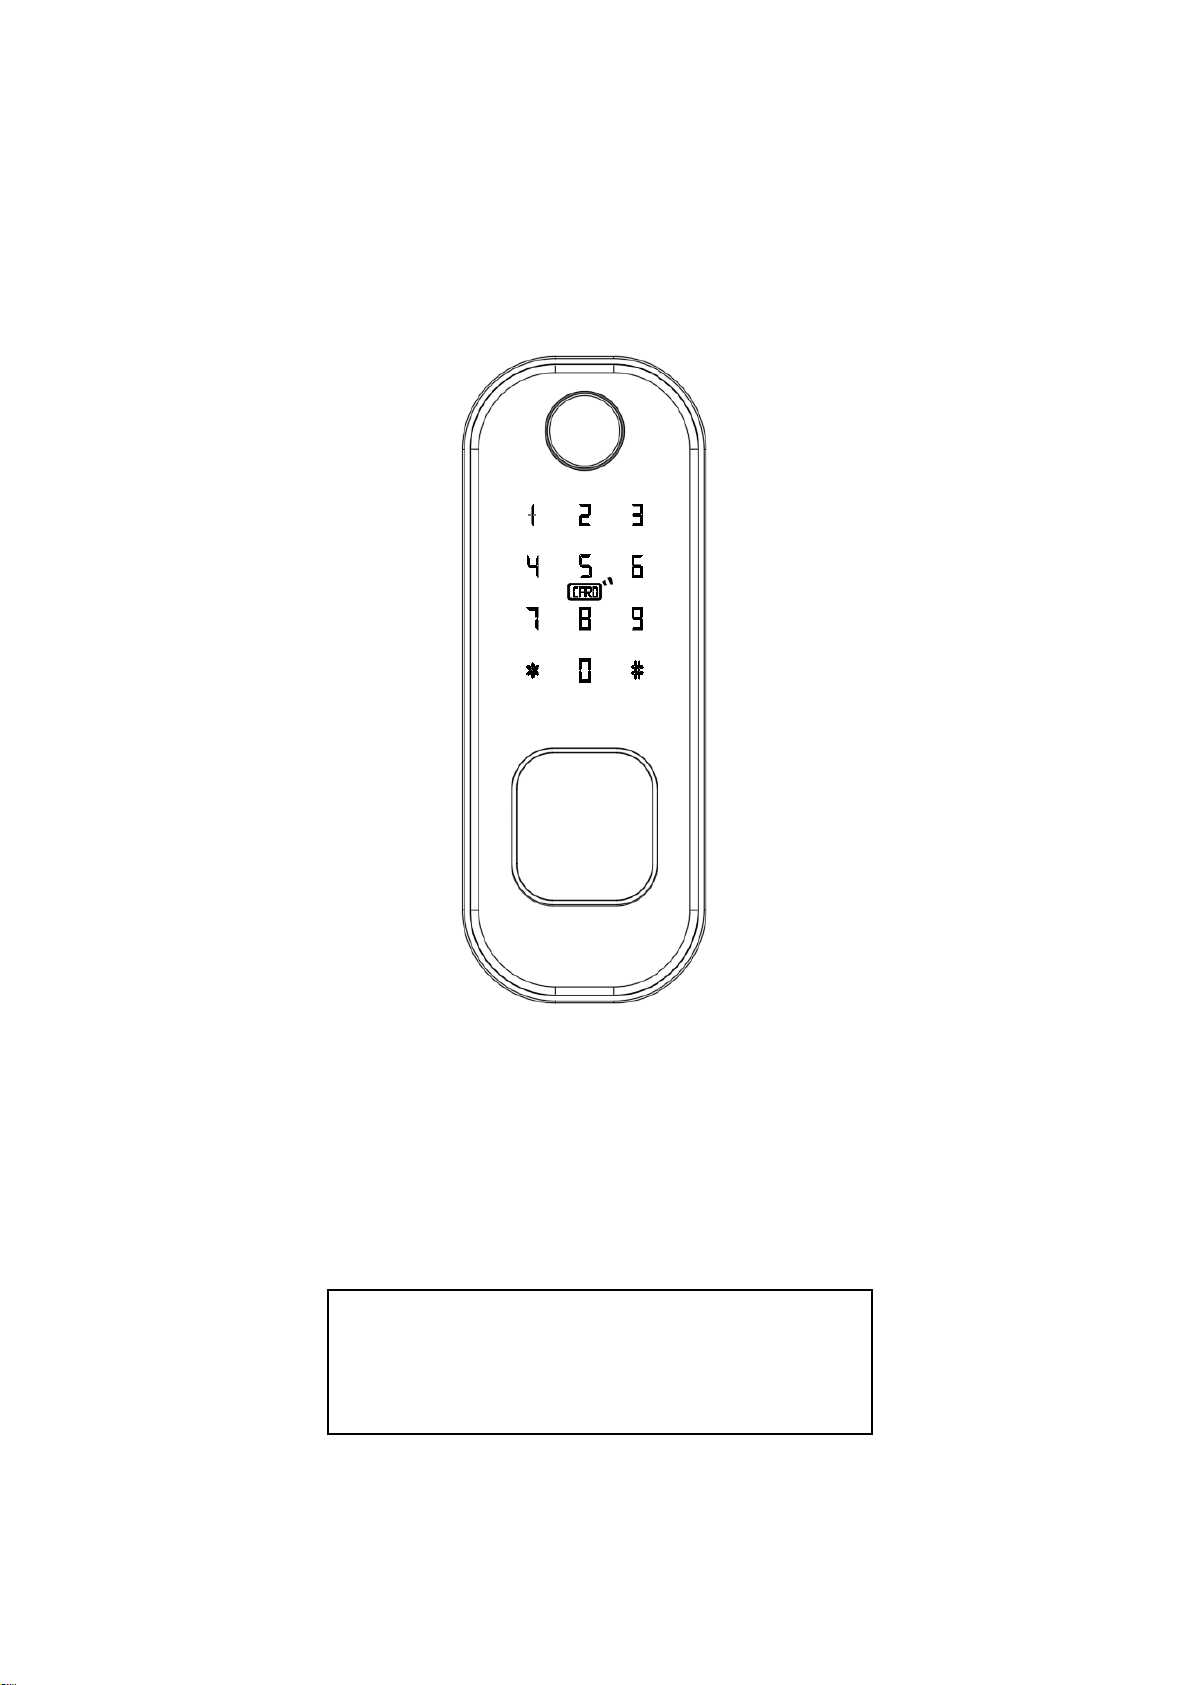
4) Function and operation
4.1) Keypad function description
Lock is with 12-digit keypad. “*” key is to return or delete while “#” key is to end the
input or confirm operation. Delete the last digit by inputting “*” key when enter
wrong password (one “*” to delete one digit). Input “#” key when finish operation.
4.2) Factory initial status
Under factory initial status, administrator password is 123456. Please change the
administrator password before use.
4.3) Mobile administrator operation
4.3.1) APP to add mobile administrator: when there is no administrator password nor
mobile administrator in lock, wake the keypad then connect the door lock to the APP
when hear invoice "Please add mobile administrator”.

4
4.3.2) Use the lock to reset the mobile administrator: to use this function, there
should be a mobile administrator already. Enter “*83XXXXXX#”(XXXXXX is the
administrator password) then use another mobile to add the lock to become another
administrator. Reset operation finished, the previous mobile administrator will
automatically become invalid.
4.3.3) To delete a mobile administrator: find settings in APP and slide to the bottom
then click delete.
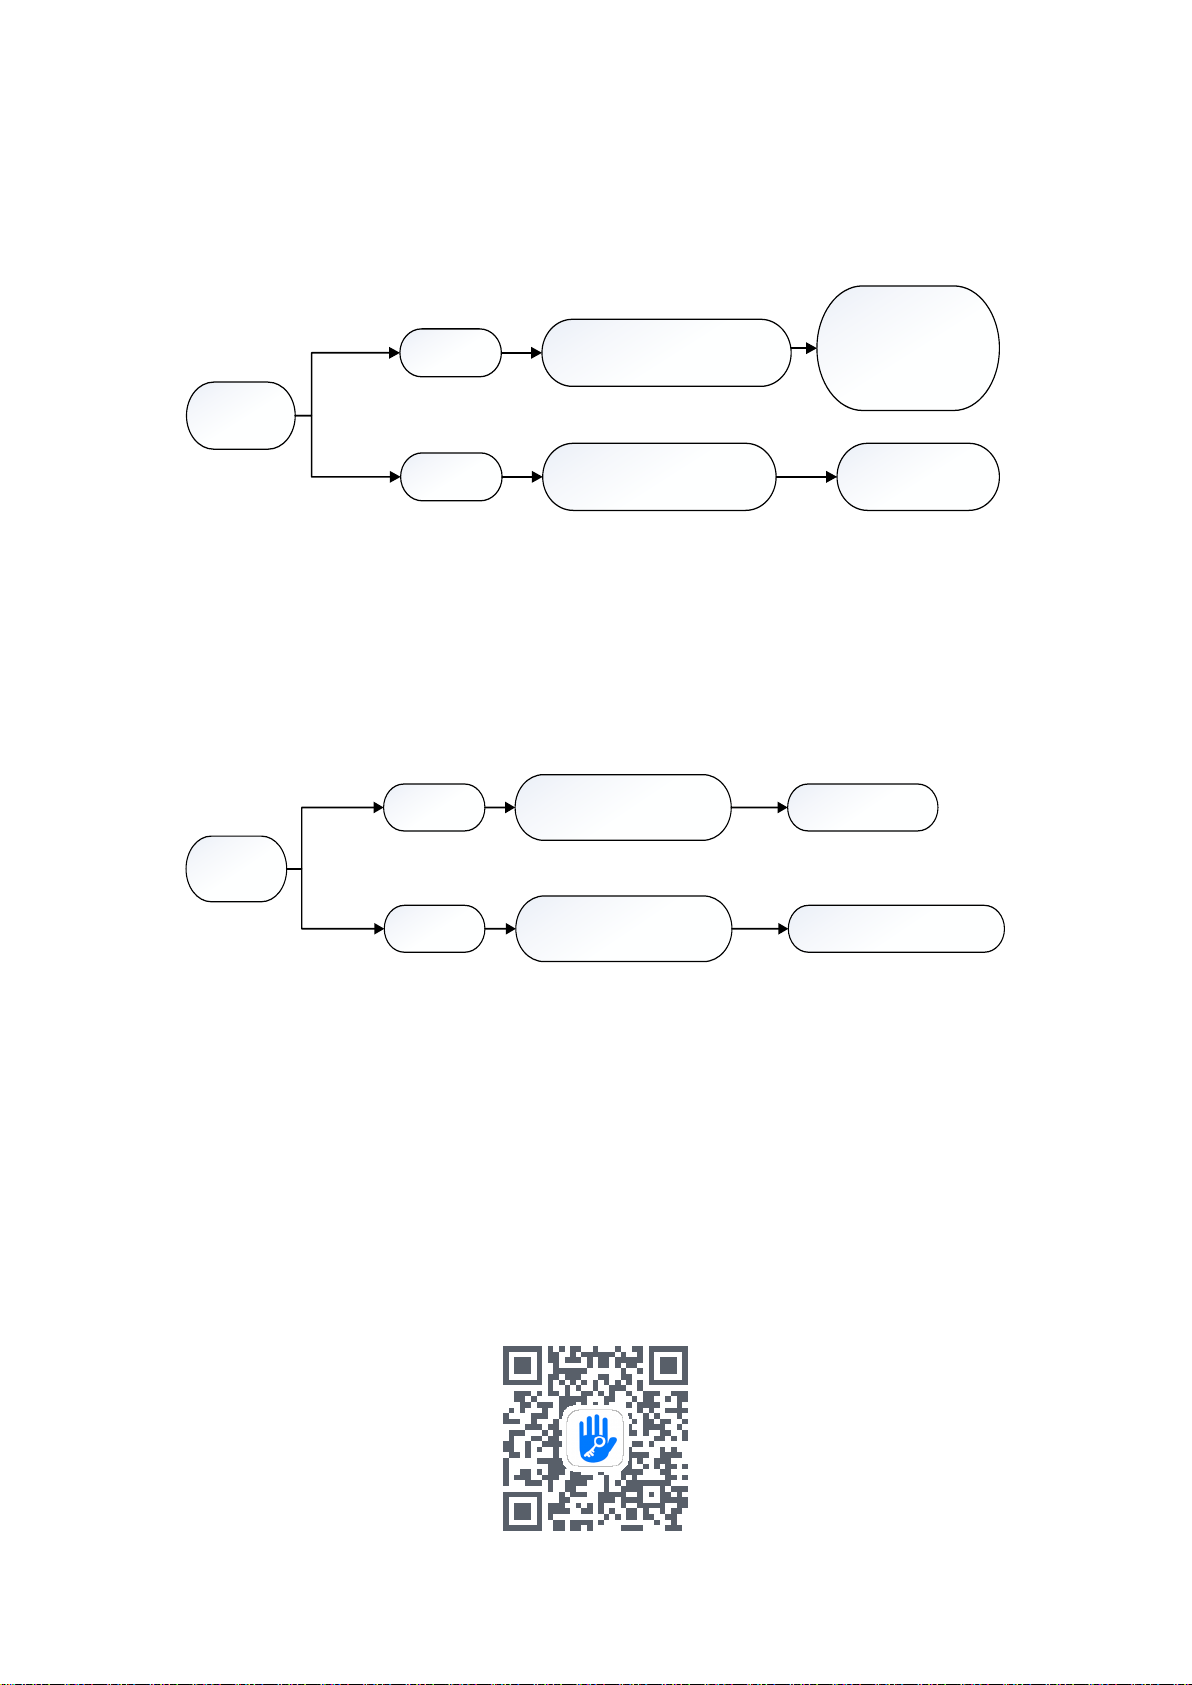
5) reset or modify administrator password
An administrator password will be generated when you add the lock. Find it in APP
“setting-basics” and modify it following the operations as below.
wake the
keypad Input*12#input the previous
administrator password#
input new
administrator
password#
reset/modify
input the new
administrator password
again#
*Remark: the above operation can be performed in APP. To check the password
information, click setting and find it in basics.
6) Set / modify / delete password
wake the
keypad
Input*85#
Input*10#
add password
modify password
Input*71#
delete password
input the administrator
password# input new password#
input the new password again#
input the administrator
password#
all password deleted
successfully
input the previous
password# input new password#
input the new password again#
*Remark: the above operation can be performed in APP. Password rename and valid
time setting can be performed in APP, too.
5
7) Add / delete fingerprint
wake the
keypad
Input*85#input the administrator
password#
follow the voice
instruction to press
your finger on the
scanner
add
Input*70#input the administrator
password#
delete all
fingerprints
delete
*Remark: the above operation can be performed in APP. Password rename and valid
time setting can be performed in APP, too.
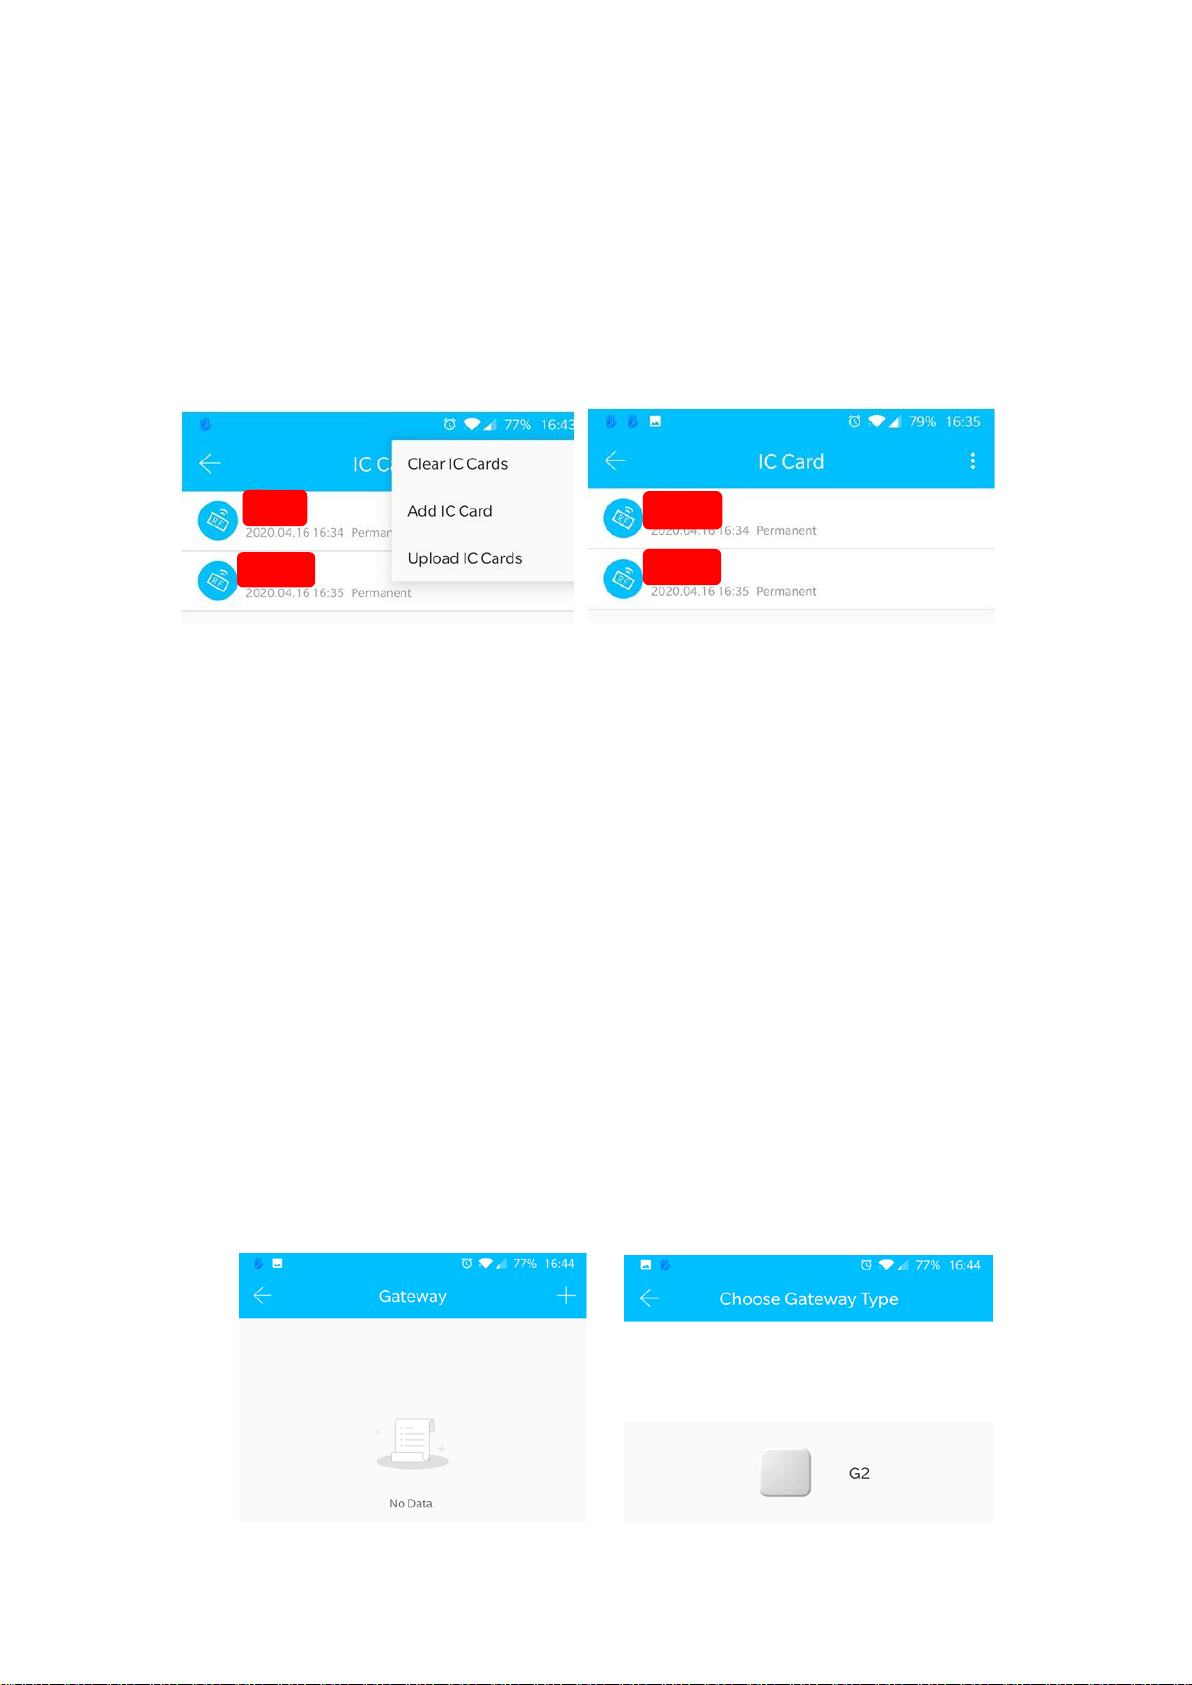
8) Add / delete IC card
wake the
keypad
Input*85#input the administrator
password# swip the card
add
Input*69#input the administrator
password# delete all IC cards
delete
* Remark: the above operation can be performed in APP. Password rename and valid
time setting can be performed in APP, too.
9) Compatible APP
For English version user, please use TTLOCK APP (supporting Chinese & other 23
languages). User can download through the QR code directly or in APP store.

6
10) APP function
10.1) The installation
Scan the APP QR code to install TTLOCK APP. For iOS version please download from
APP store. For Android, please download from google play, Xiaomi, Huawei APP
market.
10.2) Registration
TTLOCK can be registered by mobile phone number or mailboxes. It supports mobile
phone numbers from over 200 countries. When starting registration, TTLOCK will send
a verification code to the registered mobile phone or email. Once verified, the
registration is successful and will turn directly to the home page.
*On the login page, you can log in with registered mobile phone number or email
account. When log in with a mobile phone number, enter the phone number without
country code as TTLOCK will automatically recognize it. If you forget your password,
click on the “forgot password”to verify by mobile phone or email then reset the
password.
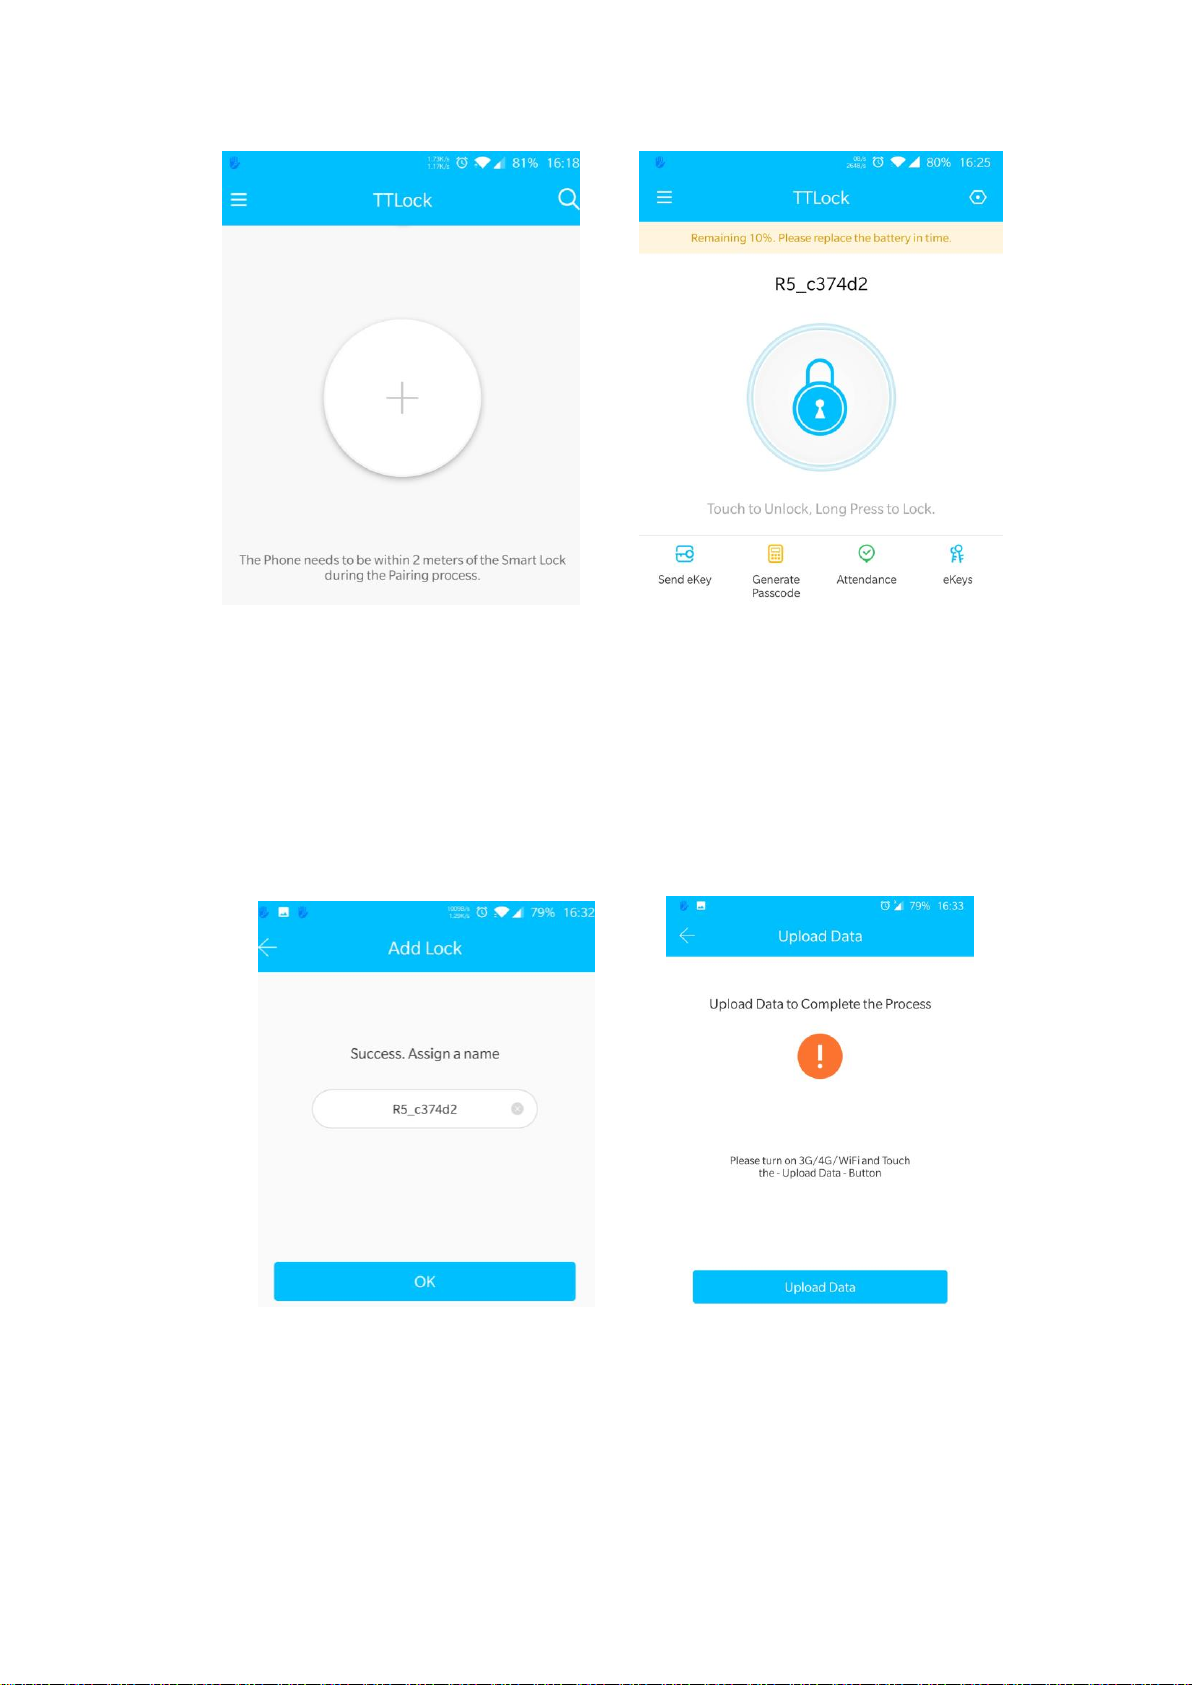
10.3) APP log in
First time to use the APP, there is no door lock nor key information. Front page will
show a button "+". Front page will show the lock information.
7
10.4) To add a lock
Please add the lock through TTLOCK App and set administrator before use. Make sure
the door lock is nearby and the mobile Bluetooth and WIFI/3G/4G opened when
doing the above operation. When finishing adding the lock, the first user will be the
default phone administrator.
10.5) Ekey management
10.5.1) The first user to add the lock will be the default phone administrator with the
highest management authority. He can send Bluetooth ekey to others specifying the
time limit (limited time, permanent, one time or cyclic). Sending ekey to unregistered

8
users supported.
10.5.2) The phone administrator can manage all the ekeys (clearing, resetting,
adjusting the validity, sending ekey, check the unlocking data etc.). APP will show the
expiring (yellow with the left days) and the expired users (red) in special color for you
to take the next step.
10.6) Password management
10.6.1) Input “password #” on the keyboard to unlock. There are permanent,
time-limited, one-time, clear, cyclic, and customized password. Passwords are
randomly generated and can be modified except the customized one (mind that
random passwords must be used at least once before modifying it).
10.6.2) Permanent password: password that will not expire.
A permanent password should be used at least once within 24 hours after it is
generated, otherwise it will automatically become invalid.
10.6.3) Time-limited password: password with a certain validity (shortest one hour,
longest 3 years).
If password validity is within one year, it can be set down to hour precision. If
password validity is more than one year, it can be set down to month precision. The
time-limited password will need to be used at least once within 24 hours, otherwise it
will automatically become invalid.
10.6.4) One-time password: password that can be used for one time only with a
validity of one hour.
10.5.5) Erase password: the password will be valid for 24 hours. When an erase
password used to unlock, all passwords set before will be permanently invalid. (this
password is recommended for rental house/apartment use only)
10.5.6) Customized password: set a certain 4-9 digits required.
10.5.7) Cyclic password: a password that can be used repeatedly within a specified
9
time, there are daily cycle, weekly cycle, weekend only cycle and other.
11) Card management
Use the APP to add IC card user when the lock is nearby. The validity period IC card
can be set to be either permanently or temporary and validity can be modified
accordingly.
12) Fingerprint management
Use the APP to add (4 times register recognition when it gets start) or delete the
fingerprint. Make sure lock is nearby and Bluetooth and WIFI/3G/4G is on.
13) The gateway
TTLOCK is connected via Bluetooth but not network, which makes it free from
network attack. The gateway is a bridge connecting the smart lock and the network at
home. User can operate the lock remotely by using the gateway. The steps of adding a
gate way is as below:
13.1) Connect the phone to the WIFI network which is connected to the gateway.
13.2) Click the “+”at the upper right Connor and input the WIFI password and gateway
name then the APP password to verify.
13.3) Press the gateway setting button for five seconds till the green light flashes then
start to add (support G2 gateway only).

10
14) other function
Anti-peeping password function: input before or after the correct password some
random number (no more than 16 bits) for better security.
5 times wrong password will cause a 5-minute keypad lock. During these 5
minutes, the correct password, registered IC card, APP unlock can release the
locked status.
Chinese and English supported. For Chinese, input “*39#XXXXXX#1#”(XXXXXXX is
the administrator password. For English, input “*39#XXXXXX#2#”.
15) Technical parameter
Bluetooth standard
Bluetooth 4.1 or above
Mobile system supported
Android 4.3/IOS7.0 or above
power
DC 6V / DC 12V
Static current
≤60μA
Work temperature
-20~60℃
Work humidity
20%~90%RH
button
Capacitive touch buttons
Password capacity
APP password sending
unlimited
Customized password
150
fingerprint
Correct rejection rate
≤1%
False recognition rate
≦0.001%
Recognition time
≤1s
capacity
200
Card supported
M1 card
IC card capacity
200
Unlock way
APP / fingerprint / password / IC card / key
Emergency power supply
DC 5V

11
—————————————————WARRANTY————————————————
1. Package will be delivered together with an English manual and warranty card. Fill
in the warranty card and keep it after installation.
2. Warranty: 1 year.
3. We do not provide warranty service in the following situations:
3.1) Damage caused by unexpected factors, human intended violent behavior and
some external factors (including but not limited to violent prying damage, input of
inappropriate voltage, etc.).
3.2) Damage caused by of irresistible factors such as natural disasters (earthquakes,
fires, floods, etc.).
3.3) For those damage out of the warranty scope, we will charge accordingly.
3.4) When the product fails to work properly, please contact your local dealer for
repair.
Table of contents
Popular Lock manuals by other brands


Kaba
Kaba SIMPLEX LD470 installation instructions

Brookline
Brookline C300 SERIES installation instructions

Assa Abloy
Assa Abloy Yale Real Living Assure Lock SL YRD256 Installation and programming instructions

Allegion
Allegion Von Duprin 4754 installation instructions

beloxx
beloxx miniPAD BeCode installation instructions

DKS
DKS 1216-080 quick start guide


