NovaSail NS100 User manual

Operating Manual
v1.0

NS100
Operating Manual2
Introduction . . . . . . . . . . . . . . . . . . . . . . . . . . . . . . . . . . . . . . . . . . . . 3
Installation . . . . . . . . . . . . . . . . . . . . . . . . . . . . . . . . . . . . . . . . . . . . . 4
Controls and display description . . . . . . . . . . . . . . . . . . . . . . . . . . . 5
Screen modes . . . . . . . . . . . . . . . . . . . . . . . . . . . . . . . . . . . . . . . . . . 6
Operations . . . . . . . . . . . . . . . . . . . . . . . . . . . . . . . . . . . . . . . . . . . . . 7
• Switching power on and off ............................................. 7
• Switching backlight on and off ......................................... 8
• Main screen ..................................................................... 8
• Timer mode ..................................................................... 8
• GPS coordinates ............................................................. 9
• Maximum speed and total distance ................................. 9
• Waypoint mode.............................................................. 10
• MOB: Man Over Board ...................................................11
Advanced Operations . . . . . . . . . . . . . . . . . . . . . . . . . . . . . . . . . . . 13
• SET mode...................................................................... 13
• Waypoint mode.............................................................. 16
Limited Warranty . . . . . . . . . . . . . . . . . . . . . . . . . . . . . . . . . . . . . . . 18
Disclaimer . . . . . . . . . . . . . . . . . . . . . . . . . . . . . . . . . . . . . . . . . . . . . 19
Contents

NS100
Operating Manual 3
The
NS100
has been designed to provide essential information with a very
simple and user friendly interface. Speed, heading, GPS coordinates and man
overboard (MOB) functions are all accessible at the push of a button and clearly
displayed on the backlit LCD, ideal for a night sailing and making your sailing
safer. This new version offers better speed accuracy, a new screen with improved
contrast and readability, and features a new waypoint management.
Compact (125 mm x 80 mm x 26 mm) and intuitive, the
NS100
is a light, portable
device, which is completely waterproof, ultra robust, and made of bombproof
polycarbonate and anodized aluminium.
Powered by only one AA battery, the
NS100
gives sailors accurate information for
over 36 hours. It can be installed in minutes and there is no need to drill a hole in
the hull or use a wired connection.
We hope you enjoy sailing with the
NS100
. We encourage you to read this
manual thoroughly to learn about the many features of your exciting new Novasail
product.
Introduction

NS100
Operating Manual4
Wherever you mount the
NS100
, it shouldn’t be flush to any thick surface, such
as the hull, so that the sensitivity of the embedded GPS receiver is not affected.
Also a direct mount on a metal surface will reduce the receiver sensitivity.
Installation
NS100
Operating Manual 5
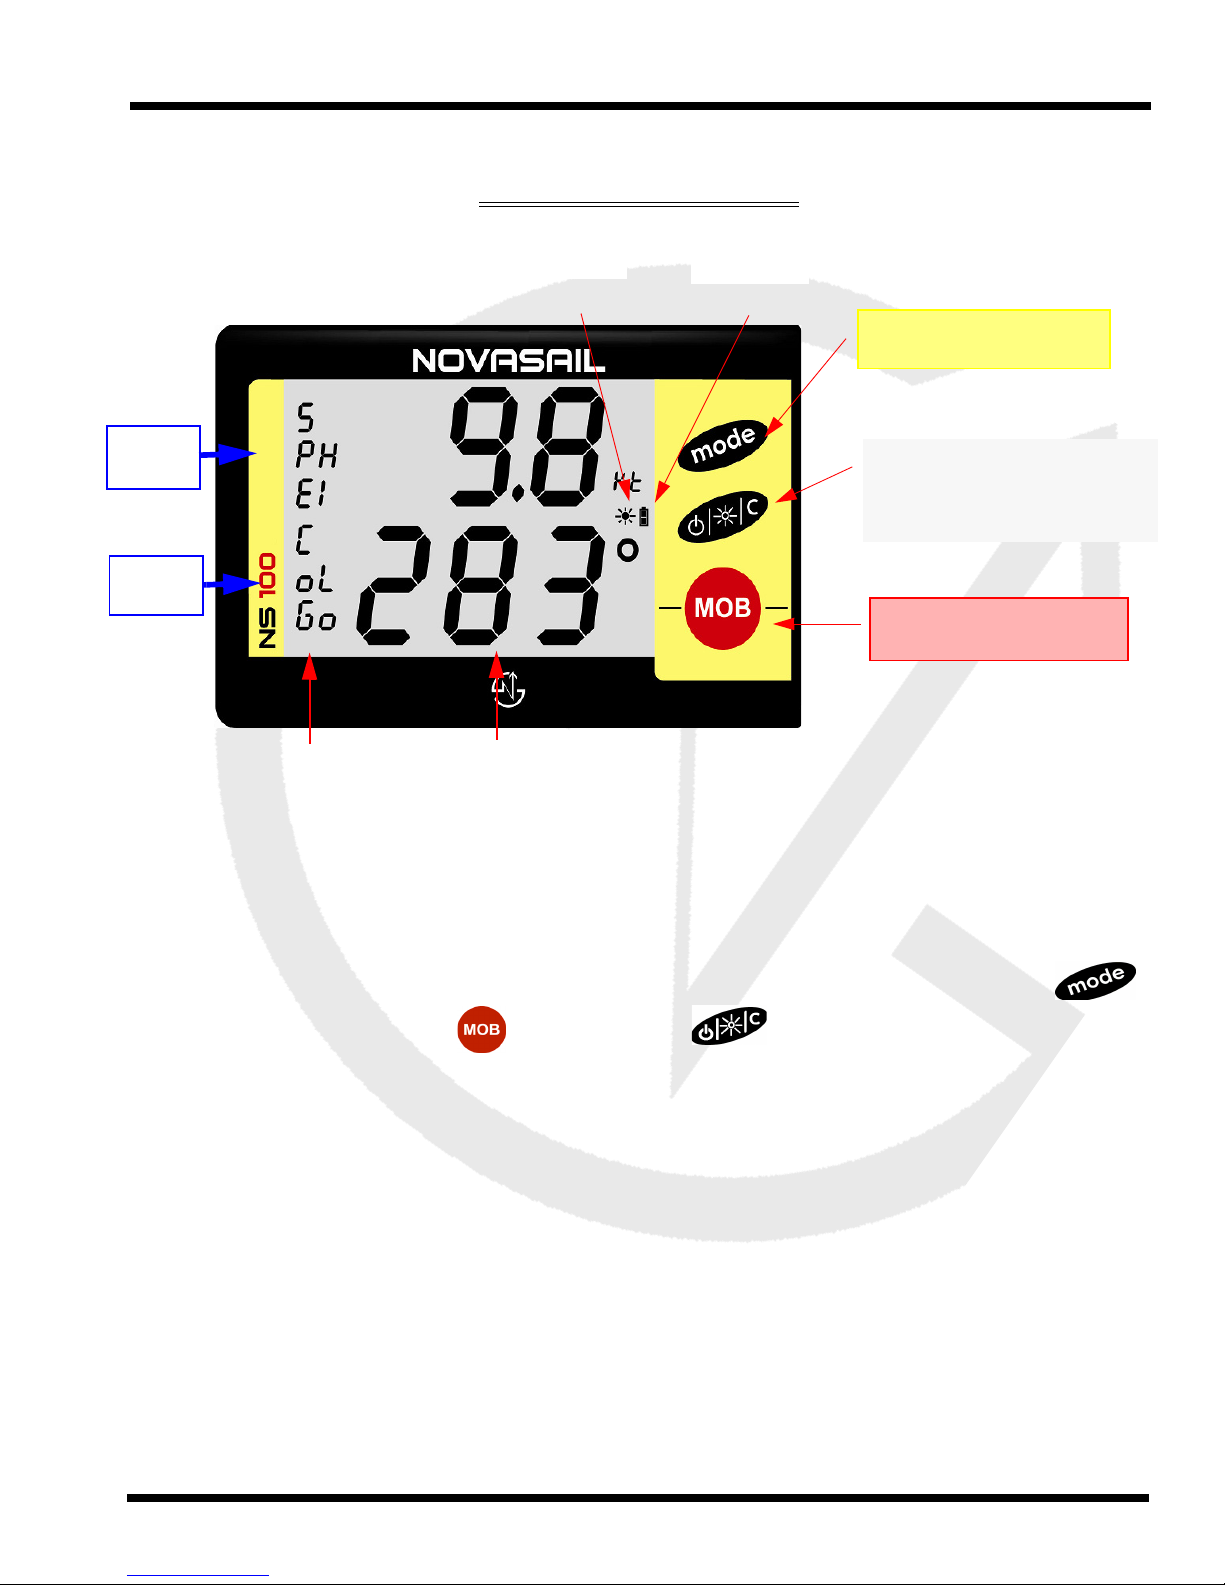
Buttons & display
The
NS100
has several modes of operation, each mode is based on
information that is displayed on the upper and the lower line. The selection
of the different mode functions is made according to the screen mode
and the man overboard buttons. The button allows the
modification of data displayed in the selected operation mode.
Screen
mode
Backlight Battery
Screen mode
selection
Controls and display description
Start/stop the
NS100
Backlight ON/OFF
Data Clear
Man Overboard
selection
Upper
line
Lower
line
Data

NS100
Operating Manual6
Screen modes
The following table is a summary of the different modes (upper and lower
lines).
Main screen mode
•SP : SPeed, displays the current speed
•COG : Course Over Ground, GPS heading
Timer mode
•TIM : down/upcounter
•COG : Course over ground, GPS heading
Maximum speed recorded and total distance mode
•SPM : Maximum SPeed
•TRP : total TRiP distance
GPS coordinates mode
•LON : current LONgitude
•LAT : current LATitude
Waypoint : Distance and heading
•Wxx : Direction and distance to the waypoint
•SPE/COG : Speed and direction to the waypoint
Coordinates, distance & heading to the memorized
GPS location (MOB: Man Over Board)
•MOB DIS/COG : Distance/Course Over Ground to
the MOB
•COG : Course Over Ground (GPS heading)
GPS coordinates memorized
•LON : GPS Longitude of the MOB location
•LAT : GPS Latitude of the MOB location
Operations
MOB button
Screen mode button
Short Press
Long press
NS100
Operating Manual 7
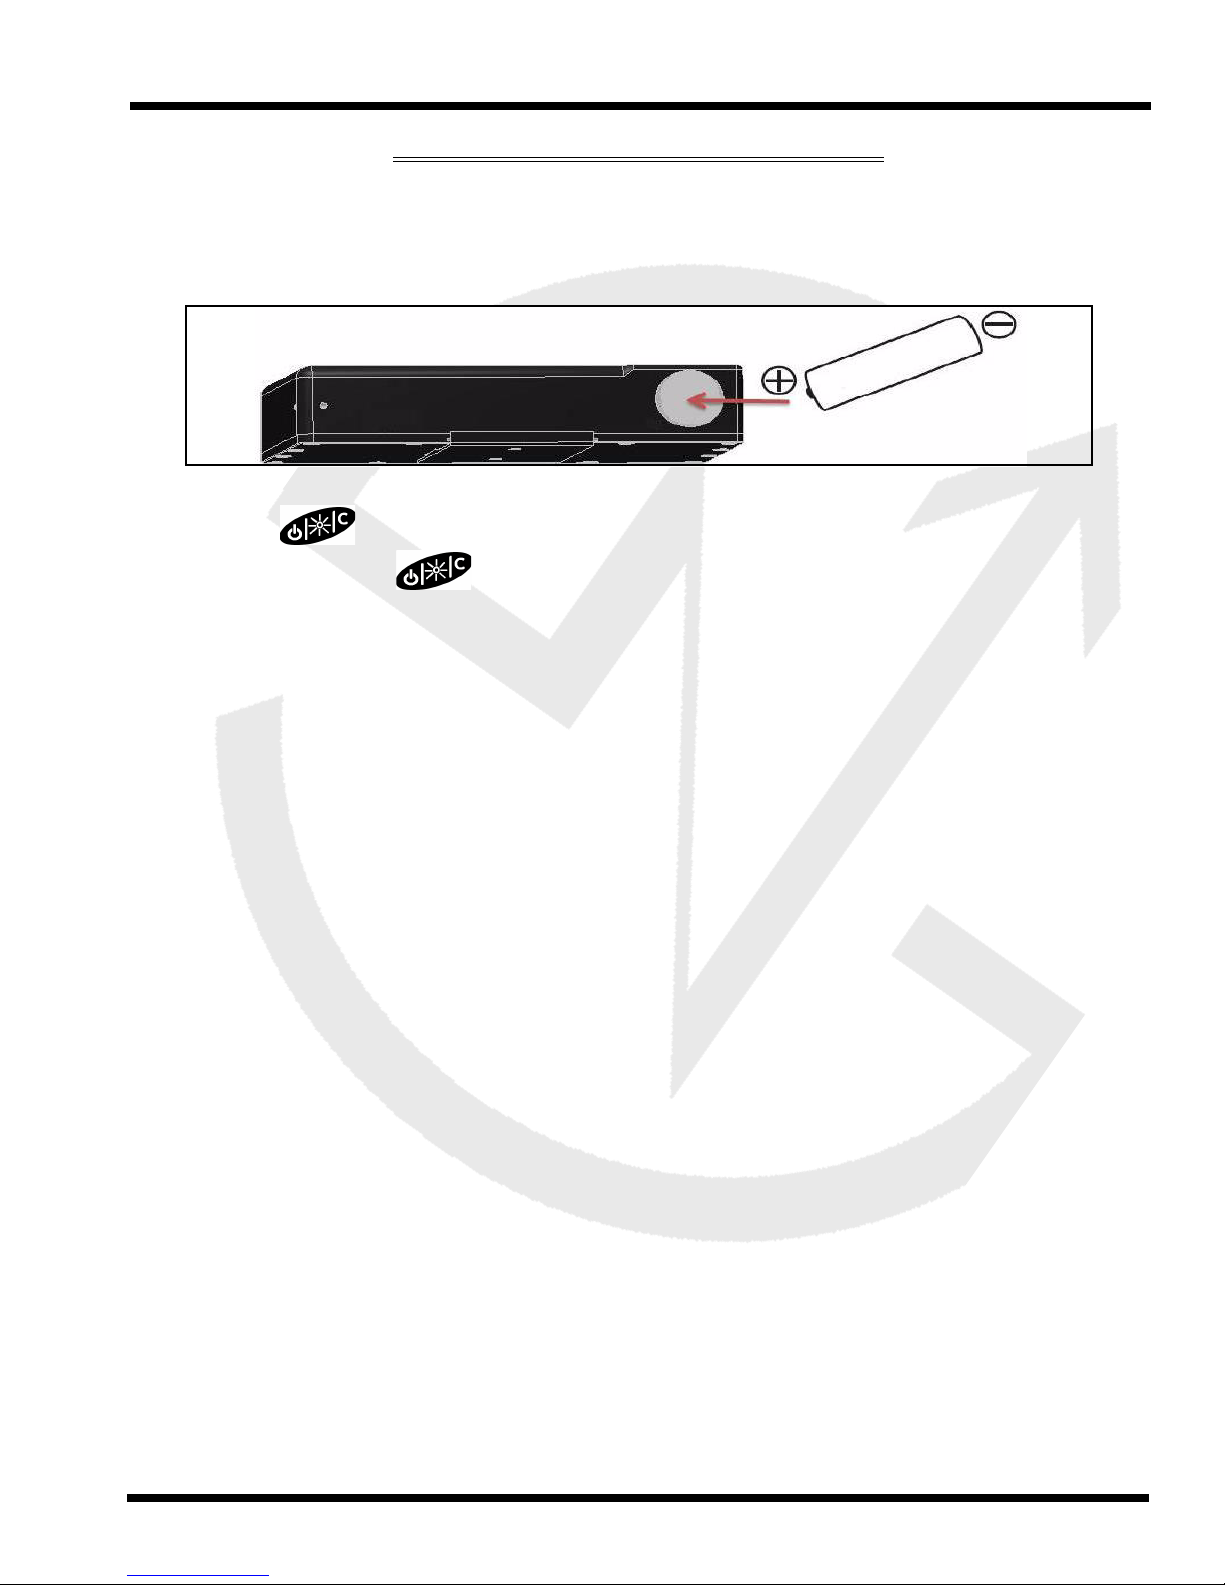
Switching power on and off
•Make sure the battery is installed with the correct polarity and has enough
remaining power (positive pole inserted first).
•Press to start the device. A beep will be emitted.
•Press and hold for more than 4 seconds until the screen displays
OFF and the sequence “3”, “2”, “1” is finished. A beep will be emitted when
the device turns off.
Note:
If the device does not turn on, you need to check if the battery is fully
charged, that the battery compartment is dry, and the polarity is correct.
NotE:
Until enough satellites are locked, the
NS100
is not ready to use. For all
the modes requiring the GPS data, the screen will display ”---” until it is ready. If
the number of satellites is low, the display will blink.
Note:
Alkaline batteries should be used in order to result in a maximum
lifespan of 36 hours. When using a disposable battery, it is also recommended to
remove it if the device is not used for a prolonged period of time (in order to avoid
a possible leakage inside the battery compartment).
If using rechargeable batteries, low self discharge rate battery types are
preferred, because normal rechargeable batteries lose their stored energy more
quickly. Recommended batteries are SANYO ENELOOP, GP RECYKO+ or
UNIROSS HYBRIO. These kinds of rechargeable battery will last for
approximately 25 hours.
Operations
NS100
Operating Manual8
Switching backlight on and off
•Press and hold for more than 1 second until the icon is displayed
on the screen. If the OFF sequence starts, simply release the button
before the sequence “3”, “2”, “1” is finished.
•To turn off the backlight, press and hold for more than 1 second until
the icon disappears from the screen.
Note :
When you press and hold the button to switch on/off the
backlight, you will not make any selection and therefore will not change any
parameter.
Main screen
This mode provides the speed and heading of the vessel.
SPE, Upper Line: The speed over ground is displayed with a resolution of 0.1
knots (KT). The minimum speed is 1 knot, the maximum speed is 99.9 knots. The
value displayed can be averaged; see “Speed sensitivity: SPE”, page 14.
COG, lower line: The course over ground (heading in degrees) as measured by
the GPS receiver is displayed. The value displayed can be averaged; see “GPS
Heading sensitivity: COG”, page 14.
Timer mode
This mode provides an adjustable downcounter and an upcounter timer with the
heading of the vessel on the lower line.
TIM, upper Line: The timer starts in downcounting mode; the starting value can
be adjusted to count down from 5, 4 or 1 minutes by a long press on the
button.
Operations

NS100
Operating Manual 9
A short press on starts the downcounter.It can be re-adjusted to 5/4/1
minutes by a long press on , whether it is stopped or still running.
When the timer reaches 0:00 it will start upcounting (’TIM up’) and will indicate the
time elapsed (hours/minutes).
Note:
When the timer reaches 0:00, the display will automatically switch to the
main screen mode (unless the MOB mode is already engaged).
A short press on will stop or restart the downcounter. To reset the timer
and restart in downcounting mode, a long push must be applied on when
the timer is stopped.
Note:
In downcounting mode, the timer will emit a beep every minute; every 10
seconds below 1 minute, every second below 10 seconds.
COG, lower line: The course over ground as measured by the GPS receiver is
displayed. The value displayed can be averaged; see “GPS Heading sensitivity:
COG”, page 14.
GPS coordinates
This mode provides the current GPS coordinates as measured by the GPS
receiver (degrees/minutes decimal).
Maximum speed and total distance
This mode provides the maximum speed recorded and the total distance.
SPM, upper Line: Speed Max
The maximum speed is displayed in knots (KT). This value is saved when the
device is turned OFF. It can be reset by pushing the button.
Operations

NS100
Operating Manual10
TRP, Lower line: TRiP distance
The total distance in nautical miles (NM) is displayed. This value is saved when
the device is turned OFF. It can be reset by pushing the button.
Note:
Both the TRP and SPM value blink until enough satellites are detected.
Waypoint mode: Wxx
This mode allows the direction and distance to reach the 20 memorized
waypoints to be displayed: W00 to W19. Each time a waypoint is selected, the
direction and distance needed to reach it are displayed sequentially.
To use a waypoint
•By default, W00 is displayed on the mode line.
•Press and hold to select the required waypoint, from W00 to W19.
The name of the waypoint is displayed with 3 characters.
•The direction and distance are displayed sequentially.
To Memorize a waypoint while sailing
•Press and hold to select the waypoint (from W00 to W19).
•Press to memorize the current position into the selected waypoint.
The previous coordinates are automatically overwritten by the new ones.
•The direction and distance to the waypoint are displayed sequentially.
Operations

NS100
Operating Manual 11
MOB: Man Over Board
This mode provides the coordinates, the distance in meters and the heading to a
GPS location recorded when the MOB button is pushed.
Note:
The MOB mode can be entered only if enough satellites are locked,
otherwise the
NS100
will emit 5 beeps and the display will remain unchanged.
To memorize the current GPS coordinates
•From any mode push the button, the device enters the MOB screen
mode. The current GPS position is automatically memorized and the display
will be as follows:
MOB DIS/COG, upper Line (blinking) : Man Over Board
This line displays sequentially the distance in meters (’DIS’) and the heading
(’COG’) to track back to the memorized GPS location.
COG, lower line : Course Over Ground
The course over ground as measured by the GPS receiver is displayed.
To display the GPS coordinates memorized
•When the MOB screen mode is engaged, the memorized GPS coordinates
can be displayed by pushing again. The device will display the
longitude then the latitude (lon/lat blink). Another push on will return the
device to the MOB screen mode.
To return to the main screen mode
•The MOB screen mode can only be exited by a long push on . The
device will return to the main screen mode and a new GPS location for the
MOB position can be recorded afterwards; the previous MOB position is
lost.
Operations

NS100
Operating Manual12
Note :
While using the MOB screen mode, you can still switch on/off the
backlight or turn off the
NS100
.
Operations

NS100
Operating Manual 13
SET mode
The SET mode allows the adjustment of your
NS100
parameters sequentially as
follows :
•Speed sensitivity
•GPS heading sensitivity
•Screen contrast
To enter the SET mode :
•Your device must be switched OFF.
•Press first then simultaneously. The device will enter the setup
menu: SET will be displayed on the upper line.
•Each parameter is displayed on the lower line (line or column). The required
value is adjusted by the button .
•The parameter is memorized when is pushed.
•The SET mode is exited automatically at the end of the sequence or by
switching off the device.
Name Display Description
Speed sensitivity SPE •Hi: High sensitivity
•Md: Medium sensitivity
•Lo: Low sensitivity
GPS heading
sensitivity
COG •Hi: High sensitivity
•Md: Medium sensitivity
•Lo: Low sensitivity
LCD contrast
level
LCD
CON
- level 1 to 7 (default level: 5)
Firmware version VER Firmware version number
Advanced Operations

NS100
Operating Manual14
The
NS100
will automatically exit the SET mode upon completion of all
parameters.
Note :
You can also exit the SET mode any time by switching off and on the
product.
Speed sensitivity: SPE
•Hi: High sensitivity
The high sensitivity speed allows a very sensitive reading of any speed variation.
•Md: Medium sensitivity
This sub-mode provides an average speed of the boat over a short period of time.
This is particularly useful when sailing with big waves upwind or downwind.
•Lo: Low sensitivity
This sub-mode provides an average speed of the boat over a longer period of
time. This is particularly useful in rough conditions with lots of speed changes.
GPS Heading sensitivity: COG
•Hi: High sensitivity
When sailing with light winds and flat seas, high sensitivity allows you to
appreciate very small wind variations.
•Md: Medium sensitivity
Medium sensitivity is more suitable for race boats under medium wind and sea
conditions. Dinghy racers will appreciate this mode.
•Lo: Low sensitivity
Under low sensitivity more subtle variations due to big waves and sudden gusts
are filtered.
Advanced Operations

NS100
Operating Manual 15
LCD contrast adjustment: LCD CON
The LCD contrast level can be set from 1 to 7 (the level 5 default value is applied
when the SET mode is entered).
Firmware version: VER
The firmware version of the
NS100
is displayed (for example: 1.0).
Advanced Operations

NS100
Operating Manual16
Mode Waypoint (WAY)
The WAY mode allows waypoints in your
NS100
to be memorized with a name
(3 characters) and the geographical coordinates.
Note :
The maximum distance to a waypoint displayed is 999 nautical miles.
To enter the WAY mode:
•When the
NS100
is off, press first then simultaneously.
•The waypoint number and name (3 characters) are displayed in the mode
lines of the upper screen.
•The geographical coordinates are displayed in the lower screen.
Note:
You can only exit the WAY mode by switching off the
NS100
(long press
until ”OFF” is displayed).
How to input the name and coordinates of a waypoint
•The and buttons allow the value from 0 to 9 for numbers and
from ’a’ to ’z’ for letters to be changed.
•The button switches to the next character.
Memorization of a waypoint
•First select the waypoint number: W00 to W19
•Enter a name (3 characters).
•Select ’NOR’ (North) if the longitude is in the northern hemisphere or ’SOU’
(South) if it is in the southern hemisphere.
•Memorize the longitude coordinate: for example 45’36.222.
•Select ’EAS’ if the latitude is east or ’WES’ if west.
•Memorize the latitude coordinate, for example: 23’46.345.
•When the latitude coordinate is completed, it rolls back to the selection of
the waypoint number.
Waypoint mode


NS100
Operating Manual18
This product meets or exceeds all of Novasail’s rigorous quality controls and
inspection standards. Complete services will be provided in accordance with the
statement of warranty set forth below if any manufacturing defect or natural failure
occurs within the warranty period.
Warranty Terms and Conditions
•If any defect arises under normal conditions of use within the warranty
period, our customer service center or specified partner will provide the
required repair services at no charge, or legally applicable services
according to the appropriate consumer protection laws and regulations of
the country in which the product was purchased by the warranty holder.
•The product has to be registered using the online service available on the
Novasail web site: www.nova-sail.com
•Please submit the proof of purchase (Invoice) when requesting service.
•The actual cost of repair may be charged to the customer or the
performance of warranty service may be rendered impossible, even within
the warranty period, under the following circumstances:
•Product failure caused by accident or carelessness
•Disassembly or modification for purposes other than it was
originally intended for
•Failure caused by a fire, earthquake or flood
•Damage/failure caused by an impact
•Failure caused by inappropriate services performed by anyone
other than Novasail’s customer service center or one of
Novasail’s service specified partners
•For assitance in obtaining service, please contact Novasail service center:
E-mail: [email protected]
www.nova-sail.com
Limited warranty

DISCLAIMER
NS100
Operating Manual 19
Information in this document is provided solely in connection with NOVASAIL LTD
products. NOVASAIL LTD reserves the right to make changes, corrections,
modifications or improvements to this document and the products described herein at
any time, without notice.
All NOVASAIL LTD products are sold pursuant to NOVASAIL LTD’s terms and
conditions of sale.
Purchasers are solely responsible for the choice, selection and use of the NOVASAIL
LTD products described herein, and NOVASAIL LTD assumes no liability whatsoever
relating to the choice, selection or use of the NOVASAIL LTD products described
herein.
UNLESS OTHERWISE SET FORTH IN NOVASAIL LTD’S TERMS AND
CONDITIONS OF SALE, NOVASAIL LTD DISCLAIMS ANY EXPRESS OR IMPLIED
WARRANTY WITH RESPECT TO THE USE AND/OR SALE OF NOVASAIL LTD
PRODUCTS, INCLUDING WITHOUT LIMITATION IMPLIED WARRANTIES OF
MERCHANTABILITY OR FITNESS FOR A PARTICULAR PURPOSE (AND THEIR
EQUIVALENTS UNDER THE LAWS OF ANY JURISDICTION).
UNLESS EXPRESSLY APPROVED IN WRITING BY AN AUTHORIZED NOVASAIL
LTD REPRESENTATIVE, NOVASAIL LTD PRODUCTS ARE NOT RECOMMENDED,
AUTHORIZED OR WARRANTED FOR USE IN MILITARY, AIR CRAFT, SPACE,
LIFE SAVING, OR LIFE SUSTAINING APPLICATIONS, NOR IN PRODUCTS OR
SYSTEMS WHERE FAILURE OR MALFUNCTION MAY RESULT IN PERSONAL
INJURY, DEATH, OR SEVERE PROPERTY OR ENVIRONMENTAL DAMAGE.
Resale of NOVASAIL LTD products with provisions different
from the statements and/or technical features set forth in this
document shall immediately void any warranty granted by
NOVASAIL LTD for the NOVASAIL LTD product or service
described herein and shall not create or extend in any manner
whatsoever, any liability of NOVASAIL LTD.

© 2011 NOVASAIL - All rights reserved
www.nova-sail.com
Other manuals for NS100
1
Table of contents
Popular Boating Equipment manuals by other brands


Humphree
Humphree HCS-5 installation manual

Vetus
Vetus BOW4512D Operation manual and installation instructions

Dock Doctors
Dock Doctors SLIDING BOARDING STEP Assembly instructions

Mastervolt
Mastervolt Mass Combi 12/2000-100 Quick installation

SeaView
SeaView PM5-FMD-8 installation instructions

Hobie
Hobie Mirage 360 manual


