NQD 757-4WD29 User manual

Short Press
for Auto
Demo, Long
Press for Mute
Programming key (press
for three seconds
to start recording,
tap to start
presentation)
One-click Twist
Twist Up/Down
All-round
Moving Rotate Left/Right
Indicator Light
Four Azimuth
Side Drifts
1. Fist rises vertically, body twist rises
2. Fist goes down vertically, body twist is reduced
3. Fist leaned forward, the carforward
4. Fist leaned back, the carbacked
5. Fist leaned left, the cardrifted left / rotated
counterclockwise in place
6. Fist leaned right, the car drifted right / rotated
clockwise in place
7. Short press the finger button to switch modes
(horizontal run / rotate), long press to mute
On/Off
Signal
Light
Finger Button
1.Installthe batteries inthe remote control, and the remote control indicator will
startflash. Then install the battery in the rc car and turn on the switch to start
the connection. When the connection is successful, the remote controlindicatorgoes
off. (Please repeat the above operation if the connection fails)
2. Each remote control can only be connected to one rc car. When the connectionis
successful, eachcar will not interfere with each other. (Do not connectmultiple cars
at the same time)
3.If the remote control does not detect the 2.4G signal from the remote controlcar
afteroneminute, the powerindicator flashes, you must restart the power switch to
pair the frequency.
4. When you needto pair with other models of remote control or remote control car,
you need to turnoff the power of the remote control and remote control car to re-pair.
The battery charger using this toy must be checked regularly to prevent damage to the
wiresandother parts. If it is damaged, it must be used afterthe damage isrepaired
757-4WD29 Gesture Remote Control Car
Product ID
Product Name
Remote Layout
Watch Sensor Control
2.4G automatic pairing frequency
Precautions
Instruction Manual
NQD

1. Fist rises vertically,body twist rises
3.Fist leaned forward, the car forward
5.Fist leaned left, the car drifted
left/ rotated counterclockwise in place
6.Fist leaned right, the car drifted
right /rotated clockwise in place
4.Fist leaned back,the car backed
2. Fistgoes down vertically,
body twist is reduced
Watch Sensor Control Demo

RC Car Operation Instructions
The remotecontrol uses two 1.5V (AA)
non-rechargeable batteries. Please
install the batteries correctly according
to the polarity instructions. (Battery is
not included)Battery socketto body powersocket
USB Charging
CableCharging
Cable SocketBattery
Socket
Input: 5V
Output: 7.2V
1. To protect the performance of the battery pack, do not chargethe battery pack
immediately after use. Leave the battery pack for afew minutes before recharging.
2. The USBcharger indicator is on during charging, and theindicator isdimmed after
charging. The charging time is about 2-3 hours.
3. It is normal for the battery pack to generate slight heat duringcharging.
1. Turn onthe remote control car switch
2. Operatethe remote control's arrow keys to control the
direction of the car
3. Turn off the remote control car switch after use
4. One-click deformation. When the deformation key is pressed,
the carwill automatically deform
5. If the remote control car does not receive a command
for oneminute, it will enter the semi-sleep state
(the semi-sleep state is not equal to shutdown, only the
power consumption is reduced), and the lights and sounds
are turned off. After entering the semi-sleep state, you
can wake up by any operation of the remote control.
6. If the remote control is not connected to the remote control car forone minute,
it willautomatically enter the sleep state. Youcan wake up with any button.
Note: The battery has low voltage protection. It will automatically power off when the
voltage islow, and it can be activated after charging.
(Note: Only one side is
transformed!)
Battery Installation Instructions
Charging Instructions

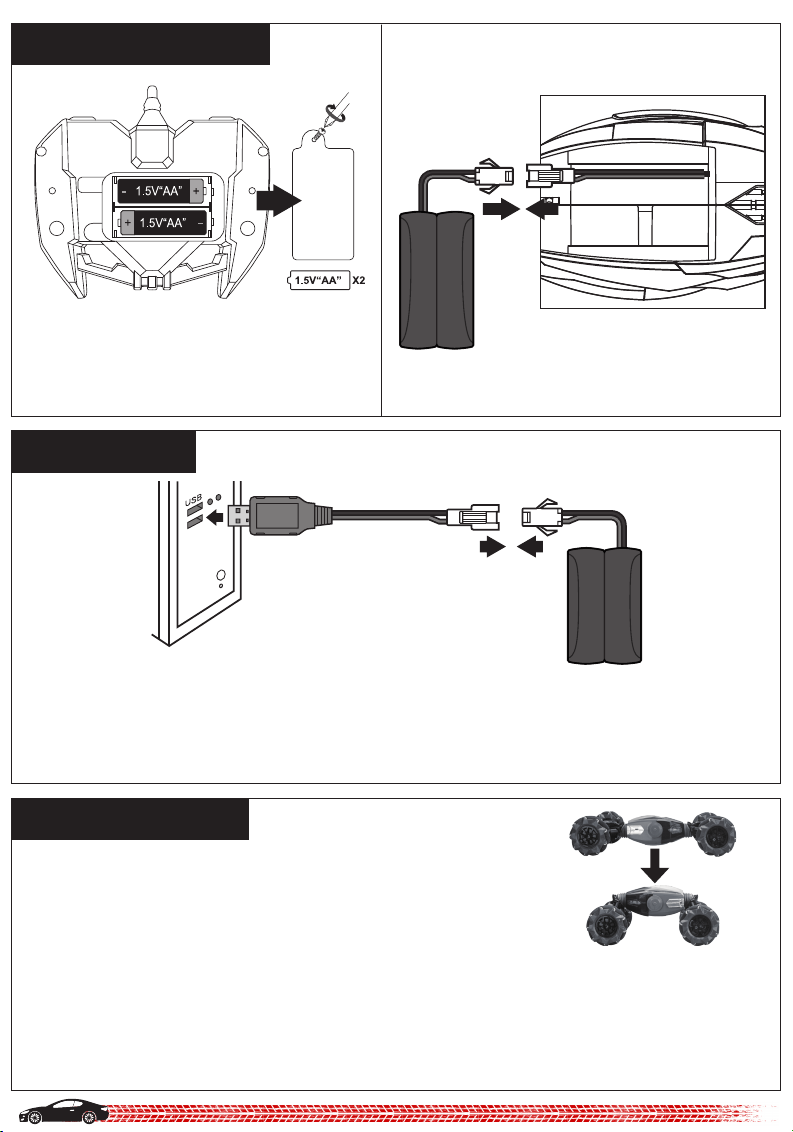
1. This product uses one7.2V rechargeable battery pack.
The remote control uses two 1.5V "AA" non-rechargeable batteries.
2. The batteryshould betaken out andinstalled correctly according tothe polarityand
voltage signs onthe toy battery box, and the batteryshould not be short-circuited.
3. Non-rechargeablebatteries cannot be charged.
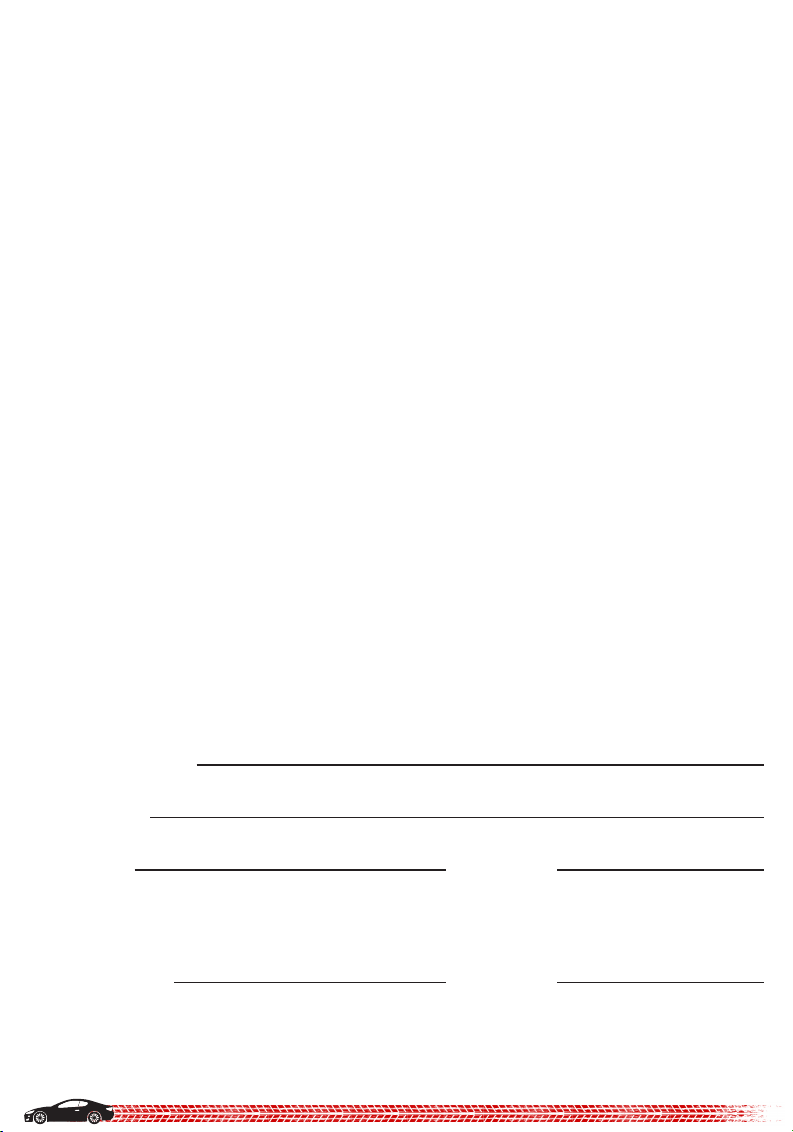
4. The rechargeablebattery must be chargedunder adult supervision.
5. The rechargeablebattery should be removed from the toy before charging.
6. Different types of batteries or oldand new batteriescannot bemixed.
7. Only use the same or equivalent batteries astherecommended ones.
8. The exhausted batteryshould be removed fromthetoy.If not used for alongtime,
pleaseremove the batteryfromthe toy.
9. The power terminals should notbe shorted.
10.Do notconnect to more than the recommended number ofpower sources.
Duringthe use of thetoyUSB cable, it should be regularly inspected for damage to
its wires, plugs, casingsand othercomponents. When damage is found, it should be
stopped until repaired.
Maintenance Matters
Malfunction
Condition
CarDoesn't Work
Uncontrolled Car
Near Remote
Control Distance
Cause of
Malfunction Howto Deal with
1. The remote control isnot connected
or theswitch ofthe remote control
car isnot turned on.
2. The remote control orremote control
car isnot properly installed the
battery.
3. The rechargeablebattery pack has
insufficient power.
1. Turn on theremote controlcar
switchand reconnect the
remotecontrol.
2. Install thebattery into the
remotecontrol or remote
control carcorrectly.
3. Chargethe rechargeable
battery pack.
1. The batteryin the remotecontrol
or rechargeable battery pack is low.
2. There may be interferencesources
near the site.
1. Replace thebatteriesin the
remotecontrol with new
batteries or charge the
rechargeable battery pack.
2. Changethe site.
1. Do notstaynearthe source ofthe fire,avoid directsunlight,hightemperature and
humidity orkeepit in the carfor a long time to avoid short circuit and fire.
2. Take out the batteries ofthe remote controlcarand remote control when notplaying,
and put theremote control andremote control car back in the color boxto avoid damage
or deformation duringtransportation or storage.
3. The remote control car must begently wiped witha damp cloth.
Battery Precautions
General Troubleshooting

If you have any product questions, or you have any
product issues, please contact our e-mail:
nqd_ser[email protected]om
WARRANTY INFORMATION:
*Please refer to the Product manual for full warranty coverage
and specifications.
Half-year limited warranty: only covers parts caused by manufacturer's
defects within half a year from the date of purchase.
1.The warranty is not transferable from the original purchaser.
2.The warranty does not cover minor surface defects, tears, tears, or
other appearance damage caused by normal use, or other intentional
or unintentional equipment damage.
3.The warranty does not cover any damage caused by improper use of
cleaners, solvents or chemicals, or water damage to the product.
4.The warranty does not cover improper repairs or misdiagnosis issues.
5.If you believe your product needs any repairor you have questions
Print Name:
Your signature below acknowledges that you have read, fully understand,
and accept this limited warranty agreement.
Address:
E-mail: Phone:
Signature: Date:
Table of contents
Popular Remote Control manuals by other brands

Artkalia
Artkalia AKLA1072 instruction manual

Automotive
Automotive 1 687 246 029 Original instructions

RF SOLUTIONS
RF SOLUTIONS TRAP Series manual

Byron
Byron Home Easy HE-300 installation instructions

Sterling Power
Sterling Power BBR Handbook

aldes
aldes Dee Fly Cube 370 micro-watt Instructions for assembly and use