NTI E-AVDS-CELC User manual

1
E-AVDS-CELC
Automatic Voice Dialer
INSTALLATION AND OPERATION
MANUAL
INTRODUCTION
The E-AVDS-CELC Automatic Voice Dialer is used to send voice alert messages from an ENVIROMUX Enterprise Environment
Monitoring System (SYSTEM) to any user’s cell phone or device capable of receiving voice messages.
The E-AVDS-CELCPincludes a 12VDC power supply for connection to E-MINI-LXO, E-DI16DOR16 or any other SYSTEM where an
external power supply will be needed.
OPEN THE E-AVDS-CELC
There are four tabs that hold the case together. Two on the top side, and two on the bottom side. To open the case for jumper
placement, press down firmly on the seam of the case near the tabs on one side of the case and snap the case halves apart.
Tabs
With the rear of the case removed, two counter-sunk
mounting holes are provided on the rear cover. Use
these to secure the E-AVDS-CELC to your desired
mounting location.
Mounting Holes
Rear Cover

2
CONFIGURE THE JUMPERS
Configure the jumpers on the E-AVDS-CELC for connection to either Pulse or Tone dialing (default is Tone) to send voice messages
and to be triggered by either the Normally-Closed (N.C.)or Normally-Open (N.O.) relay contact on the E-xD. In the image below, the
jumpers are set for Tone dialing and connection to the N.O. terminal.
To set the “normal” relay state to Normally-Open, apply the J2 jumper to the center and right pin, and J3 jumper to the center and left
pin. In this configuration, a relay closure will trigger an alert state, activating the dialer.
To set the “normal” relay state to Normally-Closed, apply the J2 and J3 jumpers to the center and left pins. In this configuration, a
relay open condition will trigger an alert state, activating the dialer.
NOTE: The “VOLTAGE” jumper position is not used in conjunction with the E-xD.
With the jumpers properly set, and the rear panel securely mounted, re-assemble the case.
J1J2J3
J3
J2
J1
Jumpers here configured for Tone dialing and Normally-Open trigger
RESET
BUTTON
RESET
BUTTON
PRESS RESET BUTTON
TO RESET PASSWORD TO
“911”

3
WIRING METHODS
Connect the cable from the E-AVDS-CELC to the E-xD according to one of the following diagrams:
Note: The attached cable is 30” long but can be extended up to 250 feet with any 4-conductor 22AWG (minimum) cable.

4

5
FEATURES
(1) Speaker
(2) Microphone
(3) LED 7-segment display- displays the number input, provides indicators for phone numbers, and provides
indicator for alarm and standby mode.
(4) “E1” – “E4” indicators: ON while setting E1-E4 phone/mobile phone numbers.
Note: E1 through E4 indicators will illuminate while setting the password.
(5) Connection Cable
red/orange = 12V
black/brown = Negative (ground)
blue/yellow = Digital Contact wire #1
green = Digital Contact wire #2
Second cable with RJ11 plug will go into telephone jack
(6) Buttons: used to enter programming
GENERAL INFORMATION
Recording Duration: 20 seconds,
Telephone numbers and voice message programming remain intact even if the power is OFF.
Telephone Number Storage: 4 telephone numbers and each can be a maximum of 16 digits.
Second-level Private Password: 0-6 digit Private Password; the first three digits can be used to stop alarms and
the whole password (all six digits) can be used to modify the settings.
Default Password: 911

6
Auto-Dialer Operation Procedures
Self-test after Being Turned ON:
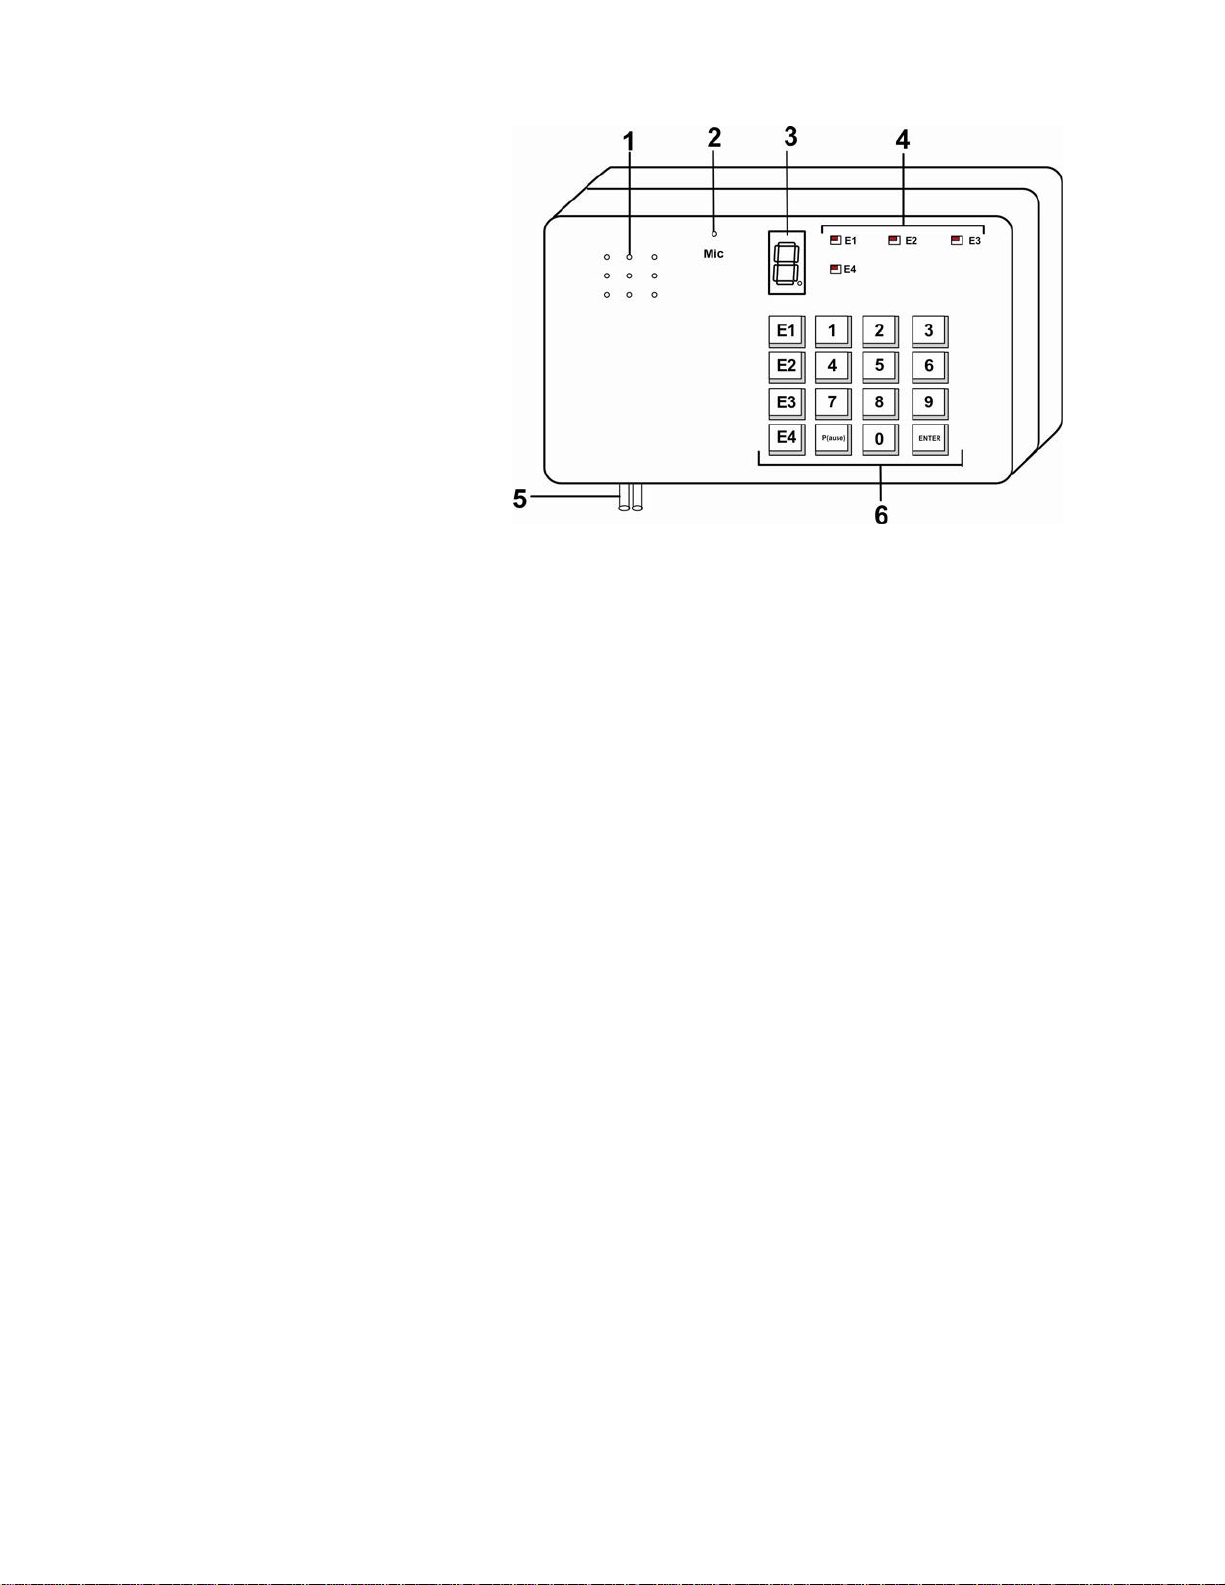
After self-test, the instrument is ready to work and the decimal point at the lower right corner on the 7 segment
display will turn ON and OFF (continuously blink). If configuration (phone numbers and voice message) already
exists, the AUTO-DIALER will alarm automatically upon receiving an alarm signal. To setup or change the
configuration, please follow the procedures below to save and check telephone numbers and passwords as well as
to record and play back recorded files:
1. Log into the Programming Mode:
First press P, then put in the Private Password (0-6 digits), then press ENTER
Note: The Default Password is 911
For instance: Log into the Programming Mode as follows:
P 911 ENTER
If the password you put in is correct, The LED will illuminate the lower half “□”, and then log into the Programming
Mode and display “S” ,
If the password you put in is incorrect, The LED will display “E” and return to the working mode. Repeat the
procedure to try again.
2. Program the telephone numbers to be dialed
A. While in the Programming Mode (the screen displays “S”):
Press E1+ the phone number + ENTER
For instance, if the telephone number is 93953399, the procedure is as follows:
Press E1+939533399+ENTER
After pressing ENTER to save the number, if “□”is displayed, it means the number was saved correctly. The
display will then return to Programming Mode (“S”);
However, If “E” is displayed, it indicates the number failed to be saved correctly; and the Dialer will return to the
Programming Mode (“S”). Repeat the procedure.
To change a programmed number, follow the same procedure. Entering a new set of numbers will overwrite the
first set of numbers.
If desired, to delete a telephone number and leave it blank, press E1 followed immediately by ENTER.
B. You can dial to an automated broadcast telephone exchange where you need to automatically dial to an
extension after the initial call is picked up. For example, supposed the extension number is 12, then program the
saved telephone numbers as follows:
E1+ initial phone number+ P+1+2+ENTER
Pressing Ponce causes the dialer to pause for two seconds before sending the additional numbers. If additional
time is needed, press Ptwice for four seconds.
To program numbers for E2, E3 and E4, follow the same steps above, substituting the corresponding E# for the
number being programmed.

7
3. Search the pre-saved telephone numbers:
In the Programming Mode (“S”), press button 3to CHECK for programmed numbers.
Then press the E1, E2, E3, E4 or PAUSE to start your intended search, the LED will display relevant numbers.
For example:
Press 3+ E1 or E2 or E3 or E4 or P
The LED will display in sequence the pre-saved telephone numbers or Private Password and will end each number
or password with a single “beep”.
4. Save and play back the audio message:
A. This dialer can save a 20-second audio message. In the Programming Mode (“S”), press button 1an “r” will be
displayed, representing RECORD. The process of recording initiates directly.
For example:
When “r” is displayed, start speaking. After 20 seconds, a “beep” will indicate recording has stopped.
B. Play back the help audio information:
Press button 3and then button 2. A “P” will be displayed, representing PLAY). The play back of the recorded
message will begin immediately.
The procedure is as follows:
3+2 Play back the pre-saved 20-second message. A “beep” will indicate when it has ended.
5. Save and search the password
A Save the password:
You can save a Private Password (0-6 digits). The Default Password is 911.
For example, if the Private Password is 714160, the procedure is as follows:
In the Programming Mode ("S"), press P+ 714160 +ENTER . When “beeps” sound, the input is complete.
B Search the password:
In the Programming Mode ("S"), press button 3and then press Pto make the password display on the LED.
For example:
Press 3+P, the LED will display the password and beeps will indicate the end.
C If the password gets lost, with power to the AUTO-DIALER OFF, open the cover on the dialer (page 1) and
press the RESET button (location indicated on page 2). This will restore the Default Password to “911”.
6 Two programmable alarm behaviors:
A. Press 5+1+ ENTER: If the alarm signal is triggered momentarily then the dialer will call the configured numbers.
This response can be terminated by entering the password.

8
B. Press 5+2+ ENTER: The dialer will active only if the alarm signal remains constant. If the alarm signal is
interrupted, the dialer will terminate response.
To check which behavior is programmed, press 3+5,
The relevant A or B programming method will be indicated by “1” or “2” respectively.
The alarm trigger is indicated on the LED by the upper half of the LED illuminating for approximately 6 seconds and
then goes dark. Once the dialer is finished the calling cycle, it will resume standby and the decimal point in the
lower right corner of the display will blink.
When entering the password, as you press “P”, the upper half of the LED will illuminate. Then, as you enter the
numbers making up the password, the numbers will be displayed. Upon completion, the decimal point will start
blinking, indicating the dialer is again in standby.
7. Stop the alarm signal:
When the DIALER is triggered, the dialer gets through one of those pre-saved telephone numbers to report alarm.
If you need to stop the automatic dialing process, type in the Private Password while “□” appears on the LED.
The display will indicate the numbers pressed as they are pressed. If the password is correct, the alarm will
terminate, indicated by “beeps”.
Note: If the password contains less than three digits, then “0” can be used as a substitute.
For instance: if the password is 1 and 2, then enter 1+2+0.
8. Notice:
A. Alteration can be made to any pre-set configuration. As long as in the Programming Mode, operate according to
the steps mentioned previously to save changes automatically.
B. It is very important to install and operate according to these instructions. Most problems that may be
encountered can be solved by paying special attention to the following:
(1)Alarm Behavior Setting (See Section 6)
(2)Alarm Wire Trigger Manner and Jumper Setting (See the trigger signal and telephone system setting
on page 2 for details)
(3)Connection of the Telephone Lines (See the trigger signal and telephone system setting for details)
C. Troubleshooting:
(1)PROBLEM: Able to trigger the alarm but failed to dial out the phone number:
CAUSE: The telephone lines are possibly connected in reverse.
(2)PROBLEM: No Alarm
CAUSE: The trigger behavior might be configured incorrectly, namely J2 and J3 jumpers are set up
incorrectly (page 2).
(3)PROBLEM: Noisy Audio Playback
CAUSE: Defective power supply powering the dialer is usually the cause of this problem.
(4)PROBLEM: Keeps Dialing
CAUSE: The alarm behavior (Section 6) has not been programmed

9
SPECIFICATIONS
Voltage DC 11V to 15V
Static current 20mA (Based on operating voltage: DC 12V)
Operating current 170mA (MAX) (Based on operating voltage: DC 12V)
Triggering mode N.C, N.O or voltage signal
Voice recording 20 seconds maximum
Phone numbers Up to 4 contact numbers
Private password protection 6-digit private password programmable
Default password = 911
MAN267 Rev 5/24/19
Table of contents
Other NTI Caller ID Box manuals