NUK Expressive 62772 User manual

Double Electric Breast Pump
Extractor de leche eléctrico doble
Operating Instructions
Instrucciones de operación
Model #62772
Version 1
03_62772_5112_A_DEBP_Booklet_REL_2-19-13_Added pages divisible by 4.indd 1 3/18/2013 2:26:53 PM

03_62772_5112_A_DEBP_Booklet_REL_2-19-13_Added pages divisible by 4.indd 2 3/18/2013 2:26:53 PM

3
1. Warnings & Precautions.................................................................................4
2. Hygiene Tips....................................................................................................5
3. About this Pump .............................................................................................5
3.1 Features ..................................................................................................5
3.2 Contraindications ...................................................................................5
3.3 Symbols on the Pump ............................................................................6
4. Overview of Parts............................................................................................6
5. Disassembly of the Pump............................................................................... 7
6. Cleaning .......................................................................................................... 7
6.1 Cleaning the tubing.................................................................................8
7. Pump Assembly..............................................................................................9
8. Instructions for Use ........................................................................................10
8.1 Operation...............................................................................................10
8.2 Frequency of Expressing .......................................................................12
8.3 Procedure ..............................................................................................12
8.4 Milk Quantity..........................................................................................12
8.5 Let-Down Reex.....................................................................................12
9. Storing & Feeding Milk...................................................................................13
9.1 NUK®Breast Milk Container .................................................................13
9.2 Tips for Handling Breast Milk ................................................................13
9.3 Feeding Expressed Milk with NUK®Breast Milk Container .................15
10. Troubleshooting .............................................................................................16
11. Technical Data................................................................................................17
12. Disposal..........................................................................................................17
13. EMC-Guidance...............................................................................................17
13.1 Warnings................................................................................................17
13.2 FCC Part 15 .............................................................................................17
14. One Year Limited Warranty............................................................................18
Contents
03_62772_5112_A_DEBP_Booklet_REL_2-19-13_Added pages divisible by 4.indd 3 3/18/2013 2:26:53 PM

4
Dear mother,
For babies, breastfeeding is the most natural and important nourishment there is.
The NUK®Breastfeeding Program provides you with practical and convenient aids for
breastfeeding. This easy to use electric breast pump is designed to help you and your
baby whenever natural breastfeeding is not possible. Please take the time to read
these operating instructions carefully before using your NUK®Expressive™Double
Electric Breast Pump for the rst time and keep for future reference. We wish you and
your baby every happiness. Intended Use
The NUK®Expressive™Double Electric Breast Pump is intended to express milk from
the breasts. It is intended for use by a single user.
Essential Performance Features
• None 1. Warnings & Precautions
READ ALL INSTRUCTIONS BEFORE USING THIS ELECTRIC BREAST PUMP.
IMPORTANT SAFEGUARDS FOR THE
ELECTRIC BREAST PUMP.
When using electrical products, especially
when children are present, basic safety
precautions should always be followed.
See details as follows:
DANGER: To reduce the risk of electrocution:
• Always unplug this electric breast pump
immediately after using.
• Do not use while bathing or showering.
• Do not place or store product where it
can fall or be pulled into a tub or a sink.
• Do not place in or drop pump unit into
water or other liquid.
• Do not reach for this electric breast
pump if it has fallen into water or other
liquid. Unplug immediately.
• Do not immerse pump unit in water.
Follow the cleaning instructions
in this manual.
WARNING: To reduce the risk of burns,
electrocution, re or injury to persons:
• This electric breast pump should never
be left unattended when plugged into
an electric outlet.
• Supervision is necessary when this
product is in the vicinity of children.
Electric medical devices like the NUK®
Expressive™Double Electric Breast Pump
may only be used by adults.
• Use this electric breast pump only for its
intended use as described in this manual.
Do not use accessory attachments not
provided by the manufacturer.
• Never operate this electric breast
pump if it has a damaged cord or
plug, if it is not working properly, if it
has been dropped or damaged, or
dropped into water.
• Keep the cord away from heated surfaces.
• Never use this electric breast pump
while sleeping or drowsy.
• Do not use the device where products
related to aerosol spray are being used
or where oxygen is being administered.
03_62772_5112_A_DEBP_Booklet_REL_2-19-13_Added pages divisible by 4.indd 4 3/18/2013 2:26:53 PM

5
• Never drop or insert any object into any
opening or tubing.
• Only use the supplied voltage adapter
GEO361U-1225 with the NUK®
Expressive™Double Electric Breast
Pump. Do not use this adapter with
any other electrical devices. In case of
misuse, EMC irritations can occur.
• Make sure the voltage of the device is
compatible with the power source.
• Breast Pumps are personal care items and
are not to be shared between mothers.
• When pump is not in use, be sure all
parts of the electric breast pump and
accessories are stored safely away
from children.
• Keep small parts out of the reach
of children.
• Never open the pump unit housing.
• Do not attempt to open, modify, or
repair the breast pump.
• During operation surface temperature of
housing may reach 120°F (50°C)
• Do not shorten the tubing provided.
3. About this Pump
2. Hygiene Tips
Hygiene is particularly important when using a breast pump. This applies to all the
individual pump components as well as to your own personal hygiene. We recommend
a daily shower or to wash your nipples in clean water. Where possible, avoid using
soap on your nipples, as this may cause irritation.
3.1 Features
The NUK®Expressive™Double Electric
Breast Pump is a multi-setting breast
pump that is designed to mimic natural
breastfeeding by offering various
combinations of suction and speed
to help you achieve fast and efcient,
customized expression.
• Custom suction power and cycle speeds :
There are 8 “suction” settings, which
allow you to control the strength of
the suction force.
There are 4 “speed settings” which
allow you to control how fast
between each “suck” and “release”
cycle.
• Memory Function:
Saves your last setting. If for any
reason you need to pause when
expressing, simply press the
“Memory” button. When you are
ready to continue, pressing the
“Memory” button will allow you to go
back to your stored setting.
• Double or Single Expression:
Choose to express from both
breasts simultaneously or express
from one breast.
3.2 Contraindications
In the event of certain nipple problems
(inammation, open cuts) the NUK®
Expressive™Double Electric Breast Pump
should not be used or only used with
special care. If you are unsure at any time
whether to use the NUK®Expressive™
Double Electric Breast Pump, please
consult your medical professional.
03_62772_5112_A_DEBP_Booklet_REL_2-19-13_Added pages divisible by 4.indd 5 3/18/2013 2:26:53 PM

6
ON THE PUMP MOTOR UNIT
Symbol Meaning Symbol Meaning
Do not dispose of
pump or voltage adapter
with household waste
Electrically protected device,
Protection Class II
Refer to the operating
instructions and warnings Application part type BF
Serial number Direct current
LOT
3.3 Symbols on the Pump
4. Overview of Parts
1. Silicone breast cushion
2. Breast shield
3. Silicone gasket
4. Shield connector
5. Connection ring
6. Backflow valve
7. Membrane
8. Breast milk container
9. Silicone tubing
10. Tubing connector
11. Connector cap
12. Connector
13. Pump unit
14. Voltage adapter GEO361U-1225
15. Nipple
16. Collar
17. Seal disk
17a. Seal disk when using bottle nipple
17b. Seal disk for storage
18. Hood
19. Power button
20. Speed display
20a. Speed fast button
20b. Speed slow button
21. Suction display
21a. Suction high button
21b. Suction low button
22. Memory button
17
17a
17b
123
4
5
6
7
8
9
14
12
13
11
10
18
15
16
20a
20
19
22
20b
8
21a
21
21b
03_62772_5112_A_DEBP_Booklet_REL_2-19-13_Added pages divisible by 4.indd 6 3/18/2013 2:26:55 PM

7
5. Disassembly of the Pump
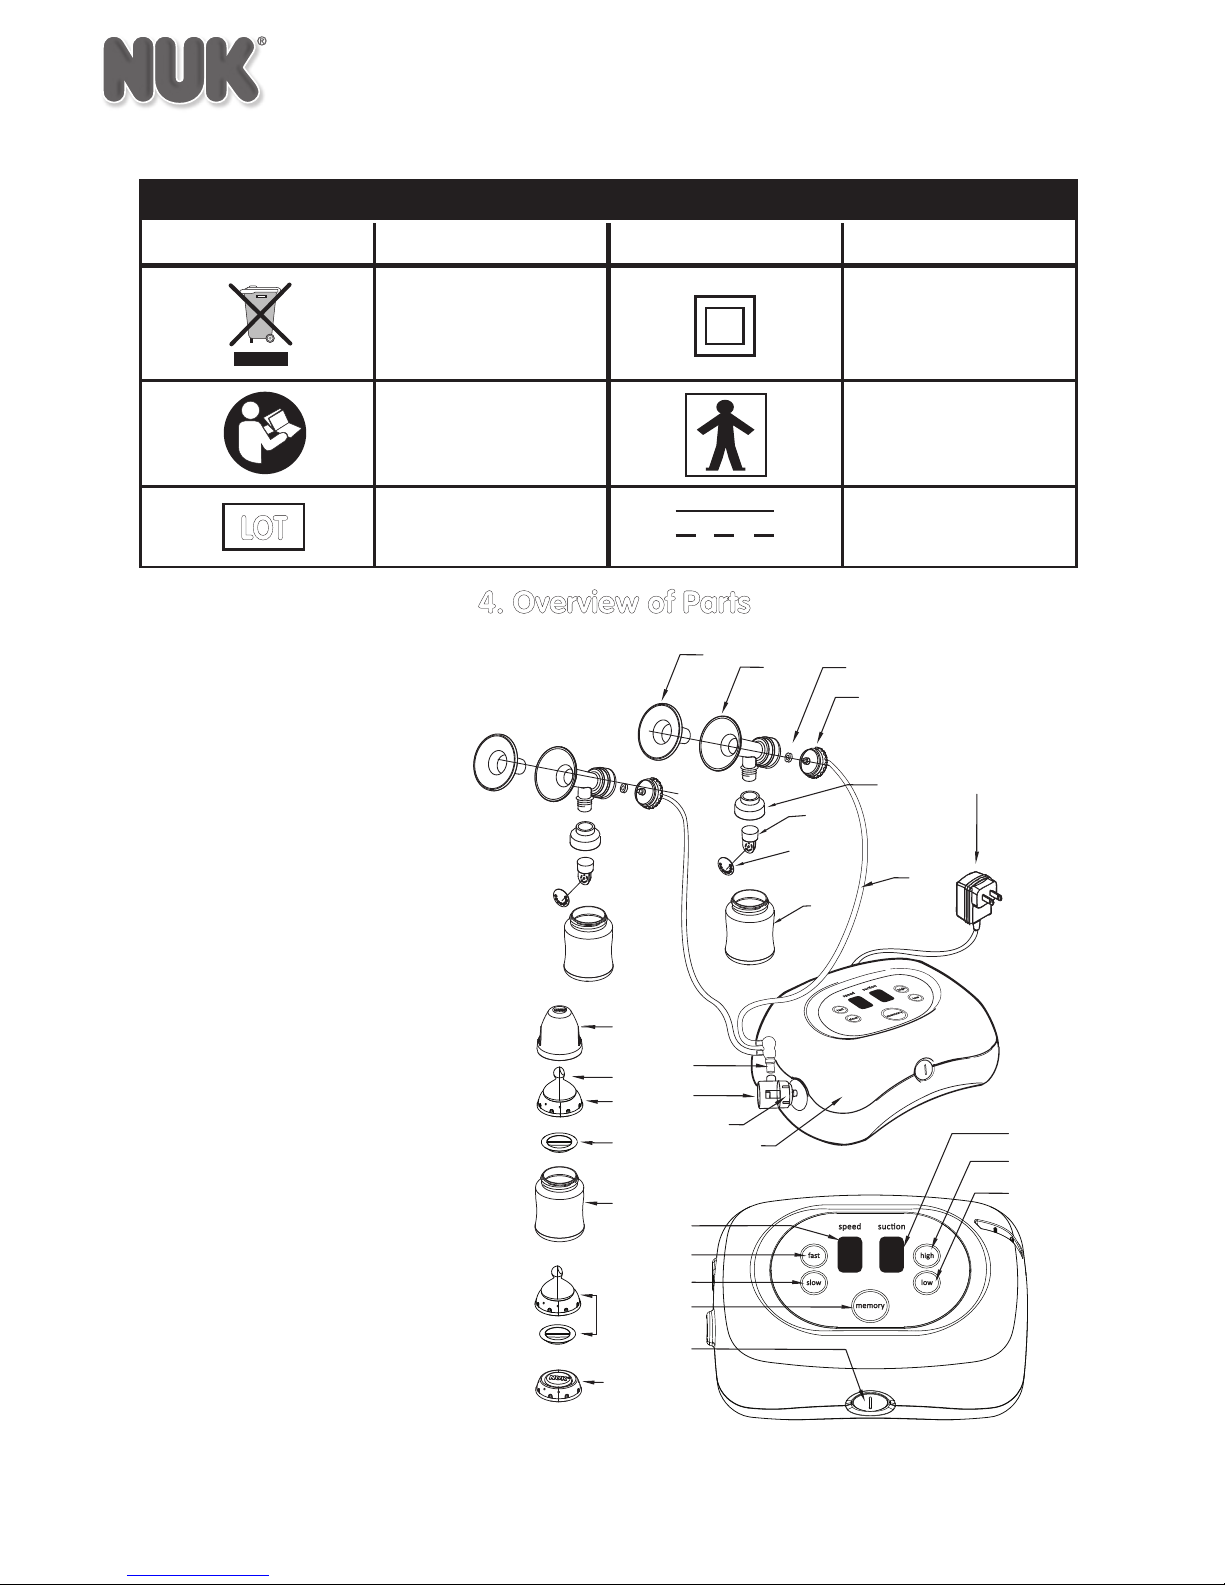
For the following please refer to “Overview
of Parts”.
CAUTION: Always hold the breast milk
container (8) upright when it contains milk
or the milk may spill out.
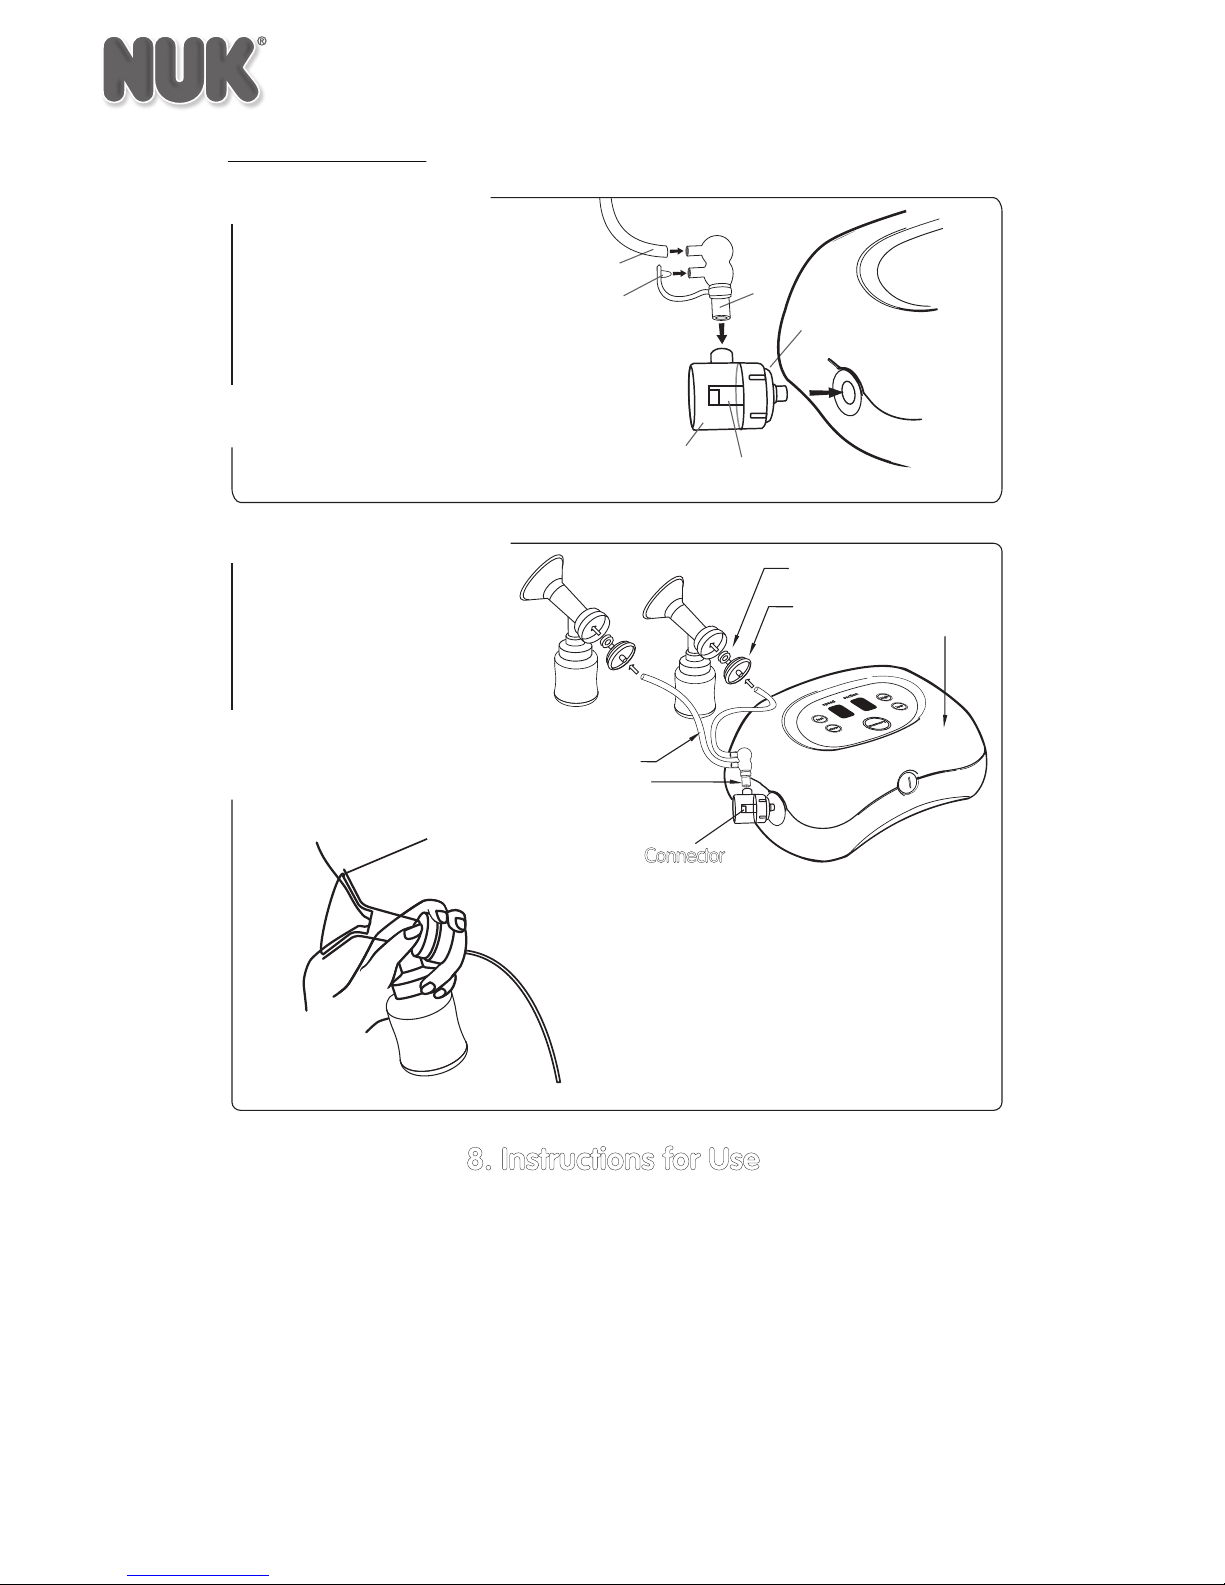
1. Unplug the voltage adapter (14) from
the pump unit (13).
2.Unscrew the shield connector (4) and
tubing (9) from the back of the breast
shield (2).
3.Unscrew the breast milk container (8)
from the connection ring (5).
4.Unscrew the connection ring (5) from
the breast shield (2).
5.Remove the backow valve (6) from the
breast shield (2).
6. Carefully remove the membrane (7) from
the backow valve (6) by pulling outwards.
7. Remove the tubing (9) from the shield
connector (4) and tubing connector
(10). Inspect tubing for condensation
or breast milk. If either appears, refer
to “Section 6.1 Cleaning the Tubing” to
immediately clean the tubing.
6. Cleaning
Hygiene is of priority when handling
breast milk and all parts that come
into contact with it. The pump should
therefore only be used in a clean and
sanitized condition. All accessories and
parts that come into contact with breast
milk – silicone breast cushion (1), breast
shield (2), connection ring (5), backow
valve (6), membrane (7), and breast
milk container (8) – must be thoroughly
cleaned prior to use. Insufcient cleaning
of the pump and/or components can lead
to contamination. Follow the instructions
to ensure proper cleaning.
NOTE: Prior to rst use, sanitize the breast
milk container (8) and nipple (15) by boiling
in water for 5 minutes. Use caution when
removing components from hot water.
CAUTION: Unplug the voltage adapter (14)
from the power outlet before cleaning.
1. Disassemble the pump according to
Section 5.
2. After each use, wash the following parts
by hand: silicone cushion (1), breast shield
(2), connection ring (5), backow valve (6),
membrane (7), and breast milk container
(8). Wash parts using plenty of warm
water and liquid dishwashing soap, then
rinse with hot water for 10 to 15 seconds.
Clean the membrane (7) carefully to avoid
damaging the material. Allow all parts
to dry completely before next use. The
breast milk container (8), collar (16), nipple
(15) and seal disk (17) can also be cleaned
by boiling or in the dishwasher (top-rack).
NOTE: The following parts should be
cleaned as needed: pump unit (13), silicone
gasket (3), shield connector (4), silicone
tubing (9), tubing connector (10), connector
(12), and connector cap (11). If the silicone
gasket (3), shield connector (4), tubing
connector (10), connector (12) or connector
cap (11) come into contact with breast milk
or need cleaning, carefully wash these
03_62772_5112_A_DEBP_Booklet_REL_2-19-13_Added pages divisible by 4.indd 7 3/18/2013 2:26:55 PM

8
If condensation
appears after use
Allow the pump to run with tubes attached until the tubes are dry,
approximately 1-2 minutes.
If milk appears in
tubing (overow)
Turn off the pump and unplug from power source. Remove and
disassemble the tubing. Wash in warm, soapy water and rinse
clean. Dry immediately by reassembling the pump according to the
instructions in section 7. Allow the pump to run with tubes attached
until dry, approximately 1-2 minutes. NOTE: All parts, especially the
connector (12) and cap (11) must be in place prior to running the pump.
parts by hand using warm water and
liquid dishwashing soap and rinse for at
least 10 to 15 seconds. Allow parts to dry
thoroughly before next use.
3.Wipe the pump unit (13) with a damp
cloth. This cleaning is sufcient because
the pump unit does not come into direct
contact with the breast milk.
CAUTION: Never immerse the pump unit
(13) or voltage adapter (14) in water as this
could damage the electric system.
6.1. Cleaning the Tubing:
The tubing of the breast pump is
designed to move air, not breast
milk and therefore does not need to
be cleaned every day if there is no
evidence of breast milk or condensation
in the tubing. Before and after each
use, inspect tubing for condensation or
milk. If milk gets into tubing, the pump
unit can be contaminated and exposed
to bacteria or stop working. Therefore,
it is important to check for milk or
condensation in the tubing before,
during and after each session.
03_62772_5112_A_DEBP_Booklet_REL_2-19-13_Added pages divisible by 4.indd 8 3/18/2013 2:26:55 PM

9
7. Pump Assembly
Before using the pump, disassemble and clean according to the instructions in
sections 5 and 6.
Repeat steps 1-6 for the other side.
Push the silicone cushion (1), onto the
opening of the breast shield (2).
Screw the Breast Milk Container (8)
onto the connection ring (5) on the
assembled breast shield.
Silicone-gasket (3)
Place the silicone gasket (3) onto the
breast shield connector (4) and screw the
breast shield connector clockwise into the
back of the breast shield (2).
Push the backow
valve (6) into
the connection
ring (5) on the
breast shield (2).
Push the membrane
(7) into the hole of the
backow valve (6).
1 2
3 4
5 6
7
Screw the connection ring (5) clockwise
onto the base of the breast shield (2).
ASSEMBLY INSTRUCTIONS:
NOTE: Make sure all pieces are rmly in place to ensure good seals to create
a vacuum needed to express breast milk.
BREAST SHIELD ASSEMBLY
03_62772_5112_A_DEBP_Booklet_REL_2-19-13_Added pages divisible by 4.indd 9 3/18/2013 2:26:55 PM

10
TUBING & PUMP UNIT
1. Screw the connector cap (11)
onto the connector (12).
2. Place the end of the tubing (9) on the
tubing connector (10) and attach to
the port of the connector (12).
3. Insert the assembled connector
(12) with attached tubing into
the side of the pump unit (13).
You are now ready to begin
using your NUK®Expressive™
Double Electric Breast Pump
Breast shield (2)
Connector
Cap
Connector
NOTE: If breast milk gets into the
tubing, stop the pump at once.
Clean the tubing according to
the instructions in Section 6.1
before continuing to pump.
12
11
10
9
3
4
9
10
13
8. Instructions for Use
Before using the pump, disassemble and clean according to the instructions in
sections 5 and 6.
8.1 Operation
1. Plug in the voltage adapter (14). Turn the
pump on by pressing the power button
(19) on the front of the pump unit.
NOTE: If you are going to express from
only one breast, remove one end of the
tubing (9) from the tubing connector (10)
and use the cap on the tubing connector
(10) to plug the connector to ensure a
vacuum for expression.
03_62772_5112_A_DEBP_Booklet_REL_2-19-13_Added pages divisible by 4.indd 10 3/18/2013 2:26:55 PM

11
Speed:
1. When turned on, the pump unit will
be on the lowest speed and suction
settings. Press the “FAST” button (20a)
to increase the speed of suction by one
speed, from 1 (slow) to 4 (fast). Press
the “SLOW” button (20b) to reduce the
speed by one speed.
Suction:
2. When the speed is set, push the
“HIGH” button (21a). The pump will start
working. The suction can be increased
from 1 (low) to 8 (high). “0” indicates the
pump unit is on standby. NOTE: If at
any time the suction is too intense, push
the “LOW” button (21b) to reduce one
grade at a time until you again reach a
comfortable level for expression.
Tip: The highest suction level doesn’t mean
more milk. Express at the highest suction
level that is comfortable for you and do not
use uncomfortable suction levels.
3.Hold the breast milk container(s) and
press the breast shield(s) against
your breast(s) rmly with your nipples
centered in the funnel to ensure a
good seal.
NOTE: During expression, you can
continually readjust both the suction and
speed to nd what’s comfortable and
efcient for your needs.
NOTE: Suction can be broken by inserting
a nger between the breast and the
breast shield.
CAUTION: If for any reason you
experience pain in the breast or nipple
while expressing, stop expressing
immediately by either powering off the
pump or breaking suction using
your nger.
CAUTION: Do not let breast milk reach or
contact the valve when expressing to avoid
the risk of contamination or damaging
the pump unit. Hold the unit as upright as
possible to avoid contact when tilting.
4.When nished expressing, break the
suction by inserting a nger between
the breast and breast shield, then
remove breast shield from the breast.
Power off the pump by pressing the
power button (19) on the front of the
pump unit (13).
NOTE: If you should need to pause while
expressing, push the “MEMORY” button
(22) to put the pump in standby mode.
When you are ready to resume pumping,
push the memory button again to return
to your last suction and speed settings. If
you power off the pump, you can still use
the memory function to resume your last
suction and speed settings.
5.Unscrew the breast milk container (8)
from the connection ring (5). Be sure
to keep the container vertical. Screw
on the enclosed collar and seal disk
or pour into NUK®Seal ‘n Go®Breast
Milk Bags and immediately place in the
fridge or freezer.
NOTE: Correct expressing needs practice.
You should rst become accustomed
to your new pump. If you continue to
experience difculty expressing, contact
your medical professional.
CAUTION: While expressing, if milk
appears in tubing, immediately turn
off the pump and refer to Section 6.1
Cleaning the Tubing.
03_62772_5112_A_DEBP_Booklet_REL_2-19-13_Added pages divisible by 4.indd 11 3/18/2013 2:26:55 PM

12
8.2 Frequency of Expressing
The frequency of expressing depends on
your individual situation. If you will be apart
from your baby and/or want to sustain
milk production, the natural breastfeeding
rhythm should be maintained. You should
therefore express 6 to 8 times daily,
including once during the night. In all other
cases you should express entirely to suit
your own individual needs.
8.3 Procedure
Always consult your medical practitioner
or a lactation consultant for help if you
experience any difculty expressing.
You may express from both breasts
simultaneously (double expression) or
one breast at a time (single expression).
The below intervals are intended to
provide helpful guidelines for expression,
but vary according to the individual.
For Double Expression:
A typical session can last about 12 to 15
minutes. You should try to pump for a
minimum of 10 minutes, but no longer
than 20 minutes.
For Single Expression:
Express from each breast in turn.
• Alternate between breasts when the
milk ow slows down or ceases.
• The amount of time needed to express
milk will vary considerably from one
person to another. The following
intervals have proven effective, but times
may vary according to the individual:
right 5 – 7 minutes, left 5 – 7 minutes;
right 3 – 5 minutes, left 3 – 5 minutes;
right 2 – 3 minutes, left 2 – 3 minutes.
8.4 Milk Quantity
Do not be surprised if it takes a little
longer at rst before the milk really starts
to ow. This is not unusual, in fact it is
perfectly normal, because in general milk
production adapts to daily requirements.
This means that the quantity of milk
produced may vary considerably.
• Be sure to drink enough uids to
stimulate milk production.
• Do not set the suction strength too
high. Higher suction strength does
not promote milk ow.
8.5 Let-Down Reex
During natural breastfeeding, placing the
baby on the breast stimulates the let-
down reex and the milk begins to ow.
You can further stimulate if you:
• Find a quiet place where you can be
fully relaxed as you express the milk.
• Adopt a comfortable and relaxed
sitting position.
• Place a warm compress on your breast
for a few minutes to relax the tissue
before expressing.
• It may be helpful to have eye contact
with your baby. If that is not possible,
try to look at a photo of your baby.
• The let-down reex releases the ow of
milk to both breasts simultaneously.
03_62772_5112_A_DEBP_Booklet_REL_2-19-13_Added pages divisible by 4.indd 12 3/18/2013 2:26:55 PM

13
9. Storing & Feeding Milk
If the breast milk is not to be used
immediately, you can seal the lled breast
milk container (8) with the collar (16) and
seal disk (17) as shown in section 4 (17b)
or pour from the container (8) into a NUK®
Seal ‘n Go®Breast Milk Bag. Store it in the
refrigerator. Use an erasable marker to
write the date and time of expressing on
the breast milk container (8).
CAUTION: Only the NUK®Breast Milk
Container with the collar (16) and seal disk
(17) should be stored in the refrigerator,
not the entire NUK®Expressive™Double
Electric Breast Pump.
9.1 NUK®Breast Milk Container
The breast milk may be chilled or frozen
and thawed out in a sealed breast milk
container (8). The breast milk container
(8) may also be used for re-heating and
feeding. Please always observe the
information below on handling breast milk.
NOTE: When freezing breast milk, do not
ll the breast milk container (8) with more
than 5 . oz as breast milk expands as it
freezes and the container may burst.
NOTE: Using the breast milk container for
infant formula or other liquids, besides
breast milk, may lead to discoloration.
9.2 Tips for Handling Breast Milk
NUK®Seal ‘n Go®Milk Bags and Breast
Milk Containers (sold with any NUK®
breast pump) are safe for storage in the
refrigerator or freezer.
• Once the container has been opened,
the maximum storage time is 12 hours
at 39°F (4°C).
• The milk may be thawed out in the
container either in the refrigerator, or,
if required immediately, by standing in
warm water.
• If desired, warm the milk to body
temperature by placing it in a NUK®
Bottle Warmer, or in a container of
heated water. Always check temperature
of the milk on your wrist before feeding
baby.
CAUTION: Breast milk must not be
thawed out in a microwave as this will
destroy valuable nutrients as well as
cause possible damage to the container
material, which may cause the risk of
explosion. Uneven heating may also result
in scalding!
• The milk should therefore be shaken
gently before feeding to ensure that milk
and milk fats are well mixed and that the
warm breast milk is evenly distributed.
• Defrosted, re-heated or unused milk
must be disposed of and not refrozen.
• If you express breast milk more than
once within a period of 24 hours, the
freshly expressed milk may be added
to the previously cooled breast milk
under the following conditions: The
temperatures must be the same (cold
on cold). Freshly expressed milk must
therefore be cooled rst before being
added to milk that is already cool.
• Consult your medical professional for
more detailed information about storage.
03_62772_5112_A_DEBP_Booklet_REL_2-19-13_Added pages divisible by 4.indd 13 3/18/2013 2:26:55 PM

14
STORAGE GUIDELINES FOR THAWED BREAST MILK1
Room Temperature (60°F to 85°F) Refrigerator (39°F or colder) Freezer
Up to 1-2 hours is best. Up to 3-4 hours is ok. 24 hours Do not refreeze thawed breast milk.
GUIDELINES FOR STORING BREAST MILK1
Location Temperature Duration Comments
Countertop, table Room temperature
(up to 77°F or 25°C) 6–8 hours
Containers should be covered and kept as cool
as possible; covering the container with a cool
towel may keep milk cooler.
Insulated cooler bag 5 - 39°F or
-15 - 4°C 24 hours Keep ice packs in contact with milk containers
at all times, limit opening cooler bag.
Refrigerator 39°F or 4°C 5 days Store milk in the back of the main body of the
refrigerator.
Freezer
Store milk toward the back of the freezer, where
temperature is most constant. Milk stored for
longer durations in the ranges listed is safe,
but some of the lipids in the milk undergo
degradation resulting in lower quality.
Freezer compartment of
a refrigerator 5°F or -15°C 2 weeks
Freezer compartment of
refrigerator with separate doors 0°F or -18°C 3–6 months
Chest or upright deep freezer -4°F or -20°C 6–12 months
Follow the below guidelines for safe storage of breast milk to ensure freshness.
1http://www.womenshealth.gov/publications/our-publications/breastfeeding-guide/BreastfeedingGuide-General-English.pdf.
03_62772_5112_A_DEBP_Booklet_REL_2-19-13_Added pages divisible by 4.indd 14 3/18/2013 2:26:56 PM

15
9.3 Feeding Expressed Milk with NUK®
Breast Milk Container
IMPORTANT SAFEGUARDS FOR THE
BREAST MILK CONTAINER & NIPPLE
WARNING: For safety and health reasons
please note the following:
• Prolonged periods of time drinking
liquids, other than water, may cause
tooth decay.
• To prevent possible choking hazard, test
strength before each use by pulling the
nipple in all directions. Any tear can lead
to the separation of pieces. Discontinue
use if any tear or crack appears. Do not
attempt to enlarge the hole as this may
lead to tearing.
CAUTION:
• Do not overheat. Always test
temperature of liquid on wrist before
feeding baby.
• Do not microwave, since this can cause
uneven heating.
• Always supervise baby when feeding.
To avoid injury, do not allow a child to
walk or run with a bottle.
CARE:
• Disassemble before cleaning. Prior to
rst use, sanitize by boiling in water for
5 minutes.
• For day to day cleaning, wash with hot
water and mild detergent then rinse
clean. Dishwasher-safe (top rack). Allow
to dry before storage.
• To heat, use a NUK®Bottle Warmer or
place the bottle under hot running water
or in a container of heated water.
• For hygiene and safety, replace with
appropriate NUK®Nipples after about
2 months of use.
USE:
1. Apply the supplied nipple (15) onto
the breast milk container (8) with the
supplied container collar (16). The
breast milk container can be used
with all NUK®Wide-Neck Nipples.
2.The NUK®Air System vents the bottle,
preventing vacuum buildup and allows
baby to drink continuously, swallowing
liquid instead of air. Make sure the
NUK®Air System symbol on the nipple
(15) is lined up under baby’s nose for the
best results.
03_62772_5112_A_DEBP_Booklet_REL_2-19-13_Added pages divisible by 4.indd 15 3/18/2013 2:26:56 PM

16
10. Troubleshooting
Low or no suction
Disconnect tubing from shield connector (4).
Turn on pump using power button on front of
pump unit. Increase suction to 1 and speed to
1. Place nger over open tubing end. If you feel
suction, the pump is functioning. Reconnect
all components following the instructions in
Section 7, Pump Assembly, ensuring good
connections. NOTE: Do not keep your nger
over the tubing end longer than a few seconds
to test for suction. This could damage the pump
unit.
Check to make sure all connections are tight
and secure:
1. Membrane (7) to backow valve (6)
2.Backow valve (6) to connection ring (5)
3.Connection Ring (5) to Breast Shield (2)
4.Breast shield (2) to silicone gasket (3) & shield
connector (4)
5.Silicone tubing (9) to tubing connector (10)
6.Connector (12) to pump unit (13)
Check all parts for tears or damage. If you
notice any, do not use. Call NUK®Customer
Service at 1-888-NUK-1238.
Low or no suction
when single pumping
The cap must be in place where the second
tube was connected. Both tubes and breast
shields cannot be connected to the pump unit
for single pumping.
Slow milk drip into the bottle Move to a faster speed setting by pushing the
“FAST” button on the pump unit.
Painful expression Try a lower suction level. If you continue
to experience pain, consult your medical
professional.
03_62772_5112_A_DEBP_Booklet_REL_2-19-13_Added pages divisible by 4.indd 16 3/18/2013 2:26:56 PM

17
11. Technical Data
Medical Device CISPR 11, Group 1, Class B
Power Supply – Voltage Adapter
GEO361U-1225
Input: AC 100-240V 50/60Hz 1.2A
Output: DC 12V, 2.5A
Rated Power 30 W
NUK®Vented Nipple Complies with EN 14350
Temperature Range
Operation
Storage
47°F to 104°F (8°C to + 40°C)
47°F to 104°F (8°C to + 40°C) and less than
80% relative humidity
Water and dust protection class IP21
12. Disposal
The Pump unit (13) and voltage adapter (14) or products labeled with a
crossed-through wheeled bin must not be disposed of with normal
household waste, but should be taken to a collection point for recycling
electric and electronic equipment.
13. EMC-Guidance
13.1 Warnings
• This pump may have problems
operating when it is used near
household items that emit
electromagnetic waves, such as small
appliances and television or video
equipment. If the pump seems to not
be working properly try moving it away
from sources such as these.
• This pump may also have problems if
the air in your house is dry. Please use
a humidier or vaporizer if you think
static electricity might be a problem in
your house.
• Portable and mobile RF communications
equipment can affect medical electrical
equipment.
• Do not stack units as EMC emissions
can result.
13.2 FCC Part 15
This device complies with Part 15 of the
FCC Rules. Operation is subject to the
following two conditions: (1) this device
may not cause harmful interference,
and (2) this device must accept any
interference received, including
interference that may cause undesired
operation.
Warning: Changes or modications to this
unit not expressly approved by the party
responsible for compliance could void the
user’s authority to operate the equipment.
NOTE: This equipment has been tested
and found to comply with the limits for
03_62772_5112_A_DEBP_Booklet_REL_2-19-13_Added pages divisible by 4.indd 17 3/18/2013 2:26:56 PM

18
14. ONE YEAR LIMITED WARRANTY
NUK USA LLC warrants the NUK®
Expressive™Double Electric Breast Pump
product sold in the USA for a period of one
year from the date of purchase against
defective material and workmanship. If
defective, NUK USA LLC will replace the
product with the same or comparable
model (at its option) during the warranty
period. If the product is no longer available,
replacement may be made with a similar
product of equal or greater value. This is
your exclusive warranty.
This warranty is valid for the original retail
purchaser from the date of initial retail
purchase and is not transferable. Keep the
original sales receipt. Proof of purchase
(dated sales receipt) is required. NUK®
dealers, service centers, or retail stores
selling NUK®products do not have the right
to alter, modify or any way change the
terms and conditions of this warranty.
This warranty does not cover normal wear
of parts or damage resulting from any of
the following: Negligent use or misuse
of the product, commercial use, use on
improper voltage or current, use contrary
to the operating instructions, disassembly,
repair or alteration by anyone other than
NUK USA LLC.
What are the limits on
NUK USA LLC’s Liability?
NUK USA LLC shall not be liable for any
incidental or consequential damages
caused by the breach of any express,
implied or statutory warranty or condition.
Except to the extent prohibited by
applicable law, any implied warranty or
condition of merchantability or tness
for a particular purpose is limited in
duration to the duration of the above
warranty. NUK USA LLC disclaims all other
warranties, conditions or representations,
express, implied, statutory or otherwise.
a Class B digital device, pursuant to
Part 15 of the FCC Rules. These limits
are designed to provide reasonable
protection against harmful interference in
a residential installation.
This equipment generates, uses and
can radiate radio frequency energy and,
if not installed and used in accordance
with the instructions, may cause harmful
interference to radio communications.
However, there is no guarantee that
interference will not occur in a particular
installation. If this equipment does cause
harmful interference to radio or television
reception, which can be determined
by turning the equipment off and on,
the user is encouraged to try to correct
the nterference by one or more of the
following measures:
- Reorient or relocate the receiving
antenna.
- Increase the separation between the
equipment and receiver.
- Connect the equipment into an outlet on
a circuit different from that to which the
receiver is connected.
- Consult the dealer or an experienced
radio/ TV technician for help.
03_62772_5112_A_DEBP_Booklet_REL_2-19-13_Added pages divisible by 4.indd 18 3/18/2013 2:26:56 PM

19
For more information on NUK®products, visit our website: www.NUK-USA.com or call
Customer Service: ( 1-888-NUK-1238)
NUK USA LLC
728 Booster Blvd
Reedsburg, WI 53959
NUK USA LLC shall not be liable for
any damages of any kind resulting
from the purchase, use or misuse of,
or inability to use the product including
incidental, special, consequential or
similar damages or loss of prots, or
for any breach of contract, fundamental
or otherwise, or for any claim brought
against purchaser by any other party.
Some provinces, states or jurisdictions
do not allow the exclusion or limitation
of incidental or consequential damages
or limitations on how long an implied
warranty lasts, so the above limitations
or exclusion may not apply to you.
This warranty gives you specic legal
rights, and you may also have other rights
that vary from state to state or jurisdiction
to jurisdiction.
How to claim the Warranty?
To make a claim or troubleshoot a
problem, please contact the Customer
Service Center at 1-888-NUK-1238.
Customer Service will provide the
assistance in resolving the issue through
troubleshooting and/or provide an
address for returning the product.
03_62772_5112_A_DEBP_Booklet_REL_2-19-13_Added pages divisible by 4.indd 19 3/18/2013 2:26:56 PM

20
1. Advertencias y precauciones ........................................................................21
2. Consejos sobre higiene................................................................................22
3. Acerca de este extractor ..............................................................................22
3.1 Características......................................................................................22
3.2 Contraindicaciones ..............................................................................23
3.3 Símbolos del extractor .........................................................................23
4. Vista general de las piezas..........................................................................24
5. Desarmado del extractor .............................................................................24
6. Limpieza ........................................................................................................25
6.1 Limpieza de los tubos ...........................................................................26
7. Armado del extractor ...................................................................................27
8. Instrucciones de uso.....................................................................................28
8.1 Operación.............................................................................................28
8.2 Frecuencia de extracción.....................................................................30
8.3 Procedimiento ......................................................................................30
8.4 Cantidad de leche................................................................................30
8.5 Reejo de bajada de leche...................................................................31
9. Conservación y uso de la leche para alimentar al bebé.............................31
9.1 Envase para leche materna de NUK®.................................................31
9.2 Consejos para manipular la leche materna ......................................32
9.3 Uso de la leche extraída y el envase
para leche materna de NUK®para alimentar al bebé......................34
10. Solución de problemas.................................................................................35
11. Datos técnicos...............................................................................................36
12. Eliminación ....................................................................................................36
13. EMC Orientación ...........................................................................................36
13.1 Advertencias ........................................................................................36
13.2 Parte 15 de la FCC .................................................................................36
14. Garantía limitada de un año........................................................................ 37
Contenido
03_62772_5112_A_DEBP_Booklet_REL_2-19-13_Added pages divisible by 4.indd 20 3/18/2013 2:26:56 PM
Table of contents
Languages:
Other NUK Water Pump manuals
Popular Water Pump manuals by other brands

Schmalz
Schmalz EVE-OG 10 operating instructions

esotec
esotec Palermo operating manual

Wacker Neuson
Wacker Neuson PS2 800 Operator's manual

Grundfos
Grundfos SP Safety instructions and other important information

GORMAN-RUPP PUMPS
GORMAN-RUPP PUMPS PRIME-AIRE Series manual

Grundfos
Grundfos MP 204 Installation and operating instructions