Nustep T4 User manual

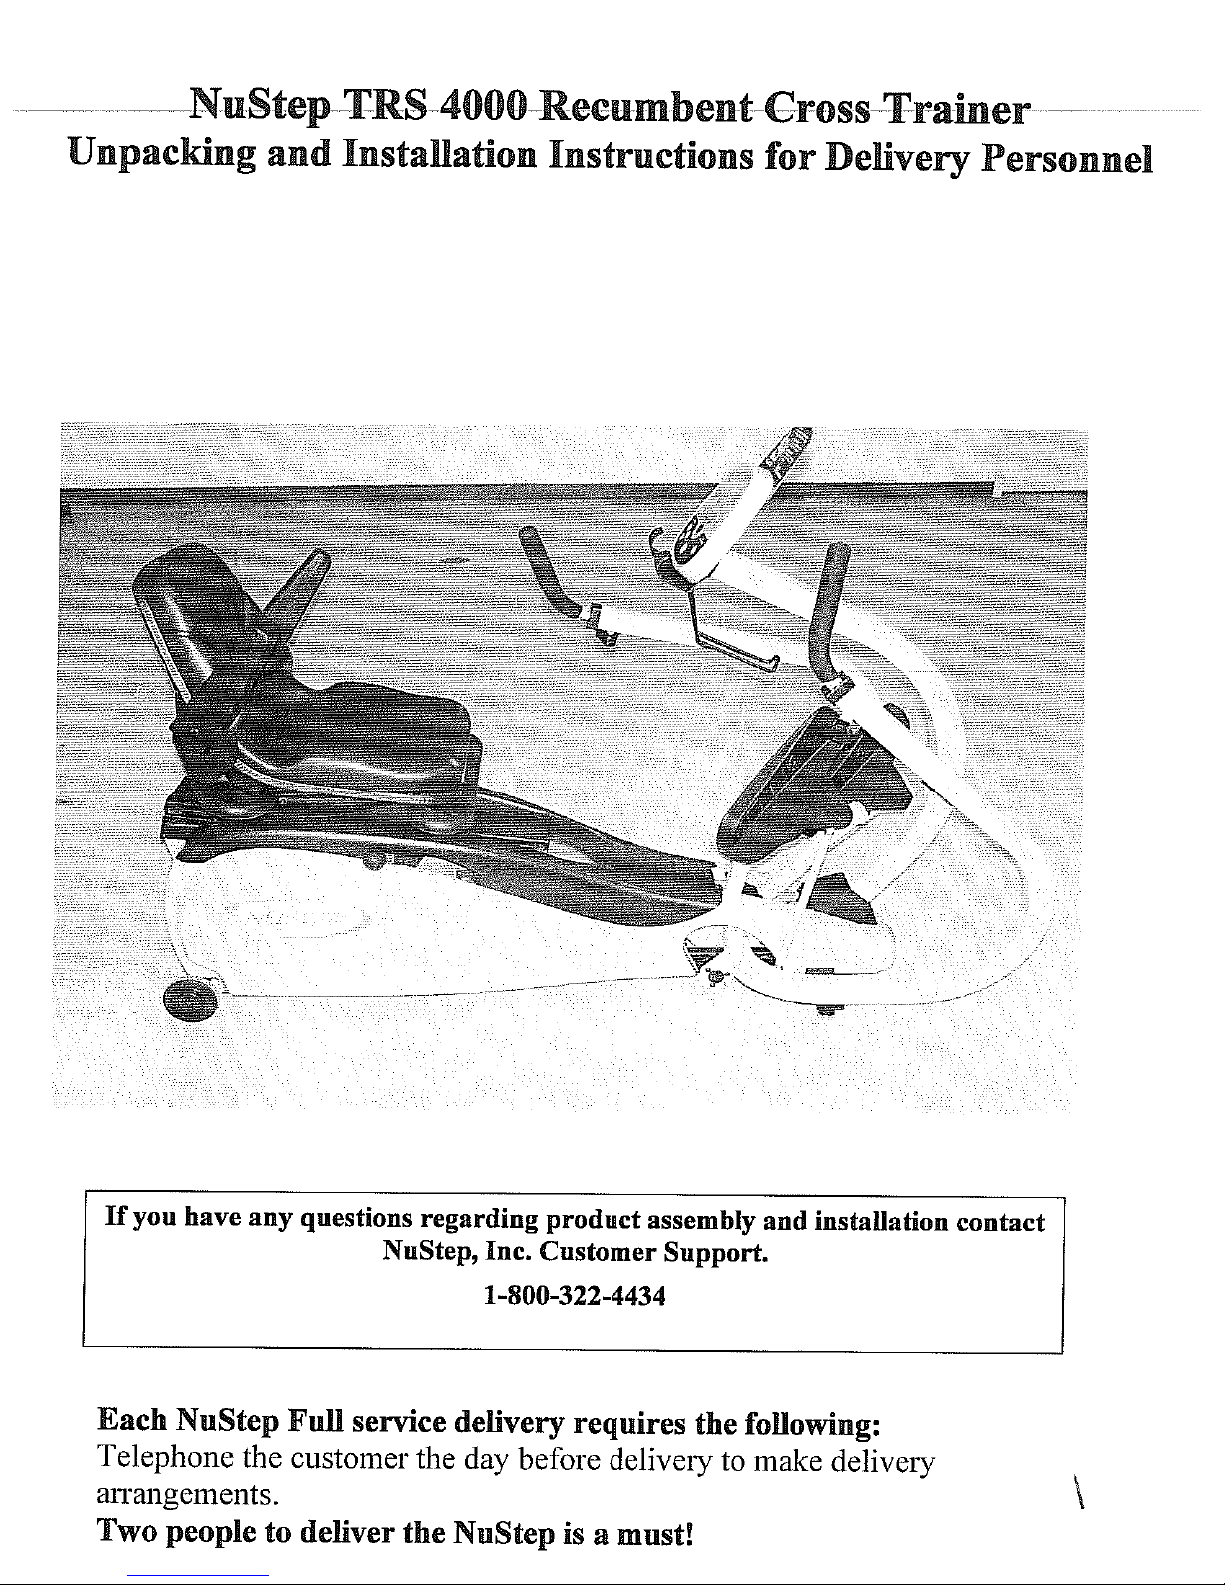
Addendum:Account4504–ServiceByAirDTWNuStepBikes
Synopsis:NonstopDeliveryisprovidingthresholdandwhiteglovedeliveryserviceswithassemblyof
NuStepexercisebikesforServiceByAirDTW.Theremaybeexistingequipmentatthelocationtobe
pickedupandpackaged.AllfreightwillbedeliveredtotheNSDlocationviamultiplecarriers,primarily
ForwardAir,ABF,Con‐wayandEstes.Finalconsigneeswillprimarilybelocatedinmedicalfacilities.
ServiceLevels:
Threshold–Deliveryofthefreightwithatwomanteamtothecustomer’sfirstavailableroomattheir
location.
Whiteglove–Deliveryofthefreightwithatwomanteamtothecustomer’sroomofchoice,
unpackaging,debrisremoval,assembly,possiblepickupandpackagingofexistingNuStep.
Scheduling:Contacttoscheduledeliverymustbeinitiatedwith24hoursofreceivingthemerchandise.
Deliverymustbecompletedwith72hoursofreceivingfreight,unlessthereareextenuating
circumstancesonthepartofthefinalcustomer.
SpecialRequests:
Receiving/DockProcedures–Allfreightmustbereceivedregardlessofdamage.Ifthereiscarton
damageorvisibledamagetotheproduct,notatethedamageontheBOL,takepicturesandnotifyNSD
immediately.DoNOTcallthefinalconsigneetoschedule.
Scheduling–Whencallingthecustomer,pleasemakesureyourepresentyourselfasaServiceByAir
employee.Thiswillhelpalleviatesomeconfusionwithscheduling.NonstopDeliveryhasprovideda
callsheet.Thiscallsheetmustbefilledoutcompletelywhencallingthecustomertoschedule.
PleasebesuretofilethiswiththeNSDdeliverypaperworkasyoumayberequestedtoprovideitifany
issueswithschedulingorthedeliveryservicesarise.Ifthisisnotfilledoutproperlyandthequestions
arenotaskedofthecustomeratthetimeofscheduling,youmayberequestedtoreturntothe
customer’slocationatalaterdatetocompletethedelivery.
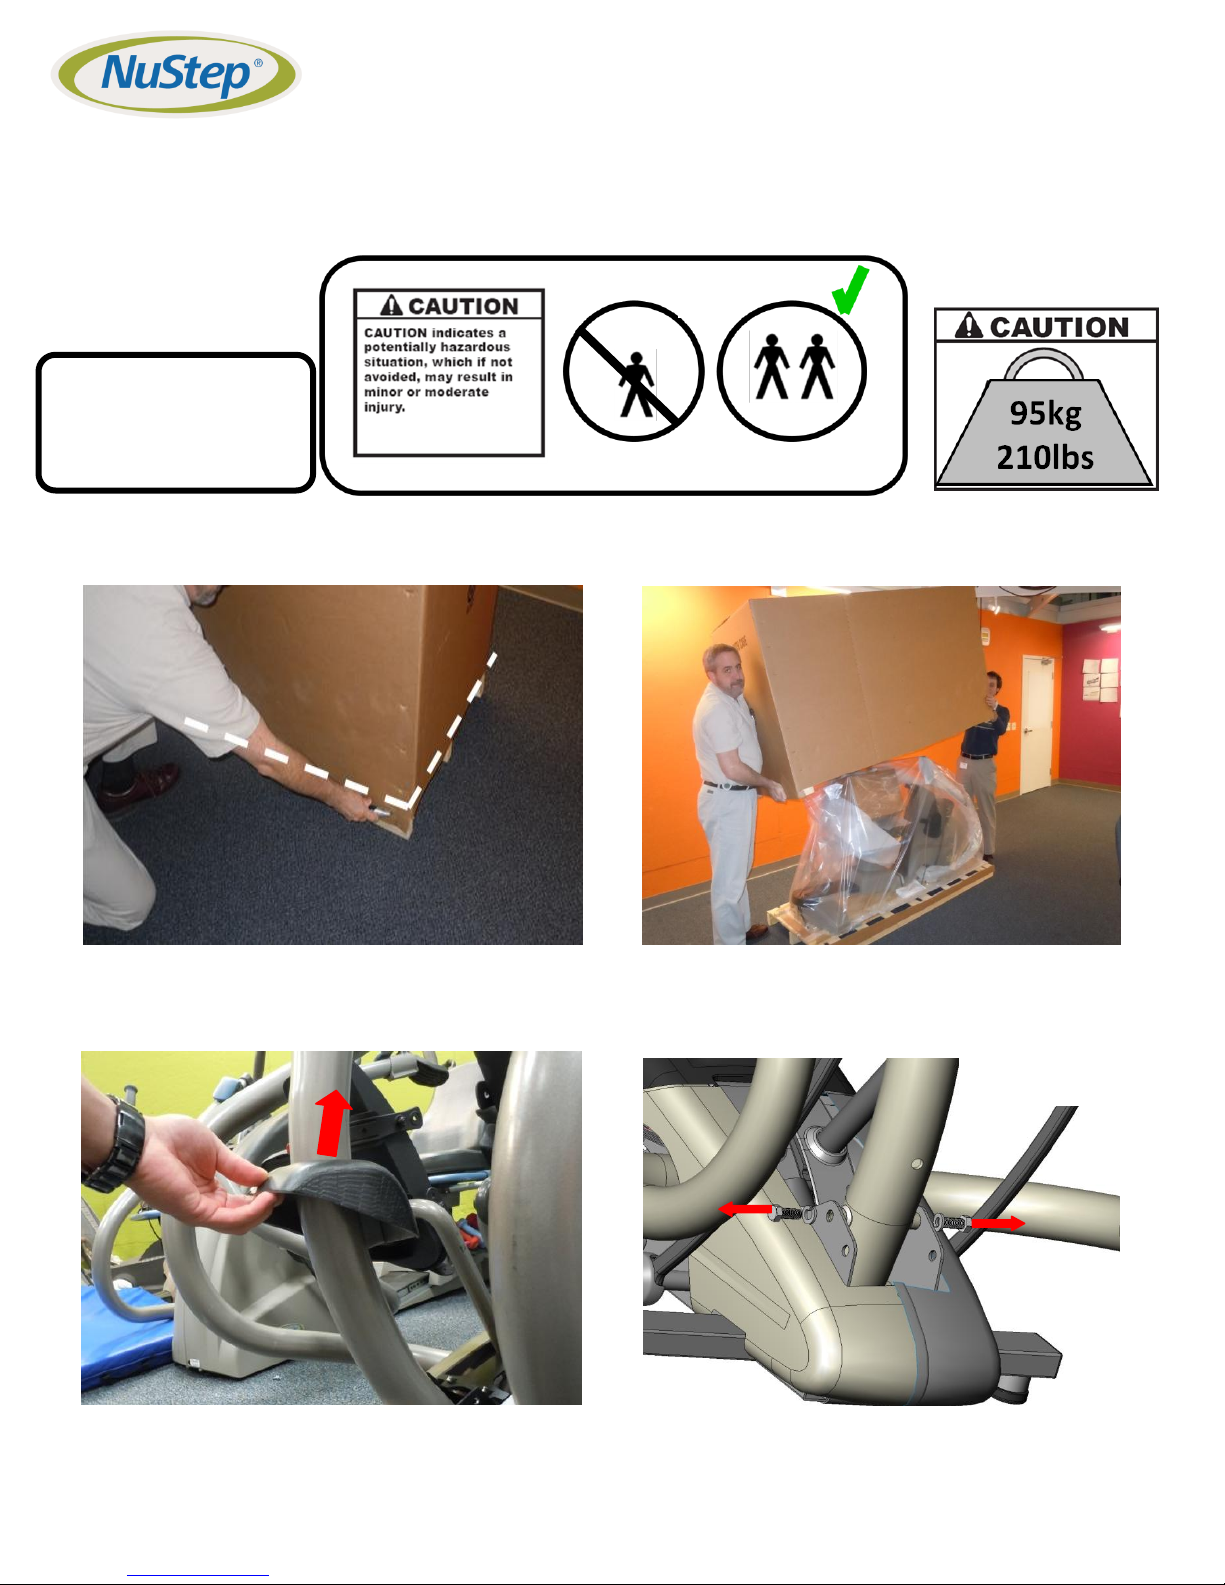
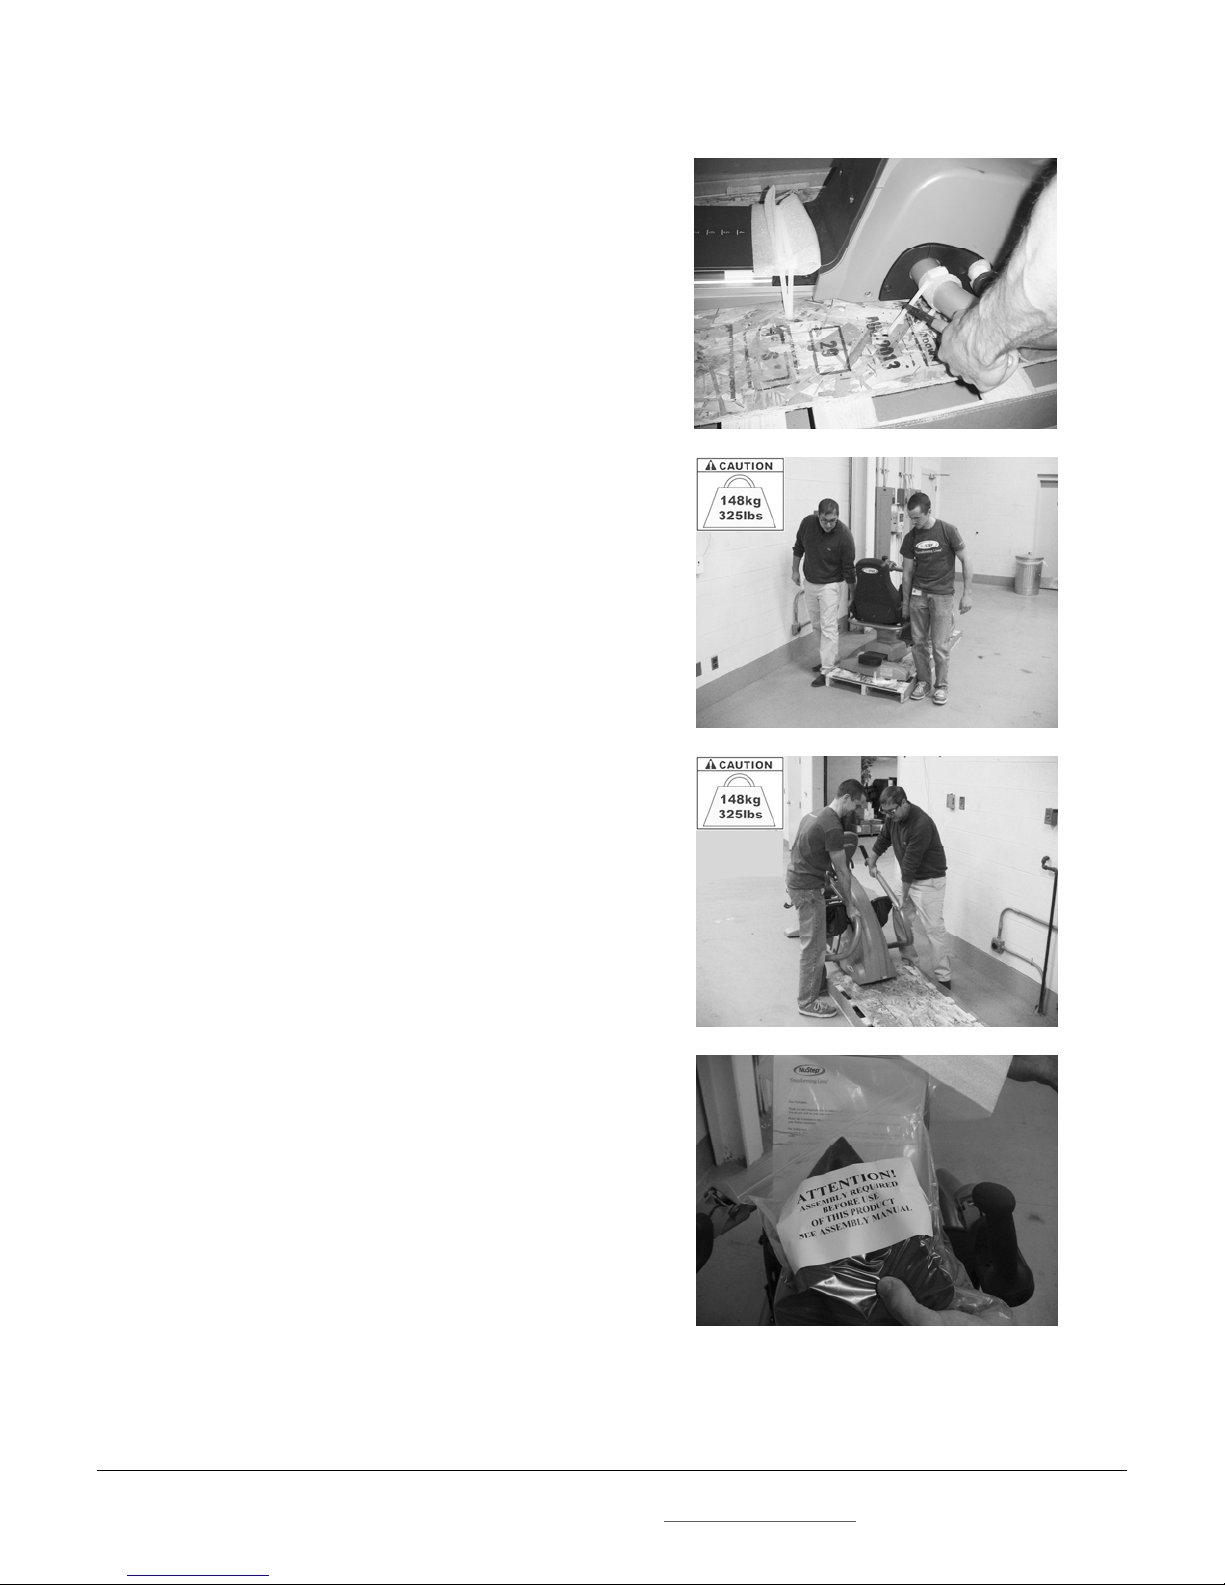
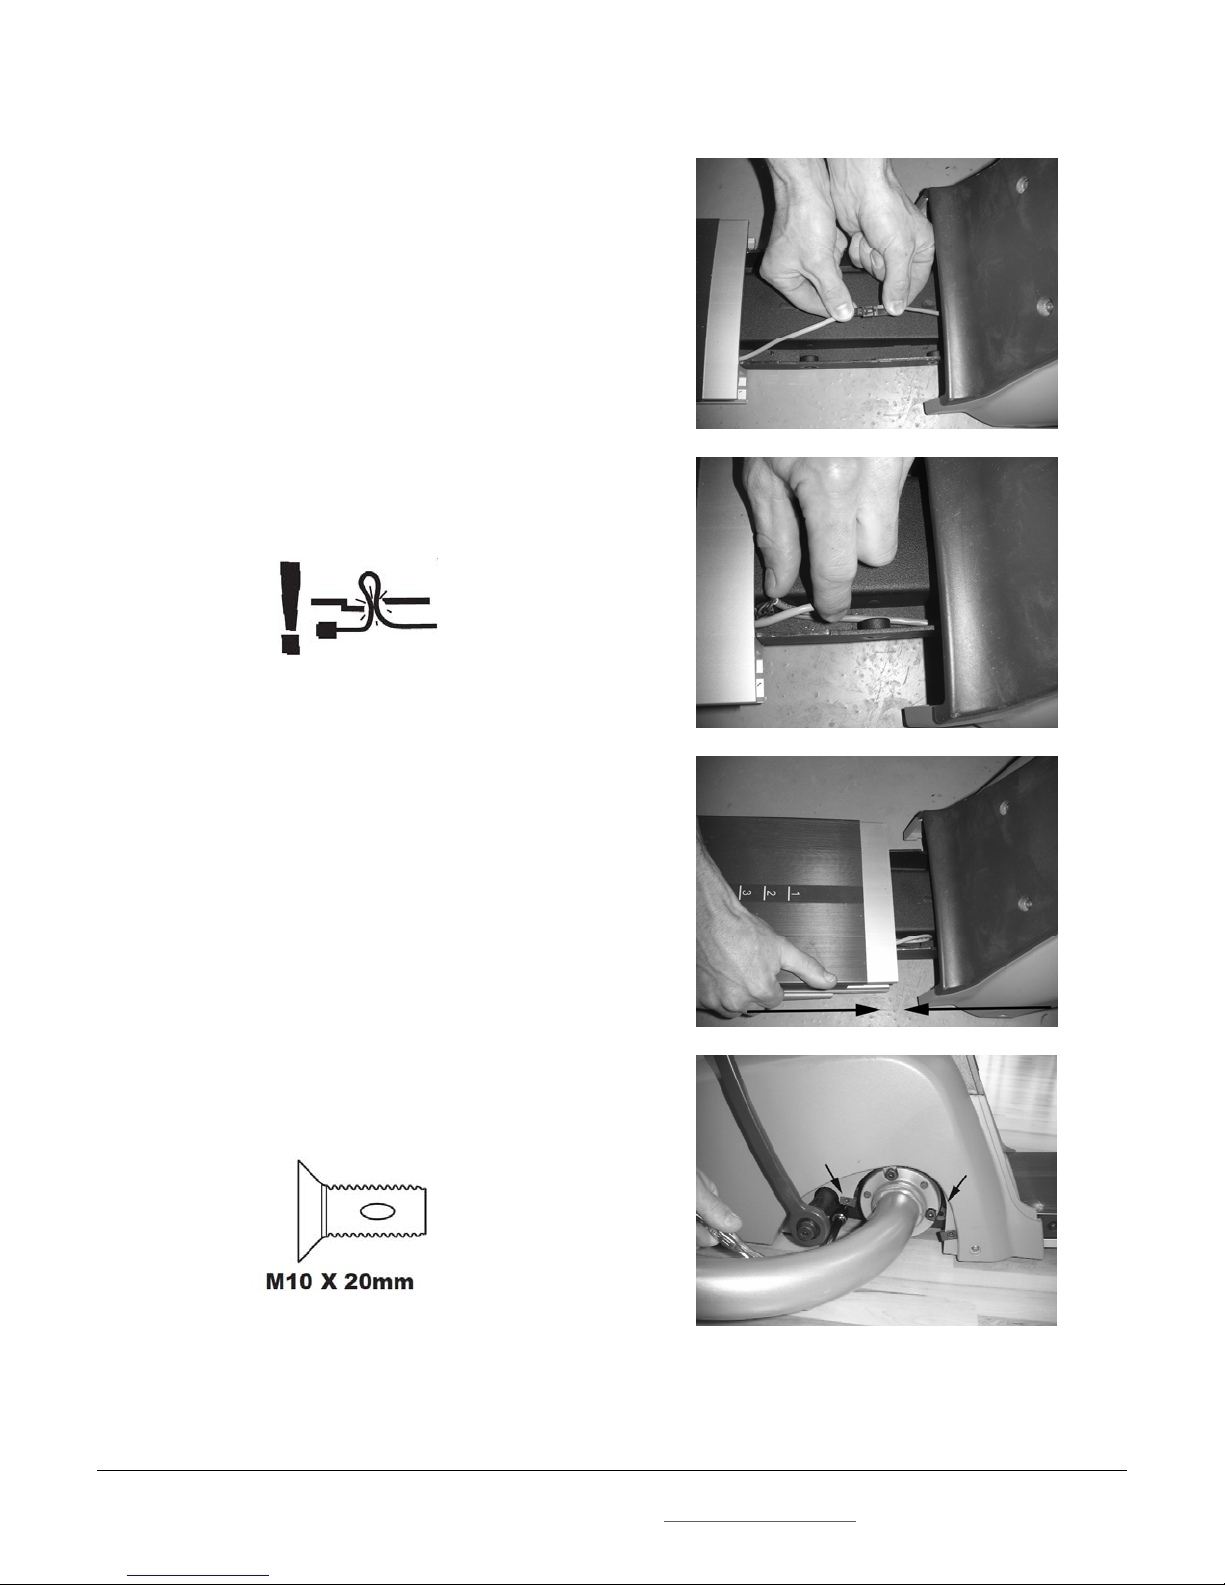
Assembly–AssemblyisrequiredonalldeliveriesoftheT4andT4RmodelsaswellastheT5ordersthat
reflect“split”intheproductdescription(ThenormalT5Nustepsshipfullyassembled).Thedrivers
mayneedtoofferthisserviceevenifthecustomerdoesnotrequestit.Ifthecustomerrefuses
assembly,NSDmustbecalledwhilethedriversareon‐sitetoauthorize.Ifthisisnotcompleted,you
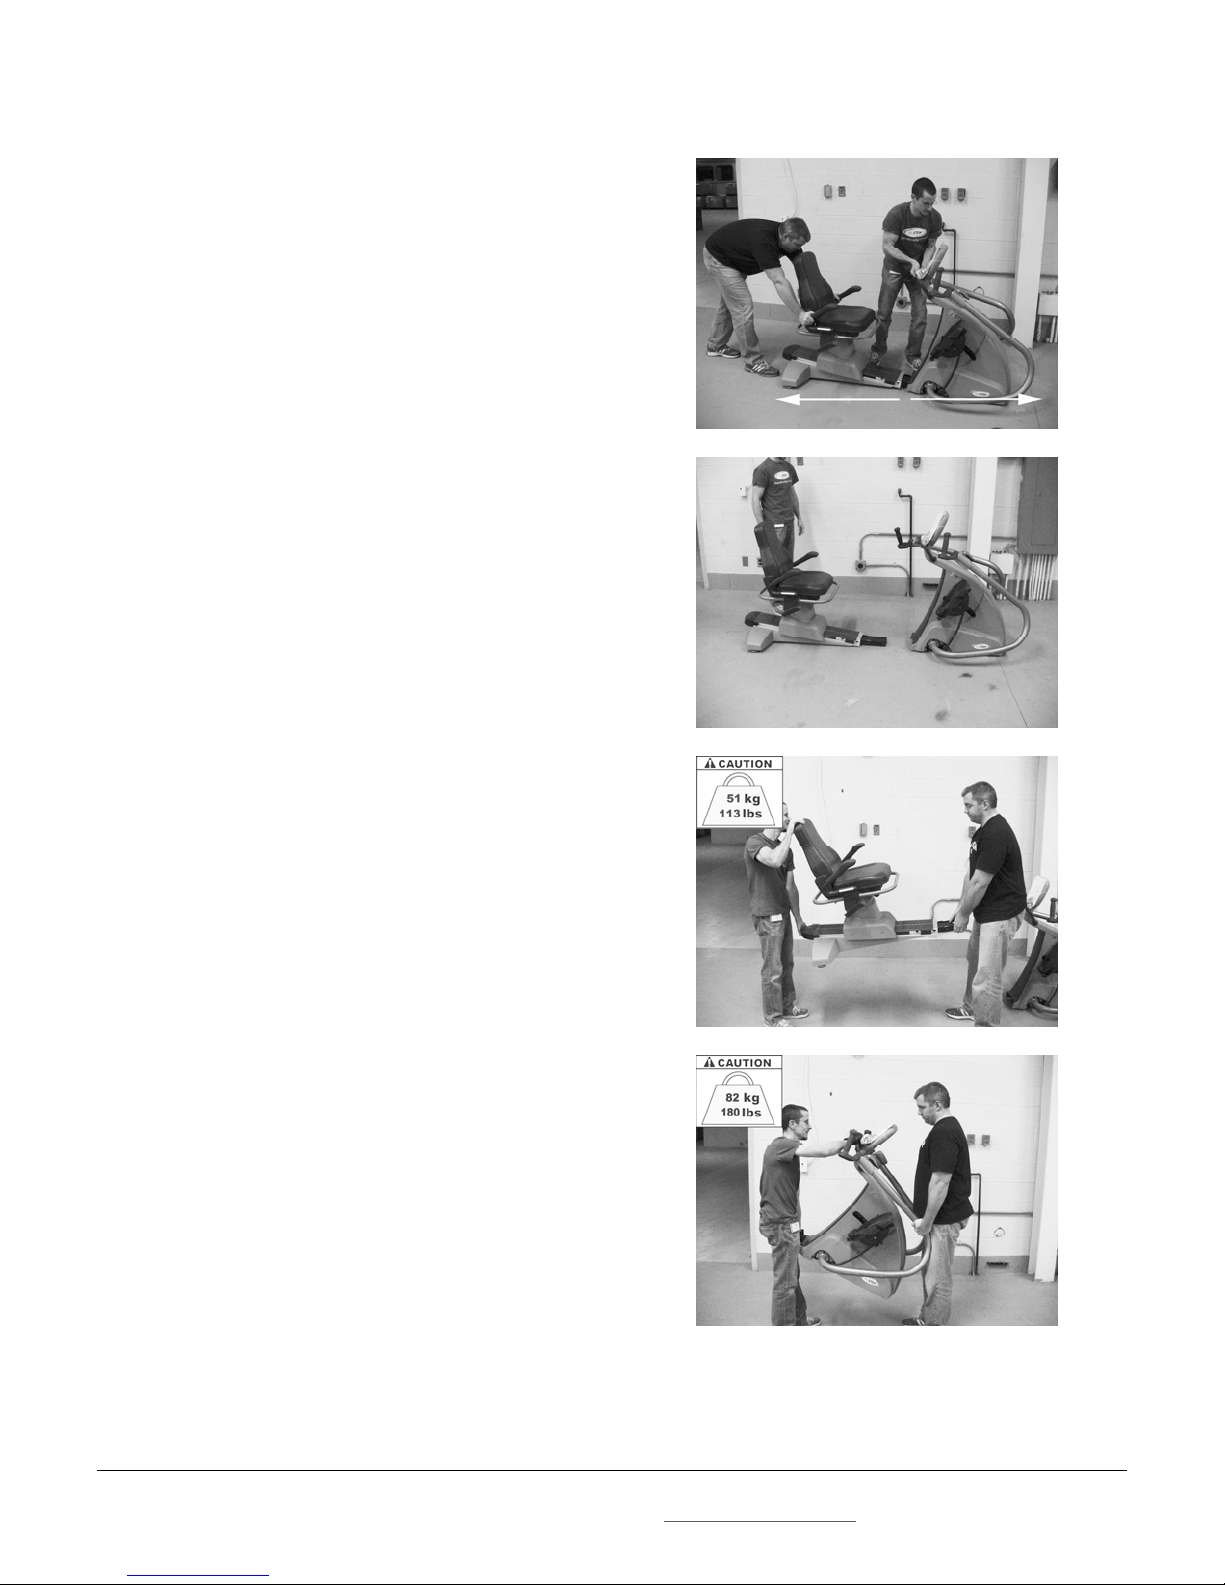
maybeaskedtoreturntothesitetocompletetheassembly.Theassemblyinstructionsareattached
andshouldnottakemorethan30minutestocomplete(ViewtheT4Rinstructionsonpages3&4,the
T5splitinstructionsonpages5‐9andtheT4instructionsstartonpage10).Anyadditionalassembly
timewillneedtobevalidatedbeforeNSDwillauthorizepayment.
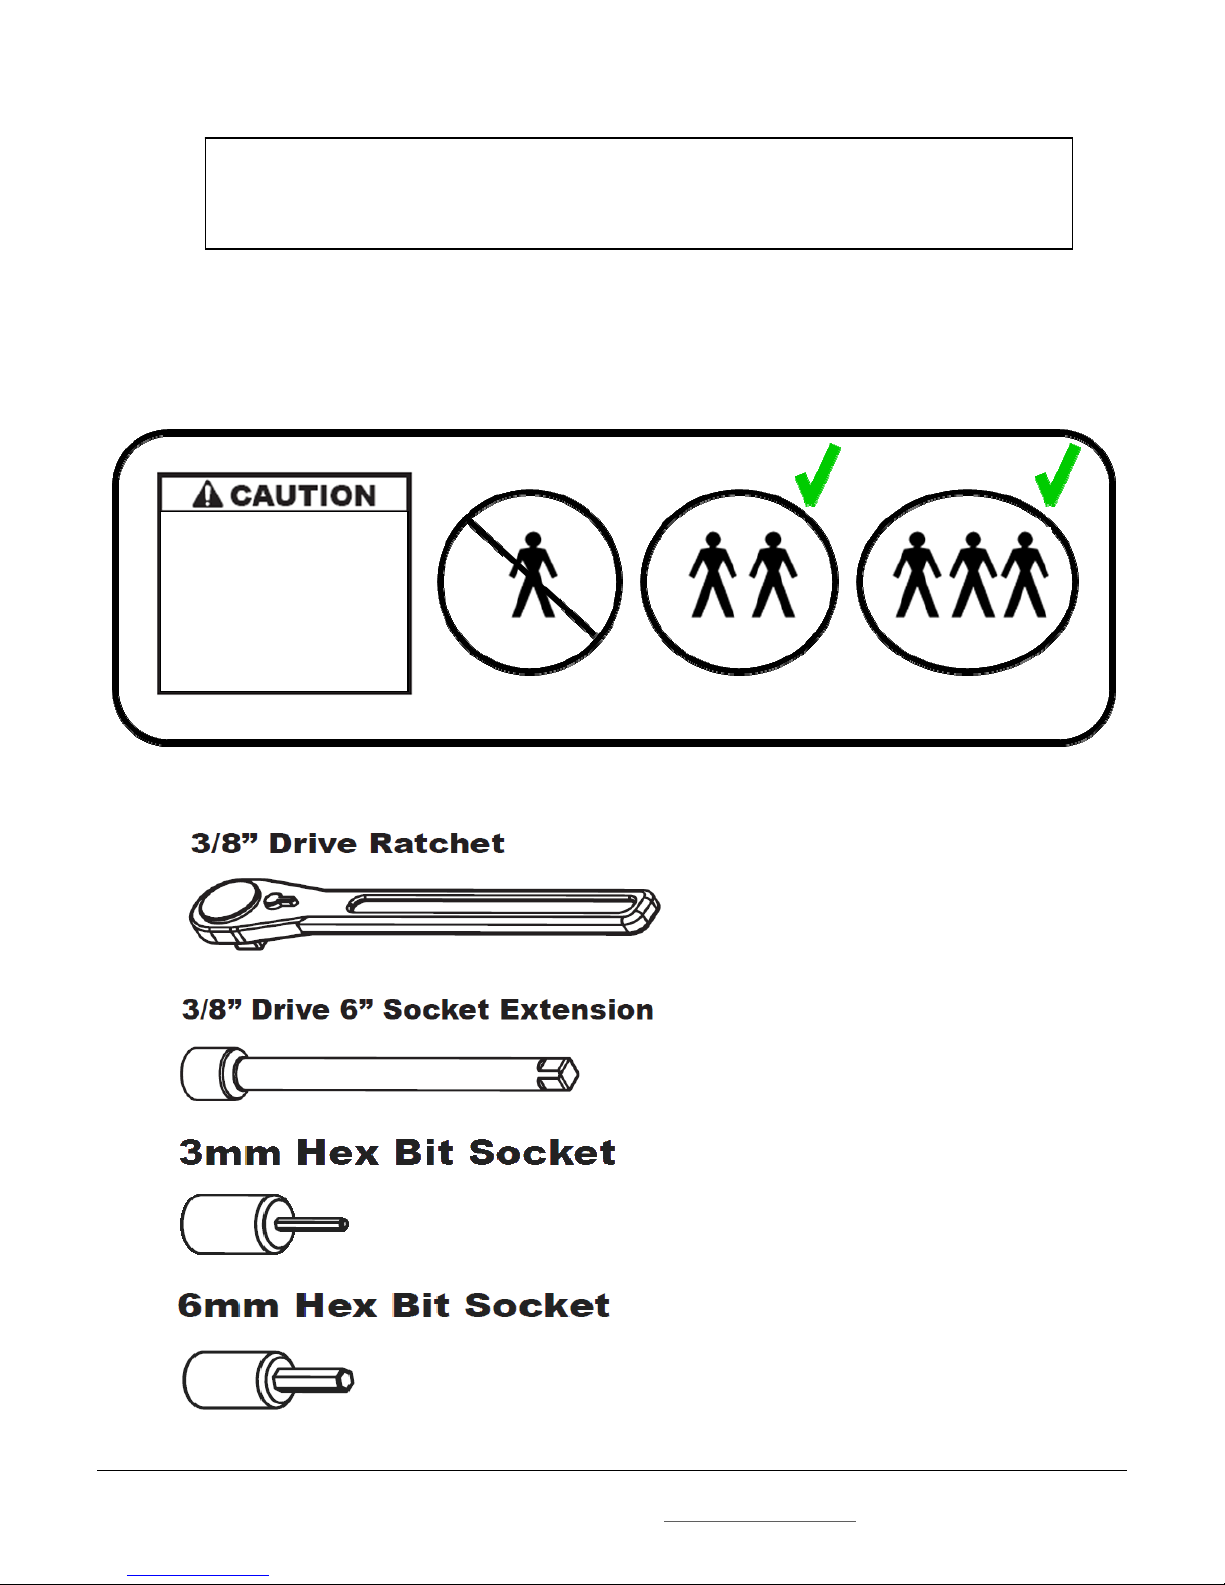
Tools–FortheT4Rmodel,a9/16”socketwrenchisneeded.FortheT4model,aPhilipsheadscrew
driverisneeded.FortheT5splitmodel,a3/8”driveratchetisneeded.Pleasemakesureyour
driversarepreparedwiththeappropriateequipmentwhenmakingthesedeliveries.
Stairs–FortheT4,T4RandT5splitmodels,NSDisexpectedtocarrythefreightupordownstairsas
requestedbythecustomer.TheT5modelthatshipsFULLYASSEMBELEDissoldasafirstflooror
TM

elevatordeliveryonly.IfthecustomerrequestsdeliveryofaT5thatitnotshippeddisassembledtoa
roomthatrequiresthedeliveryteamtocarryitupordownaflightofstairs,pleasecontactNSDwhile
on‐site.
PickupandPackaging–NSDmaypickupexistingNuStepmachineswhileon‐siteforthedelivery.The
needforthispickupwillbeindicatedbyareturnorderinthesystem.Ifthecustomeraskstokeepthe
bikeoriftheyrequestapickupthathasnotbeenenteredintothesystem,NSDmustbecalledwhilethe
driversareon‐sitetoauthorize.Ifthisisnotcompleted,youmaybeaskedtoreturntothesiteto
recovertheequipment.Onceatyourdock,pleasepackagetheNuStepwithcardboardandshrink
wrapandpalletizethefreight.Thisisexpectedtobecompletedwithin48hrsofpickup.NSDwill
sendaBOLfortheroutingfromyourdock.
AttemptedDeliveries/DetentionTime–Inordertomitigateexpenses,NSDmustbenotifiedwhilethe
driverison‐siteifthereisanydetentiontimecausedbythecustomeroranattempteddelivery.Ifthis
isnotcompleted,NSDmaynotbeabletopaytheadditionalcharges.
Delivery:
Toproperlydeliverthefreightforawhiteglovedelivery,pleasefollowthestepsbelow:
1. Whenyouarriveatthecustomer’slocation,donotusethedrivewaybutparkcurbside.
2. Haveoneofthedeliverypersonnelcompleteawalkthroughwiththecustomertoavoid
anyunexpectedobstructionsorobstaclestothedelivery.
3. Taketheproducttotheplaceofchoiceinsidethecustomer’slocationandunpackit.
4. Assembleproductperattachedassemblyinstructions.
5. LoadtheexistingNuStepbikeintothedeliveryvehicle(ifnecessary).
6. Cleanupallofthedebrisandremovefromthepremises.(Donotthrowawayat
customer’slocation.Thedebrisneedstobeloadedintodeliveryvehicleforremoval).
7. HavethecustomercompletetheNSDdeliverydocuments.
8. Thankthecustomerandleave.
9. UpdateNSDAgentconsoleandfaxthePODto703‐564‐3711within24hoursof
completionofthedelivery.
IfyouhavefurtherquestionspleasecontactyourNSDlogisticscoordinatorforfurtherclarificationat
703‐964‐9500.
Therequirementsforthisaccounthavebeenreadandagreedtothis__dayof,20__
NONSTOPDELIVERY,INC CARRIER:________________________
____________________________ ________________________________
By:(PrintName)By:(PrintName)
____________________________ ________________________________
Title:Title:
____________________________ ________________________________
Signature:Signature:

Nustep, Inc. •Venture Dr. Ann Arbor MI 48108 USA • Customer Support 800-322-4434
45580 –Instruction –T4 Delivery and Installation, Draft
T4 Installation Instructions
PLEASE READ GUIDELINES COMPLETELY BEFORE BEGINNING.
Call Customer Support with any questions at 800-322-4434.
Specifications subject to change without notice. These are guidelines that may help delivery, however, delivery personnel need to evaluate the
delivery situation and make an appropriate decision as to what the best practice should be.
2. Lift box off, cut zip ties, remove bags,
and transfer unit from pallet.
1. Using box cutter, cut box all around
just above the lower staples
3. Slide E-tube cover up the E-tube
Tools Required:
“ Socket Wrench
Box cutters
Page 1 of 2
HOLD TUBE!
4. Remove the top bolts & lock washers
with the 9/16”socket wrench from E-tube
and the mounting bracket

Nustep, Inc. •Venture Dr. Ann Arbor MI 48108 USA • Customer Support 800-322-4434
45580 –Instruction –T4 Delivery and Installation, Draft
5. Rotate E-tube away from the seat until aligned
with front set of mounting bracket holes.
6. Hold E-tube in place. Install and tighten (Qty-2)
3/8”-24 x 7/8” bolts & 3/8”lock washers with the
9/16” socket wrench to 200 ± 20 in-lb.
7. Return E-tube mounting back to rest on Covers
Stowed
Position
Final
Position
Page 2 of 2
Rotate
Ready to
NuStep!

NuStep,Inc.5111VentureDrAnnArborMI48108USA
CustomerService800‐322‐4434[email protected]m
PN51705T5/T5xr2PDeliveryInstallationGuideline,RevA
PLEASEREADGUIDELINESCOMPLETELYBEFOREBEGINNING.
CallCustomerServicewithanyquestionsat800‐322‐4434.
Specificationssubjecttochangewithoutnotice.Theseareguidelinesthatmayhelpdelivery,however,deliverypersonnel
needtoevaluatethedeliverysituationandmakeanappropriatedecisionastowhatthebestpracticeshouldbe.
Tool List
T5/T5xr2PDELIVERYINSTALLATIONGUIDELINES
CAUTIONindicatesa
potentiallyhazardous
situation,whichifnot
avoided,mayresultin
minorormoderateinjury.
(NotIncluded)

NuStep,Inc.5111VentureDrAnnArborMI48108USA
CustomerService800‐322‐4434[email protected]m
PN51705T5/T5xr2PDeliveryInstallationGuideline,RevA
1. Cut cable ties at rear, sides, and middle of unit.
2. Lift and roll unit to edge of skid with two
people minimum. (Note: Lift from base of
armrest or contact heart rate handles. Do
not lift up more than 4 or 5 inches
otherwise front covers may rub on pallet.)
3. Lift unit front end and move skid out of way
with two people minimum.
4. Remove bag with tools and installation
hardware from console.

NuStep,Inc.5111VentureDrAnnArborMI48108USA
CustomerService800‐322‐4434[email protected]m
PN51705T5/T5xr2PDeliveryInstallationGuideline,RevA
5. Separate front piece of unit from back
piece of unit by gently pulling the two apart.
6. Fully separate the two pieces.
7. Transport rear piece of unit with two people
minimum.
8. Transport front piece of unit with two
people minimum.

NuStep,Inc.5111VentureDrAnnArborMI48108USA
CustomerService800‐322‐4434[email protected]m
PN51705T5/T5xr2PDeliveryInstallationGuideline,RevA
9. Once in desired location, place two pieces
together and plug in seat position sensor
cable.
10. Tuck seat position sensor cable into frame
so it does not get pinched when
assembling.
11. Slide two pieces fully together.
12. Install two fasteners on each side of frame
just below lower arm weldments. Tighten
bolts to 300 in-lbs (33 Nm) ± 10%.

NuStep,Inc.5111VentureDrAnnArborMI48108USA
CustomerService800‐322‐4434[email protected]m
PN51705T5/T5xr2PDeliveryInstallationGuideline,RevA
13. Place lower arm flange cover over lower
arm.
14. Install three screws in lower arm flange
cover. Repeat step 13 and 14 for opposite
side lower arm flange cover.


Other manuals for T4
4
This manual suits for next models
4
Table of contents