NW Explorations Discovery User manual

NW Exploraons DISCOVERY OPERATING MANUAL | 1
Discovery
A 46’ Grand Banks Classic
Operang Manual
Edion of April 1, 2017 • Copyrighted. See noce next page.
Secon Contents
1Introducon & General Boat Descripon
2Specicaons, Capacies & Important Numbers
3Operang Checklists & Maneuvering Suggesons
4Specic Discussion of Boat Systems
5“What to Do” for Some Specic Concerns
6EMERGENCY PROCEDURES
7Index

2| DISCOVERY OPERATING MANUAL NW Exploraons
Author’s Note
Over the winter of 2006-2007 the owner of Discovery made major improvements in electronics,
replacing or adding the Radar, GPS, Ploer, Weather Staon, Hailer, and CB Radio; a Spectra
Watermaker was also added. These new units are illustrated in the secons of the manual specically
discussing them, however some of the wide-angle pictures of the boat show the old units. Thank you for
your understanding!
Copyright 1998, 1999, 2006, 2007 Joseph D. Coons. This manual was wrien for this boat’s owner and
NW Exploraons of Bellingham Washington U.S.A. by Joseph D. Coons, 25 Shorewood Drive, Bellingham,
WA 98225, telephone (360) 647-0288. All rights reserved. This manual may not be quoted, copied, or
duplicated, in whole or in part, in printed or electronic form, without express wrien consent from the
author.

NW Exploraons DISCOVERY OPERATING MANUAL | 3
Secon I: Introducon & General Boat Descripon About This Manual
Manual Objecve and Limitaons
This manual is intended to introduce you to “Discovery”, its systems and features, allowing you to operate it with the
condence and self-assurance necessary to enjoy your cruising vacaon to its fullest. It is not intended to replace a basic
understanding of seamanship, including navigaon skills, weather interpretaon or boat handling. You are expected
to have an understanding of these subjects obtained through other sources, including training, seminars, reading and
perhaps most important, experience.
There is no way that a small manual like this one can answer every queson or give you a soluon to every circumstance,
foreseen or unforeseen. If you have a queson which limits your understanding or handling of this vessel, ask your NWE
checkout skipper or contact the oce for details (you might make a list of quesons as you read the manual, saving them
all up to ask at one me).
How the Manual is Organized
The tab for each secon denes its general purpose as shown on the front page.
You will use Secon 3, containing checklists, most of all. You should have it available so that each checklist can be used
on a daily basis, even aer you are familiar with the boat.
Secon 6, regarding Emergency Procedures, is the most important, and you should read it, but hopefully you will never
need it.
Read this secon rst to learn about this manual and the general details of your boat. The other secons will tell you
most of what you need to know to enjoy your cruise to the fullest with safety and condence.

4| DISCOVERY OPERATING MANUAL NW Exploraons
General Descripon of This Grand Banks 46’ Classic
Exterior
The Grand Banks 46’ Classic is a tradional yacht design,
with berglass hull, cabin, and ybridge structures, a teak
swim grid/step, teak decks, rails, and gunwhale caps, and
stainless steel welded ngs and handrails. The window
frames are of painted wood with sliding glass panes,
while the windshield frame is of the same material.
Of parcular note are the easy walk-around decks,
enabling safe, secure passage about the boat by
passengers and crew. A roomy cockpit secon with a
storage lazaree beneath is especially useful for shing
and for handling the dinghy aer it is launched from its
davit on the stern.
On the side decks are the two fuel lls, one port-side and the other starboard. A holding tank pump-out deck ng is
located on the port side a. The water tank lls are on the port side, in the side and foredecks.
The roomy walk-around helps
keep you safe and secure. A view of the cockpit. Aft shore power
connection by door; shower foreground.

NW Exploraons DISCOVERY OPERATING MANUAL | 5
Forward on the bow deck is the anchor windlass with foot switches
allowing chain movement both “up” and “down” electrically. The
anchor is retracted into the bow pulpit which hangs out over the bow
to give beer chain clearance from the hull than otherwise possible;
this pulpit is strong and braced, easily supporng not only the anchor
during hauling but also an aending crew member if necessary. Aer
passing over the winch, the chain goes below decks via a hawse pipe in
the foredeck.
There are shore power connecons (with an adjacent fuse holder) at
both the bow and stern, selected by the shore power switch in the
electric panel; when this cable is to be disconnected, the switch
should rst be turned to the “o” posion to avoid arcing which could
damage the plug contacts. The boat’s 30-amp shore power cable is 50 feet long and stays with the boat when away from
its home dock. An addional 30-amp cable is located in the starboard bow locker.
Three steps above the a side
decks is the “boat deck”. Here
you will nd the permanently
mounted barbeque with its own
xed propane tank, as well as
a professional electric davit to
which is aached a hard- boom
inatable dinghy with a Honda
outboard engine.
Up three steps from the boat deck is the ybridge, with seang for crew and
passengers, and the upper helm staon. In addion to the helm’s instruments
and controls, the console has storage for the ship’s canvas covers and a space for
ybridge electronics. Within the storage compartments beneath the seats you
will nd a complement of life jackets (on the starboard side) and the propane
tank for the ship’s stove (to port).
Bow pulpit, windlass, & shore power connection.
The barbecue and its tank (here in their
canvas covers) are on the boat deck handy
to both the main deck and the ybridge.
In this view you can see the mast with radar
and spreader lights and forward, the Bimini.
The Deck Crane & dinghy on its davits
on the boat deck. (The outboard
was off the boat)
The ybridge has comfortable tandem
seats with storage beneath plus
a full helm station.
The L-settee on the ybridge will be
a focus for your evening relaxation
after cruising.
The electronics panel in the ybridge.

6| DISCOVERY OPERATING MANUAL NW Exploraons
Interior Accommodaons
The boat is entered by either side door, port or starboard. These doors are ed with strong deadbolt locks, and in
addion have stainless catches axed to the cabin sides to hold them open; these “hold-open catches” should be
engaged manually, not just by “slamming the doors open” to avoid damage to the catches by bending, or the doors by
banging. The doors should be closed when underway except at very low speeds in calm waters to avoid geng salt water
inside the doorways. The starboard and port door steps have storage beneath for shore power cord adapters, ashlights,
re exnguishers, etc.
Just forward of the starboard door is a professional-quality helm staon with electric switch panels adjacent and
electronics panel above; on the helm itself are the ship’s radar, and GPS/ploer. In the helm cabinet is storage for
manuals, de tables, navigaon tools, charts, etc.
A of the starboard door is the custom helm seat with three drawers and a cushioned top. Just a of this is a dry bar
with an icemaker below. A of the icemaker cabinet is ed an L-seee to starboard. Under this seee’s forward end are
stored the boat’s engine spares; in the next cabinet a under the seee is the vacuum cleaner. The seee a-end drawer
has emergency gear (see following secons). A table in front of the seee is used for dining/cocktails.
To port is the entertainment center with
sidechairs and a book/magazine rack.
Moving aft from the bar is the L-settee
with the table in front and cabinets below.
Looking forward to the helm, helm seat
with drawers, and dry bar with icemaker.

NW Exploraons DISCOVERY OPERATING MANUAL | 7
The table has storage inside it for
games, cards, and other miscellaneous
items, and below it for boles and
magazines.
To port in the salon is more
seang, with two side chairs by the
entertainment center which has a TV/
DVD and stereo system. The ship’s
manuals are in the a cabin. Forward
by the port doorway are swivel bar
chairs.
Down from the salon to port is the
U-shaped galley. It has a propane
stove/oven in the counter; a large
stainless sink on the a counter;
deepfreeze (right of sink) and a
microwave. There is extensive storage.
A storage hold is in the galley oor.
The stove burners have a push- buon
“igniters”; the oven re- quires manual
pilot-lighng (a “propane match”
galley).
The forward stateroom includes a
V-berth with insert, a hanging lock-
er, and drawers/ cabinets for crew
clothing. A large overhead hatch and
side opening portlights provide plenty of
light. Moving a from the stateroom to
starboard is a locker housing the ship’s
washer/dryer; then the forward head
compartment with its own stall shower
and Vacu-ush head and basin with van-
ity. Both the stateroom and head have
oor storage holds.
The a (master) stateroom is down a
few steps from the port end of the salon.
Forward to port in this stateroom is a
head compartment with toilet, sink/van-
ity, and numerous cabinets and drawers;
to starboard opposite in the cabin is the
stall shower. Between these two com-
partments are a huge hanging locker for
clothing and the salon passageway. There
is a queen-sized island berth, beneath
which are drawers including a spacious
chart drawer. To each side of the berth
are tables with cabinets beneath, as well
as storage lining the vessel’s exterior
walls on each side. A dresser is a to port
beneath the emergency exit hatch.
The rest of the galley itself: The stove,
cabinets, and the double-door fridge.
In this galley picture you see the
microwave,the sink, glass rack, and un-
der the hatch to right, the built-in
deep freeze and dish racks.
The forward stateroom berth.
This gives you an idea of the ne
cabinetry and copious storage
throughout the boat.
The fwd S/R hanging locker.
The Master Stateroom aft has a walk
around queen berth with
tables on each side.
The washer & dryer

8| DISCOVERY OPERATING MANUAL NW Exploraons
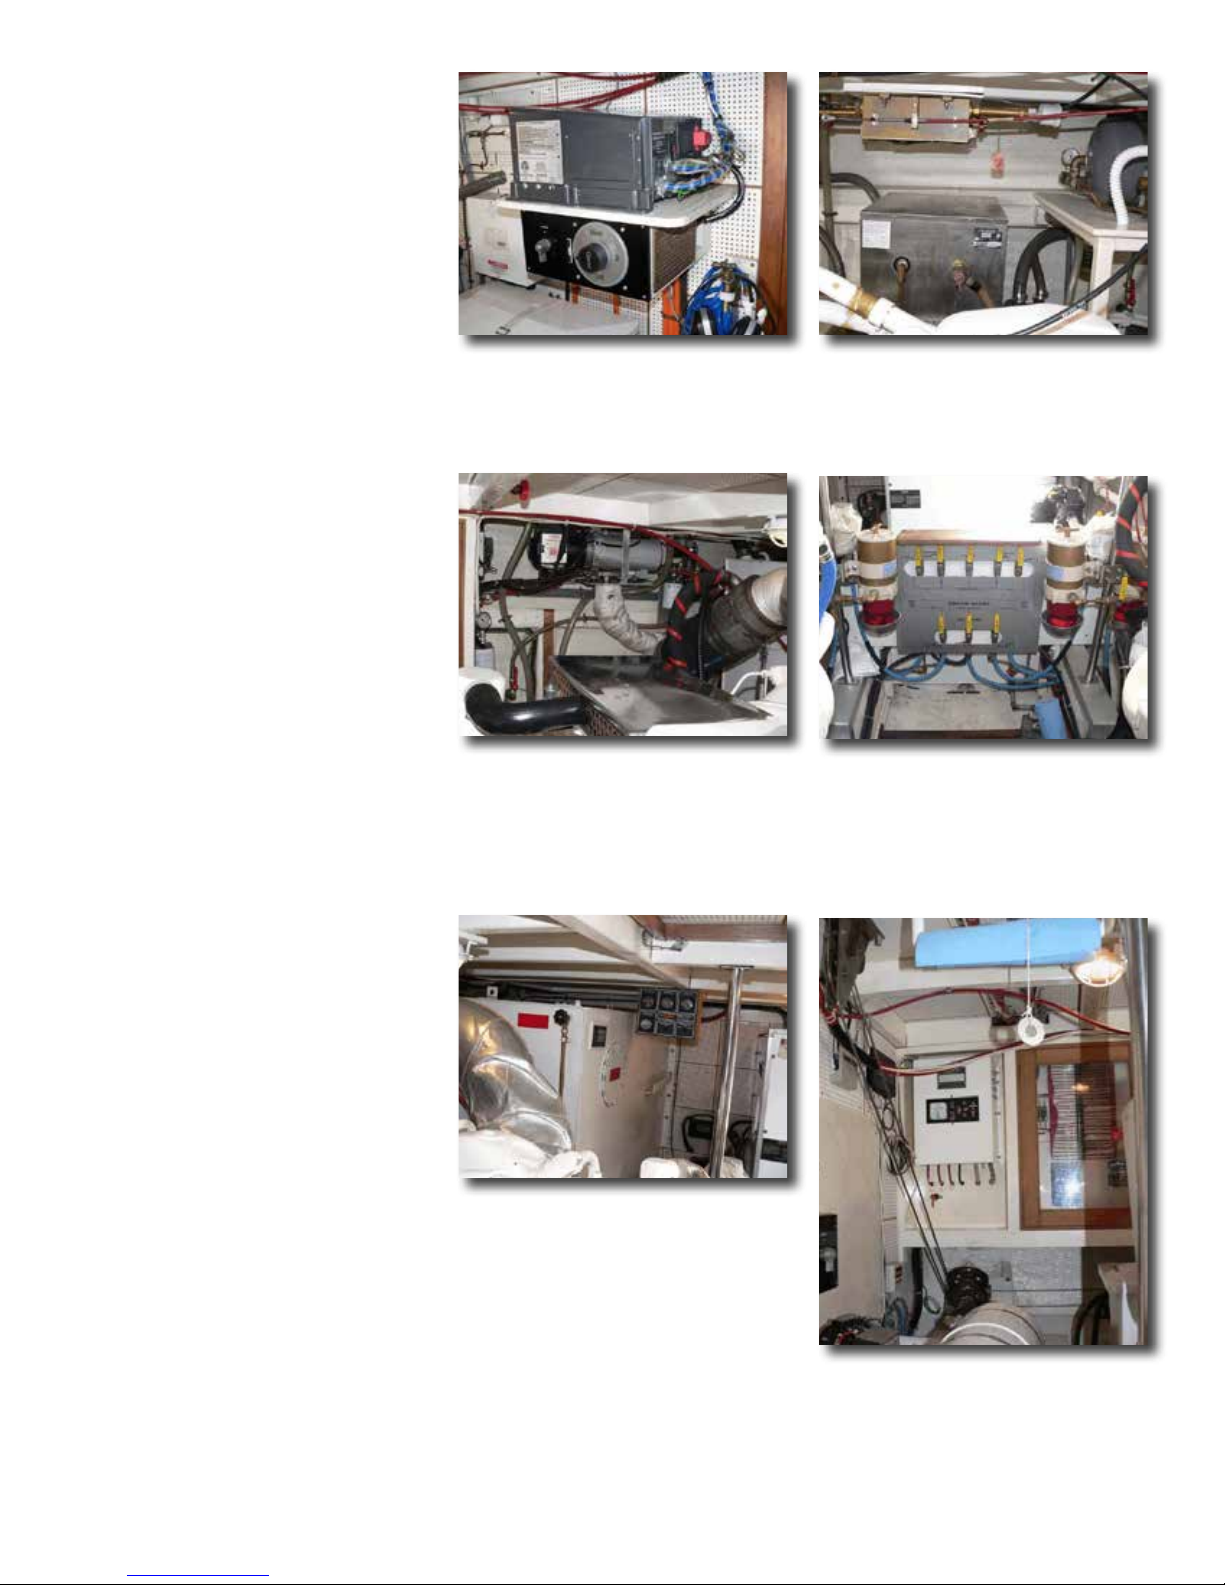
Engine Room
Preferred access to the engine room
is through the oor hatch by the
entertainment center in the salon.
Engine room lighng is turned on by a
breaker in the ship’s DC power panel.
The engines are to each side, while
forward of the engines are their sea
strainer/seacocks, the sea strainer for the
refrigeraon system, the vacuum pump
for the forward head, lters for the
watermaker. On the forward bulkhead
of the room are wiring terminals and
the ship’s inverter. Outboard of the
engines to starboard are the ship’s
furnace, watermaker, and two baeries;
to port are the fresh water pressure
pump and accumulator tank, the water
heater, refrigeraon compressors, and
two more baery boxes.
Just a of the engines outboard are
the two fuel tanks, with sight gauges
for fuel levels (the valves at each end
of the gauge for safety must be opened
for a tank reading). A of the engines
midships is the Northern Lights
generator in its sound shield; and to
each side of it are the main engine
Racor primary fuel lters. To starboard
of the genset are the oil change pump
and a set of controls for the genset.
To port of the genset is its sea strainer
and Racor, the a head vacuum pump
and accumulator tank, and the genset
muer. The engine shas lead from the
transmission couplings through the
hull via virtually maintenance-free sha
logs/packing glands. Just forward of the
genset midships is a fuel manifold panel
(which requires no operaon under
normal circumstances) and beneath the
genset is one of the ship’s two water
tanks; the other is forward.
Right over the middle of the port engine.
The water pressure accumulator tank
to right (the refrigeration compressor is
forward of it), thewater heater, and the
synchronizer unit.
Forward, just to port: The inverter above
its battery switch. To right, a water
faucet. To left, the refrigeration control
box, and underneath a battery box.
In the center aft engine room you
see the white genset box; the fuel
manifold with its valves, and the fuel
lters for each engine. The genset
battery is outboard of the port engine.
Looking over the top of the starboard
engine aft of the wiring panel: we see
the heater system and its various
hoses. Note the asbestos-wrapped ex-
haust going out the starboard side:
we talk about this under “Furnace”
later in this manual.
Looking to starboard at the forward
end of the engine room. You see the
battery switches (foreground) a head
systen vacuum pump, the battery
charger and the wiring panel,
and the steering cables.
Looking aft of the starboard engine
there is the starboard fuel tank with
its sight gauge; a set of generator
controls, and the sound shield
around the generator.

NW Exploraons DISCOVERY OPERATING MANUAL | 9
In the engine room is a supply of extra lube oil, baery water, spare parts, oil pads, etc.
Dinghy
The boat is equipped with a 10’ AB RIB-inatable dinghy with 15hp Honda 4-stroke outboard motor, fuel tank, pump and
oars.
Deck Equipment
The boat has mooring lines; a stern/shore line at least 200’ long; an appropriate all-purpose anchor with at least 360’ of
all-chain rode plus an emergency anchor with chain and rope rode; fenders/bumpers; four deck chairs; an ice chest; a
crab pot or ring with line, oat, and bait rigging; a hose for fresh water tank lling and boat washing; and a boat hook.
Safety Equipment
This vessel is equipped with three fire exnguishers, one each in
the forward stateroom and a stateroom and another in the port
interior side door step; a ship’s bell; ares; an appropriate supply of
life jackets; and VHF radio. Charter clients with children under 90
pounds should bring appropriate life jackets for them.
An engine sea strainer. See the long
yellow handle on the right? The “T-knob”
referred tolater in this manual is hidden
on the opposite side of the strainer.
Look just aft of the fuel lter: See
the loop forming the dipstick handle?
You can also seethe coolant cap clearly
atop the tank. The black “bump”
just left of the coolant tank is the
emergency stop button.
The port engine. Note the coolant tank
on the forward upper end; the yellow
“can” is the secondary fuel lter.
The white knob on the front end
is the fuel priming pump.
On the aft side of the aft ybridge rail is the lifering,
easily accessed from either the ybridge
or the boat deck. A second lifering is located behinfd the
seat on the ybridge settee.

10 | DISCOVERY OPERATING MANUAL NW Exploraons
Secon II - Specicaons, Capacies, & Important Numbers
Vessel Name:
DISCOVERY
Vessel Ocial Number: 1048488
Vessel Registraon Number: WN7999RF FCC
Ships License Call Leers WDD 7445
Hull ID Number GNDF0169E595
Capacies:
Sleeps four: Two in each stateroom
Fuel: 700 Gallons in two 350 gallon tanks
Fresh water: 290 Gallons in two tanks
Holding Tank: 30 Gallons
Dimensions:
Length:
47 feet 1 Inch (Including bowsprit and swim step)
Beam:
14 Feet 9 Inches
Dra: 4 Feet 5 inches
Displacement: 39,000 Pounds
Fluids:
Motor Fuel: #2 Diesel
Motor Oil, mains: 15W-40 Chevron Delo Mulgrade
Transmission Oil: 30W Chevron Delo Single Grade
Engine Coolant: 50-50 mix, ethylene glycol and water; corrosion inhibitor added
Operang Parameters:
(all esmated)
1700 RPM 8.5 knots 8.0 GPH
2000 RPM 11.8 knots 14.0 GPH
2400 RPM 15 knots 24.0 GPH

NW Exploraons DISCOVERY OPERATING MANUAL | 11
Secon III: Checklists & Maneuvering Suggesons
Operang Checklists: Discovery
First Thing Each Day:
• Check engine oil, coolant.
• Check under-engine oil pads. Okay?
• Check fuel tank levels (open valves on top/boom of sight gauges to check them!)
• Check holding tank indicator in a head. Need pumping?
• Turn o anchor light if illuminated.
Starng Engines:
• All lines clear of propellers and on deck.
• Items running on AC evaluated vis-a-vis the Inverter and Generator.
• Baery selector switch to “House”.
• Throles retarded to idle, shi levers in “neutral”.
• Stop solenoid switch “On”.
• Engine power switches “On”, start engines in turn.
• If engines do not turn over, see “What to Do If”.
Leaving Dock: (Only 3-4 minute engine warmup required!)
• Shore power switch “O”.
• Shore power cord removed, stowed on board.
• Step stool aboard, if used.
• Lines removed as appropriate.
• Fenders hauled aboard and stowed.
• Lines and other deck gear secure/stowed.
• Doors and hatches closed and secured as appropriate.
Underway:
• Helmsperson on watch at all mes.
• RPM under 1400 unl engines warm to 140°; RPM never to exceed 2400 RPM.
• Wake eects always in mind.
• Synchronizer “On”.
Approaching Dock:
• Fenders out on appropriate side.
• Bow line OUTSIDE stanchions and bloused around toward midships.
• Engines dead slow, wheel centered for engine-only maneuvering.
• Mate ready to secure stern rst (in most circumstances).
• Synchronizer “O”.
• Trim Tabs Up (“Bow Up”)
Arriving at Dock in Marina:
• Trim Tabs Up (“Bow Up”)
• Lines secure, including spring lines.
• Step stool out, if needed.
• Baery switch to “House” posion.
• Water heater breaker o unl Inverter current seles (see “Inverters” below).
• Shore power connected, shore power switch “On” to appropriate power locaon.
• Shore power conrmed on meters, Inverter “On”.
• Electric use monitored for current capacity of shore facilies.

12 | DISCOVERY OPERATING MANUAL NW Exploraons
Arriving at Mooring Buoy:
• Trim Tabs Up (“Bow Up”)
• Skipper puts starboard end of swim step, with mate on it, next to buoy.
• Mate loops 20’ or so line, such as bow line, through buoy ring.
• Mate holds two ends together, walks up side of boat to bow of boat.
• With buoy held close to bow, line secured to each bow cleat through hawsepipe.
• Generator running if required.
Mooring at Anchor:
• Anchor is lowered from pulpit while boat is backed up slowly away from anchor.
• When desired chain length out (4:1 or 5:1 scope), windlass is stopped.
• Engines reversed for “count of ve” unl chain pulls up virtually straight. Note: The boat is not held in reverse
against a taught anchor chain!
Generator Starng/Stopping:
• Hold “Preheat” switch for 15 seconds, thenboth “Preheat” and “Start” unl starts.
• Check port side exhaust for water ow.
• Aer one minute for warmup, turn power selector from “O” to “Gen”.
• Stopping: Turn power selector from “Gen” to “O”, wait one minute for cool-down.
• Hold “Stop” switch unl stopped.
Overnight Checklist in Marina:
• Shore power “On”.
Overnight at Anchor or Buoy:
• Anchor light “On”.
• DC electrical items all “O” including radios, extra lights, etc.
Upon Arising:
• Start generator for baery charging.
• Turn on heat if necessary.
• Go to top of this Discovery checklist.

NW Exploraons DISCOVERY OPERATING MANUAL | 13
Maneuvering & Operang Suggesons
Docking & Undocking
Usually it’s easier to dock bow in. Have your mate
at the side rail opening, ready to step o and secure
the stern line, against which you can pull to swing
the bow in toward the dock. By having your mate
ready to disembark when close to the dock, he/she
will not have to jump to the dock, risking a turned
ankle or falling overboard. It is the skipper’s job to
put the boat next to the dock so the mate needn’t
jump, but merely step o!
Approaching a dock, have fenders out as required
and have the bow line already rigged, passed through its hawse pipe, and draped back on the side of the boat between
the stanchions so it can be reached from the dock. Never put a line from a cleat over a rail: the boat’s weight will bend or
break the rail if it pulls against the line! When the mate’s ashore, the line can be easily reached!
If dock clearance permits, spring the boat forward so that it pulls forward on the stern line. This will bring the stern close
to the dock. Let the bow line out enough so that the boat can rest against the stern and midships fenders.
Maneuvering in a Harbor
With its twin screws, you’ll do best if you center the rudder and steer with the engines only! The props are so large that
the boat will respond well except in high winds just with use of the propellers in forward and/or reverse. Take your me,
and keep the boat running “dead slow” so that you can plan each approach. You shouldn’t need to use the throles at
all.
Using the Synchronizer
The Glendinning Synchronizer exactly, automacally synchronizes the engines. To engage it:
1. Set the engines to the approximate cruise sengs;
2. Push the switch on the engine alarm panel (the pilot light will go on);
3. Push the “Slave” control all the way forward (This will save stress on the synchronizer as it adjusts the slave
engine’s speed). You now control the speed of both engines with the “Lead” engine.
To disengage the synchronizer:
1. Pull back “slave” lever unl you feel resistance;
2. Push in the switch. The engine throles are now once again independent.
Note: The synchronizer will automacally disengage if an engine cannot be synchronized. For this reason, it cannot
reliably be used if both engines are throled back to idle.
Filling the Fuel Tanks
With the large fuel tanks, you can fuel the boat prey fast using a standard hose and nozzle (like those on auto gas
pumps). Fuel each tank, taking the hose around the fore-or-a deck to get to the outside ll pipe (do not drag the hose
over the decks or teak handrails have someone help you handle it). Fill both the tanks completely but do not spill fuel!
Control the ow rate by sound, as the ll pipes make the characterisc “geng to the top of the bole” pitch change
when the ll pipes begin to ll aer the tanks themselves are full. (The tank vents will gurgle before the tanks are full, so
when the vents begin gurgling, slow down unl you hear the ll pipes’ pitch change.)

14 | DISCOVERY OPERATING MANUAL NW Exploraons
Anchoring
Anchoring can be accomplished safely with minimum fuss if you are prepared. Or, if you are not ready, it can be stressful
and dangerous for you or the boat.
Before aempng to anchor, select an anchorage with a so boom such as sand, mud, or gravel, if possible. Look
at the charts and cruising guides for ps on good locaons. Then, choose the spot in the anchorage where you have
room to “swing” on the anchor without disturbing other boats. Remember, responsibility for leaving room goes to each
successive boat to arrive, for the rst boat has priority in the anchorage!
Here in the Northwest, because of the deep waters, all-chain rodes and small bays, we anchor a lile dierently than in
the Gulf of Mexico or Caribbean, for example. First, except in severe weather we use anchor chain scopes of only 4-to-1
or 5-to-1. For example, in water that is 40 feet at low de in the typical anchorage, we might use 160 feet of chain unless
the weather was to be gale force or greater winds.
Second, because of the small bays and steep booms, we oen rig a shore line from the stern of the boat to shore. The
best example of this would be at Todd Inlet at Butchart Gardens. Here is a bay that can accommodate 8 - 10 boats, yet
it is only about 150’ wide and 200’ long! Boats aach their bows to the mooring buoys or, in a few cases, anchor; and
then their sterns are secured to rings provided in the steep clis overlooking the bay. Boats are thus perhaps only 15-20’
apart, side to side.
Third, boats oen will “ra” side by side in busy marinas, although this is not very common.
Fourth, courteous boaters will call vessels coming into busy bays and oer to let them ra to the same buoy, if signs on
the buoys do not limit usage to only one boat depending upon length.
Anchoring safely requires two persons, one at the helm maneuvering the boat and one on the bow operang the anchor.
Pung the bow of the boat over the spot where the anchor is to be placed aer checking the depth on the depth
sounder, the windlass foot-switches are used to lower the anchor slowly toward (but not onto) the boom, by watching
the chain markings.
The anchor chain on Discovery is 360 feet, with distances from the anchor marked as follows:
50’ Yellow 200’ Red
100’ Red 250’ Yellow
150’ Yellow 300’ Red
When the anchor is about to reach boom, the boat is backed away by pung the engines into reverse for 5 seconds:
eddies from the chain indicate moon. Resume lowering the anchor while driing backwards (watch the eddies and add
another burst or reverse if necessary!) unl the desired amount of chain is out. Stop paying out chain. Engage reverse
for ve seconds at a me unl the chain starts to pull straight o the bow toward the anchor. A straight chain indicates a
“set” anchor!
NEVER pull on the chain for more than ve seconds, and never at any engine RPM other than idle! Pung the boat’s
weight plus its horsepower on the chain forcefully even at idle will bend the anchor and/or damage the mooring gear!
If while checking the set, the chain rumbles and clunks, and seems to release in bursts, it means you’re anchoring on
a rocky boom and the anchor is not holding. Be paent: it may not set on the rst try, and you’ll have to repeat the
process somemes to get a good “bight” on the boom.

NW Exploraons DISCOVERY OPERATING MANUAL | 15
Shore Lines
When a shore line is required,
anchors are set 75 - 100 feet from
shore, with the boat backing toward
shore during anchor-seng. The
stern line is put around a tree, and
brought back to the boat.
During this process, be sure to
keep clear of rocks near the shore,
and allow for our Northwest des,
occasionally twelve feet, and
somemes 20 feet when further north! Check the present de, and high and low des before beginning anchoring: No
sense anchoring in 15 feet of water if you’re at the “top” of a 15 foot de!
To get to the shore, you will need to have a dinghy down, and then have your mate keep the boat’s stern toward shore
with short bursts of reverse gear. Somemes a helpful boater already anchored will help you by taking your line to shore
for you with his dinghy, a neat “good deed” that you might reciprocate. We’ve met some nice boaters this way!
The shore line is in the lazaree, and is long enough to usually allow taking it to a tree, around it, and back to the boat
so you don’t have to go ashore to une when leaving. With a crew member keeping the boat in posion, take the dinghy
to shore pulling the end of the shore line with you. Pass it around a tree, and pull it back to the boat if you can, since
then to get away in the morning all you have to do is release the bier end from the boat, and pull it aboard. Pull the line
ght, as long as you’ve got over 100’ total of line out: there is plenty of sag/stretch, and we want to keep the boat in its
area! If necessary, put a crab pot oat or fender on the line to warn others it’s there!
Here is a sketch of a properly anchored boat with a shore line (In this drawing, S=Scope, which should be at least 4 x DL,
the Depth at Low Tide):
Trim Tabs
The boat is ed with a set of Benne Trim Tabs. These are wide “aps” aached to the a end of the boat, under the
swim step at the trailing edge of the hull, operated hydraulically under the control of the skipper by rocker switches at
each helm staon.
At low speeds, up to approximately eight or nine knots, the tabs do lile, and should be le in the “Bow Up” posion
(see below). But at speeds over this range, the tabs begin to take eect and will help the operator lower the bow for
more ecient cruising.
The best way to adjust the tabs is to lower them while watching the “Speed” indicator to get the highest speed at a
given throle seng by adjusng “Bow Down”. If the tabs are “Bow Down” too much, the steering will get mushy and
speed may drop o a lile, and the tabs should be adjusted “Bow Up” a lile. Note that it will take me to make these
adjustments; when the buons are depressed, they need to be held 2-5 seconds each me for change to be felt and
observed (the best way to see the eect of the tabs is by the knot meter and by observing the height of the bow relave
to the horizon).
Because the trim tabs are so large, they must be in the fully-bow-up posion whenever the boat is to be operated in
reverse, otherwise the great water forces against the tabs may damage them severely, even tearing them o the hull!

16 | DISCOVERY OPERATING MANUAL NW Exploraons
Secon IV: Specic Discussion of Boat Systems
This secon of the operang manual will discuss each of the boat’s systems in turn. The systems and major components
discussed are grouped and in order as follows:
• Main Engines & Sea Strainers
• Dinghy, Davit & Outboard Motor
• Fresh Water System
• Electrical-AC
• Electrical-DC
• Generator and Inverter
• Heads and Holding Tanks
• Heang System
• Galley Equipment
• Navigaon Equipment
• Radios
• Radar
Main Engines & Sea Strainers
The main engines on the boat are two Caterpillar 3208TA Diesels, each producing a maximum of 375 horsepower.
These extraordinarily-reliable, rugged machines are the top-of- the-line, and can be expected to give you trouble-free,
economical cruising.
On engine start, no long warm-up is required! Three or four minutes is sucient, then load the engines by pung the
transmissions in gear. Do not run them over 1400 RPM unl the temperature gauges read at least 140° Fahrenheit. Do
not run the engines for long periods with the transmissions in neutral, with no load!
The engines require a regular, daily check, since once underway, you will probably not check them while in use, tucked
away as the are beneath the cabin oor. Please perform this check each morning (when the engine room is cool!):
• CHECK THE OIL. The oil level should be between the two marks on the dipsck. The dipscks are located on
inboard side of each engine, toward the forward end of the engine itself, and the sck “pulls out” upward. Use
a paper towel from the roll on the forward bulkhead, wipe the sck, reinsert, guiding the sck with the towel to
keep from bending it, and take reading.
The distance between the two marks is about 1.5 quarts. Add only enough oil to bring it up above the “add”
mark, say a quart, using the oil provided on the boat. (If you need more oil, buy it! We will reimburse you.) The
oil ll on each engine is a T-handled stopper cap in the top of one valve cover on each engine. Loosen the T
handle by turning it one or two turns and remove. Aer reinserng, be sure to ghten the cap, but do not over-
ghten.
• DO NOT OVERFILL the crankcase (above the “full” mark), as these engines will quickly waste excessive lubricant.
If oil is required oen, check under the engine carefully to be sure there is no oil leak, and if there is, have it
corrected promptly.
• CHECK THE COOLANT LEVEL. The heat exchanger coolant tanks are located on the forward end of each engine,
with caps on the top. Remove the cap by turning; you will have to press the cap down and turn it past the
second detent to get it o. Put a nger into the tank; if it gets wet before it hits the bae inside the tank, there is
enough coolant.
If coolant is needed, determine if there is any sign of a coolant leak under the engine, and if there is, do not run
the engine; if no leak, add coolant to the tank from the jug of pre-mixed anfreeze/corrosion inhibitor/water
supplied on the boat.

NW Exploraons DISCOVERY OPERATING MANUAL | 17
• VISUALLY INSPECT THE ROOM whenever you’re in the engine room, asking yourself, “Does everything look
right?”. Look at the pads under the engines and transmissions: while some drips are normal, there shouldn’t ever
be substanal accumulaons of any uids!
• CHECK THE SEA STRAINERS ONCE A WEEK, or immediately if either engine runs “hot”. The engine strainers are
in the forward end of the engine room bilge. The refrigeraon sea strainer is just forward of them. The generator
sea strainer is between the engines. To check a strainer, shine a ashlight through it. While some “fuzziness”
from trapped thin growth is normal, you should see the light clearly on the other side; if obscured, you should
clean the strainer. See below.
• CHECK THE TRANSMISSION OIL LEVEL once every two weeks, more oen if a transmission shis erracally, with
the dipsck on the starboard side of each transmission. It is unlikely that any oil will need to be added. Be sure to
check under the transmission for leaks! Low transmission oil is a serious maer.
With the engine idling, remove the transmission dipsck. Wipe it with a towel, reinsert it, and take a reading.
If the level is below the add mark, stop the engine, add a pint of the same oil used for the engine crankcases
through the plug in the top of the transmission case, and then start the engine and measure again. Do not over-
ll, for to do so could cause the seals to “blow out”.
These CAT engines are red-lined at 2800 RPM. Maximum cruise is 2400 RPM. However, the realies of vessel hull design
and powerplant engineering dictate that higher RPM operaon is very inecient on semi-displacement vessels like this
one, so you will nd these operang specicaons to be true (gallons per hour, speeds, and naucal miles/gallon are
esmates):
RPM Gallons per hour,
Total both Engines* Speed, Knots* Naucal Miles
per Gallon*
1400 5.0 8.00 1.6
1600 7.0 9.00 1.29
2000 14.0 11.8 .84
2400 24.0 15.0 .625
As you can see, each extra knot is very expensive once you have passed “displacement speed” on the vessel hull; this is
not a “planing” boat! It is sensible to operate the boat in the 1600-1800 RPM range, and you’ll enjoy quieter, more pleas-
ant cruising and economy, too!
Sea Strainer Cleaning and Seacocks
The engine, generator and refrigeraon cooling systems from water-borne debris which might block internal equipment
passages. If a sea strainer needs cleaning (see above regarding inspecon) here is the procedure:
1. Look at the base of the strainer near the hull. On one side is a valve lever with a relavely long handle; on the
other side is a “T”-shaped knob. Loosen the T-knob two turns. The valve itself may begin to “weep” sea water, do
not be alarmed.
2. Turn the longer valve lever so it is perpendicular to the sea strainer (parallel to the hull).
3. Tighten the T-handle; the weeping will stop.
4. Using the same spanner you use for the fuel and water tank deck caps, unscrew the top of the sea strainer. Then
remove the strainer by pulling it out the top of the assembly. Rinse the strainer thoroughly and, if necessary,
remove any debris from the glass housing.
5. Reinsert the strainer, ghten the top cover with the spanner, AND TURN THE VALVE BACK ON — failure to do so
will overheat the engine. BE SURE TO TIGHTEN THE T-KNOB ON THE VALVE SO IT IS SECURE.
This enre operaon will take 5-10 minutes at most, and will assure you of cool engines.

18 | DISCOVERY OPERATING MANUAL NW Exploraons
Alarm Warning and Windshield Wiper Control Panel
The alarm lights will warn you if the alarm is caused
by high temperature or low oil pressure; a pilot light
is also here to remind you if you le the engine
room lights “on”.
Above the helm is the windshield wiper and engine
alarm panel. The three wiper switches control the
individual wipers: push to wash the windows, turn
to engage wipers in steady or intermient modes.
On the ybridge alarm panel, there are no wiper
controls but there are remote engine start and
stop buons, as well as a horn buon and remote
windlass control.
Dinghy, Davit & Outboard Motor
Dinghy
The dinghy aboard this boat is a hard-boom inatable, designed to carry up to six passengers safely, with four sharing
the seats and one on each side seated on the dinghy’s pontoon. For safety, and compliance with U.S. rules, there should
be a life jacket aboard the dinghy for each passenger aboard whenever the dinghy is at sea.
Please be careful when pulling the dinghy ashore on beaches to minimize damage and scratches to the boom. It can
be lied by two persons if one is on each side. Don’t “Ram” the beach; you can bump up to the beach gently and step
ashore over the bow, pulling the dinghy a lile more ashore as each person o-loads. Don’t forget to raise the outboard
when the boat is beached!
The dinghy will seldom require inaon as long as the valve seals are maintained and it is not punctured. Should inaon
be required, simply pump up the dinghy unl it is prey hard (thumb can deect a tube by about ½» maximum) using
the pump provided on the boat.
Should the dinghy be punctured and you feel competent to make the repair, follow the instrucons in the dinghy manual
and use the dinghy repair kit also on the boat; otherwise, have it professionally patched at NW Exploraons or a dealer.
Dinghy Davit
This boat has a high-quality electric davit supporng the dinghy. To use it,
1. Plug the davit control box found in the starboard salon door step into the
receptacle (under the yellow cap on davit post near its support bracket).
2. Remove the dinghy’s canvas cover, if installed.
3. Raise the dinghy, swing it to starboard, and launch it;.
4. Swing the davit hook back to the boat, secure it, and tension it on the
davit, avoiding damage to the yacht if the boat rolls.
To retrieve the dinghy on the boat, reverse the above procedure.
Outboard Motor
The outboard motor for this boat is a Honda 15hp 4-Stroke. Operaon is conven-
onal. This outboard is 4-stroke motor and oil should not be mixed with the fuel.
An alarm panel is at the
ybridge also; it has start
and stop buttons for each
engine, an anchor windlass
remote control, but no wiper
switches.
The alarm panel has warning lights for
the temperature and oil pressure alarms,
and for the engine room lights; the
synchronizer switch and pilot light, and
the three wiper/washer controls.
If the dinghy davit circuit breaker trips, it
is accessed at this box in on the
starboard side under the Racor lters aft
of the main engine.

NW Exploraons DISCOVERY OPERATING MANUAL | 19
Fresh Water System
Tanks
There are two water tanks located midships in the engine room under the genset and forward under the galley sole.
These are lled by side deck ll pipes on the port side midships and port side forward with a cap on each marked “WA-
TER”. You need to ll the tanks individually. You can use the sight gauge on the engine room tank to tell if your water is
geng low.
Water Pump
The water line from the tanks leads to the boat’s fresh water pump in the engine room, port side forward. Provided its
circuit breaker is “On”, this pump will run whenever its built-in pressure switch detects low water pressure. There is also
an “accumulator tank” located here; it provides a “pressure head” for the pump, so the pump doesn’t need to run so of-
ten. Instead, a pump cycle will provide for several minutes of roune water use before pressure diminishes and the pump
starts again.
It is a good idea to turn o the fresh water pump breaker (labeled “F.W. Pump”) whenever leaving the boat for any ex-
tended period, lest a dripping faucet or broken hose cause the pump to run and waste your precious drinking water.
Water heater
Aer the water pump, water is distributed directly to the cold water faucet lines. In addion, it goes to the boat’s water
heater. This heater uses two energy sources, (1) heat from the port engine, so that whenever the boat is running or has
recently run, there is hot water; and (2) 110 volts AC from shore power, if available and the breaker is “on”. The heater is
insulated well enough to keep hot water overnight without power, provided you haven’t wasted a lot in dishwashing!
Waste Water
Waste water from the sinks and showers (but not from the toilets) is dumped overboard in accordance with U.S. and
Canadian law. From sink basins, the water simply ows by gravity overboard. Since the oor of the showers is below the
water line, built in shower sump pumps operate to li this water back above the waterline and dump it overboard.
It is therefore very important that the “drain pump” breaker in the DC panel be le “On” , and that the switch in each
head compartment labeled “drain pump” also be “on” (pulled out) during a shower.
Aer the shower is complete, turn the “Drain Pump” switch in the head compartment “O” by pushing it in. This roune
is followed in case each pump’s own oat switch fails or scks, causing the pump to run connuously, overheang it and
running down the ship’s baeries.

20 | DISCOVERY OPERATING MANUAL NW Exploraons
Watermaker
The boat carries a Spectra Watermaker. This great system (which requires AC
power to operate) has the following features:
• It automacally ushes itself on a regular basis to keep the ltraon
membranes clean and in service;
• It has automac controls that run it for specic periods so that you
need not worry about overlling tanks and wasng water;
• It assures you that there will always be plenty of water, however it
will take several hours to top o the tank under normal use.
• Note that you can use city water without lling the tanks (which you
should not do: see below). Simply connect the hose to the pressure water inlet ng outside the cockpit swim
door and leave the hose “on” as long as you are at the dock; this will then go directly to the boat’s faucets as
needed, but not into the tanks.
Operaon is enrely automac. Simply push the buon to add water to the tanks, following these provisos:
• Do not run the watermaker while in the harbor: You will shorten the me that the lters can be in service;
• Do not add City water to the tanks, for then the watermaker will needlessly run to remove chlorine.
• Leave the watermaker on at all mes so it can monitor its own operaons.
• Always leave the fresh water pump breaker on so that the purge system can operate properly!
DC Electrical System
Concepts
Each year it seems more folks are confused by the operaon of electrical systems on yachts than by any other subject!
Don’t feel discouraged if something isn’t clear: you’ve got company in your confusion. So let’s try to cover some theory
here rst.
Most of the equipment on any boat is run by 12 volt DC electricity from the boat’s baeries. This is true because DC
should always be available: we have baeries aboard even when there is no shore power! If the baeries aren’t run
down, everything should work, just like in the family car.
Since the baeries are used so much, we have to replenish, or charge them. The most important way we do this is by
alternators on the ship’s engine(s). In most cases one engine will provide enough electricity in most every case to run
everything, and sll have some energy le over to add back to the baery, that is, to charge it.
Ah, but what if the engine(s) isn’t running? Then, the baeries are slowly depleted unl they have “run down” and there
is no more electricity stored in them . . . a big problem, because then we not only can’t run all the neat stu on the boat,
we can’t start an engine to get more electricity.
So a good skipper and crew has “electrical power management” in mind whenever they turn an electrical gadget on or
o!
It is with this in mind that we can cite a reality: If we need more electricity than the baeries alone must provide, and if a
propulsion engine isn’t running, we will need to get our electrical power from an alternave source! That’s the most im-
portant reason why we plug the boat in to shore power or use the generator: To keep from running down the baeries.
For by using baery chargers geng their power from shore power or the generator, we can keep the baeries charged,
or, at least, from geng too low.
In modern, luxury cruising boats, however, there is another important factor: Some of the “goodies” we like to have on
board such as hair dryers and microwave ovens require ordinary household electricity. This is 110 volts AC. It is dierent
from DC. So if we want to use these things when we’re not at a dock, we must have another way to get 110 volts AC, and
for this we use the generator or an inverter, an amazing high tech gadget that takes 12 volts DC from the ship’s baeries
and makes it into 110 volts AC!
Table of contents
Other NW Explorations Boat manuals

NW Explorations
NW Explorations Patos User manual

NW Explorations
NW Explorations AnamCara User manual

NW Explorations
NW Explorations Konocti Bay User manual

NW Explorations
NW Explorations Eldean User manual

NW Explorations
NW Explorations Grey Lady User manual

NW Explorations
NW Explorations HELE MAI A 46 User manual

NW Explorations
NW Explorations Arctic Star User manual

NW Explorations
NW Explorations Morveren User manual

NW Explorations
NW Explorations La Vida 2022 User manual

NW Explorations
NW Explorations Aquila User manual