NZXT MXER User manual

MXER
AUDIO CONTROL STATION

CONTENTS
INTRODUCTION ...................................................................... 01
ABOUT THE NZXT MXER .......................................................... 02
MXER PACKAGE CONTENTS & DESCRIPTION............................. 03
SETTING UP THE MXER........................................................... 04
MAIN CONTROLS .................................................................... 08
SOFTWARE FEATURES ............................................................ 14
BASIC TROUBLESHOOTING...................................................... 15
HAZARDOUS SUBSTANCES ..................................................... 16
WARRANTY & SUPPORT .......................................................... 17
01
02
03
04
05
06
07
08
09
NZXT MXER

NZXT MXER
INTRODUCTION
Congratulations on your purchase of the NZXT MXER!
Whether you are a professional streamer, a casual player,
or a hardcore gamer; we’d like to welcome you to the
NZXT family of high-end gaming peripherals.
01

NZXT MXER
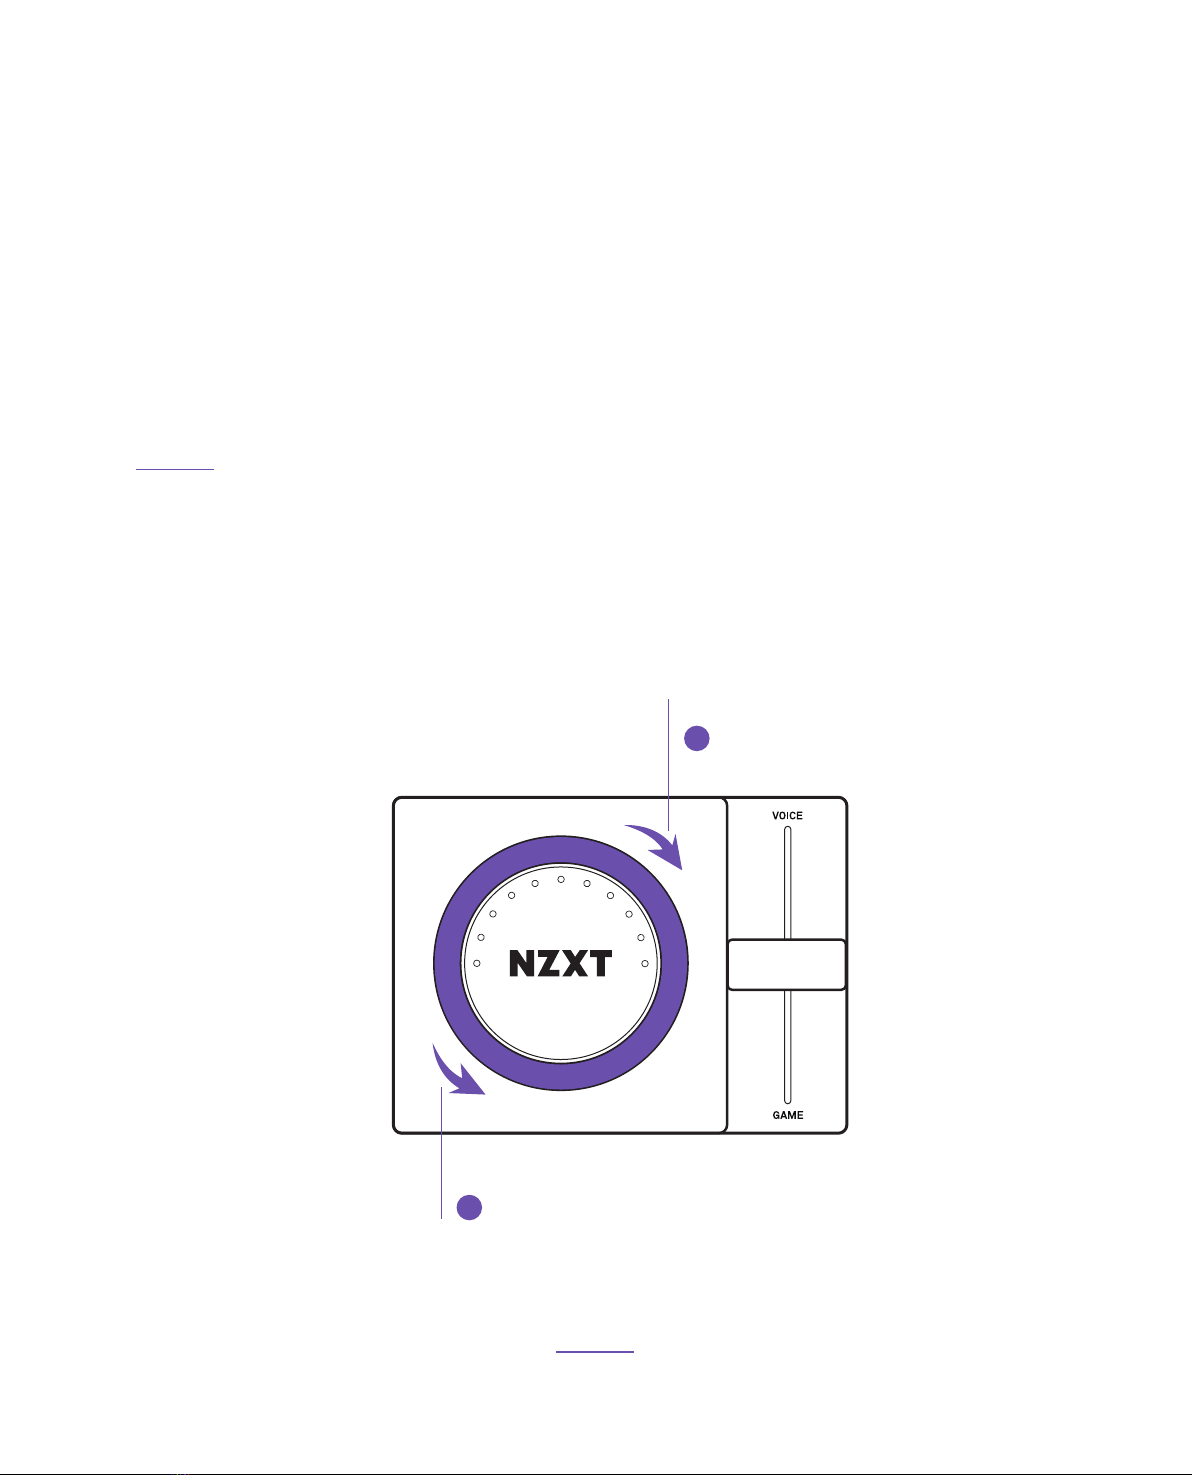
The NZXT MXER enables quick volume and voice/audio mixing while quickly
switching between connected headsets and speakers.
Powered by a studio-grade fader, Wolfson DAC, and Nahimic 7.1 surround,
the MXER delivers an ultra-wide soundstage. Complete your battlestation
with the AER Headsets, and STND.
ABOUT THE MXER
ABOUT USING THE MXER WITH THE
NZXT AUDIO SYSTEM
The complete NZXT Audio System consists of the NZXT AER Headset, the NZXT
MXER (described in this guide), and NZXT STND. All of the NZXT Audio System
components are high-end desktop PC gaming audio products by themselves,
but combined together, they unlock additional functionality and performance.
Learn more about the NZXT Audio System at NZXT.com
02

Volume
Fader
Connect to PC
Connect to MXER
NZXT MXER
NZXT MXER
PACKAGE CONTENTS &
DESCRIPTION
MXER ( CONTROLLER )
MICRO USB TO USB CABLE
B
D
A
A
D
B
C
C
03

NZXT MXER
SETTING UP THE MXER
CONNECT MICRO USB INTO THE USB INPUT ON YOUR PC
STEP 01
The MXER comes with a Micro USB cable that connects directly to the USB input on your PC.
This will utilize a Wolfson DAC to achieve high-quality digital to analog to conversion.
Plugging the cable into the PC will provide power to the unit. The unit will turn on and
automatically begin installing the MXER.
IMPORTANT: Keep the Micro USB fully inserted and seated into the
connector on the back of the MXER for proper operation.
Plug the cable into the PC
D
C
BACK OF MXER
04

CONNECT YOUR SPEAKERS AND/OR HEADSET
STEP 02
You'll find a 3.5mm audio output jack noted with a < > at the back of the MXER, and a < > on
the front of the MXER. Insert one end of the 3.5mm cable into these jacks and insert the other end
into the 3.5mm input on your speaker system or headset.
IMPORTANT: For proper performance
of the MXER, make sure that the cable
is FULLY SEATED in the speaker and/
or headset receptacle. Make sure
the speakers are turned off before
plugging connecting to the MXER.
F
F
E
Connect MXER to your Headset
Connect MXER to your Speakers
E
FRONT OF MXER
BACK OF MXER
05

CONNECT THE NZXT STND
STEP 03
Locate the 2.5mm cable at the bottom of STND. Lay the MXER on the base of the STND and insert
the cable into the 2.5mm input jack on the back of MXER indicated by < >.
When used in conjunction with STND, The MXER will intelligently sense when your gaming headset
is being actively used in a gaming session or is mounted on STND’s flat top surface.
( OPTIONAL )
G
G
Connect MXER to NZXT STND
BACK OF MXER
06

CHANGING THE AUDIO SETTINGS
STEP 04
Open your sound preferences or right-click the audio icon located at the bottom of the taskbar.
Click on the "Playback" (or output) selection.
Select "NZXT MXER GAME" and click "Set as Default."
Now select "Recording" (or input selection).
Select "NZXT MXER VOICE" and click "Set Default."
Click "OK."
1
2
3
4
5
6
07

NZXT MXER
MAIN CONTROLS
INCREASE / DECREASE
VOLUME KNOB 01
The front face of the MXER contains an LED display
to show various states of the device’s features.
The volume knob digitally controls the headset and speaker volume independently. The MXER can
store and recall levels individually so you can be rest assured your levels will maintain the same
volume between the headset, speaker, game, and voice.
A
A
Volume Increase
Volume Decrease
08

HEADSET MODE: WHITE
SPEAKER MODE: PURPLE
A
Press and hold to change
headset / speaker.
HEADSET / SPEAKER
VOLUME KNOB 02
11 LED lights indicate volume. When lit in white, the knob controls the primary volume of the
headset. When lit in purple, the knob will indicate the primary volume of the speaker.
PLEASE NOTE: To enable output switching,
you must have a device connected to both
speaker and headset outputs.
When MXER is used without STND, press and hold the volume dial for one second and release.
The primary device light indicator changes from white to purple or from purple to white.
09

WHEN FADER IS CENTERED, BOTH GAME AND VOICE VOLUME WILL BE 100%
MIXING FADER 01
The fader enables control of gaming audio and voice audio balance. Move the fader up to activate
voice audio or down to hear more game sounds. At exactly the middle point in the fader, both the
volume of the voice and game are at 100%. The fader is studio-grade quality and perfect for quick
adjustments that maximize player efficiency without the need to open your audio preferences.
B
Voice 100%
Game 100%
10

MORE VOICE VOLUME
MIXING FADER 02
B
B
Voice 100%
Game 0%
Voice 75%
Game 25%
11

MORE GAME VOLUME
MIXING FADER 03
B
B
Voice 25%
Game 75%
Voice 0%
Game 100%
12

QUICKLY PRESS AND RELEASE ANYWHERE ON THE VOLUME KNOB TO
MUTE THE OUTPUT OF EITHER THE HEADSET OR SPEAKER.
MUTE
A
The MXER LEDs will turn red
to indicate mute.
Short Press to
mute output.
13

NZXT MXER
MXER SOFTWARE FEATURES
The MXER utilizes the NZXT CAM software suite to access Nahimic 7.1 Surround
as well as other features to further customize your sound experience. Please visit
camwebapp.com/download to download the latest version of NZXT CAM.
14

NZXT MXER
BASIC TROUBLESHOOTING
IF YOUR NZXT MXER IS NOT POWERING, CHECK…
• Is the USB cable fully plugged into the USB jack on both the MXER and PC?
IF YOUR NZXT MXER HAS NO SOUND, CHECK…
IF THE MICROPHONE DOES NOT OPERATE PROPERLY, CHECK…
• Are both ends of the headset audio cable firmly pushed into their 3.5mm audio connectors?
• Are both ends of the speaker audio cable firmly pushed into their 3.5mm audio connectors?
• Is the sound output selector switched to the appropriate device you would like to listen to?
• Are the speakers turned on?
• Is the volume level of the speakers or headphones set to "0"?
• Is the Game/Voice Fader pushed to one side or the other?
• Is the MUTE on the inline Mute/Volume control engaged? (the switch indicates RED when the mic is muted)
• Is the MICROPHONE BOOM properly inserted and seated? (check the alignment of the positioning key, and
firmly insert the microphone boom)
• Are both sides of the headset cable firmly pushed into their 3.5mm connectors?
PLEASE NOTE: To enable output switching, you must have a device
connected to both speaker and headset outputs.
15

NZXT MXER
HAZARDOUS SUBSTANCES
产品名称:MXER音频控制器 ( 型号 : AP-1MX01-B1 )
有害物质
部件名称 铅(Pb ) 镉(Cd ) 汞(Hg ) 六价铬(Cr+6)多溴联苯(PBB) 多溴联苯醚(PBDE)
线材 ○ ○ ○ ○ ○ ○
塑胶 ○ ○ ○ ○ ○ ○
五金 ○ ○ ○ ○ ○ ○
硅胶 ○ ○ ○ ○ ○ ○
PCBA ○ ○ ○ ○ ○ ○
本表格依据SJ/T 11364的规定编制。
○: 表示该有害物质在该部件所有均质材料中的含量均在GB/T 26572规定的限量要求下。
Indicates toxic and hazardous substances in all homogeneous materials of the stated part is below the limit requirement of SJ / T 11363-2006 standard.
X
: 表示该有害物质至少在该部件的某一均值材料中的含量超出GB/T 26572官定的限量要求。
Indicates toxic and hazardous substances in all homogeneous materials of the stated part is within the limit requirement of the European Restriction of
Hazardous Substances Directive 2011/65/EC (the "RoHS Directive).
產品名稱:MXER音頻控制器 ( 型號 : AP-1MX01-B1 )
限用物質及其化學符號
單元 鉛(Pb ) 鎘(Cd ) 汞(Hg ) 六價鉻(Cr+6)多溴聯苯(PBB) 多溴聯苯醚(PBDE)
線材 ○ ○ ○ ○ ○ ○
塑膠 ○ ○ ○ ○ ○ ○
五金 ○ ○ ○ ○ ○ ○
硅膠 ○ ○ ○ ○ ○ ○
PCBA ○ ○ ○ ○ ○ ○
備考1. “超出0.1wt%”及”超出0.01wt%”係指限用物質之百分比含量超出百分比含量基準值。
備考2. “○” 係指該項限用物質之百分比含量未超出百分比含量基準值。
備考3. “
–
”係指該項限用物質為排除項目。
有毒有害物质及元素
有毒有害物質及元素
16

NZXT MXER
NZXT GLOBAL
WARRANTY POLICY
I. WARRANTY LENGTH
New NZXT Product Warranty Length for Parts
Computer Cases 2 Years
Temperature Meters 2 Years
Fans 2 Years
Lighting 2 Years
Accessories 2 Years
Headset/Headphone 2 Years
Headset/Headphone Storage 2 Years
Mixer 2 Years
Kraken M Coolers 3 Years
Motherboards 4 Years
Power Supply 10 Years
Kraken Coolers 6 Years
Refurbished NZXT Product Warranty Length for Parts
All NZXT Certified Refurbished Products 1 Year
This NZXT Global Warranty Policy governs the sale of products by NZXT to you.
Any replacement product will be covered under warranty for the remainder of the warranty period
or thirty days, whichever is longer. Proof of purchase is required for warranty service.
17

II. WHO IS PROTECTED
III. WHAT IS AND IS NOT COVERED
The Warranty covers only NZXT products purchased by the original consumer.
Please note that our warranty is not an unconditional guarantee. If the product, in NZXT's
reasonable opinion, malfunctions within the warranty period, NZXT will provide you at its sole
discretion with a repaired or replacement product, either new or refurbished, with a similar
function that is equal or greater in value depending on supply. Our warranty does not cover the
following:
• any product or serial number/warranty sticker modification applied without permission from NZXT;
• any damage that is not a manufacturing defect;
• damage, deterioration or malfunction resulting from: accident, abuse, misuse, neglect, fire, water, lightning,
or other acts of nature, unauthorized product modification or failure to follow instructions included with
the product;
• improper installation, unauthorized alterations or modifications, or repair or attempted repair by anyone
not authorized by NZXT;
• shipping or transport damage (claims must be made with the carrier);
• normal wear and tear.
NZXT does not warrant that this product will meet your requirements. It is your responsibility to
determine the suitability of this product for your purpose. For NZXT Store orders, we cover two
way return shipping for all exchanges and returns. For all other authorized dealers, NZXT Support
does not cover return shipping and only covers one way shipping from NZXT back to the end user
for exchanges. Two way expedited shipping is provided for all PSUs covered under the Less Than
Three program, indiscriminate of purchase location, provided the location is an approved NZXT
reseller.
18
Table of contents
Other NZXT Recording Equipment manuals