OBaby OBA-BikeT1 User manual

OBA-BikeT1
OBA-BikeT025
USER MANUAL
WWW.OBA.SRL
The products are subject to change without notice.
© OBA Srl VIA LEPANTO, 132
VAT and Fiscal Code: 07750391216.
Machine Translated by Google

The bicycle weighs 35 kg, while the packing weight is 40.5 kg.
The 48V 1000W and 250W high-speed rear electric motor features 5-speed power control
and allows you to reach a maximum speed of 55km/h for the 1000W model and 25km/h for the 250W
model.
The hydraulic disc brakes and aluminum alloy toothed disc ensure prompt and precise braking, while
the Shimanuo TX30-7 variable speed and Shimanuo TY300 rear derailleur allow for a smooth and
comfortable ride.
The electric range varies between 50-60 km, while the assisted one reaches 60-70 km.
The bicycle has a super light aluminum alloy handlebar and can support up to 200 kg of weight.
The 48V and 17.5AH and 15.5AH lithium battery is combined with a 48V 2A battery charger, which allows
a charging time of only 5-6 hours.
The bike has a 21-speed gearbox, a speed booster sensor and a smart color LED display. The soft-tail
6061 aluminum alloy frame, adjustable suspension fork suspension and ultra-comfortable saddle ensure a
comfortable and safe riding experience.
The packing size is 155X31X81CM, and the bicycle size is 198x 85<>105 (Seat Adjustment) x 110.
The new electric bicycle from the OBA company is available in three
colours: black, red and grey, all painted with an electrostatic spray which guarantees a uniform and
resistant finish.
Machine Translated by Google
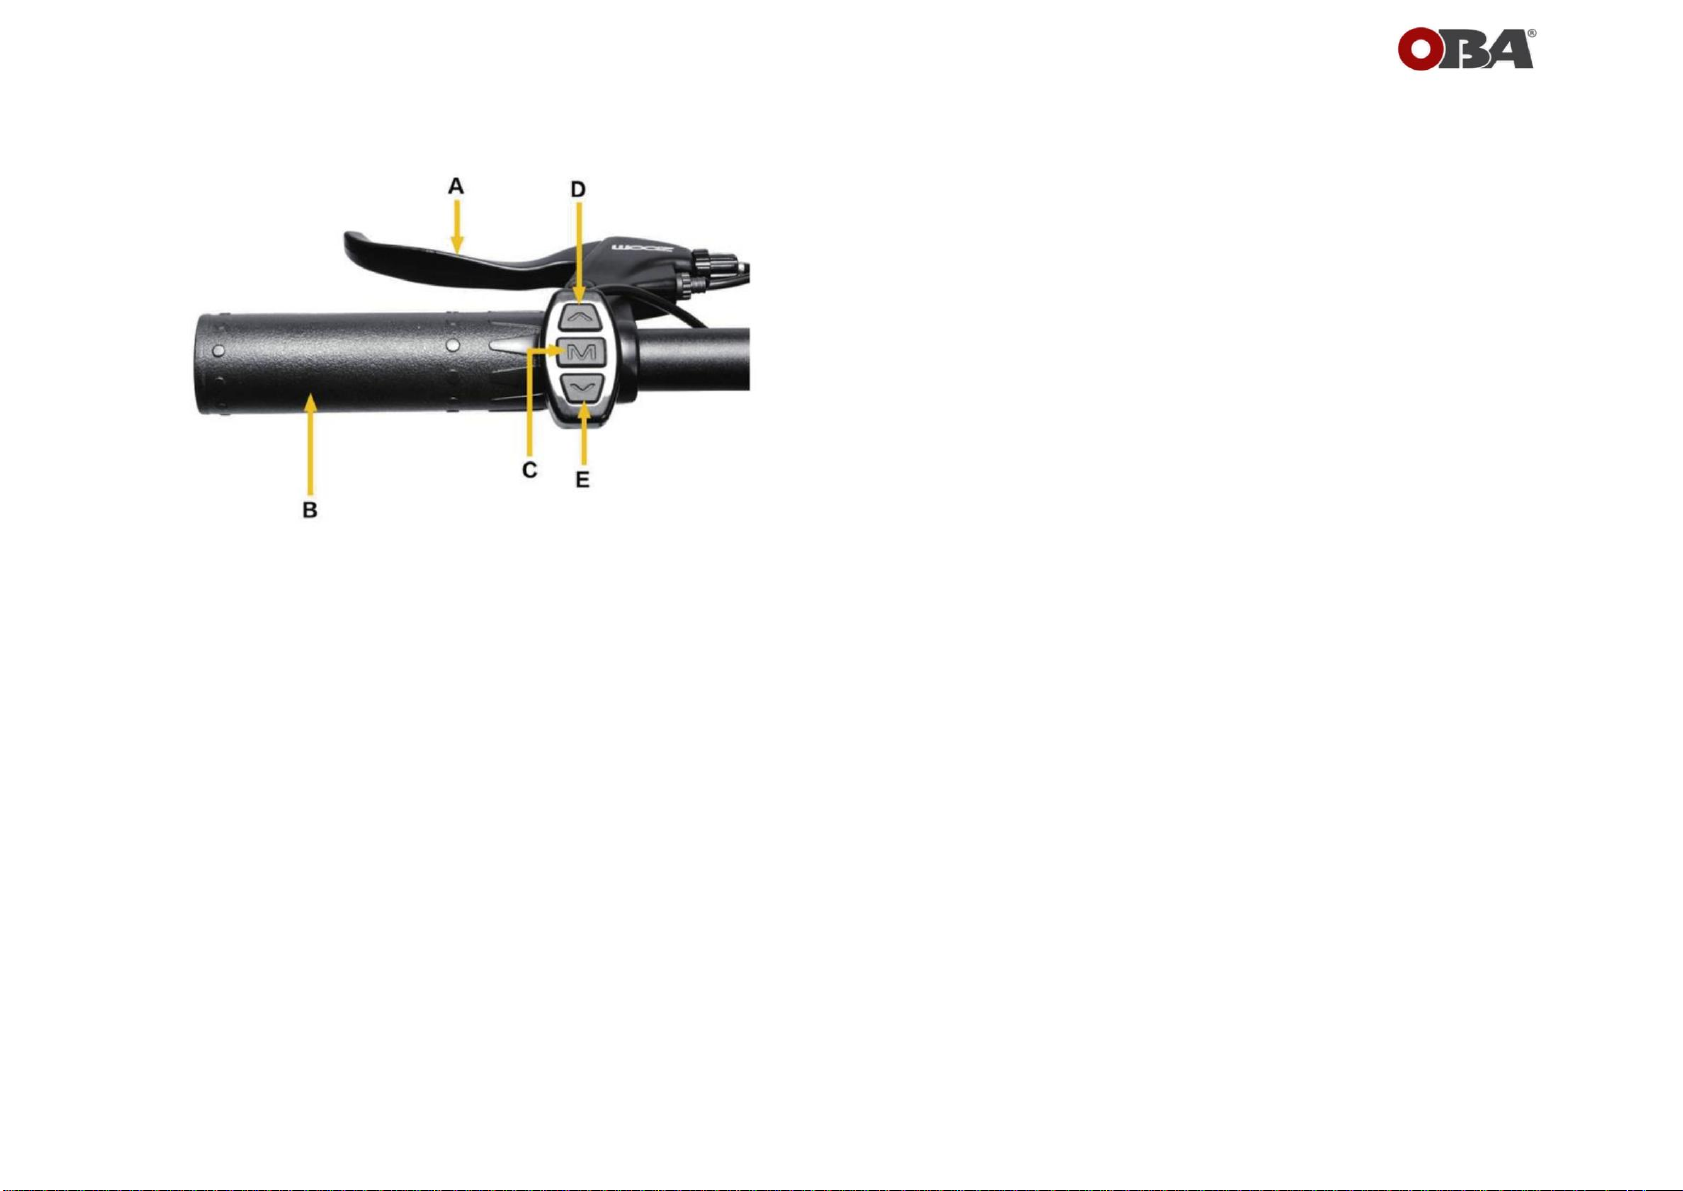
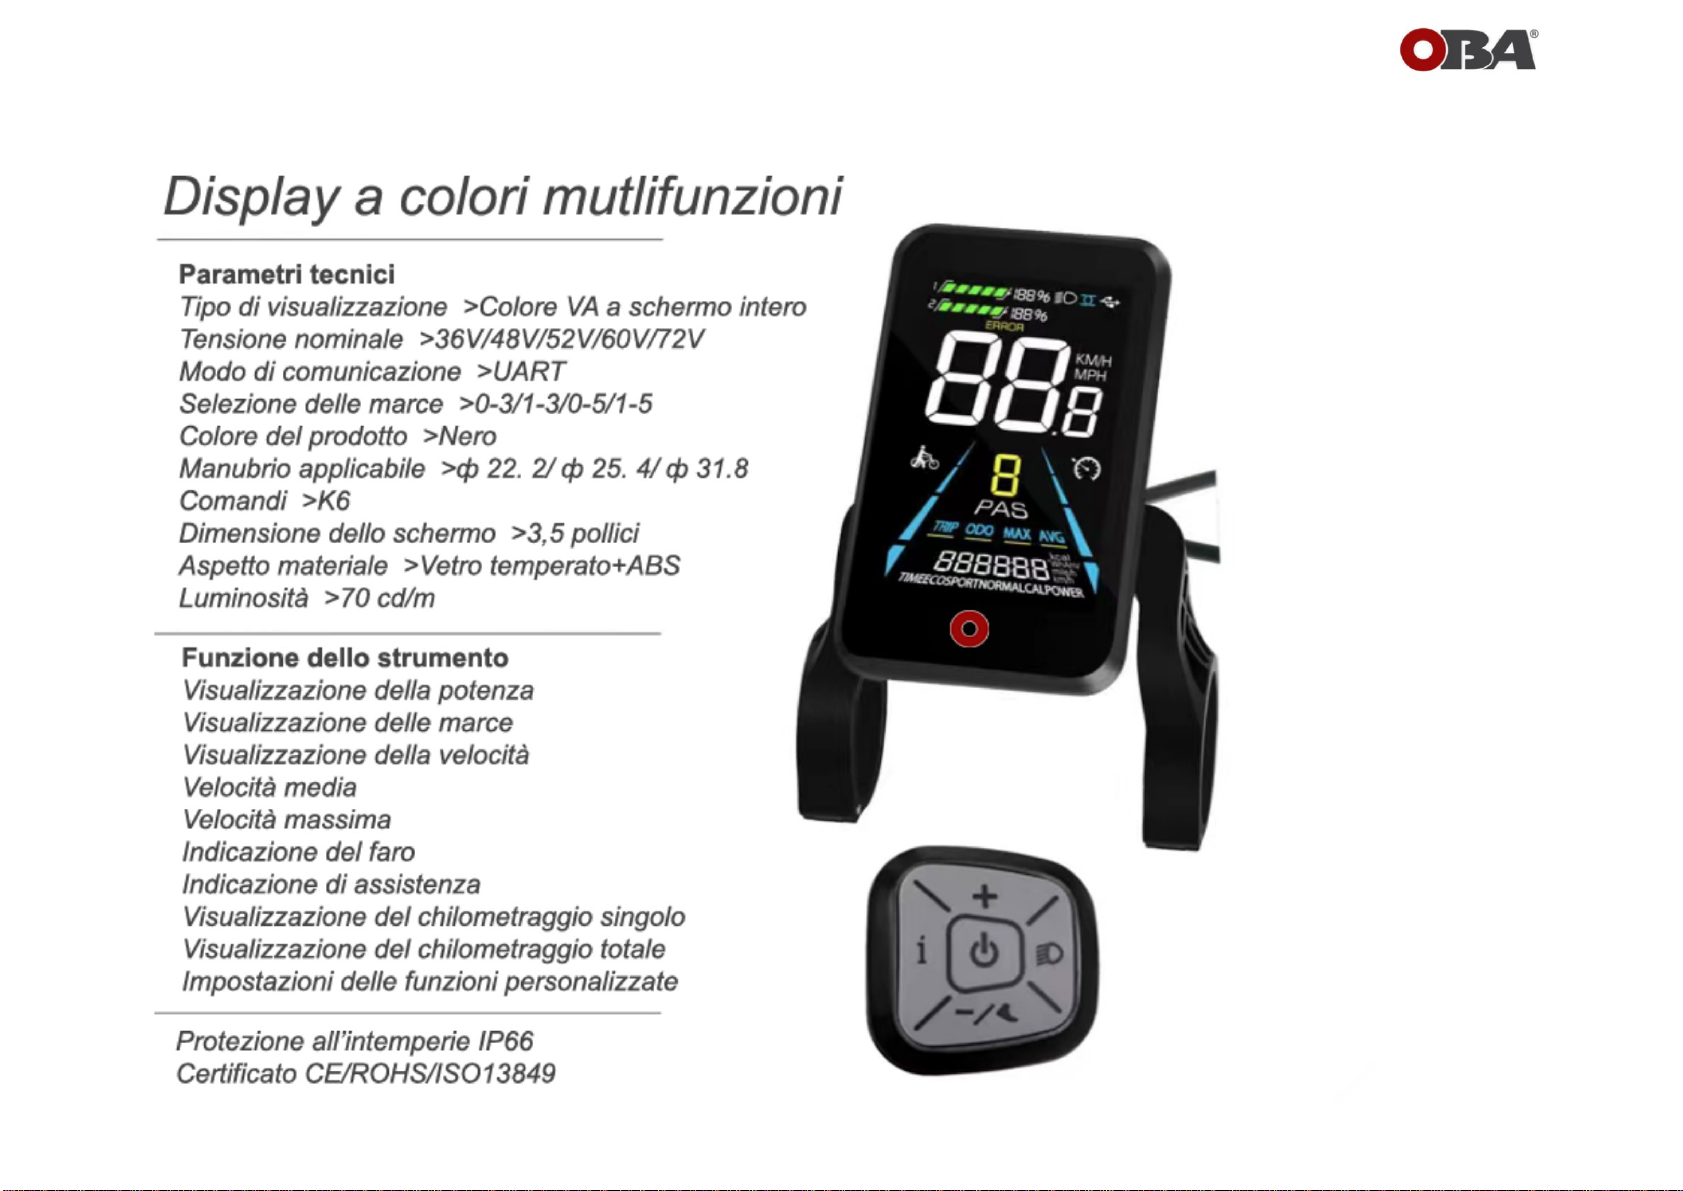
TO
B Left Handlebar Grips C On/
Off Button: Press for 3 seconds to
turn your E-Bike on or off D Speed Speed Increase Button/
Headlight: Press once to increase speed Press for 3 seconds to turn on/off the
light E Cruise/Low Speed Button: Press once to
decrease speed Press for 3 seconds to activate low speed cruise function
(approximately 4 MPH) in PAS mode 0.
LEFT HANDLEBAR
Rear brake lever (behind handlebar grip in this photo). The rear brake is activated by pressing the left brake lever. THIS IS *THE OPPOSITE OF A
TRADITIONAL BIKE.
To set a different cruising speed, rotate the right handlebar grip, setting the desired speed, then simultaneously press E for 3 seconds.
To cancel the cruise function, press the right or left brake
Machine Translated by Google
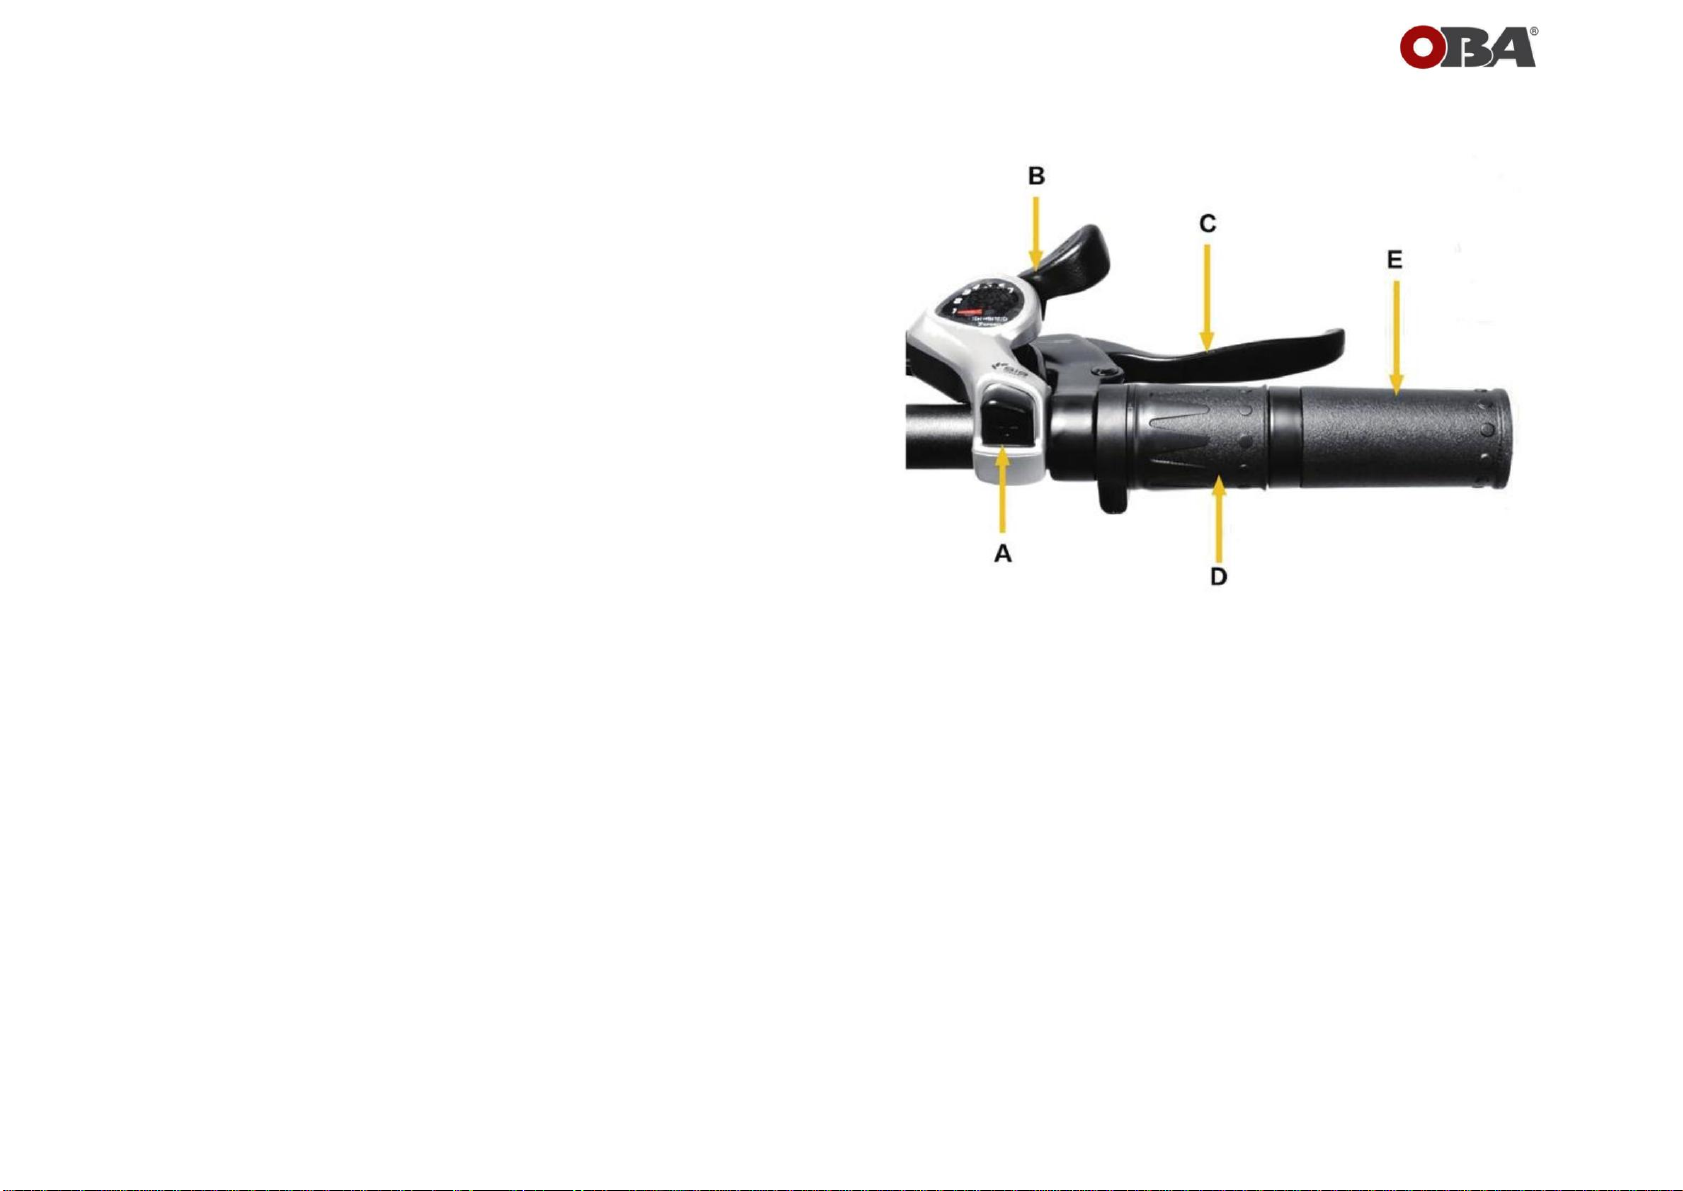
Right handlebar grip
B Rear derailleur: by pressing the lever while pedalling, it is possible to reduce the gears from 21 to 1. The derailleur is labeled with the
corresponding
gear selection C Front brake lever (behind the handlebar grip in this photo).
d
AND
RIGHT HANDLEBAR
A
Gears - by pressing the button while pedalling, it is possible to increase the gears from 1 to 21. The gearbox is labeled
with the corresponding gear selection.
The front brake is activated by pressing the right brake lever. THIS IS THE OPPOSITE OF A TRADITIONAL BIKE.
Speed Regulator - Turn this knob to give power to the engine,
Machine Translated by Google

Assembly
Machine Translated by Google
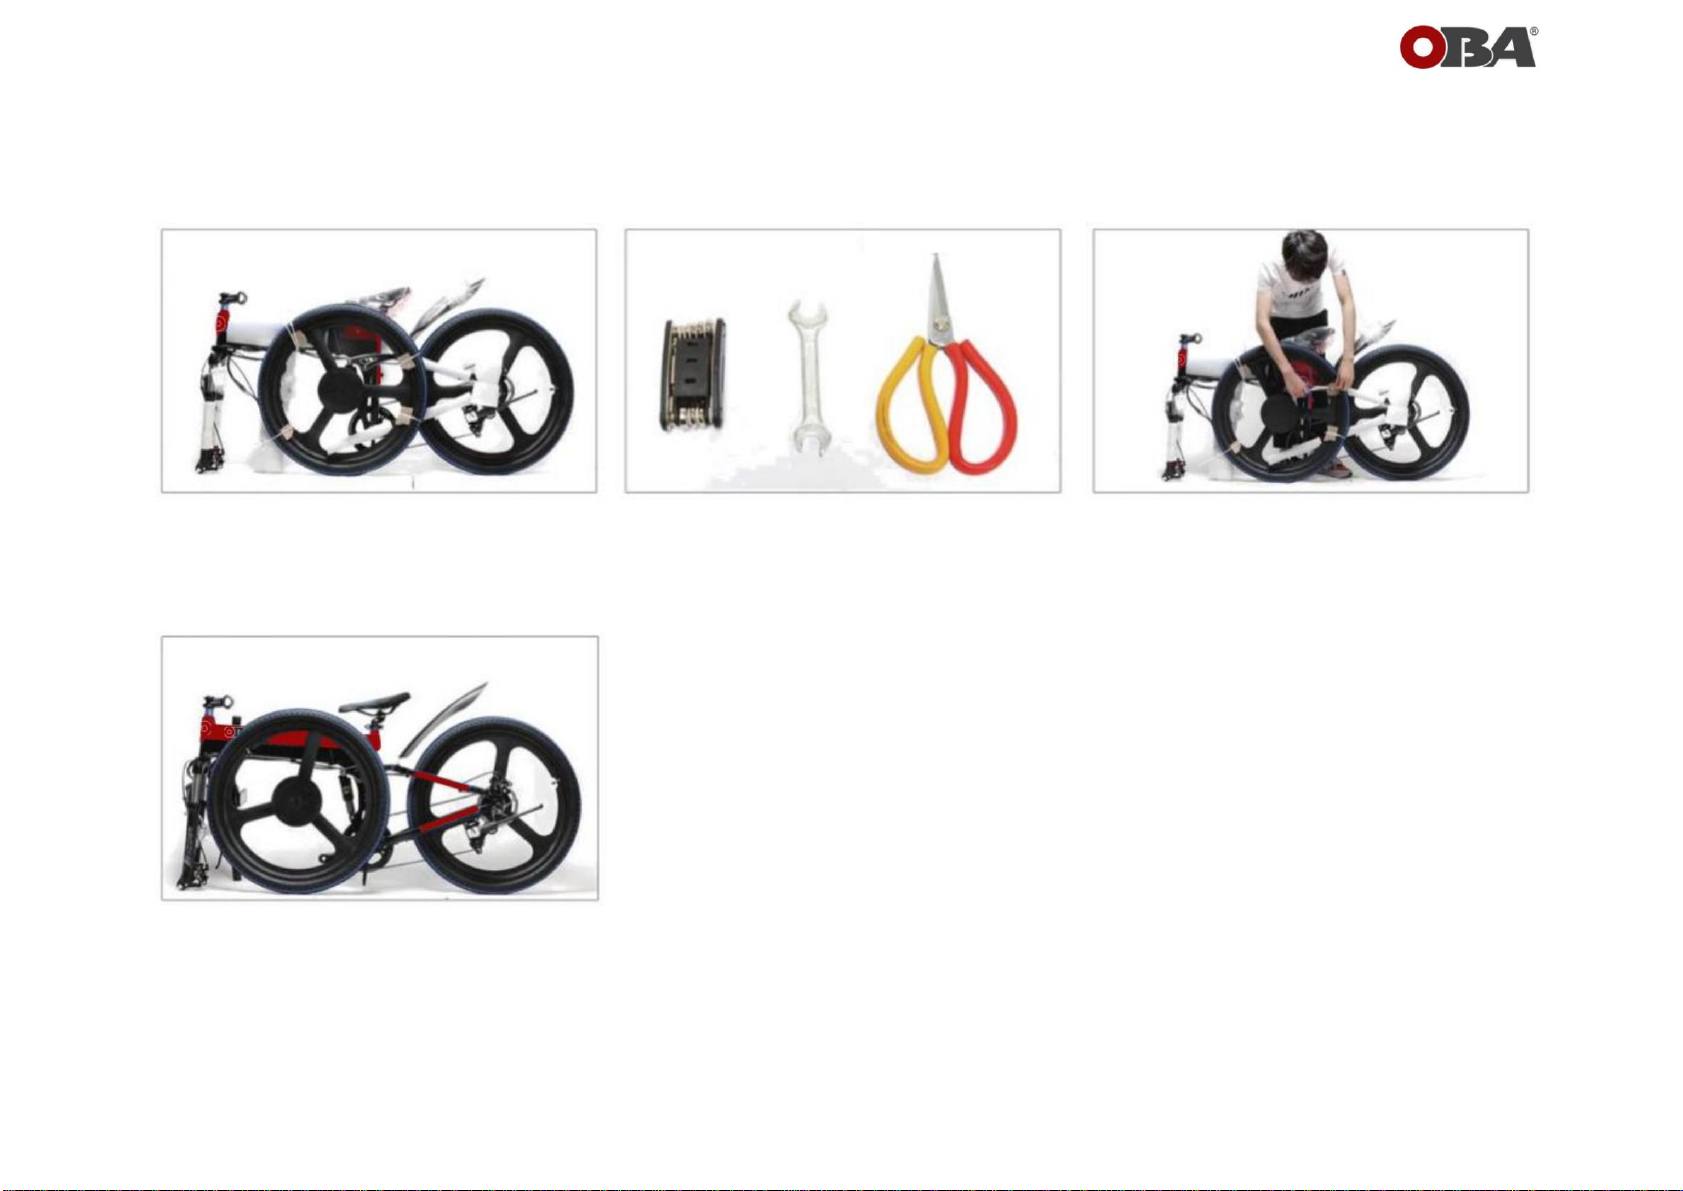
1 Unpack your electric OBA. 3 Remove the packing materials
REMOVE PACKAGING
2 Tools needed
4 Remove the front wheel
Machine Translated by Google
1 2
5
3
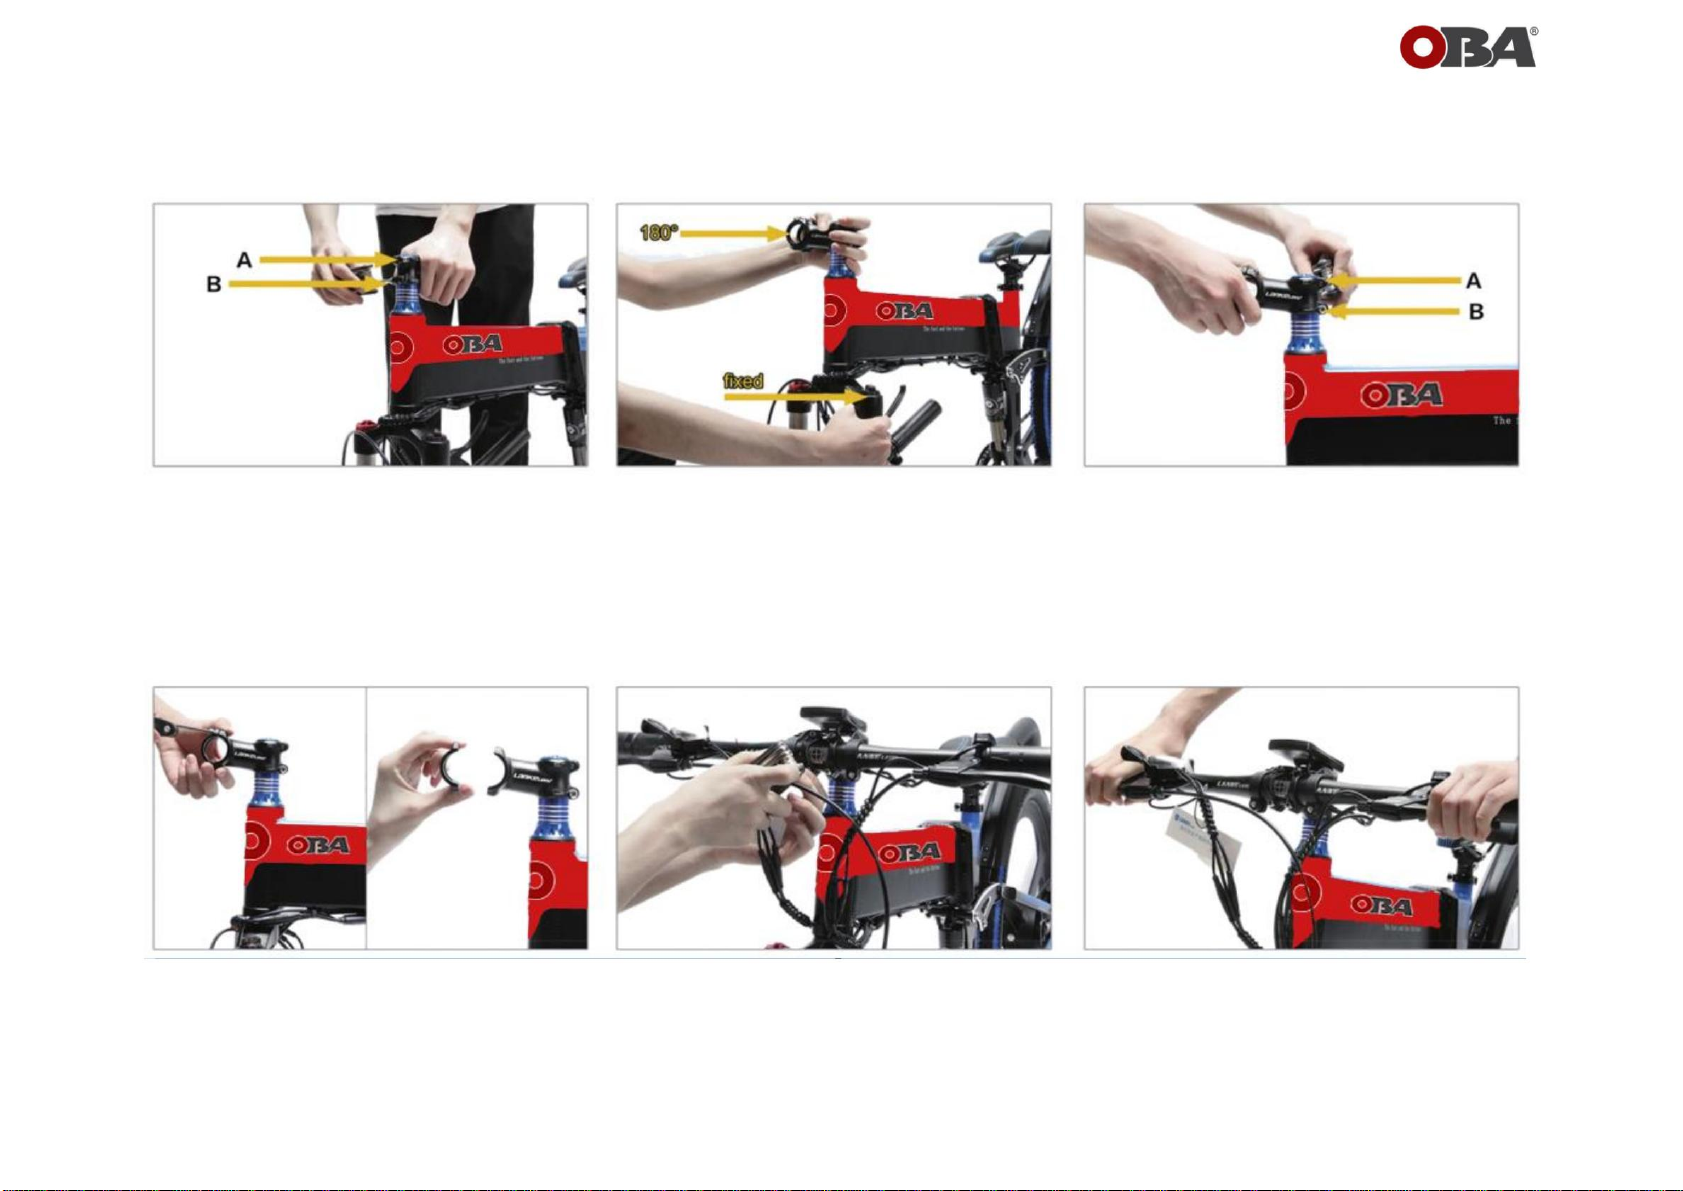
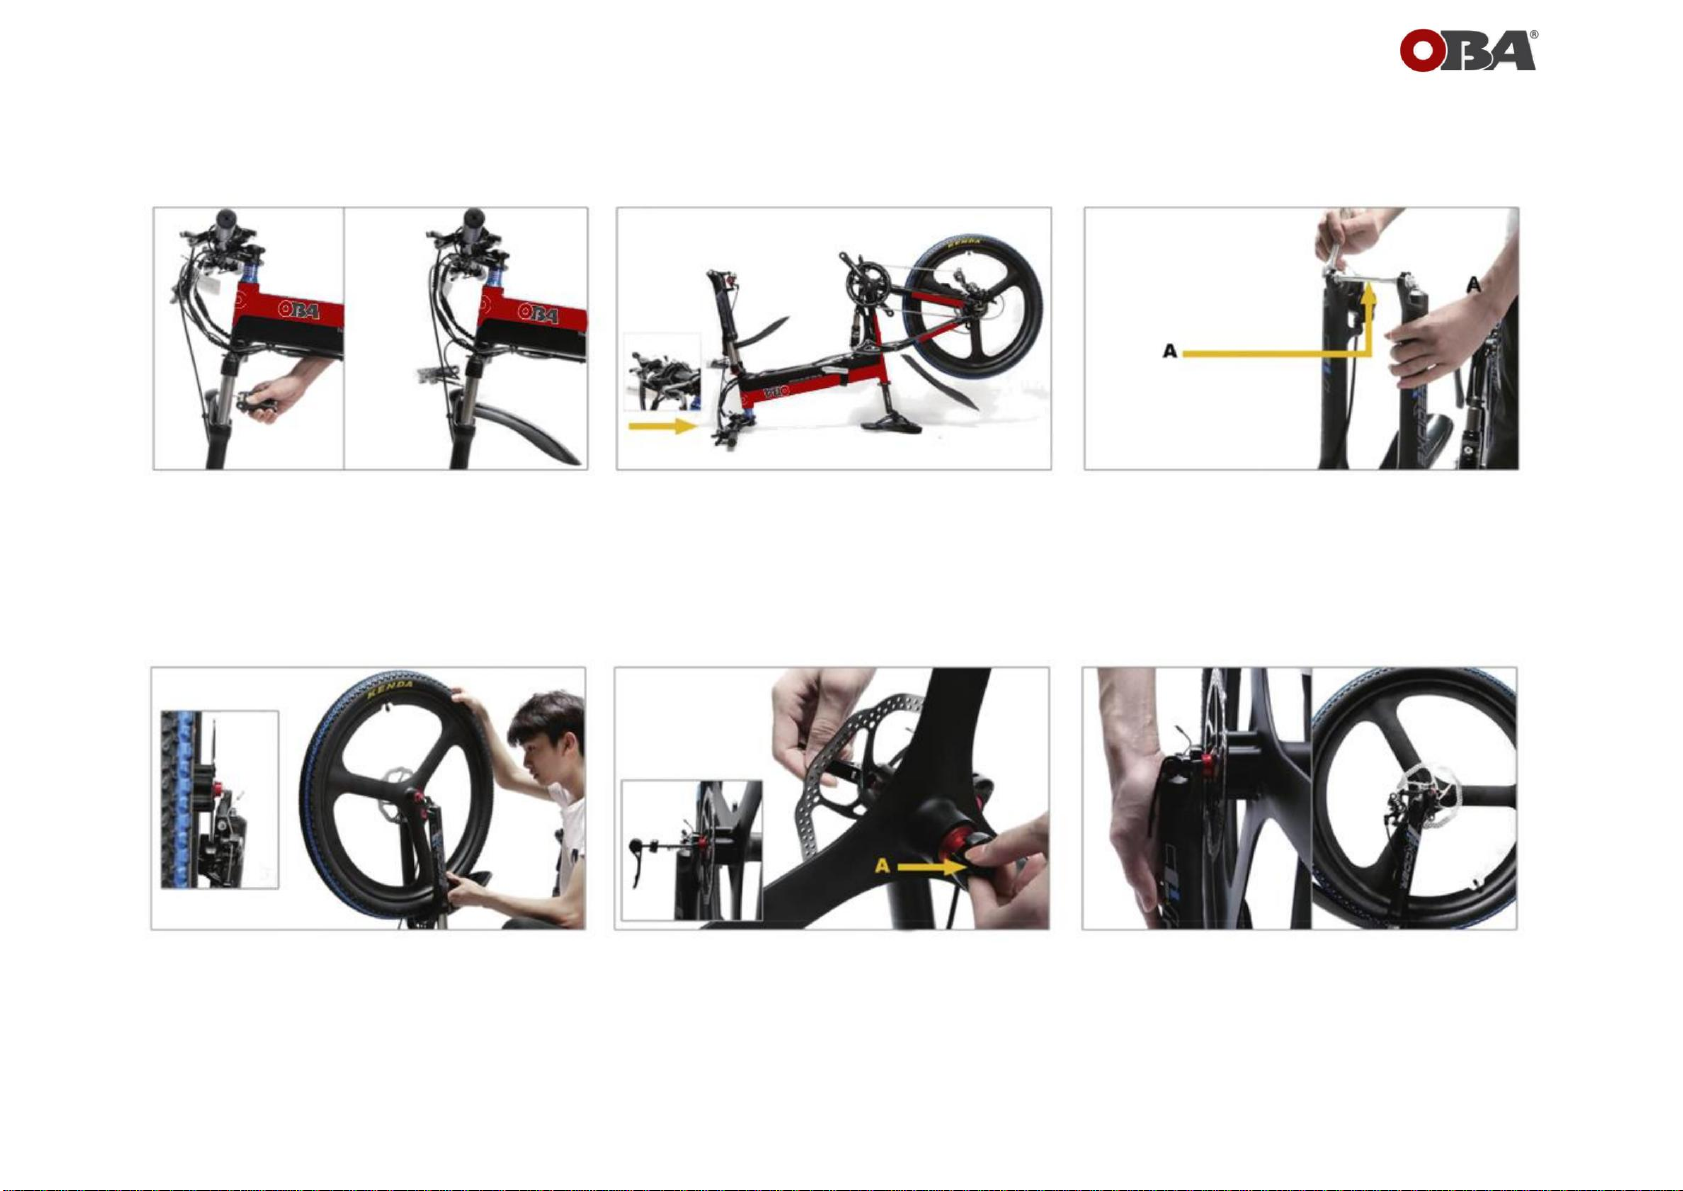
HANDLEBAR ASSEMBLY
"Before installation, pay attention
4 Remove the front 4 bolts from the stem
cover, then remove the cover.
Secure the front shock absorber
6 Adjust the handlebar to your needs then
make sure all bolts are tightened securely.
Loosen the screws A, B of the sides of the upright
Fit the handlebar to the stem then replace
the stem cover and tighten all 4 bolts
Tighten the side screws A, B
ETC
Machine Translated by Google
45
HEADLIGHT AND FRONT WHEEL ASSEMBLY
Align disc and brake caliper
Adjust the seat height and rotate the handlebar
angle to avoid direct contact with the ground
Adjust the screw pressure
The protective rod can be removed and thrown away
2
Turn the bike upside down.
Insert the front wheel
Remove the fork protector
1 Remove the bolt from the headlights, then
adjust the headlights and front grille to the correct
position and tighten the bolts.
Put the wheel in the front fork
3
6 Front wheel lock.
Machine Translated by Google

4
21
Secure the clamps and screws
3
The 'R' right side is mounted on the crown
6 Face the wheel and align the wheel and
handlebars at a "T" angle.
“L” mount counterclockwise to the
crank
Check the left and right pedals
5 Secure the seat clamp.
Adjust the seatpost to your height, making sure it is
within the safe line
"The right side is mounted on the opposite side
The "R" pedal is fixed clockwise on the chain
side
ASSEMBLING AND ADJUSTING THE PEDALS AND THE SADDLE
Machine Translated by Google
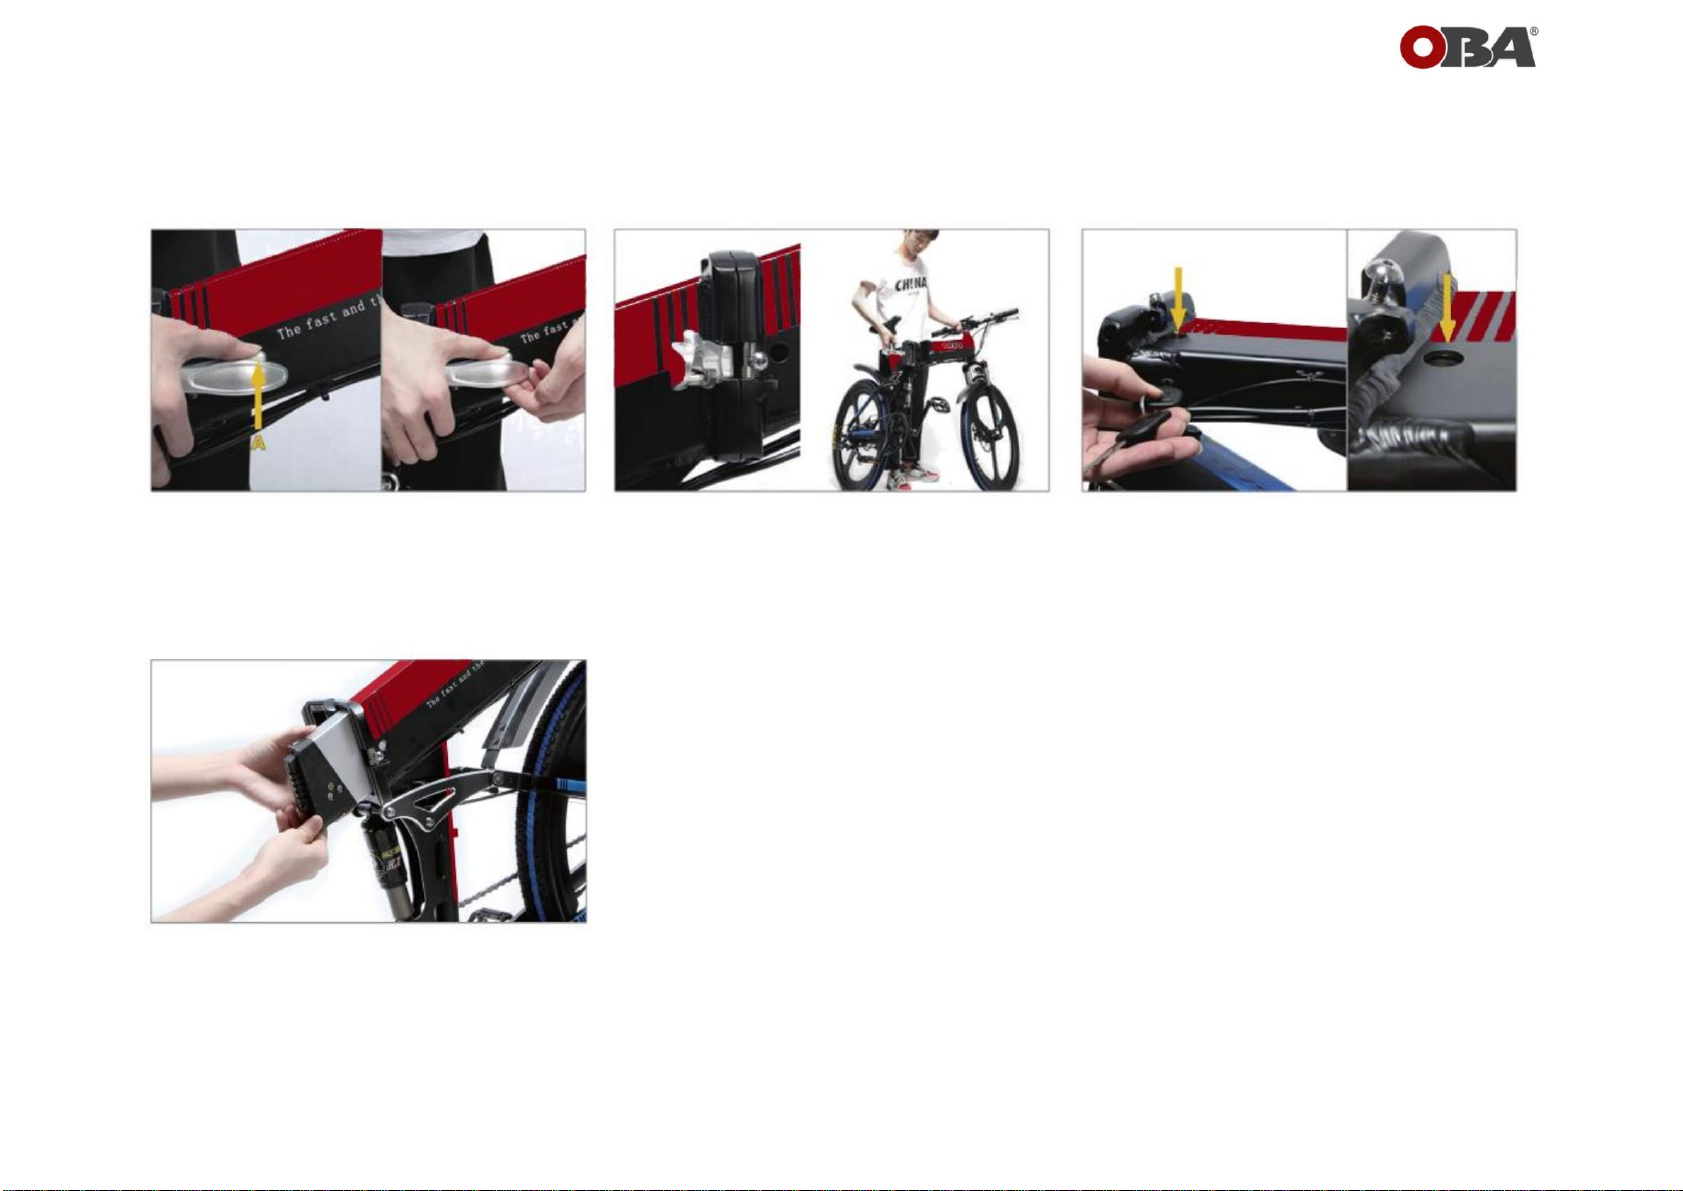
4
Open the lock, the lock cylinder must be fully
retracted, pull the key
A Self-locking safety lever
3
1 Push the lever forward. Release the lever and fold the bike in half
You can remove the battery
CLOSING THE CHASSIS AND REMOVING THE BATTERY
2
Machine Translated by Google

Direct recharge
Battery recharge
The battery can be charged without removing it from the bike or alternatively it can be removed
and charged in another location
Machine Translated by Google

Connect the battery first, then connect the power and make sure the red LED of the charger is on.
The green LED indicates that the battery is fully charged.
The red LED indicates that the battery is being charged.
The charger will charge the full battery within 3-6 hours.
BATTERY RECHARGE
ATTENTION
Machine Translated by Google
Machine Translated by Google
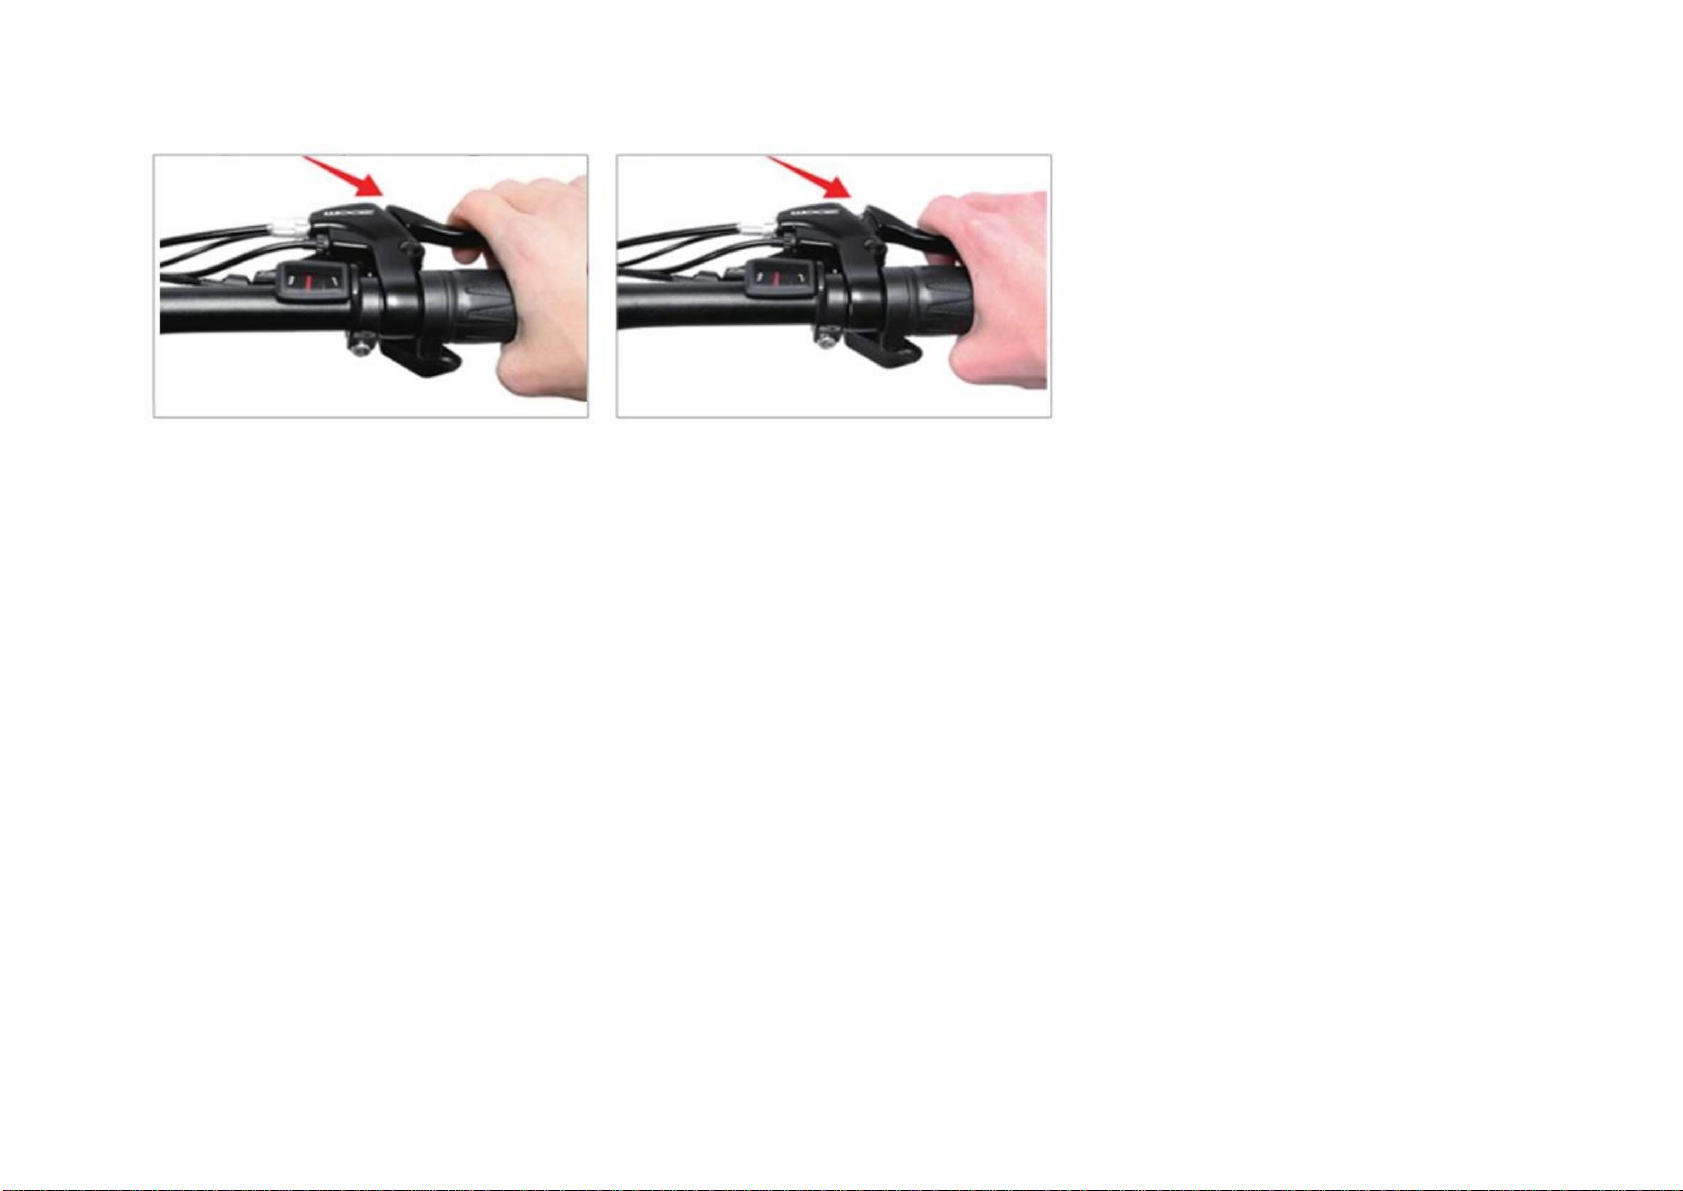
Make sure the brake lever does not touch the handlebars when full hand pressure is applied (Figure
2). If so, the brakes need to be adjusted by increasing the tension on the cable.
A quick adjustment can be made by screwing in or out the adjuster on the brake lever until the brakes are adjusted to a safe stop (Figure 1). If
the brakes still don't work properly, they may require further adjustments by a professional.
It is important for your safety to instinctively know which brake lever controls which brake. On your OBA E-Bike, the right brake lever controls the
front brake. The left brake lever controls the rear brake.
The rear brake must always be applied before and while applying the front brake. Applying the front brake only to slow down or stop at high
speeds can result in the rider being kicked off the saddle and forward on the handlebars. It is best to apply even pressure
to both brake levers when slowing or stopping. Bikes equipped with disc brakes
occasionally make a slight scraping noise when the wheels are spinning with no brakes applied. This is normal.
BRAKES
The greater the hand pressure on the brake lever, the faster the E-Bike will stop.
Your OBA E-Bike is equipped with hydraulic disc brakes for maximum reliability. Applying hand pressure to the brake levers will cause the wheel
brake to create friction against the brake disc, slowing the wheel.
WARNING • The
brake discs get hot during use. Do not touch or come into contact with the disc immediately after use. •
Wet weather will require a longer distance to stop.
Brake earlier and avoid sudden stops when driving in wet conditions
FIGURE 1 FIGURE 2
Machine Translated by Google
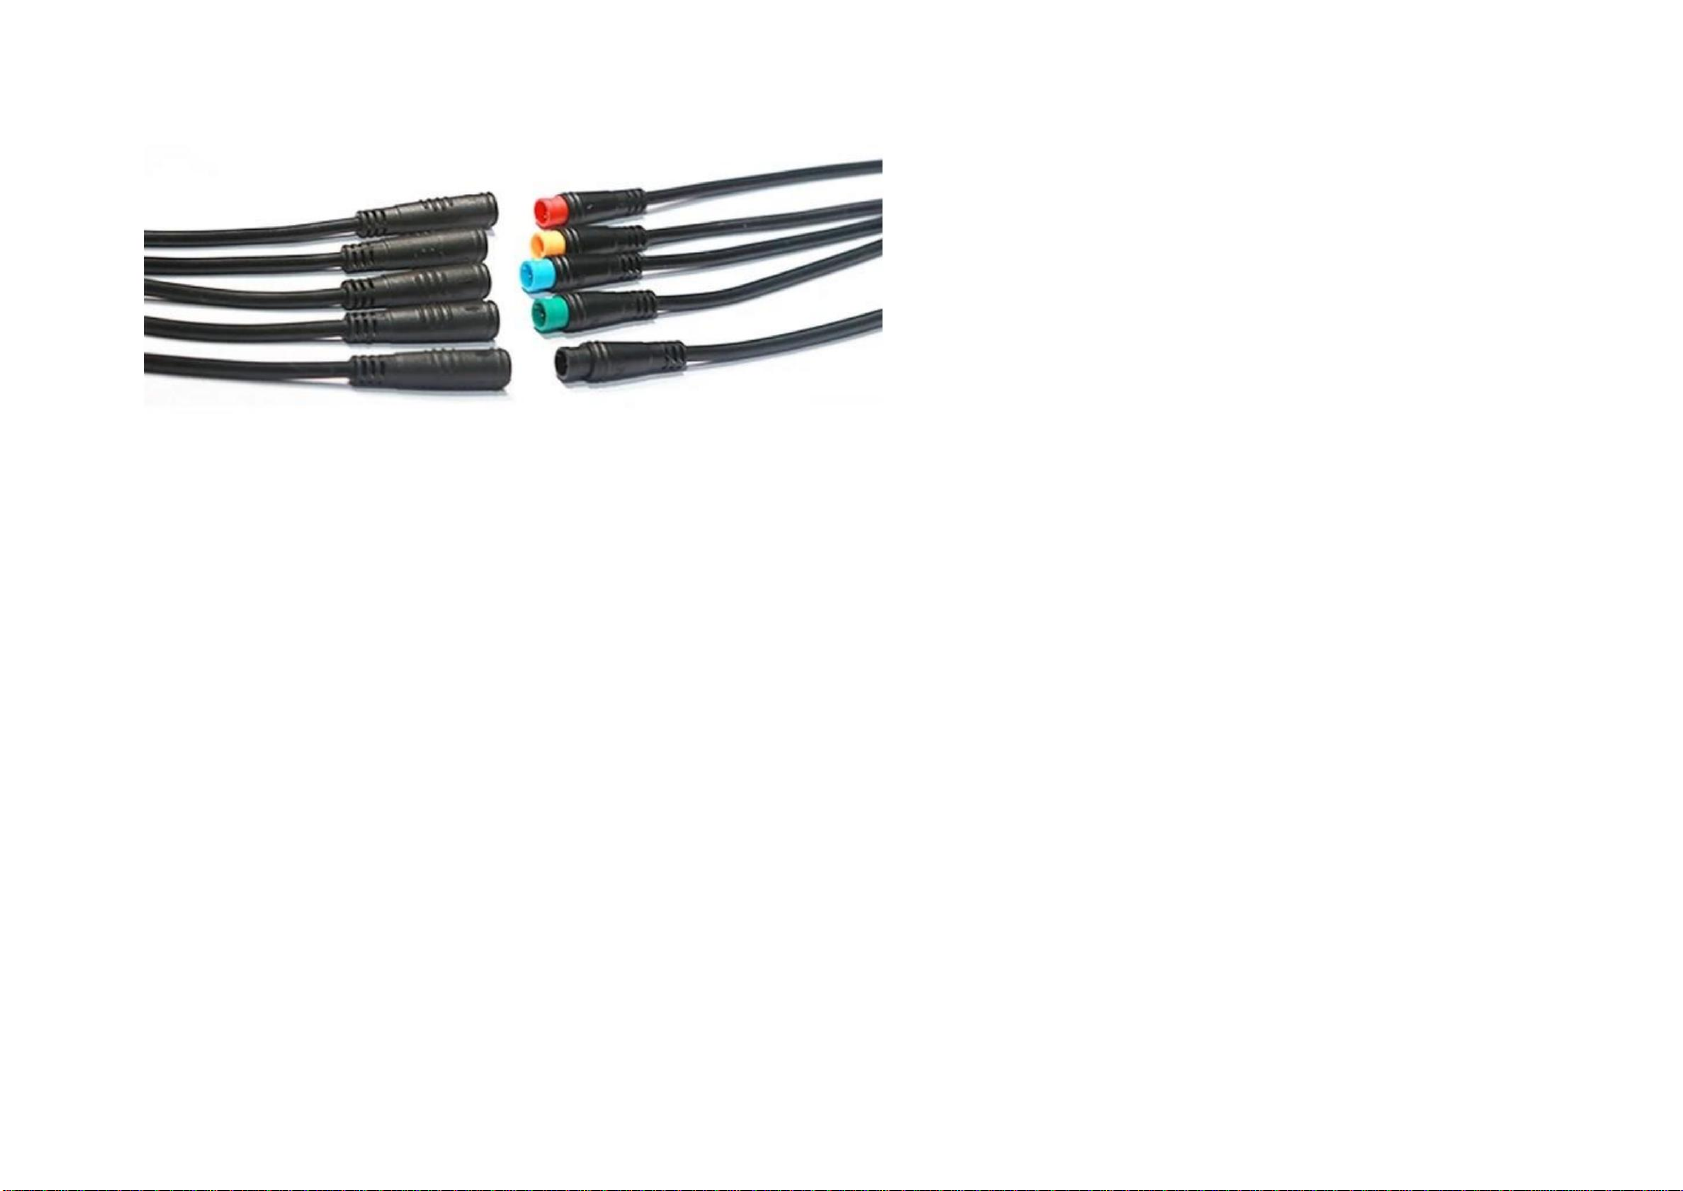
If your OBA E-Bike doesn't work, check all Quick Fittings to make sure they
haven't become loose or disconnected.
Simply unroll the black coiled wire cover until the quick release fitting is visible, disconnect and
reconnect the fittings.
TROUBLESHOOTING
Machine Translated by Google

INSPECTION AND MAINTENANCE
Make sure to keep the battery and charger out of the reach of children when charging. Do not attempt to disassemble or modify the battery or charger. Do not use the battery
or charger for purposes other than those intended.
When the battery reaches its minimum voltage, it is necessary to switch to pedalling. The battery must be recharged before driving again.
During the charging process, the charger and battery should be placed in a stable and cool place. The operating temperature range of the battery should be between 32 and
110 degrees Fahrenheit. Do not cover the battery or charger. Make sure that no liquid comes into contact with the charger.
Note: The battery switch should be turned off using the bottom switch when the battery is charging. The battery must be fully charged before first use. It is recommended to
charge the battery for at least 6 hours after the first 3 uses. If the bicycle is not used for a long time, it is necessary to fully charge and remove the battery. When
not in use, keep the battery off and recharge it every 2 months.
Low Voltage Protection
When the battery output voltage reaches the limit, the electronic control system will automatically cut off the power to protect the battery.
Charging indicator
Red indicates charging, green indicates the battery is full.
Handbrake cut-off power When your
bicycle is equipped with a brake cut-off system, it will automatically cut off the power when the brake is applied.
Battery charging
Connect the connector between the charger and the battery, then plug the charger into an electrical outlet. The LED indicator on the charger will be red which means it is
charging. When the light turns green, the battery is fully charged. After charging is complete, first disconnect the charger from the power supply and then disconnect the
connector between the battery and the charger.
When your E-Bike is not in use, turn it off.
Machine Translated by Google
This manual suits for next models
1
Table of contents


