Ocean Instruments SoundTrap ST300 Series User manual

SoundTrap ST300 and ST4300
series user guide
September 2021

1 About this guide ..............................................................................................................................4
2 Quick start guide .............................................................................................................................5
2.1 Install the SoundTrap host on your PC.............................................................................5
2.2 Connect SoundTrap to your PC........................................................................................5
2.3 Check SoundTrap Status ..................................................................................................6
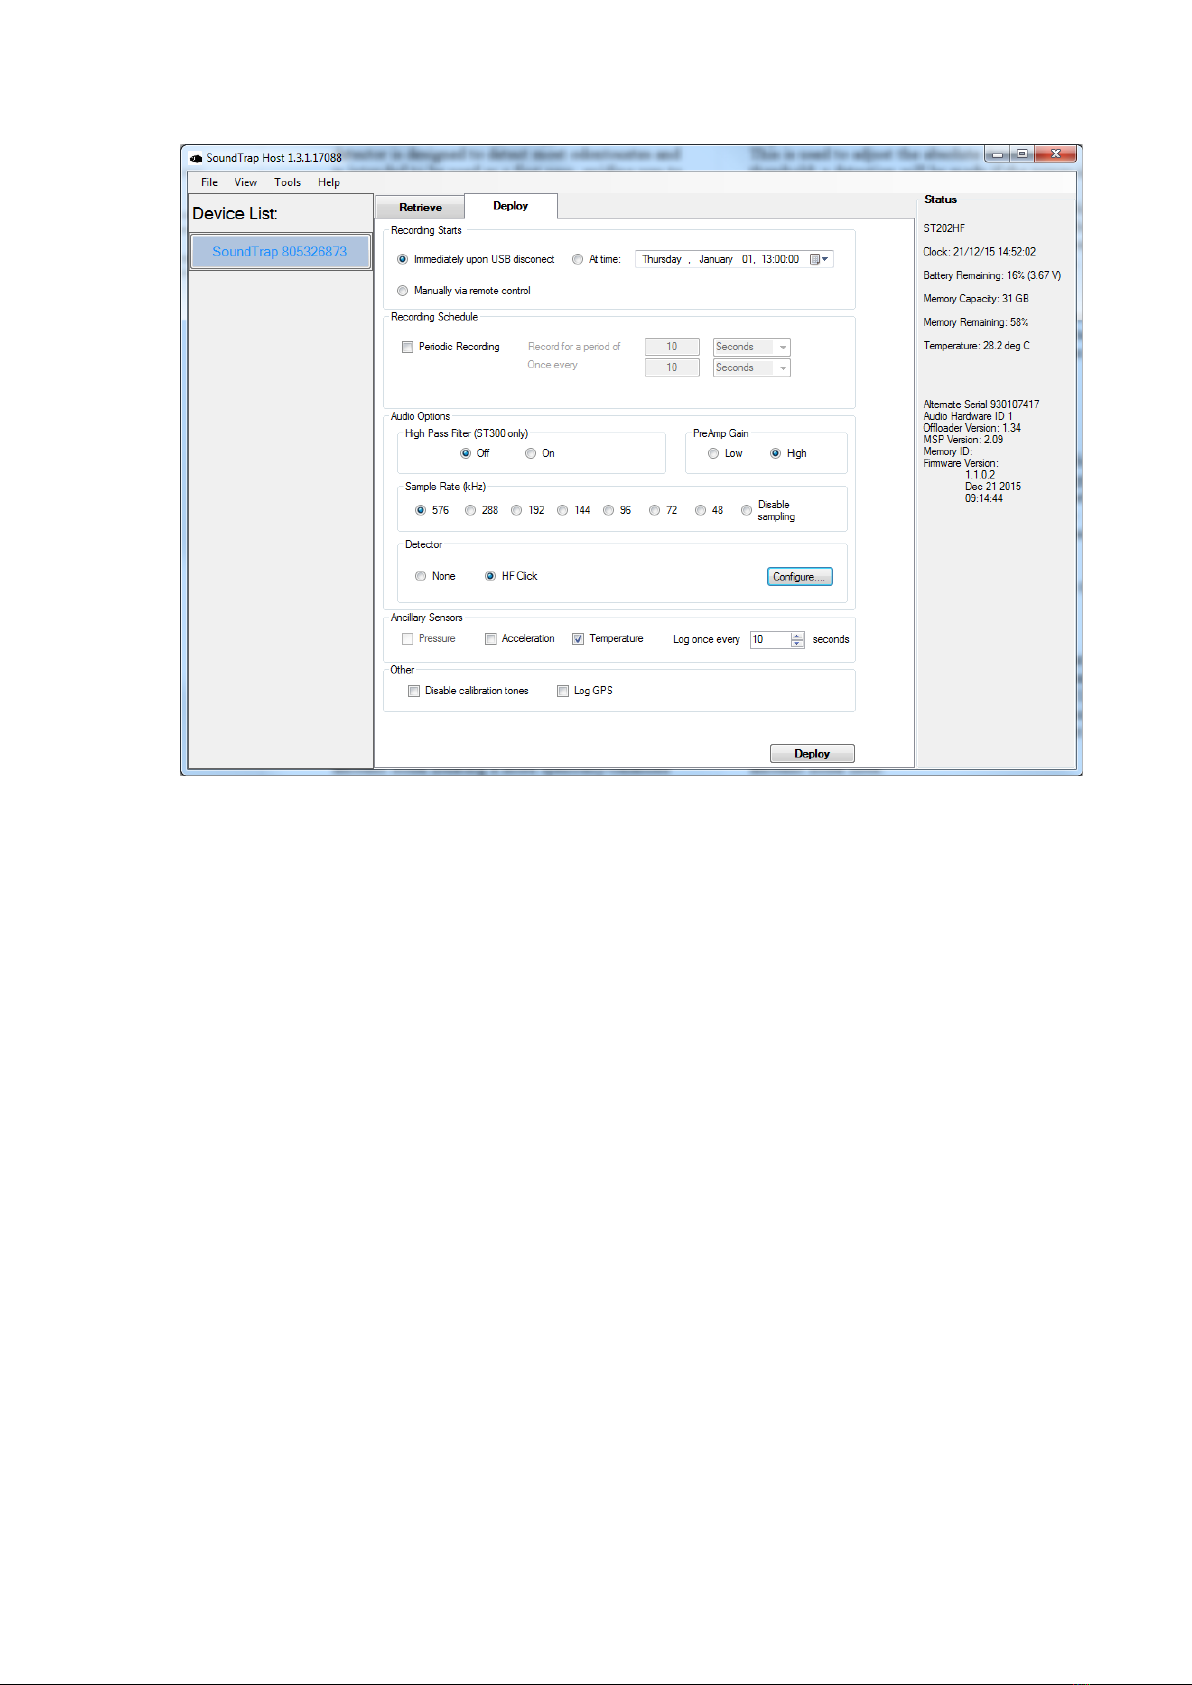
2.4 Configure the deployment...............................................................................................7
2.5 Begin recording using the IR Remote Control..................................................................9
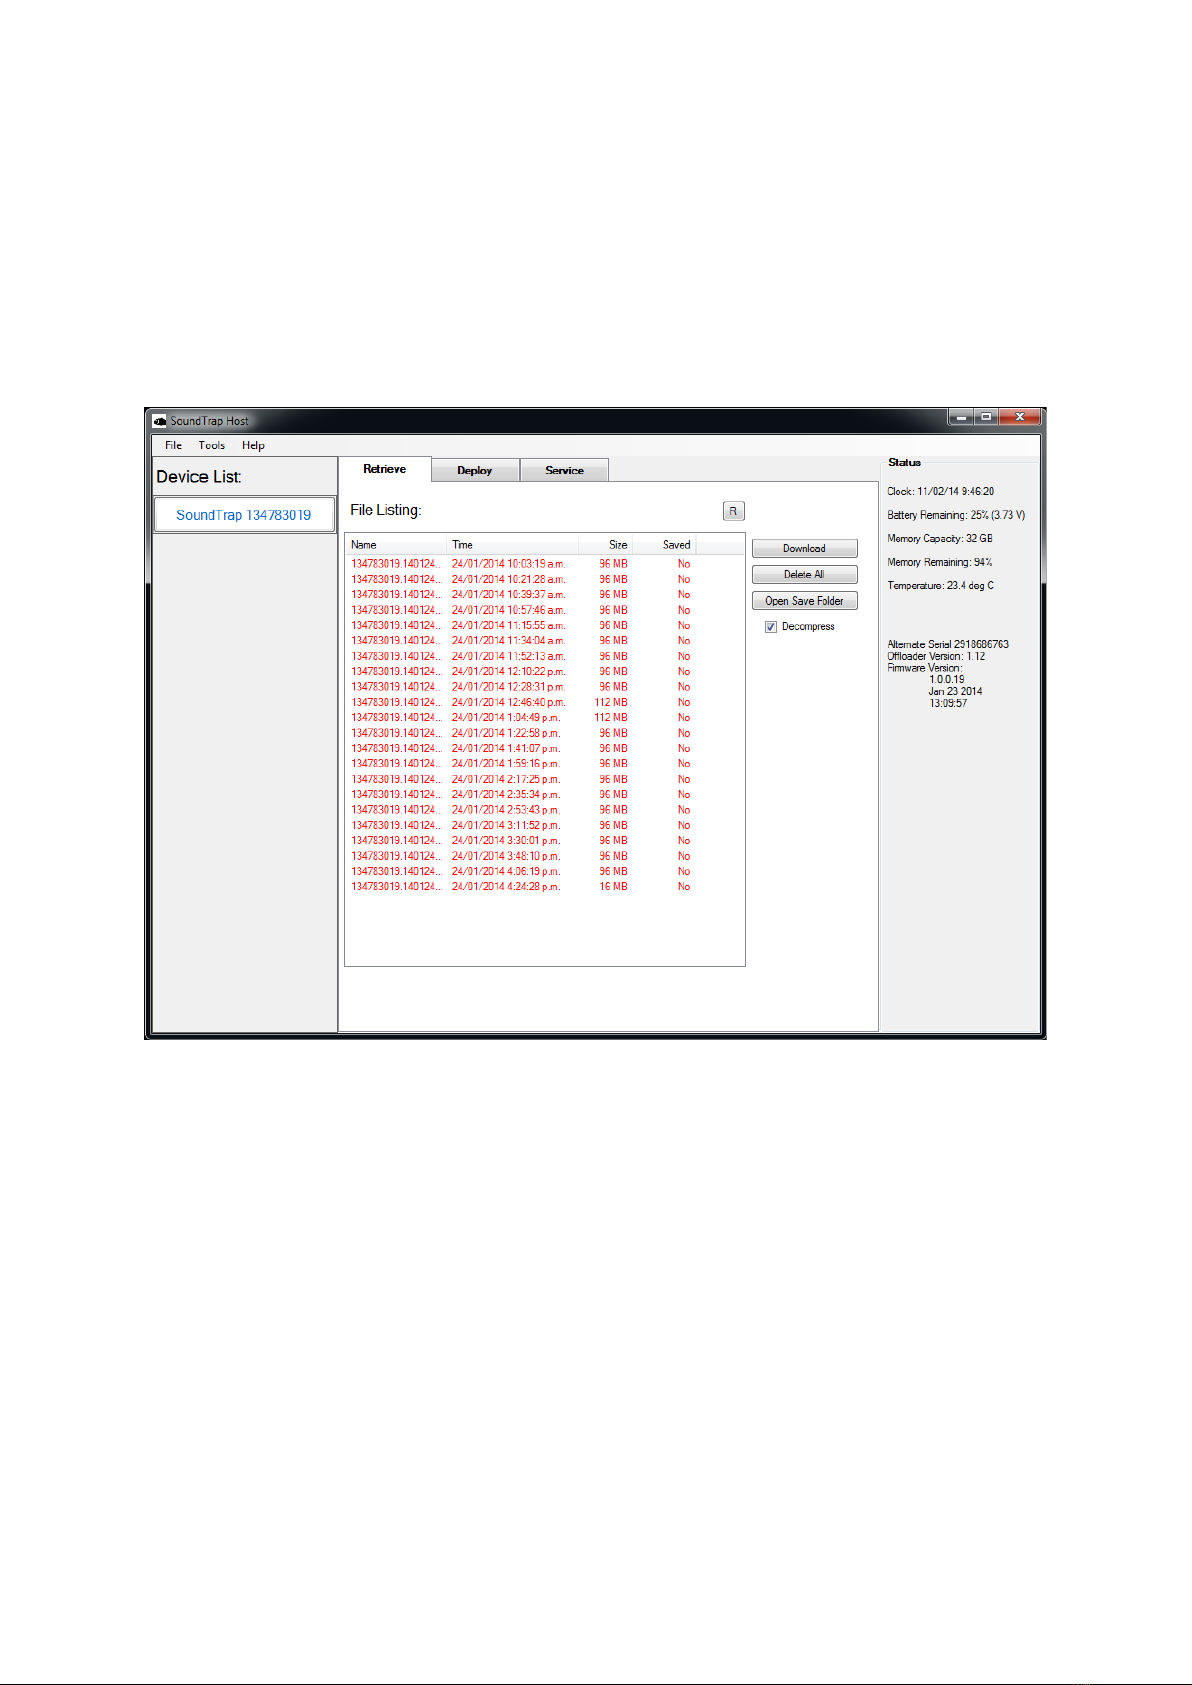
2.6 Data Offload...................................................................................................................10
3 More details ..................................................................................................................................12
3.1 Data Files........................................................................................................................12
3.2 Battery charging.............................................................................................................12
3.3 Using the optional external battery pack.......................................................................14
3.4 Calculation of deployment endurance...........................................................................15
3.5 Clock details ...................................................................................................................15
3.6 Ancillary Sensors ............................................................................................................17
3.7 ST4300 multi channel recording ....................................................................................18
3.8 Deployment scheme ......................................................................................................19
3.9 Housing maintenance ....................................................................................................20
3.10 Software updates...........................................................................................................21
3.11 MSP firmware updates...................................................................................................21
3.12 Calibration......................................................................................................................21

3.13 Troubleshooting.............................................................................................................24
4 Appendices....................................................................................................................................26
4.1 SoundTrap HF Click Detector .........................................................................................26
4.1.1 Click detector..........................................................................................................26
4.1.2 Snippet extractor....................................................................................................27
4.1.3 User parameters.....................................................................................................27
4.1.4 Output File formats ................................................................................................28
4.1.5 Click Detector Caveats and Cautions......................................................................30

1About this guide
This guide begins with a ‘Quick start’ section to help you get going with your new SoundTrap, including
software installation and basic deployment instructions. This is followed by several sections containing
more detailed information around operation, deployment, maintenance and troubleshooting. It is
highly recommended you read the entire guide to ensure you have a good understanding of the
instrument and how to get the most from its capabilities.

2Quick start guide
To start using your SoundTrap you’ll need to install the SoundTrap Host software.
2.1 Install the SoundTrap host on your PC
•Pre-installation Notes:
oThe SoundTrap host software supports Windows 7 and 8 (32 or 64 bit versions).
oDo not connect the SoundTrap to your computer until you have completed the
SoundTrap host software installation.
oThe installation will be smoother if you’re logged into windows as an administrator.
•Visit www.OceanInstruments.co.nz/downloads/ to download the software.
•Download and run the installer.
•Once the install completes, run the SoundTrap Host application.
2.2 Connect SoundTrap to your PC
•Connect the SoundTrap using the USB cable provided.
•The drivers will take a couple of minutes to install. Once complete you should see your
SoundTrap appear in the ‘Device List’ on the left, as shown in figure 1.
•Select your SoundTrap by clicking its label on the left.

Figure 1 - The Device List
2.3 Check SoundTrap Status
Note the ‘Status’ panel on the right (Figure 3). Verify that the battery has sufficient charge
and the memory is not full.

Figure 2 –Deploy Control
2.4 Configure the deployment
•Select the ‘Deploy’ tab as shown in figure 2.
•Configure the deployment parameters as follows:
oThe ‘Recording Starts’ section determines when recording will begin. Recording can
begin immediately on disconnection of the USB cable, at a pre-determined date and
time, or manually using the IR remote control. Note that the remote can always be
used to override the other options.
oThe ‘Recording Schedule’ section provides selection of continuous or periodic
recording. For continuous recording simply leave the ‘Periodic Recording’ option
unchecked.
oOptions available in the ‘Audio Options’ will vary according to your device’s
capabilities. Options include the following:
▪Channel Selection selects which channels to record on.

▪Sample Rate should be set based on the frequency band of interest and
data rate considerations. A 96 kHz sampling rate is often a good choice for
general environmental noise measurements. Contact OI support if unsure.
▪Preamp Gain should usually be set to ‘High’. This will result in a maximum
SPL before clipping of approximately 172 dB re 1 uPa. The ‘Low’ setting
should be used for very noisy environments such as in the vicinity of pile
driving. The low setting increases the maximum SPL to around 184 dB, but
comes at the cost of lower sensitivity.
▪High pass filter. This should usually be turned off. Generally only used in
high energy sites or when towing a SoundTrap behind a boat. Turning this
on reduces sensitivity in the band 0 to 600 Hz, while leaving higher
frequencies unaffected.
oDetector –see HF Click Detector section below.
oAncillary sensors –select those you want to log and at what interval. See following
section for details.
•Once you’ve made your selections click the deploy button which will save the settings and
you’re ready to go!
•The instruments internal clock is synchronised to your PC when you click the deploy button.
•If you change your mind about something, just re-select the instrument from the ‘Device
List’.
•Unplug the USB cable and replace it with the dummy plug. If the connector becomes dry,
lubricate with silicon grease or spray to ensure a water tight fit.
Your SoundTrap is supplied with a dummy plug for the wet connector. Please ensure that
you remember to use it when deploying the SoundTrap in order to prevent damage.

2.5 Begin recording using the IR Remote Control
You may use the remote control to start recording.
•Press ‘START’ to start recording.
•Press ‘STOP’ to stop recording.
•If you have set a recording to start recording at a
later time, the recorder will blink red to indicate it
is ‘armed’ and waiting.
•The ‘armed’ state is cancelled by pressing Stop key.
•Re-enable the armed state by pressing the ARM
button.
•You can verify recording has started by checking
for slow blinking of the status (green) indicator.
•Note that the remote is splash proof and designed to tolerate wet hands. Don’t attempt
to use it underwater –you’ll be disappointed.

2.6 Data Offload
Once you’re done recording, reconnect your SoundTrap to your PC and select the Retrieve Tab, as
shown in figure 4.
Figure 3 –Retrieve Tab
•You will see a list of files in the SoundTrap’s memory, including the file name (made from the
device serial number plus local date and time), date recorded, approximate size and whether
it has yet been downloaded to your computer’s hard drive.
•Download individual files by right clicking the file and selecting ‘download’.
•By default all files will be downloaded to a ‘SoundTrap’ folder under My Documents. This
default location can be changed under the ‘Tools’ menu.
•Click the ‘Open Save Folder’ button to open the download folder location.
•To download all files, select all files using the shift key, then click the ‘Download’ button.
•To delete, click the ‘Delete All’ button. Files cannot be deleted individually.

•For faster download in the field, or to save disk space, un-check the ‘Decompress’ checkbox.
This will disable the decompression step of the offload process, meaning you will end up
with ‘sud‘ files only. These can be decompressed into wav files at a later time using the ‘File
Extraction’ option under the tools menu.

3More details
3.1 Data Files
Downloads produce several types of files:
o‘sud’ files which are the raw downloaded file. This is a compressed file and therefore
ideal for storing or sending of complete recordings. It can then be decompressed at
a later time into the following constituent file formats.
o‘wav’ files containing the audio. This is a Microsoft WAV format file that can be
opened by any media player, matlab, raven etc.
o‘xml’ files which contain metadata such as date recorded, gain setting, etc.
o‘csv’ files containing ancillary sensor data (e.g. temperature)
All file types follow the same naming convention consisting of the device serial number followed by
the date and time of the start of the recording in the format YYMMDDHHMMSS.
For duty cycled recording there will usually be one file per recording period. For continuous
recording a maximum file length of 1036800000 samples (2GB of wav) will determine the length of
the files. This equates to 1 hour recordings for a 288khz sample rate.
Where smaller than 2G files are desired for continuous recording it is recommended to set a duty
cycle with ‘zero off time’. For example, a duty cycle of 30 minutes every 30 minutes will result in
continuous 30 minutes files with no missing samples between files.
3.2 Battery charging
SoundTrap uses an internal rechargeable Lithium ion battery. The battery is recharged by plugging
the SoundTrap into a computer’s USB port, or other USB power supply. Look for the blue LED
indicator to confirm that the battery is charging. Once the charging cycle completes the blue
indicator will extinguish. Charging time for ST202 (STD or HF) is approximately 8 hours for a
completely discharged battery. Some additional notes about battery charging:
•The battery will charge while data is being offloaded over the USB.
•The charge level reported by the SoundTrap Host software (in percentage and voltage
terms) is only accurate to within approximately 10%. Determination of whether the battery
is fully changed should be by observation of the blue LED indicator, NOT the approximation
given by the Host software.

•Once the battery reaches full charge (blue indicator extinguished) the charge indicator in
the Host software will start to fall. The charging process will restart once the charge
indicator drops to around 90%. Do not be concerned that the battery is not fully charged.
Provided the blue LED is not lit, the battery should be considered fully charged.
•Battery charging will be quicker when the SoundTrap is not connected to the host software.
If the green LED is NOT flashing (indicating USB communication mode) battery recharging
will be quicker. As such, for quickest recharge time do not start the Host software, or
alternatively charge the SoundTrap from a USB power supply rather than a computer.
•The battery should not be left for long periods in a discharged state. When storing a
SoundTrap for the off-season, ensure the battery is fully recharged before placing in
storage. To ensure battery longevity, give the battery a top up once every 3 months.
•If the SoundTrap has been left unused for several months the battery may be in a severely
discharged condition. In order to recover from this state the SoundTrap will begin trickle
charging the battery until it reaches a normal state. This process can be very slow if the
SoundTrap is connected to the Host software. See the trouble shooting guide if your
SoundTrap has trouble recovering from this condition.

3.3 Using the optional external battery pack
The ST300 series products support the connection of an external battery pack. Connection of the
battery pack is straightforward. First fit the battery pack with 3 x fresh D cell alkaline batteries,
carefully ensuring correct polarity.
We strongly recommend using Energizer brand batteries. Advertised endurances are based on this
brand, and performance of other brands is unknown. Most importantly, Energizers are guaranteed
not to leak electrolyte when left in a discharged state. Other battery brands may leak, possibly
causing damage.
Before opening the housing always check for flooding by shaking the recorder and listening for water
sloshing around inside. If flooding is suspected, then be aware that the housing may be pressurised
and therefore potentially dangerous. Carefully relieve any pressure by opening the small seal screw
at the base of the housing.
Before closing the battery housing ensure that the o’ring seal is perfectly clean, free from nicks or
other damage, well lubricated and properly seated. Generously apply silicon o’ring grease on both
the o’ring and the tubes sealing surface. Close the housing by screwing closed by hand until the
shoulder snugs up against the titanium tube. You may choose to use a lever arm (e.g. screwdriver)
through the holes provided top and bottom. However difficulty in screwing home the cap may
indicate insufficient o’ring lubrication; do not apply excessive force – instead correct by applying
o’ring lubricant.
Fit the supplied cable between the battery pack and SoundTrap, using the supplied plastic collars to
lock the two connectors. The cable should plug in without effort. Where it is difficult to insert it is
important to lubricate the connector with silicon grease or spray.
Verify the supply of power from the external battery to the SoundTrap. Do this by pressing the ‘BAT’
button on the IR remote and observing the SoundTrap’s red status LED. If all is well you should see
two long red flashes. Note that there is a 10 second delay between connecting the battery and the
software determining that the supply is stable. Observation of the two long flashes is confirmation
that the external battery is available, has viable batteries, and is ready to go.
A single short red flash indicates a problem. In this event, disconnect the external battery and
inspect for correct battery insertion and adequate battery condition.

When deploying with the battery pack it is important to avoid any strain on the cable. Tight bends
close to the connector are particularly problematic as they can cause the connector rubber to
deform and allow water to reach the contacts. This will destroy the connector. It is therefore very
important to avoid tight bends in the cable.
3.4 Calculation of deployment endurance
An excel spreadsheet is provided on the web site to help with the calculation of deployment times
for differing deployment parameters. The spreadsheet provides deployment estimates, as well as
identifying one of three possible deployment constraints: battery capacity, memory capacity, or file
count. While the first two are obvious, the file count constraint requires explanation.
The file system used by SoundTrap currently has a minimum file size of 4 MB. When using periodic
recording, if the programmed ‘record for a period of’ period is very short, the resultant file may be
smaller than the minimum file size. This will result in inefficient usage of memory, and the
deployment may be artificially memory limited. For example, a SoundTrap 202 has 64 GB of
memory; dividing this by the minimum file size of 4 MB gives a maximum of 16000 files.
This limitation becomes an issue when using low sample rates in combination with X3 compression.
By experimenting with the periodic recording parameters in the deployment spreadsheet it will
become clear how to best avoid this limitation.
3.5 Clock details
SoundTrap’s clock is synchronised to your PC whenever you click on the ‘deploy’ button, with an
accuracy of +/- 0.5s.
Internally the clock is maintained in UTC time. When files are offloaded to the PC file times are
converted to local time (using the PCs location settings) for population of the filenames. This means
that the dates and times in the filenames are always in the time zone of the PC that was used to
offload the files. This can be important where files are offloaded in a region other than that in which
they were recorded. Alternatively, filenames can be assigned UTC times by selecting the ‘Use UTC
time’ option under the tools menu.
Like most electronic devices, SoundTrap relies on a crystal oscillator for time keeping. The oscillator
used in the ST300/ST4300 has an accuracy of +/- 20PPM, or +/- 1.77 seconds per day. The audio
sample rate is derived from the same oscillator, meaning the sample rate is subject to the same

accuracy. The oscillator will drift with temperature with this range. For more information on the
clock accuracy please see documentation for the oscillator –part OV-7604-C7-STD-020.
Sampling rate accuracy is also subject to occasional sampling gaps. The nature of SD flash memory
cards is such that occasional the memory card will fail to keep up with sampling, thereby resulting in
dropped samples. When this occurs, an entry will be written to the log (xml) files in the format
“sampling gap X us at sample Y”. There is an experimental option under the Tools menu ‘Zero Fill
Dropouts’. This function will attempt to fill any sampling gaps with a series of zeros. This may be
useful where more precise sampling timing is required.

3.6 Ancillary Sensors
All SoundTraps include temperature and accelerometer sensors. Logging of these is enabled by
selecting the corresponding checkbox in the deployment screen of the SoundTrap Host software.
Note that logging can only take place while the recorder is awake, meaning that sensor logging is
subject to the same duty cycle as that configured for audio recording.
Sensor data is offloaded alongside audio data, and is decompressed into CSV format files, one file
per sensor, per audio recording.
Temperature data is recorded in degrees Celsius. Note
that these measurements are only valid when the
instrument is fully submerged, and that
measurements made in air will be incorrect due to
internal heat build-up, particularly when connected to
USB and recharging the battery.
Accelerometer data is recorded as unscaled 16 bit
values ranging +/- 32768. The full scale sensitivity of
the accelerometer is +/- 2 g, meaning each count
represents 61 ug. The orientation of the
accelerometers axis for the ST300 is shown in the
adjacent diagram. Older ST200 models have the X and
Y axis transposed. Note that the X & Y axis are not
easily discerned as the rotation of the sensor within
the housing varies. This is generally of little
consequence for inclination and cable strum
applications, but where required can be measured by placing the recorder in a known static
orientation, observing the resultant measurements and solving for gravitational acceleration. For
those wanting more detailed information on the accelerometer sensor characteristics, please refer
to the datasheet for the Kionix KXTI9.
Figure 4 - Accelerometer axis for ST300

3.7 ST4300 multi channel recording
The ST4300 supports connection of up to four external hydrophones. These are connected via four
wetplugs at the base of the recorder. Each wetplug has a number adjacent to it relating it to the
channel selection in the deployment settings.
ST4300 output files are multichannel wav files where the channel numbering is from lowest to
highest physical channel number. For example - recording on channels 2 and 4 only would result in a
two channel wav file with the 1st wav channel pertaining to the 2nd physical channel.
Recording endurance will be reduced by increased channel count due to both increased power
consumption and data rate. We recommend using our online endurance calculator to make these
calculations. Note that the calculator assumes use of HTI-96-MIN hydrophones which consume
approximately 3.6 mW. Use of other hydrophones may give different results.
Compatible hydrophones can be obtained from High Tech Inc USA with model code:
HTI-96-MIN/3V/Low Noise/SoundTrap/-165dB.
This model has bandwidth of 30 kHz. For higher frequency models we recommend discussing your
requirements with HTI.
While use of other manufacturers hydrophones is possible we advise a cautious approach. To be
compatible hydrophones must operate on a 3V supply with a max power draw of 10 mW. Contact
OI for more information including connector pin-out.
Is is critical that unused channel connectors are protected with dummy wet plugs. Failure to do so
will result in damage.

3.8 Deployment scheme
The anchoring scheme used is very dependent on the goals of the data collection in combination
with the deployment environment. Thankfully
SoundTraps are more easily deployed than traditional
acoustic recorders due to their small size. A SoundTrap’s
weight in water is approximately 0.5 kg.
Most often the hydrophone is located near the sea
floor, using an anchored line. This involves running a line
between a heavy anchor weight and either a surface or
sub-surface float. A sub-surface float is often best, as it
is less affected by weather/swell and is less likely to be
tampered with. The SoundTrap should be attached to
the line a couple of meters off the bottom. Two grooves
in the housing circumference provide attachment points
for cable ties for this purpose. Do not use hose clamps
or any other fastener that will place clamping stress on
the housing as this may cause damage. There are also
two lanyard attachment points which can be used to
provide additional security/redundancy.
Ensure there are no metal objects in close proximity
(3cm) to the SoundTrap wet connector eg using metal
brackets or wire rope. Doing so may lead to galvanic
corrosion (and eventual failure) of the stainless steel
wet-socket body.
Don’t mount your SoundTrap so close to the sea floor
that it may become covered in sand or mud. This will
also lead to corrosion and eventual failure of the wet
connector.
Be mindful that a taut line combined with strong currents may result in ‘cable strum’ which may
disrupt your recordings. In this case a rigid frame may be more appropriate.
Figure 5 - Typical deployment including external
battery

Deploying with the external battery housing
The external battery housing has two cable tie slots, bottom and top. Cable ties should be threaded
through the associated holes so they cannot slip off. When using an external battery housing the
weight of the complete system in water is approximately 1.5 kg. It is important to ensure that the
battery and recorder are secured to the line such that there is minimal stress on the power cable.
See the image alongside as an example.
3.9 Housing maintenance
SoundTrap ST200 & ST300 series recorders come in two housing types –standard and deep with 500
and 1000m depth rating respectively. Both types of housing are filled with mineral oil in order to
achieve their depth rating. You will notice an air bubble visible through the transparent window,
which over time will tend to grow in size.
Standard housing (500m rated)
Most ST300 recorders are of this type. For this housing topping up is only necessary when deploying
deeper than 200m. If the air bubble becomes larger than approximately 12 mm diameter and you
intend to deploy beyond 100m then you should top it up.
Deep Housing (1000m rated)
This housing is recognisable by the soft rubber diaphragm around it’s middle section. Most ST200
series recorders are of this type. When using these housings at any depth it is important to check
that the mineral oil is topped up. If the air bubble is larger than approximately 12 mm diameter, the
oil must be topped up.
Topping up procedure
Topping up is done via the filler port screw, located next to the wet plug socket. This is best achieved
using a syringe and large gauge needle (16 gauge works well). The oil should be a good quality
mineral oil, as commonly available from drug stores. Feel free to send us an email if you are unsure.
This manual suits for next models
1
Table of contents
Other Ocean Instruments Recording Equipment manuals