Oceanic Steam Aroma User instructions

PRODUCT IMAGE
Oceanic Ltd, Pountney Street, Wolverhampton, WV2 4HX
Sauna & Steam
3 Way Fragrance Pump
Assembly and operating manual

Sauna & Steam
3 Way Fragrance Pump Manual
Table of contents
1. Introduction . . . . . . . . . . . . . . . . . . . . . . . . . . . . . . . . . . . . . . . . . . . . . 3
2. Parameter and functions . . . . . . . . . . . . . . . . . . . . . . . . . . . . . . . . . . . . .3
2.1. Power supply transformer . . . . . . . . . . . . . . . . . . . . . . . . . . . . . . . . . . . 3
3. Install and Operate . . . . . . . . . . . . . . . . . . . . . . . . . . . . . . . . . . . . . . . . .5
4. Testing and operation . . . . . . . . . . . . . . . . . . . . . . . . . . . . . . . . . . . . . . .6
5. Electrical Diagram . . . . . . . . . . . . . . . . . . . . . . . . . . . . . . . . . . . . . . . . . . 7
6. General Information . . . . . . . . . . . . . . . . . . . . . . . . . . . . . . . . . . . . . . . .7
7. Bottle Kit Set Up . . . . . . . . . . . . . . . . . . . . . . . . . . . . . . . . . . . . . . . . . . . 8

Sauna & Steam
3 Way Fragrance Pump Manual
1. Introduction
Thank you for choosing to buy our Oceanic 3 way fragrance pump OC-EP, please take the time to
read these instructions before you begin as they contain important information about the
installation and maintenance requirements.
OC-EP fragrance pump operates at 9V via a mains transformer.
We recommend the use of Steamaroma fragrance concentrates for use with this pump.
FOR SUPPLIES CONTACT www.oceanic-saunas.co.uk
2. Parameter and functions
2.1. Power supply transformer
Input Voltage 220V ~ 240V
Output Voltage: Output I 9VAC, 5W
Outpur II 9VAC, 30W
2.2. OC-EP(3 way)function instruction (gure 1)

Sauna & Steam
3 Way Fragrance Pump Manual
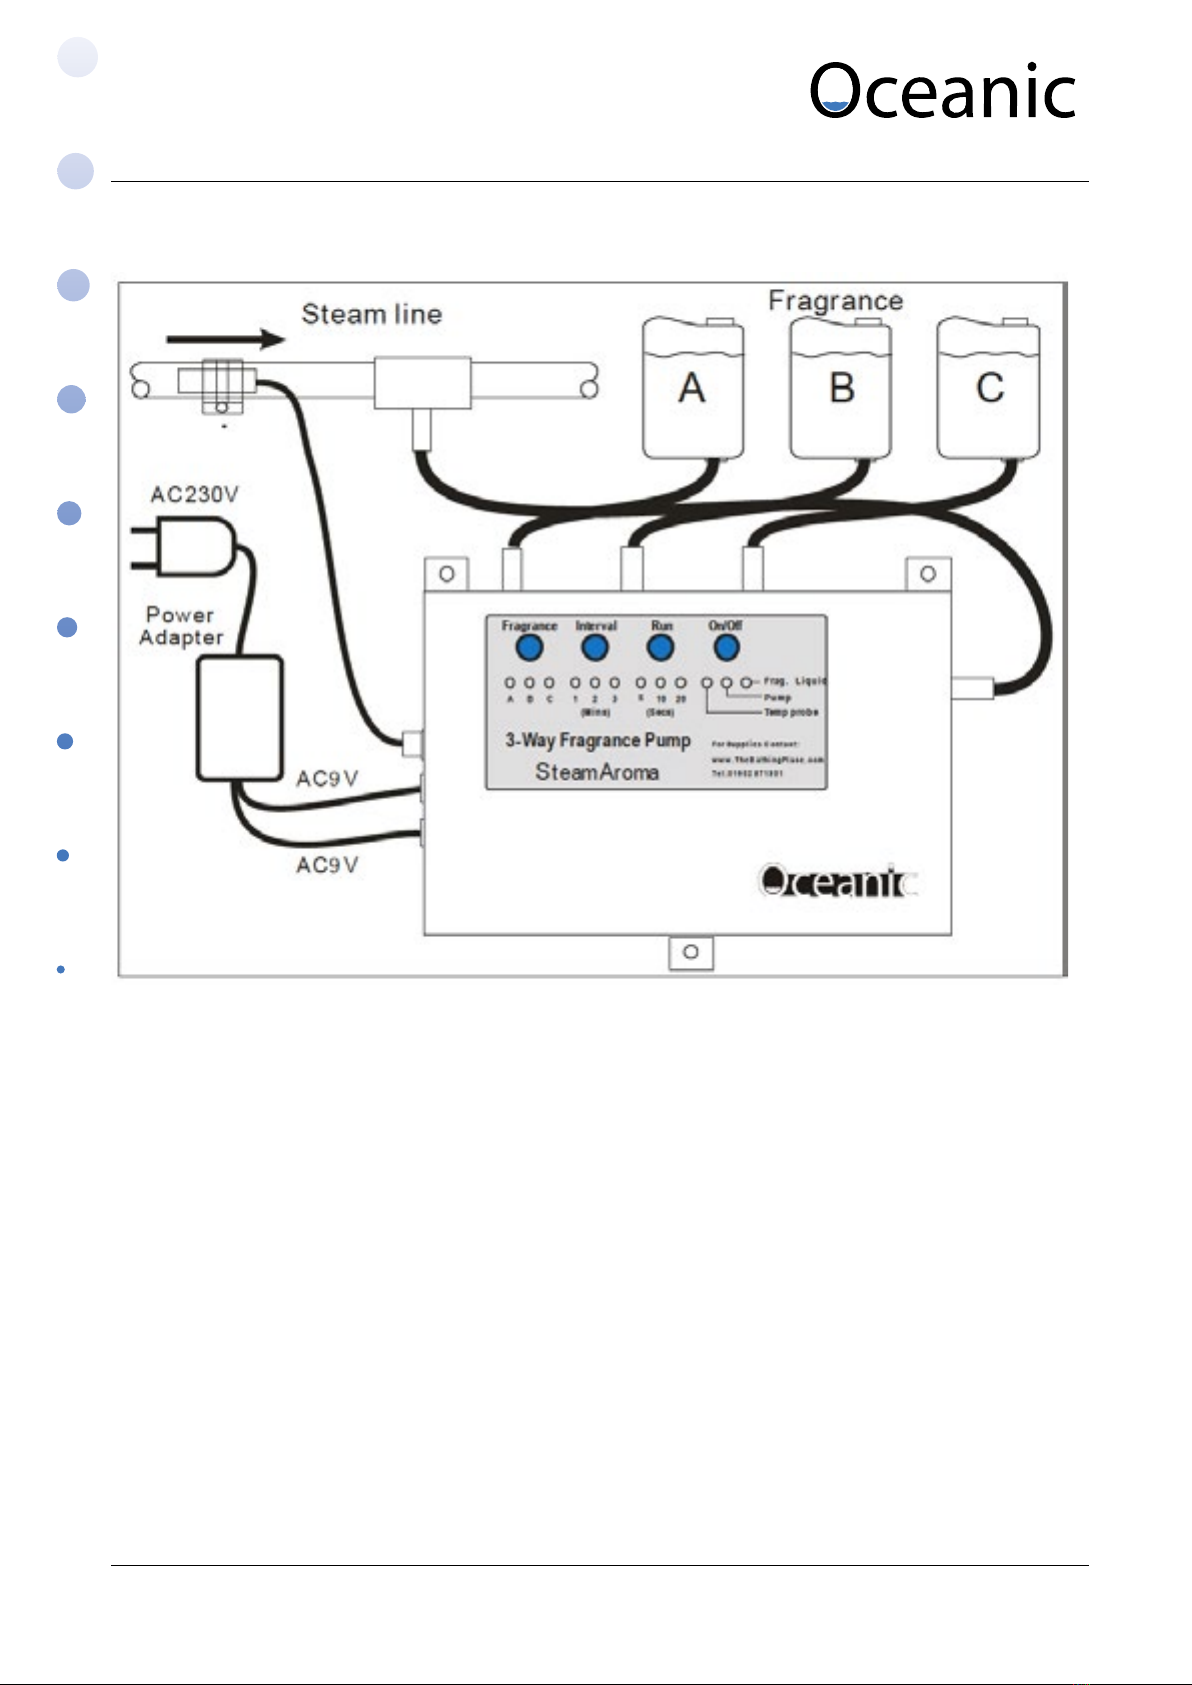
No Description Function
1 Temperature control port Temperature signal input
2 Power input I 9V power supply input (for circuit board)
3 Power input II 9V power supply input
4 A fragrance Input
5 B fragrance Input
6 C fragrance Input
7 Fragrance Output
8 Fragrance Selection Key Choose A, B or C or alternating
9Interval Time Key Sets the dispersal interval time (Frequency)
10 Run Time Key Sets the pump operating time (Amount)
11 ON/OFF key Push to operate
12 A fragrance indicator LED When C LED is on, means C fragrance was chosen
to input
13 B fragrance indicator LED When B LED is on, means B fragrance was chosen to
input
14 C fragrance indicator LED When A LED is on, means A fragrance was chosen
to input
15 1 minutes interval time
indicator LED
The LED is on, means the fragrance pump every
working internal time is 1 minute
16 2 minutes interval time
indicator LED
The LED is on, means the fragrance pump every
working internal time is 2 minutes
17 3 minutes interval time
indicator LED
The LED is on, means the fragrance pump every
working internal time is 3 minutes
18 5 seconds working time
indicator LED
The LED is on, means the fragrance pump every
working time is 5 seconds
19 10 seconds working time
indicator LED
The LED is on, means the fragrance pump every
working time is 10 seconds
20 20 seconds working time
indicator LED
The LED is on, means the fragrance pump every
working time is 20 seconds
21 Temperature indicator LED When the detected temperature on steam line
achieve 85℃, the LED is on (fragrance pump will can
operate)
22 Pump operation indicator LED LED is on the pump is working
23 Water level indicator LED When the LED is on, means all the 3 fragrance
solutions containers has fragrance solutions
(fragrance pump can operate).
Notes When the fragrance A.B.C LED all are on, means the it is alternating sequence
working status for fragrance A.B.C

Sauna & Steam
3 Way Fragrance Pump Manual
3. Install and Operate
Figure 2
i. Install the pump in close proximity to the steam generator with a suitable power supply for
the mains adapter. Note that the fragrances should be positioned at least 50 cm above the
pump.
ii. Fix the fragrance pump onto dry wall using screws and plugs.
iii. Use the regular 15mm plastic hose to connect the between the fragrance storage vessels
and 3 input ports as shown in g 2. Then insert the T piece into the steam output line from
the steam generator and connect the output port of the fragrance pump using the high
temperature silicon rubber hose make sure all the connections are tight so that there are no
leaks and that none of the pipes are kinked or form a trap which could cause a restriction to
the ow.
iv. Remove the protective silicone covering and attach the temperature sensor to steam pipe
covered with insulation cotton or a jubilee clip then connect the pin into socket of fragrance
pump.
v. Once the fragrance bottles are full and lying down, puncture a hole in the top of the bottles
to allow an air ow.
6) Connect the transformer outputs to the input ports I and II. Connect the transformer to power
supply.

Sauna & Steam
3 Way Fragrance Pump Manual
4. Testing and operation
i. Fill the fragrance storage vessels with a dilute solution of fragrances open the valves (taps) to the
fragrance pump.
ii. Turn on the power supply
iii. Press the “on/o” key (LED 17 & 20 will be on) - the default settings are fragrance A, run time 5
seconds and interval 1 minute; when the level sensor probe holder is full of fragrance solution
water level indictor LED 23 is on.
iv. Turn on the steam generator, when the temperature of the steam line reaches 85℃ the
temperature indicator LED will light and the pump will operate for 5 seconds (the pump
indicator LED is on)
After pumping for 5 seconds the pump will stop for an interval of 1 minute to allow the fragrance to
diuse; then the cycle will be repeated.
Note that for the rst operation it may require one or two operations of the pump before the
fragrance enters the steam line depending upon the distance to T piece.
We suggest you observe the sequence operate 2 or 3 times to ensure it is functioning satisfactorily.
To select the required fragrance press the fragrance key for A, B or C - pressing the button again will
light all 3 LEDs to indicate the pump is set to the alternating sequence.
Depending on the size of the steam room and the concentration of fragrance required you can set
the run and interval periods to suit.
Using Steamaroma concentrates the typical dilution rate is 1 part concentrate to 20 parts of water
but you may also vary this to suit customer requirements.
Please note the power supply should be 220VAC~240VAC 50~60HZ, the fragrance solution container
must be placed at least 500mm higher than fragrance pump; the input hose from fragrance solution
container to fragrance pump must not form a trap to block the solution ow.
The input hose from fragrance pump to steam line must be high temperature silicon hose, and also
this hose should not create a trap.
Warranty - The product is guaranteed for 12 months from the date of purchase; for after sales service
please contact your retailer, dealer or service centre.

Sauna & Steam
3 Way Fragrance Pump Manual
5. Electrical Diagram
6. General Information
An automatic pump for use with all steam generators. The Steam-Aroma fragrance pump is
controlled by advanced electronics to provide a host of unique features;
• Automatic temperature sensor - the pump will only operate when the generator is steaming.
3 Way pumping - the pump has 3 inlet valves to enable 3 dierent fragrances to be injected
into the steam line - select anyone of the 3 or an alternating sequence.
• Variable settings for dierent steam room sizes and various fragrance concentrations.
• Variable interval settings to maximize eciency
• Built in non return valve & a run dry sensor to protect the pump
• Supplied complete with
• 9V mains adapter
• 3 meters of exible feed pipe
• 1.5 meters of high temperature piping and a pipe
• 15mm female threaded copper tting (for connection to a T piece you should install in your
steam line)

Sauna & Steam
3 Way Fragrance Pump Manual
7. Bottle Kit Set Up
We recommend Steam-Aroma fragrance concentrates for use with this pump - Please see Steam
Aroma category for our complete range.
Note the steam generator and storage bottles shown in the picture illustrate the set up, they are not
included in the price.
Table of contents
Other Oceanic Water Pump manuals
Popular Water Pump manuals by other brands

Central Machinery
Central Machinery 40634 Assembly & operating instructions

Knauer
Knauer BlueShadow 80P instructions

Dover
Dover Almatec Biocor Series Operating and installation instructions

Ingersoll-Rand
Ingersoll-Rand PM20R A02 Series Operator's manual

EasyPro
EasyPro Tranquil Decor quick start guide

Sitepower
Sitepower SP80 operation instruction

Graco
Graco Series A Instructions - parts

Homa
Homa Chromatic C 237 WF Installation and operation instruction manual

Clements
Clements SUC 81030 user manual

Samoa
Samoa LARIUS MIRO Operating and maintenance manual

SHURflo
SHURflo RVFRESH WATER PUMP Installation and operation manual

Nocchi
Nocchi FCD20/VLR16 Series Use and maintenance manual