Odys Slim TV 10 User manual

ODYS Slim TV 10
1
EN
Table of contents
1Safety instructions...................................................................................2
2Product properties...................................................................................5
2.1 Language Settings....................................................................................6
3Controls ..................................................................................................8
3.1 DVD player...............................................................................................8
3.2 Using USB memory and SD cards ............................................................11
3.3 Buttons of the Remote Control ...............................................................12
4Connecting the DVD player ..................................................................15
4.1 Connecting to a television set.................................................................15
4.2 Connecting to an external A/V source ....................................................15
4.3 Connecting headphones.........................................................................16
4.4 Connecting to DVB-T Antenna ...............................................................17
4.5 Power supply unit ...................................................................................17
4.6 Car adapter ............................................................................................18
5Rechargeable battery pack ...................................................................19
5.1 Notes on using rechargeable batteries ...................................................19
5.2 Connecting the rechargeable battery pack .............................................20
5.3 Charging the battery pack.......................................................................20
5.4 Removing the rechargeable battery pack ...............................................20
6DVB-T functions....................................................................................21
6.1 Using the Setup Wizard..........................................................................21
6.2 TV programme selection and video text .................................................22
6.3 Additional DVB-T settings.......................................................................23
7Disc information ....................................................................................27
7.1 Compatible disc formats .........................................................................27
7.2 Using discs.............................................................................................28
8Playback operation ...............................................................................29
8.1 Getting started........................................................................................29
8.2 DVD playback.........................................................................................30
8.3 CD playback (Audio, VCD, SVCD) .........................................................31
8.4 Files View...............................................................................................33
8.5 Image CD/DVD-Playback .......................................................................33
8.6 Video Files, MP3-Playback.....................................................................35
8.7 Programmable Playback ........................................................................37
9Display Settings ....................................................................................38
10 System settings.....................................................................................39
10.1 General Setup ........................................................................................39
10.2 Language Setup .....................................................................................41
10.3 Audio Setup............................................................................................42
10.4 Video Setup............................................................................................42
11 Glossary................................................................................................44
12 Trouble-shooting...................................................................................45
13 Specifications........................................................................................47

ODYS Slim TV 10
2
EN
1 Safety instructions
Thank you for choosing our product. Please read this manual carefully and observe all
safety and operating instructions. Store the manual in a safe place for later reference.
The flash symbol displayed in a triangle warns the user of dangerous electrical
voltages inside the device that could lead to electrical shocks with harmful effects
to health if the device is used incorrectly.
or
The exclamation point displayed in a triangle in the documentation
indicates dangers when using and maintaining the device.
The information symbol in the documentation indicates useful information and tips
for using and maintaining the device.
Caution
The device is a class 1 laser product. The corresponding label
is located on the rear side of the device. When the housing has
been opened and the lock is not engaged, visible laser radiation
can escape. Avoid looking into the laser beam by all means.
Caution
The product contains a low-power laser device. In order to ensure the safety of the
laser device, do not remove any cover and attempt to repair the unit. If any service
is needed, please contact the distributor or its authorized service center.
To reduce the risk of electric shock, do not remove the cover (or back). No user-
serviceable parts inside. Refer servicing to qualified service personnel. Unplug the
product from the wall outlet before servicing or when it is unused for a long period
of time.
The manufacturer should not hold responsibility for the damage caused by any
substitutions and modifications of the product without authorization from the
manufacturer or authorized unit.
Power supply
Connect the power supply cable to the DC 12V IN jack on the right side of the
device. Connect the power plug to an earthed socket AC 100-240 V. If you have
problems when plugging the mains plug into the socket, rotate the plug by 180°
and plug it in again.

ODYS Slim TV 10
3
EN
Caution
Read, keep and follow these instructions and heed all warnings.
•Do not open the casing of the device under any circumstances, and do not attempt to
repair or modify the device. Malfunctions, damage, electric shocks and fires can occur as
a result.
•Never expose the device to rain, moisture or humidity. Malfunctions, damage and electric
shocks can occur as a result.
•When cleaning the device, do not use any volatile substances, such as solvents, to avoid
damaging the surface. Clean the device only using a soft, dry cloth.
•Ensure adequate air circulation around the device. Do not place the device on soft
furniture, carpets or other materials while in operation, as this may restrict the air from
properly circulating around the device.
•The device may not be excessively heated or operated near heat sources (e.g. heaters).
Malfunctions, damage, smoke and fires can occur as a result.
•Connect the device only to mains sockets that are properly earthed (protective earth).
The mains voltage must correspond to the operating voltage of the device indicated on
the device housing. When connecting the device to other electric devices, always follow
the manufacturer's instructions.
•Make sure that the cables are not damaged, stretched or twisted and that no short
circuits occur.
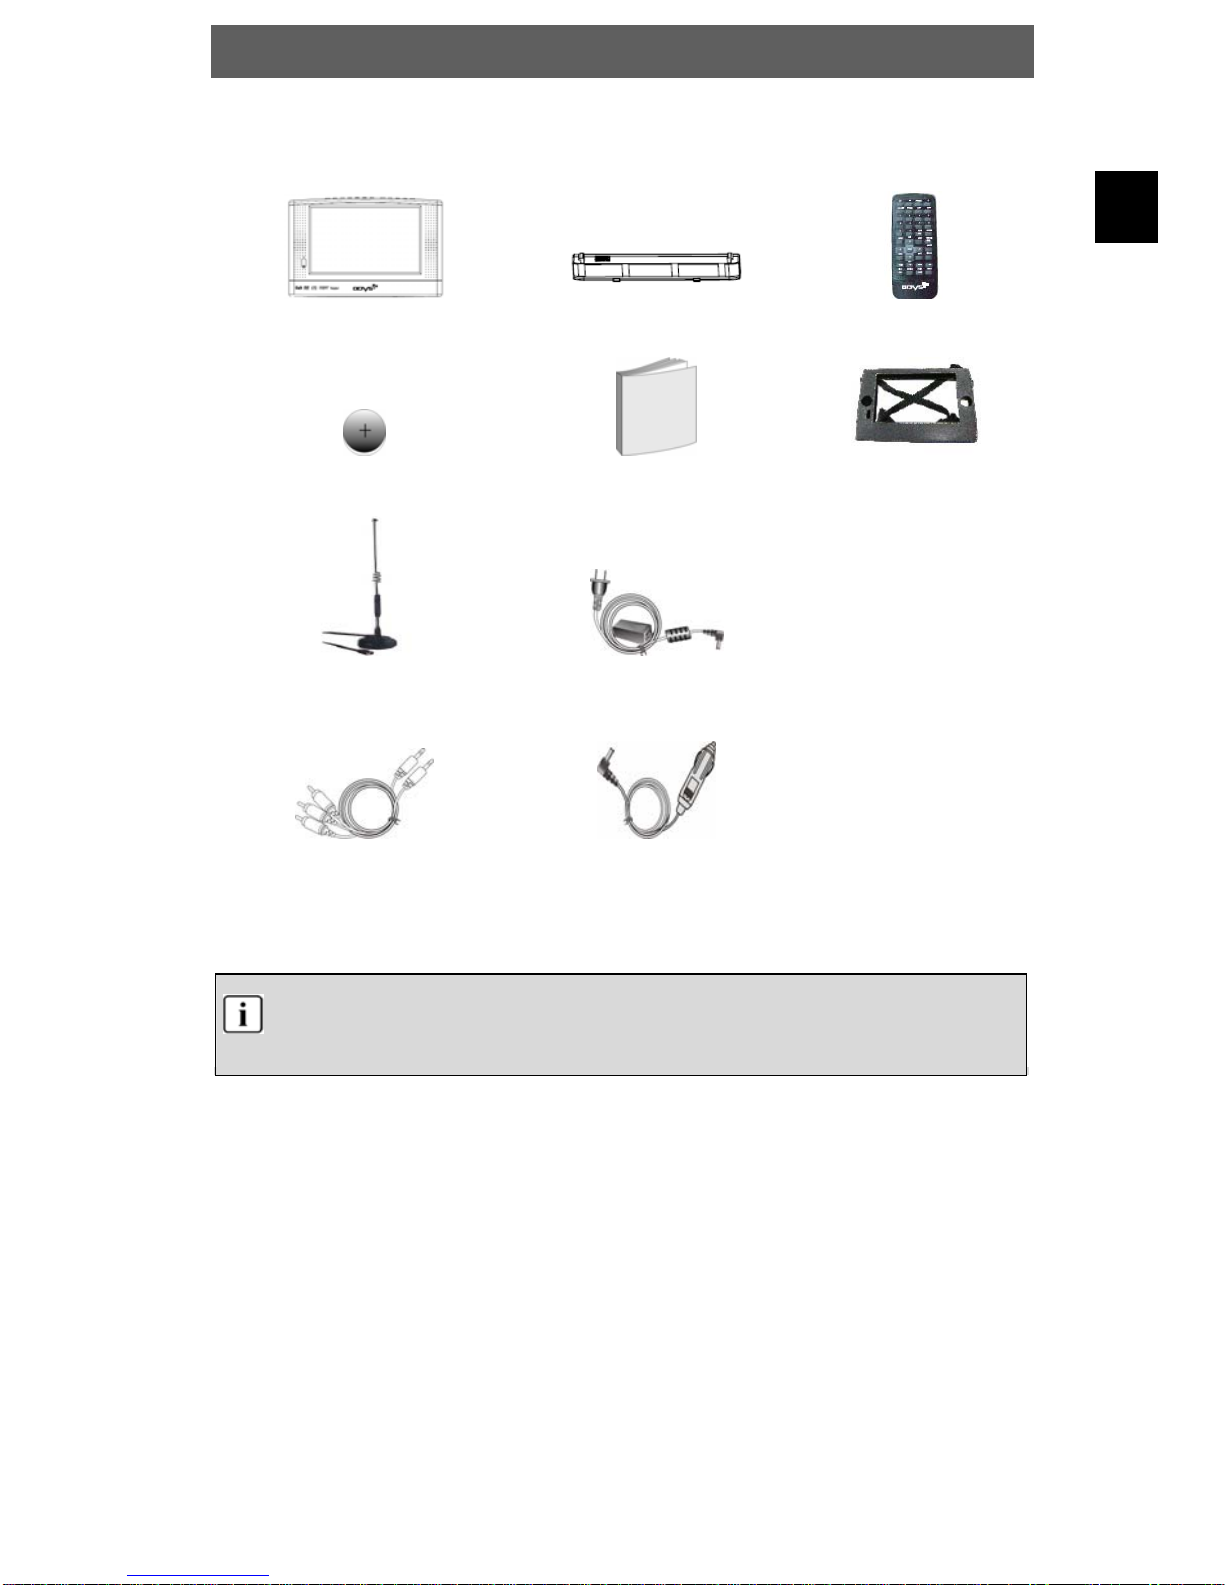
•Use only accessories specified or supplied by the device manufacturer. This also applies
to any attachments and fasteners.
•Place the device in a secure spot where it cannot shift or fall. If used in a
vehicle, the device must be securely fastened to avoid injuries or accidents
resulting from the device shifting or falling down.
•During a thunderstorm, disconnect the device from the mains. Do not use
the device during a thunderstorm. Malfunctions, damage and electric shocks can occur
as a result. Disconnect the power plug from the socket when you do not use the device
for an extended period of time. Keep the device in a clean, dry location where it is not
exposed to direct sunlight.
Caution
•In case of malfunctions or damage, maintenance or repair work may be required. Do not
use the device if there is visible damage to it. All maintenance and repair should be
conducted by qualified service technicians only.
•Do not place any heavy objects and objects that contain liquids, such as vases, on top of
the device..
•Make sure that no objects or fluids can penetrate into the device though openings or
venting slots. This could lead to short circuits, damage, electric shocks and fires.
•Do not touch the TFT LCD screen with your bare hand.
•Observe the safety instructions on rechargeable batteries in chap. 5.1.
Operating the device in a vehicle
•Please note that the device may not be used while the vehicle is in motion. It may only be
used when the vehicle is parked!
•When operating the device in a vehicle, make sure that it does not inhibit the driver's
forward or rear view and that it does not interfere with the safe operation of the vehicle.
Otherwise injuries or accidents may result. The driver must not operate the device or look
at the screen while driving. Do not allow your children to loosen or disengage their safety
belts to operate the device.

ODYS Slim TV 10
4
EN
•Do not place the device near the airbag in the vehicle, thus avoiding functional disorders.
When the airbag deploys, the device or accessories may be flung through the vehicle and
thus can cause injuries and accidents.
•Install the cables so that they do not present an obstacle to operating the vehicle or to
getting into or out of the vehicle. Make sure that no cables can accidentally wrap around
the steering wheel, the pedals or any passenger's feet. Tie the cables together.
•If operating the device inside a vehicle, do not set the volume level too high so that you
are still able to hear sounds occurring on the inside and outside of your vehicle.
Otherwise accidents can occur.
Note
DVD players and discs are coded by region. Your DVD player will
only play back discs whose region code matches that of the player.
The region code of your DVD player is 2 (Europe).
Note on copyrights
This device is equipped with technology for the protection of copyrights that is
protected by patents in the United States of America and by other laws regarding
the protection of intellectual property. Use of this copyright protection technology
must be approved by Macrovision. This approval is granted exclusively for personal
use and other limited visual presentations, unless Macrovision has expressly
permitted a more extensive use. Reverse engineering and disassembly are
forbidden.

ODYS Slim TV 10
5
EN
2 Product properties
•Excellent sound quality:
Dolby Digital technology ensures outstanding sound.
•High resolution:
More than 500 lines of horizontal resolution with MPEG-2
•AV In: Input for external audio and video signals. Can be connected to a variety of
external AV sources.
AV Out: Analogue audio/video output
•Playable formats: DVD, VCD, SVCD, MVCD, Audio-CD, MP3, WMA, JPEG, Kodak
Picture CD
•High resolution 10.2" LCD colour screen
•Switchable power supply unit:
Automatic adjustment to different voltages in different countries.
•On-screen menu in English, French, Spanish, German etc.
•Shock resistance:
Electronic shock resistance allows the device to be operated in a vehicle
Special playback functions:
•Various playback speeds (fast forward, fast reverse, slow play, Search By Time),
supports several playback languages and repeat functions. Multiple display formats
and camera perspectives, zoom in/zoom out, multilingual subtitles
•Remember the last playback position and resume playback when turned on without
opening the disc cover (Resume).
•Parental control: Blocking of certain scenes or entire discs.
Support
URL: http://www.odys.de
See our website for the latest information on this DVD player, on other products by our
company and on our company itself. If you have questions or problems, please read

ODYS Slim TV 10
6
EN
2.1 Language Settings
This device offers three separate menus in which the language settings may be set.
DVD Menu:
1. To change the settings for the DVD mode, switch the device to the DVD
mode.
2. Press the Setup key on the remote control.
3. Select the menu „Language Setup” using thekey.
4. Select the menu „OSD Language” using thekey.
5. Select „German” to change the menu language to German.
6. Confirm using the „Enter” key.
DVB-T Menu:
1. To change the settings for the DVB-T mode, switch the device to the DVB-T
mode.
2. Press the Setup key on the remote control.
3. Select the menu „System Config” and „Language“, press the “Enter” key to
confirm.
4. Select „German” to change the menu language to German
5. Confirm using the „Enter” key.
P-Menu (Display Settings):
1. Press the „P-MENU” key.
2. Press the P-MENU key continuously until the entry „Language” has been
highlighted.
3. Use the + or – keys to select the desired language.
4. The menu will automatically close after 4 seconds of inactivity.

ODYS Slim TV 10
7
EN
Contents of package
1 x DVD player + carrying bag 1 x rechargeable battery pack 1 x remote control
1 x battery for remote control 1 x operating manual Vehicle Bag
Antenna 1 x mains cable with power
supply unit
1 x audio/video cable 1 x car adapter
Note
Accessories and their corresponding part numbers are subject to change without
notice due to technological progress.

ODYS Slim TV 10
8
EN
3 Controls
3.1 DVD player
Front view
1. TFT screen
Presents high resolution picture.
2. Loudspeaker
Two speakers output high quality stereo sound.
3. Sensor for remote control
Sensor that receives the signal from the remote control
4. Power supply indicator lamp / Display for charge state of rechargeable battery
In active mode, it is red; in standby mode, it turns green.
When switched off, the lamp will blink green when charging the battery and will remain
constant once the charging has finished.
Note
Charge the battery with the device switched off. This will shorten the charging time
and extend the life of the battery.
Top view
1. DVB-T Antenna Jack (DVB-T antenna connection)
2. STOP button
Stops playback
3. SETUP button
Accesses the setting for the DVD or DVB mode

ODYS Slim TV 10
9
EN
4. Direction buttons ()
Selects the menu entries or channel, both forwards and backwards (DVB)
5. Direction buttons (, )
To select menu objects
fast forward/rewind during playback
Jump to next/previous chapter
6. PLAY/PAUSE button
Starts playback or activates the pause function
7. Direction buttons (, )
To select menu objects
fast forward/rewind during playback
Jump to next/previous chapter
8. DVD/DVB quick-change button
Switches between the DVD and DVB functions
9. AV button
Switches between DVD/DVB-T playback and reception of an external AV signal source
(activates the AV In signal input)
10. Vol - button
To decrease the volume.
11. Vol+ button
To increase the volume
12. P-MENU button
To change the display format, brightness, contrast, colour
To change display settings
Right view
1. Power supply jack (12 V DC)
Power supply unit or car adapter connection
2. SD/MMC/MS card slot
3. Headphone jack (dual jack)
When the headphones are inserted, the loudspeakers are switched off.
4. USB terminal (USB connection to USB mass storage/Sticks)
5. Jack for audio/video output
For connecting an external monitor / speakers
6. Jack for audio/video input
For connecting an external / audio-video source
2
3
4
5
6
1

ODYS Slim TV 10
10
EN
Left view
1. Power on/off switch (for switching the device on and off)
Backside View
1. Rechargeable battery locks
2. Disc cover
3. Connection for rechargeable battery (see chap. 5.2)

ODYS Slim TV 10
11
EN
3.2 Using USB memory and SD cards
1. Connect the device to the power supply.
2. Switch the device on.
3. Press the DVD/DVB-T switch on the control panel to switch to the DVD-Mode and insure that
no CD/DVD is present in the drive.
4. Insert the USB memory stick into the USB port or insert the SD card into the SD card slot (see
the images below).
Prior to connecting the device, make sure that the USB memory stick or the SD card contains
JPEG, MP3 or WMA files.
5. Open and close the DVD tray to start the reading process.
6. The following display appears on the screen (Chapter 8.4):
7.
8. Press the ,buttons to select the folder and confirm your selection using the ENT button.
9. Press the ,buttons to select the desired file and start playback using PLAY .
10. Press to the STOP button to stop playback. Playback can now be continued again from the
beginning of the current file. Press the button to return to the folder menu.
Once you are finished with the JPEG or WMA playback, remove the USB plug or the
SD card. The device then returns to DVD mode.
The USB 1.1 jack cannot be used for connecting digital cameras or other USB
devices.
Please note that Videos with large data files may have an effect on the playback.
This device accepts memory cards with a maximum capacity of 2 GB.
Current
Folder Filename
Folder Files
Music Images Videos

ODYS Slim TV 10
12
EN
3.3 Buttons of the Remote Control
1. AV button
Switches between DVD/DVB-T playback and reception of an external AV signal source
(activates the AV In signal input)
2. –
Shortening the selected values in the display settings menu (P-Menu).
3. P-MENU
The display settings (brightness, contrast, colour, and hue) and display mode settings
(viewing 4:3 or 16:9) may be altered by pressing the „P-Menu“ key once again.
4. +
Increase the selected values in the display settings mode (P-Mode).
5. DVD/ DVB-T
Switches between the DVD and DVB-T functions
6. P-POWER
For switching the screen on and off
7. Vol - button
To decrease the volume.
8. Vol+ button
To increase the volume
9. Numerical buttons (0-9)
To select the corresponding number for title, chapter, time etc.
10. GOTO/SEARCH
DVD mode: Press to select the desired disc starting Time, Track or Title
DVB mode: Activate Automatic channel search
AV -P-MENU +
DVD/DVB-T P-POWER VOL- VOL+
1 2 3 4
5 6 7 8
9 0 GOTO RETURN
SETUP CH+ MENU TV-RADIO
REPEAT
PROG MUTE DISPLAY
CH-
TITLE SUBTITLE AUDIO ANGLE
?? ZOOM
ENTER
EPG
/ /
TTX LANG
2 3
1 4
6 7
5 8
9
10
11
13
12 14
15 16
17
19
18 20
22 23
21 24
26 27
25 28

ODYS Slim TV 10
13
EN
11. RETURN
Displays the DVD menu
12. SETUP
Access to system settings for the DVD or DVB mode
13. MENU
While in playback mode, to display the menu of the DVD currently inserted.
DVB: Calls the channel list menu
14. ZOOM/TV/RADIO
DVD-Mode: Access the zoom function
DVB-T Mode: switching between TV/Radio
15. Direction buttonsn / CH+ CH-
Selects the menu entries or channel, both forwards and backwards (DVB)
16. ENTER
For confirming your selection
17. REPEAT
To repeat a chapter, track, title or the entire disc
18. PROG
To arrange a playback sequence (DVD)
DVB: enters the channel schedule
19. MUTE
Switch the sound off
20. DISPLAY
Displays or hides detailed information about the disc in the device
DVB-T: Enter EPG
21. /
Press longer: Activate fast reverse
press once: jump to the beginning of the current track or chapter of the disc
press twice: jump to the beginning of the previous track or chapter of the disc
DVB Mode: Switches to the favourite list
22. PLAY / PAUSE
Starts playback or activates Pause
23. /
Press longer: activate fast forward playback
Skips the track or chapter forward in DVD mode or switches to the game menu in DVB mode
24. STOP / RETURN
DVD Mode: Press once: Stops playback (press PLAY to continue playback at this point);
press twice: stops playback completely; DVB mode: access the channel viewed last
25. TITLE /Teletext (TTX)
Shows the title menu if the disc contains subtitles or displays the teletext in DVB mode
26. SUBTITLE
To select a language for subtitles (if available on disc) or turn off the subtitles in the DVD
mode
27. AUDIO
Selects a different playback language of a DVD (if available on disc)
28. ANGLE
Access different camera angles in DVD mode (if available on disc)

ODYS Slim TV 10
14
EN
Preparation of the Remote Control
Place the remote control on an even surface and insert the supplied button cell into
the remote control as follows.
1Refer to the drawing and remove the empty
battery receptacle.
2Insert the battery into the receptacle. Make
sure the polarity matches the marks inside the
component.
3Insert the receptacle into the remote control.
Button cell data
Battery type: CR2025 , 3 V
Service life: approximately 1 year (for normal use and room temperature)
Using Of Remote Control
Point the remote control towards the main unit when operating. The remote control works
best at a distance less than 5 m and at an angle of up to 30° to the front of the unit. No
obstacles may stand in the way between remote control and infrared sensor and do not
place the remote control in direct sunlight. If the remote control unit fails to work even when
it is operated near the player, replace the battery.
Notes on batteries
If the remote control is not used for a long period of time, please remove the
battery from the compartment.
Do not heat batteries or dispose of them in fires.
Do not dismantle, deform or modify batteries.

ODYS Slim TV 10
15
EN
4 Connecting the DVD player
•The DVD player, the television set and any other electric devices to be connected to the
DVD player must be switched off and disconnected from the mains.
•Observe the colour coding when connecting audio and video cables.
4.1 Connecting to a television set
Audio/video connectors
Using the audio/video cables, connect the DVD player to the A/V inputs of the
television set as shown in the illustration.
4.2 Connecting to an external A/V source
Using the audio/video cables, connect the DVD player to the A/V signal source (for
example, DVD or video recorder) as shown in the illustration. Press the AV button on
the control panel of the DVD player.
Black
Yellow
Red
Signal
A
udio/Video Cable
TV
White

ODYS Slim TV 10
16
EN
Note
When external audio signals are received during DVD playback, this can lead to
disturbing noise in the loudspeakers. If this is the case, disconnect the audio
cable.
4.3 Connecting headphones
Connect the headphones to the headphone jack on the right side of the device. The
loudspeakers are automatically deactivated.
Caution
Excessively high volume can damage your hearing. Turn the volume down before
connecting the headphones and then turn the volume up to a moderate level.
Earphone jacks
A
udio/Video Cable
Signal
Red Yellow
White
A
V Source
Black

ODYS Slim TV 10
17
EN
4.4 Connecting to DVB-T Antenna
Plug the DVB-T antenna into the DVB-T jack on the rear panel of the unit to receive
TV signal.
4.5 Power supply unit
The DVD player is delivered with a power supply unit.
Connect the power supply cable to the DC 12V IN jack on the right side of the device
as shown below. Connect the power plug to an earthed socket. The power supply
indicator lamp lights up red.
Note
Turn off the DVD player before you unplug the mains cable from the socket.
When the DVD player operates on mains power, the LCD screen lights up brighter
than when it operates on battery power.

ODYS Slim TV 10
18
EN
4.6 Car adapter
Use the supplied car adapter to operate the DVD player in a vehicle.
Connect the adapter cable as shown below to the mains terminal DC 12V IN of the
DVD player and the cigarette lighter of the vehicle.
The driver must not operate the device or look at the screen while driving.
Position the device in a way that ensures an uninhibited view.
Remove the rechargeable battery pack before connecting the device using the car
adapter.
If possible, disconnect the car adapter cable while starting the vehicle.
Caution
Only use the power supply unit provided or the 12V adapter.
The adapter is only designed for 12V and should not be connected when
starting the engine.
to the cigarette
lighter socket

ODYS Slim TV 10
19
EN
5 Rechargeable battery pack
A rechargeable lithium ion battery is included in the scope of delivery of your portable
DVD player. This battery is connected on the rear side of the device. Fully charge the
battery before you use the device for the first time. Normally it takes about five hours
for the battery to be charged. When the rechargeable battery is fully charged, you can
operate the device with it for about 2 (DVB-T) – 2.5 (DVD) hours. However, the actual
operating time also depends on the disc you use. Fully charge the battery when it will
not be used for an extended period of time.
5.1 Notes on using rechargeable batteries
¾When using a new rechargeable battery, fully charge it prior to use.
¾Use rechargeable batteries only in temperatures between 0°C and 40°C. Do not expose
rechargeable batteries to high temperatures or direct sunlight.
¾Do not throw the battery into water or fire.
¾Ensure adequate air circulation around the device. Do not place the device on soft furniture,
carpets or other materials while in operation, as this may restrict the air from properly circulating
around the device.
¾Do not short-circuit the contacts of a rechargeable battery.
¾Do not disassemble the rechargeable battery.
¾When switched off, the indicator lamp will blink green when charging the battery and will remain
constant once the charging has finished.
¾Remove the battery pack when it is fully charged or when it is not used.
¾When the state of charge reaches a low level, the symbol is displayed on the LCD screen.
Some minutes later the DVD player turns off automatically.
.
Note
Charge the battery with the device switched off. This will shorten the charging
time and extend the life of the battery.
Charge the battery fully before using for the first time.
Caution
Do not touch the battery's terminals with any metal objects. This would cause the
battery to go to standby mode. Connect the DVD player with the battery
connected to a voltage supply source to exit the standby mode.

ODYS Slim TV 10
20
EN
5.2 Connecting the rechargeable battery pack
Connect the rechargeable battery pack as described below:
1Place the DVD player with the bottom side up
on a plain, clean surface.
2Hold on to the device with one hand. Position
the battery's plastic pins so that they are
aligned with the matching notches on the
DVD player, and push the battery inside the
device until it audibly locks into place.
5.3 Charging the battery pack
Use the power supply unit provided for charging the rechargeable batteries. In doing
so, connect the power supply unit to the DVD player as described in chap. 4.6.
5.4 Removing the rechargeable battery pack
Fully charge the battery and remove it from the device when it will not be used for an
extended period of time. Even a device that is turned off uses small amounts of
electricity in standby mode which ultimately discharges the battery.
Turn off the DVD player before you remove the rechargeable battery as described
below:
1Press and hold the rechargeable battery
lock toward arrow , as displayed on
the right.
2Carefully slide the rechargeable batter
toward arrow .
3 Carefully remove the rechargeable
battery and store it in a suitable place if it
is not to be used for an extended time
period.
Note
Remove the rechargeable battery when you use the car adapter for power
supply.
Table of contents
Other Odys DVD Player manuals