Odys EliteWin 360 User manual

V1.1.0
Table of Content
Table of Content ...............................................................................1
Safety Precautions ...........................................................................2
Conformity........................................................................................5
Listening Cautions............................................................................6
Support.............................................................................................7
Appropriate use................................................................................7
Cleaning ...........................................................................................7
Feature Summary.............................................................................8
Accessories......................................................................................8
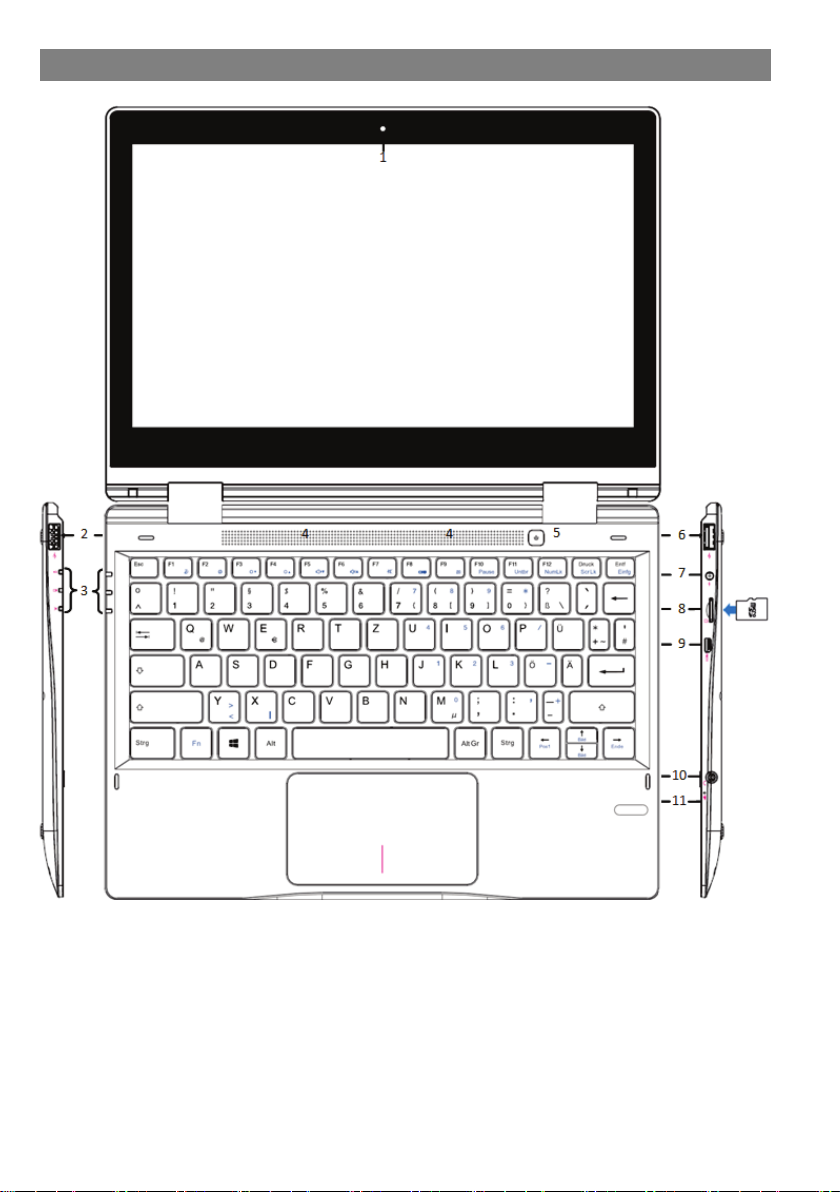
Buttons & Ports ................................................................................9
Tilting the screen ............................................................................ 11
Charging Battery ............................................................................12
Using the keyboard ........................................................................13
Using the Pen.................................................................................15
Installing Memory Card ..................................................................17
Connect via USB ............................................................................18
Transferring Files............................................................................19
Turning On/Off................................................................................19
Screen Lock ...................................................................................19
Using the Touch Screen .................................................................20
Customize Home Screen ...............................................................25
Bluetooth Connection .....................................................................26
Access Internet - Wifi .....................................................................27
Virtual Keyboard.............................................................................29
Using the Web Browser..................................................................30
Sending/Receiving E-Mails ............................................................32
Photo Playback ..............................................................................34
Camera usage................................................................................36
One Drive - File Explorer................................................................37
Windows Desktop...........................................................................38
System Settings .............................................................................39
Troubleshooting..............................................................................40
Specifications .................................................................................42
Warranty Conditions.......................................................................44

2
Safety Precautions
Do not subject the device to severe impact or drop it from
heights.
Do not use the device in extreme hot or cold, dusty or damp
conditions. Do not expose it to direct sunlight.
Avoid using the device near strong magnetic fields.
Keep the device away from water and other liquids. In the event
that water or other liquids enter the device, power off the product
immediately and clean the device.
Do not use chemicals to clean the device in order to avoid
corrosion. Clean it with a dry cloth.
We are not responsible for damage or lost data caused by
malfunction, misuse, modification of the device or battery
replacement.
Do not attempt to disassemble, repair or modify the product. This
will invalidate the warranty.
If the device will not be used for an extended period of time,
please charge the battery at least once per month to maintain
battery life.
Charge the battery if:
a) The battery level icon displays (An empty battery)
b) The device powers off automatically when restarted.
c) There is no response when pressing keys with keys
unlocked and battery full.
When the device is being formatted or transferring a file, do not
interrupt the connection. Otherwise, data may be corrupted of
lost.
When the device is used as a portable HD, please use only per
the instructions. Otherwise, permanent data loss could occur.
Please use and install data using the attachments/accessories
provided and only according to the manufacturer’s instruction.
Please refer to the information on the bottom of the device for
electrical and safety information before installing data or
operating the device.
To reduce the risk of fire or electric shock, do not expose this
device to rain or moisture. The device should not be exposed to
dripping or splashing. Never place objects filled with liquids, such
as vases, on the device.

3
There is danger of explosion if the battery is replaced incorrectly.
Replace only with the same or equivalent type.
The battery (battery or batteries or battery pack) should not be
exposed to excessive heat such as sunlight, fire or the like.
Please follow responsible procedures for battery disposal.
If the power adaptor is disconnected from the device, the device
will remain operable as long as the battery has sufficient charge.
The power adaptor is a CLASS II apparatus with double
insulation, and no external ground is provided.
Safety symbol explanation:
- The lightning flash with arrowhead symbol within an
equilateral triangle is intended to alert the user to the
presence of non-insulated “dangerous voltage” within the
product’s enclosure that may be of sufficient magnitude to
constitute a risk of electric shock.
- To reduce the risk of electric shock, do not remove the cover
(or back) as there are no user-serviceable parts inside. Refer
servicing to qualified personnel.
- The exclamation point within an equilateral triangle is
intended to alert the user to the presence of important
operating and maintenance instructions in the literature
accompanying the device.
Do not leave the device on in a confined space such as a book
case or similar. The ventilation should not be impeded by
covering the ventilation openings with items such as newspaper,
table-cloths, curtains, etc.
No open flames, such as lighted candles, should be placed on
the device.
Use the device in moderate climates.
Never disconnect the USB cable from your e-book reader to the
PC during a data transfer or formatting. Correctly disconnect the
device from the operating system. Information loss and
malfunctions can occur.

4
Note
Please only charge the battery while the device is turned
off. The charging time will be shorter and the lifetime of the
battery will be enlarged. Please fully charge the battery
before first use.
Disposal
Correct Disposal of this product. This marking indicates that
this product should not be disposed of with other household
waste in the EU. To prevent possible harm to the
environment or human health from uncontrolled waste
disposal, recycle it responsibly to promote the sustainable
reuse of material resources. To dispose of your used device,
please use the return and collection systems available in your
area or contact the retailer where the product was purchased.
They can take this product for safe environmental recycling.
Note
Please note that the internal battery can only be replaced
by qualified personnel.
If necessary please contact to the ODYS customer service
at www.odys.de.

5
Conformity
Herby, Axdia International GmbH declares that the
device EliteWin 360 is in compliance with
Directive 2014/53/EU.
The full text of the EU declaration of conformity is
available at the following internet address:
www.odys.de – Service – Downloads
(http://www.odys.de/web/downloads_de.html)

6
Listening Cautions
Hearing Safety
Listen at a moderate volume: Using headphones at a high
volume can impair your hearing. This product can produce
sounds in decibel ranges that may cause hearing loss for a
normal person, even for exposure less than a minute. The
higher decibel ranges are offered for those that may have
already experienced some hearing loss. Sound can be
deceiving. Over time your hearing ‘comfort level’ adapts to
higher volumes of sound. So after prolonged listening, what
sounds ‘normal’ can actually be loud and harmful to your
hearing. To guard against this, set your volume to a safe
level before your hearing adapts and leave it there. To
establish a safe volume level: Set your volume control at a
low setting. Slowly increase the sound until you can hear it
comfortably and clearly, without distortion. Listen for
reasonable periods of time: prolonged exposure to sound,
even at normally ‘safe’ levels, can also cause hearing loss.
Be sure to use your equipment reasonably and take
appropriate breaks. Be sure to observe the following
guidelines when using your headphones. Listen at
reasonable volumes for reasonable periods of time. Be
careful not to adjust the volume as your hearing adapts.
Do not turn up the volume so high that you can’t hear
what’s around you. You should use caution or temporarily
discontinue use in potentially hazardous situations. Do not
use headphones while operating a motorized vehicle,
cycling, skateboarding, etc.; it may create a traffic hazard
and is illegal in many areas.

7
Support
http://www.odys.de support@odys.de
On our website you will find the latest information about this product,
other products of our enterprise, our company itself and valid
warranty terms. The latter you will find under Service - Downloads.
Firmware upgrades for this device are also offered on our website.
For questions or problems read our FAQs on our website or contact
our after sales service.
Manufacturer
Axdia International GmbH
Formerweg 9
D-47877 Willich (Germany)
Tel: +49(0) 2154 / 8826-0
Fax: +49(0) 2154 / 8826-100
Web: www.odys.de
Support-Hotline: +49 (0)2154 / 8826-101
E-Mail: [email protected]
Appropriate use
Device is designed for playing music and video files in commonly
used formats, showing photos and access internet functions using
the build in Wi-Fi function. It is exclusively meant for this purpose
and must only be used for the same.
This also includes paying attention to all information contained in
this operating manual, especially in the safety instructions. Any
other usage is considered to be improper and may lead to material
damages and even personal injuries. Moreover, it will result in the
immediate loss of guarantee. The manufacturer does not bear any
liability for damages caused due to improper use.
This manual may not reflect your actual device’s operation. All
information is subject to change without prior notification.
Please follow your actual device’s operational procedures.
Cleaning
• Please only clean the device using a cloth.
• Please don’t use any chemicals or solvents.

8
Feature Summary
Wi-Fi Connectivity
With the latest Wi-Fi technology, this device can connect you to the
Internet wherever you are.
Touch Screen
Touch or slide your finger on the screen, the screen responds
instantly.
Third-party Application Support
With the built-in WindowsTM OS, you can install a large number of
third-party applications in this device. Please note that you need to
insert a Micro SD-Card for it.
Built-in G-sensor
The screen changes to landscape or portrait automatically when the
device rotates.
Entertainment
You can enjoy music, movies, pictures and e-books with the Mobile
Tablet.
Accessories
USB Cable
Power Adaptor
Quick start

9
Buttons & Ports

10
1. Front Camera
Front-facing camera for taking avatar
pictures
2. USB 2.0
Support for USB stick, Surf stick, ...
3. Status Indicator
4. Speaker
5. Power Button
Press and hold the power switch to turn
on or off the device;
Briefly press the switch to turn the screen
on or off.
Should the device stop functioning or
operate abnormally, press and hold for
15 seconds to reset the device off.
6. USB 3.0
Support for USB stick, Surf stick, ...
7. Power jack
Charge and power the tablet with the
included power adapter.
8. Micro SD Card Slot
Accommodates any standard SD/SDHC
memory card.
9. Micro HDMI
Connect to a TV or other display.
10. Headphone jack
Audio output connection for head-phones
Note: Speaker output is automatically
disabled when headphones are
connected to the player.
11. Microphone

11
Tilting the screen
The hinges of the device allow the screen to be tilted to almost 360°.
This allows the device to be used as a traditional notebook, Tablet
PC or propped touch screen PC.
Note:
The device will automatically switch to the tablet mode when
opened to an angle of 180°-200°. A notice will appear in the display.
The keyboard will automatically be deactivated when reaching the
above mentioned angle and reactivated when folded back.

12
Charging Battery
The device has a built-in rechargeable battery. No extra battery
installation is required. Just charge the device when it indicates low
battery.
To charge the battery, connect the device to any standard wall
outlet using the power adaptor. It takes about 5 hours to fully charge
the battery.
Note:
a. We advice to use only the delivered power adapter with this
tablet.
b.You can operate the device even when it is being charged. But for
extended battery life, it is suggested NOT to use the device when
it is charging.
c. It is recommended to charge the battery before you use the
device for the first time.
d. For maximum performance, lithium-ion batteries need to be used
often. If you don’t use the device often, be sure to recharge the
battery at least once per month.
e.Should the rechargeable battery of the device discharge
completely, connect the device to the main power source for
approximately 5-10 minutes before attempting normal operation.
f. In some cases, devices which have been charged for longer
periods of time may not be able to be switched back on. Should
this occur, make a Reset.

13
Using the keyboard
Note:
When the tablet overlaps on the keyboard, the display will be turned
off; as soon as it is erect, the display will be turned on again.

14
Keyboard parts
Note: Some keys have several different assignments!
Important key combinations can be found at the chart below.
(1) On/ Off
(14)
Fn + F12: to activate the
NumLock.
(2)
Status indicator:
a) Device turned on
b) Power connected
c) Caps Lock on
(15) Fn +Druck: Scroll Lock
(3)
Fn + F1: Turn screen
off/on
(16) Fn + Entf: Insert
(4)
Fn + F2: Open System
settings
(17)
Fn + y to input <
Fn +Shift + y to input >
(5)
Fn + F3: Decrease the
brightness
(18) Fn + x to input |
(6)
Fn + F4: Increase the
brightness
(19) Fn Function key
(7)
Fn + F5: Decrease the
volume
(20) Windows Key
(8)
Fn + F6: Increase the
volume
(21)
Fn +
: Move to the top of
the page
(9) Fn + F7: Mute
(22)
Fn +
: Page up
Fn +
: Page down
(10) Fn + F8: Toggle screen
(23)
Fn +
: Move to the end of
the page
(11)
Fn + F9: lock the
touchpad
(24) Touchpad
(12)
Fn + F10: Pause
(25)
Left Mouse key
(13)
Fn + F11: Break
(26)
Right Mouse key

15
Using the Pen
The Vario 12 Pro has been designed
particularly for use with Windows Ink.
To use the Windows Ink features,
please use only the included pen.
The pen may be attached to the device
using the supplied bracket located
above the left USB connector.
To use, pull the pen and bracket from its
slot or press the pen upwards to release
it from its holder.
For operation, one AAAA battery is
required. To insert or change the battery,
open the battery compartment by
twisting the upper portion of the pen
counterclockwise. Place the battery into
the compartment, paying close attention
to the symbols marked on the pen to
insure proper polarity.
If using after prolonged storage, insure
that the battery is sufficiently charged. If
necessary change the battery.
Use to buttons of the pen to simulate
the left and right click. Tapping the pen
shortly or tapping for a longer period of time may also be used to
simulate a left and right mouse click respectively.
Notice: Please only use the supplied pen for input. The use of other
pens cannot be guaranteed.
The pen and bracket has been designed to be inserted into the left
USB 2.0 port only. Connection to other USB 3.0 ports may cause
damage to the ports.
For operation, a AAAA battery is required.
Notice: For best use of the pen, we recommend using the device as
a tablet. Fold the tablet completely and place on a stable, flat
surface.
Right Mouse key
Left Mouse key

16
To open the Windows Ink work area, tap the appropriate icon in the
taskbar, located at the bottom right of the screen. Here you can find
programs designed for use with windows ink. such as sticky notes,
sketch pad, screen sketch, etc.
Other programs designed for Windows Ink may be installed here.
Notice: Should no Windows Ink Icon be available, right click the
taskbar at the bottom of the screen and activate the context menu
that opens "Windows Ink Workspace View".

17
Installing Memory Card
- To use a memory card, find the card slot at the
side of the device and then insert the memory
card into the slot in the correct orientation as
shown. Check that the Micro SD card is in the
correct position with the contact pin facing
downwards directed to the screen as illustrated.
You may damage the card and the reader if
Micro SD card is not inserted in correct
position.
- Push the Micro SD card into the card slot until it clicks.
- To access the files stored in the memory card, enter the Explorer
mode by tapping the Explorer icon and select the “SD Card”
directory.
- To remove Micro SD card, push the card once again until it clicks.
Note: We recommend using only Micro SD or SDHC cards up to
128GB capacity.
- When a Micro SD card is inserted in or ejected from the device, it
may take few seconds for the
device to update the content.
- Please avoid inserting or ejecting Micro SD card when other
operation is running as this may cause
the system hang.
- Do Not remove the card if the content inside the card is being
played. This will halt the
operation of the device and might cause a system hang.
- Please use your fingernails to properly insert or remove the card.

18
Connect via USB
Connect a USB Cable
On the side of the plug there are usually small sizes of hooks that
secure the fixation.
Pay special attention on the position of the hooks, they show
upward when connecting cables while the screen is above.
Please note:
Only use connecting cable with a maximum length of 100cm.
Please make sure when connecting the USB adapter or connector
cables attention to the correct alignment of the connector before
inserting it into the USB socket on the unit. Incorrect insertion may
cause damage to plug and socket.
Screen
Hooks
Top
Bottom

19
Transferring Files
Before reading or playing back the files, these must be transferred
from the Internet or from a computer to the device. To do this, use a
Micro SD card or USB memory as usual.
Please note:
A direct USB connection with another PC is unfortunately not
possible.
Turning On/Off
To turn on the device, press and hold the Power button on the unit
until you see the boot-up screen then release. It may take a few
minutes to start up the system, please wait before you proceed.
To turn off the device, press and hold the [Power] button until you
see the turn off picture. Drag down the picture as indicated.
Tip: This device will sleep with the screen off if it stays inactive for a
few seconds. You can briefly press the Power button to turn on the
screen and wake it up.
Screen Lock
The screen automatically turns off and locks itself after a set period
of time.
When the screen turned off, press the Power button to light up the
screen.
Slide the screen upwards to unlock.
After the system start-up, the start screen appears.
The individual icons provide quick access to the applications that
you use most. The display can be adapted to suit your needs.
Examples are including Internet Explorer or applications for e-mail,
photos and contacts.
Swipe from right to left to display elements of the extended home
located on the right side of the screen.
Caution!
This view may vary and could show different or less elements at
your device.

20
Using the Touch Screen
Once started, the initial display will be displayed. Each tile offers
quick access to the most commonly used applications.
Elements of the initial display
List of Programs
Tap this tile to show a list of
all installed programs. The
list will be displayed on the
left edge of the display in
alphabetical order.
Start Menu
tapping the menu symbol will
open the Start Menu.
Here you will find user
information, documents last
used and a link to the
system’s file explorer and
system settings.
To Power OFF
Tiles
each tile offers a quick link to its respective application. The order in
which each tile is displayed may be
altered to suite your specific needs.
Start Menu
List of Programs
Tiles
Table of contents
Other Odys Laptop manuals
Popular Laptop manuals by other brands

MSI
MSI A13M-259US user guide

Lenovo
Lenovo ThinkPad L430 Benutzerhandbuch

Dell
Dell Inspiron 13 7000 Series quick start guide

Gigabyte
Gigabyte AORUS 17X YB-9UK2452MP quick start guide

Toshiba
Toshiba Satellite Pro L640-EZ1412 Specifications

Toshiba
Toshiba Satellite P205D-S7454 Detailed product specification