ODYSTrendbook14–Quickstart
V1.1.0
Introduction
Pleaseobservetheinformationandwarningsfromtheusermanual.
‐ Pleaserefertotheusermanualfordetailedinstructions,conformityandsupportinformation.
‐ Themanualcanbefoundathttp://www.odys.de/web/personal‐computer_de.html.
‐ Usethehyperlinkat„Einstellungen–PCundGeräte–PC‐Info".
‐ Thereyouwillalsofindaguideonhowtochangethesystemlanguage.
‐ Usetheinstallationassistanttoeasilyconfigurethedevice.
Important!Pleasenote:Inordertouseallfeaturesavailable,aMicrosoftuseraccountmustbe
createdanditisnecessarytoactivateyoursystemlateron.Toresetaforgottenpasswordpleasevisit
www.live.com.
Topreventconflictswithothersystemswerecommendcreatinganewaccount.
Pleasecloseunusedappstoextendthebatterylifetimeasdescribedontheright.
Turnoffthedevicewhennotinuse.
TurningOn/Off
Toturnonthedevice,pressandholdthePowerbuttonontheunituntilyouseetheboot‐upscreen
thenrelease.Itmaytakeafewminutestostartupthesystem,pleasewaitbeforeyouproceed.
Toturnoffthedevice,pressandholdthePowerbuttonuntilyouseethePowerOffscreen,clickon
itandslideitdowntoturnoff.
Tip:Thisdevicewillsleepwiththescreenoffifitstaysinactiveforafewseconds.Youcanbriefly
pressthePowerbuttontoturnonthescreenandwakeitup.
PowerOnandOfftheDisplay
‐Shortlypressthe[Power]buttonorclosethedevicetoturnoffthedisplay.
‐Pressthe[Power]buttonagainshortlyturnthedisplayonagain.
GettingStarted
1. FrontCameraFront‐facingcamerafortakingavatarpictures
2. ChargeIndicatorStaysredduringchargingandturnsoffafterthebatteryisfullycharged.
3. PowerjackChargeandpowerthedevicewiththeincludedpoweradapter.
4. USBSupportforUSBstickorSurfstick
5. MiniHDMIConnecttoaTVorotherdisplay.
6. Speaker
7. StatusIndicatorStaysgreenwhenturnedon.
8. NumLockIndicatesiftheNumerickeypadisenabled
9. CapsLockIndicatesenabledcapitalletters
10. Microphone
11. PowerButtonPressandholdthepowerswitchtoturnonoroffthedevice;
Brieflypresstheswitchtoturnthescreenonoroff.
12. HeadphonejackAudiooutputconnectionforhead‐phones
Note:Speakeroutputisautomaticallydisabledwhenheadphonesare
connectedtotheplayer.
13. MicroSDCardSlotAccommodatesanymicroSD/SDHCmemorycard.
14. Touchpad
15. LeftMouseKey
16. RightMouseKe
ChargingBattery
Thedevicehasabuilt‐inrechargeablebattery.Noextrabatteryinstallationisrequired.Justcharge
thedevicewhenitindicateslowbattery.
Tochargethebattery,connectthedevicetoanystandardwalloutletviatheDCportusingthe
providedpoweradaptor.Ittakesabout5hourstofullychargethebattery.
Note:
a. Weadvicetouseonlythedeliveredpoweradapterwiththisdevice.
b. Youcanoperatethedeviceevenwhenitisbeingcharged.
c. Itisrecommendedtochargethebatterybeforeyouusethedeviceforthefirsttime.
d. Formaximumperformance,lithium‐ionbatteriesneedtobeusedoften.Ifyoudon’tusethe
deviceoften,besuretorechargethebatteryatleastoncepermonth.
e. Shouldtherechargeablebatteryofthedevicedischargecompletely,connectthedevice(using
theadapter)tothemainpowersourceforapproximately5‐10minutesbeforeattempting
normaloperation.
f. Insomecases,deviceswhichhavebeenchargedforlongerperiodsoftimemaynotbeabletobe
switchedbackon.ShouldthisoccuryouhavetomakeaReset.
InstallingMemoryCard
- Touseamemorycard,findthecardslotatthesideofthedeviceand
theninsertthememorycardintotheslotinthecorrectorientationas
shown.CheckthattheMicroSDcardisinthecorrectpositionwiththe
contactpinfacingdownwardsasillustrated.Youmaydamagethecard
andthereaderifMicroSDcardisnotinsertedincorrectposition.
- PushtheMicroSDcardintothecardslotuntilitclicks.
- Toaccessthefilesstoredinthememorycard,entertheExplorermode
byclickingtheExplorericonandselectthe“SDCard”directory.
- ToremoveMicroSDcard,pushthecardonceagainuntilitclicks.
Note:WerecommendusingonlyMicroSDorSDHCcardsupto128GBcapacity.
‐WhenaMicroSDcardisinsertedinorejectedfromthedevice,itmaytakefewsecondsforthe
devicetoupdatethecontent.
‐PleaseavoidinsertingorejectingMicroSDcardwhenotheroperationisrunningasthismaycause
thesystemhang.
‐DoNotremovethecardifthecontentinsidethecardisbeingplayed.Thiswillhaltthe
operationofthedeviceandmightcauseasystemhang.
‐Pleaseuseyourfingernailstoproperlyinsertorremovethecard.
ConnectingtotheInternet
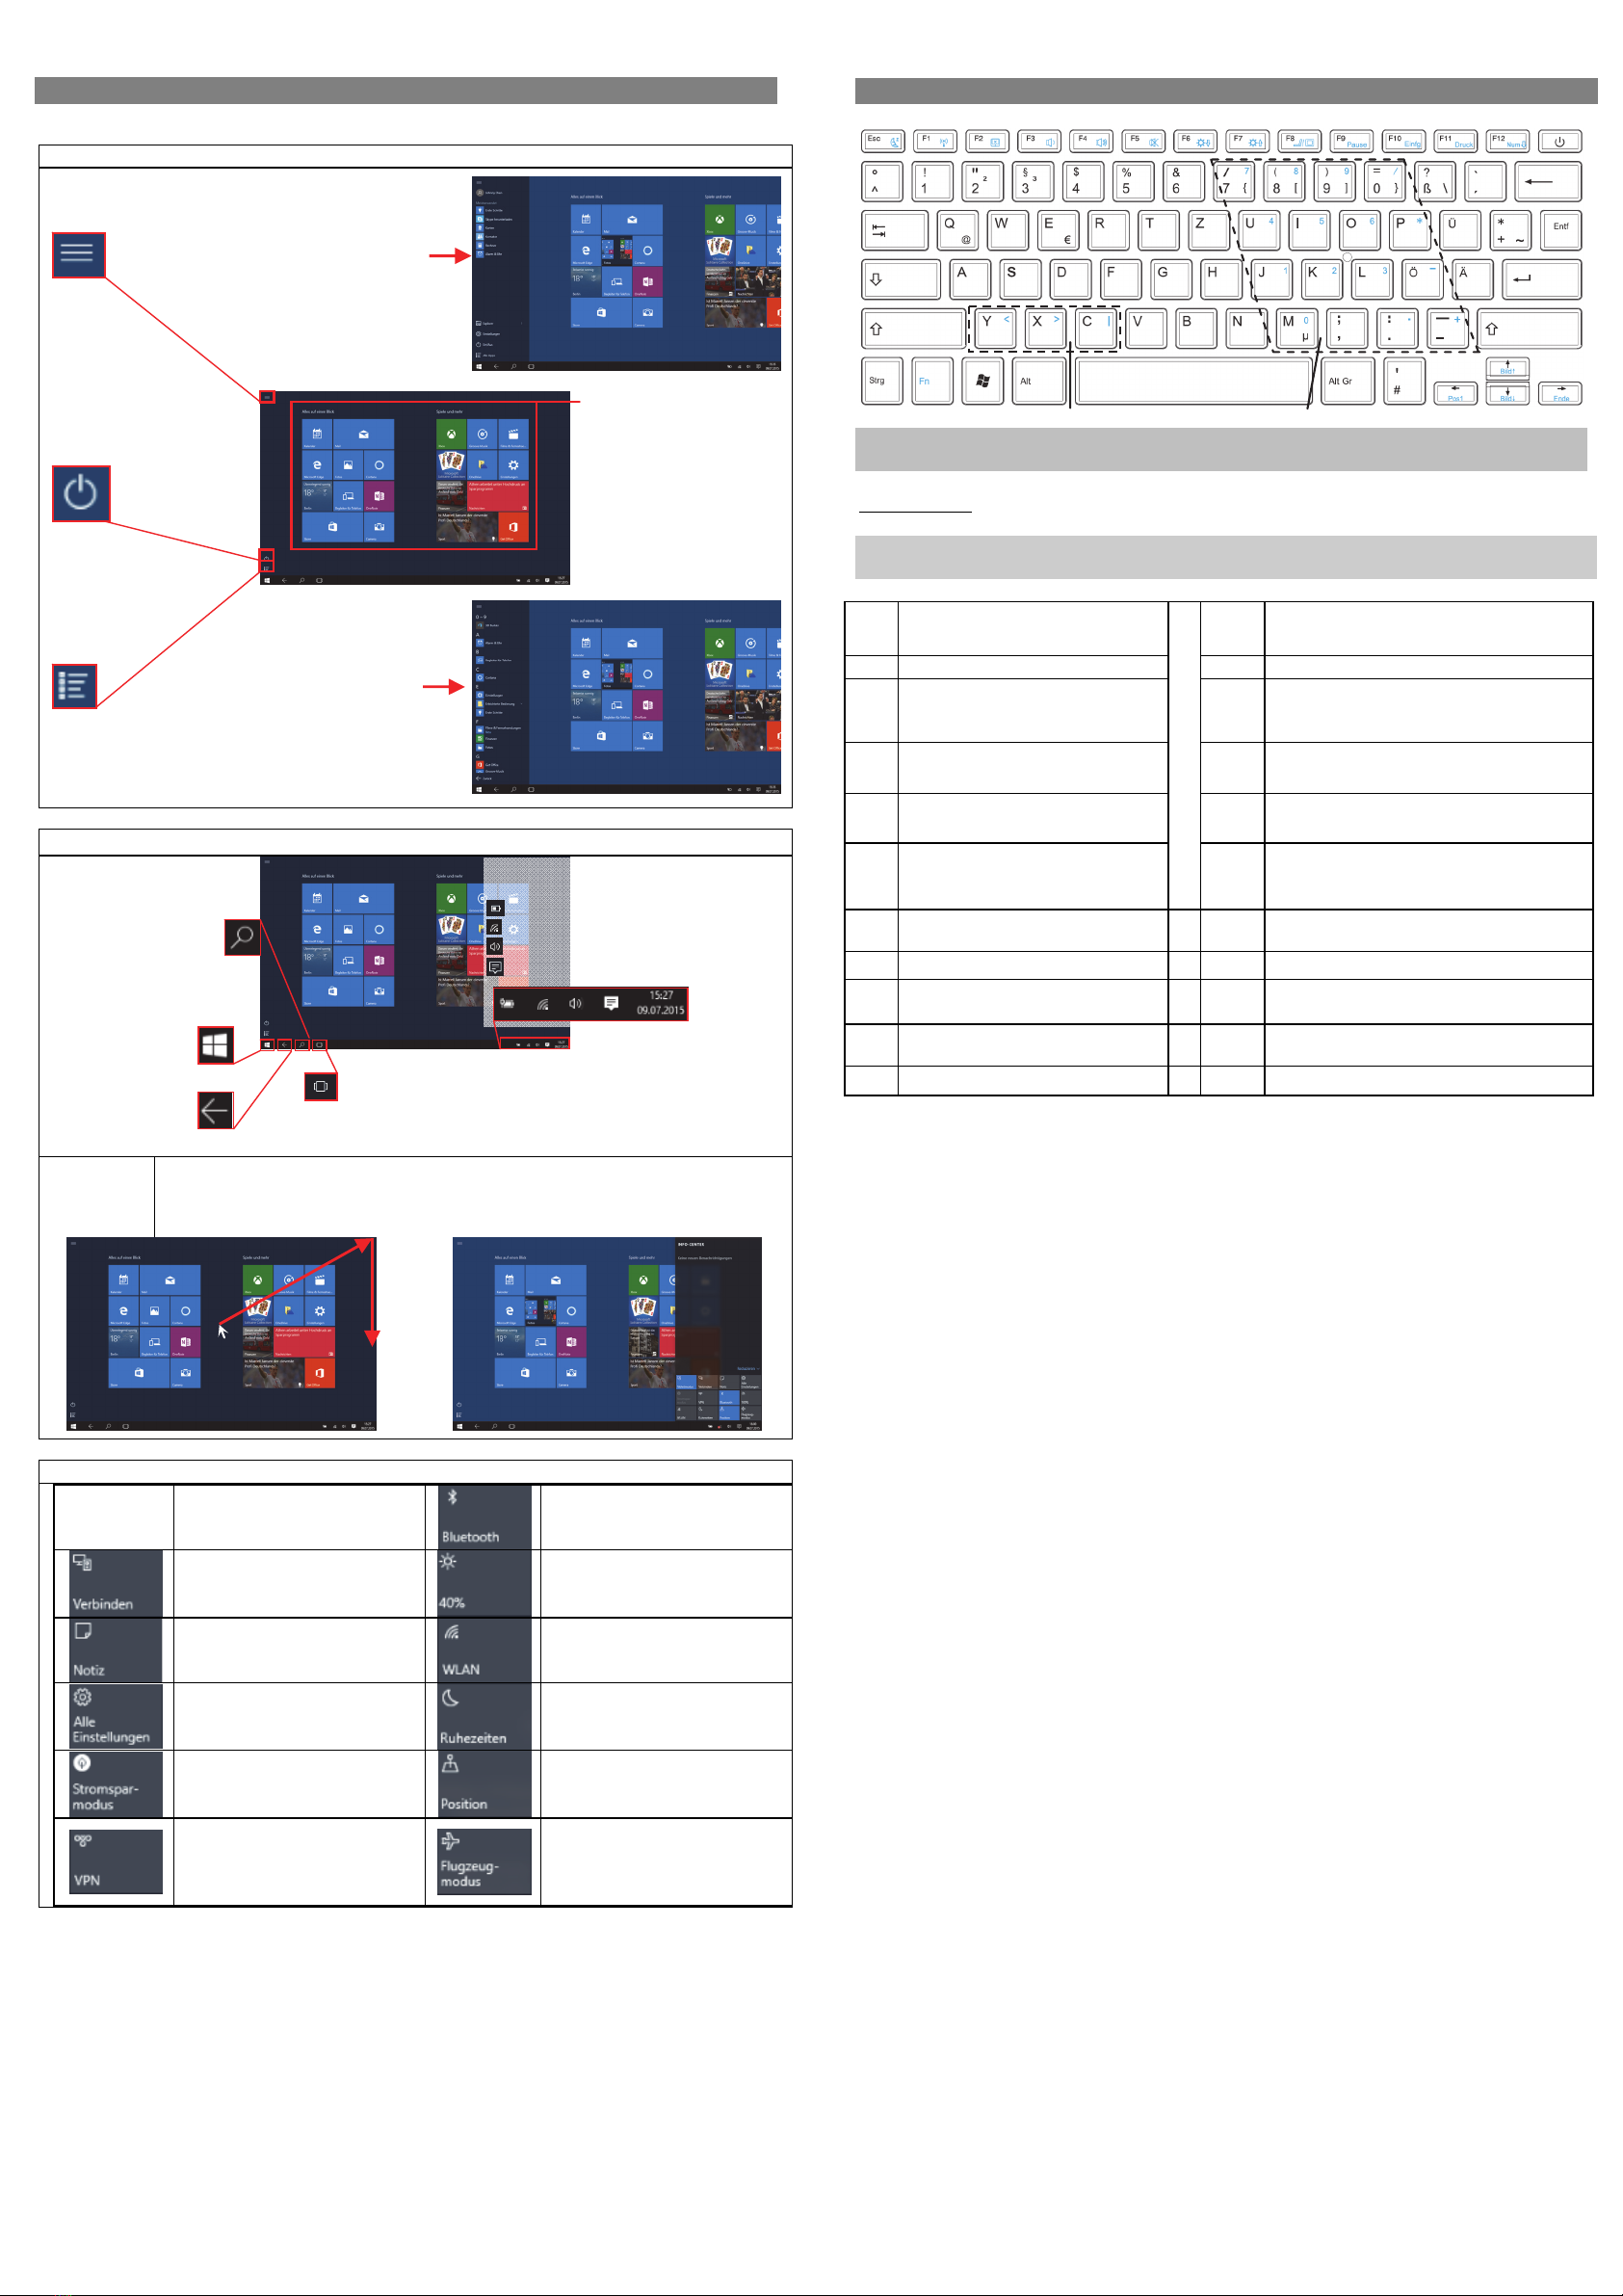
(1) Movethemousecursortotheupperrightcorneranddragitdownwardstoopenthe
functionbarlikethis.
(2) ClicktheicontoopenAllsettingsandselect„NetworkandInternet“.
(3) Clickonthenetworkyouwishtoconnecttoandthenclickon“Connect”.YourDevicewill
nowattempttoestablishaconnectiontothat3Gnetwork.Iftheconnectionissuccessful,
themessage“Connected”willappearbelowthenetwork.
Note:
Ifthereisnointernetconnectionpleaserecheckthissettingandverifythatyouareconnectedtoan
avilablewifior3GNetwork.
Support
Onourwebsiteyouwillfindthelatestinformationaboutthisproduct,otherproductsofour
enterprise,ourcompanyitselfandvalidwarrantyterms.ThelatteryouwillfindunderService‐
Downloads.
AxdiaInternationalGmbH Tel:+49(0)2154/8826‐0
Formerweg9 Fax:+49(0)2154/8826‐100
D‐47877Willich(Germany)
Support‐Hotline(9.00am–1.00pm):+49(0)2154/8826‐101
Note:
PleaseaddressanyfurtherquestionsdirectlytoourCustomerServiceDepartmentatthefollowing
e‐mailaddress:support@axdia.de
Inordertobeabletoprocessyourrequestquickly,weaskyoutohavethefollowinginformation
ready:
‐Productdescription
‐Purchasedate
‐Descriptionofproblem
Disposal
Donotdisposeofthisitemwithnormalhouseholdwaste.Pleasereturnany
defectivedevicetoyourdealerortoacollectionpointforenvironmentallysound
disposal.
Compliance
AxdiaInternationalGmbHherebydeclaresthatthisdeviceisinaccordance
withtheessentialrequirementsandotherrelevantprovisionsofDirective
2004/108/EC.TheCEdeclarationofconformityforthisproductcanbefound
ontheinternetat:www.odys.de–Service–downloads