Odys PDV 751 User manual

Introduction
- 1 -
Introduction
Thank you for choosing the 7” portable DVD Player. The unit applies the
latest state of the art electronics and is designed for use in hotels,
offices, vehicles or your home. The DVD Player is constructed to provide
years of reliable, trouble-free service, and is compact so that you can
take it with you anywhere and is designed for quick and easy setup.
Please read all documentation prior to using this product. The
documentation will assist you in obtaining the best equipment
performance. Save this manual for later use.
Important Notice
It is unlawful in most jurisdictions for a person to drive a motor vehicle
which is equipped with a television viewer or screen that is located in the
motor vehicle at any point forward of the back of the driver’s seat, or that
is visible, directly or indirectly, to the driver while operating the vehicle.
In the interest of safety, this system should never be installed where it
will be visible, directly or indirectly, by the operator of the motor vehicle.
Safety Precaution
For safety reasons, when changing video media, it is recommended that
the vehicle is not in motion, and that you do not allow children to
unfasten seat-belts to change video media or make any adjustments to
the system.
Enjoy your entertainment system but always remember-safety of all
passengers remains the number one priority.
Please note that the device may not be used while
the vehicle is in motion. It may only be used when
the vehicle is parked!

Important Safety Instruction
- 2 -
Important Safety Instruction
This product has been listed as class 1 laser product. The mark is on the rear panel.
CAUTION
1. The product contains a low-power laser device. In order to ensure the safety of
the laser device, do not remove any cover and attempt to repair the unit. If any
service is needed, please contact the distributor or its authorized service center.
2. To reduce the risk of electric shock, do not remove the cover (or back). No
user-serviceable parts inside. Refer servicing to qualified service personnel.
Unplug the product from the wall outlet before servicing or when it is unused for a
long period of time.
3. The manufacturer should not hold responsibility for the damage caused by any
substitutions and modifications of the product without authorization from the
manufacturer or authorized unit.
4. Danger of explosion if battery is incorrectly replaced. Replace only with the same
or equivalent type.
WARNING
The apparatus shall not be exposed to dripping or splashing and that no objects filled
with liquids, such as vases, shall be placed on the apparatus.
The lightning flash with arrowhead symbol, within an equilateral triangle,
is intended to alert the user to the presence of un-insulated “dangerous
voltage” within the product’s enclosure that may be of sufficient
magnitude to constitute a risk of electric to persons.
The exclamation point within an equilateral triangle is intended to alert the
user to the presence of important operating and maintenance (servicing)
instructions in the literature accompanying the appliance.
CLASS 1 LASER PRODUCTCLASS 1 LASER PRODUCT

Important Safety Instruction
- 3 -
Notes
1. Read these instructions.
2. Keep these instructions.
3. Heed all warnings.
4. Follow all instructions.
5. Do not use near water.
6. Clean only with dry cloth.
7. Do not block any ventilation openings. Maintain well ventilated conditions around
the product. Do not put product on bed, sofa or anything that blocks ventilation.
Install in accordance with the manufacturer’s instructions.
8. Do not install near any heat sources such as radiators, heat registers, stoves, or
other apparatus (including amplifiers) that produce heat.
9. Read, heed and follow all instructions to ensure correct and safe installation and
interconnection of the apparatus;
10. The apparatus shall not be exposed to dripping or splashing and that no objects
filled with liquids, such as vases, shall be placed on the apparatus;
11. The mains plug shall remain readily operable;
12. Protect the power cord from being walked on or pinched particularly at plugs,
convenience receptacles, and the point where they exit from the apparatus.
13. Only use attachments/accessories specified by the manufacturer.
14. Use only with the cart, stand, tripod, bracket, or table specified by the
manufacturer, or sold with the apparatus. When a cart is used, use caution when
moving the cart/apparatus combination to avoid injury from tip-over.
15. Unplug the apparatus during lightning storms or when unused for long periods of
time.
16. Refer all servicing to qualified service personnel. Servicing is required when the
apparatus has been damaged in any way, such as power-supply cord or plug is
damaged, liquid has been spilled or objects have fallen into the apparatus, the
apparatus has been exposed to rain or moisture, does not operate normally, or
has been dropped.
Copyright Protection
This product incorporates copyright protection technology that is protected by U.S.
patents and other intellectual property rights. Use of this copyright protection
technology must be authorized by Macrovision, and is intended for home and other
limited viewing uses only unless otherwise authorized by Macrovision. Reverse
engineering or disassembly is prohibited.

Table Of Contents
- 4 -
Table Of Contents
Introduction __________________________________________________________________ 1
Important Safety Instruction_____________________________________________________ 2
Table Of Contents _____________________________________________________________ 4
Main Features ________________________________________________________________ 5
High Quality Audio and Video ___________________________________________________ 5
Advanced Playing Function _____________________________________________________ 5
Region Code ________________________________________________________________ 5
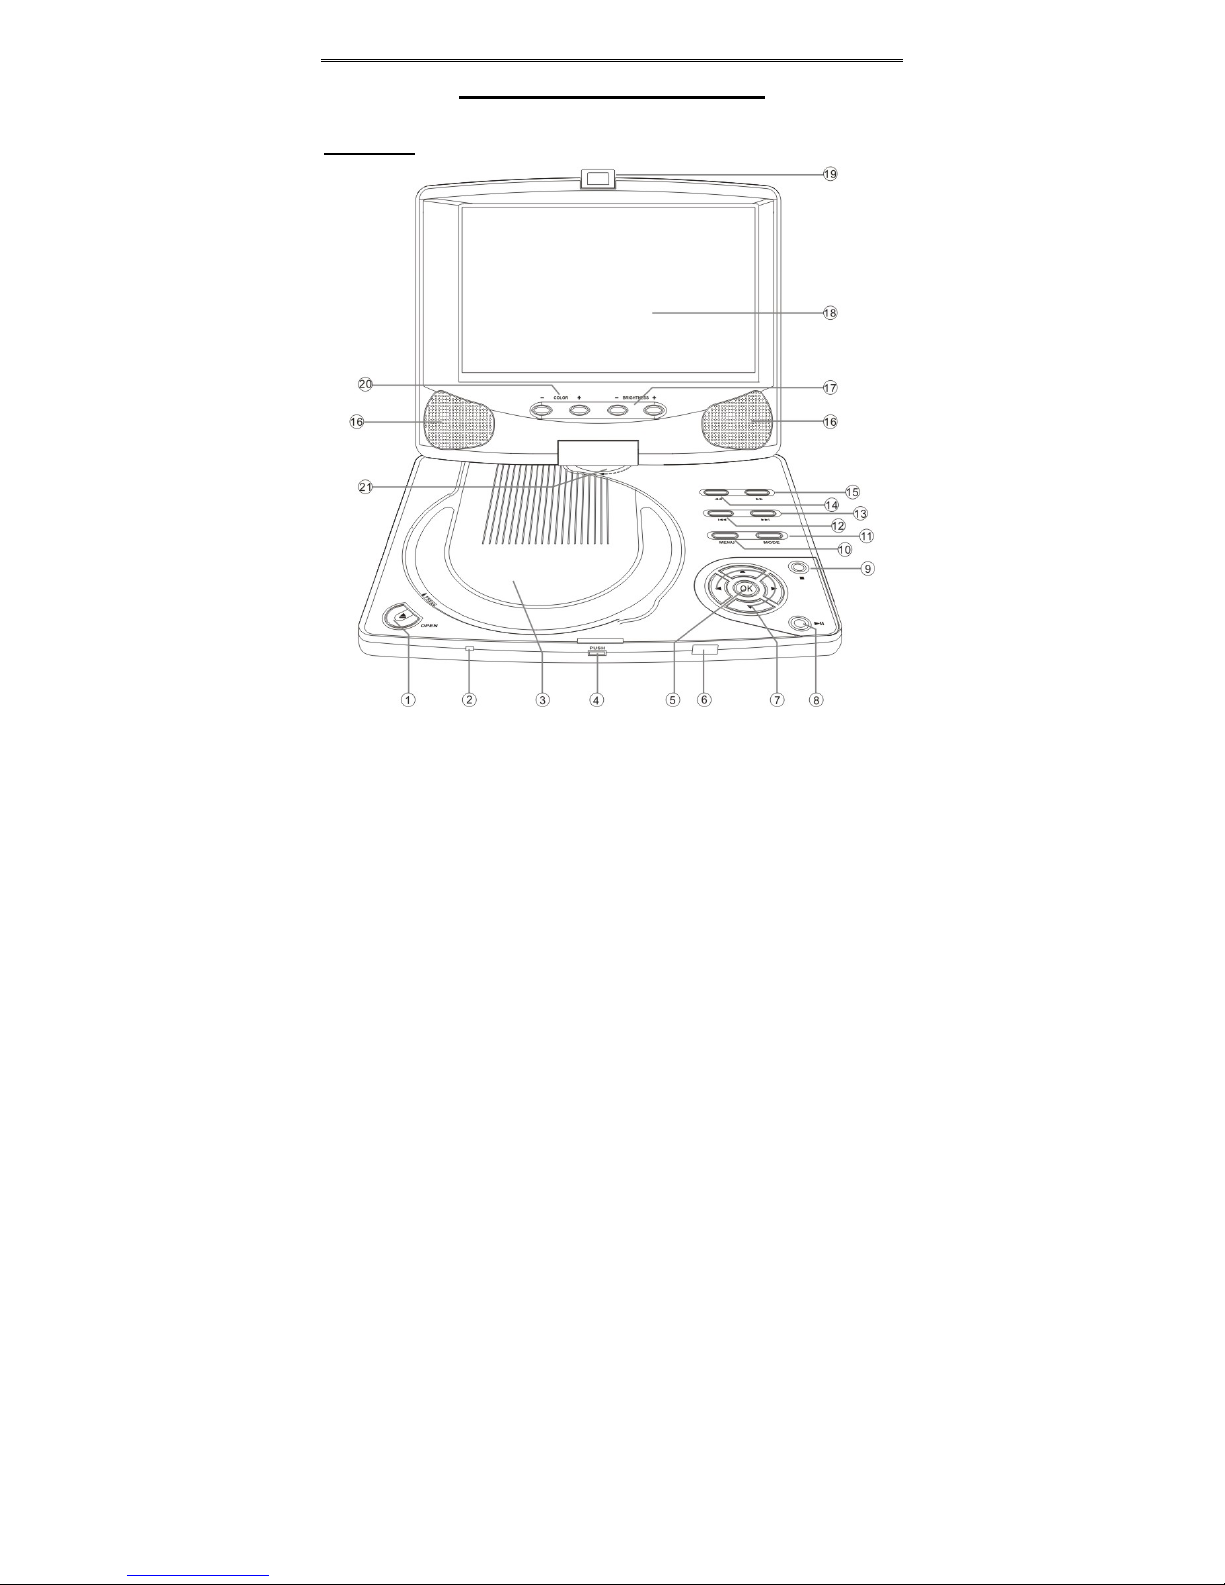
Description- Front Panel________________________________________________________ 6
Front Panel _________________________________________________________________ 6
Description- Right and Left Panel ________________________________________________ 8
Right Panel _________________________________________________________________ 8
Left Panel___________________________________________________________________ 8
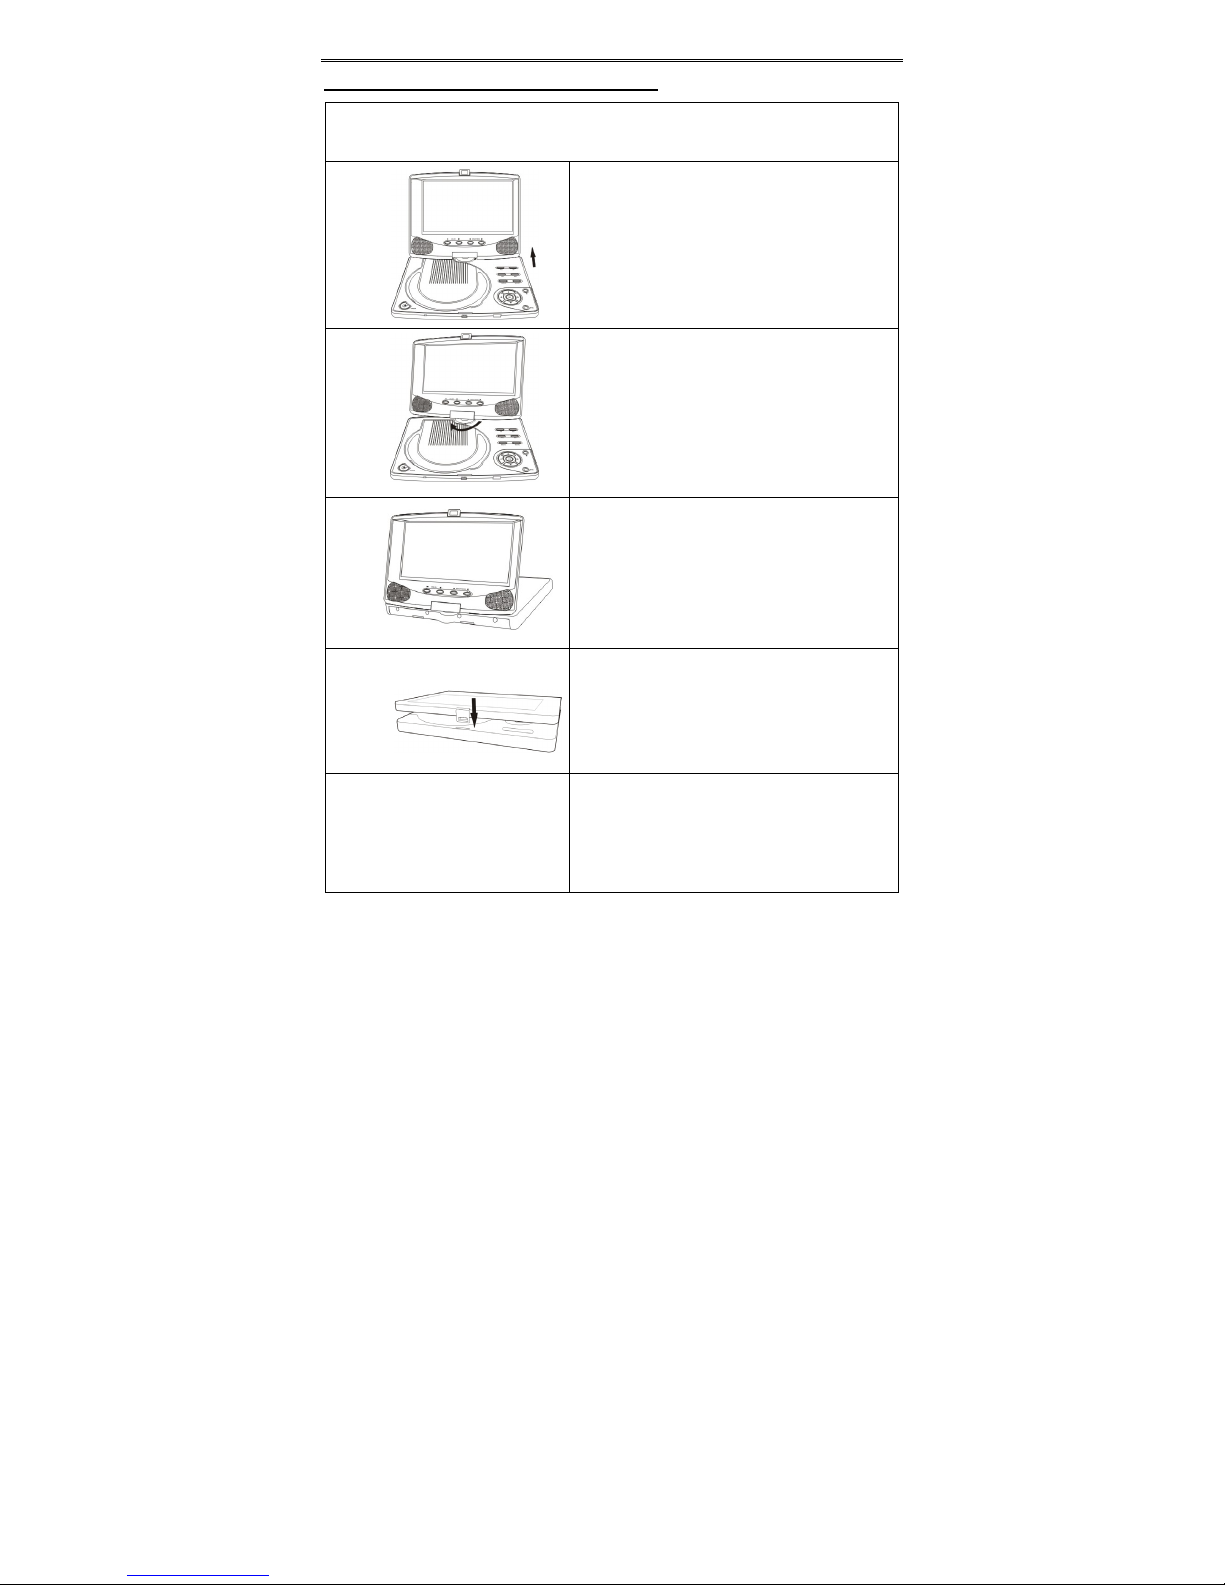
Special Features of Revolving LCD Screen_________________________________________ 9
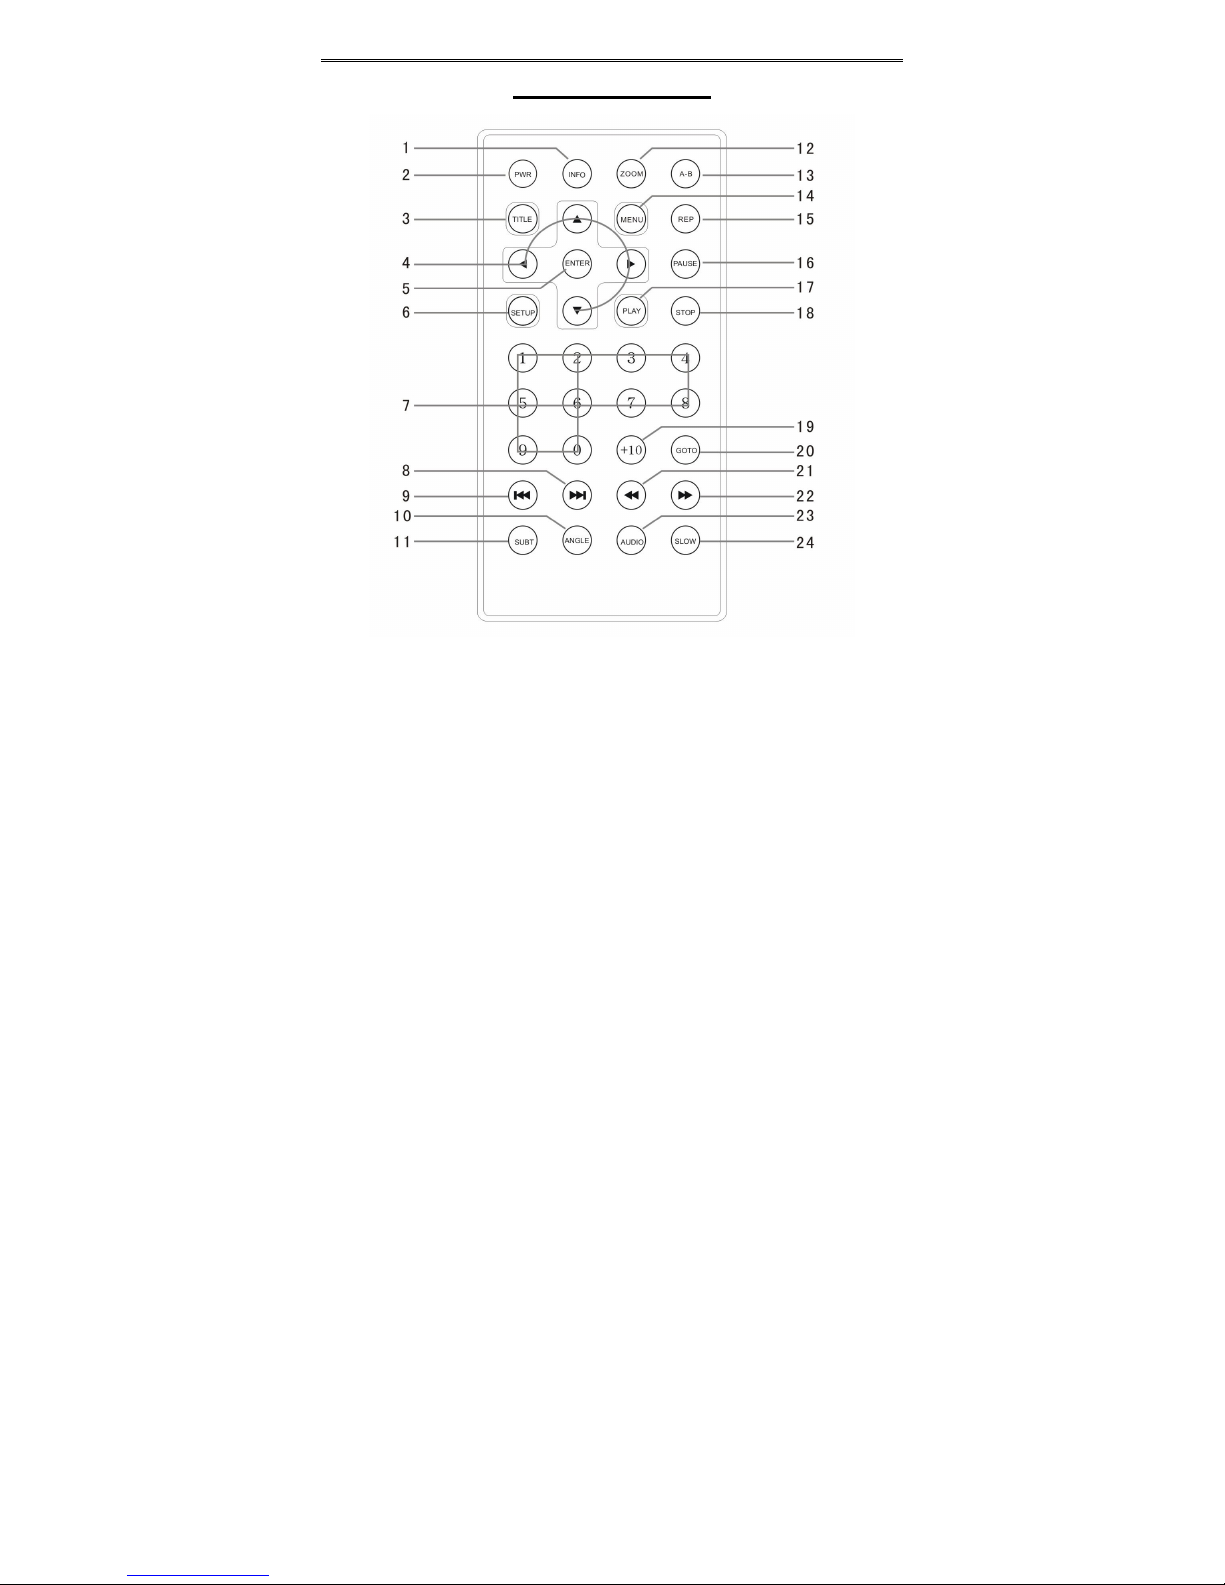
Remote Control ______________________________________________________________ 10
System Connections __________________________________________________________ 12
Power Supply Connection _____________________________________________________ 12
Connecting to a TV __________________________________________________________ 12
Connecting to an Amplifier_____________________________________________________ 13
Connecting to a Digital Amplifier ________________________________________________ 13
Connecting to External AV Signal Source _________________________________________ 14
Connecting to Headphone _____________________________________________________ 14
Using of Remote Control ______________________________________________________ 15
System Preparations__________________________________________________________ 16
Disc Formats Supported By This Player __________________________________________ 16
Care of Discs _______________________________________________________________ 16
Storage of Discs_____________________________________________________________ 16
Cleaning of Discs ____________________________________________________________ 16
Power Supply________________________________________________________________ 17
Rechargeable Battery Pack ____________________________________________________ 17
Attaching the Battery Pack_____________________________________________________ 17
Charging the Battery Pack _____________________________________________________ 18
Detaching the Battery Pack ____________________________________________________ 18
Using the Vehicle DC Adapter __________________________________________________ 19
Playback Operation ___________________________________________________________ 20
Pre-Operation ______________________________________________________________ 20
General Playback Operation ___________________________________________________ 20
Playback of DVD Disc ________________________________________________________ 21
Playback of CD Disc _________________________________________________________ 22
Playback of JPEG Disc _______________________________________________________ 23
System Setup________________________________________________________________ 24
General Setup ______________________________________________________________ 24
OSD Lang _________________________________________________________________ 24
Speaker Setup ______________________________________________________________ 25
Dolby Digital Setup __________________________________________________________ 25
Video Setup ________________________________________________________________ 25
Preference Page ____________________________________________________________ 25
Password __________________________________________________________________ 26
Default Reset _______________________________________________________________ 26
Troubleshooting _____________________________________________________________ 27
Specifications _______________________________________________________________ 28

Main Features
- 5 -
Main Features
High Quality Audio and Video
LCD (Liquid Crystal Display) Screen
7” Color LCD screen.
Special Functions
Supports Multi-angle, Multi-language and
Parental-lock features.
AV Input
External Audio/Video signal input can be
connected to AV input jacks
Digital Out
Convenient optical digital audio output
jack for connection to an external digital
processor.
Audio Output
Audio output jack for connection to an
external amp or powered speakers.
Video Output
Composite video output for connection to
an external monitor.
Headphone Output
For listening to movies or music in
private.
Switching Power Adapter
Automatically adapts to voltage
requirements in the U.S. and other
countries.
Advanced Playing Function
Compatibility
Plays: DVD, CD, CD-R, CD-RW, and
PICTURE CD discs are compatible.
ON-Screen Display
ON-screen displays in your choice of
several different languages.
Viewing Performance
Multi-speed, fast forward, fast reverse,
slow play and repeat playback.
Zoom Function
Allows the viewer to enlarge in the
picture.
Search By Time
Search for a certain time on a disc.
Region Code
DVD players and discs are coded by
region. These regional codes must
match. If the codes don’t match, the disc
cannot be played. This player’s code is
region 2.

Description- Front Panel
- 6 -
Description- Front Panel
Front Panel
1. OPEN button
Press to open the disc tray cover.
2. Power Indicator
Light turns green when the player is in operation.
Light turns red when the player is in standby mode.
3. Disc Tray Cover
When the disc is loaded gently press the cover to close it.
4. Push button
Press to open the LCD screen.

Description- Front Panel
- 7 -
5. OK button
Press to confirm selection.
6. Remote Sensor
IR receiver for remote control operation.
7. Direction buttons
Press to select menu items or settings.
8. PLAY/PAUSE button
Press to start or pause playback.
9. STOP button
Press to stop playback.
10. MENU button
Press to display the disc menu on the LCD screen in Playback mode.
11. MODE button
Press to change the aspect ratio to 4:3 or 16:9 and overturn the picture.
12. Prev button
Press once to skip to the beginning of the current chapter or track, press twice
to skip to the previous chapter or track.
13. Next button
Press to skip to the next chapter or track.
14.
Press to activate fast backward playback.
15.
Press to activate fast forward playback.
16. Speakers
Provide high quality audio output.
17. BRIGHTNESS +/- button
Press to adjust the brightness level.
18. LCD Screen
7” TFT LCD Panel
19. Latch Hook
Used to lock the LCD panel to the unit.
20. COLOR +/- button
Press to adjust the color level.
21. LCD screen axis
For the screen to be rotated around, please refer to the following pages for
details.

Description- Right and Left Panel
- 8 -
Description- Right and Left Panel
Right Panel
1. Volume Control knob
Used to adjust the headphone and speaker volume.
2. Headphone Jack
Used to connect wired headphones for private listening. When headphones are
connected to this jack the speaker output will turn off automatically.
3. Audio Input/Output and Optical Digital Output Jack
Used for connection to an external amplifier or digital processor (Optical Cable not
supplied) or external audio source
4. Video Input/Output Jack
Used for connection to an external monitor or video source
5. AV IN/OUT Switch
Switch to IN, to input an external Audio/Video source. Switch to OUT when the
player is connected to an external monitor.
6. DC 9.5V Input Jack
Used to connect the AC/DC Adaptor or DC Vehicle Adaptor Power to the unit.
Left Panel
1. Power ON/OFF Switch
Switch the power on or off.

Description- Right and Left Panel
- 9 -
Special Features of Revolving LCD Screen
The revolving LCD screen is one of the outstanding features about this product.
You are suggested to take the following steps for proper operation.
Pos A
1. Open the screen cover to position (A) as
shown in left figure at which the screen is
vertical to the operation panel.
Pos B
2. Revolving the screen horizontally about its
axis in the clockwise only. The maximum
revolving degree is 180 (position C) at
which you will hear a click and the screen
faces backward. If you want to return to
initial position (A) please revolve screen
counter clockwise until it clicks.
Pos C
3. You can rotate the screen vertically from
position C to operation panel as indicated
in left fig.
Pos D
4. The final rotating position (position D) at
which the screen facing upward and back
to operation panel.

Remote Control
- 10 -
Remote Control
1. INFO button
Press for detailed information on the
disc. Keep pressing the button to
remove information from screen.
2. PWR button
Press to turn unit ON or OFF.
3. TITLE button
Press to display titles if present on
the disc.
4. Direction buttons
Press to select menu items.
5. ENTER button
Press to confirm the items or
settings.
6. SETUP button
Press to access the DVD player’s
setup menu.
7. Number buttons
Select numbers by pressing these
buttons.

Remote Control
- 11 -
8. NEXT SKIP button
Press to go to next track /chapter.
9. PREV SKIP button
Press to go to beginning of current
track/chapter. Press twice to go to
beginning of a previous
track/chapter.
10. ANGLE button
Press to access various camera
angles, if the DVD disc contains
multiple camera angles.
11. SUBT button
When a DVD with subtitles is
playing, press to select a subtitle
language or to turn subtitles OFF.
12. ZOOM button
Press to enter and cycle through
zoom functions, during zooming in
status, use the direction buttons (4)
to move around the screen.
13. A-B Repeat button
Used to play a section of the DVD from
point A to point B. Press once to
select the starting point (A) press
again to select the end point (B).
Press a third time to stop the A-B
Repeat
14. MENU button
Press to open the disc menu.
15. REP button
Press to repeat a chapter, track, title,
or the entire disc.
16. PAUSE button
Press to pause playback.
Press the button again or PLAY button
to resume normal playback.
17. PLAY button
Press to start playback.
18. STOP button
Press once to stop playback. Press
the PLAY button to resume normal
playback. Press the button twice
repeatedly to stop playback
completely.
19. +10 button
Select numbers greater than 9 by
pressing the (+10) button first, and
then additional number buttons as
needed.
20. GOTO button
Press to select the desired disc
starting time, track or title.
21. REV SCAN button
Press to search backward.
22. FWD SCAN button
Press to search forward.
23. AUDIO button
Press to access various audio
languages, when the DVD disc
contains multiple audio languages.
24. SLOW button
Press to activate slow playback.

System Connections
- 12 -
System Connections
•Before plugging the power cord into an AC outlet, make sure that all other
connections have been made as described below.
•Always ensure that the DVD player, TV and any other electrical components are
switched OFF before connecting to the DVD player.
Power Supply Connection
Connect the supplied adapter to the side of the DVD player in the jack marked “DC
9.5V IN”. Plug the two-prong end of the power cord to an AC100-240V outlet. If you
have difficulty inserting the plug, turn it over and reinsert it. If the DVD Player will not
be used for a long time, disconnect the plug from the outlet.
Connecting to a TV
Audio/video connections
The easiest way to connect the DVD player to a television is via the supplied
Audio/Video cable. Use the audio/video cable to connect the output jacks of the DVD
player with the audio/video input jacks of the TV. And then switch the AV IN/OUT
button to OUT.

System Connections
- 13 -
Connecting to an Amplifier
The DVD player can be connected to an amplifier. Plug the supplied A/V cable into the
audio jack on the right side of the unit and plug the other end into an audio input on
the amplifier. Please refer to the equipment’s manual before connecting. After
connection, switch the AV IN/OUT button to OUT.
Connecting to a Digital Amplifier
The DVD Player can be connected to an amplifier with a digital optical input. The
cable is not supplied, but can be purchased at most home electronics retail stores.
After connection, switch the AV IN/OUT button to OUT.

System Connections
- 14 -
Connecting to External AV Signal Source
The unit can be connected to the AV signal input source. Use the audio/video cable to
connect the audio/video input jacks on the right panel of the unit with the output jacks
of the external AV signal source. After connecting, switch the AV IN/OUT button to IN.
See the below figure:
Connecting to Headphone
Connect headphones into the headphone Jack on the right side of the unit.
•
•
•
•
•
•
•
•
•
•Excessively loud volume could damage your hearing.
•Turn down the volume before you connect the headphones, and then raise the
volume to comfortable level.
•Sound from the DVD Player’s external speaker will stop when headphones are
connected.

System Connections
- 15 -
Using of Remote Control
1. Take off the battery holder. Refer to the figure above.
2. Insert the battery into the battery holder (observe correct polarity) and insert the
battery holder into the remote.
3. For best results, aim the remote directly at the player’s IR receiver window, within
15 feet, and angles not exceeding 60 degrees. The path between the remote
control and remote sensor should be free of obstructions.
4. Under normal use the battery will last for approximately one year.
5. Remove the battery if the remote is not to be used for a long time.
6. Battery type is a CR2025

System Preparations
- 16 -
System Preparations
Disc Formats Supported By This Player
DISC LOGO DIAMETER
PLAYBACK TIME/
PLAYABLE SIDES
133 min (SS-SL)
242 min (SS-DL)
266 min (DS-SL)
12cm
484 min (DS-DL)
41 min (SS-SL)
75 min (SS-DL)
82 min (DS-SL)
DVD
8cm
150 min (DS-DL)
12cm 74 min
CD
8cm 20 min
The disc maker specifies the operation of some DVD discs. Please refer to the
instruction manual with the disc.
Care of Discs
Do not touch the playing surface of the
disc.
Do not stick paper or labels on the disc.
Storage of Discs
Do not expose discs to direct sunlight or
excessive temperatures.
Cleaning of Discs
If a disc has fingerprints or dust on it,
lightly wipe the disc with soft cloth from
the center of the disc outward.
Never use record cleaning sprays, or
any other solvents to clean your discs.

Power Supply
- 17 -
Power Supply
Rechargeable Battery Pack
Your portable DVD player comes with a lithium ion rechargeable battery that attaches
to the rear of the DVD player. Charge the battery fully before initial use. Charging time
is normally about 4-5 hours. A fully charged battery delivers about 3 hours of use, but
playing time varies from disc to disc. If the battery will not be used for a long period
of time, fully charge the battery prior to storage.
Working conditions and precautions of the battery
•New batteries should be fully charged before initial use.
•Battery should only be used and charged when temperatures are between 32 -
100F.
•Never put the battery in fire or water.
•Do not expose the battery to high temperatures or store in hot, sunny places.
•Maintain well-ventilated conditions around the product to avoid overheating. Don’t
put the product on bed, sofa or anything that may block ventilation to the product.
•Do not short the battery terminals.
•Do not open the battery.
•Detach the battery after charging is complete. When charging the battery pack,
the charge light will turn red, when the charging is complete, the light will turn
green.
•Detach the battery when not in use.
•When the battery is weak, “Low Power” will appear on the LCD screen and about
one minute later, the player will power OFF automatically.
Attaching the Battery Pack
Refer to the following steps for attaching the Battery Pack:

Power Supply
- 18 -
1. Place the DVD Player on a soft and smooth surface with the bottom of the unit
facing UP, Direct the battery so that the battery contacts and the five plastic tabs
are aligned with the matching contacts and tab recesses on the player. (chassis
up see the Fig.1).
2. With one hand on the player to prevent it from moving, push the battery pack on
to the player. (see the Fig.2).
3. Slide the Battery Pack until you hear it click and lock into place (see the Fig.3).
Fig.1 Fig.2 Fig.3
Charging the Battery Pack
The battery pack must be attached to the DVD player to charge it using the supplied
AC Power Adapter.
1. Attach the battery pack to the DVD player
2. Plug the supplied AC Power Adapter into the player’s power jack marked with
”DC9.5V IN”, which is located on right side of the DVD Player.
3. Plug the other end of the AC Power Adapter Cord into a household AC Outlet as
shown below.
•
•
•
•
•
•
•
•
•
Detaching the Battery Pack
If the DVD Player is not going to be used for long periods of time, the battery pack
should first be fully charged and the Battery Pack should be detached. When the
DVD Player is turned OFF, the DVD Player is still consuming some power in
STANDBY mode. This will eventually discharge the battery.

Power Supply
- 19 -
Make sure the power is turned OFF before detaching the Battery Pack.
1. Place the player on a soft and smooth surface with the bottom of the unit facing
up.
2. Press and hold the Battery Release Tab (1) (located on the bottom) in the
direction of the arrow as shown below.
3. Remove the Battery Pack by gently sliding it towards the back of the unit (2).
4. Carefully remove the Battery Pack from your player.
Using the Vehicle DC Adapter
To use the supplied Vehicle DC Adapter, disconnect the Battery pack and plug the
Vehicle DC Adapter into the DVD Player’s Power Jack and the other end into the
Vehicle DC outlet (Cigarette Lighter Socket) as shown below.
Quick Tips:
•Do not operate the unit while driving a vehicle.
•Place the unit in a secure position for viewing.
•Do not leave battery attached when using car adaptor as power source.
•Do not connect the unit to the car adapter when starting the car.

Playback Operation
- 20 -
Playback Operation
Pre-Operation
1. Connect DVD Player to power source.
2. Unlock and lift the LCD screen up.
3. Switch the “POWER” to the “ON” position.
4. Press the “OPEN” button to open the disc cover.
5. Put the disc into the tray with the printed side facing up.
6. Close the disc tray cover by pressing the area of the disc cover that says “Press”.
The player will automatically search for the disc and start playback.
7. Adjust the volume with the “VOLUME” control (also adjusts headphone volume if
using headphones).
General Playback Operation
Pause
Press the Pause button once on remote control or the PLAY/PAUSE button on the
front panel to pause playback.
Press the PLAY or PAUSE button on the remote control or thePLAY/PAUSE button
on the front panel to resume normal playback.
Resume Playback
During playback, Press the STOP button on the remote control or the button on the
front panel once. The DVD Player will memorize the location where playback of the
disc was stopped.
Press the PLAY button on the remote control or thebutton on the front panel to
resume normal playback. The DVD Player will resume the playback of the disc from
the location where it was stopped. This function will not operate if the disc is removed
from the DVD Player.
Press the STOP button twice (2). Playback of the disc will stop. When the PLAY
button on the remote control or thebutton on the front panel is pressed again,
playback of the disc will start from the beginning of disc.
Screen Modes
Press the MODE button on the front panel to change the screen aspect ratio to 16:9
or 4:3 mode.
Zoom
Press the ZOOM button on the remote control to cycle through the different zoom
settings. While in the zoom mode use the direction buttons to move the picture.
Table of contents
Other Odys Portable DVD Player manuals