ODYSPrimoWin12–Quickstart
Introduction
Pleaseobservetheinformationandwarningsfromtheusermanual.
‐ Pleaserefertotheusermanualfordetailedinstructions,conformityandsupportinformation.
‐ Themanualcanbefoundathttp://www.odys.de/web/tablet‐pc‐wintab_de.html.
‐ Usethehyperlinkat„Einstellungen–PCundGeräte–PC‐Info".
‐ Thereyouwillalsofindaguideonhowtochangethesystemlanguage.
‐ Usetheinstallationassistanttoeasilyconfigurethedevice.
Important!Pleasenote:Inordertouseallfeaturesavailable,aMicrosoftuseraccountmustbe
createdanditisnecessarytoactivateyoursystemlateron.Toresetaforgottenpasswordpleasevisit
www.live.com.
Topreventconflictswithothersystemswerecommendcreatinganewaccount.
Pleasecloseunusedappstoextendthebatterylifetimeasdescribedontheright.
Turnoffthetabletwhennotinuse.
TurningOn/Off
Toturnonthedevice,pressandholdthePowerbuttonontheunituntilyouseetheboot‐upscreen
thenrelease.Itmaytakeafewminutestostartupthesystem,pleasewaitbeforeyouproceed.
Toturnoffthedevice,pressandholdthePowerbuttonuntilyouseetheoption“PowerOff”,tap
on“PowerOff”andthentapon“OK”.
Tip:Thisdevicewillsleepwiththescreenoffifitstaysinactiveforafewseconds.Youcanbriefly
pressthePowerbuttontoturnonthescreenandwakeitup.
PowerOnandOfftheDisplay
‐Shortlypressthe[Power]buttontoturnoffthedisplay.
‐Pressthe[Power]buttonagainshortlyturnthedisplayonagain.
LanguageSetting
‐ConfirmthetworequestsatthebeginningbytapingatOK.
‐Tapon[Settings]andselect[Language&Input]
‐Selectyourdesiredlanguage.
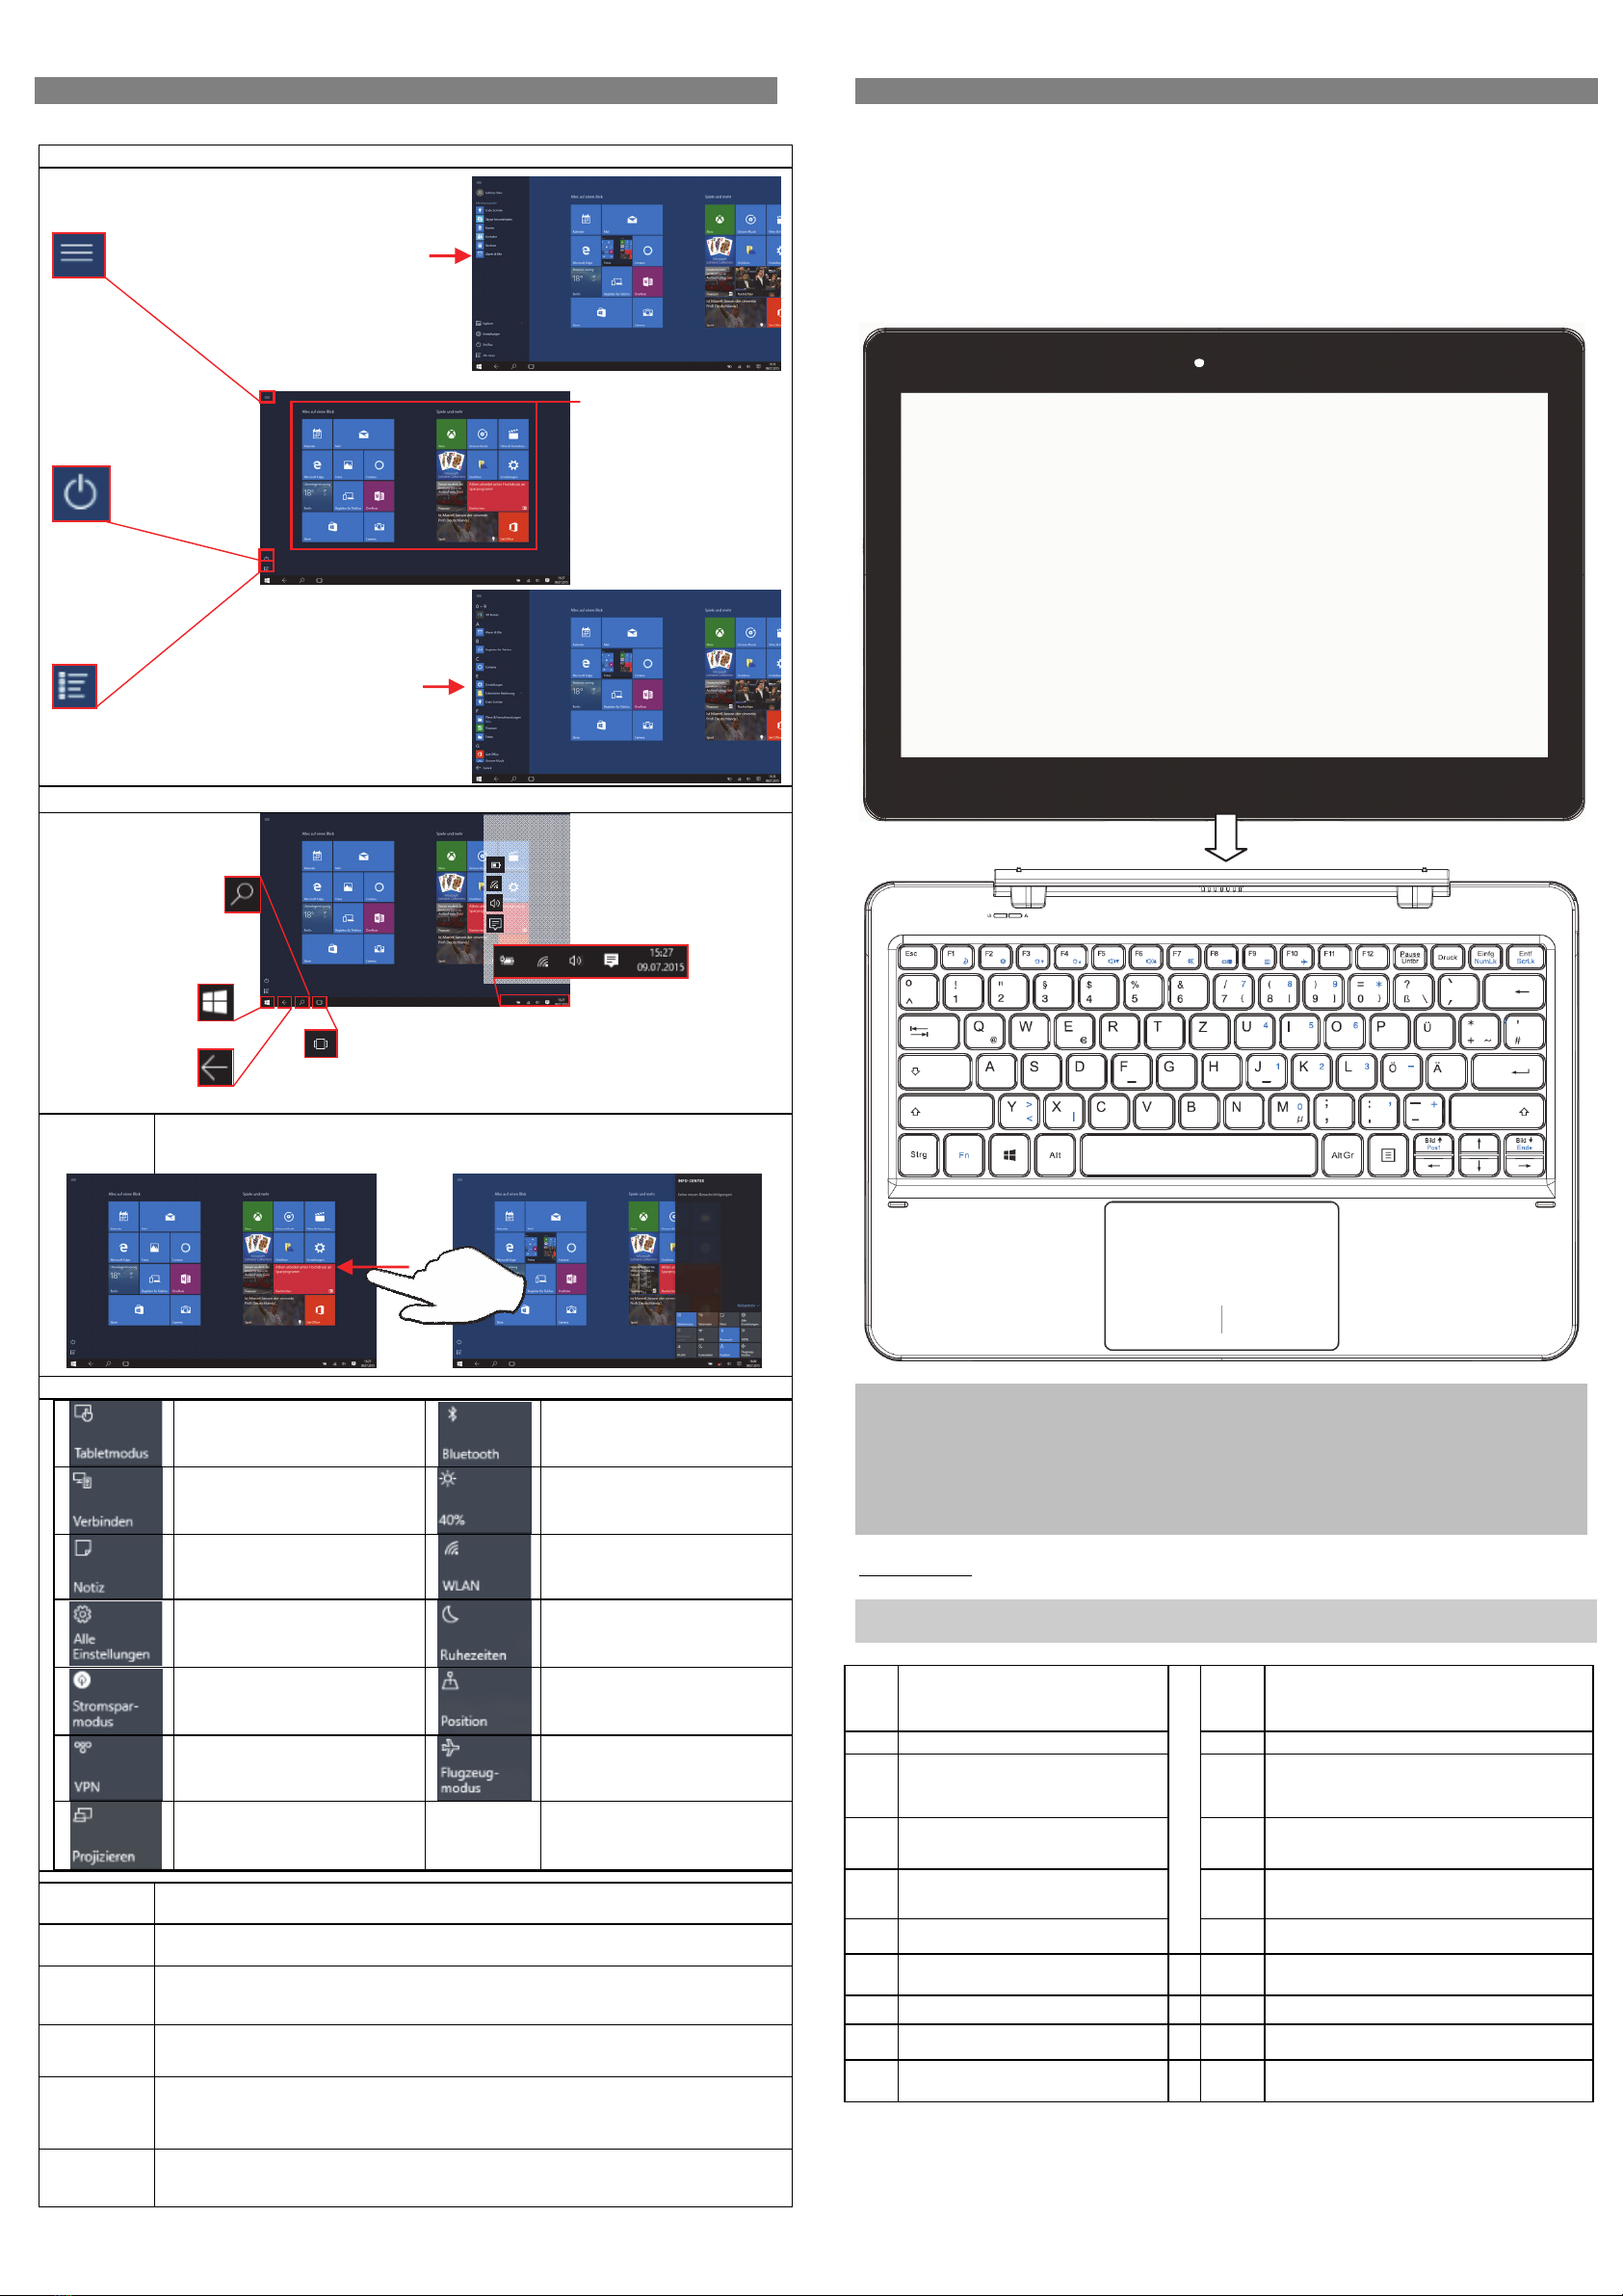
GettingStarted
1. StatusIndicatorStaysredduringchargingandwillturnorangeafterthebatteryisfully
charged.
2. MicroHDMIConnecttoaTVorotherdisplay.
3. MicroUSBSupportforUSBstick,Surfstick,KeyboardandMouse.
Note:AnOTGsupportingadaptercableisrequired(optional)
4. PowerjackChargeandpowerthetabletwiththeincludedpoweradapter.
5. Microphone
6. HeadphonejackAudiooutputconnectionforhead‐phones
Note:Speakeroutputisautomaticallydisabledwhenheadphonesare
connectedtotheplayer.
7. FrontCameraFront‐facingcamerafortakingavatarpictures
8. Speaker
9. DockingclipToalignthetablet.
10. DockingToconnectanoptionalavailablekeyboard.
11. RearCameraRear‐facingcamerafortakingpictures
12. Volumekey+/‐ Shortlypresstoincrease/decreasevolumelevel.
13. PowerButtonPressandholdthepowerswitchtoturnonoroffthedevice;
Brieflypresstheswitchtoturnthescreenonoroff.
Shouldthedevicestopfunctioningoroperateabnormally,pressandhold
for15secondstoresetthedeviceoff.
14. MicroSDCardSlotAccommodatesanystandardSD/SDHCmemorycard.
ChargingBattery
Thedevicehasabuilt‐inrechargeablebattery.Noextrabatteryinstallationisrequired.Justcharge
thedevicewhenitindicateslowbattery.
Tochargethebattery,connectthedevicetoanystandardwalloutletviatheDCportusingthe
providedpoweradaptor.Ittakesabout5hourstofullychargethebattery.
Note:
a. Weadvicetouseonlythedeliveredpoweradapterwiththistablet.
b. Youcanoperatethedeviceevenwhenitisbeingcharged.Butforextendedbatterylife,itis
suggestedNOTtousethedevicewhenitischarging.
c. Itisrecommendedtochargethebatterybeforeyouusethedeviceforthefirsttime.
d. Formaximumperformance,lithium‐ionbatteriesneedtobeusedoften.Ifyoudon’tusethe
deviceoften,besuretorechargethebatteryatleastoncepermonth.
e. Shouldtherechargeablebatteryofthedevicedischargecompletely,connectthedevice(using
theadapter)tothemainpowersourceforapproximately5‐10minutesbeforeattempting
normaloperation.
f. Insomecases,deviceswhichhavebeenchargedforlongerperiodsoftimemaynotbeabletobe
switchedbackon.ShouldthisoccuryouhavetomakeaReset.
Factory reset
Shouldyounoticeunusualbehaviororthedevicecannotbeactivated,wesuggestrestoringthe
devicetothefactorysettings.Switchoffthedevice.WhilepressingthePowerButtonandthe
Volume‐Minuskeysimultaneously,startthedeviceuntiltheRecoveryModeisstarted.Followthe
instructionsunder“Troubleshoot”or“ProblemSolving”.Select„ResetyourPC”or“Restore“
ATTENTION!Alldataandsettingswillbeerased.
ConnectviaUSB
Note:OnlyuseaUSBcablewithamaximumlengthof100cm.
PleasemakesurewhenconnectingtheUSBadapterintotheUSB
socketthattheconnectoralignmentarecorrect.Incorrectinsertion
maycausedamagetotheplugandsocket.
Ononesideoftheplugthereareusuallysmallsizesofhooksthat
securethefixation.Payspecialattentiontothepositionofthe
hooks,theyshouldshowupwardswhenconnectingthecableinto
thesocketwhilethedeviceislyingonscreenup.
Inordertovieworplaybackfiles,thesemustfirstbedownloaded
fromtheinternetortransferredfromacomputerandstoredon
thedeviceviaMircoSDcardorUSB‐Stick.
ATTENTION:AdirectconnectionbetweentheDeviceandComputer,viaUSB‐Cableisnotpossible!
InstallingMemoryCard
- Touseamemorycard,findthecardslotattheside
ofthedeviceandtheninsertthememorycardinto
theslotinthecorrectorientationasshown.Check
thattheMicroSDcardisinthecorrectpositionwith
thecontactpinfacingdownwardsdirectedtothe
screenasillustrated.Youmaydamagethecardand
thereaderifMicroSDcardisnotinsertedincorrect
position.
- PushtheMicroSDcardintothecardslotuntilitclicks.
- Toaccessthefilesstoredinthememorycard,enter
theExplorermodebytappingtheExplorericonand
selectthe“SDCard”directory.
- ToremoveMicroSDcard,pushthecardonceagain
untilitclicks.
Note:WerecommendusingonlyMicroSDorSDHCcardsupto128GBcapacity.
‐WhenaMicroSDcardisinsertedinorejectedfromthedevice,itmaytakefewsecondsforthe
devicetoupdatethecontent.
‐PleaseavoidinsertingorejectingMicroSDcardwhenotheroperationisrunningasthismaycause
thesystemhang.
‐DoNotremovethecardifthecontentinsidethecardisbeingplayed.Thiswillhaltthe
operationofthedeviceandmightcauseasystemhang.
‐Pleaseuseyourfingernailstoproperlyinsertorremovethecard.
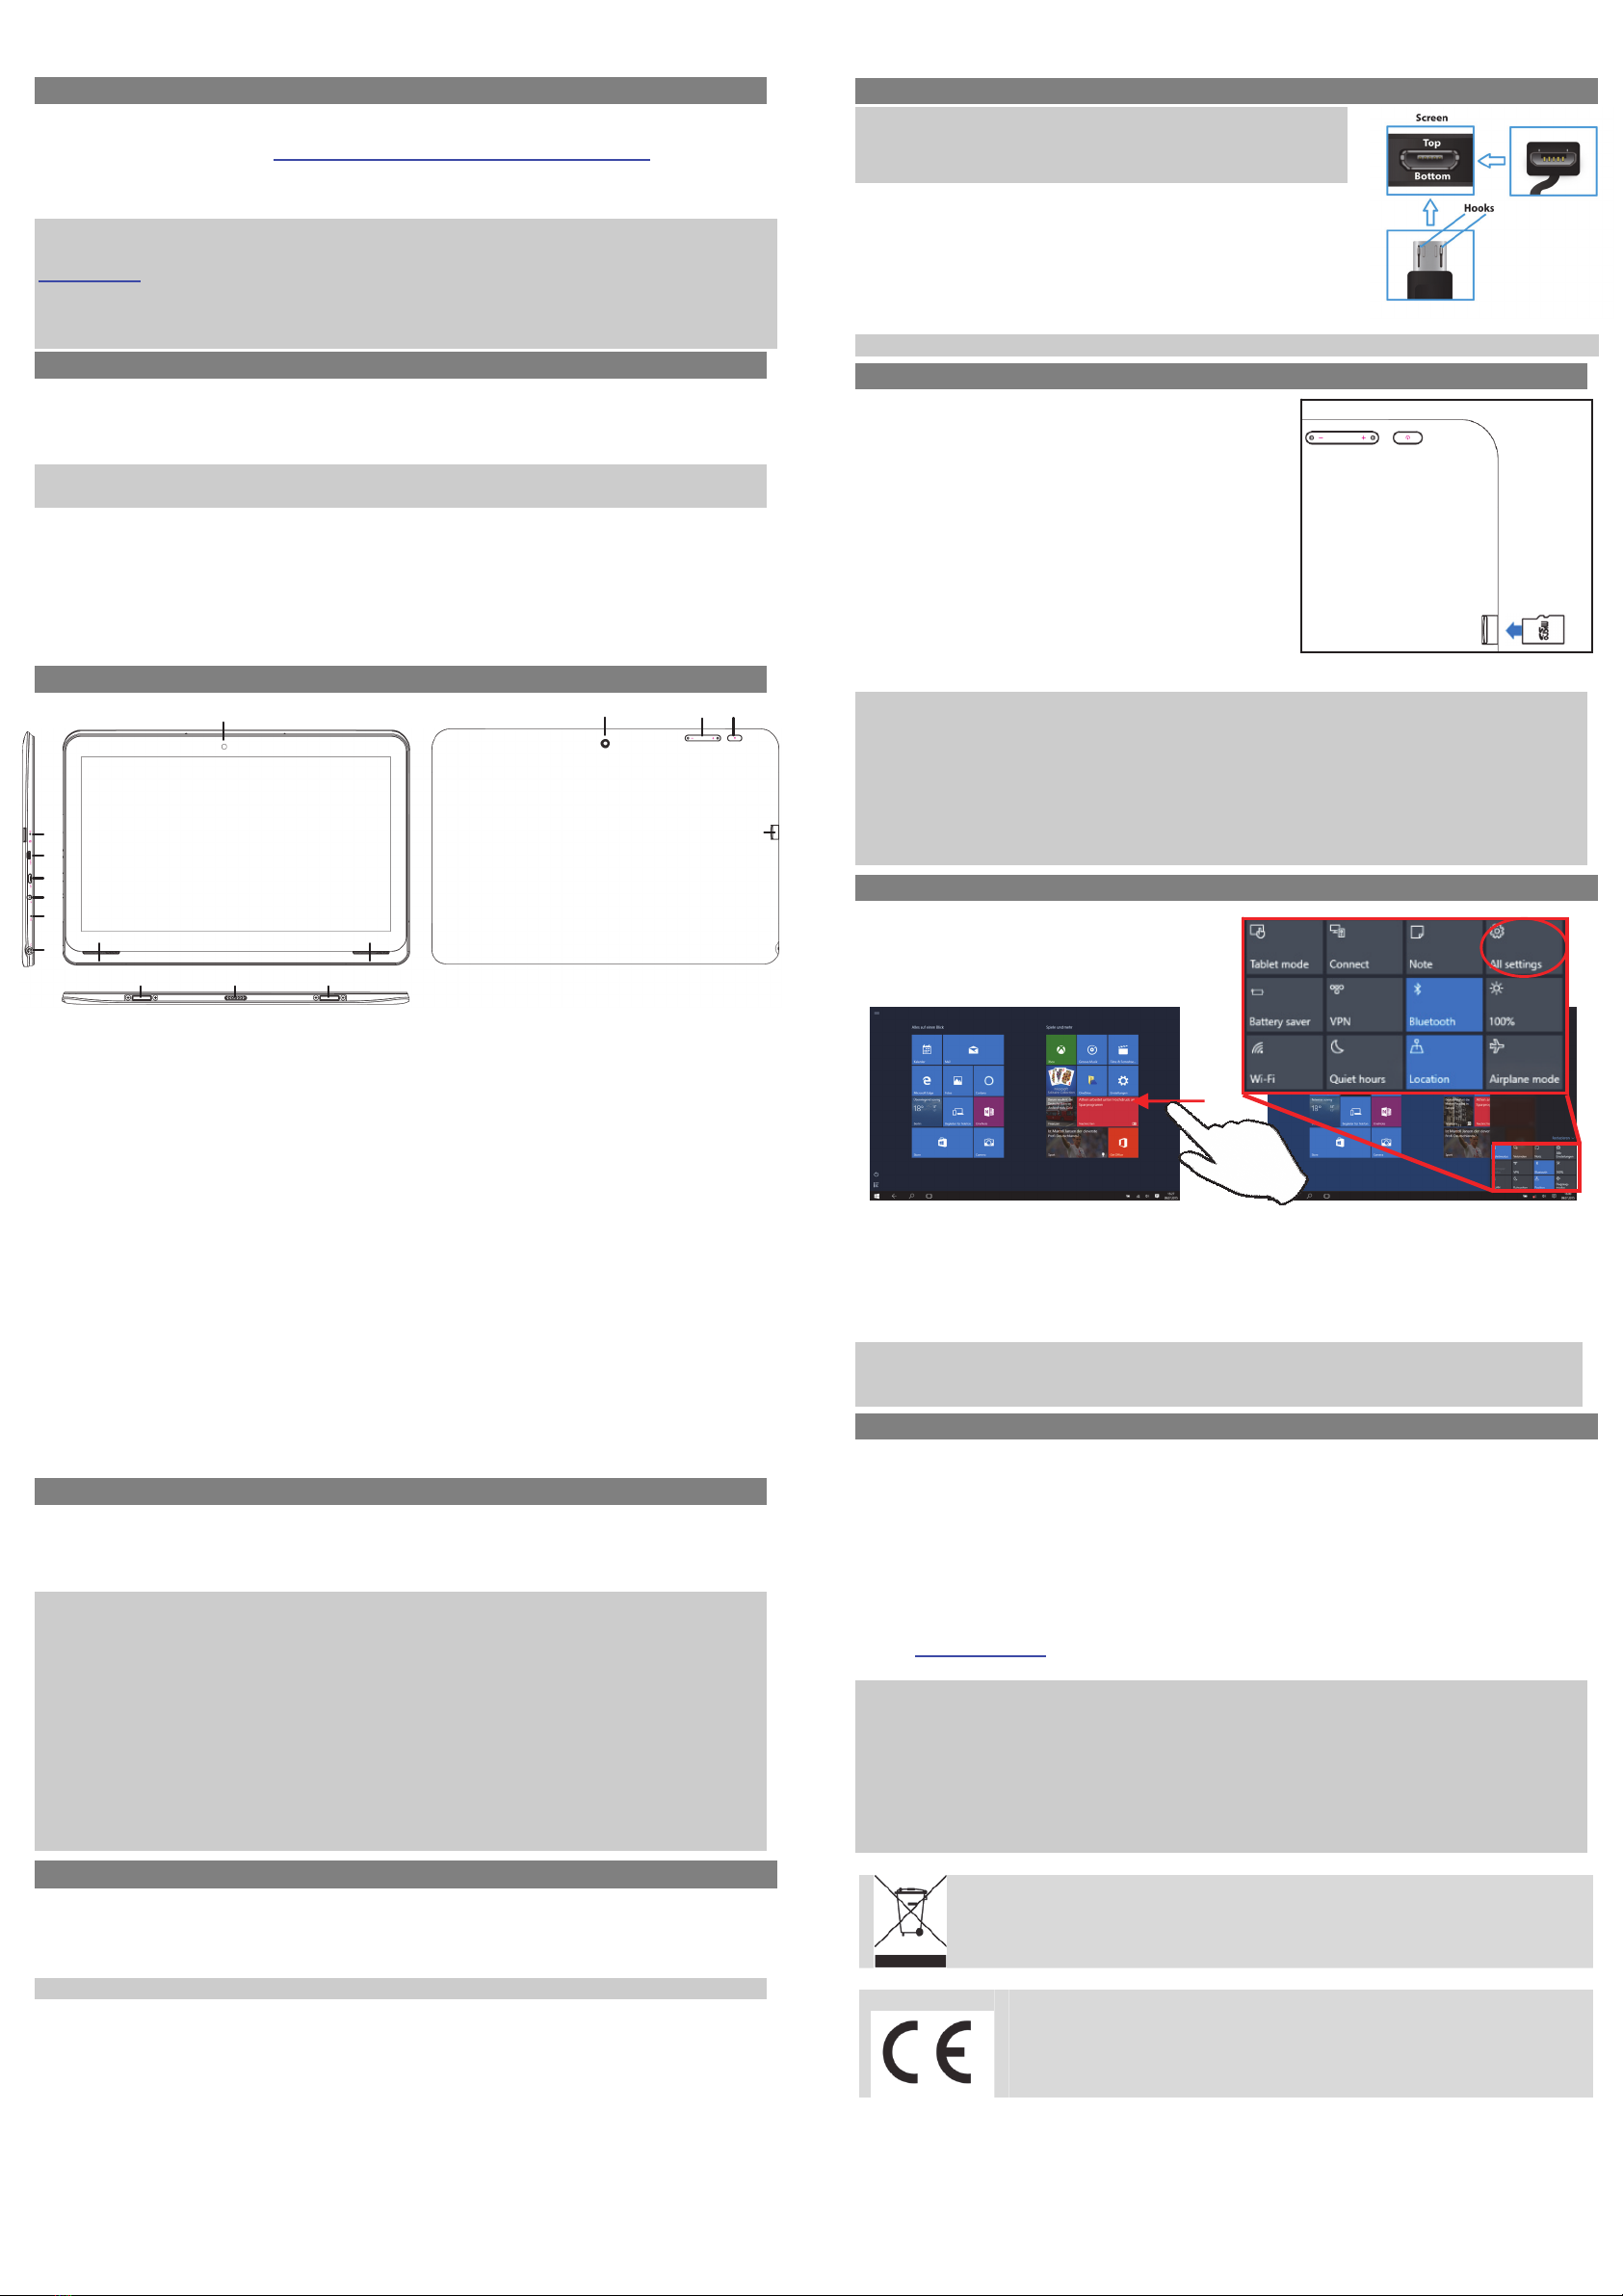
ConnectingtotheInternet
(1) Swipewithyourfingerfromtheright‐handsidetowardsthecentreandopenthefunction
barlikethis.
(2) TouchtheicontoopenAllsettingsandselect„NetworkandInternet“.
(3) Taponthenetworkyouwishtoconnecttoandthentapon“Connect”.YourTabletwillnow
attempttoestablishaconnectiontothat3Gnetwork.Iftheconnectionissuccessful,the
message“Connected”willappearbelowthenetwork.
Note:
Ifthereisnointernetconnectionpleaserecheckthissettingandverifythatyouareconnectedtoan
avilablewifior3GNetwork.
Support
Onourwebsiteyouwillfindthelatestinformationaboutthisproduct,otherproductsofour
enterprise,ourcompanyitselfandvalidwarrantyterms.ThelatteryouwillfindunderService‐
Downloads.
AxdiaInternationalGmbH Tel:+49(0)2154/8826‐0
Formerweg9 Fax:+49(0)2154/8826‐100
D‐47877Willich(Germany)
Support‐Hotline(9.00am–2.30pm):+49(0)2154/8826‐101
Note:
PleaseaddressanyfurtherquestionsdirectlytoourCustomerServiceDepartmentatthefollowing
e‐mailaddress:support@axdia.de
Inordertobeabletoprocessyourrequestquickly,weaskyoutohavethefollowinginformation
ready:
‐Productdescription
‐Purchasedate
‐Descriptionofproblem
Disposal
Donotdisposeofthisitemwithnormalhouseholdwaste.Pleasereturnany
defectivedevicetoyourdealerortoacollectionpointforenvironmentallysound
disposal.
Compliance
AxdiaInternationalGmbHherebydeclaresthatthisdeviceisinaccordance
withtheessentialrequirementsandotherrelevantprovisionsofDirective
1999/5/EC.TheCEdeclarationofconformityforthisproductcanbefoundon
theinternetat:www.odys.de–Service–downloads
v1.1.0
1
2
3
4
5
6
891098
711 12 13
14