OEG Digitaler Wandscanner
D
6
5 Auffinden von Objekten
Wenn sich Holzmaterial im Sensorbereich befinden, wird auch die Entfernung zum Objekt angezeigt. Bei der
kürzesten Entfernung kann eine Markierung an die Wand gesetzt werden. Danach wiederholt man den Vorgang
in entgegengesetzter Richtung und setzt wieder eine Markierung bei der geringsten Entfernung. Die Breite än-
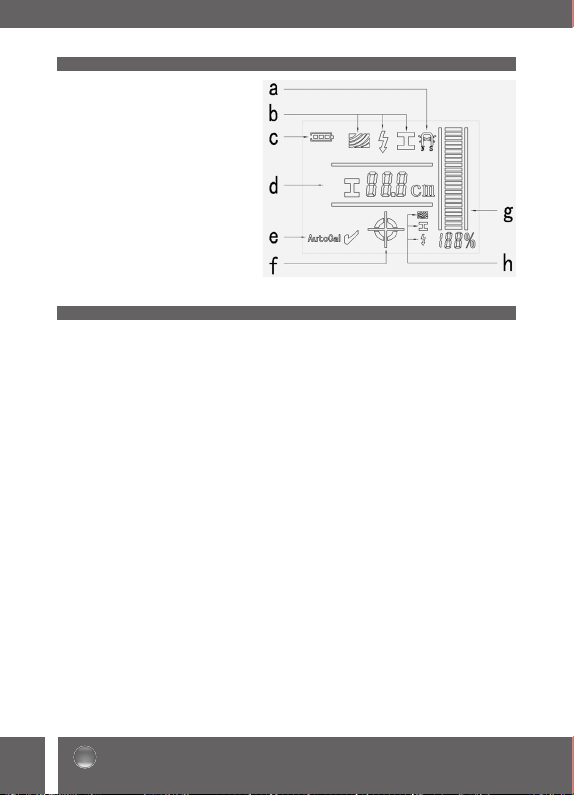
dert sich je nach Tiefe und Masse des Objektes. Das Fadenkreuz erscheint, wenn sich das Objekt direkt unter
dem Sensor befindet.
Achtung: Unter keramischen Oberflächen, Teppichböden, Tapeten mit Metallfasern und in feuchten Wänden
können Holzmaterialien nicht aufgefunden werden.
Erfassen von spannungsführenden Leitungen
Nach der Aktivierung ertönt ein akustisches Signal und die grüne LED leuchtet. Da sich das Gerät standardmä-
ßig im Metallsuchmodus befindet, drücken Sie zweimal die Taste für spannungsführende Leitungen. Es er-
scheint das Symbol b im Display. Sollten sich keine spannungsführenden Leitungen um den Scanner herum
befinden, obwohl ein Signal ertönt und die Ampelanzeige rot leuchtet, benötigt das Gerät eine Kalibrierung.
Setzen Sie den Wandscanner zunächst auf einen Wandbereich, in dem sich keine spannungsführenden Leitun-
gen befinden. Dann führen Sie das Gerät dort hin, wo die Bohrung erfolgen soll. Dort führen Sie es horizontal
oder vertikal durch langsame Zickzackbewegungen über die Oberfläche. Nähert sich das Gerät einer
spannungsführenden Leitung, so steigt die Balkenanzeige. Gleichzeitig wechselt die Ampelanzeige bei wach-
sender Annäherung von grün über gelb nach rot. Dann ertönt ein akustisches Signal. Bei der kürzesten Entfer-
nung kann eine Markierung an die Wand gesetzt werden. Danach wiederholt man den Vorgang in
entgegengesetzter Richtung und setzt wieder eine Markierung bei der geringsten Entfernung. Die Breite ändert
sich je nach Tiefe und Masse des Objektes. Das Fadenkreuz erscheint, wenn sich das Objekt direkt unter dem
Sensor befindet.
Achtung: Statische Aufladungen an der Wand oder Wasserrohre, die parallel zu spannungsführenden Leitungen
liegen, können zu ungenauen Messergebnissen führen. Um statische Elektrizität zu verringern und die Anzeige
zu verbessern, legen Sie am besten Ihre freie Hand neben das Messwerkzeug flach auf die Wand.
Anmerkung: Das Messgerät kann Leitungen mit Wechselspannung , und Volt mit bis Hz
orten.
6 Pflege und Reinigung
• Wischen Sie Schmutzpartikel oder Verunreinigungen mit einem trockenen, weichen Tuch ab. Benutzen Sie
keine Reinigungs- oder Lösungsmittel.
• Um die Messfunktion nicht zu beeinträchtigen, dürfen Aufkleber oder Typenschilder, insbesondere
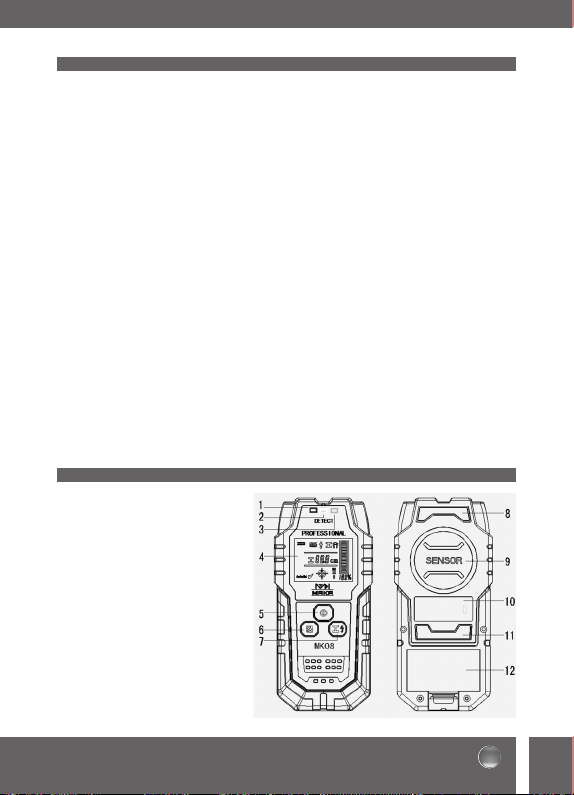
metallische, nicht auf der Vorder- oder Rückseite im Sensorbereich () befestigt werden.
• Lagern und transportieren Sie das Messgerät nur in der mitgelieferten Schutztasche.