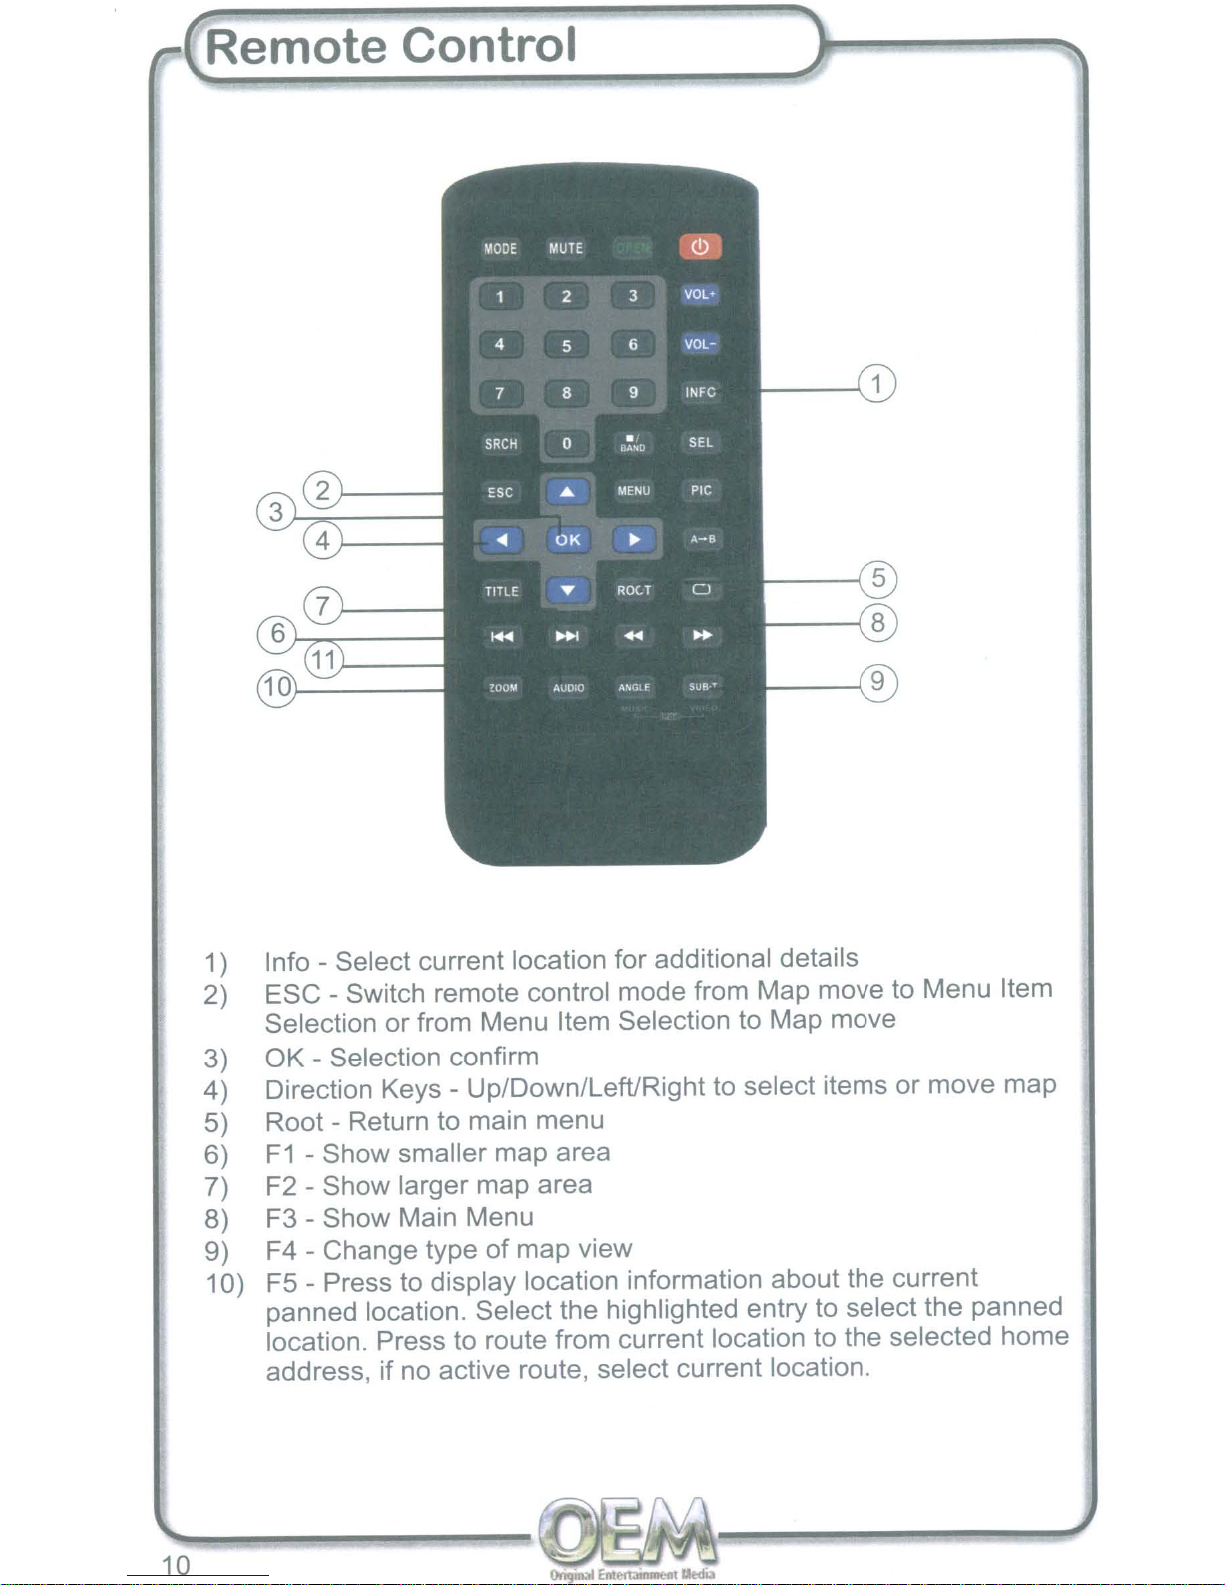
OEM SNAV-1 User manual


2
Contents
Thank you for choosing our products. We hope you will find the
instructions
in
this user manual clear and easy to follow. If you take a
few
minutes to look through it, you'll learn
how
to use the features
of
your
new
SNAV-1 for maximum enjoyment.
This manual explains how to install this navigation system
in
your
vehicle. Included
in
this manual is aguide detailing the operation
of
the
software for the navigation system.
After you have finished reading the instructions, please keep this manual
in
asafe place for future reference.
Safety
Instructions.................................................
3
Safety
Precautions..................................................
4
Accessories
5
Installation Notes 6
Installation
Instructions...........................................
7
Enter
Navigation.....................................................
8
Controls on
Host
0
••••••••
0000
•••••••••
0
•••••••
0 0 9
Remote
Control 0
•••••••
0
••••••••••••••••••••••••••••••••••••
10
How
to
Use Navigation ..
0.0
•••••••••••••••••••••
011
Update
Map .....0
••••••••••••••••
0
••••
00.000
•••••••••••
000.0
•••
00000
0
o.
11
Troubleshooting 0...
12
Troubleshooting 0
0.0
•••••••••••••
o.
0.....
13
Navigation Box Warrenty
14
Navigation Box Specifications
0...........................
15
Software
Guide 0
0.......
17

Safety Instructions
TO REDUCE THE RISK OF FIRE AND ELECTRIC SHOCK, DO NOT EXPOSE THIS
UNIT TO RAIN OR MOISTURE
CAUTION:
To
reduce the risk of fire and electric shock, do not remove the cover (or back)
of
the unit. Refer servicing only to qualified service personnel.
CAUTION: TO PREVENT ELECTRIC SHOCK, MATCH WIDE BLADE OF PLUG TO
WIDE SLOT AND FULLY INSERT. The unit shall not
be
exposed to dripping or splashing
and that no objects filled iwth liquids, such as condensers or drain pipes, shall be placed
on the unit.
IMPORTANT SAFEGUARDS
In
addition to the careful attention devoted to quality standards
in
the manufacture
of
your
DE
RADIO Navigation product, safety
is
amajor factor
in
the design
of
every instrument.
However, safety is your responsibility too. This sheet lists important information that will
help
to
assure your enjoyment and proper use
of
the navigation product and accessory
equipment. Please read them carefully before operation and using your navigation
product.
Installation
1.
Read and Follow Instructions -All the safety and operating instructions should be
read before the navigation product is operated. Follow all operating procedures.
2.
Retain instructions -The safety and operating instructions should be retained for
future reference.
3.
Head All Warnings -Comply with all warnings on the navigation product and
in
the
operating instructions.
4.
Power Sources -This navigation product should be operated only from the type
of
power source indicated
on
the marking label. If you are not sure
of
the type
of
power
supply, consult your navigation provider. For navigation products intended to operate
from battery power, or other sources, refer to the operating instructions.
5.
Attachments -Do not use attachments unless recommended by the navigation
product manufacturer as they may cause hazards.
6.
Water and Moisture -Do not use this navigation product near water.
Caution:
Maintain electrical safety. Electrically operated equipment or accessories connected
to this unit should bear asafety certification mark on the accessory itself and should
not
be
modified so as to defeat the safety features. This will help avoid any potential
hazard from electrical shock or fire. If
in
doubt, contact qualified service personnel.
7.
Cleaning -Turn off the unit before cleaning.
Do
not use liquid cleaners or aerosol
cleaners. Use adamp cloth for cleaning.
8.
Objects that may touch dangerous voltage points
or
"short-out" parts could result
in
a
fire or electric shock. Never spill liquid
of
any kind
on
the NAVIGATION product.
9.
Servicing -
Do
not attempt to service the NAVIGATION product yourself, as opening
or removing covers may expose you to dangerous voltage or other hazards. Refer
al
servicing to qualified service personnel.
10. Safety Check -Upon completion
of
any service or repairs
to
this NAVIGATION
product, ask the service technician to perform safety checks recommended by
the manufacturer to determin that the NAVIGATION product is
in
safe operating
condition.
11. Heat -The product should
be
situated away from heat sources.
3

This Unit has been manufactured to satisfy international safety
standards. Please read the following recommended safety precautions
carefully.
Safety Precautions
Keep liquids away from the unit
Do not install the display unit or navigation unit where
it may (i) obstruct the driver's vision, (ii) impair the
performance
of
any
of
the vehicle's operating systems
of
safety features, including airbags, hazard lamp
buttons
or
(iii) impair the driver's ability to safely
operate the vehicle.
In
some cases, it may not be
possible to install this product because
of
the vehicle
type
or
the shape
of
the vehicle interior.
Certain government laws may restrict the placement
and use
of
navigation systems in your vehicle. Please
comply with all applicable laws and regulations inthe
installation and operation
of
your navigation system.
Never use this navigation system to route to hospitals,
police stations, or similar facilities in an emergency,
Please
call
911.
Before cleaning, disconnect the unit. Use acloth lightly
dampened with water (no solvents) to clean the exterior
Do not operate this navigation system if doing so in any
way
will divert your attention from the safe operation
of
your vehicle. Traffic restrictions and advisories
currently
in
force should always take precedence over
guidance given by this product. Always obey current
traffic restrictions, even
if
this product provides contrary
advice.
Ensure that free airflow is maintained around the
unit. Never store the unit where it is exposed to direct
sunlight or near heating equipment. Never stack other
electronic equipment on top
of
the unit.
Do not use any attachment that is not recommended
by the manufacturer; it may cause ahazard or damage
the equipment.
Connect all components before turning on the
power. Always turn off the unit before you connect
or
disconnect any cables.
This unit is for NEGATIVE ground vehicles ONLY.
Do not attempt to service this product yourself. It will
make the warranty invalid. Refer all servicing to aquali-
fied service agent.
Emergency Situations
Safe Operation
of
SNAV-1 unit
Installation
Ventilation
Connecting or Removing
Cables
4

Accessories
Navigation Unit
Power Harness Connection Cable USB Extension Cable
SO
Card Magnetic Mount Antenna Card Reader
5

Do not install the display unit or Hide-away unit in places where it may become
subject to high temperatures or humidity, such as:
•Places close to aheater, vent or air conditioner.
•Places exposed to direct sunlight, such as on top
of
the dashboard
or
the rear
shelf.
•Places that may be splashed by rain, for example close to the door.
Install this product
in
an area strong enough to bear its weight. Choose positions
where the Navigation unit can be firmly installed and install it securely. If the
Navigation unit
is
not securely installed, the current location
of
the vehicle cannot be
displayed correctly.
Do not install the Navigation unit on the board covering the spare tire or other places
which are subject to vibration.
When the Navigation unit is installed under afront seat, ensure that it does not
obstruct the sliding action
of
the seat.
When installing the Navigation, choose aposition that ensures there will be no
contact with luggage. The impact
of
aheavy weight or sudden shock on the
Navigation unit will adversely affect the accurate display
of
the current location
of
the
vehicle.
Avoid installing the Navigation unit
in
places where it will interfere with loading and
unloading
of
the spare tire, jack, tools, etc.
Install the Navigation unit horizontally on asurface within +300to
-30
0tolerance
(within five degrees to the left or right
of
your vehicle's direction
of
travel).
Misinstalling the unit with the surface tilted more than these tolerances would
increase the potential for errors in the location display, and might otherwise cause
reduced display performance.
If installation angle exceeds 30° from horizontal, the display unit might not give its
optimum performance.
Installation Notes
6

Ground
Power Harness
Example Display
Screen
Example Display
@Connections
Installation Instructions
Connection Cable
to Display
~
Q'
0
.....J
U
.....J
::i
w-
C-
o
CX)
w-
>
~
0
NUZ
~
<.9
GPSANTENNA U
()
~
0
7

Enter Navigation
8
Please follow the steps below before using the NAVIGATION unit.
1)
To
install your unit, please refer to the installation section
of
this
manual.
2) Start engine or turn ignition switch to ACC
3) Power
on
the radio, navigation system will start automatically.
4) Switch to navigation source from the radio.
5) After ashort startup, the screen will display the following picture:
Press "Press to Accept" to enter the main menu
of
navigation.

Controls
on
Host
Using the TY-6300SD as
an
example:
(Note: Your model may differ)
1) NAV -Press to enter navigation or return to the main menu
of
the
radio
2) Zoom Out -Zoom out the map
3) Zoom
In
-Zoom
in
the map
4) PIC -Press to select current location
5) VOL -Use to adjust the navigation voice guidance volume while
the voice is speaking.
9

10
Remote Control
MODE
MUTE
<D
23VOL·
456
VOl-
189INFC
SRCH
0•SEl
BAND
II
ESC
•MENU
II
....
PIC
...
OK
~
A-B
•TITLE
~
RO<.T
0•
11m-
I+IlI
~
..
..
II
1m
?OUM MIOIO ANGl F
SUR·"
II
1) Info -Select current location for additional details
2) ESC -Switch remote control mode from Map move to Menu Item
Selection or from Menu Item Selection to Map move
3) OK -Selection confirm
4) Direction Keys -Up/Down/Left/Right to select items or move map
5) Root -Return to main menu
6)
F1
-Show smaller map area
7) F2 -Show larger map area
8) F3 -Show Main Menu
9) F4 -Change type
of
map view
10) F5 -Press to display location information about the current
panned location. Select the highlighted entry to select the panned
location. Press to route from current location to the selected home
address, if no active route, select current location.

How to Use Navigation
Please refer to the navigation software manual.
Update Map
1) Insert
SO
card into USB-SO card adapter
2) Connect USB-SO card adapter to
PC
3) Insert navigation
OVO
map disc into
PC
with OVO-ROM
4) Start /Open the navigation
OVO
map disc to start the map
downloader program
5) Select the appropriate language, region and destination drive of
the
SO
card
6) Begin download
7) After the download
is
complete, "safely eject" the USB-SO
adapter
8) Insert your loaded
SO
card into the
SO
slot for the navigation
module
11

Register those again.
Press the MAP icon
Add adestination close to
the specifi ed road
Search for the route again.
GPS signals will be received
when the obstruction is no
longer
in
the way
Mount antenna
in
aposition
where it can receive GPS
signals easily
Drive for awhile on aroad
with good reception.
Check the wiring
Check distance correction
precision (Accuracy Level)
Drive for awhile on aroad
with good reception.
Aroad away from the start location
and destination was specifi ed
Power was turned off immediately after
searching for aroute.
The GPS antenna cable is
incompletely connected, or the vehicle
speed signal cable, relay cable, etc.,
are not connected correctly.
Distance correction is not complete
The GPS signal cannot be received
due to obstructions
The power was turned off immediately
after aContact or area to avoid was
registered or asetting was changed.
The GPS antenna is mounted
in
abad
position
Error
in
the signal from the GPS satel-
lite is excessive.
The display is on Map Mode screen
The vehicle position changed while
ACC was off. Movement
of
the vehicle
by ferry
or
car train, rotation by parking
lot turntable, towing, etc.
Asearched route was
deleted.
The desired road is not
included
in
the route.
Troubleshooting
Settings do not change.
The GPS mark is not
displayed.
The vehicle position is not
displayed
The vehicle position is not
displayed correctly.
Registered points
or
detour
memory are not registered.
The volume is set to "0" under Guide
Speaker setting Adjust the volume under
Guide Speaker
There is no voice guidance.
The vehicle has deviated from the
route.
The vehicle is moving backwards
along the route
Check the route guidance
display on the current
position screen
Move back to the route.
Search again for aroute.
Check the direction to the
next destination.
Search again for aroute.
The audio cable is not connected
correctly. Check the wiring
Audio output is audible, but
navigation voice guidance
is not.
The volume is set to "0" under Guide
Speaker setting Adjust the volume under
Guide Speaker
The route uses toll roads
even when ordinary road
search is prioritized
..
Even when ordinary road search is
prioritized, the route may employ toll
roads due to the current position and
the destination.
This is not amalfunction.
When making aroute
on ordinary roads, add a
destination on the road you
want
to use.
12

If you cannot solve the issue using this troubleshooting reference or find new issues,
please shut off the unit and contact customer service @1-877-305-8972 for additional
help.
Troublestlooting
This
is
not amalfunction.
To
set aroute
on
the specifi
ed
roads, add adestination
on
the
road you wish to use.
Change the destination and
conduct aroute search again.
Conduct aroute search by
setting the destination midway
to the
fi
nal destination.
Stop
in
asafe place and en-
gage the parking brake before
scrolling
There is acase that route
search cannot be conducted
depending on the destination.
Drive the car referring to the
map.
Check the connections and
correct the condition
Reload the data and ensure
the
SO
card
is
in
the correct
location
Remove battery and install
correctly
Replace battery with new
on
Aroute is created if it is not possible
to reach the destination without
taking aroad other than the one
specified.
Depending on the current position
and destination, aroute may
be
created on roads other than those
intended for use.
Distance
to
the destination
is
too far
or aroad
to
the destination cannot
be
found.
As asafety feature, map scrolling
is
disabled while the vehicle is
in
motion
Cables are not connected securely
or correctly
SO
card
is
not properly loaded with
data
Battery incorrectly installed
Battery depleted
Remote control does not
function
Cannot enter navigation
Unable to scroll map while
driving. Please use after
stopping.
Aroute is created
on
roads
other than the specifi
ed
road.
Route cannot be searched.
13

Warranty
Limited One Year Warranty
Who
is
covered?
Priority
Audio
(the Company) extends this
warranty to the original retail purchaser
of
prod-
ucts purchased through
an
authorized
Priority
Audio
retailer
in
the U.S.A.
or
Canada. This war-
ranty is not transferable
or
assignable.
What
is
covered?
The Company warrants that should this prod-
uct
or
any part thereof, under normal use and
conditions, be proven defective
in
material or
workmanship within
12
months from the date
of
original purchase, such defect(s) will be repaired
or replaced with anew
or
reconditioned product
(at the Company's option) without charge for parts
and repair labor.
What
is
not
covered?
This Warranty does not cover the following:
Any product not distributed by
Priority
Audio
within the United States or Canada
Damage incurred during shipping (claims
must be addressed to the carrier)
Incidental damages related to transporting
the product to aservice center, including
loss
of
personal time, transportation costs,
and loss
of
use
of
product
Elimination of car static or motor noise
Correction
of
antenna problems
Costs incurred for installation, removal, or
reinstallation
of
the product
Consequential damage to compact discs,
USB devices, digital media cards, cell
phones and other accessories or property
Damage to vehicle electrical systems.
Alteration, improper installation,
mishandling, misuse, neglect, accident,
blown fuse, battery leakage, theft or
improper storage. Exposure to moisture,
humidity, excessive temperature or extreme
environmental conditions. External natural
forces, including without limitation, fire,
flood,earthquake,sandor~orm
Products subjected to removal or
defacement of the factory serial number/
bar code label(s) or markings
Service performed by
an
unauthorized
person, company or association.
14
Any product which has been adjusted
altered or modified without
Priority
Audio
consent.
Defects
in
cosmetic, decorative or non-
operative structural parts such as framing
Please review the "Care and Maintenance" sec-
tion of your Installation and Operation Manual for
additional information regarding the proper use
of
your product.
Limitations
THE EXTENT OF THE COMPANY'S LIABILITY
UNDER THIS WARRANTY
IS
LIMITED TO THE
REPAIR OR REPLACEMENT PROVIDED ABOVE
AND,
IN
NO EVENT, SHALL THE COMPANY'S
LIABILITY EXCEED THE PURCHASE PRICE
PAID BY PURCHASER FOR THE PRODUCT.
This Warranty is
in
lieu of all other express war-
ranties or liabilities.
ANY IMPLIED WARRANTIES,
INCLUDING
ANY
IMPLIED WARRANTY OF MERCHANTABILITY,
SHALL
BE
LIMITED TO THE DURATION
OF THIS WRITTEN WARRANTY. ANY
ACTION FOR BREACH OF ANY WARRANTY
HEREUNDER INCLUDING ANY IMPLIED
WARRANTY OF MERCHANTABILITY
MUST
BE
BROUGHT WITHIN APERIOD OF
24
MONTHS
FROM DATE OF
ORIGINAL
PURCHASE. IN
NO CASE
SHALL
THE COMPANY BE
LIABLE
FOR ANY
CONSEQUENTIAL
OR
INCIDENTAL
DAMAGES FOR BREACH OF THIS OR
ANY
OTHER WARRANTY, EXPRESS OR IMPLIED,
WHATSOEVER.
No person or representative is authorized to
assume for the Company any liability other than
expressed herein
in
connection with the sale
of
this product.
Some states do not allow limitations
on
how long
an
implied warranty lasts or the exclusion
or
limi-
tation
of
incidental or consequential damage so
the above limitations or exclusions may not apply
to
you. This Warranty gives you specific legal
rights and you may also have other rights which
vary from state to state.
Obtaining
Warranty
Service
To
obtain warranty repair or replacement within
the terms, contact 1-877-305-8972 for location
of
warranty station serving your area.

Specifications
General
Operating temperature:
Storage Temperature:
Operating Voltage:
Current Consumption:
ACC Off Current:
Dimensions:
Weight:
Map Storage:
Connectors:
-15°C to 70°C
-40°C to 85°C
9.5VDC to 18VDC
0.12 Atypical at 13V (Max 1.0A at 13V)
70 uA typical at 13V
13/16"H x
43/4"
W x 4 5/8" L(30mm x120mm x117mm)
0.41
Ib
(184 g)
Pre-loaded NaviMate map data
on
removable
SO
card
System/Power, GPS antenna,
SO
card slot
Antenna:
Design and specifications subject to change without notice.
Navigation (GPS)
Receiver:
Frequency:
Acquistion Times:
16
parallel channel GPS receiver
1,575.42 MHz
Warm: Approx. 15 seconds; Cold: Approx. 45 seconds;
AutoLocate®: Approx. 2minutes
Update Rate: 1/second, continuous
GPS Accuracy: 15 meters (49 feet) RMS 95% typical with GPS
DGPS (WAAS) Accuracy:
<3
meters (10 feet) 95% typical with DGPS (WAAS/EGNOS)
corrections
External GPS antenna
15

16
OE RADIO
Toll
Free: 1-877-305-8972
www.oeradio.com
©2007 PRIORITY AUDIO All rights reserved.

FAEGUIDE

18
Contents
PREFACE 19
END
USER
AGREEMENT 20
SAFETY INFORMATION
21
INTRODUCTION
TO
YOUR
SAVANT NAVMATE SOFTWARE 22
VEHICLE POSiTION 22
MAP AND INFORMATION DATABASE
22
SAVANT NAVMATE SOFTWARE OPERATION 23
QUICK START 23
USING
YOUR
SAVANT NAVMATE SOFTWARE 25
FUNCTION
BUTIONS
25
NAVIGATION MENUS 26
LIST MODE, SPELL MODE, AND
MOST
RECENTLY USED
27
MAP
SCREEN
28
DESTINATION SELECTION (GO TO )29
ADDRESS/INTERSECTION 30
POINT
OF
INTEREST (POI) 32
HOME
ADDRESS
35
OFFICE ADDRESS 35
FAVORITES 36
ADDRESS
BOOK 37
TRAIL BOOK 37
LATITUDE LONGITUDE 37
PREVIOUS
DESTINATION 38
BY USING MAP 39
ROUTE CALCULATION AND
GUIDANCE
40
PLEASE PROCEED
40
ROUTE
GUiDANCE 40
MAP
DiSPLAy
42
CURRENT
LOCATION SCREEN
42
ARRIVAL SCREEN
43
OFF-ROUTE
AND ROUTE INTERRUPTIONS
43
EDIT FAVORITES MENU 44
EDIT
ADDRESS
BOOK
44
EDIT
HOME
ADDRESS
45
EDIT
OFFICE
ADDRESS............................................................................................... 46
EDIT TRAIL BOOK 46
SET-UP MENU...............................................................................................................
47
NAVIGATION PREFERENCES 47
DISPLAY OPTIONS
48
UIF
SETIINGS
49
DAY/NIGHT SETTINGS
49
POINT
OF INTEREST 49
SET
DISTANCE UNITS 50
LANGUAGE 50
LOCATION RESET
51
SySTEM
51
GPS
52
PLANNED ROUTE 54
DETOUR 54
CANCEL ROUTE 56
TRAIL BOOK 56
ADD TRAIL 56
NAME TRAIL 58
DELETE TRAIL 59
FOLLOW TRAIL 60
NOTES 63

Preface
NavMate navigation software provides turn-by-turn route guidance
while traveling to your destination. Before operating, take afew minutes
to review the safety and operating instructions
in
this manual so you
can quickly and safely become familiar with your navigation system
software's many features.
This User Manual explains the navigation software's functions, and
provides details on:
•Using the control buttons
•Entering destinations
•Understanding the different screens available on your navigation
software
•Adjusting user preferences
Note:
------------------------
All users should read this manual prior to operating your
navigation software.
This document and the software described
in
it are furnished under license
and may be used or copied only
in
accordance with such license. Except as
permitted by such license, the contents
of
this document may not
be
disclosed
to third parties, copied, or duplicated
in
any form,
in
whole or
in
part, without the
prior written permission of Horizon Navigation, Inc.
The NavMate software, including its operation and use,
is
covered by one or
more of the following patents:
US
Patents No. 5,262,775; 5,283,575; 5,291,412;
5,291,413; 5,291,414; 5,297,028; 5,303,159; 5,311,434; 5,339,246; 5,343,400;
5,345,382; 5,359,529; 5,374,933; 5,377,113; 5,390,123; 5,394,333; 5,402,120;
5,414,630; 5,430,655; 5,440,484; 5,477,220; 5,508,931; 5,515,283; 5,515,284;
5,550,538; 5,608,635; 5,712,788; 5,731,978; 5,862,509; 5,898,390; 5,902,350;
5,904,728; 5,910,177; 5,912,635; 5,922,042; 5,928,307; 5,938,720; 5,987,381;
6,058,390; 6,144,919; 6,147,626; 6,253,154; 6,259,987; 6,282,496; 6,298,305;
6,360,165; 6,456,931; 6,456,935; 6,470,268; 6,542,814; 6,552,656; 6,600,994;
6,622,086; 6,735,516; 0364,840; 0397,046; 0457,823; EP0987665A3. The
sale and/or licensing of the NavMate software and associated materials does
not include any licenses (implied or otherwise) to patents or technology, unless
specifically stated
in
writing.
NavMate® is atrademark of Horizon Navigation, Inc. The NavMate
software and associated materials are protected by copyright
in
the
US
and
internationally.
19

This End-User License Agreement (EULA) is alegal agreement between you (either
an individual
or
asingle entity) and HORIZON NAVIGATION, INC. for the operating
software and updates thereof that run the digital map database and associated hardware
(collectively the "Software"). By installing
or
using the Software, you agree to be bound by
the terms of this Agreement. If you do not agree to the terms
of
this Agreement, return the
Software, along with all other accompanying items
in
the form they were purchased, within
thirty (30) days after such purchase to the authorized dealer from where the Software was
purchased, for afull refund of any fees paid. Use of the Software without acceptance
of
this Agreement is unauthorized and not permitted.
1.
License Grant. HORIZON NAVIGATION, INC. grants you anon-exclusive license to use
your purchased copy
of
the Software for your own internal purposes
of
accessing the
digital map database and running the associated hardware and not for service bureau
time-sharing, or other similar purposes.
2.
Limitations On Use.
You
are not permitted to copy, modify, decompile, disassemble,
or
reverse engineer any portion
of
the Software without the expressed written permission
from HORIZON NAVIGATION, INC.
3.
U.S. Government End Users. The Software is provided with Restricted Rights. Use,
duplication,
or
disclosure by the Government is subject to restrictions as set forth
in
subparagraph (c) (1) (II)
of
the Rights
in
Technical Data and Computer Software
clause at DFARS 252.227- 7013 or subparagraphs (c) (1) and (2)
of
the Commercial
Computer Software-Restricted Rights at 48 CFR 52.227-19, as applicable. HORIZON
NAVIGATION, INC.
4.
Indemnity. You agree to indemnify, defend and hold free and harmless HORIZON
NAVIGATION INC., including its licensors assignees, subsidiaries, affiliated companies,
and the respective officers, directors, employees, shareholders, agents, authorized
dealers
or
sales agents, and representatives
of
each of them from and against any
liability, loss, injury, demand, cost. expense or claim
of
any kind
of
character, including
but not limited to attorney's fees, arising out of (a) any use
or
possession
of
the
Software,
or
(b) any breach
of
any warranties or representations made by you
in
this
Agreement
or
of your obligations under this Agreement.
5.
Disclaimer
of
Warranty. HORIZON NAVIGATION, INC. does not make any warranties
or representations, either express
or
implied, with respect to the software, without
limiting the foregoing, HORIZON NAVIGATION, INC. expressly disclaims any implied
warranties
of
quality, performance, merchantability, fitness for aparticular purpose
or
non-infringement. Some states do not allow the exclusion of implied warranties, so some
portion
of
the above exclusion may not apply to you.
6.
Limitation
of
Liability. HORIZON NAVIGATION, INC. shall not be held responsible for
any actual, anticipated or speculative loss
of
profit or direct, indirect, incidental, special,
or consequential damages, including, without limitation, loss
of
revenue, data, or use
incurred by you or any third party arising out of your use or possession of the software,
whether in an action
in
contract
or
tort or based on awarranty, even
if
HORIZON
NAVIGATION, INC. has been advised
of
the possibility of such damages.
7.
Warnings.
A. Copies of the digital map database reflect conditions as they existed at various points
in
time before your receipt
of
such copies. Accordingly, copies
of
the digital database
map may contain inaccurate or incomplete data
or
information due to inaccurate
or
incomplete source materials, the passage of time, road construction, changing
conditions, and otherwise.
B.
Neither the Software nor the digital map database include, analyze, process, consider
or
reflect any of the following categories of information, i.e., neighborhood quality or
safety; population density; availability or proximity
of
law enforcement, emergency,
rescue, medical
or
other assistance; construction work, zones, or hazards; road and
lane closures; various legal restrictions (such as vehicular type, weight, load, height
and speed restrictions); road slope
or
grade; bridge height, width, weight or other
limits; road, traffic or traffic facilities safety or conditions; weather conditions; pavement
characteristics or conditions; special events; traffic congestion; or travel time
8.
Transfer. This Agreement, including all rights, obligations and representations may be
transferred to another individual or single entity, provided the same transfer includes
the simultaneous transfer
of
the associated hardware
in
which the Software is installed,
and further provided that such other individual
or
single entity accepts all the terms
of
this Agreement.
In
the event such individual or single entity to which the Software
is transferred does not accept the terms of this agreement, then the License herein
automatically terminates. Further use of the Software is unauthorized and not permitted.
9.
Governing Law. This Agreement shall be governed by the laws
of
the State
of
California,
without giving effect to its conflict
of
laws provisions.
End-User License Agreement
20
Table of contents
Other OEM Car Navigation System manuals